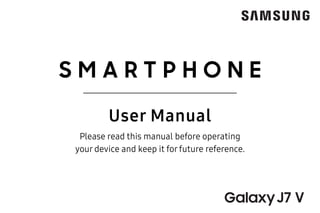
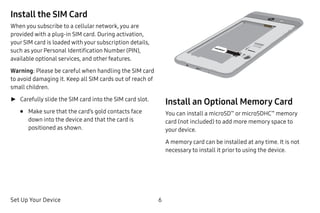
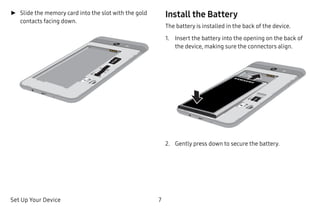
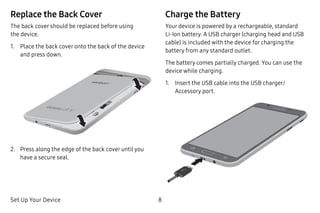
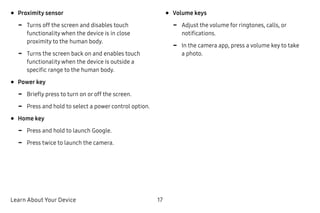
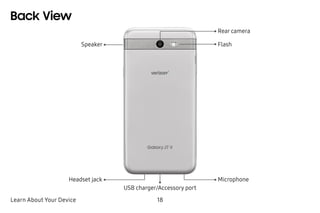
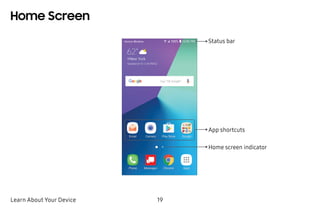
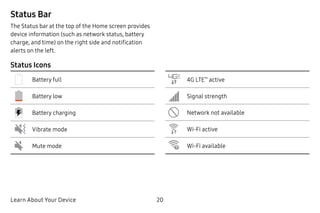
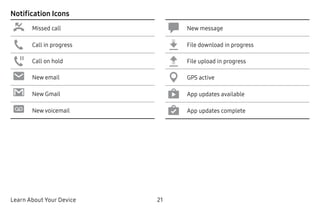
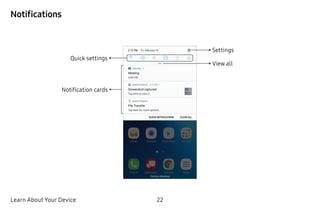
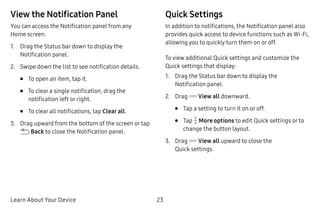
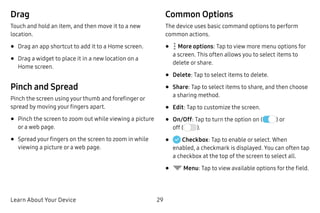
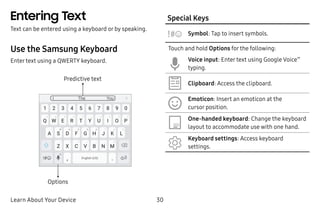
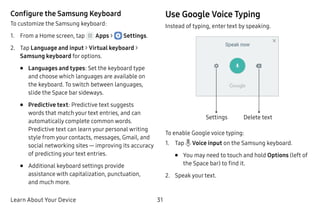
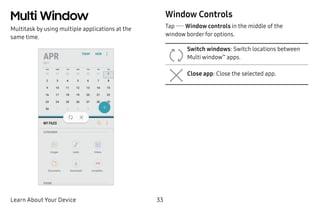
This document is a user manual for a Samsung Galaxy J7 smartphone. It provides instructions on setting up the device, learning about its features and basic functions. The manual covers topics such as assembling the phone hardware, navigating the home screen and apps, making calls, sending messages, taking photos and videos, and changing device settings.


![65Apps
Manage the Inbox
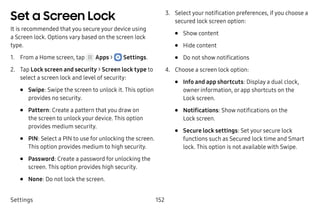
There are several tools available from the Inbox screen.
►► From a Home screen, tap Apps > Email.
• Tap a message to read and reply or forward it.
• Tap Search to search for key words in your email
inbox.
• Tap Edit for additional message options like
sorting, deleting, sharing and more.
• Tap Sort by to customize how messages display.
View Multiple Email Accounts
You can view email you receive for multiple accounts
on the Combined inbox screen oryou can view email
accounts individually.
1. From a Home screen, tap Apps > Email.
2. Tap Mailbox at the top left of the screen to view
the current account mailbox.
3. Tap the account name to view:
• All accounts: View all email in a combined
inbox.
• [Account Name]: View email for only one email
account.](https://image.slidesharecdn.com/samsun-galaxy-j7-v-ug-170812231248/85/Samsung-Galaxy-J7-V-Manual-User-Guide-72-320.jpg)

![95Apps
Before beginning your exercise regimen check with
your doctor if you have symptoms suggestive of heart,
lung, or other serious disease, such as:
• Pain or discomfort in your chest, neck, jaw, or arms
during physical activity;
• Dizziness or loss of consciousness;
• Shortness of breath with mild exertion or at rest, or
when lying down or going to bed;
• Ankle swelling, especially at night;
• A heart murmur or a rapid or pronounced heartbeat;
• Muscle pain when walking upstairs or up a hill that
goes away when you rest.
It is recommended that before engaging in an exercise
routine, you consult with your doctor or medical
practitioner. If you are unsure of your health status,
have several health problems, or are pregnant, you
should speak with your doctor before starting a new
exercise program. [110116]](https://image.slidesharecdn.com/samsun-galaxy-j7-v-ug-170812231248/85/Samsung-Galaxy-J7-V-Manual-User-Guide-102-320.jpg)


![Settings 158
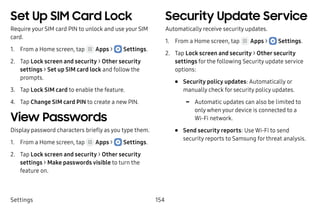
Add an Account
You can add and manage all your email, social
networking, and picture and video sharing accounts.
1. From a Home screen, tap Apps > Settings.
2. Tap Accounts, and then tap Add account.
3. Tap one of the account types.
4. Follow the prompts to enteryour credentials and
set up the account.
Synchronize Accounts
You can synchronize your calendar, contacts, and other
types of accounts.
1. From a Home screen, tap Apps > Settings.
2. Tap Accounts > [Account type].
3. Tap an account to view the sync settings for that
account.
4. Tap individual data items to sync.
5. Tap More options > Sync now to synchronize the
account.](https://image.slidesharecdn.com/samsun-galaxy-j7-v-ug-170812231248/85/Samsung-Galaxy-J7-V-Manual-User-Guide-165-320.jpg)
![Settings 159
Account Settings
Each account has its own set of settings. In addition,
you can configure common settings for all accounts of
the same type.
Account settings and available features vary between
account types and service providers. Contact your
service provider for more information on your account’s
settings.
1. From a Home screen, tap Apps > Settings.
2. Tap Accounts > [Account type].
3. Tap an account to configure that account’s sync
settings.
4. Tap other available options for the account type.
Remove an Account
You can remove accounts from your device.
1. From a Home screen, tap Apps > Settings.
2. Tap Accounts > [Account type].
3. Tap the account and then tap More options >
Remove account.](https://image.slidesharecdn.com/samsun-galaxy-j7-v-ug-170812231248/85/Samsung-Galaxy-J7-V-Manual-User-Guide-166-320.jpg)