Download to read offline


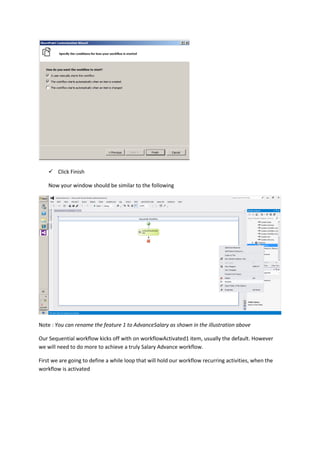
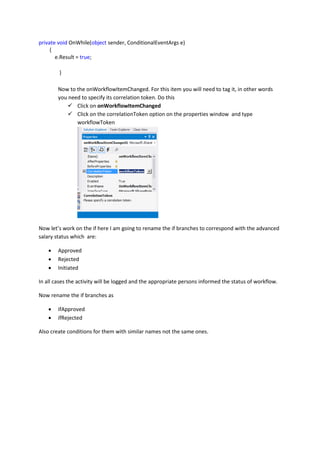

![ On the resulting dialog box click bind to a new member(see below)
Click create Field
Click ok
Repeat the same steps to create a field for the BeforeProperties.
With that achieved, it’s time to populate the if conditions methods and determine their result
based on the value of the Status. Open the IfStatusApproved method you created earlier for the
ifApproved ifelse branch and enter the following:
private void IfStatusApproved(object sender, ConditionalEventArgs e)
{
string status = onWorkflowItemChanged1_AfterProperties1["Status"].ToString();
if (status == "Approved")
{
e.Result = true;
}
else
{
e.Result = false;
}
}
Repeat a Similar thing for the ifRejected Condition and apply the following:
private void IfStatusRejected(object sender, ConditionalEventArgs e)
{
string status = onWorkflowItemChanged1_AfterProperties1["Status"].ToString();
if (status == "Rejected")
{
e.Result = true;
}
else
{
e.Result = false;
}
}](https://image.slidesharecdn.com/salaryadvanceworkflow-140417051130-phpapp01/85/Salary-advanceworkflow-11-320.jpg)
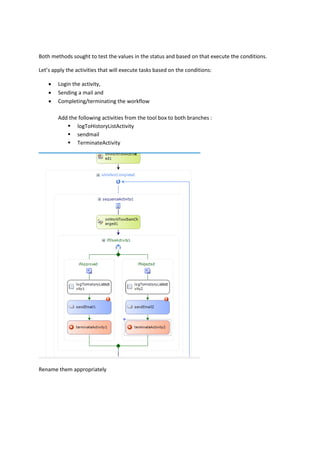
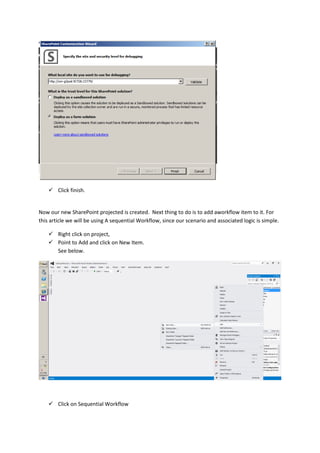
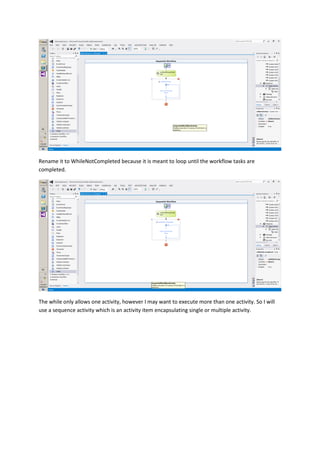
![ Let’s add an ifelse branch that will be responsible for sending mail to the accounts
department when the workflow is initiated by an employee.
o Add an ifelse branch, rename it to ifInitiated, add a log activity history and send
email to it. Also add its correlation token and condition, you can use the method
name ifStatusInitiated, and as done above specify the content below for the
method.
private void ifStatusInitiated(object sender, ConditionalEventArgs e)
{
string status = onWorkflowItemChanged1_AfterProperties1["Status"].ToString();
if (status == "Initiated")
{
e.Result = true;
}
else
{
e.Result = false;
}
}
Your Workflow Design should look like:](https://image.slidesharecdn.com/salaryadvanceworkflow-140417051130-phpapp01/85/Salary-advanceworkflow-13-320.jpg)
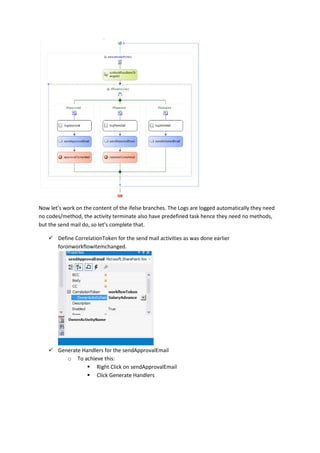
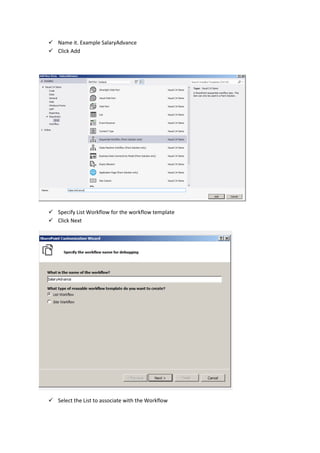
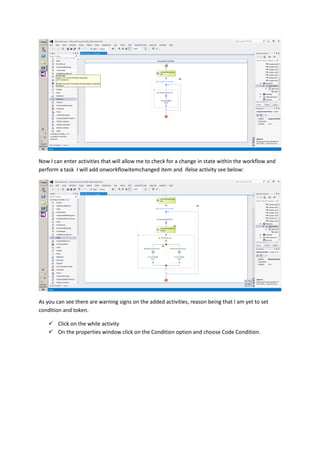
![ Type the following into the method:
private void sendApprovalEmail_MethodInvoking(object sender, EventArgs e)
{
//Create an Item object based on our List
SPListItem item = onWorkflowActivated1.WorkflowProperties.Item;
//get the Employee Field Colunm from our List
SPFieldUser assignedto = (SPFieldUser)item.Fields["Employee"];
//get the field value content of Accountant Clerk
SPFieldUserValue user =
(SPFieldUserValue)assignedto.GetFieldValue(item["Employee"].ToString());
//get the Requested Date Field Colunm from our List
SPFieldDateTime requestedDate = (SPFieldDateTime)item.Fields["Requested Date"];
//get the field value content of Requested Date
string rdt = requestedDate.GetFieldValue(item["Requested Date"].ToString()).ToString();
//get the Amount Field Colunm from our List
SPFieldCurrency amount = (SPFieldCurrency)item.Fields["Amount"];
//get the field value content of Amount
string amt = amount.GetFieldValue(item.Fields["Amount"].ToString()).ToString();
//get employee email, assign mail subject, and body
string assigneeEmail = user.User.Email;
sendApprovalEmail.To = assigneeEmail;
sendApprovalEmail.Subject = "Advance Salary Request Approved";
sendApprovalEmail.Body = "Salary Advance Request with ID " +
onWorkflowActivated1.WorkflowProperties.Item.ID.ToString() + ".n Requested Date :" + rdt +
".nn Amount Requested :"+amt+".nn Has been Approved.";](https://image.slidesharecdn.com/salaryadvanceworkflow-140417051130-phpapp01/85/Salary-advanceworkflow-15-320.jpg)
![}
Generate Handlers for the sendRejectedEmail
o To achieve this:
Right Click on sendRejectedEmail
Click Generate Handlers
Type the following into the method:
private void sendRejectedEmail_MethodInvoking(object sender, EventArgs e)
{
//Create an Item object based on our List
SPListItem item = onWorkflowActivated1.WorkflowProperties.Item;
//get the Employee Field Colunm from our List
SPFieldUser assignedto = (SPFieldUser)item.Fields["Employee"];
//get the field value content of Accountant Clerk
SPFieldUserValue user =
(SPFieldUserValue)assignedto.GetFieldValue(item["Employee"].ToString());
//get the Requested Date Field Colunm from our List
SPFieldDateTime requestedDate = (SPFieldDateTime)item.Fields["Requested Date"];
//get the field value content of Requested Date
string rdt = requestedDate.GetFieldValue(item["Requested Date"].ToString()).ToString();
//get the Amount Field Colunm from our List
SPFieldCurrency amount = (SPFieldCurrency)item.Fields["Amount"];
//get the field value content of Amount
string amt = amount.GetFieldValue(item.Fields["Amount"].ToString()).ToString();
//get employee email, assign mail subject, and body
string assigneeEmail = user.User.Email;
sendApprovalEmail.To = assigneeEmail;
sendApprovalEmail.Subject = "Advance Salary Request Rejected";
sendApprovalEmail.Body = "Salary Advance Request with ID " +
onWorkflowActivated1.WorkflowProperties.Item.ID.ToString() + ".n Requested Date :" + rdt +
".nn Amount Requested :" + amt + ".nn Has been Rejected.";
}
Also generate Handlers for the sendInitiatedEmail
o To achieve this:
Right Click on sendInitiatedEmail
Click Generate Handlers
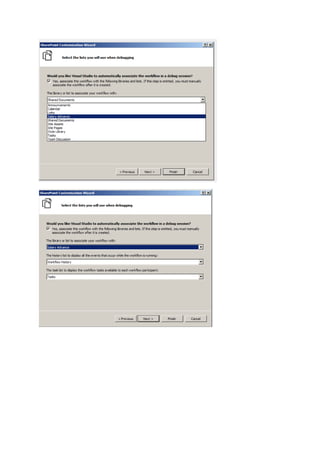
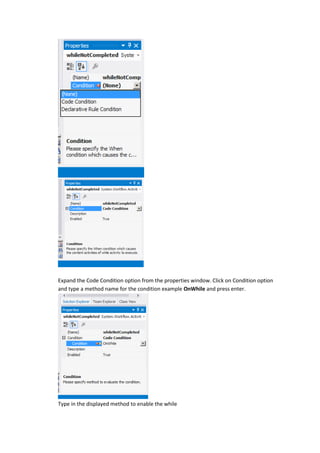
Type the following into the method:](https://image.slidesharecdn.com/salaryadvanceworkflow-140417051130-phpapp01/85/Salary-advanceworkflow-16-320.jpg)
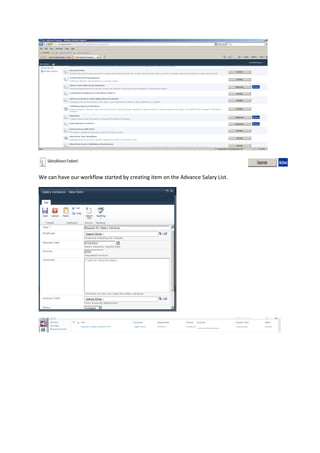
![private void sendInitiatedEmail_MethodInvoking(object sender, EventArgs e)
{
//Create an Item object based on our List
SPListItem item = onWorkflowActivated1.WorkflowProperties.Item;
//get the user Field Colunm from our List
SPFieldUser assignedto = (SPFieldUser)item.Fields["Accountant Clerk"];
//get the field content of Accountant Clerk
SPFieldUserValue user = (SPFieldUserValue)assignedto.GetFieldValue(item["Accountant
Clerk"].ToString());
string assigneeEmail = user.User.Email;
sendApprovalEmail.To = assigneeEmail;
sendApprovalEmail.Subject = " Salary Advance Request ";
sendApprovalEmail.Body = "Advance Salary Request <br/><br/>Request ID:" +
onWorkflowActivated1.WorkflowProperties.Item.ID;
}
That’s all. We can now build and deploy.
Simply right click on the project and choose build, repeat the same steps but choose deploy to
deploy it to the SharePoint server .see below.
From the Site collection features of our SharePoint server you can see our new feature running](https://image.slidesharecdn.com/salaryadvanceworkflow-140417051130-phpapp01/85/Salary-advanceworkflow-17-320.jpg)

This document describes the steps to create a salary advance workflow in SharePoint using Visual Studio. The workflow allows employees to request a salary advance, which is then sent to the accounts department for approval or rejection. Key steps include: 1. Creating a new SharePoint project in Visual Studio and defining the URL of the associated web application and list. 2. Adding a sequential workflow and associating it with the salary advance list. 3. Defining a while loop to hold recurring activities until workflow completion. 4. Adding if/else branches for approved, rejected, and initiated statuses and activities like logging, emailing, and terminating the workflow. 5. Populating the if conditions and branches