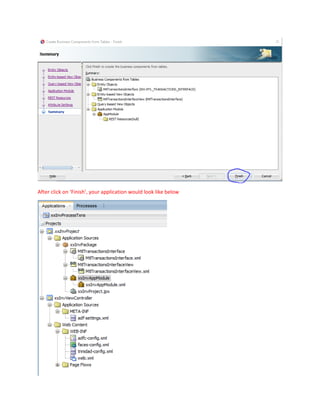
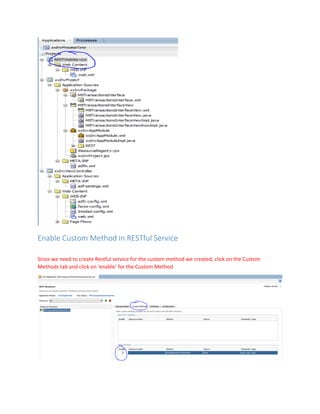
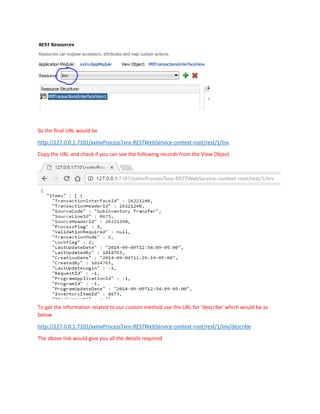
BUILD RESTFUL SERVICE
USING ADF BUSINESS COMPONENTS
OCTOBER 31, 2016
SHRAVAN KUMAR CHELIKA
Contents
Jdeveloper Version and Options...................................................................................................................2
Create ADF Fusion Web Application.............................................................................................................3
Connect to Database.....................................................................................................................................6
Create Business Components from Tables ...................................................................................................8
Create Application Module.........................................................................................................................10
Generate Java Class for Application Module..............................................................................................13
Generate Java classes for View Objects......................................................................................................15
Add Business logic/Custom Method to the View Object............................................................................17
Create Client Interface for View Object......................................................................................................19
Add version for Rest Resource....................................................................................................................22
Create REST Resource.................................................................................................................................23
Enable Custom Method in RESTful Service.................................................................................................25
Start Integrated Weblogic Server ...............................................................................................................26
Test Restful Service using POSTMAN tool...................................................................................................27
Setups for Restful Service in POSTMAN tool ..............................................................................................31
Verifying if RESTFUL Service Works ............................................................................................................31
Steps to build Restful Service using ADFBC
Jdeveloper Version and Options
Open Jdeveloper 12.2.1.1.0
Click on New Application
Select ADF Fusion Web Application
Create ADF Fusion Web Application
Enter the ADF Application Name and click ‘Next’
Leave the Defaults for the next screen
Enter the project name and click ‘Next’, as you can see the project features are automatically included
Enter name for package and click ‘Next’
Enter a name for ‘ViewController’ and click ‘Next’
Enter a name for default package and click ‘Finish’
After finishing the above steps your project would look like below
Right click on your project ‘xxInvProject’ and select New->Business Components from Tables
Connect to Database
The following screen shows up to connect to the Database, click on the green plus sign and add your
database connection information
Click on ‘Test Connection’ and you should see the Status of ‘Success’ and click on OK
It would show you the connection information, click on OK again
Create Business Components from Tables
The next screen for creating Business components from tables shows up.Select the schema as ‘INV’ and
enter the Name Filter as ‘MTL_TRANSACTIONS_INTERFACE’ and click on ‘Query’.
Shuffle the selected table to the Right side and click on ‘Next’.
In the next screen shuffle the available entity based View Object to the right side and click on ‘Next’
Leave the defaults in the next screen and click on ‘Next’
Create Application Module
Change the name of the Application Module in the next screen and click on ‘Next’
Leave the defaults and click on ‘Next’
The following summary screen shows up, click on ‘Finish’
After click on ‘Finish’, your application would look like below
Now would be a good time to save the application
Generate Java Class for Application Module
Double click on your Application Module ‘xxInvAppModule’ and go to ‘Java’
Now we will generate ‘Java Classes’ for the Application Module, click on the edit and select ‘Generate
Application Module Class’ and click ‘OK’
You would see the ‘xxInvAppModuleImpl.java’ file generated, save the application
Generate Java classes for View Objects
Now, double click on your ‘MtlTransactionsInterfaceView’ and click on ‘Java’ to generate Java classes
related to the View Object
Click on Edit and select ‘Generate View Object Class’ with ‘Include bind variable accessors’ and also
‘Generate View Row Class’ with ‘Include accessors’ and click on ‘OK’
You would see the following java class files generated for View Objects, save all
Add Business logic/Custom Method to the View Object
Double click on the ‘MtlTransactionsInterfaceViewImpl.java’ file. This is where you would add your
custom Method to invoke Oracle Public API
The following custom method is to process Inventory Transactions by invoking Oracle Public API –
‘INV_TXN_MANAGER_PUB.PROCESS_TRANSACTIONS’
Click on Save and make sure you have no compilation errors
Create Client Interface for View Object
Now we will create a client interface for the View Object so that the custom method can be exposed as
Restful Service.
Double click on your ‘MtlTransactionInterfaceView’ and click on ‘Java’
Click on the edit for ‘Client Interface’ and shuffle the custom method that needs to be exposed to the
right side.
Click on ‘OK’
You can notice the method available in the ‘Client Interface’
Double click on your application Module ‘xxInvAppModule’ and select ‘Webservice’ and click on ‘REST’
Click on the add icon (green sign) to create Rest resource
Add version for Rest Resource
The following ‘No Version’ might show up, click on the link which would redirect you to file for ‘adf-
configure.xml’ where you can add the version
Under Release Versions, click on the add icon to create a version
Enter a version number and click ‘Ok’
Create REST Resource
Now, you can go back to create the REST resource
The following screen shows up, click on ‘Yes’
The next screen shows up to enter the Resource Name, enter a name and click ‘Ok’ to create REST
Resource
The following screen with the REST Resources you created shows up
Notice that ‘RESTWebService’ is generated automatically and your application would be like below
Enable Custom Method in RESTful Service
Since we need to create Restful service for the custom method we created, click on the Custom
Methods tab and click on ‘enable’ for the Custom Method
Start Integrated Weblogic Server
Now to run the REST Service, right click on ‘RESTWebService’ and select ‘Run’
This would start your Integrated Weblogic Server
Target URL would be generated
Double Click on the Target URL and it opens up the HTTP Analyzer, click on ‘Send Request’
You would see the URLS generated
Test Restful Service using POSTMAN tool
To test the ‘RESTful Service’, I am using a tool called ‘POSTMAN’, a quick google search would show you
the tool to download
Note that the URL to access the REST Resource would be a combination of the
Target URL+ Version Number+ Resource Name, so the URL would be
+
(Release Version number)
+
(Name of the REST Resource)
So the final URL would be
http://127.0.0.1:7101/xxInvProcessTxns-RESTWebService-context-root/rest/1/Inv
Copy the URL and check if you can see the following records from the View Object
To get the information related to our custom method use the URL for ‘describe’ which would be as
below
http://127.0.0.1:7101/xxInvProcessTxns-RESTWebService-context-root/rest/1/Inv/describe
The above link would give you all the details required
Do a ‘Ctrl+F’ to find our Custom method we created
You see the name of the method, parameters, and the requested method to set the request (POST in
this case) and the request type ‘application/vnd.oracle.adf.action + json'.
Setups for Restful Service in POSTMAN tool
Using the POSTMAN tool, we need to create the following header and Body to test the REST Resource
Headers
Body
Verifying if RESTFUL Service Works
I have inserted a record in the ‘MTL_TRANSACTIONS_INTERFACE’ to do ‘Account Alias Receipt’.
The base table ‘MTL_MATERIAL_TRANSACTIONS’ does not have the record yet
Now let us send the Rest request to invoke the Oracle API and process the record in interface table, to
do this simply click on ‘Send’
It comes back with the following result
Let’s verify from the backend if the record has been processed by running the SQL
That’s it!!! 
Hope this is helpful.

Build Restful Service using ADFBC

  • 1.
    BUILD RESTFUL SERVICE USINGADF BUSINESS COMPONENTS OCTOBER 31, 2016 SHRAVAN KUMAR CHELIKA
  • 2.
    Contents Jdeveloper Version andOptions...................................................................................................................2 Create ADF Fusion Web Application.............................................................................................................3 Connect to Database.....................................................................................................................................6 Create Business Components from Tables ...................................................................................................8 Create Application Module.........................................................................................................................10 Generate Java Class for Application Module..............................................................................................13 Generate Java classes for View Objects......................................................................................................15 Add Business logic/Custom Method to the View Object............................................................................17 Create Client Interface for View Object......................................................................................................19 Add version for Rest Resource....................................................................................................................22 Create REST Resource.................................................................................................................................23 Enable Custom Method in RESTful Service.................................................................................................25 Start Integrated Weblogic Server ...............................................................................................................26 Test Restful Service using POSTMAN tool...................................................................................................27 Setups for Restful Service in POSTMAN tool ..............................................................................................31 Verifying if RESTFUL Service Works ............................................................................................................31
  • 3.
    Steps to buildRestful Service using ADFBC Jdeveloper Version and Options Open Jdeveloper 12.2.1.1.0 Click on New Application Select ADF Fusion Web Application
  • 4.
    Create ADF FusionWeb Application Enter the ADF Application Name and click ‘Next’ Leave the Defaults for the next screen
  • 5.
    Enter the projectname and click ‘Next’, as you can see the project features are automatically included Enter name for package and click ‘Next’
  • 6.
    Enter a namefor ‘ViewController’ and click ‘Next’ Enter a name for default package and click ‘Finish’
  • 7.
    After finishing theabove steps your project would look like below Right click on your project ‘xxInvProject’ and select New->Business Components from Tables Connect to Database The following screen shows up to connect to the Database, click on the green plus sign and add your database connection information
  • 8.
    Click on ‘TestConnection’ and you should see the Status of ‘Success’ and click on OK It would show you the connection information, click on OK again
  • 9.
    Create Business Componentsfrom Tables The next screen for creating Business components from tables shows up.Select the schema as ‘INV’ and enter the Name Filter as ‘MTL_TRANSACTIONS_INTERFACE’ and click on ‘Query’. Shuffle the selected table to the Right side and click on ‘Next’.
  • 10.
    In the nextscreen shuffle the available entity based View Object to the right side and click on ‘Next’ Leave the defaults in the next screen and click on ‘Next’
  • 11.
    Create Application Module Changethe name of the Application Module in the next screen and click on ‘Next’
  • 12.
    Leave the defaultsand click on ‘Next’ Leave the defaults and click on ‘Next’ The following summary screen shows up, click on ‘Finish’
  • 13.
    After click on‘Finish’, your application would look like below
  • 14.
    Now would bea good time to save the application Generate Java Class for Application Module Double click on your Application Module ‘xxInvAppModule’ and go to ‘Java’ Now we will generate ‘Java Classes’ for the Application Module, click on the edit and select ‘Generate Application Module Class’ and click ‘OK’
  • 15.
    You would seethe ‘xxInvAppModuleImpl.java’ file generated, save the application
  • 16.
    Generate Java classesfor View Objects Now, double click on your ‘MtlTransactionsInterfaceView’ and click on ‘Java’ to generate Java classes related to the View Object Click on Edit and select ‘Generate View Object Class’ with ‘Include bind variable accessors’ and also ‘Generate View Row Class’ with ‘Include accessors’ and click on ‘OK’
  • 17.
    You would seethe following java class files generated for View Objects, save all
  • 18.
    Add Business logic/CustomMethod to the View Object Double click on the ‘MtlTransactionsInterfaceViewImpl.java’ file. This is where you would add your custom Method to invoke Oracle Public API The following custom method is to process Inventory Transactions by invoking Oracle Public API – ‘INV_TXN_MANAGER_PUB.PROCESS_TRANSACTIONS’
  • 20.
    Click on Saveand make sure you have no compilation errors Create Client Interface for View Object Now we will create a client interface for the View Object so that the custom method can be exposed as Restful Service. Double click on your ‘MtlTransactionInterfaceView’ and click on ‘Java’
  • 21.
    Click on theedit for ‘Client Interface’ and shuffle the custom method that needs to be exposed to the right side. Click on ‘OK’
  • 22.
    You can noticethe method available in the ‘Client Interface’ Double click on your application Module ‘xxInvAppModule’ and select ‘Webservice’ and click on ‘REST’
  • 23.
    Click on theadd icon (green sign) to create Rest resource Add version for Rest Resource The following ‘No Version’ might show up, click on the link which would redirect you to file for ‘adf- configure.xml’ where you can add the version Under Release Versions, click on the add icon to create a version Enter a version number and click ‘Ok’
  • 24.
    Create REST Resource Now,you can go back to create the REST resource The following screen shows up, click on ‘Yes’ The next screen shows up to enter the Resource Name, enter a name and click ‘Ok’ to create REST Resource
  • 25.
    The following screenwith the REST Resources you created shows up Notice that ‘RESTWebService’ is generated automatically and your application would be like below
  • 26.
    Enable Custom Methodin RESTful Service Since we need to create Restful service for the custom method we created, click on the Custom Methods tab and click on ‘enable’ for the Custom Method
  • 27.
    Start Integrated WeblogicServer Now to run the REST Service, right click on ‘RESTWebService’ and select ‘Run’ This would start your Integrated Weblogic Server Target URL would be generated Double Click on the Target URL and it opens up the HTTP Analyzer, click on ‘Send Request’
  • 28.
    You would seethe URLS generated Test Restful Service using POSTMAN tool To test the ‘RESTful Service’, I am using a tool called ‘POSTMAN’, a quick google search would show you the tool to download
  • 29.
    Note that theURL to access the REST Resource would be a combination of the Target URL+ Version Number+ Resource Name, so the URL would be + (Release Version number) + (Name of the REST Resource)
  • 30.
    So the finalURL would be http://127.0.0.1:7101/xxInvProcessTxns-RESTWebService-context-root/rest/1/Inv Copy the URL and check if you can see the following records from the View Object To get the information related to our custom method use the URL for ‘describe’ which would be as below http://127.0.0.1:7101/xxInvProcessTxns-RESTWebService-context-root/rest/1/Inv/describe The above link would give you all the details required
  • 31.
    Do a ‘Ctrl+F’to find our Custom method we created
  • 32.
    You see thename of the method, parameters, and the requested method to set the request (POST in this case) and the request type ‘application/vnd.oracle.adf.action + json'. Setups for Restful Service in POSTMAN tool Using the POSTMAN tool, we need to create the following header and Body to test the REST Resource Headers Body Verifying if RESTFUL Service Works I have inserted a record in the ‘MTL_TRANSACTIONS_INTERFACE’ to do ‘Account Alias Receipt’.
  • 33.
    The base table‘MTL_MATERIAL_TRANSACTIONS’ does not have the record yet Now let us send the Rest request to invoke the Oracle API and process the record in interface table, to do this simply click on ‘Send’
  • 34.
    It comes backwith the following result Let’s verify from the backend if the record has been processed by running the SQL That’s it!!!  Hope this is helpful.