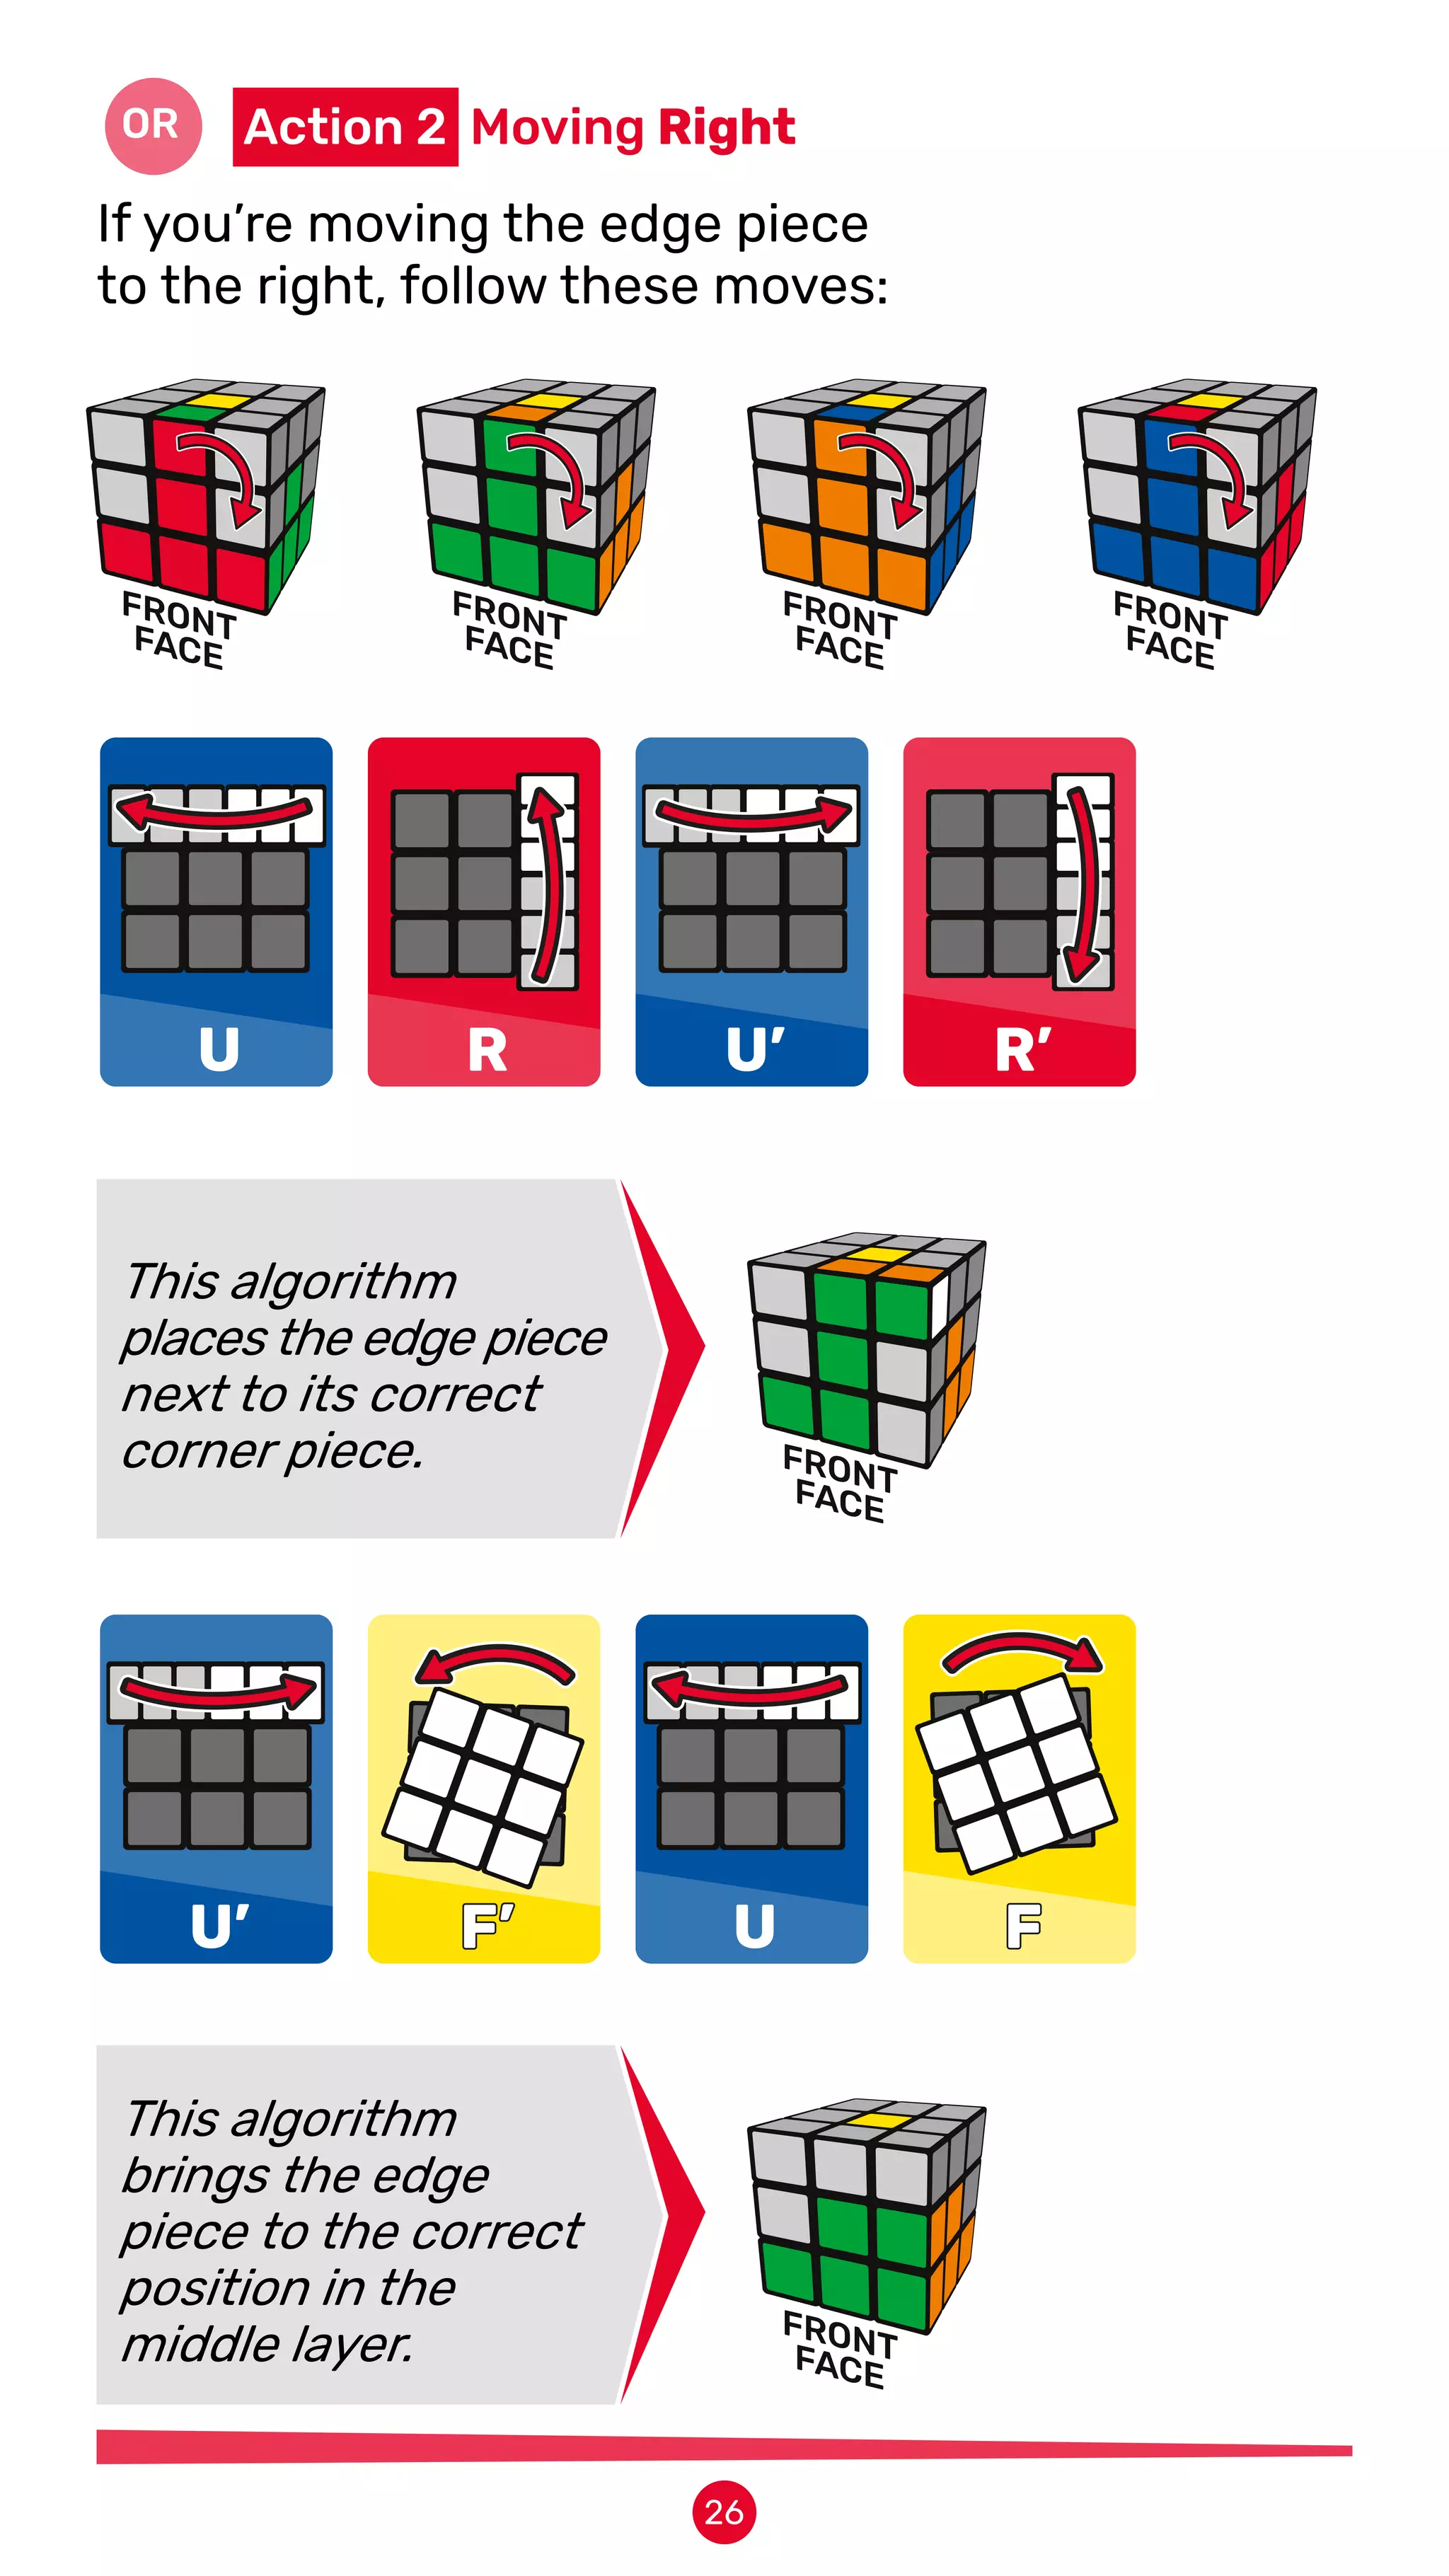
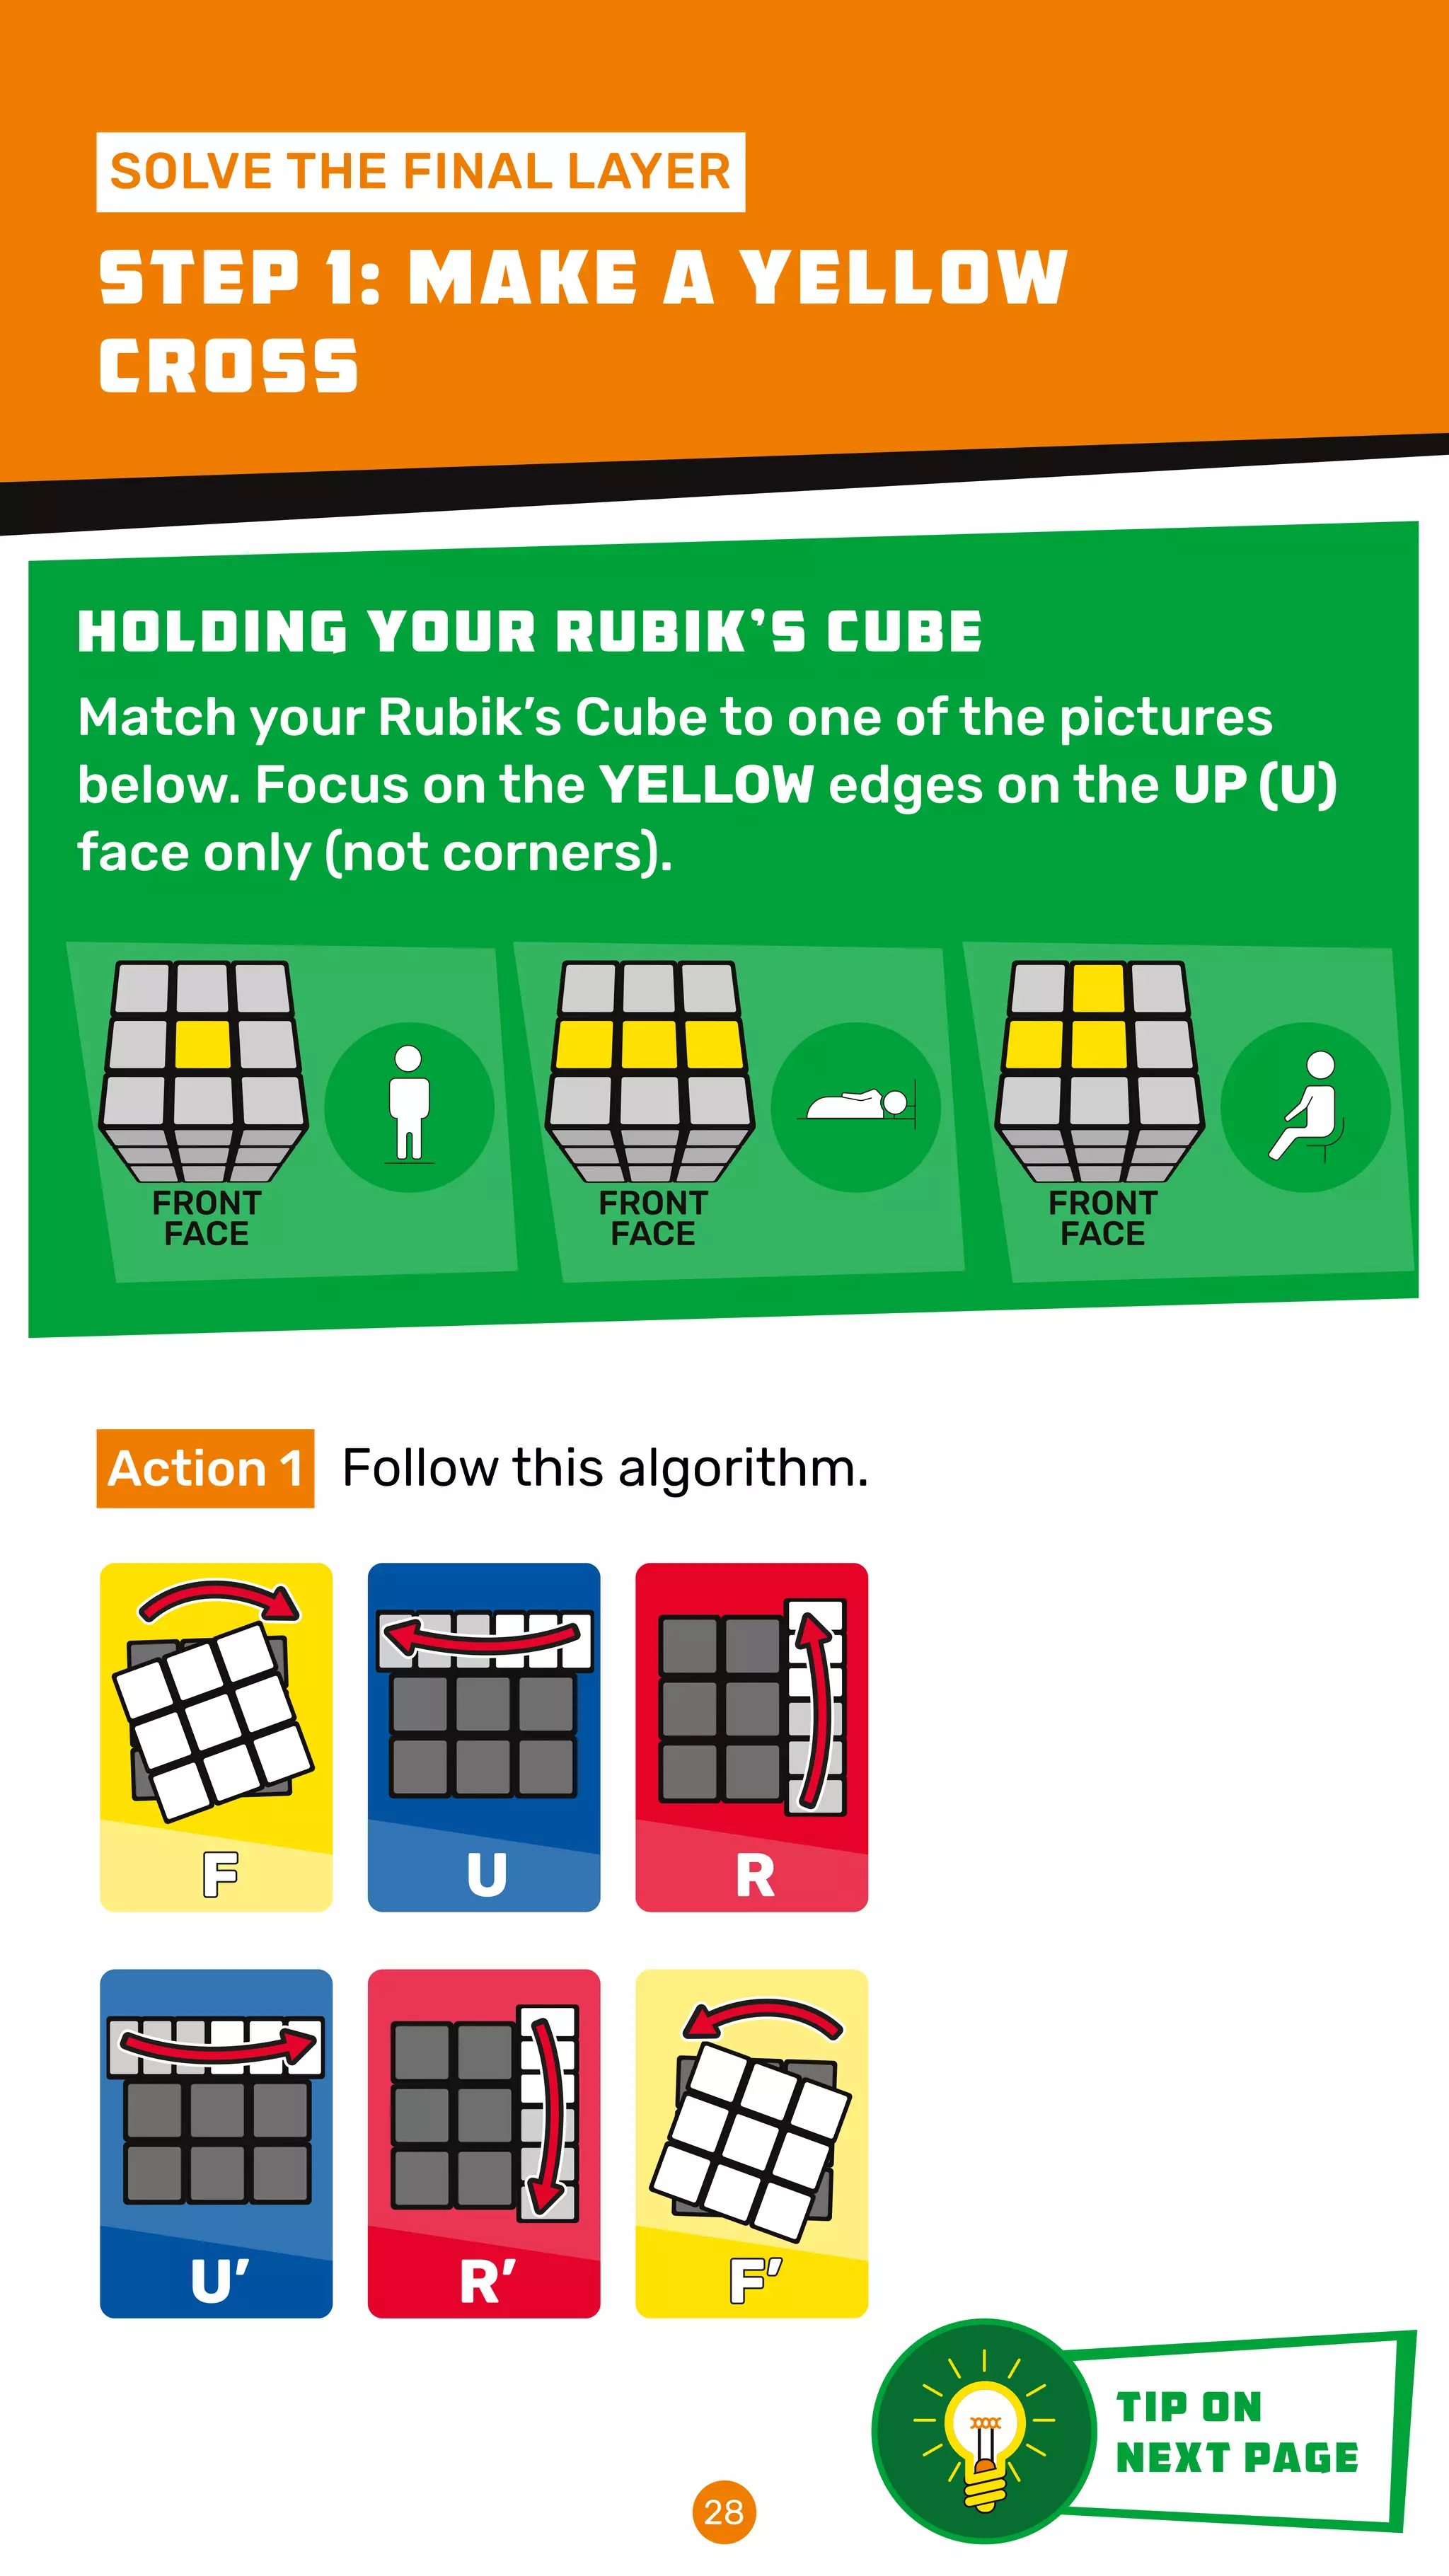
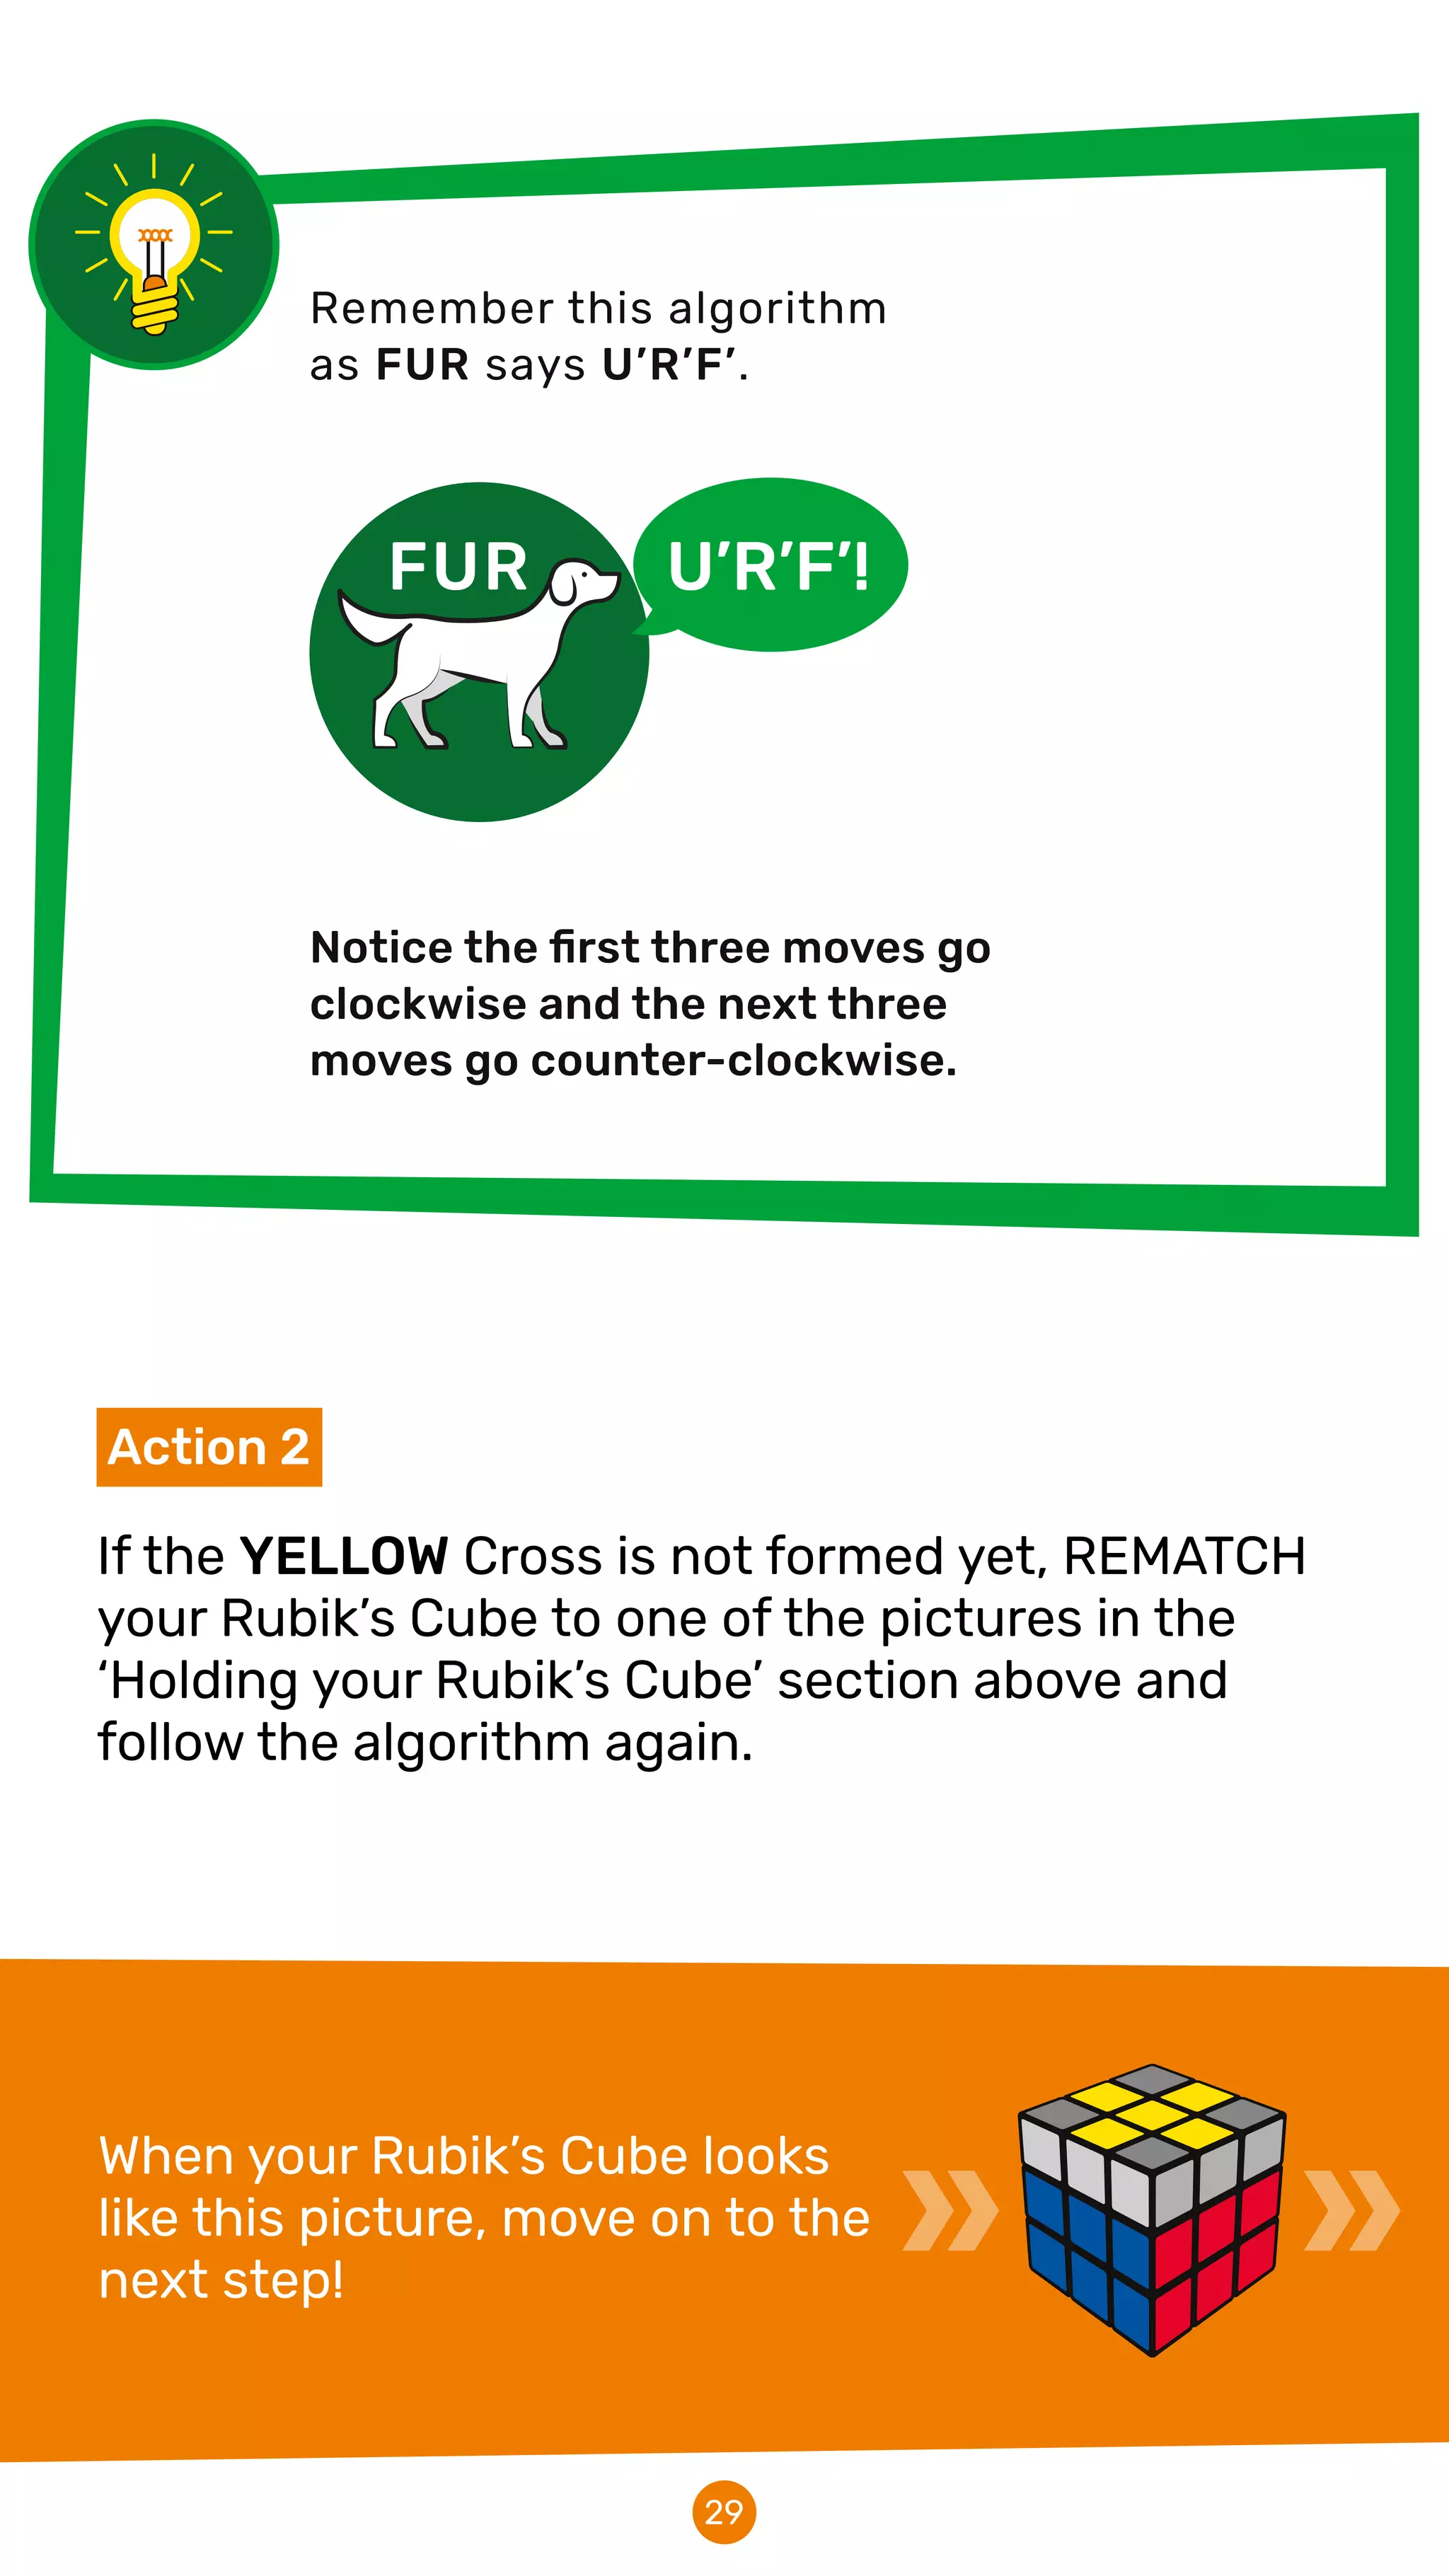
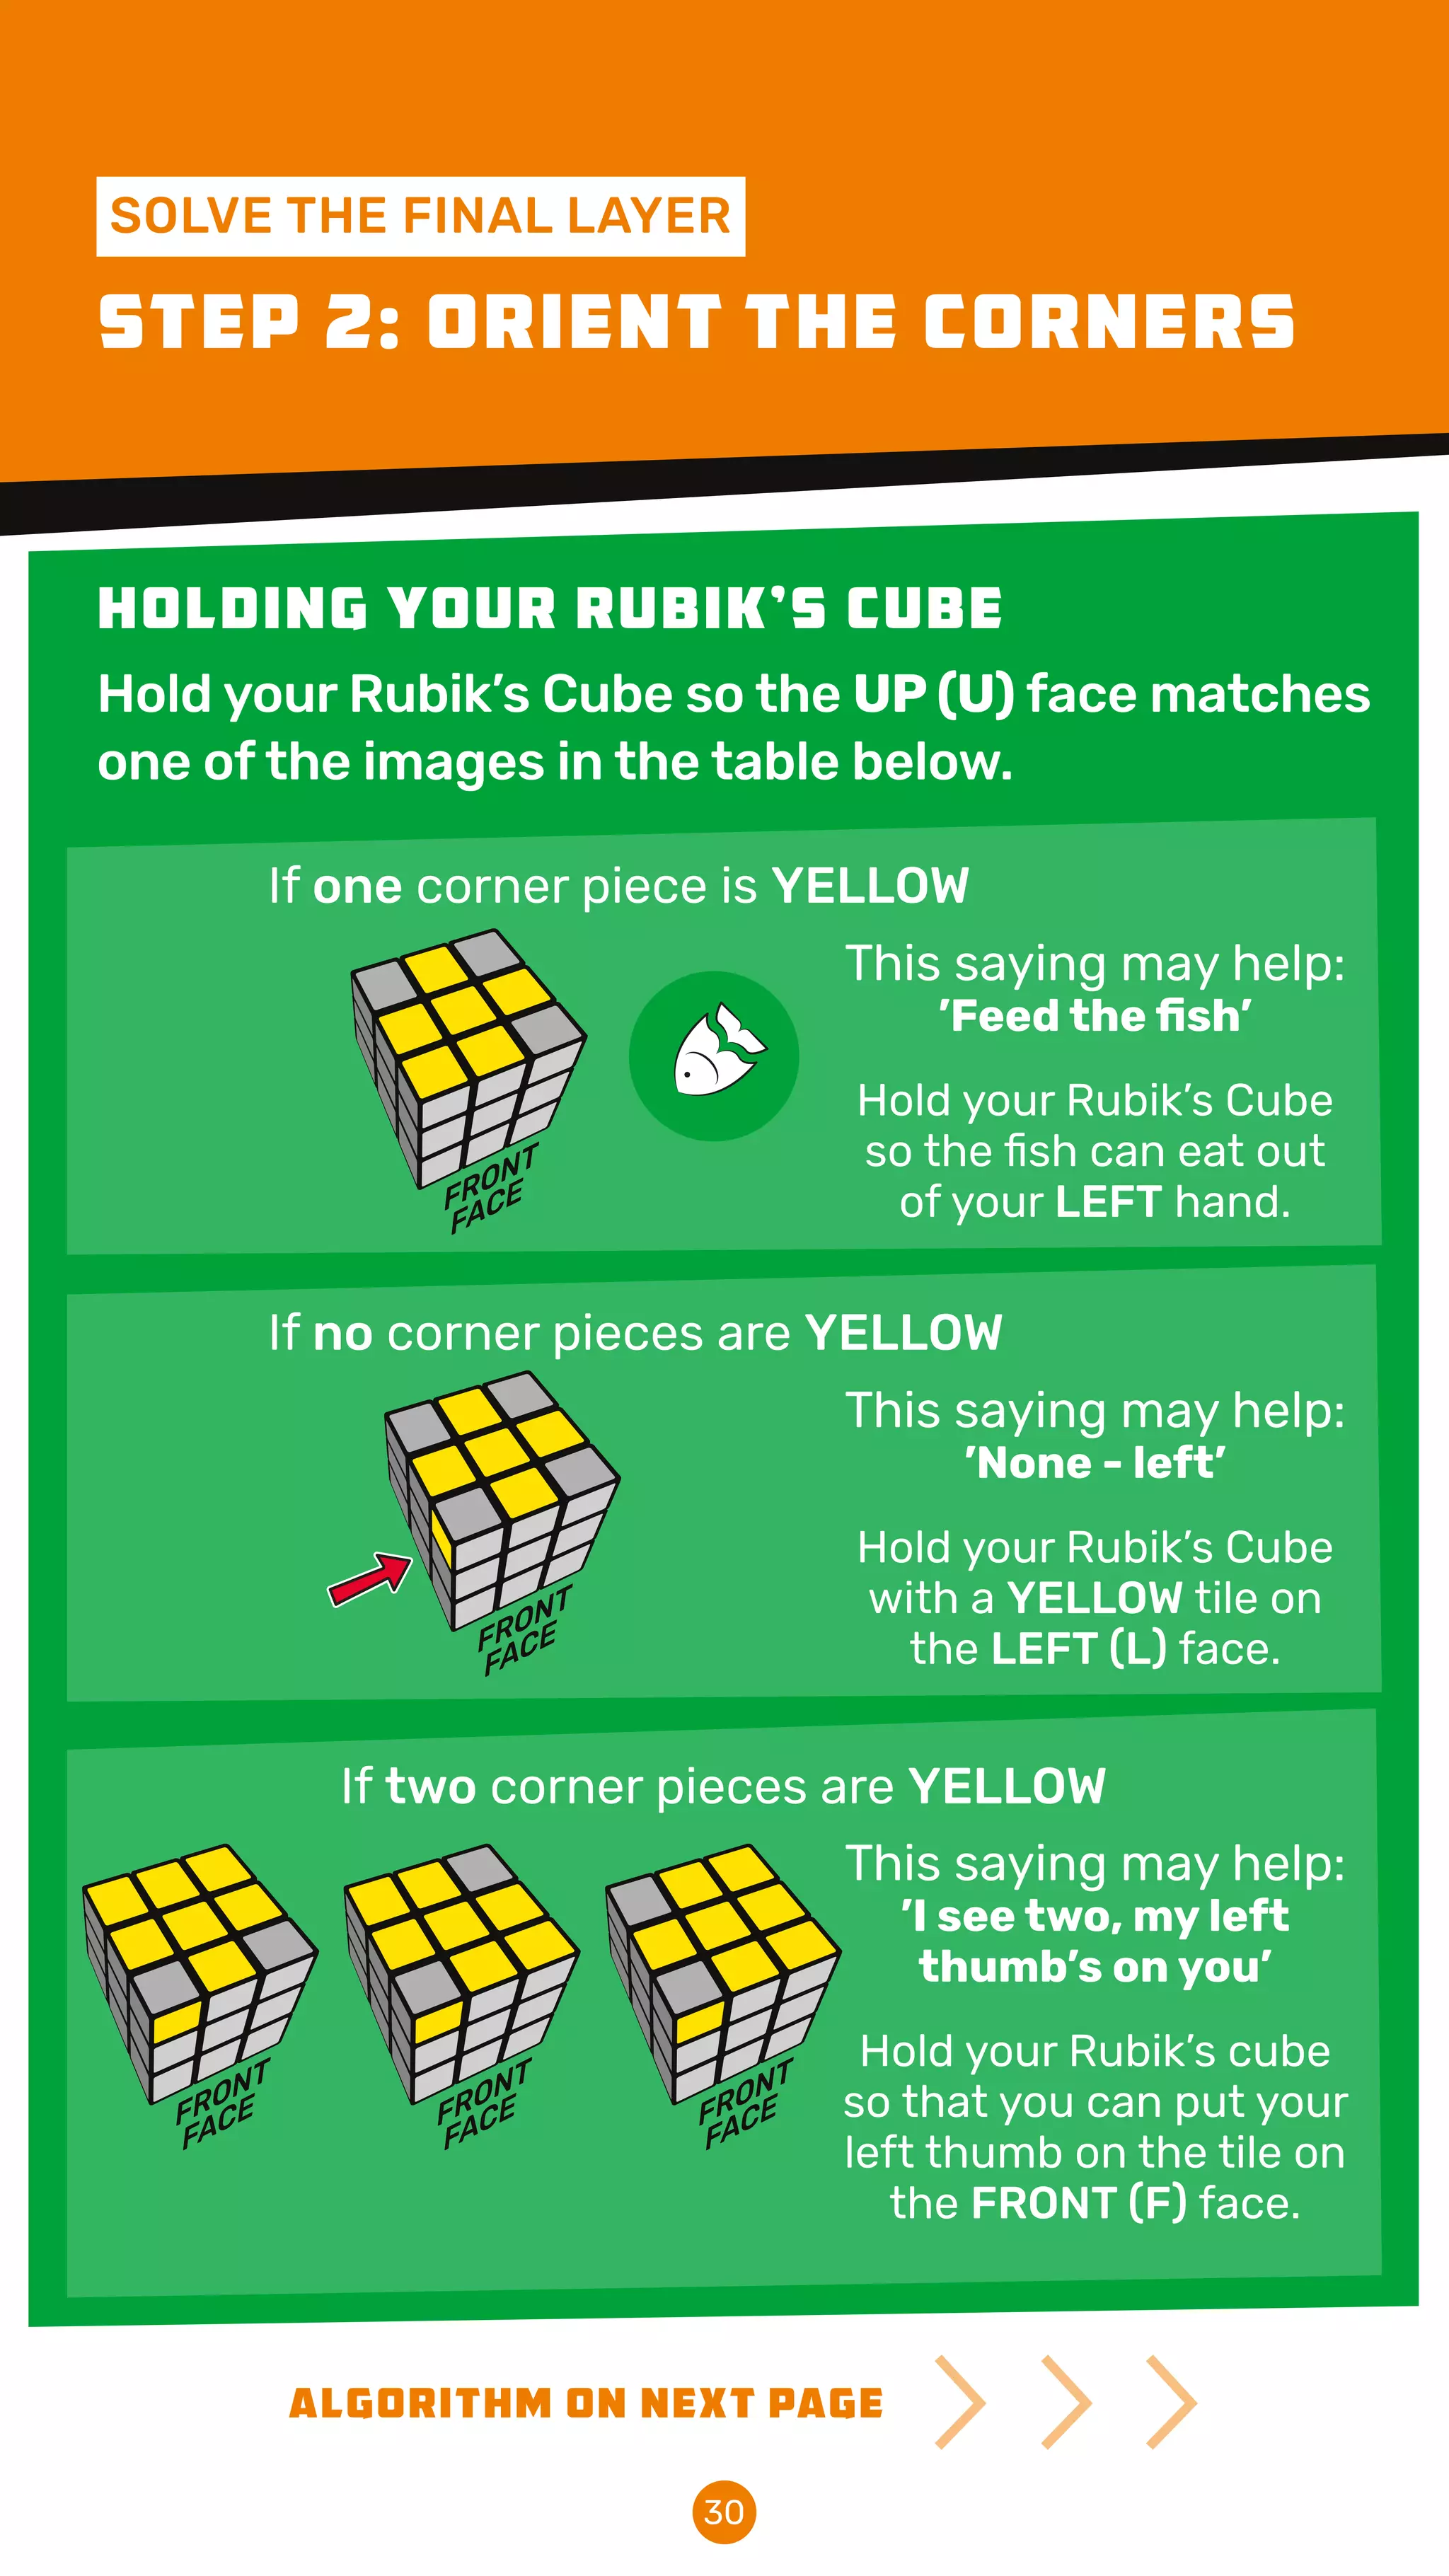
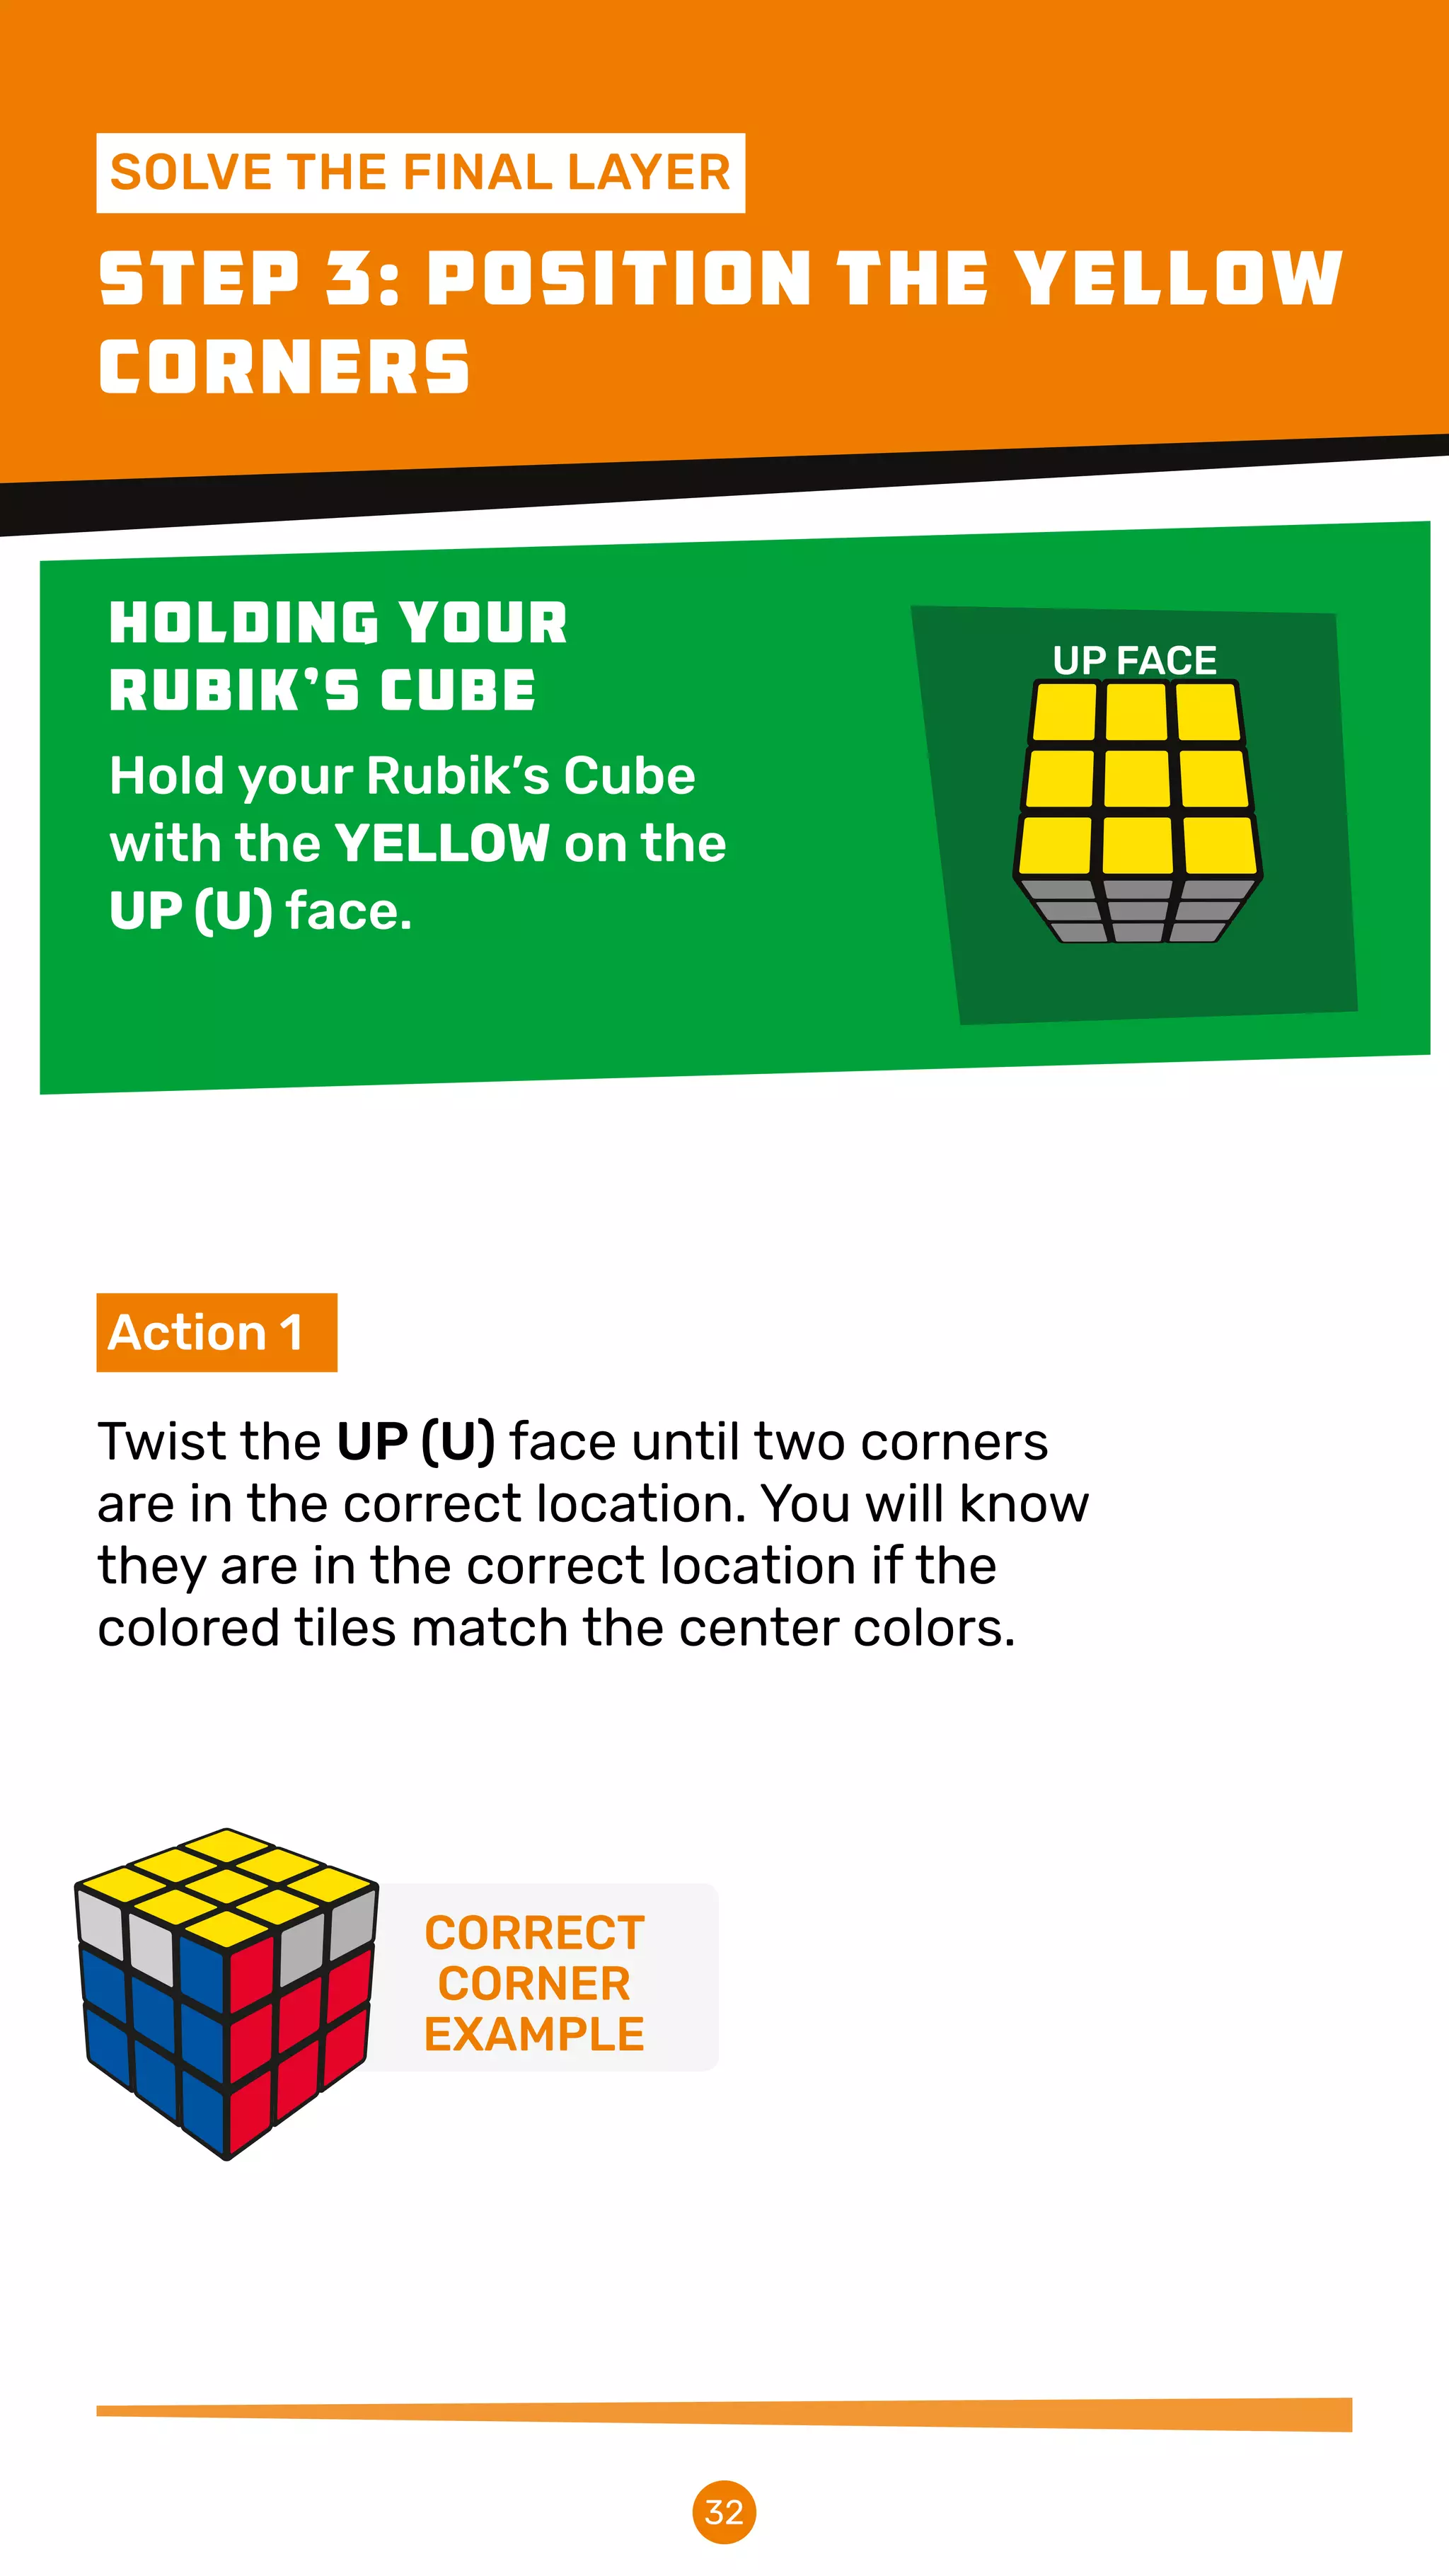
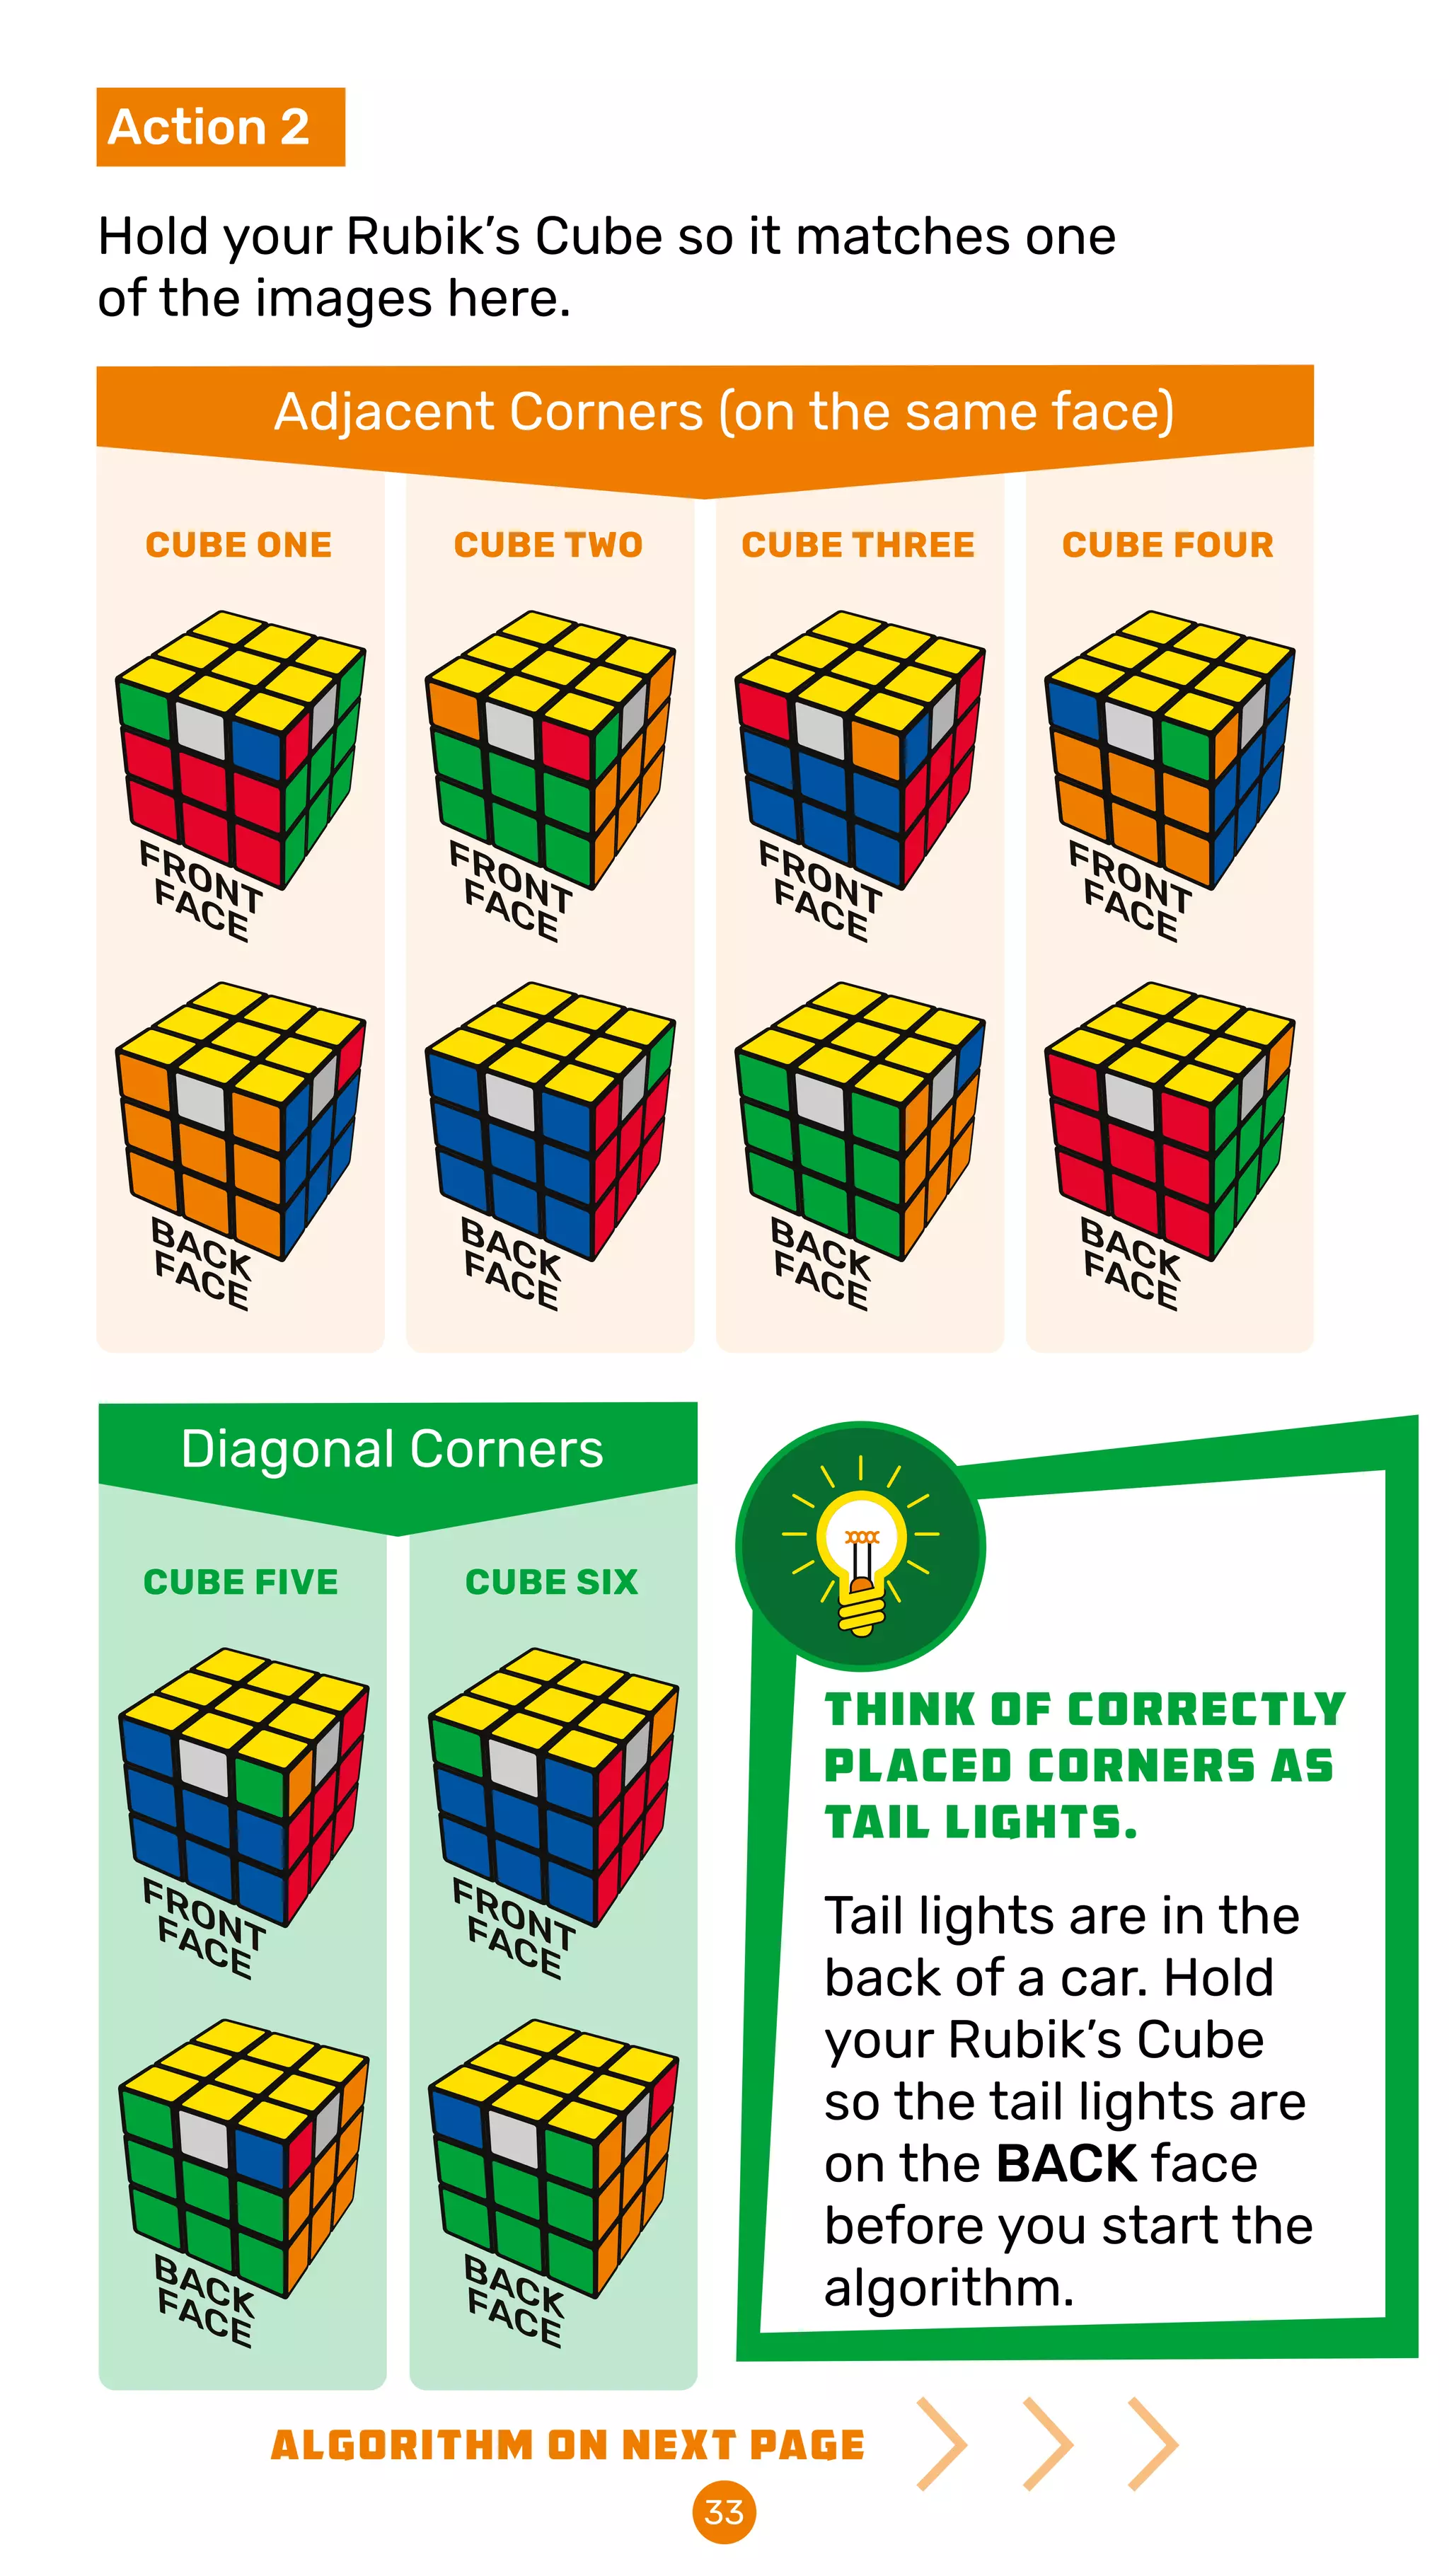
This document provides instructions for solving a Rubik's Cube in 3 stages - solving the first layer, solving the middle layer, and solving the final layer. It explains the different parts of the cube, basic turns and algorithms. For each stage, it lists the steps to complete that layer, with descriptions and diagrams of the moves and algorithms needed. The overall goal is to teach the layered method of solving the cube one layer at a time from bottom to top.
The document describes how different animals survive the winter. It contains pictures of animals that the user can click on to learn how each animal adapts, including by camouflaging, migrating, or hibernating. The text then provides information about how Arctic foxes, Arctic wolves, snowy owls, and snowshoe rabbits camouflage; how geese, whales, caribou, and butterflies migrate; and how squirrels, some bears, bats, and frogs hibernate. It concludes with an activity to sort the winter animals into the appropriate categories.
Komatsu PC27R-8 Hydraulic Excavator Service Repair Manual SN: 10001 and upudfjjsjejkksemm
This is the Highly Detailed factory service repair manual for theKOMATSU PC27R-8 HYDRAULIC EXCAVATOR, this Service Manual has detailed illustrations as well as step by step instructions,It is 100 percents complete and intact. they are specifically written for the do-it-yourself-er as well as the experienced mechanic.KOMATSU PC27R-8 HYDRAULIC EXCAVATOR Service Repair Workshop Manual provides step-by-step instructions based on the complete dis-assembly of the machine. It is this level of detail, along with hundreds of photos and illustrations, that guide the reader through each service and repair procedure. Complete download comes in pdf format which can work under all PC based windows operating system and Mac also, All pages are printable. Using this repair manual is an inexpensive way to keep your vehicle working properly.
Service Repair Manual Covers:
Safety
Operation
Maintenance
Specifications
Options, Attachments
General
Structure and Function
Testing and Adjusting
Disassembly and Assembly
Maintenance Standard
Others
File Format: PDF
Compatible: All Versions of Windows & Mac
Language: English
Requirements: Adobe PDF Reader
NO waiting, Buy from responsible seller and get INSTANT DOWNLOAD, Without wasting your hard-owned money on uncertainty or surprise! All pages are is great to haveKOMATSU PC27R-8 HYDRAULIC EXCAVATOR Service Repair Workshop Manual.
Thanks for visiting!
This document provides step-by-step instructions for solving a Rubik's Cube. It begins with an overview of the different pieces that make up the cube, including corner pieces and center pieces. It then outlines 8 steps to solve the cube, starting with making a cross on one side and filling in the first layer. Further steps include orienting the middle layers, placing the corner pieces correctly, and finishing by solving the final side. The instructions provide diagrams to illustrate each step and ensure the reader understands the rotations and movements needed to rearrange the colors and pieces to solve the puzzle.
1. This document provides step-by-step instructions for solving a Rubik's Cube using eight algorithms. It explains the cube terminology and how to perform basic rotations of the cube faces.
2. The instructions first have the user solve the first layer by making a plus sign and aligning center pieces. Then the middle layer edges and centers are solved using algorithms 3-6.
3. Algorithms 7-8 are used to solve the final corner pieces by placing them in the correct spots and aligning their orientations. Repeating the algorithms as needed will solve the entire cube.
This document discusses solving a Rubik's cube using group theory. It introduces basic rotational moves of the cube faces and defines "Z moves" that swap corners or edges. It outlines a two stage process to solve the cube: 1) use Z and reflected moves to orient the corners correctly and 2) use similar moves to orient the edges while keeping corners fixed. While this method systematically solves the cube, it is not the fastest approach. The document also proves that a cube's orientation can be either even or odd, preventing a single swap without disassembly.
Rubiks Cube - Part 7 of The Mathematics of Professor Alan's Puzzle SquareAlan Dix
This document discusses solving a Rubik's cube using group theory. It introduces basic rotation moves of the cube faces and defines "Z moves" that swap corners or edges. It presents a two stage approach to solving the cube: 1) use Z moves to orient the corners correctly and 2) use Z moves to position the edges while keeping the corners fixed. However, it notes there are limitations due to even vs odd permutations and orientation of individual pieces that divide the cubes into many families, proving one cannot swap just two edges using these basic moves alone. The document provides an in-depth mathematical analysis of the cube and strategies for systematic solving.
The document provides instructions for solving a Rubik's Cube in 6 steps:
1. Solve the green cross on the top side by locating and positioning the 4 green center pieces.
2. Solve the 4 corner pieces on the top side by locating them and using algorithms to position them correctly.
3. Solve the remaining pieces on the second row by again using algorithms to position the corner pieces correctly.
4. Repeat step 1 to solve the cross on the opposite side.
5. Solve the remaining center block in the top row.
6. Solve the remaining corner pieces using algorithms.
This document provides step-by-step instructions for solving a Rubik's Cube using an intuitive method. It describes 5 steps: 1) solving the top cross of edges, 2) solving the top face corners, 3) solving the second layer edges, 4) positioning the top face edges with their correct colors facing up, and 5) aligning the top face edges with the colors of the surrounding faces. Diagrams accompany each step to illustrate the before and after configurations. The goal is to solve the first two layers and position the top layer edges correctly.
The document provides instructions for solving a Rubik's Cube in 6 sessions over 6 days. It begins with an introduction and code of conduct for the sessions. Each day focuses on solving a different layer - day 1 is the top layer, day 2 is the middle layer, and day 3 is the bottom layer. The remaining days are for practice. It then discusses the inventor of the Rubik's Cube, facts about the puzzle, world records for solving it, and provides the key steps and algorithms for constructing each layer to solve the Rubik's Cube.
This document provides an introduction to solving a Rubik's cube while blindfolded. It assumes the reader already knows how to solve a cube normally. The method involves first memorizing the scrambled state of the cube, then solving it in small portions without looking. Corner orientation is explained first, using algorithms that twist 1-2 corners at a time. A second method uses more intuitive algorithms to twist multiple corners simultaneously. Edge orientation is then covered, outlining the criteria for a correctly oriented edge and restrictions during the permutation step. The document provides detailed instructions on memorization techniques and algorithms to complete the blindfolded solve in two main steps: orientation then permutation.
This document provides a 7-step method for solving a Rubik's Cube layer by layer: 1) Make a cross on the top layer, 2) Complete the top layer, 3) Complete the second layer, 4) Make a cross on the last layer, 5) Spread the cross to complete the last layer, 6) Place the last corners without a guide, and 7) Finish the cube by orienting the last corners correctly.
This document provides folding instructions to create a dollar koi fish origami sculpture. It consists of 14 steps beginning with orienting the dollar bill correctly and making precise folds. Subsequent steps involve mountain and valley folds to shape the head, body, fins, and tail of the koi fish. Pre-creasing and refolding techniques are used to sculpt details like the lips, eyes, and scales. The final steps refine the whiskers, fins, and overall shape to complete the koi fish sculpture.
Learn How To Do The Rubik's Cube In 3 Mins Or Less Using 7 Easy Steps With Sh...J. Skyler Fernandes
This is a tutorial on: How To Do The Rubik's Cube In 3 Mins Or Less Using 7 Easy Steps. It includes a new method for learning how to do the Rubik's Cube by phonetically remembering only four short algorithms, as well as various scenarios and walk through examples.
This document provides a step-by-step guide for solving a Rubik's cube in 6 steps:
1) Solve the white face by aligning the first layer
2) Solve the second layer
3) Solve the yellow cross
4) Solve the yellow face
5) Swap any misaligned corners
6) Swap any misaligned edges
This document provides instructions for creating tessellations, which are patterns made by repeating a shape so that there are no gaps or overlaps. It begins by explaining tessellations and providing examples. Readers are instructed to use graph paper to draw lines and create shapes that tessellate. Various line patterns are demonstrated. Readers are challenged to find hidden images within the patterns by rotating them. The document then guides refining one pattern to look more like seals. Finally, instructions are given for transferring and coloring the completed tessellation design.
The document provides step-by-step instructions for making a pop-up flower card. It involves using a paper clip or pen to create creases on dotted lines on paper pieces and the card. The pieces are then cut out and colored. The pieces are assembled one by one onto the card using small amounts of glue in designated areas, with some pieces inserted into others to create a three-dimensional pop-up flower when the card is opened.
Using AutoDesk Inventor to assemble a Trinket boxkrysia
This slide show is based on the premise that pupils have already created the parts for their trinket box (sides, base and lid). It goes through the steps to fully constrain it all together.
The exercise allowed pupils to easily see what they were about to make in 'Craft and Design' (E.g. the types of joint and how it fitted together.
All the exercises in this series were aimed 2nd yr (13/14year olds).
The document provides instructions to make an origami triangular box using origami paper. It involves 14 steps including folding the paper to create shapes, connecting 3 pieces together by inserting flaps and edges into pockets, and then attaching a lid. The finished product is a triangular box made from origami folds.
Rubik's Cube beginner's solution edited by Mr. Pass, a Middle School Mathematics Educator, in order to make the instructions as clear and as easy to understand as possible.
The document provides a step-by-step tutorial on using perspective in drawings. It explains basic perspective techniques like horizon lines, vanishing points, and how to draw boxes and shapes in one-point, two-point, and three-point perspectives. Later steps demonstrate how changing the horizon line or vanishing point positions can influence the composition to depict different angles or scales.
This document provides instructions for creating a trihexaflexagon, a paper model that can be flexed to reveal different faces. It explains how to mark and cut a sheet of paper to form the necessary shapes and labels. Detailed steps are given for folding the paper according to the markings to form a hexagonal shape. Additional instructions describe how to flex the completed model by folding edges together to reveal different triangle combinations on each face.
LESSON 4 - Flash Animation
STRUCTURE AND PERSPECTIVE
Competencies
• draw a single and two point perspective drawing.
• draw objects in proportion by knowing the center of a drawing.
• understand the structure and form of an object.
This document provides instructions for making an origami Santa Claus figure in 12 steps. It begins by cutting out squares of paper and folding tabs on the edges. It then involves folding the paper in half and folding the edges inward repeatedly to form the body. Triangles are made at the ends to create legs. A separate square is folded to create the head and hat, which are then attached to the body. The origami Santa is completed in 12 steps involving careful folding according to the visual instructions.
This document provides instructions for making an origami crane in under 10 steps. It begins with gathering a square piece of paper and making diagonal folds to form a square. Subsequent steps include folding the paper into thirds, creating petal folds on the sides, and shaping the wings and head. With a few final bends and folds, the crane takes shape. The instructions emphasize that the simple project only takes a short time but results in an impressive paper crane that can be proudly shown off.
This document provides instructions for making an origami crane in under 10 steps. It begins with gathering a square piece of paper and making diagonal folds to form a square. Subsequent steps include folding the paper into thirds, creating petal folds on the sides, and shaping the wings and head. With a few more precise folds, the crane takes shape. The instructions emphasize that the crane is a simple yet impressive origami project that anyone can accomplish in a short amount of time.
This document provides instructions for making an origami crane in under 10 steps. It begins with gathering a square piece of paper and making diagonal folds to form a square. Subsequent steps include folding the paper into thirds, creating petal folds on the sides, and shaping the wings and head. With a few more precise folds, the crane takes shape. The instructions emphasize that the crane is a simple yet impressive project that can be completed in a short time.
The document provides instructions for solving a Rubik's Cube in 7 steps, beginning with solving the white cross on one side, then the white corners, and continuing through solving the middle layers and lastly the yellow cross and remaining pieces on the top layer. It includes the notation and algorithms needed to rotate certain pieces and layers to match colors and solve each step of the puzzle.
How to Make a Field Mandatory in Odoo 17Celine George
In Odoo, making a field required can be done through both Python code and XML views. When you set the required attribute to True in Python code, it makes the field required across all views where it's used. Conversely, when you set the required attribute in XML views, it makes the field required only in the context of that particular view.
Philippine Edukasyong Pantahanan at Pangkabuhayan (EPP) CurriculumMJDuyan
(𝐓𝐋𝐄 𝟏𝟎𝟎) (𝐋𝐞𝐬𝐬𝐨𝐧 𝟏)-𝐏𝐫𝐞𝐥𝐢𝐦𝐬
𝐃𝐢𝐬𝐜𝐮𝐬𝐬 𝐭𝐡𝐞 𝐄𝐏𝐏 𝐂𝐮𝐫𝐫𝐢𝐜𝐮𝐥𝐮𝐦 𝐢𝐧 𝐭𝐡𝐞 𝐏𝐡𝐢𝐥𝐢𝐩𝐩𝐢𝐧𝐞𝐬:
- Understand the goals and objectives of the Edukasyong Pantahanan at Pangkabuhayan (EPP) curriculum, recognizing its importance in fostering practical life skills and values among students. Students will also be able to identify the key components and subjects covered, such as agriculture, home economics, industrial arts, and information and communication technology.
𝐄𝐱𝐩𝐥𝐚𝐢𝐧 𝐭𝐡𝐞 𝐍𝐚𝐭𝐮𝐫𝐞 𝐚𝐧𝐝 𝐒𝐜𝐨𝐩𝐞 𝐨𝐟 𝐚𝐧 𝐄𝐧𝐭𝐫𝐞𝐩𝐫𝐞𝐧𝐞𝐮𝐫:
-Define entrepreneurship, distinguishing it from general business activities by emphasizing its focus on innovation, risk-taking, and value creation. Students will describe the characteristics and traits of successful entrepreneurs, including their roles and responsibilities, and discuss the broader economic and social impacts of entrepreneurial activities on both local and global scales.
Beyond Degrees - Empowering the Workforce in the Context of Skills-First.pptxEduSkills OECD
Iván Bornacelly, Policy Analyst at the OECD Centre for Skills, OECD, presents at the webinar 'Tackling job market gaps with a skills-first approach' on 12 June 2024
LAND USE LAND COVER AND NDVI OF MIRZAPUR DISTRICT, UPRAHUL
This Dissertation explores the particular circumstances of Mirzapur, a region located in the
core of India. Mirzapur, with its varied terrains and abundant biodiversity, offers an optimal
environment for investigating the changes in vegetation cover dynamics. Our study utilizes
advanced technologies such as GIS (Geographic Information Systems) and Remote sensing to
analyze the transformations that have taken place over the course of a decade.
The complex relationship between human activities and the environment has been the focus
of extensive research and worry. As the global community grapples with swift urbanization,
population expansion, and economic progress, the effects on natural ecosystems are becoming
more evident. A crucial element of this impact is the alteration of vegetation cover, which plays a
significant role in maintaining the ecological equilibrium of our planet.Land serves as the foundation for all human activities and provides the necessary materials for
these activities. As the most crucial natural resource, its utilization by humans results in different
'Land uses,' which are determined by both human activities and the physical characteristics of the
land.
The utilization of land is impacted by human needs and environmental factors. In countries
like India, rapid population growth and the emphasis on extensive resource exploitation can lead
to significant land degradation, adversely affecting the region's land cover.
Therefore, human intervention has significantly influenced land use patterns over many
centuries, evolving its structure over time and space. In the present era, these changes have
accelerated due to factors such as agriculture and urbanization. Information regarding land use and
cover is essential for various planning and management tasks related to the Earth's surface,
providing crucial environmental data for scientific, resource management, policy purposes, and
diverse human activities.
Accurate understanding of land use and cover is imperative for the development planning
of any area. Consequently, a wide range of professionals, including earth system scientists, land
and water managers, and urban planners, are interested in obtaining data on land use and cover
changes, conversion trends, and other related patterns. The spatial dimensions of land use and
cover support policymakers and scientists in making well-informed decisions, as alterations in
these patterns indicate shifts in economic and social conditions. Monitoring such changes with the
help of Advanced technologies like Remote Sensing and Geographic Information Systems is
crucial for coordinated efforts across different administrative levels. Advanced technologies like
Remote Sensing and Geographic Information Systems
9
Changes in vegetation cover refer to variations in the distribution, composition, and overall
structure of plant communities across different temporal and spatial scales. These changes can
occur natural.
Main Java[All of the Base Concepts}.docxadhitya5119
This is part 1 of my Java Learning Journey. This Contains Custom methods, classes, constructors, packages, multithreading , try- catch block, finally block and more.
Temple of Asclepius in Thrace. Excavation resultsKrassimira Luka
The temple and the sanctuary around were dedicated to Asklepios Zmidrenus. This name has been known since 1875 when an inscription dedicated to him was discovered in Rome. The inscription is dated in 227 AD and was left by soldiers originating from the city of Philippopolis (modern Plovdiv).
2. 2
How to Use this Guide
You will be learning the layered method to solve
the Rubik’s®
Cube. After you learn this method,
you can add speed cubing moves when you
are ready.
Throughout the guide you will see this symbol
to indicate helpful tips. Take the time to read
the tips closely.
The gray areas on the Rubik’s Cube mean that
at the stage you are working on, the color of the
gray pieces doesn’t matter.
3. 3
Tips for Success
Mindset is critical - learning to solve the Rubik’s
Cube is difficult but if you persevere, you CAN
solve the Rubik’s Cube.
Keep the Rubik’s Cube on a table to maintain the
same front face for an entire algorithm (sequence
of moves).
Think of the algorithms as moving a piece out of
the way, setting up its correct position, and then
moving the piece into that place.
Master one layer by re-scrambling your Rubik’s
Cube and practicing multiple times before
moving on to the next layer. (Note: When solving
the last layer, you can scramble just the top by
applying the algorithm on page 12).
Learn songs and chants to help you memorize
the algorithms.
Place a small sticky note on the piece of the
Rubik’s Cube you are moving so you can follow
its path. Consider taking a video while you do this
and then watch the video.
Use this guide along with the videos on
Rubiks.com showing each solving stage.
4. 4
LAYERS
There are three horizontal layers in a 3x3
Rubik’s Cube.
Using this guide, you will solve the Rubik’s
Cube layer by layer.
TOP
LAYER
MIDDLE
LAYER
BOTTOM
LAYER
GET TO KNOW YOUR
RUBIK’S CUBE
5. 5
FACES
Each flat surface is a face.
There are 6 faces on a Rubik’s Cube.
You can
place your
palm flat
on a FACE.
You use
one finger
to touch
a CENTER
piece.
WHITE
WHITE
BLUE
BLUE
ORANGE
ORANGE
opposite
opposite
opposite
YELLOW
YELLOW
GREEN
GREEN
RED
RED
CENTERS
Center pieces have one colored tile.
There are 6 center pieces.
Center pieces are single tiles, fixed to
the internal core.
When correctly solved, each face will
be the color of its center piece.
These center piece colors
are always opposite each other:
6. 6
You use
three fingers
to touch
all sides of
a CORNER
piece.
CORNERS
Corner pieces have three colored tiles.
There are 8 corner pieces.
You use two
fingers to
pinch an
EDGE piece.
EDGES
Edge pieces have two colored tiles.
There are 12 edge pieces.
7. 7
U =
UP
FACE
D =
DOWN
FACE
Each face is
represented by a letter.
FACE KEY
Think of the movements
of these objects when
you turn the faces.
MOTIONS
ALGORITHM KEY
Moves used in
this guide.
U
D
U’
D’
GET TO KNOW YOUR
RUBIK’S CUBE
8. 8
L L’
L =
LEFT
FACE
R R’
R =
RIGHT
FACE
Each face is
represented by a letter.
FACE KEY ALGORITHM KEY
Moves used in
this guide.
Think of the movements
of these objects when
you turn the faces.
MOTIONS
9. 9
F
F F’
F’
F =
FRONT
FACE
B B’
B =
BACK
FACE
Each face is
represented by a letter.
FACE KEY
Think of the movements
of these objects when
you turn the faces.
MOTIONS
ALGORITHM KEY
Moves used in
this guide.
10. 10
An ALGORITHM is a sequence of moves
that you need to do in a specific order.
When following the algorithms in this
guide, it is important to maintain the
FRONT face of your Rubik’s Cube so it
stays the FRONT through all of the turns.
If there is a 2 next to the algorithm letter,
turn the face twice.
A turn is clockwise when looking at that
face directly. A letter with an apostrophe
(‘) after it means to make an inverse or
counterclockwise turn of the face.
D2
D2 D D
=
F
F F’
F’
Each move is a ¼ TURN.
11. 11
Now... let’s get
solving!
solve
layer ONE
solve the
middle layer
solve THE
FINAL LAYER
RUBIK’S CUBE
SOLUTION GUIDE
This 3x3 solution guide
is divided into three
stages as seen below.
12. 12
SOLVE LAYER ONE
STEP 1: CREATE
A DAISY
Holding your
rubik’s cube
Begin by holding your
Rubik’s Cube with the
YELLOW CENTER piece
on the UP (U) face.
UP FACE
Action 1
Look at the top layer to locate the
EDGE pieces that have a WHITE
tile. Leave them where they are.
See example to the right and
notice that at this stage it is okay
if the white tile is not touching
the YELLOW CENTER piece.
Action 2
Look at the middle layer.
Move EDGE pieces that
have a WHITE tile from
the MIDDLE layer into
the top layer.
Tip on
next page
13. 13
Be careful not to bump
out the white edges
already in the daisy.
Rotate the UP (U) face to
move a white edge out of
the way before moving
another white edge into
the daisy.
F’
F’
U’
Then...
Action 3
Look at the bottom layer.
Move EDGE pieces that
have a WHITE tile from
the BOTTOM layer into
the top layer.
Don’t forget the previous
tip about bumping.
F2
F2
F2
F2
Tip on
next page
14. 14
Sometimes, when you place
the edge in the top layer, the
WHITE tile is not on the UP face
and it needs to be “flipped”.
OR OR OR
Holding your Rubik’s Cube
To “flip the edge,” so the White
tile is on the UP face, hold your
Rubik’s Cube so the edge that
needs to be flipped is on the
RIGHT (R) face.
Follow this algorithm.
U F’
F’
R’
When your Rubik’s Cube
has a daisy that looks like
this picture, you can move
to Step 2!
15. 15
OR
SOLVE LAYER ONE
STEP 2: CREATE A white
cross with matched edges
and center pieces
Holding your
rubik’s cube
Begin by holding your Rubik’s
Cube with the daisy on the UP
(U) face. Look at the FRONT
face of the Rubik’s Cube.
UP FACE
=
Action 1
If the FRONT tile of the UP edge
piece matches the CENTER tile
color, go to Action 2 on page 16.
If not, turn the Up (U) face until
it does.
U U’
16. 16
F2
F2
F2
F2
When your Rubik’s Cube has a
white cross with the center and
edge pieces matched, like this
picture, you can move to Step 3!
Action 3
Repeat Action 1 2 for each WHITE edge.
Action 4
Once all 4 edges have been correctly placed, flip
your Rubik’s Cube over to see the WHITE cross
(with matching edge tiles on the RED
RED, BLUE
BLUE,
ORANGE
ORANGE and GREEN
GREEN faces).
Action 2
Turn the FRONT face two times
(F2) so that the WHITE tile is now
on the DOWN (D) face.
17. 17
Holding your
rubik’s cube
Begin by holding your Rubik’s
Cube with the white cross on
the UP (U) face.
UP FACE
Correct Placement
The correct placement of a corner piece
is between center pieces with the same
colors. Notice on the image how a red/
blue/white corner goes between the red,
blue, and white center pieces.
SOLVE LAYER ONE
STEP 3: solve the white
corners
18. 18
If your corner piece is in the
top layer but not in the correct
location then see the tip below.
To get a corner with a
white tile from the top
layer to the bottom
layer:
D’
R’ R
Action 1
Locate a corner piece with a WHITE tile
in the bottom layer.
If your corner piece is in any of these
positions then go to Action 2 on page 19
the next page.
19. 19
SOLVE LAYER ONE
STEP 3: solve the white
corners
Action 2
Rotate the DOWN (D) face until
the corner is between the two
matching colored center tiles.
See ‘Correct Placement’ note on
previous page and images below.
D
OR
OR
20. 20
Action 3
Keeping the white cross on the
UP (U) face, hold your Rubik’s
Cube so the WHITE tile is on the
FRONT face.
If the WHITE tile is on the bottom,
see the tip below.
To change a White tile
from facing down to
facing front:
1.
Hold your Rubik’s Cube
with the corner
on the RIGHT face.
2. Follow this algorithm.
D’
F
F F’
F’ D2
D2
Continue to next page
21. 21
Follow the algorithm below.
D L D’ L’
Notice: D
D moves the corner piece out of the way,
L
L brings its corner position down, D’
D’ moves it into
place and then L’
L’ brings it up to the top layer.
FRONT
FACE
OR Action 4
If the WHITE tile is on
the RIGHT
FRONT
FACE
D R
D’ R’
Notice: D’
D’ moves the corner piece out of the way,
R’
R’ brings its corner position down, D
D moves it into
place and then R
R brings it up to the top layer.
Follow the algorithm below.
Action 4
If the WHITE tile is on
the LEFT
22. 22
Action 5
Continue Actions 1-4 on the previous
page until all white corner pieces are
in the correct positions.
When your Rubik’s Cube looks
like the picture here, you have
one-third solved and you
can now learn to solve the
middle layer!
Congratulations!
You have now solved layer one!
Scroll on to solve the middle layer.
23. 23
Holding your
rubik’s cube
Flip your Rubik’s Cube over so
the completed WHITE face is
the DOWN face.
UP FACE
Action 1
Choose a FRONT face. Rotate the UP (U) face to create
a vertical line matching one of the pictures below.
Ifyou can’t match one of these pictures, pick another
FRONT face until you can match one of the pictures.
If you can’t make any vertical
lines, see tip on the next page.
FRONT
FACE
FRONT
FACE
FRONT
FACE
FRONT
FACE
FRONT
FACE
FRONT
FACE
FRONT
FACE
FRONT
FACE
Tip on
next page
SOLVE THE MIDDLE LAYER
24. 24
If you can’t make a vertical
line to match a picture above:
You will need to swap an edge
from the UP (U) face with an edge
already in the middle layer.
Look in the MIDDLE layer to locate a
mismatched edge that doesn’t have
a yellow tile.
Hold your Rubik’s Cube so the mismatched
edge in the middle layer is on the RIGHT face.
Follow the algorithm ‘Moving Right’ on page 26.
Now proceed to Action 1 on page 23.
FRONT
FACE
FRONT
FACE
FRONT
FACE
FRONT
FACE
FRONT
FACE
FRONT
FACE
FRONT
FACE
FRONT
FACE
If you can’t make a vertical line
to match a picture below:
25. 25
If you’re moving the edge piece
to the left, follow these moves:
Action 2 Moving Left
U’ L’ U L
U F
F U’ F’
F’
This algorithm
places the edge piece
next to its correct
corner piece.
This algorithm
brings the edge
piece to the correct
position in the
middle layer.
26. 26
OR Action 2 Moving Right
If you’re moving the edge piece
to the right, follow these moves:
U’
U
U’ U F
F
F’
F’
R’
R
This algorithm
places the edge piece
next to its correct
corner piece.
This algorithm
brings the edge
piece to the correct
position in the
middle layer.
27. 27
When the two bottom layers
of your Rubik’s Cube look like
this picture, you can move to
solving the third layer. You are
two-thirds of the way done!
Action 3
Continue Actions 1-2 on the
previous page until all MIDDLE layer
pieces are in the correct positions.
Congratulations!
You have now solved the
middle layer!
Scroll on to solve the final layer.
28. 28
SOLVE THE FINAL LAYER
STEP 1: MAKE A YELLOW
CROSS
Holding your rubik’s cube
Match your Rubik’s Cube to one of the pictures
below. Focus on the YELLOW edges on the UP (U)
face only (not corners).
FRONT
FACE
FRONT
FACE
FRONT
FACE
U
F
F R
R’
U’ F’
F’
Action 1
Follow this algorithm.
Tip on
next page
29. 29
Remember this algorithm
as FUR says U’R’F’.
Notice the first three moves go
clockwise and the next three
moves go counter-clockwise.
U’R’F’!
Action 2
If the YELLOW Cross is not formed yet, REMATCH
your Rubik’s Cube to one of the pictures in the
‘Holding your Rubik’s Cube’ section above and
follow the algorithm again.
FUR
When your Rubik’s Cube looks
like this picture, move on to the
next step!
30. 30
Holding your rubik’s cube
Hold your Rubik’s Cube so the UP (U) face matches
one of the images in the table below.
This saying may help:
’I see two, my left
thumb’s on you’
Hold your Rubik’s cube
so that you can put your
left thumb on the tile on
the FRONT (F) face.
This saying may help:
’None - left’
Hold your Rubik’s Cube
with a YELLOW tile on
the LEFT (L) face.
This saying may help:
’Feed the fish’
Hold your Rubik’s Cube
so the fish can eat out
of your LEFT hand.
If no corner pieces are YELLOW
If one corner piece is YELLOW
If two corner pieces are YELLOW
SOLVE THE FINAL LAYER
STEP 2: ORIENT THE CORNERS
Algorithm on next page
31. 31
R U R’ U
R R’
U2
U2
Notice the RIGHT (R) face turns in opposite
directions every other time and the UP (U) face
always turns clockwise.
Action 1
Follow this algorithm.
Action 2
If you do not have all yellow tiles on the
UP (U) face you will need to REMATCH
and follow the algorithm. (You may need
to do this multiple times.)
When your Rubik’s Cube has all
the YELLOW on the UP (U) face,
like this picture, move to Step 3!
32. 32
SOLVE THE FINAL LAYER
STEP 3: POSITION THE YELLOW
CORNERS
Holding your
rubik’s cube
Hold your Rubik’s Cube
with the YELLOW on the
UP (U) face.
UP FACE
Action 1
Twist the UP (U) face until two corners
are in the correct location. You will know
they are in the correct location if the
colored tiles match the center colors.
CORRECT
CORNER
EXAMPLE
33. 33
Algorithm on next page
Action 2
Hold your Rubik’s Cube so it matches one
of the images here.
CUBE ONE CUBE TWO CUBE THREE CUBE FOUR
CUBE FIVE CUBE SIX
Adjacent Corners (on the same face)
Diagonal Corners
Think of correctly
placed corners as
tail lights.
Tail lights are in the
back of a car. Hold
your Rubik’s Cube
so the tail lights are
on the BACK face
before you start the
algorithm.
34. 34
Action 3 Follow the algorithm below.
R2
R2 U’
R’ F
F R’
B
B
B2
R’
R F’
F’
B
B
B2
After this part of the
algorithm, the top
of your Rubik’s Cube
will look like this:
After this part of the
algorithm, the top
of your Rubik’s Cube
will look like this:
R’un to me Fast R’un to me Back Back
Run away F’ast R’un to me Back Back
Run Run
away
U’p
UP FACE
UP FACE
CHANT
The words underneath
the turns are a chant
to help you remember
the algorithm.
35. 35
Action 4
If your corners are not correct at this
point, rematch your Rubik’s Cube to one
of the images in Action 2 on page 33
and repeat the algorithm.
When your Rubik’s Cube looks
like this picture, move on to the
final step!
Continue to step 4: Position
the Yellow Edges on the
following page
36. 36
SOLVE THE FINAL LAYER
STEP 4: POSITION THE
YELLOW EDGES
Holding your
rubik’s cube
Hold your Rubik’s Cube so the
one face that is a solid color
is the BACK, and the Yellow
face is the UP(U) face.
If no face is a solid color, it
doesn’t matter which face is
in the back.
EXAMPLE
Action 1 Follow this algorithm up to 3 times to
move the unsolved edges CLOCKWISE /
TO THE LEFT.
U R’
L
L’ R U
F2
F2
F2
F2
F2
F2
F2
F2 F2
F2
F2
F2
Tip on
next page
37. 37
Before starting the algorithm,
look at the unsolved edge on the
FRONT face. Is it the same color as
the center tile of the:
U’
LEFT face? Follow the
algorithm above.
RIGHT face? Change
the two U turns to U’.
If you restart the algorithm, make sure
a solved face starts as the BACK face
of the Rubik’s Cube.
When your Rubik’s Cube looks
like this picture, you have
completed the final step!