The document provides instructions for solving a Rubik's Cube in 6 steps:
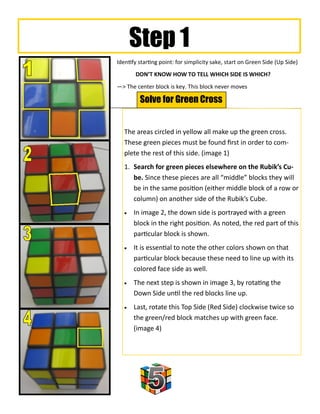
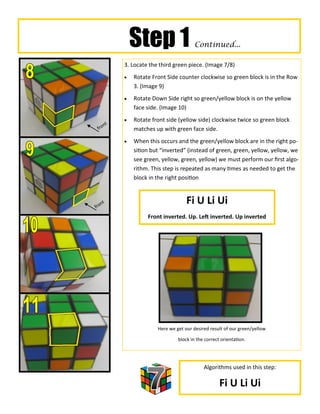
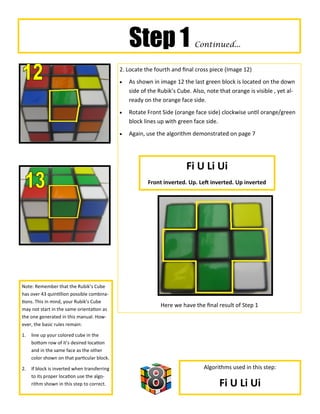
1. Solve the green cross on the top side by locating and positioning the 4 green center pieces.
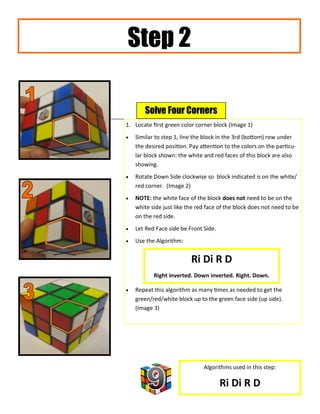
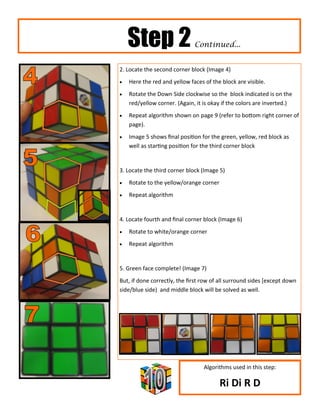
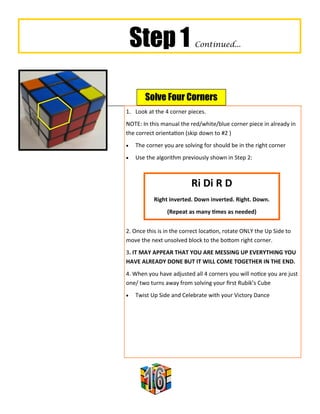
2. Solve the 4 corner pieces on the top side by locating them and using algorithms to position them correctly.
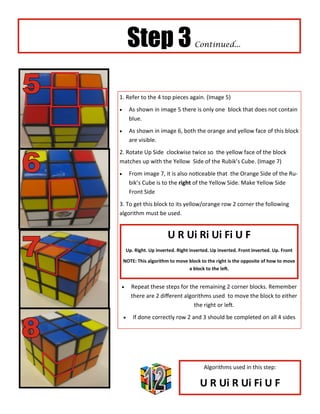
3. Solve the remaining pieces on the second row by again using algorithms to position the corner pieces correctly.
4. Repeat step 1 to solve the cross on the opposite side.
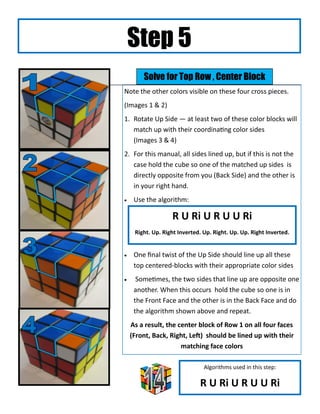
5. Solve the remaining center block in the top row.
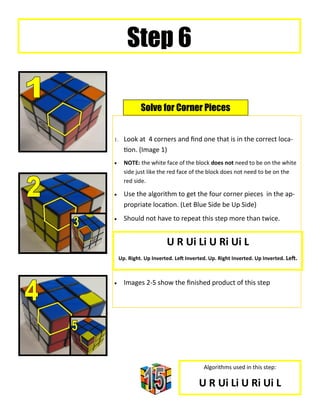
6. Solve the remaining corner pieces using algorithms.
This document provides step-by-step instructions for solving a Rubik's Cube. It begins with an overview of the different pieces that make up the cube, including corner pieces and center pieces. It then outlines 8 steps to solve the cube, starting with making a cross on one side and filling in the first layer. Further steps include orienting the middle layers, placing the corner pieces correctly, and finishing by solving the final side. The instructions provide diagrams to illustrate each step and ensure the reader understands the rotations and movements needed to rearrange the colors and pieces to solve the puzzle.
This document provides a step-by-step guide for solving a Rubik's cube in 6 steps:
1) Solve the white face by aligning the first layer
2) Solve the second layer
3) Solve the yellow cross
4) Solve the yellow face
5) Swap any misaligned corners
6) Swap any misaligned edges
The document provides instructions for solving a Rubik's cube using the layer-by-layer method, which involves solving each of the cube's layers one at a time, first orienting and placing the edges and corners of the top layer, then the second layer, and finally the last layer through a series of orientation and positioning steps using memorized algorithms. It explains that the cube actually only has 20 separate pieces to solve rather than 54 stickers as many believe, and provides the standard notation used to represent turns of the various cube faces.
This document provides step-by-step instructions for solving a Rubik's Cube using an intuitive method. It describes 5 steps: 1) solving the top cross of edges, 2) solving the top face corners, 3) solving the second layer edges, 4) positioning the top face edges with their correct colors facing up, and 5) aligning the top face edges with the colors of the surrounding faces. Diagrams accompany each step to illustrate the before and after configurations. The goal is to solve the first two layers and position the top layer edges correctly.
The document discusses the Evo Mouse, a portable computer mouse that uses time-of-flight principles to track hand motions and gestures instead of requiring surface movement. The Evo Mouse works on nearly any flat surface and allows cursor control, clicking, dragging, zooming and more through natural hand gestures without needing space. Compatible with desktops and laptops via Bluetooth or USB, the Evo Mouse provides a more innovative way to interact with computers beyond traditional mice.
1. This document provides step-by-step instructions for solving a Rubik's Cube using eight algorithms. It explains the cube terminology and how to perform basic rotations of the cube faces.
2. The instructions first have the user solve the first layer by making a plus sign and aligning center pieces. Then the middle layer edges and centers are solved using algorithms 3-6.
3. Algorithms 7-8 are used to solve the final corner pieces by placing them in the correct spots and aligning their orientations. Repeating the algorithms as needed will solve the entire cube.
The document summarizes the history and development of the computer mouse. It describes how Douglas Engelbart invented the first mouse in 1964 to make computers more user-friendly. The trackball was an earlier precursor invented in 1952 for military use. Mice allow users to navigate graphical user interfaces via movement detection. Early mice had cords and tracking balls, while modern mice use optical or laser sensors and wireless connectivity. The design of mice has evolved to be smaller and more ergonomic over time.
The document provides instructions for a unit assignment involving simplification of logic expressions using the Variable Elimination Method (VEM) technique. It lists 3 steps - 1) simplify an expression using VEM, 2) obtain the minimal product, 3) simplify another expression using VEM. It then provides 4 logic expressions that need simplification.
This document discusses brain-computer interfaces (BCI). It defines BCI and describes the different types - invasive, non-invasive, and semi-invasive. It explains the implementation process for BCI, including signal acquisition using EEG, feature extraction, translation to device commands, and feedback. Examples of BCI applications in India are provided. The global BCI market and conclusions are also briefly mentioned.
This document provides an overview of brain-computer interfaces and their applications. It discusses the science of reading brain activity through various technologies like EEG, MRI, and ultrasound. It also covers direct brain input methods such as tDCS and TMS. The document outlines several consumer brain-computer interfaces currently available and demonstrates using a brain interface to control a quadcopter. It concludes by discussing future applications of brain interfaces such as enhanced reality, thought identification, and uploading consciousness.
1. The document discusses the decimal and binary number systems.
2. The decimal system uses 10 symbols (0-9) and has a base of 10, while the binary system uses two symbols (0 and 1) and has a base of 2.
3. Binary code is made up of only zeros and ones and forms the basis for computer processors and digital text.
This document contains a set of 22 multiple choice questions about computer generations and technologies. It provides the questions along with brief explanatory paragraphs about computer history and generations. The questions cover topics like the defining technologies of each generation of computers, popular computers from different eras, programming languages developed in each generation, and more. The document concludes by sharing contact information to send additional MCQ questions or discuss computer topics further.
The document provides instructions for drawing the projections of a semicircular plate that is inclined in multiple ways. The plate has a diameter of 80mm and its straight edge is in the vertical plane (VP) and inclined at 45 degrees to the horizontal plane (HP). The surface of the plate makes an angle of 30 degrees to the VP. The projections should be drawn with the VP parallel to the drawing plane and one side of the resulting hexagon vertical.
Neuralink is developing brain-computer interface technology to connect the human brain to computers. It aims to implant a chip in the skull that can transmit signals wirelessly between the brain and devices. Currently it is testing on monkeys but hopes to help paralyzed humans control devices with their thoughts. While this technology could help many, it also raises ethical concerns regarding privacy, identity, and the possibility of hacking that provides access to people's brains.
The document discusses various methods of drawing conic sections such as ellipses, parabolas, and hyperbolas. It provides details on the concentric circle method, rectangle method, oblong method, arcs of circle method, and general locus method for drawing ellipses. For parabolas, it describes the rectangle method, tangent method, and basic locus method. The hyperbola can be drawn using the rectangular hyperbola method, basic locus method, and through a given point with its coordinates. The document also discusses how to draw tangents and normals to these conic section curves from a given point.
This document discusses 3D rendering and the graphics pipeline. It begins with an introduction and overview of the topics to be covered. It then proceeds to explain each stage of the graphics pipeline in detail, from the 3D modeling stage through vertex shading, projection, clipping, rasterization, and pixel shading. Different rendering techniques like radiosity and ray tracing are also introduced and compared. The document emphasizes that rendering is the process of converting a 3D scene into a 2D pixel image displayed on screen. It encourages students to complete a worksheet on rendering and the graphics pipeline, and provides a video tutorial and exercise on rendering textured 3D objects.
Importance of I/O devices,Types of input devices,keyboard
Pointing devices,Speech recognition,Digital camera
Webcam,Scanners,OCR,OMR,MICR,Bar-code reader
5 pen PC technology is one of the most awaiting tchnology in the world.
it is now under development stage by NEC CORPORATION (JAPAN company.)
by using these 5 pen,It will work as a computer,so no need to carry heavy laptops.
if any one want journal paper on his topic then comment here,I will mail to u.
This document provides step-by-step instructions for solving the last layer of a 3x3 Rubik's cube using a minimum number of formulas, without involving rotations of the B, D, E and S faces.
It begins by introducing permutation notation and orientation of the cube. Then it provides exercises to practice basic permutations without those faces. Next, it gives tips for solving the first two layers, focusing on matching edges and centers and forming crosses.
For the last layer, it categorizes possible cases as 1/9, 3/9, 4/9, 6/9 and 9/9 patterns. Formulas like FURUF', FRUF'U', RUR'U'R
The document is a collection of templates and graphics for presentations. It includes templates for slides on various topics like challenges and solutions, social media, and diagrams. The templates can be edited in PowerPoint and contain placeholders for text and graphics. The document also includes instructions for editing objects in PowerPoint, such as ungrouping objects and changing colors.
Erno Rubik invented the Rubik's Cube in the 1970s while teaching interior design in Hungary. A standard 3x3 cube has 6 colored sides with 43 quintillion possible configurations. The world record for solving a cube is under 12 seconds while blindfolded and multi-cube records also exist. Various YouTube tutorials provide guidance on solving the popular puzzle.
The document discusses the benefits of exercise for mental health. Regular physical activity can help reduce anxiety and depression and improve mood and cognitive functioning. Exercise boosts blood flow and levels of neurotransmitters and endorphins which elevate and stabilize mood.
Rubik's Cube is a 3D combination puzzle invented in 1974 by Hungarian sculptor Ernő Rubik. It took Rubik over a month to solve his own puzzle. The Rubik's Cube contains 26 miniature cubes that make up 6 central pieces that don't move, 12 edge pieces that show two colors, and 8 corner pieces that show three colors. There are over 43 quintillion possible permutations of a solved Rubik's Cube.
The document provides instructions for solving the Rubik's Cube using the CFOP method in 4 steps: [1] Make a cross on one side and align the edges with centers, [2] fill in the remaining slots between cross pieces one at a time by inserting corners and edges, [3] orient the last layer so the entire top side is one color, and [4] permute the top layer to complete the cube. It includes algorithms and notation for each step, such as making the white cross, inserting edge and corner pieces, orienting the last layer, and permuting the last layer to solve the cube.
O documento descreve a história do cubo mágico 3x3x3, suas características matemáticas e curiosidades, além de fornecer instruções passo a passo para resolvê-lo.
This document provides an overview of quantitative methods and statistics. It covers basic concepts like scales of measurement, population and sample, parameters and statistics. It distinguishes between descriptive and inferential statistics. Descriptive statistics involves collecting and presenting data, while inferential statistics draws conclusions about a population based on a sample. The document also discusses different types of data and scales of measurement including nominal, ordinal, interval and ratio scales. It provides examples to illustrate each scale of measurement. The course syllabus covers topics like probability, sampling, estimation, hypothesis testing, analysis of variance and decision trees.
This document defines discrete and continuous random variables and provides examples of each. It then focuses on discrete random variables and probability distributions. Specifically, it discusses the binomial probability distribution, giving its formula and providing examples of calculating binomial probabilities. It also discusses properties of the binomial distribution such as its shape and mean, and shows how binomial tables can be used to find probabilities.
10 lessons to become a successful entrepreneurCoolirisSlides
This document outlines 10 lessons for becoming a successful entrepreneur according to Soujanya Bhumkar, Co-Founder & CEO of Cooliris. The lessons are: having a great idea is only 5% of success - execution is 95%; focusing on the how, not the what or why, is key; user feedback is important for navigating the entrepreneurial journey; anticipating what the user will do 10 seconds before clicking is crucial; be aware of and adapt to changing conditions; your biggest competitor may be yourself when you look in the mirror; plan investments for both the present and future; high user engagement is more valuable than mass broadcasts these days; it's better to ask and possibly be told no than not ask at all
The document discusses various types of hair loss including:
- Androgenic alopecia (male and female pattern baldness) which is influenced by hormones and genetics.
- Alopecia areata which causes patchy hair loss and may result in complete baldness. It often affects children and young adults.
- Telogen effluvium which is a temporary form of hair thinning caused by a large number of hairs entering the resting phase at the same time.
- Treatments discussed include minoxidil, finasteride, hair transplants, and targeting the underlying cause for conditions like telogen effluvium.
The document discusses respect and its three components: respecting yourself, respecting others, and respecting the environment. It defines respect as thoughtfulness or consideration for feelings, wishes, rights, traditions, and belongings of oneself and others. Respecting yourself involves honoring your own emotions, skills, beliefs, and body. Respecting others means caring for others, embracing differences, communicating kindly, listening, and using good manners. Respecting the environment entails helping create a greener world and protecting nature and property.
This document is a guide to free resources for creating visually impressive presentations. It provides direct links to websites for free fonts, colors, icons, photos, backgrounds, charts, infographics, PSD/vector files, inspiration, and extras. The guide aims to provide creative people with everything they might need for their design process. It encourages using the resources to complement unique creativity and create designs for all to share.
You and I have wasted enough time on PowerPoint Presentations. It's a necessary evil, but there are much better ways to approach it. Based off a talk I gave @ APTS. Enjoy!
Your welcome email (or lack thereof) sets the tone for the email marketing relationship you have with your subscribers—make sure it's sending the right message!
Did you know that Tuesdays at 11am is one of the worst possible times to send your email campaigns? Stop relying on guesswork and hunches to drive your email marketing--you might be shooting yourself in the foot. Learn How to Tweak Your Email Messaging to Generate More Leads!
View full presentation here: http://www.hubspot.com/the-science-of-email-marketing/
Are you leveraging social proof to optimally boost leads and sales? Checkout out these tricks for harnessing current and past customer success (testimonials, star ratings, customer action shots, etc.) to drive more conversions.
You'll learn:
- What kinds of social proof aid conversion (and why)
- Common conversion-killing social proof cases to avoid
- When and where social proof matters on a landing page
- How to score/grade the quality of your social proof
- What elements make a highly persuasive testimonial (and how to get them)
BONUS: Learn my "CRAVENS" methodology -- a simple scorecard for measuring the quality of social proof to effectively persuade conversion. CRAVENS = Credible, Relevant, Attractive, Visual, Enumerated, Nearby [anxiety points], Specific.
Note: A "craven" is a chicken, quitter, scaredy cat, etc. The CRAVENS model focuses on leveraging social proof to strategically reduce anxiety (i.e. scaredy cat, abandonment tendencies) and in turn boost conversion. Get ready for some actionable social proof tips and some epic LOL cat slides! #RememberTheCravens (scaredy cats!)
>> Presented Aug 26, 2014 for an Unbounce Webinar.
Short link: http://j.mp/socialproofcrowebinar
Pitching Ideas: How to sell your ideas to othersJeroen van Geel
Learn how to convince others of your UX ideas by understanding them.
We are good in designing usable and engaging products and services. We understand the user's needs and have a toolkit with dozens of deliverables. But for some reason it remains difficult to sell an idea or concept to team members, managers or clients. After this session that problem will be solved!
Selling your ideas and convincing others is one of the most undervalued assets in our field. This ranges from convincing a colleague to use a certain design pattern to selling research to your boss and convincing a client to go for your concept. You can come up with the best ideas in the world, but if it is presented in the wrong way these ideas will die a lonely dead. This is sad, because everybody can learn how to bring a message across. The main thing is that you know what to pay attention to.
In this session I will take you on a journey through the world of presenting ideas. We will move through the heads of clients and your colleagues, learn what their thoughts and needs are. We will move to the core of your idea and into the world of psychology.
This document discusses solving a Rubik's cube using group theory. It introduces basic rotational moves of the cube faces and defines "Z moves" that swap corners or edges. It outlines a two stage process to solve the cube: 1) use Z and reflected moves to orient the corners correctly and 2) use similar moves to orient the edges while keeping corners fixed. While this method systematically solves the cube, it is not the fastest approach. The document also proves that a cube's orientation can be either even or odd, preventing a single swap without disassembly.
Rubiks Cube - Part 7 of The Mathematics of Professor Alan's Puzzle SquareAlan Dix
This document discusses solving a Rubik's cube using group theory. It introduces basic rotation moves of the cube faces and defines "Z moves" that swap corners or edges. It presents a two stage approach to solving the cube: 1) use Z moves to orient the corners correctly and 2) use Z moves to position the edges while keeping the corners fixed. However, it notes there are limitations due to even vs odd permutations and orientation of individual pieces that divide the cubes into many families, proving one cannot swap just two edges using these basic moves alone. The document provides an in-depth mathematical analysis of the cube and strategies for systematic solving.
Learn How To Do The Rubik's Cube In 3 Mins Or Less Using 7 Easy Steps With Sh...J. Skyler Fernandes
This is a tutorial on: How To Do The Rubik's Cube In 3 Mins Or Less Using 7 Easy Steps. It includes a new method for learning how to do the Rubik's Cube by phonetically remembering only four short algorithms, as well as various scenarios and walk through examples.
This document provides instructions for solving a Rubik's Cube in 3 stages - solving the first layer, solving the middle layer, and solving the final layer. It explains the different parts of the cube, basic turns and algorithms. For each stage, it lists the steps to complete that layer, with descriptions and diagrams of the moves and algorithms needed. The overall goal is to teach the layered method of solving the cube one layer at a time from bottom to top.
This document provides an introduction to solving a Rubik's cube while blindfolded. It assumes the reader already knows how to solve a cube normally. The method involves first memorizing the scrambled state of the cube, then solving it in small portions without looking. Corner orientation is explained first, using algorithms that twist 1-2 corners at a time. A second method uses more intuitive algorithms to twist multiple corners simultaneously. Edge orientation is then covered, outlining the criteria for a correctly oriented edge and restrictions during the permutation step. The document provides detailed instructions on memorization techniques and algorithms to complete the blindfolded solve in two main steps: orientation then permutation.
This document provides folding instructions to create a dollar koi fish origami sculpture. It consists of 14 steps beginning with orienting the dollar bill correctly and making precise folds. Subsequent steps involve mountain and valley folds to shape the head, body, fins, and tail of the koi fish. Pre-creasing and refolding techniques are used to sculpt details like the lips, eyes, and scales. The final steps refine the whiskers, fins, and overall shape to complete the koi fish sculpture.
The document discusses the logo of the Mathematical Association of America (MAA), which is an icosahedron. It begins by describing how to construct an icosahedron out of three rectangles placed along perpendicular axes. This construction leads to two questions: 1) Can the three rectangles be rearranged into the desired configuration without taking one apart? 2) How symmetrical is an icosahedron? Additional constructions are used to answer these questions by showing that the rectangles are linked together, preventing their rearrangement, and that the icosahedron has 60 orientation-preserving symmetries forming the alternating group on 5 symbols.
Taylor Swift: Conquering Fame, Feuds, and Unmatched Success | CIO Women MagazineCIOWomenMagazine
From country star to global phenomenon, delve into Taylor Swift's incredible journey. Explore chart-topping hits, feuds, & her rise to billionaire status!
The Evolution and Impact of Tom Cruise Long Hairgreendigital
Tom Cruise is one of Hollywood's most iconic figures, known for his versatility, charisma, and dedication to his craft. Over the decades, his appearance has been almost as dynamic as his filmography, with one aspect often drawing significant attention: his hair. In particular, Tom Cruise long hair has become a defining feature in various phases of his career. symbolizing different roles and adding layers to his on-screen characters. This article delves into the evolution of Tom Cruise long hair, its impact on his roles. and its influence on popular culture.
Follow us on: Pinterest
Introduction
Tom Cruise long hair has often been more than a style choice. it has been a significant element of his persona both on and off the screen. From the tousled locks of the rebellious Maverick in "Top Gun" to the sleek, sophisticated mane in "Mission: Impossible II." Cruise's hair has played a pivotal role in shaping his image and the characters he portrays. This article explores the various stages of Tom Cruise long hair. Examining how this iconic look has evolved and influenced his career and broader fashion trends.
Early Days: The Emergence of a Style Icon
The 1980s: The Birth of a Star
In the early stages of his career during the 1980s, Tom Cruise sported a range of hairstyles. but in "Top Gun" (1986), his hair began to gain significant attention. Though not long by later standards, his hair in this film was longer than the military crew cuts associated with fighter pilots. adding a rebellious edge to his character, Pete "Maverick" Mitchell.
Risky Business: The Transition Begins
In "Risky Business" (1983). Tom Cruise's hair was short but longer than the clean-cut styles dominant at the time. This look complemented his role as a high school student stepping into adulthood. embodying a sense of youthful freedom and experimentation. It was a precursor to the more dramatic hair transformations in his career.
The 1990s: Experimentation and Iconic Roles
Far and Away: Embracing Length
One of the first films in which Tom Cruise embraced long hair was "Far and Away" (1992). Playing the role of Joseph. an Irish immigrant in 1890s America, Cruise's long, hair added authenticity to his character's rugged and determined persona. This look was a stark departure from his earlier. more polished styles and marked the beginning of a more adventurous phase in his hairstyle choices.
Interview with the Vampire: Gothic Elegance
In "Interview with the Vampire" (1994). Tom Cruise long hair reached new lengths of sophistication and elegance. Portraying the vampire Lestat. Cruise's flowing blonde locks were integral to the character's ethereal and timeless allure. This hairstyle not only suited the gothic aesthetic of the film but also showcased Cruise's ability to transform his appearance for a role.
Mission: Impossible II: The Pinnacle of Long Hair
One of the most memorable instances of Tom Cruise long hair came in "Mission: Impossible II" (2000). His character, Ethan
Brian Peck Leonardo DiCaprio: A Unique Intersection of Lives and Legaciesgreendigital
Introduction
The world of Hollywood is vast and interconnected. filled with countless stories of collaboration, friendship, and influence. Among these tales are the notable narratives of Brian Peck and Leonardo DiCaprio. The keyword "Brian Peck Leonardo DiCaprio" might not immediately ring a bell for everyone. but the connection between these two figures in the entertainment industry is intriguing and significant. This article delves deep into their lives, careers, and the moments where their paths intersect. providing a comprehensive look at how their stories intertwine.
Follow us on: Pinterest
Early Life and Career Beginnings
Brian Peck: The Early Years
Brian Peck was born in New York City on July 29, 1960. From a young age, Peck exhibited a passion for the performing arts. He attended the Professional Children's School. which has a history of nurturing young talent in the arts. Peck's early career marked by a series of roles in television and film that showcased his versatility as an actor.
Peck's breakthrough came with his role in the cult classic "The Return of the Living Dead" (1985). His performance as Scuz, one of the punk rockers who releases a toxic gas that reanimates the dead. earned him a place in the annals of horror cinema. This role opened doors for Peck. allowing him to explore various facets of the entertainment industry. including writing and directing.
Leonardo DiCaprio: From Child Star to Hollywood Icon
Leonardo DiCaprio was born in Los Angeles, California, on November 11, 1974. His career began at a young age with appearances in television commercials and educational films. DiCaprio's big break came when he joined the cast of the popular sitcom "Growing Pains" (1985-1992). where he played the character Luke Brower.
DiCaprio's transition from television to film was seamless. He gained recognition for his role in "This Boy's Life" (1993) alongside Robert De Niro. This performance began a series of acclaimed roles. establishing DiCaprio as one of the most talented actors of his generation. His portrayal of Jack Dawson in James Cameron's "Titanic" (1997) catapulted him to global stardom. solidifying his status as a Hollywood icon.
Brian Peck Leonardo DiCaprio: Their Paths Cross
Collaborations and Connections
The keyword "Brian Peck Leonardo DiCaprio" signifies more than two names; it represents a fascinating connection in Hollywood. While their careers took different trajectories, their paths crossed in the 1990s. Brian Peck worked with DiCaprio on the set of the 1990s sitcom "Growing Pains." where DiCaprio had a recurring role. Peck appeared in a few episodes. contributing to the comedic and dynamic environment of the show.
Their professional relationship extended beyond "Growing Pains." Peck directed DiCaprio in several educational videos for the "Disneyland Fun" series. where DiCaprio's youthful charm and energy were evident. These early collaborations offered DiCaprio valuable experience in front of the camera. he
Sara Saffari: Turning Underweight into Fitness Success at 23get joys
Uncover the remarkable journey of Sara Saffari, whose transformation from underweight struggles to being recognized as a fitness icon at 23 underscores the importance of perseverance, discipline, and embracing a healthy lifestyle.
HD Video Player All Format - 4k & live streamHD Video Player
Discover the best video playback experience with HD Video Player. Our powerful, user-friendly app supports all popular video formats and codecs, ensuring seamless playback of your favorite videos in stunning HD and 4K quality. Whether you're watching movies, TV shows, or personal videos, HD Video Player provides the ultimate viewing experience on your device. 🚀
From Teacher to OnlyFans: Brianna Coppage's Story at 28get joys
At 28, Brianna Coppage left her teaching career to become an OnlyFans content creator. This bold move into digital entrepreneurship allowed her to harness her creativity and build a new identity. Brianna's experience highlights the intersection of technology and personal branding in today's economy.
Leonardo DiCaprio House: A Journey Through His Extravagant Real Estate Portfoliogreendigital
Introduction
Leonardo DiCaprio, A name synonymous with Hollywood excellence. is not only known for his stellar acting career but also for his impressive real estate investments. The "Leonardo DiCaprio house" is a topic that piques the interest of many. as the Oscar-winning actor has amassed a diverse portfolio of luxurious properties. DiCaprio's homes reflect his varied tastes and commitment to sustainability. from retreats to historic mansions. This article will delve into the fascinating world of Leonardo DiCaprio's real estate. Exploring the details of his most notable residences. and the unique aspects that make them stand out.
Follow us on: Pinterest
Leonardo DiCaprio House: Malibu Beachfront Retreat
A Prime Location
His Malibu beachfront house is one of the most famous properties in Leonardo DiCaprio's real estate portfolio. Situated in the exclusive Carbon Beach. also known as "Billionaire's Beach," this property boasts stunning ocean views and private beach access. The "Leonardo DiCaprio house" in Malibu is a testament to the actor's love for the sea and his penchant for luxurious living.
Architectural Highlights
The Malibu house features a modern design with clean lines, large windows. and open spaces blending indoor and outdoor living. The expansive deck and patio areas provide ample space for entertaining guests or enjoying a quiet sunset. The house has state-of-the-art amenities. including a gourmet kitchen, a home theatre, and many guest suites.
Sustainable Features
Leonardo DiCaprio is a well-known environmental activist. whose Malibu house reflects his commitment to sustainability. The property incorporates solar panels, energy-efficient appliances, and sustainable building materials. The landscaping around the house is also designed to be water-efficient. featuring drought-resistant plants and intelligent irrigation systems.
Leonardo DiCaprio House: Hollywood Hills Hideaway
Privacy and Seclusion
Another remarkable property in Leonardo DiCaprio's collection is his Hollywood Hills house. This secluded retreat offers privacy and tranquility. making it an ideal escape from the hustle and bustle of Los Angeles. The "Leonardo DiCaprio house" in Hollywood Hills nestled among lush greenery. and offers panoramic views of the city and surrounding landscapes.
Design and Amenities
The Hollywood Hills house is a mid-century modern gem characterized by its sleek design and floor-to-ceiling windows. The open-concept living space is perfect for entertaining. while the cozy bedrooms provide a comfortable retreat. The property also features a swimming pool, and outdoor dining area. and a spacious deck that overlooks the cityscape.
Environmental Initiatives
The Hollywood Hills house incorporates several green features that are in line with DiCaprio's environmental values. The home has solar panels, energy-efficient lighting, and a rainwater harvesting system. Additionally, the landscaping designed to support local wildlife and promote
Tom Cruise Daughter: An Insight into the Life of Suri Cruisegreendigital
Tom Cruise is a name that resonates with global audiences for his iconic roles in blockbuster films and his dynamic presence in Hollywood. But, beyond his illustrious career, Tom Cruise's personal life. especially his relationship with his daughter has been a subject of public fascination and media scrutiny. This article delves deep into the life of Tom Cruise daughter, Suri Cruise. Exploring her upbringing, the influence of her parents, and her current life.
Follow us on: Pinterest
Introduction: The Fame Surrounding Tom Cruise Daughter
Suri Cruise, the daughter of Tom Cruise and Katie Holmes, has been in the public eye since her birth on April 18, 2006. Thanks to the media's relentless coverage, the world watched her grow up. As the daughter of one of Hollywood's most renowned actors. Suri has had a unique upbringing marked by privilege and scrutiny. This article aims to provide a comprehensive overview of Suri Cruise's life. Her relationship with her parents, and her journey so far.
Early Life of Tom Cruise Daughter
Birth and Immediate Fame
Suri Cruise was born in Santa Monica, California. and from the moment she came into the world, she was thrust into the limelight. Her parents, Tom Cruise and Katie Holmes. Were one of Hollywood's most talked-about couples at the time. The birth of their daughter was a anticipated event. and Suri's first public appearance in Vanity Fair magazine set the tone for her life in the public eye.
The Impact of Celebrity Parents
Having celebrity parents like Tom Cruise and Katie Holmes comes with its own set of challenges and privileges. Suri Cruise's early life marked by a whirlwind of media attention. paparazzi, and public interest. Despite the constant spotlight. Her parents tried to provide her with an upbringing that was as normal as possible.
The Influence of Tom Cruise and Katie Holmes
Tom Cruise's Parenting Style
Tom Cruise known for his dedication and passion in both his professional and personal life. As a father, Cruise has described as loving and protective. His involvement in the Church of Scientology, but, has been a point of contention and has influenced his relationship with Suri. Cruise's commitment to Scientology has reported to be a significant factor in his and Holmes' divorce and his limited public interactions with Suri.
Katie Holmes' Role in Suri's Life
Katie Holmes has been Suri's primary caregiver since her separation from Tom Cruise in 2012. Holmes has provided a stable and grounded environment for her daughter. She moved to New York City with Suri to start a new chapter in their lives away from the intense scrutiny of Hollywood.
Suri Cruise: Growing Up in the Spotlight
Media Attention and Public Interest
From stylish outfits to everyday activities. Suri Cruise has been a favorite subject for tabloids and entertainment news. The constant media attention has shaped her childhood. Despite this, Suri has managed to maintain a level of normalcy, thanks to her mother's efforts.
The cats, Sunny and Rishi, are brothers who live with their sister, Jessica, and their grandmother, Susie. They work as cleaners but wish to seek other kinds of employment that are better than their current jobs. New career adventures await Sunny and Rishi!
3. Introduction
Basic History
he infamous Rubik’s Cube has been puzzling the minds of millions
since its creation in 1974. The originally dubbed “Magic Cube,” was
invented by a Hungarian Sculptor and professor of architecture
Erno Rubik. The toy was licensed by Rubik, and sold by Ideal Toy
Corp in 1980, and won the German Game of the Year for the Best
Puzzle of the year. As of January 2009, 350 million cubes have
been sold worldwide.
Objective
he goal of this instruction manual is to provide the basic tutorial
on how to properly solve the Rubik’s Cube. While you may not
solve the puzzle as quickly as Feliks Zemdegs of Australia (record
of 6.63 seconds), you will undoubtedly solve this daunting task
and have superior bragging rights over others.
WARNING
olving the Rubik’s Cube will undeniably cause stress to the individual
completing the task. This high level of stress may cause person to sweat
profusely, mutter under their breath, swear uncontrollably, and/or throw
the Cube or other foreign (possibly larger) objects across the room. Fear
not, this is all apart of the “fun” in the game.
4. Notations
There are 6 colors represented on the Rubik’s cube (one color per face side)
Terminology
Column 1
Column 2
Column 3
Block: an individual “cube”/peg on the Rubik’s Cube
Rows: Horizontal (3 blocks across)
Row 1 Columns: Vertical (3 blocks up & down)
Side: 3x3 blocks of the Rubik’s Cube
Row 2 Sides
Front:: side “facing” you Left: face front, side to the left
Up: top side Right: face front, side to the right
Row 3
Down: bottom side Back: side opposite of face
Rotation Methods
F= Front Fi=Front inverted
U= Up Ui= Up inverted
D= Down All Done Clockwise (CW) All Done Counter-Clockwise (CCW) Di= Down inverted
L= Left Li= Left inverted
R= Right Ri= Right inverted
Simplify Rotation Methods (if looking at cube from face side)
F: twist right-CW L: twist towards you Fi: twist left-CCW Li: twist away from you
U: twist right R: twist away from you Ui: twist left Ri: twist towards you
D: twist right Di: twist left
5. Step 1
Identify starting point: for simplicity sake, start on Green Side (Up Side)
DON’T KNOW HOW TO TELL WHICH SIDE IS WHICH?
—> The center block is key. This block never moves
Solve for Green Cross
The areas circled in yellow all make up the green cross.
These green pieces must be found first in order to com-
plete the rest of this side. (image 1)
1. Search for green pieces elsewhere on the Rubik’s Cu-
be. Since these pieces are all “middle” blocks they will
be in the same position (either middle block of a row or
column) on another side of the Rubik’s Cube.
In image 2, the down side is portrayed with a green
block in the right position. As noted, the red part of this
particular block is shown.
It is essential to note the other colors shown on that
particular block because these need to line up with its
colored face side as well.
The next step is shown in image 3, by rotating the
Down Side until the red blocks line up.
Last, rotate this Top Side (Red Side) clockwise twice so
the green/red block matches up with green face.
(image 4)
6. Step 1 Continued...
2. Locate the second green piece of the cross
This green piece is found on the Down Side of the Rubik’s Cube .
Note the white face of this block is also showing. (Image 5)
Rotate the Down side to the White face of the Rubik’s Cube.
(Image 6)
Rotate the white face side (front side) clockwise until green block
matches up with green face side (up side). (Image 7)
Image 7 also depicts our starting point for our next step in solving
our 3rd block of the green cross.
7. Step 1 Continued...
3. Locate the third green piece. (Image 7/8)
Rotate Front Side counter clockwise so green block is in the Row
3. (Image 9)
Rotate Down Side right so green/yellow block is on the yellow
face side. (Image 10)
Rotate front side (yellow side) clockwise twice so green block
n t
fro matches up with green face side.
When this occurs and the green/yellow block are in the right po-
sition but “inverted” (instead of green, green, yellow, yellow, we
see green, yellow, green, yellow) we must perform our first algo-
rithm. This step is repeated as many times as needed to get the
block in the right position
fro
n t Fi U Li Ui
Front inverted. Up. Left inverted. Up inverted
Here we get our desired result of our green/yellow
block in the correct orientation.
Algorithms used in this step:
Fi U Li Ui
8. Step 1 Continued...
2. Locate the fourth and final cross piece (Image 12)
As shown in image 12 the last green block is located on the down
side of the Rubik’s Cube. Also, note that orange is visible , yet al-
ready on the orange face side.
Rotate Front Side (orange face side) clockwise until orange/green
block lines up with green face side.
Again, use the algorithm demonstrated on page 7
Fi U Li Ui
Front inverted. Up. Left inverted. Up inverted
Note: Remember that the Rubik’s Cube
has over 43 quintillion possible combina-
tions. This in mind, your Rubik’s Cube
Here we have the final result of Step 1
may not start in the same orientation as
the one generated in this manual. How-
ever, the basic rules remain:
1. line up your colored cube in the
bottom row of it’s desired location
and in the same face as the other
color shown on that particular block.
2. If block is inverted when transferring Algorithms used in this step:
to its proper location use the algo-
rithm shown in this step to correct. Fi U Li Ui
9. Step 2
Solve Four Corners
1. Locate first green color corner block (Image 1)
Similar to step 1, line the block in the 3rd (bottom) row under
the desired position. Pay attention to the colors on the particu-
lar block shown: the white and red faces of this block are also
showing.
Rotate Down Side clockwise so block indicated is on the white/
red corner. (Image 2)
NOTE: the white face of the block does not need to be on the
white side just like the red face of the block does not need to be
on the red side.
Let Red Face side be Front Side.
Use the Algorithm:
Ri Di R D
Right inverted. Down inverted. Right. Down.
Repeat this algorithm as many times as needed to get the
green/red/white block up to the green face side (up side).
(Image 3)
Algorithms used in this step:
Ri Di R D
10. Step 2 Continued...
2. Locate the second corner block (Image 4)
Here the red and yellow faces of the block are visible.
Rotate the Down Side clockwise so the block indicated is on the
red/yellow corner. (Again, it is okay if the colors are inverted.)
Repeat algorithm shown on page 9 (refer to bottom right corner of
page).
Image 5 shows final position for the green, yellow, red block as
well as starting position for the third corner block
3. Locate the third corner block (Image 5)
Rotate to the yellow/orange corner
Repeat algorithm
4. Locate fourth and final corner block (Image 6)
Rotate to white/orange corner
Repeat algorithm
5. Green face complete! (Image 7)
But, if done correctly, the first row of all surround sides [except down
side/blue side) and middle block will be solved as well.
Algorithms used in this step:
Ri Di R D
11. Step 3
Flip Rubik’s Cube over so solved side( Green Side) is down -Blue Side up
Solve Row 2 Corner Pieces
1. Look for one of the 4 pieces (highlighted in image 1) that does
not have blue in it on both top and side levels.
Image 2 shows the only block of these 4 (shown in image 1) that
does not have any blue in any of its shown faces.
2. Rotate Up Side counter clockwise so yellow face of the red/
yellow block lines up with the yellow face side . The Yellow Side is
now Front Side. (Image 3)
As noted before, the red face of this block is on the Up Side.
The goal is to move this block, so its red face is on the Red Side
of the Rubik’s Cube. (Red Side is to the Left of the Yellow Side)
To do this, use the algorithm below to move the block to the
left
Ui Li U L U F Ui Fi
Up inverted. Left inverted. Up. Left. Up. Front. Up inverted. Front inverted
Image 4 shows the red/yellow block in its correct orientation
Algorithms used in this step:
Ui Li U L U F Ui Fi
12. Step 3 Continued...
1. Refer to the 4 top pieces again. (Image 5)
As shown in image 5 there is only one block that does not contain
blue.
As shown in image 6, both the orange and yellow face of this block
are visible.
2. Rotate Up Side clockwise twice so the yellow face of the block
matches up with the Yellow Side of the Rubik’s Cube. (Image 7)
From image 7, it is also noticeable that the Orange Side of the Ru-
bik’s Cube is to the right of the Yellow Side. Make Yellow Side
Front Side
3. To get this block to its yellow/orange row 2 corner the following
algorithm must be used.
U R Ui Ri Ui Fi U F
Up. Right. Up inverted. Right inverted. Up inverted. Front inverted. Up. Front
NOTE: This algorithm to move block to the right is the opposite of how to move
a block to the left.
Repeat these steps for the remaining 2 corner blocks. Remember
there are 2 different algorithms used to move the block to either
the right or left.
If done correctly row 2 and 3 should be completed on all 4 sides
Algorithms used in this step:
U R Ui R Ui Fi U F
13. Step 4
Solve Blue Cross
1. Once you have solved the first two layers (Row 2 and 3), you’re going to
have one of four different positions on the top Blue Side.
Option 1: center blue dot (Image 1)
Option 2: an L (Image 2)
Option 3: center line (Image 3)
Option 4: the cross (Image 4)
Note: if this is present, skip to next step
The goal is to solve this blue cross
2. Looking at this particular Rubik’s Cube, Option 3 is represented
(central line). Turn it so the line is horizontal. Let Red Side be Front Side,
Blue Side be Up Side. (Image 4)
3. Use the algorithm to complete this step:
F R U Ri Ui Fi
Front. Right. Up. Right Inverted. Up Inverted. Front Inverted.
If Option 1 and 2 are present, repeat this step
Algorithms used in this step:
F R U Ri Ui Fi
14. Step 5
Solve for Top Row , Center Block
Note the other colors visible on these four cross pieces.
(Images 1 & 2)
1. Rotate Up Side — at least two of these color blocks will
match up with their coordinating color sides
(Images 3 & 4)
2. For this manual, all sides lined up, but if this is not the
case hold the cube so one of the matched up sides is
directly opposite from you (Back Side) and the other is
in your right hand.
Use the algorithm:
R U Ri U R U U Ri
Right. Up. Right Inverted. Up. Right. Up. Up. Right Inverted.
One final twist of the Up Side should line up all these
top centered-blocks with their appropriate color sides
Sometimes, the two sides that line up are opposite one
another. When this occurs hold the cube so one is in
the Front Face and the other is in the Back Face and do
the algorithm shown above and repeat.
As a result, the center block of Row 1 on all four faces
(Front, Back, Right, Left) should be lined up with their
matching face colors
Algorithms used in this step:
R U Ri U R U U Ri
15. Step 6
Solve for Corner Pieces
Look at 4 corners and find one that is in the correct loca-
tion. (Image 1)
NOTE: the white face of the block does not need to be on the white
side just like the red face of the block does not need to be on the
red side.
Use the algorithm to get the four corner pieces in the ap-
propriate location. (Let Blue Side be Up Side)
Should not have to repeat this step more than twice.
U R Ui Li U Ri Ui L
Up. Right. Up Inverted. Left Inverted. Up. Right Inverted. Up Inverted. Left.
Images 2-5 show the finished product of this step
Algorithms used in this step:
U R Ui Li U Ri Ui L
16. Step 1 Continued...
Solve Four Corners
1. Look at the 4 corner pieces.
NOTE: In this manual the red/white/blue corner piece in already in
the correct orientation (skip down to #2 )
The corner you are solving for should be in the right corner
Use the algorithm previously shown in Step 2:
Ri Di R D
Right inverted. Down inverted. Right. Down.
(Repeat as many times as needed)
2. Once this is in the correct location, rotate ONLY the Up Side to
move the next unsolved block to the bottom right corner.
3. IT MAY APPEAR THAT YOU ARE MESSING UP EVERYTHING YOU
HAVE ALREADY DONE BUT IT WILL COME TOGETHER IN THE END.
4. When you have adjusted all 4 corners you will notice you are just
one/ two turns away from solving your first Rubik’s Cube
Twist Up Side and Celebrate with your Victory Dance