Qt4 App - Sliding Window
•
3 likes•3,433 views

Show how to use Qt4 flick effect (kinetic list).

Recommended
More Related Content
Similar to Qt4 App - Sliding Window
Similar to Qt4 App - Sliding Window (20)
More from William Lee
More from William Lee (20)
Recently uploaded
Recently uploaded (20)
Qt4 App - Sliding Window
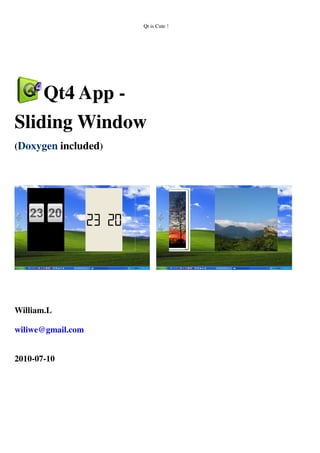
- 1. Qt is Cute ! Qt4 App - Sliding Window (Doxygen & Qt 5 Porting Guide included) William.L wiliwe@gmail.com 2010-07-10 (2015-09-10 update)
- 2. Qt is Cute ! Index About Sliding Window.......................................................................................................................................... 3 Kinetic Scrolling............................................................................................................................................ 3 Development Environment .................................................................................................................................. 6 Qt 4.6.2 SDK.................................................................................................................................................. 6 Linux – Ubuntu...................................................................................................................................... 6 Microsoft Windows................................................................................................................................. 7 Qt Creator 2.0................................................................................................................................................ 8 Linux – Ubuntu...................................................................................................................................... 8 Microsoft Windows................................................................................................................................11 Build & Run......................................................................................................................................................... 14 Document Generator <1> - QDoc...................................................................................................................... 16 Configuration File....................................................................................................................................... 16 Document Generator <2> - Doxygen ................................................................................................................ 18 Tools.............................................................................................................................................................. 19 Configuration File....................................................................................................................................... 20 Documenting the Code ............................................................................................................................... 24 Special Command ............................................................................................................................... 24 Putting documentation after members ............................................................................................. 27 Documentation at other places .......................................................................................................... 30 Generate Diagrams/Graphs....................................................................................................................... 32 Sliding Window Internals................................................................................................................................... 34 Porting to Qt5...................................................................................................................................................... 41 Reference ..................................................................................................................................................... 42 Resources ............................................................................................................................................................. 43
- 3. Qt is Cute ! About Sliding Window For MeeGo’s Pre-Alpha Tablet UX (June, 2010)(as below figures), there has some applicatoins categorized into separated pane(widget) in home screen. (left figure is from Wikipedia: http://en.wikipedia.org/wiki/File:MeeGo_Tablet_Computex_2010.png ) Cause to that the screen is too small to show all applications, so MeeGo provides a navigation method for users to browse widgets beyond screen. This method is the same as Flick gesture in Apple iOS and is call Flick List, Kinetic List or Kinetic Scrolling. A video on Youtube shows this new UI and its operation is as below link : https://www.youtube.com/watch?v=MdYTV4fnCGA Kinetic Scrolling Kinetic scrolling is the combination of regular, drag-finger-on-screen scrolling with an additional movement after the finger is lifted off the screen. Based on how fast the finger was dragged on the screen, the duration, speed and deceleration of the additional movement can vary. A notable difference from using a scrollbar is that when tapping and dragging, the list moves in the same direction that the user is dragging in, which is the opposite of how a scrollbar works. For a scrollbar, when one drags down the list moves up, for kinetic scrolling when one drags down, the list also moves down – it feels more natural this way. Download example from GitHub: https://github.com/wiliwe/qt4-sliding-window.git Using Git tool (http://git-scm.com/downloads) to fork this repo: git clone https://github.com/wiliwe/qt4-sliding-window.git
- 4. Qt is Cute ! How does it work? Note that here using mouse device to test kinetic scrolling. Kinetic Scrolling can be viewed as the combination of two features, it can be implemented in two steps. <Step1 - Click & Drag scrolling> It can be achieved by installing an event filter and intercepting mouse press, move and release events: * When a press event is received the scrolling starts * When a move event is received the list is scrolled * When a release event is received the scrolling stops. To avoid accidental clicks, all the events are blocked inside the filter function. Consuming the mouse events is a necessary step that leads to an unpleasant problem: regular clicks are no longer registered by the target list. This issue can be avoided by making the algorithm guess when the user is clicking and dragging as opposed to when they’re just clicking to select an item in the list. In the implementation a press & release event sequence is considered a click when it has less than five move events in between. Personal experiments have shown that a finger tap is much less precise than a pointer click, with one to four move events received between the time the finger is pressed on the screen and then lifted. By the time the scroller has figured out that the user wanted to tap the screen, the events have already been consumed. To get around this last obstacle, the scroller records the screen position of the last press event and simulates a mouse click at that position. Finally, by tracking mouse move events and updating the scrollbar position, the scroller makes the item list follow the user’s finger. Implementing this first part of the algorithm allows Qt application users to scroll much easier than with scrollbars. <Step2 -Kinetic(accelerate) scrolling> The second step makes scrolling more visually interesting and easier to do, especially on longer lists. For step two, the scroller continues to scroll the list automatically after the user has lifted their finger off the screen, gradually slows down and then stops. To display a pleasing effect, the scroller must decide 1)how fast to scroll, 2)how far to scroll and 3)how fast to slow down. A good starting point is "how fast to scroll". In physics velocity represents the direction in which and magnitude by which an object changes its position. Speed is another word for magnitude in this context. The "how fast to scroll" question can be answered by recording the cursor’s drag velocity on the screen. A simple but imprecise way to do this is to poll the cursor position at specific time intervals; the difference in positions represents the speed (measured in pixels/timer interval) and the mathematical sign of the difference represents the direction. This algorithm will give a good enough idea on whether the cursors is moving fast or slow and it is popular enough, since it can be found in other implementations such as Sacha Barber’s Scrollable canvas (http://sachabarbs.wordpress.com/2009/03/28/scrollable-friction-canvas-for-silverlight/).
- 5. Qt is Cute ! Next up is "how far to scroll". How far is actually connected to how fast to slow down because the list is scrolled with a certain velocity and then it decelerates until it stops. Since the velocity has previously been established, the only thing left is to calculate the deceleration based on friction. In physics, kinetic friction is the resistance encountered when one body is moved in contact with another. Of course, there can be no friction between pixels, but kinetic scrolling is a simulation and one can pretend that the list items are moving over the list container and that this movement generates friction. In reality friction is calculated based on the nature of the materials, mass, gravitational force and so on. In the simulation a numeric value is used to alter the speed of scrolling. Having determined the deceleration, "how far" the list scrolls kinetically is simply a function of the time that it needs to reach a speed of zero. More detailed information about implementation of kinetic scrolling could be found in links: * http://developer.nokia.com/community/wiki/Qt_Kinetic_scrolling_-_from_idea_to_implementation * http://developer.nokia.com/community/wiki/File:QsKineticScroller.zip (example source code) In Qt 4.6.2 SDK source codes, there has two examples demostrating kinetic list: This program uses FlickCharm to achieve flick effect. Besides, it could use Qt QTimeLine from Qt Animation Framework to achieve sliding effect.. Qt Animation Framework is from Kinetic project: http://blog.qt.digia.com/blog/2008/11/06/welcome-to-kinetic/ Here having a slide introducing Qt Animation Framework: http://www.slideshare.net/wiliwe/qt-animation Qt Graphics Dojo(道場) provide examples using QTimeLine to achieve sliding effect for Parallax Slide. Here having demo video : https://www.youtube.com/watch?v=F4IxS6RdWAc The Qt Parallax Slide examples download links are list under “Parallax Sliding/Scrolling” item of Reference of this document. FlickCharm # https://qt.gitorious.org/qt-labs/graphics-dojo/source/8000ca3b229344ed2ba2ae81ed5ebaee86e9d63a:flickcharm Flickable # https://qt.gitorious.org/qt-labs/graphics-dojo/source/8000ca3b229344ed2ba2ae81ed5ebaee86e9d63a:flickable # Qt-4.6.2-SDK-Install-Path/demos/embedded/flickable
- 6. Qt is Cute ! Development Environment The original environment for the development of this Qt application is as below: Microsoft Windows XP sp3 Microsoft Visual Studio 2008 Operating System Linux Ubuntu 9.10 Qt SDK 4.6.2 Qt Creator 2.0 Qt 4.6.2 SDK Here using static-link way to build Qt applications, so it needs to configure SDK to be static-linking Linux – Ubuntu 1) Download Qt 4.6.2 SDK source code archive, , from Qt official site: http://download.qt-project.org/archive/qt/4.6/ 2) Decompress and extract source codes to your user home directory. 3) In console, change directory to the SDK source folder and execute GNU Autoconf script configure. For 32-bit O.S, use parameters: "-v" for showing verbose message. For 64-bit O.S, use parameters: 4) After configuration is done, following message on console to run make or gmake to build(compile) SDK source. 5) After successful building, run make install command to install SDK libraries in super user mode. ./configure -v ./configure -v -platform linux-g++-64
- 7. Qt is Cute ! The default Qt SDK installation path is: /usr/local/Trolltech/<Qt-Version> For Qt 4.6.2 SDK, the default installation path is: /usr/local/Trolltech/4.6.2 Finally, modify user session profiles to add the path to Qt SDK binary file for searching Qt inbuilt tools(such as qmake, qdoc3, etc) to the environment variable PATH. The feasible user session profiles are shown as below and the Linux system will search profiles in the following order: 1) $HOME/.bash_profile 2) $HOME/.bash_login 3) $HOME/.profile . The line to be added into profiles is as below. Microsoft Windows 1) Download Qt 4.6.2 SDK source code archive, , from Qt official site: http://download.qt-project.org/archive/qt/4.6/ 2) Run qt-win-opensource-4.6.2-vs2008.exe to start to install Qt 4.6.2 SDK. export PATH = $PATH: /usr/local/Trolltech/4.6.2/bin
- 8. Qt is Cute ! Qt Creator 2.0 Qt Creator is a cross-platform IDE (integrated development environment) tailored to the needs of Qt developers. It is part of the Qt Project ( http://qt-project.org ) . Linux – Ubuntu Download & Install Qt Creator 2.0 1) Download Qt Creator 2.0 to your home directory: [32-bit] http://download.qt-project.org/archive/qtcreator/2.0/qt-creator-linux-x86-opensource-2.0.0.bin [64-bit] http://download.qt-project.org/archive/qtcreator/2.0/qt-creator-linux-x86_64-opensource-2.0.0.bin 2) In your home directory , add “executable” mode of Qt Creator 2.0 by running command: chmod +x qt-creator-linux-x86-opensource-2.0.0.bin or chmod +x qt-creator-linux-x86_64-opensource-2.0.0.bin 3) To invoke installation wizard by running ./qt-creator-linux-x86-opensource-2.0.0.bin or ./ qt-creator-linux-x86_64-opensource-2.0.0.bin and follow instructions to finish installation. Invoke Qt Creator 2.0 In desktop application menu, click Application -> Development -> Qt Creator
- 9. Qt is Cute ! Congiure to use Qt 4.6.2 SDK in Qt Creator 1) In Qt Creator, click menu item Tools -> Options to pop up Options dialogue. 2) Click the button with plus sign.
- 10. Qt is Cute ! 3) Enter “4.6.2 ” in Version name field and input the path to qmake executable in qmake location field. Find the lcoation of qmake tool using which or locate (it is better to run updatedb command in super user mode first) command.
- 11. Qt is Cute ! Finally, click Rebuild button and it will show GREEN check if it build successfully. Microsoft Windows Download & Install Qt Creator 2.0 Download Qt Creator 2.0 for Microsoft Windows: http://download.qt-project.org/archive/qtcreator/2.0/qt-creator-win-opensource-2.0.0.exe Double click downloaded file to start install progress. Look! On Microsoft Windows, if you want to use VS2008 version of Qt Creator, it is better to install Visual Studio before installing Qt Creator.
- 12. Qt is Cute ! Invoke Qt Creator 2.0 Click Start -> Qt Creator by Nokia v2.0.0 (open source) -> Qt Creator Congiure to use Qt 4.6.2 SDK in Qt Creator 1) In Qt Creator, click menu item Tools -> Options to pop up Options dialogue. 2) Click the button with plus sign, enter “4.6.2 ” in Version name field, input the path to qmake executable in qmake location field and select the verion of Microsoft Visual Studio in Toolchain field.
- 13. Qt is Cute ! Sometimes, it might happen that the QtCreator shows “The process could not be started!”(shown as below snapshot) error message when building successfully and run the built program. To solve this problem, it could set “Build directory” in Projects -> Build Settings dialog.
- 14. Qt is Cute ! Build & Run Using QtCreator to open Qmake project file(.pro) or changing to the place where having Qmake project file and run command qmake and then run make to build Sliding Window program. In the Qmake project file, there may have DEFINES variable for adding or removing some funcationalities: 1> Add page number for graphical item 2> Let Sliding Window window be transparent 3> Show control panel to control item movement. Below figures show the effect of transparent and opaque window frame of Widget and GraphicView sliding window in Microsoft Windows XP and Linux Ubuntu operating system. <Windows XP> Transparent Frame Opaque Frame
- 15. Qt is Cute ! <Ubuntu> Need to install and turn on Compiz (a compositing windows manager). Transparent Frame Opaque Frame Images with page number.
- 16. Qt is Cute ! Document Generator <1> - QDoc QDoc is an internal tool for Qt Project to document the Qt sources, NOT to be used for external projects. It works by extracting QDoc comments from project source files and then formatting these comments as HTML pages or DITA XML (http://en.wikipedia.org/wiki/Darwin_Information_Typing_Architecture) documents. A QDoc comment always begins with an exclamation mark ( ! ). QDoc finds QDoc comments in .cpp files and in .qdoc files but NOT in .h files. QDoc interprets three types of commands: * Topic Commands http://doc-snapshot.qt-project.org/qdoc/13-qdoc-commands-topics.html * Context Commands http://doc-snapshot.qt-project.org/qdoc/14-qdoc-commands-contextcommands.html * Markup Commands http://doc-snapshot.qt-project.org/qdoc/03-qdoc-commands-markup.html Configuration File Before running QDoc, you must create a QDoc configuration file(whose extension is ".qdocconf") to tell QDoc where to find the source files that contain the QDoc comments. The pathname to your configuration file is passed to QDoc on the command line: qdoc ./config.qdocconf The environment variable PATH should be set properly so the system could find the path to qdoc for execution. The configuration file is a list of entries of the form "variable = value". Using the configuration variables, you can define where QDoc should find the various source files, images and examples, where to put generated documentation etc. The configuration file can also contain directives like include. The value of a configuration variable can be set using either '=' or '+='. The difference is that '=' overrides the previous value, while '+=' adds a new value to the current one. QDoc Configuration Variables * General Variables http://doc-snapshot.qt-project.org/qdoc/22-qdoc-configuration-generalvariables.html * C++ Specific Variables http://doc-snapshot.qt-project.org/qdoc/23-qdoc-configuration-cppvariables.html
- 17. Qt is Cute ! A minimal QDoc configuration file is as below. For compatibility with older versions of Qt, it is recommended to include compat.qdocconf. The image files can be found in the underlying directory "images". Ref: http://doc-snapshot.qt-project.org/qdoc/qdoc-guide-conf.html QDoc will export a Qt Help Project file, in a .qhp file. The .qhp file is then used by the qhelpgenerator to package the documentation into a .qhp file. Qt Creator and Qt Assistant reads the qch file to display the documentation. Qt Help Project - http://qt-project.org/doc/qt-4.8/qthelpproject.html #include(compat.qdocconf) project = pfa versionsym = version = 1.0 language = Cpp outputdir = html headerdirs = . sourcedirs = . exampledirs = . imagedirs = ./images
- 18. Qt is Cute ! Document Generator <2> - Doxygen When viewing source codes written by others or sharing codes to others, it would be better for readers if there have documents to comment or explain codes and show architecture(relationship of each part, such as files, modules, packages, functions, classes, in codes) using graph or diagram. This may let readers get idea (overview, a big map/picture) of codes quickly. There have many tools to generate documents of source codes by adding special markings in comment blocks, this kind of tool is called Document Generator. For a programmer, if he or she can add comments while coding, the work to document codes could be accomplished when code is done, it would save much time compared to that adding comments after code is done. Comments about code's implementation are called Implementation comments. Comments describe the specification of the code, from an implementation-free perspective to be read by developers who might not have the source code at hand, are called Documentation comments. Tools such as JavaDoc, Doxygen, DOC++, Qt Qdoc(for Qt Project itself only) are well-known. Doxygen is used to generate documents for Icon Chooser program.. Doxygen (http://www.doxygen.org/) is for generating documentation from annotated C++ sources, but it also supports other popular programming languages such as C, Objective-C, C#, PHP, Java, Python, IDL (Corba, Microsoft, and UNO/OpenOffice flavors), Fortran, VHDL, Tcl, and to some extent D. It runs on most Unix systems as well as on Windows and Mac OS X. Doxygen is written in Qt (http://qt-project.org/). Initially doxygen was specifically designed to be used for projects that make use of Troll Tech’s Qt toolkit. So it is ‘Qt-compatible’: doxygen can read the documentation contained in the Qt source code and create a class browser that looks quite similar to the one that is generated by Troll Tech. Doxygen understands the C++ extensions used by Qt such as signals and slots and many of the markup commands used in the Qt sources. How did the name "Doxygen" come from? From Doxygen FAQ of the official site, its solution is that: " Doxygen got its name from playing with the words documentation and generator. At the time I was looking into lex and yacc, where a lot of things start with "yy", so the "y" slipped in and made things pronounceable (the proper pronouncement is Docs-ee-gen, so with a long "e")." Doxygen FAQ link: http://www.stack.nl/~dimitri/doxygen/manual/faq.html It can generate an on-line documentation browser (in HTML) and/or an off-line reference manual (in LATEX) from a set of documented source files. There is also support for generating output in RTF (MS-Word), PostScript, hyperlinked PDF, compressed HTML(.chm), and Unix man pages. The documentation is documentation -> docs -> dox generator -> gen
- 19. Qt is Cute ! extracted directly from the sources, which makes it much easier to keep the documentation consistent with the source code. The following figure shows the relation between the tools and the flow of information between them. ( From doxygen site - http://www.stack.nl/~dimitri/doxygen/manual/starting.html ) Doxygen looks at the file's extension to selects the proper parser to parse a file. Extension types recognized by doxygen is listed in http://www.stack.nl/~dimitri/doxygen/manual/starting.html Tools The executable doxygen is the main program that parses the sources and generates the documentation.
- 20. Qt is Cute ! To generate a manual for your project you typically need to follow these steps: <1> Document your source code with special documentation blocks , or called special command blocks. See http://www.stack.nl/~dimitri/doxygen/manual/docblocks.html <2> Generate a template configuration file by running doxygen with the -g option: <3> Edit the configuration file so it matches your project. In the configuration file you can specify the input files and a lot of optional information. <4> Let doxygen generate the documentation, based on the settings in the configuration file. The default output directory is the directory in which doxygen is started. <5> If you have a configuration file generated with an older version of doxygen, you can upgrade it to the current version by running doxygen with the -u option. All configuration settings in the original configuration file will be copied to the new configuration file. Any new options will have their default value. Note that comments that you may have added in the original configuration file will be lost. More detailed information about doxygen tool is here: http://www.stack.nl/~dimitri/doxygen/manual/doxygen_usage.html Optionally, the doxywizard tool which is a graphical front-end written in Qt can be used for editing the configuration file that is used by doxygen and for running doxywizard in a graphical environment. More detailed usage information about doxywizard is here: http://www.stack.nl/~dimitri/doxygen/manual/doxygen_usage.html Configuration File A configuration file is a free-form ASCII text file with a structure that is similar to that of a Makefile, with the default name Doxyfile. It is parsed by doxygen tool. The file essentially consists of a list of assignment statements. * Each statement consists of a TAG_NAME written in capitals, followed by the equal sign (=) and one or more values. * If the same tag is assigned more than once, the last assignment overwrites any earlier assignment. * For tags that take a list as their argument, the += operator can be used instead of = to append new values to the list. * Values are sequences of non-blanks. doxygen -g <config_file> doxygen <config_file> doxygen -u <config_file>
- 21. Qt is Cute ! * If the value should contain one or more blanks it must be surrounded by quotes ("..."). Multiple lines can be concatenated by inserting a backslash () as the last character of a line. * Environment variables can be expanded using the pattern $(ENV_VARIABLE_NAME). * The statements in the file are case-sensitive. The file may contain tabs and newlines for formatting purposes. The default encoding used for all characters in the configuration file is UTF-8 and it could be changed by setting the tag DOXYFILE_ENCODING. Doxygen uses libiconv (or the iconv built into libc) for transcoding. See http://www.gnu.org/software/libiconv for the list of possible encodings. Here listing some tags usually used in project: Tag Name Description Default Value Depending Tag PROJECT_NAME A single word (or a sequence of words surrounded by double-quotes) that should identify the project. PROJECT_NUMBER Project or revision number PROJECT_BRIEF To provide an optional one line description for a project that appears at the top of each page and should give viewer a quick idea about the purpose of the project. OUTPUT_DIRECTORY To specify the (relative or absolute) path into which the generated documentation will be written. OUTPUT_LANGUAGE To specify the language in which all documentation generated by doxygen is written. English INPUT To specify the files and/or directories that contain documented source files. You may enter file names like myfile.cpp or directories like /usr/src/myproject. Separate the files or directories If this tag is empty the current directory is searched.
- 22. Qt is Cute ! with spaces. RECURSIVE Be used to specify whether or not subdirectories should be searched for input files as well. No EXTRACT_ALL Assume all entities in documentation are documented, even if no documentation was available. No EXTRACT_ANON_NSPACES Include the members of anonymous namespaces No EXTRACT_LOCAL_CLASSES Include classes (and structs) defined locally in source files. Yes EXTRACT_LOCAL_METHODS Include local methods, which are defined in the implementation section but not in the interface No EXTRACT_PRIVATE Include private members of a class No EXTRACT_STATIC Include static members of a class No SORT_MEMBER_DOCS Sort the (detailed) documentation of file and class members alphabetically by member name. Yes GENERATE_HTML Generate HTML output Yes HTML_HEADER HTML_FOOTER A footer typically contains the author of the document, copyright information, links to terms of use, contact information, etc. HTML_OUTPUT Specify output folder HTML_FILE_EXTENSION Specify the file extension .html GENERATE_TREEVIEW No GENERATE_HTM L HAVE_DOT To use dot tool to generate diagrams and graphs No CALL_GRAPH Generate a call dependency graph for every global function or class method. No HAVE_DOT
- 23. Qt is Cute ! For a small project consisting of a few C and/or C++ source and header files, you can leave INPUT tag empty and doxygen will search for sources in the current directory. If you have a larger project consisting of a source directory or tree you should assign the root directory or directories to the INPUT tag, and add one or more file patterns to the FILE_PATTERNS tag (for instance *.cpp *.h). Only files that match one of the patterns will be parsed (if the patterns are omitted a list of source extensions is used). For recursive parsing of a source tree you must set the RECURSIVE tag to YES. If you start using doxygen for an existing project (thus without any documentation that doxygen is aware of), you can still get an idea of what the structure is and how the documented result would look like. To do so, you must set the EXTRACT_ALL tag in the configuration file to YES. Then, doxygen will pretend everything in your sources is documented. Please note that as a consequence warnings about undocumented members will not be generated as long as EXTRACT_ALL is set to YES. If the EXTRACT_ALL option is set to NO in the configuration file (the default), then doxygen will only generate documentation for documented members, files, structs, classes and namespaces. To analyze an existing piece of software it is useful to cross-reference a (documented) entity with its definition in the source files. Doxygen will generate such cross-references if you set the SOURCE_BROWSER tag to YES. It can also include the sources directly into the documentation by setting INLINE_SOURCES to YES (this can be handy for code reviews for instance). CALLER_GRAPH Generate a caller dependency graph for every global function or class method No GENERATE_LEGEND Yes GRAPHICAL_HIERARCHY Yes DIRECTORY_GRAPH Yes UML_LOOK No UML_LIMIT_NUM_FIELDS Threshold limits the number of items for each type to make the size more manageable. Set this to 0 for no limit. Minimum value: 0 Maximum value: 100 10 CLASS_GRAPH Yes COLLABORATION_GRAPH Yes GENERATE_LATEX Yes
- 24. Qt is Cute ! More detailed usage information about configuration file is here: http://www.stack.nl/~dimitri/doxygen/manual/config.html Documenting the Code For members, structs, classes and namespaces there are basically two options to document codes: 1. Place a special documentation block in front of the declaration or definition of the member, struct, class or namespace. For file, struct, class and namespace members it is also allowed to place the documentation directly after the member. 2. Place a special documentation block somewhere else (another file or another location) and put a structural command in the documentation block. A structural command links a documentation block to a certain entity that can be documented (e.g. a member, struct, class, namespace or file). Files can only be documented using the second option, since there is no way to put a documentation block before a file. Of course, file members (functions, variables, typedefs, defines) do not need an explicit structural command; just putting a special documentation block in front or behind them will work fine. The text inside a special documentation block is parsed before it is written to the HTML and/or LaTeX output files. During parsing the following steps take place: * Markdown formatting is replaced by corresponding HTML or special commands. * The special commands inside the documentation are executed. * If a line starts with some whitespace followed by one or more asterisks (*) and then optionally more white space, then all whitespace and asterisks are removed. * All resulting blank lines are treated as a paragraph separators. This saves you from placing new-paragraph commands yourself in order to make the generated documentation readable. * Links are created for words corresponding to documented classes (unless the word is preceded by a %; then the word will not be linked and the % sign is removed). * Links to members are created when certain patterns are found in the text. This link is called Automatic Link ( http://www.stack.nl/~dimitri/doxygen/manual/autolink.html .) * HTML tags that are in the documentation are interpreted. More information could be found in http://www.stack.nl/~dimitri/doxygen/manual/htmlcmds.html . The following doxygen documenting commands are used in comment blocks for C-like languages(C, C++, C#, Objective-C, PHP, Java). Special Command A special documentation block is a C or C++ style comment block with some additional markings, so doxygen knows it is a piece of documentation that needs to end up in the generated documentation.
- 25. Qt is Cute ! For each code item there are two (or in some cases three) types of descriptions, which together form the documentation: a brief description and detailed description, both are optional. For methods and functions there is also a third type of description, the so called ”in body” description, which consists of the concatenation of all comment blocks found within the body of the method or function. Having more than one brief or detailed description is allowed (but NOT recommended, as the order in which the descriptions will appear is not specified). As the name suggest, a brief description is a short one-liner, whereas the detailed description provides longer, more detailed documentation. An ”in body” description can also act as a detailed description or can describe a collection of implementation details. For the HTML output brief descriptions are also use to provide tooltips at places where an item is referenced. There are several ways to mark a comment block as a detailed description: <1> JavaDoc style <2> Qt style(e.g. Qdoc, ) In both cases the intermediate * (asterisk)’s are optional, so below example is also valid. <3> A block of at least two C++ comment lines, where each line starts with an additional slash or an exclamation mark. or /** * ... text ... */ /*! * ... text ... */ /*! ... text ... */ /// /// ... text ... /// //! //! ... text ... //!
- 26. Qt is Cute ! <4> To make their comment blocks more visible in the documentation. (note the 2 slashes to end the normal comment block and start a special comment block) or For the brief description there are also several possibilities: <1> One could use the brief command with one of the above comment blocks. This command ends at the end of a paragraph, so the detailed description follows after an empty line. <2> If JAVADOC_AUTOBRIEF is set to YES in the configuration file, then using JavaDoc style comment blocks will automatically start a brief description which ends at the first dot followed by a space or new line. The option has the same effect for multi-line special C++ comments: <3> To use a special C++ style comment which does not span more than one line. /********************************************//** * ... text ***********************************************/ ///////////////////////////////////////////////// /// ... text ... ///////////////////////////////////////////////// /*! brief Brief description. * Brief description continued. * * Detailed description starts here. */ /** Brief description which ends at this dot. Details follow * here. */ /// Brief description which ends at this dot. Details follow /// here. /// Brief description. /** Detailed description. */
- 27. Qt is Cute ! or (Note the blank line in the last example, which is required to separate the brief description from the block containing the detailed description. The JAVADOC_AUTOBRIEF should also be set to NO for this case.) If you have multiple detailed descriptions(as below example), they will be joined. Note that this is also the case if the descriptions are at different places in the code! In this case the order will depend on the order in which doxygen parses the code. Furthermore, if there is one brief description before a declaration and one before a definition of a code item, only the one before the declaration will be used. If the same situation occurs for a detailed description, the one before the definition is preferred and the one before the declaration will be ignored. Unlike most other documentation systems, doxygen also allows you to put the documentation of members (including global functions) in front of the definition. This way the documentation can be placed in the source file instead of the header file. This keeps the header file compact, and allows the implementer of the members more direct access to the documentation. Putting documentation after members If you want to document the members of a file, struct, union, class, or enum, it is sometimes desired to place the documentation block after the member instead of before. For this purpose you have to put an additional < marker in the comment block. Note that this also works for the parameters of a function. (This block can be used to put a Qt style detailed documentation block after a member.) or //! Brief descripion. //! Detailed description //! starts here. //! Brief description, which is //! really a detailed description since it spans multiple lines. /*! Another detailed description! */ int var; /*!< Detailed description after the member */ int var; /**< Detailed description after the member */
- 28. Qt is Cute ! or or Most often one only wants to put a brief description after a member. This is done as follows: or For functions one can use the @param command to document the parameters and then use [in], [out], [in,out] to document the direction. For inline documentation this is also possible by starting with the direction attribute, e.g. Note that these blocks have the same structure and meaning as the special comment blocks, only the < indicates that the member is located in front of the block instead of after the block. [Warning] These blocks can only be used to document members and parameters. They cannot be used to document files, classes, unions, structs, groups, namespaces and enums themselves. Furthermore, the structural commands are NOT allowed inside these comment blocks. An example of C++ code using the Qt style: //! A test class. /*! A more elaborate class description. */ class Test { public: //! An enum. /*! More detailed enum description. */ enum TEnum { TVal1, /*!< Enum value TVal1. */ int var; //!< Detailed description after the member //!< int var; ///< Detailed description after the member ///< int var; //!< Brief description after the member int var; ///< Brief description after the member void foo(int v /**< [in] docs for input parameter v. */);
- 29. Qt is Cute ! The one-line comments contain a brief description, whereas the multi-line comment blocks contain a more detailed description. The brief descriptions are included in the member overview of a struct, class, namespace or file and are printed using a small italic font (this description can be hidden by setting BRIEF_MEMBER_DESC to NO in the configuration file). By default the brief descriptions become the first sentence of the detailed descriptions (but this can be changed by setting the REPEAT_BRIEF tag to NO). Both the brief and the detailed descriptions are optional for the Qt style. By default a JavaDoc style documentation block behaves the same way as a Qt style documentation block. This is not according the JavaDoc specification however, where the first sentence of the documentation block is automatically treated as a brief description. To enable this behavior you should set JAVADOC_AUTOBRIEF to YES in the configuration file. If you enable this option and want to put a dot in the middle of a sentence without ending it, you should put a backslash and a space after it as below example. /** Brief description (e.g. using only a few words). Details follow. */
- 30. Qt is Cute ! Here is the same piece of code as shown above, this time documented using the JavaDoc style and JAVADOC_AUTOBRIEF set to YES: Similarly, to set QT_AUTOBRIEF to YES in the configuration file to take the first sentence of a Qt style documentation block to automatically be treated as a brief description. Documentation at other places In above examples the comment blocks were always located in front of the declaration or definition of a file, class or namespace or in front or after one of its members. Although this is often comfortable, there may sometimes be reasons to put the documentation somewhere else. Doxygen allows you to put your documentation blocks practically anywhere (the exception is inside the body of a function or inside a normal C style comment block). The price you pay for not putting the documentation block directly before (or after) an item is the need to put a /** * A test class. A more elaborate class description. */ class Test { public: /** * An enum. * More detailed enum description. */ enum TEnum { TVal1, /**< enum value TVal1. */ TVal2, /**< enum value TVal2. */ TVal3 /**< enum value TVal3. */ } *enumPtr, /**< enum pointer. Details. */ enumVar; /**< enum variable. Details. */ ..................................................... /** * a function variable. * Details. */ int (*handler)(int a,int b); };
- 31. Qt is Cute ! structural command inside the documentation block, which leads to some duplication of information. So in practice you should avoid the use of structural commands unless other requirements force you to do so. Structural commands (like all other commands) start with a backslash (), or an at-sign (@) if you prefer JavaDoc style, followed by a command name and one or more parameters. The below example is for class Test using command “class”: Below list shows some structural commands: FileFileFileFile ((((HeaderHeaderHeaderHeader //// SourceSourceSourceSource)))) comments filefilefilefile Source code file name with extension file name. datedatedatedate Date authorauthorauthorauthor Author of this program versionversionversionversion Program version b Change_Historyb Change_Historyb Change_Historyb Change_History Date and contents of changing or modifying MacroMacroMacroMacro comments defdefdefdef To document a #define#define#define#define. FucntionFucntionFucntionFucntion comment fnfnfnfn to document a function. param[in]param[in]param[in]param[in] InputInputInputInput parameter Format: VariableName + Space + Description param[param[param[param[outoutoutout]]]] OutputOutputOutputOutput parameter Format: VariableName + Space + Description returnreturnreturnreturn Function return value. NamespaceNamespaceNamespaceNamespace comment namespacenamespacenamespacenamespace To document a namespace. ClassClassClassClass comment classclassclassclass To document a class. InterfaceInterfaceInterfaceInterface comment interfainterfainterfainterfacececece To document an IDLIDLIDLIDL interface. NoteNoteNoteNote: InterfaceInterfaceInterfaceInterfaces in C++C++C++C++ are implemented using Abstract ClassAbstract ClassAbstract ClassAbstract Class. EnumEnumEnumEnum comment enumenumenumenum To document an enumeration type. /*! class Test brief A test class. A more detailed class description. */
- 32. Qt is Cute ! StuctStuctStuctStuct comment structstructstructstruct To document a C-struct. UnionUnionUnionUnion comment unionunionunionunion To document a union. PackagePackagePackagePackage comment packagepackagepackagepackage To document a Java package. OtherOtherOtherOther comment varvarvarvar To document a variablevariablevariablevariable or typedeftypedeftypedeftypedef or enumenumenumenum value. briefbriefbriefbrief Shore description. nnnn New line cccc Convert font type. More information about structural commands could be found in the page: http://www.stack.nl/~dimitri/doxygen/manual/commands.html Note: 1) To document a member of a C++ class, you must also document the class itself. The same holds for namespaces. 2) To document a global C function, variable, typedef, enum or preprocessor definition you must first document the file that contains it (usually this will be a header file, because that file contains the information that is exported to other source files). Using a comment block containing a file or @file command to document the file in which those commands are located. or 3) Alternatively, you can put all members in a group (or module) using the ingroup command and then document the group using a comment block containing the defgroup command. For member functions or functions that are part of a namespace you should document either the class or namespace. Generate Diagrams/Graphs Doxygen can use the "dot" tool from GraphViz (Graph Visualization Software) to generate more advanced diagrams and graphs. GraphViz is an open-source, cross-platform graph drawing toolkit and can be found at http://www.graphviz.org/ To install GraphViz tool, run below commands in two Linux distro separately: Ubuntu /*! file */ /* * @file */
- 33. Qt is Cute ! sudo apt-get -y install graphviz The below screenshot shows installed graphviz tool in Synaptic Package Manager program. If you have the "dot" tool in the path, you can set tag HAVE_DOT to YES in the configuration file to let doxygen use it.
- 34. Qt is Cute ! Sliding Window Internals A surface containing items with a viewport that let user see some of all objects on the surface. Each item’s size may fit the dimension of the viewport and be aligned in linear form. Fixing viewport in a position and moving objects let users feel sliding effect. Below figures show the behavior that items move in horizontal direction. The dash-line rectangular is viewport that the area where items are visible to user. Surface Item Item ItemItem Surface Item Item ItemItem Surface Item Item ItemItem Viewport
- 35. Qt is Cute ! Each item is a QWidget object or a graphical object(e.g. it could display picture). If items are graphical objects, the sliding window program is a Simple Image/Photo Viewer. In practice, the surface(container) could be implemented using one of two Qt classes : * QWidget * GraphicsView QWidget-based Surface 01) Create a QWidget object as the main window and set its size. 02) Create a QWidget object as the surface and add this widget to the main window as a child node in window hierarchy. 03) Create QWidget objects and assign their parent to be the surface (e.g. they are children of the surface). 04) Re-implement “resizeEvent()” event handler of QWidget in the surface. 05) Set the dimension of the surface. Its width is widthOfMainWindow * NumberOfChildOfTheSurface and height is the same as the main window. 06) Align surface’s children. Set the size(width/height) of each surface’s child to be the same as the one of the main window. 07) Add a property, for example, “slideOffset” and implement propery setter/getter function, setSlideOffset() and getSlideOffset(). 08) Use QPropertyAnimation to modify the value of “slideOffset” property. 09) While QPropertyAnimation modify “slideOffset” property(e.g. call setSlideOffset() function, for example), the surface calls its method “scroll()” to pan itself including its children. And, it will show “sliding” effect. 10) This way is suitable for containing objects(application) derived from QWidget class directly. QGraphicsView-based Surface Graphics View was introduced in Qt 4.2 and to replace its predecessor, QCanvas ( http://doc.qt.digia.com/3.3/qcanvas.html ). Graphics View provides a surface for managing and interacting with a large number of custom-made 2D graphical items, and a view widget for visualizing the items, with support for zooming and rotation. Graphics View uses a BSP (Binary Space Partitioning) tree to provide very fast item discovery, and as a result of this, it can visualize large scenes in real-time, even with millions of items. The Graphics View framework includes an event propagation architecture that allows precise double-precision interaction capabilities for the items on the scene. Items can handle key events, mouse press, move, release and double click events, and they can also track mouse movement.
- 36. Qt is Cute ! 01) Most things are the same as QWidget-based way excepts: # The mainwindow is QGraphicsView type # The surface is QGraphicsScene type. # The objects the surface contains are QGraphicsPixmapItem type for graphical item or QgraphicsProxyWidget for non-graphical item type. Set the items width or height or both to fit the dimension of the screen. # When the event filter receives mouse events (mouse press/release/move), it uses FlickCharm / QTimeLine to do sliding animation. It needs to return FALSE after processing the mouse events from the upper layer, so the contained widgets could accept input events. 02) This way is unsuitable for the case that there have too many(around 1000) QWidget type of objects. Because it needs to process window handler and its painter will be invoked each time the widget is going to be shown. When adding page number for each image, it creates a QGraphicsSimpleTextItem object representing the page number and put it ABOVE the image. And when using QPropertyAnimation to slide images, it MUST slide page number synchronously or you will see the page number be at the location it was put originally.. In the Sliding Window program, it uses following applications as Non-Graphical Items in the surface. * Qt 4.6.2demosembeddeddigiflip * Qt4.6.2_Srcexampleswidgetsanalogclock * Qt4.6.2_Srcexampleswidgetsdigitalclock * Qt4.6.2_Srcexampleswidgetswiggly * http://qt.gitorious.org/qt-labs/graphics-dojo/trees/master/parallaxhome The doxygen configuration files are in the “doxygen“ folder of each Sliding Window program source folder. There are two configuration files, one for generating documents with graphs(this needs graphivz tool to be installed) and the other is for the document without graphs. By running command “doxygen Conf-File” to generate documents. If it succeeds to generate documents, it will have a folder named “html“ in the doxygen folder. The main Web page of the generated HTML document is “index.html”. The below figures show screenshots of Sliding Window program HTML documents generated by doxygen.
- 37. Qt is Cute !
- 38. Qt is Cute !
- 39. Qt is Cute !
- 40. Qt is Cute ! (If you want to let the document include your source codes for browsing, remember to set the variable “SOURCE_BROWSER” to YES in the doxygen configuration file.)
- 41. Qt is Cute ! Porting to Qt5 Below contents are changes for Sliding Window program that could be compiled successfully using Qt 5. * Add this in your .pro file: QT += widgets * Change all instances of #include <QtGui> to #include <QtWidgets> The code should work now, though sometimes you may require to be more explicit, for example: #include <QtWidgets/QToolButton> * Change #include <QtGui/QApplication> to #include <QtWidgets/QApplication> * QString class toAscii() methods are deprecated, so change toAscii() to toStdString() It could add scopes depending on the version of Qt to the .pro files: Also, it could introduce #if scopes around code using modified API: , the above pre-processor directives “#if QT_VERSION >= 0x050000” mean “if the current Qt SDK version is greater than or equal to version 5.” greaterThan(QT_MAJOR_VERSION, 4): QT += widgets #if QT_VERSION >= 0x050000 headerView->setSectionResizeMode(QHeaderView::ResizeToContents); #else headerView->setResizeMode(QHeaderView::ResizeToContents); #endif
- 42. Qt is Cute ! Reference * https://wiki.qt.io/Transition_from_Qt_4.x_to_Qt5 * http://doc.qt.io/qt-5/portingguide.html * http://doc.qt.io/qt-5/portingcppapp.html * http://www.kdab.com/porting-from-qt-4-to-qt-5/ * http://www.ics.com/blog/porting-desktop-applications-qt-4-qt-5 * http://qt.apidoc.info/5.0.2/qtdoc-online/portingcppapp.html * http://chenglearning.blogspot.tw/2014/10/qt5qt4.html 中文中文中文中文
- 43. Qt is Cute ! Resources MeeGo # http://en.wikipedia.org/wiki/MeeGo # http://www.engadget.com/2010/06/01/meego-moorestown-powered-tablet-hands-on/ A Qt Preliminary Site # http://web.njit.edu/all_topics/Prog_Lang_Docs/html/qt/ Qt Graphics View Framework # http://doc.qt.digia.com/qq/qq19-graphicsview.html # http://doc.qt.digia.com/4.6/graphicsview.html Qt Kinetic Scrolling # http://blog.qt.digia.com/blog/2008/11/06/welcome-to-kinetic/ # http://blog.qt.digia.com/blog/2008/11/15/flick-list-or-kinetic-scrolling/ Youtube for FlickCharm # http://blog.qt.digia.com/blog/2009/07/19/kinetic-scrolling-on-any-widgets/ Youtube for Flickable # http://blog.codeimproved.net/2010/12/kinetic-scrolling-with-qt-the-what-and-the-how/ # https://qt-project.org/search/tag/kinetic~scrolling # https://www.youtube.com/watch?v=b68mskFTHX0 Kinetic Scrolling on any widgets - Nokia S60 <Ariya’s Kinetic Model> # https://gitorious.org/ofi-labs/x2/source/adada3532f1d78c9a770833dbda3a639dbdc98be:widget/kineticmodel <Qt-Labs: Kinetic Scroller> For Qt 4.6 and Qt 4.7 on all platforms # https://qt.gitorious.org/qt-labs/kineticscroller/source/6ac62ecc1fb1ddaa939e5417d864382e944b0fd1: Declarative UI in 4.6 # http://blog.qt.digia.com/blog/2009/05/13/qt-declarative-ui/ # http://www.slideshare.net/qtbynokia/introducing-the-qt-kinetic-project Qt Graphics Dojo(道場道場道場道場) (Dojo is pronunciation of Japanese for Kanji/Chinese-word : 道場道場道場道場) # http://qt.gitorious.org/qt-labs/graphics-dojo
- 44. Qt is Cute ! Qmake Usage # http://web.njit.edu/all_topics/Prog_Lang_Docs/html/qt/qmake-manual.html Qmake User Guide # http://www.qtcentre.org/wiki/index.php?title=Undocumented_qmake Qmake User Guide # https://qt-project.org/doc/qt-4.7/qmake-manual.html Qmake Manual from Qt Project # http://doc.qt.digia.com/qtcreator-2.0/creator-project-qmake.html Set up a qmake tool in Qt Creator Parallax Sliding/Scrolling # http://en.wikipedia.org/wiki/Parallax_scrolling # http://blog.qt.digia.com/blog/2008/11/03/parallax-sliding/ # http://blog.qt.digia.com/blog/2009/10/22/home-screen-with-parallax-effect/ # http://qt.gitorious.org/qt-labs/graphics-dojo/trees/master/parallaxslide # http://qt.gitorious.org/qt-labs/graphics-dojo/trees/master/parallaxhome <Declarative Parallax Home> # http://qt-project.org/doc/qt-4.7/declarative-modelviews-parallax.html