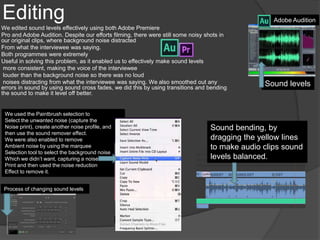
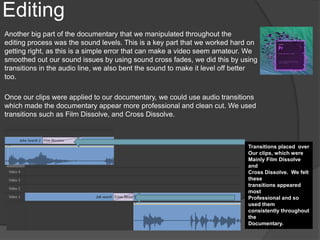
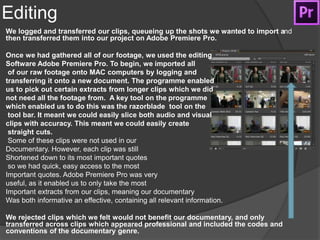
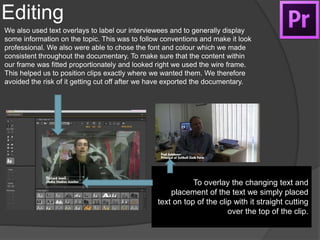
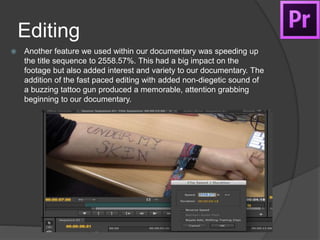
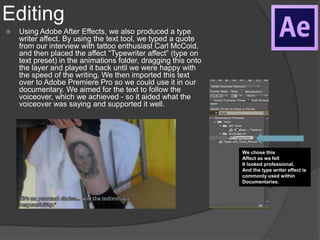
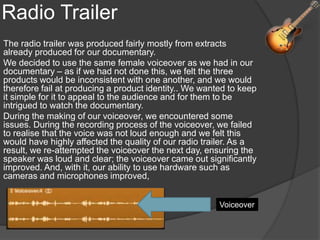
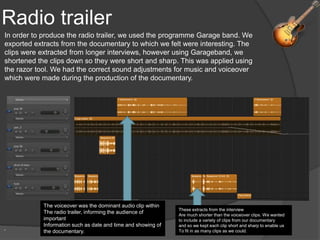
Rachel Westwood
Research and planningFor my documentary, the research and planning contributed helpfully towards the
production. I planned our documentary in various ways, firstly producing a mind map of
potential ideas of what topic to base our documentary on. Therefore, we were able to
write down our ideas and carefully consider the advantages and disadvantages of
making a documentary on each topic. For example, we considered choosing to make a
documentary about street buskers, however we wanted to aim our documentary at an
audience of teenagers to young adults. Through using the internet, which was one of
our most important resource to researching our topic we came to the conclusion that
body modification is a current, popular topic. We realised this through finding news
articles on browsers such as Windows 7 Internet Explorer, and at home Google
Chrome. Through careful consideration, we came to the conclusion that young people
today are interested in more controversial topics such as body modifications – and so
we felt we would get more out of this, and a more interesting documentary if we
planned to make a documentary which could gain interesting opinions of young people.
Following this, we planned our documentary through storyboard sheets, which meant
we could start planning shots; we did this by hand drawing and writing the text.
We produced our mind map using more simple media
technologies such as Microsoft Word. We found
Microsoft very useful because in the initial stages, we
wanted to use something simple and easy to use to
portray our ideas in our planning.
Websites which we found to be very
useful in our research and planning were
The Guardian Online, Mail Online,
Huffington Post, BBC, and The Times.
News articles provided us with popular
opinions of both the public and experts.
real life stories, statistics and facts about
our topics, which was useful as the
informatio was accurate and reliable
information.
Research and Planning
Microsoft Word was a piece of software which we used significantly during our
research.
We mainly used word to document news articles, as well as produce our
questionnaires. By using Microsoft Word, we could customize our questions
exactly how we wanted to. This meant that our audience feedback would be
relevant to the documentary and therefore the quality of our research was
improved.
We conducted our research and planning onto a blog, using the website Blogger
This was an extremely useful resource as we could put all of our information and
planning into one space which we could all individually access. By logging our
research regularly it highlighted any gaps in our research and ultimately kept
everything under organized, chronological order.
In order to log our research and planning from Office in more creative,
imaginative ways, we used software such as Prezi and SlideShare. We then
embedded these into Blogger.
Research and Planning
Also, in order to get a better idea of the documentary
genre, we did some research into previous
documentaries and applied this to our blog. This
meant we could constantly look at our blog to remind
ourselves of the codes and conventions we wanted to
present in our documentary. We documented what
we saw onto our blog, examples of documentaries
include ‘Super Size Me’, ‘My Tattoo Addiction’ and
‘Gimme Shelter’. The software YouTube meant this
process was much easier for us. We could access
hundreds of documentaries which would help inform
us of how a typical documentary would be portrayed,
in terms of codes and conventions.
My Tattoo Addiction Gimme Shelter
Research and Planning
 During the planning stages of our
documentary we also produced sketches,
meaning we did not use media technologies
throughout all of the planning of our
documentary. We could have produced a plan
on programmes such as Word however we
instead created hand written storyboards
which allowed us to express our ideas straight
from pen to paper – we did this for both our
documentary, and magazine, providing
detailed plans for each which made both
filming and creating the magazine easier.
In addition to researching news articles online to gain information, we also researched TV channels in order
to come to the conclusion of which one our documentary would suit. Therefore, we looked at TV Channels,
such as Channel 4, ITV, and also BBC Radio 1 channel, in order to find out which channel produced similar
shows and topics to our topic of documentary. We also looked at listing websites, such as TV Guide, in
order to look at schedules for such channels, and what time of viewing their documentaries shows, to find
out if they showed similar programmes and the time the programme was on helped us to recognize the
target audience the channel targets for specific shows.
Research and planning
Channel 4 was most useful
resource for our documentary.
This is because Channel 4 has
produced various programmes
and documentary's about body
modifications.
BBC showed a couple of
documentaries which we’re
similar to our topic, however we
found information most useful on
the BBC Radio 1 website.
ITV was the least useful
resource for information as we
failed to find a documentary
which was similar to ours on ITV.
We also used online services such
As 4OD (My Tattoo Addiction), ITV Player (Exposure – The Kill List).
Furthermore, we used YouTube to watch documentaries such as SuperSize Me, and
A DVD to watch Gimme Shelter.
Research and Planning
We made also sure to plan where and where we were
filming, in order to avoid time wasting. We also provided the
expert interviewees with questions before filming so they
had a prior awareness of what we were going to ask them.
We also made sure we did not ask the interviewee too late
into production whether or not they could conduct the
interview, as we wanted to avoid rushing interviews. When
we planned the questions, we made sure to produce
questions which were relevant and would provide useful
information for the documentary.
Questions included, for example:
“Do you think that students are being
discriminated against for their tattoo’s and/or piercings?”
and “Have you had any experience with body
modifications yourself?”
Research and Planning
In order to communicate to each other, mobile phones came in extremely handy. This is because the
software on our mobile phones allowed us to communicate to each other effectively. These included
programmes such as Facebook, Snapchat, Whatsapp and Twitter. These came in very useful so we
could organise and plan our documentary. We regularly messaged eachother, organising dates to get
together to complete either coursework or the production of the documentary.
Twitter also came in very useful so we could communicate with people with body modifications or
who were in the tattoo/piercing industry. For example, through Twitter, we obtained the email of Carl
McCoid from popular Channel 4 programme My Tattoo Addiction. From here, we emailed him through
Outlook, and he responded by telling us he would be happy to supply us with some answers for a few
questions we would ask him. This came in very useful in the documentary as a response from a well-
known person would generate publicity and so attract and appeal to the younger generation.
Emails from Carl
McCoid, a tattoo enthusiast
With 27 tattoos of Miley
Cyrus. Because of this,
He has become a well known
Character in the tattooing world.
Filming
After doing our extensive research and planning, we began to film our footage, following the storyboard
as a basis for our filming. We were provided with a professional, high quality hardware. Firstly, we were
provided with a high quality professional camera, we used a Canon HG20 HD. We found this extremely
useful in the production of our documentary as it meant we could carry out shorts which consisted of
high quality, focused and out of focus shots. It furthermore enabled us to manipulate autofocus, which
helped us to create more dynamic shots. It meant our documentary had a professional, high quality,
smooth look, and each image we projected was clear and had high definition. Also, we were provided
with other hardware equipment such as a tripod and a microphone, meaning our sound was excellent
quality and we were able to film steady shots using the tripod to place the camera in a rigid position. For
example during the filming of the College sign, we found the tripod extremely useful as it enabled us to
slowly pan with precision and ease, without moving the camera out of place, which provided a smooth,
elegant shot. This was similarly the case for filming a precise, rigid shot when filming Touchwood,
Solihull.
Panning shot Establishing shot
Filming
Also, for our vox pops and interviews, we used a tripod to keep the
shot stable whilst we talked to the interviewee and asked them questions.
It also meant we could keep the rule of thirds in mind, along with the mise-en-scene.
We checked whether the sound levels were working through plugging in headphones
to the camera, which were Sennheisser HD201 Headphones. These came in very
useful as it meant we could ensure the interviewee’s voices were picked up clearly
and loudly. However, on our first attempt, we did make errors. On our first interview,
we made the mistake of not checking with the headphones whether the sound was
coming through correctly. It meant we had one less interview to place in our
documentary which could have ultimately effected our work.
However, I look at this in a positive manner as it meant every interview
Thereafter we always double-checked whether the sound was working well.
When asking questions, we aimed the microphone directly towards the speaker,
hiding the microphone above the camera shot. To avoid the microphone picking
up external, unwanted noises we filmed expert interviews in quiet rooms. We used a
E2000 Condenser microphone , which was very useful as provided high quality,
Clean, professional sound.
Furthermore, in a few of our interviews, specifically expert interviews which were
conducted indoors, we had issues with lighting. In retrospect, we could have
checked the lighting with more precision before we began filming to overcome
this issue. However, our outside interviews were conducted very well as the
natural lighting was bright and clear. Using Adobe Premiere Pro,
we were able to slightly increase the brightness of the clip,
which came as extremely useful.
Changing brightness levels on
Adobe Premiere Pro.
Bright lighting made the clip look more
visually pleasing.
Here, artificial lighting affected
The lighting, making it less clear and
bright.
Editing
We edited sound levels effectively using both Adobe Premiere
Pro and Adobe Audition. Despite our efforts filming, there were still some noisy shots in
our original clips, where background noise distracted
From what the interviewee was saying.
Both programmes were extremely
Useful in solving this problem, as it enabled us to effectively make sound levels
more consistent, making the voice of the interviewee
louder than the background noise so there was no loud
noises distracting from what the interviewee was saying. We also smoothed out any
errors in sound by using sound cross fades, we did this by using transitions and bending
the sound to make it level off better.
Adobe Audition
We used the Paintbrush selection to
Select the unwanted noise (capture the
Noise print), create another noise profile, and
then use the sound remover effect.
We were also enabled to remove
Ambient noise by using the marquee
Selection tool to select the background noise
Which we didn’t want, capturing a noise
Print and then used the noise reduction
Effect to remove it.
Process of changing sound levels
Sound levels
Sound bending, by
dragging the yellow lines
to make audio clips sound
levels balanced.
Editing
Another big part of the documentary that we manipulated throughout the
editing process was the sound levels. This is a key part that we worked hard on
getting right, as this is a simple error that can make a video seem amateur. We
smoothed out our sound issues by using sound cross fades, we did this by using
transitions in the audio line, we also bent the sound to make it level off better
too.
Once our clips were applied to our documentary, we could use audio transitions
which made the documentary appear more professional and clean cut. We used
transitions such as Film Dissolve, and Cross Dissolve.
Transitions placed over
Our clips, which were
Mainly Film Dissolve
and
Cross Dissolve. We felt
these
transitions appeared
most
Professional and so
used them
consistently throughout
the
Documentary.
Editing
We logged and transferred our clips, queueing up the shots we wanted to import and
then transferred them into our project on Adobe Premiere Pro.
Once we had gathered all of our footage, we used the editing
Software Adobe Premiere Pro. To begin, we imported all
of our raw footage onto MAC computers by logging and
transferring it onto a new document. The programme enabled
us to pick out certain extracts from longer clips which we did
not need all the footage from. A key tool on the programme
which enabled us to do this was the razorblade tool on the
tool bar. It meant we could easily slice both audio and visual
clips with accuracy. This meant we could easily create
straight cuts.
Some of these clips were not used in our
Documentary. However, each clip was still
Shortened down to its most important quotes
so we had quick, easy access to the most
Important quotes. Adobe Premiere Pro was very
useful, as it enabled us to only take the most
Important extracts from our clips, meaning our documentary
Was both informative an effective, containing all relevant information.
We rejected clips which we felt would not benefit our documentary, and only
transferred across clips which appeared professional and included the codes and
conventions of the documentary genre.
Editing
We also used text overlays to label our interviewees and to generally display
some information on the topic. This was to follow conventions and make it look
professional. We also were able to chose the font and colour which we made
consistent throughout the documentary. To make sure that the content within
our frame was fitted proportionately and looked right we used the wire frame.
This helped us to position clips exactly where we wanted them. We therefore
avoided the risk of it getting cut off after we have exported the documentary.
To overlay the changing text and
placement of the text we simply placed
text on top of the clip with it straight cutting
over the top of the clip.
Editing
 Another feature we used within our documentary was speeding up
the title sequence to 2558.57%. This had a big impact on the
footage but also added interest and variety to our documentary. The
addition of the fast paced editing with added non-diegetic sound of
a buzzing tattoo gun produced a memorable, attention grabbing
beginning to our documentary.
Editing
 Using Adobe After Effects, we also produced a type
writer affect. By using the text tool, we typed a quote
from our interview with tattoo enthusiast Carl McCoid,
and then placed the affect “Typewriter affect” (type on
text preset) in the animations folder, dragging this onto
the layer and played it back until we were happy with
the speed of the writing. We then imported this text
over to Adobe Premiere Pro so we could use it in our
documentary. We aimed for the text to follow the
voiceover, which we achieved - so it aided what the
voiceover was saying and supported it well.
We chose this
Affect as we felt
It looked professional,
And the type writer effect is
commonly used within
Documentaries.
Radio Trailer
The radio trailer was produced fairly mostly from extracts
already produced for our documentary.
We decided to use the same female voiceover as we had in our
documentary – as if we had not done this, we felt the three
products would be inconsistent with one another, and we would
therefore fail at producing a product identity.. We wanted to keep
it simple for it to appeal to the audience and for them to be
intrigued to watch the documentary.
During the making of our voiceover, we encountered some
issues. During the recording process of the voiceover, we failed
to realise that the voice was not loud enough and we felt this
would have highly affected the quality of our radio trailer. As a
result, we re-attempted the voiceover the next day, ensuring the
speaker was loud and clear; the voiceover came out significantly
improved. And, with it, our ability to use hardware such as
cameras and microphones improved,
Voiceover
Radio trailer
.
In order to produce the radio trailer, we used the programme Garage band. We
exported extracts from the documentary to which we felt were interesting. The
clips were extracted from longer interviews, however using Garageband, we
shortened the clips down so they were short and sharp. This was applied using
the razor tool. We had the correct sound adjustments for music and voiceover
which were made during the production of the documentary.
The voiceover was the dominant audio clip within
The radio trailer, informing the audience of
important
Information such as date and time and showing of
the documentary.
These extracts from the interview
Are much shorter than the voiceover clips. We wanted
to include a variety of clips from our documentary
and so we kept each clip short and sharp to enable us
To fit in as many clips as we could.
Radio trailer
We also included a backing track within our documentary which we
chose from a range of music clips. Examples included:
We chose to pick a track from the “pop” folder as we felt pop music is the most
upbeat, entertaining choice of music for our documentary. We wanted to appeal
predominantly to young people and it would seem as though young people are
most interested in pop music.
We also used the loop feature so that we could get the music to loop giving us
a theme that we could use in our media products.
Evaluation
In the creation of my evaluation, I used a mixture of both Microsoft Word
And Microsoft PowerPoint. I then uploaded these documents to either Scribd or
SlideShare, where they were able to embed into a blog post on our Blogger blog.
For question 3, I used Prezi – Prezi is a slightly more creative approach, allowing
Users to create interactive slideshows. This was useful as for this question I wanted
To display creatively made graphs and charts which we collected from our
audience research.
Overall, these are the software
products we used…
 Prezi
 SlideShare
 Scribd
 Soundcloud
 Garageband
 Microsoft Powerpoint
 Adobe Photoshop
 Adobe Audition
 Microsoft Word
 Adobe Premiere Pro
 Youtube
 Blogger
 Whatsapp
 Snapchat
 Facebook
 Twitter
 Microsoft Word
Overall, the hardware products
we used…
 Apple Mac computer
 Windows 7 computer
 Camera
 Microphone
 Headphones
 Mobile phones
 Printer

q4

  • 1.
  • 2.
    Research and planningFormy documentary, the research and planning contributed helpfully towards the production. I planned our documentary in various ways, firstly producing a mind map of potential ideas of what topic to base our documentary on. Therefore, we were able to write down our ideas and carefully consider the advantages and disadvantages of making a documentary on each topic. For example, we considered choosing to make a documentary about street buskers, however we wanted to aim our documentary at an audience of teenagers to young adults. Through using the internet, which was one of our most important resource to researching our topic we came to the conclusion that body modification is a current, popular topic. We realised this through finding news articles on browsers such as Windows 7 Internet Explorer, and at home Google Chrome. Through careful consideration, we came to the conclusion that young people today are interested in more controversial topics such as body modifications – and so we felt we would get more out of this, and a more interesting documentary if we planned to make a documentary which could gain interesting opinions of young people. Following this, we planned our documentary through storyboard sheets, which meant we could start planning shots; we did this by hand drawing and writing the text. We produced our mind map using more simple media technologies such as Microsoft Word. We found Microsoft very useful because in the initial stages, we wanted to use something simple and easy to use to portray our ideas in our planning. Websites which we found to be very useful in our research and planning were The Guardian Online, Mail Online, Huffington Post, BBC, and The Times. News articles provided us with popular opinions of both the public and experts. real life stories, statistics and facts about our topics, which was useful as the informatio was accurate and reliable information.
  • 3.
    Research and Planning MicrosoftWord was a piece of software which we used significantly during our research. We mainly used word to document news articles, as well as produce our questionnaires. By using Microsoft Word, we could customize our questions exactly how we wanted to. This meant that our audience feedback would be relevant to the documentary and therefore the quality of our research was improved. We conducted our research and planning onto a blog, using the website Blogger This was an extremely useful resource as we could put all of our information and planning into one space which we could all individually access. By logging our research regularly it highlighted any gaps in our research and ultimately kept everything under organized, chronological order. In order to log our research and planning from Office in more creative, imaginative ways, we used software such as Prezi and SlideShare. We then embedded these into Blogger.
  • 4.
    Research and Planning Also,in order to get a better idea of the documentary genre, we did some research into previous documentaries and applied this to our blog. This meant we could constantly look at our blog to remind ourselves of the codes and conventions we wanted to present in our documentary. We documented what we saw onto our blog, examples of documentaries include ‘Super Size Me’, ‘My Tattoo Addiction’ and ‘Gimme Shelter’. The software YouTube meant this process was much easier for us. We could access hundreds of documentaries which would help inform us of how a typical documentary would be portrayed, in terms of codes and conventions. My Tattoo Addiction Gimme Shelter
  • 5.
    Research and Planning During the planning stages of our documentary we also produced sketches, meaning we did not use media technologies throughout all of the planning of our documentary. We could have produced a plan on programmes such as Word however we instead created hand written storyboards which allowed us to express our ideas straight from pen to paper – we did this for both our documentary, and magazine, providing detailed plans for each which made both filming and creating the magazine easier.
  • 6.
    In addition toresearching news articles online to gain information, we also researched TV channels in order to come to the conclusion of which one our documentary would suit. Therefore, we looked at TV Channels, such as Channel 4, ITV, and also BBC Radio 1 channel, in order to find out which channel produced similar shows and topics to our topic of documentary. We also looked at listing websites, such as TV Guide, in order to look at schedules for such channels, and what time of viewing their documentaries shows, to find out if they showed similar programmes and the time the programme was on helped us to recognize the target audience the channel targets for specific shows. Research and planning Channel 4 was most useful resource for our documentary. This is because Channel 4 has produced various programmes and documentary's about body modifications. BBC showed a couple of documentaries which we’re similar to our topic, however we found information most useful on the BBC Radio 1 website. ITV was the least useful resource for information as we failed to find a documentary which was similar to ours on ITV. We also used online services such As 4OD (My Tattoo Addiction), ITV Player (Exposure – The Kill List). Furthermore, we used YouTube to watch documentaries such as SuperSize Me, and A DVD to watch Gimme Shelter.
  • 7.
    Research and Planning Wemade also sure to plan where and where we were filming, in order to avoid time wasting. We also provided the expert interviewees with questions before filming so they had a prior awareness of what we were going to ask them. We also made sure we did not ask the interviewee too late into production whether or not they could conduct the interview, as we wanted to avoid rushing interviews. When we planned the questions, we made sure to produce questions which were relevant and would provide useful information for the documentary. Questions included, for example: “Do you think that students are being discriminated against for their tattoo’s and/or piercings?” and “Have you had any experience with body modifications yourself?”
  • 8.
    Research and Planning Inorder to communicate to each other, mobile phones came in extremely handy. This is because the software on our mobile phones allowed us to communicate to each other effectively. These included programmes such as Facebook, Snapchat, Whatsapp and Twitter. These came in very useful so we could organise and plan our documentary. We regularly messaged eachother, organising dates to get together to complete either coursework or the production of the documentary. Twitter also came in very useful so we could communicate with people with body modifications or who were in the tattoo/piercing industry. For example, through Twitter, we obtained the email of Carl McCoid from popular Channel 4 programme My Tattoo Addiction. From here, we emailed him through Outlook, and he responded by telling us he would be happy to supply us with some answers for a few questions we would ask him. This came in very useful in the documentary as a response from a well- known person would generate publicity and so attract and appeal to the younger generation. Emails from Carl McCoid, a tattoo enthusiast With 27 tattoos of Miley Cyrus. Because of this, He has become a well known Character in the tattooing world.
  • 9.
    Filming After doing ourextensive research and planning, we began to film our footage, following the storyboard as a basis for our filming. We were provided with a professional, high quality hardware. Firstly, we were provided with a high quality professional camera, we used a Canon HG20 HD. We found this extremely useful in the production of our documentary as it meant we could carry out shorts which consisted of high quality, focused and out of focus shots. It furthermore enabled us to manipulate autofocus, which helped us to create more dynamic shots. It meant our documentary had a professional, high quality, smooth look, and each image we projected was clear and had high definition. Also, we were provided with other hardware equipment such as a tripod and a microphone, meaning our sound was excellent quality and we were able to film steady shots using the tripod to place the camera in a rigid position. For example during the filming of the College sign, we found the tripod extremely useful as it enabled us to slowly pan with precision and ease, without moving the camera out of place, which provided a smooth, elegant shot. This was similarly the case for filming a precise, rigid shot when filming Touchwood, Solihull. Panning shot Establishing shot
  • 10.
    Filming Also, for ourvox pops and interviews, we used a tripod to keep the shot stable whilst we talked to the interviewee and asked them questions. It also meant we could keep the rule of thirds in mind, along with the mise-en-scene. We checked whether the sound levels were working through plugging in headphones to the camera, which were Sennheisser HD201 Headphones. These came in very useful as it meant we could ensure the interviewee’s voices were picked up clearly and loudly. However, on our first attempt, we did make errors. On our first interview, we made the mistake of not checking with the headphones whether the sound was coming through correctly. It meant we had one less interview to place in our documentary which could have ultimately effected our work. However, I look at this in a positive manner as it meant every interview Thereafter we always double-checked whether the sound was working well. When asking questions, we aimed the microphone directly towards the speaker, hiding the microphone above the camera shot. To avoid the microphone picking up external, unwanted noises we filmed expert interviews in quiet rooms. We used a E2000 Condenser microphone , which was very useful as provided high quality, Clean, professional sound. Furthermore, in a few of our interviews, specifically expert interviews which were conducted indoors, we had issues with lighting. In retrospect, we could have checked the lighting with more precision before we began filming to overcome this issue. However, our outside interviews were conducted very well as the natural lighting was bright and clear. Using Adobe Premiere Pro, we were able to slightly increase the brightness of the clip, which came as extremely useful. Changing brightness levels on Adobe Premiere Pro. Bright lighting made the clip look more visually pleasing. Here, artificial lighting affected The lighting, making it less clear and bright.
  • 11.
    Editing We edited soundlevels effectively using both Adobe Premiere Pro and Adobe Audition. Despite our efforts filming, there were still some noisy shots in our original clips, where background noise distracted From what the interviewee was saying. Both programmes were extremely Useful in solving this problem, as it enabled us to effectively make sound levels more consistent, making the voice of the interviewee louder than the background noise so there was no loud noises distracting from what the interviewee was saying. We also smoothed out any errors in sound by using sound cross fades, we did this by using transitions and bending the sound to make it level off better. Adobe Audition We used the Paintbrush selection to Select the unwanted noise (capture the Noise print), create another noise profile, and then use the sound remover effect. We were also enabled to remove Ambient noise by using the marquee Selection tool to select the background noise Which we didn’t want, capturing a noise Print and then used the noise reduction Effect to remove it. Process of changing sound levels Sound levels Sound bending, by dragging the yellow lines to make audio clips sound levels balanced.
  • 12.
    Editing Another big partof the documentary that we manipulated throughout the editing process was the sound levels. This is a key part that we worked hard on getting right, as this is a simple error that can make a video seem amateur. We smoothed out our sound issues by using sound cross fades, we did this by using transitions in the audio line, we also bent the sound to make it level off better too. Once our clips were applied to our documentary, we could use audio transitions which made the documentary appear more professional and clean cut. We used transitions such as Film Dissolve, and Cross Dissolve. Transitions placed over Our clips, which were Mainly Film Dissolve and Cross Dissolve. We felt these transitions appeared most Professional and so used them consistently throughout the Documentary.
  • 13.
    Editing We logged andtransferred our clips, queueing up the shots we wanted to import and then transferred them into our project on Adobe Premiere Pro. Once we had gathered all of our footage, we used the editing Software Adobe Premiere Pro. To begin, we imported all of our raw footage onto MAC computers by logging and transferring it onto a new document. The programme enabled us to pick out certain extracts from longer clips which we did not need all the footage from. A key tool on the programme which enabled us to do this was the razorblade tool on the tool bar. It meant we could easily slice both audio and visual clips with accuracy. This meant we could easily create straight cuts. Some of these clips were not used in our Documentary. However, each clip was still Shortened down to its most important quotes so we had quick, easy access to the most Important quotes. Adobe Premiere Pro was very useful, as it enabled us to only take the most Important extracts from our clips, meaning our documentary Was both informative an effective, containing all relevant information. We rejected clips which we felt would not benefit our documentary, and only transferred across clips which appeared professional and included the codes and conventions of the documentary genre.
  • 14.
    Editing We also usedtext overlays to label our interviewees and to generally display some information on the topic. This was to follow conventions and make it look professional. We also were able to chose the font and colour which we made consistent throughout the documentary. To make sure that the content within our frame was fitted proportionately and looked right we used the wire frame. This helped us to position clips exactly where we wanted them. We therefore avoided the risk of it getting cut off after we have exported the documentary. To overlay the changing text and placement of the text we simply placed text on top of the clip with it straight cutting over the top of the clip.
  • 15.
    Editing  Another featurewe used within our documentary was speeding up the title sequence to 2558.57%. This had a big impact on the footage but also added interest and variety to our documentary. The addition of the fast paced editing with added non-diegetic sound of a buzzing tattoo gun produced a memorable, attention grabbing beginning to our documentary.
  • 16.
    Editing  Using AdobeAfter Effects, we also produced a type writer affect. By using the text tool, we typed a quote from our interview with tattoo enthusiast Carl McCoid, and then placed the affect “Typewriter affect” (type on text preset) in the animations folder, dragging this onto the layer and played it back until we were happy with the speed of the writing. We then imported this text over to Adobe Premiere Pro so we could use it in our documentary. We aimed for the text to follow the voiceover, which we achieved - so it aided what the voiceover was saying and supported it well. We chose this Affect as we felt It looked professional, And the type writer effect is commonly used within Documentaries.
  • 17.
    Radio Trailer The radiotrailer was produced fairly mostly from extracts already produced for our documentary. We decided to use the same female voiceover as we had in our documentary – as if we had not done this, we felt the three products would be inconsistent with one another, and we would therefore fail at producing a product identity.. We wanted to keep it simple for it to appeal to the audience and for them to be intrigued to watch the documentary. During the making of our voiceover, we encountered some issues. During the recording process of the voiceover, we failed to realise that the voice was not loud enough and we felt this would have highly affected the quality of our radio trailer. As a result, we re-attempted the voiceover the next day, ensuring the speaker was loud and clear; the voiceover came out significantly improved. And, with it, our ability to use hardware such as cameras and microphones improved, Voiceover
  • 18.
    Radio trailer . In orderto produce the radio trailer, we used the programme Garage band. We exported extracts from the documentary to which we felt were interesting. The clips were extracted from longer interviews, however using Garageband, we shortened the clips down so they were short and sharp. This was applied using the razor tool. We had the correct sound adjustments for music and voiceover which were made during the production of the documentary. The voiceover was the dominant audio clip within The radio trailer, informing the audience of important Information such as date and time and showing of the documentary. These extracts from the interview Are much shorter than the voiceover clips. We wanted to include a variety of clips from our documentary and so we kept each clip short and sharp to enable us To fit in as many clips as we could.
  • 19.
    Radio trailer We alsoincluded a backing track within our documentary which we chose from a range of music clips. Examples included: We chose to pick a track from the “pop” folder as we felt pop music is the most upbeat, entertaining choice of music for our documentary. We wanted to appeal predominantly to young people and it would seem as though young people are most interested in pop music. We also used the loop feature so that we could get the music to loop giving us a theme that we could use in our media products.
  • 20.
    Evaluation In the creationof my evaluation, I used a mixture of both Microsoft Word And Microsoft PowerPoint. I then uploaded these documents to either Scribd or SlideShare, where they were able to embed into a blog post on our Blogger blog. For question 3, I used Prezi – Prezi is a slightly more creative approach, allowing Users to create interactive slideshows. This was useful as for this question I wanted To display creatively made graphs and charts which we collected from our audience research.
  • 21.
    Overall, these arethe software products we used…  Prezi  SlideShare  Scribd  Soundcloud  Garageband  Microsoft Powerpoint  Adobe Photoshop  Adobe Audition  Microsoft Word  Adobe Premiere Pro  Youtube  Blogger  Whatsapp  Snapchat  Facebook  Twitter  Microsoft Word
  • 22.
    Overall, the hardwareproducts we used…  Apple Mac computer  Windows 7 computer  Camera  Microphone  Headphones  Mobile phones  Printer