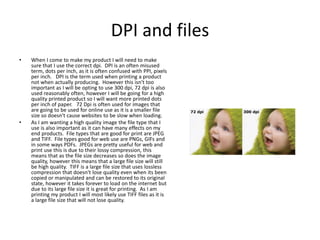
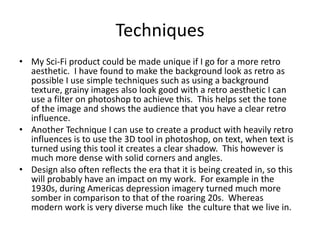
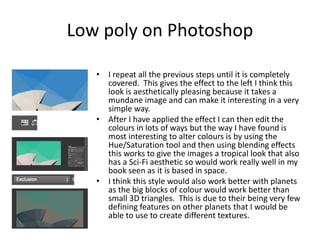
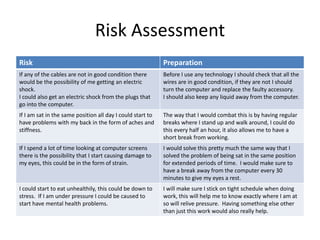
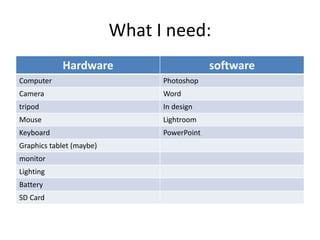
2. Missing / Damaged Equipment
• Any missing or damaged equipment would have a big effect on the
efficiency of my work. Examples would include; missing mouse,
keyboard, these products could also be damaged. This would have
quite a significant effect on my work, as without certain bits of
equipment I will be unable to create certain parts of my work, for
example a missing mouse would make me unable to use my
computer which would stop me creating anything at all as my work
will all be created on the computer. It could also mean that I would
have to spend money to fix the issue. There are a few ways that I will
be able to remedy this problem. To start with I would make sure I
have access to a second machine or have replacement parts that I
could use if necessary. This is a great solution as it means that I will
not be slowed down in production too greatly as replacing a
keyboard or mouse is easy, so I could get straight back on with my
work. However having to have spare parts is not cheap and I would
have to put more money into the project at the start, although it
would mean I would be prepared for this problem in future projects.
Another solution to this problem would be to make sure that I have
backup work that I can do, an example of this would be planning out
improvements for the work that I am doing on the computer.
However I will not necessarily be able to do other work and would
need the computer to make any sort of advancement.
3. Storage & Backups
• A problem would arise due to the way I store my files. As any damage to the drive that I
store files on could cause me to lose all of the work that I have done. If the storage was
too get damaged I would in effect lose all my work, this would obviously set me back
weeks and would likely result in a far different end product. As it would cause me to rush
my product as I came nearer to the deadline. One easy way of circumventing this
problem would be to create a secondary place of storage so that you always have a
backup of the file, I could use a memory stick or cloud service for this. Using a cloud
service like one drive would likely be the most useful way of doing this, as I would be able
to access my files anywhere, being most useful if I do not have access to my memory
stick. Files can get corrupted when removing a memory stick from a device, to remove
any risk of this happening I will eject the memory stick in the file manager before
removing it physically.
• Another similar issue would be not having enough storage space because a file is too big,
this is an unlikely issue however, a file size being to large is much more likely to be a
problem if trying to send it through an email. This would halt my work flow momentarily
while I sorted out new space. However it could have a greater effect if I needed to save
something quickly and was unable to because I had no storage, this could cause me to
lose my work and set me back a few hours. One way to stop the chance of me needing to
save work with no available location is to carry around a memory with lots of empty
storage, this is so that I have a place separate to the computer to store files. It also
coincides with the solution to the other problem as it gives me a secondary place to store
work. The risk of not being able to send work through email due to a large file can be
circumvented easily if sending PowerPoints and can also be done on Photoshop, these are
the programmes most my work will be on. On PowerPoint I am able to decrease the
image quality within the individual PowerPoint, as images use the most space. With
photoshop if I am sending work I can save the work as jpeg as this is a small file size, and is
commonly used on websites because of its file size.
4. Copyright
• There would be a problem with my end
product if I use copyrighted or unlicensed
material and make money from it. If I was
caught doing this it would lead to me to have
to pay damages. A court would make me pay
any damages to the owner of the image and
may also prohibit me from using any of the
owners other images. The solution to this all
comes in the planning phase of production.
When I am planning out my work I will have to
consider whether or not to use images I have
found on the internet or to instead create my
own pieces to not risk being taken to court.
When planning to use an image I will have to
check the website I have found it from to see if
there is any way to pay for the images use, this
would normally be available on stock photo
sites. However if there is no where to pay on
the site I could also try and contact the owner
of the image through email.
5. DPI and files
• When I come to make my product I will need to make
sure that I use the correct dpi. DPI is an often misused
term, dots per inch, as it is often confused with PPI, pixels
per inch. DPI is the term used when printing a product
not when actually producing. However this isn't too
important as I will be opting to use 300 dpi, 72 dpi is also
used reasonably often, however I will be going for a high
quality printed product so I will want more printed dots
per inch of paper. 72 Dpi is often used for images that
are going to be used for online use as it is a smaller file
size so doesn't cause websites to be slow when loading.
• As I am wanting a high quality image the file type that I
use is also important as it can have many effects on my
end products. File types that are good for print are JPEG
and TIFF. File types good for web use are PNGs, GIFs and
in some ways PDFs. JPEGs are pretty useful for web and
print use this is due to their lossy compression, this
means that as the file size decreases so does the image
quality, however this means that a large file size will still
be high quality. TIFF is a large file size that uses lossless
compression that doesn't lose quality even when its been
copied or manipulated and can be restored to its original
state, however it takes forever to load on the internet but
due to its large file size it is great for printing. As I am
printing my product I will most likely use TIFF files as it is
a large file size that will not lose quality.
6. Techniques
• My Sci-Fi product could be made unique if I go for a more retro
aesthetic. I have found to make the background look as retro as
possible I use simple techniques such as using a background
texture, grainy images also look good with a retro aesthetic I can
use a filter on photoshop to achieve this. This helps set the tone
of the image and shows the audience that you have a clear retro
influence.
• Another Technique I can use to create a product with heavily retro
influences is to use the 3D tool in photoshop, on text, when text is
turned using this tool it creates a clear shadow. This however is
much more dense with solid corners and angles.
• Design also often reflects the era that it is being created in, so this
will probably have an impact on my work. For example in the
1930s, during Americas depression imagery turned much more
somber in comparison to that of the roaring 20s. Whereas
modern work is very diverse much like the culture that we live in.
7. 3D Planet Technique
• For the experiments I wanted to work on my low poly style.
The first one that I attempted was this 3D model one. I like this
but it doesn’t have much vibrancy too it, I could fix this
however it doesn’t strike me as very appealing to the eyes and
doesn’t give off the aesthetic that I desire.
• I used the programme blender to create this and overall the
task was quite monotonous and fiddly to understand.
• On the scene I created a “UV Sphere”, this meant that it was
made up of little squares rather than polygons. I then
increased the size and number of UVs on the sphere, allowing
more precision, then over that I I triangulated all of the faces
on the sphere so that I had the low poly effect.
• To make it look like earth I then got an earth map and applied
it as a texture to the sphere, I then went around selecting all of
the triangles that had land on top of them. Once all of the land
was selected I created a dark green texture and painted all the
selected area with this green. I then created another green
texture, I shrunk the selected area buy a few UVs and then
painted that area with the lighter green. I repeated all of these
steps with the water and sand.
• I then selected the ocean area and used the modify tool to
push all of the faces inwards to create a feel of depth between
the ocean and land. To further emphasise the point of depth I
also made it so that the beaches a have a slight slope on them
so it looks like the land runs into the ocean.
8. Low poly on Photoshop
• Here I decided practice using a low poly effect just on
photoshop. This mainly involves using just one tool and a
filter. Which is very simple but works really well to create a
unique image that I can then alter the colours to create a
very vibrant image.
• The first thing I do is draw a triangle or other low poly
shape, I do think its better if just stuck to triangles however
or at least used very few other shapes. Once have selected
the area I then use filter – blur – average, this converts the
selected area into one solid colour that is the average of all
the other colours in the selection.
• Once I have done this once I can use CTRL + F to repeat this
step without having to go into the filter menu. I do still have
to select each area. I make sure that I choose every area
carefully so the image still represents the original.
9. Low poly on Photoshop
• I repeat all the previous steps until it is completely
covered. This gives the effect to the left I think this
look is aesthetically pleasing because it takes a
mundane image and can make it interesting in a very
simple way.
• After I have applied the effect I can then edit the
colours in lots of ways but the way I have found is
most interesting to alter colours is by using the
Hue/Saturation tool and then using blending effects
this works to give the images a tropical look that also
has a Sci-Fi aesthetic so would work really well in my
book seen as it is based in space.
• I think this style would also work better with planets
as the big blocks of colour would work better than
small 3D triangles. This is due to their being very few
defining features on other planets that I would be
able to use to create different textures.
10. Risk Assessment
Risk Preparation
If any of the cables are not in good condition there
would be the possibility of me getting an electric
shock.
I could also get an electric shock from the plugs that
go into the computer.
Before I use any technology I should check that all the
wires are in good condition, if they are not I should
turn the computer and replace the faulty accessory.
I should also keep any liquid away from the computer.
If I am sat in the same position all day I could start to
have problems with my back in the form of aches and
stiffness.
The way that I would combat this is by having regular
breaks where I stand up and walk around, I could do
this every half an hour, it also allows me to have a
short break from working.
If I spend a lot of time looking at computer screens
there is the possibility that I start causing damage to
my eyes, this could be in the form of strain.
I would solve this pretty much the same way that I
solved the problem of being sat in the same position
for extended periods of time. I would make sure to
have a break away from the computer every 30
minutes to give my eyes a rest.
I could start to eat unhealthily, this could be down to
stress. If I am under pressure I could be caused to
start have mental health problems.
I will make sure I stick on tight schedule when doing
work, this will help me to know exactly where I am at
so will relive pressure. Having something else other
than just this work would also really help.
11. What I need:
Hardware software
Computer Photoshop
Camera Word
tripod In design
Mouse Lightroom
Keyboard PowerPoint
Graphics tablet (maybe)
monitor
Lighting
Battery
SD Card