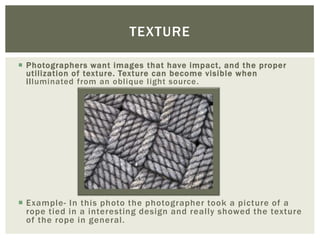
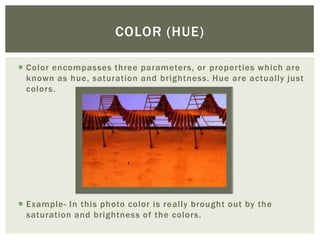
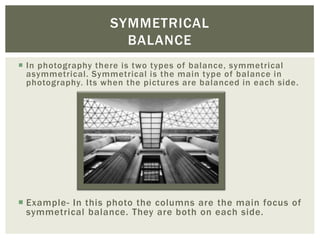
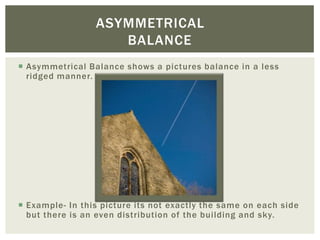
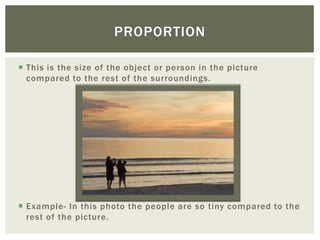
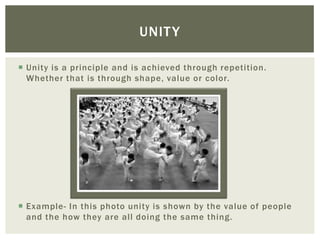
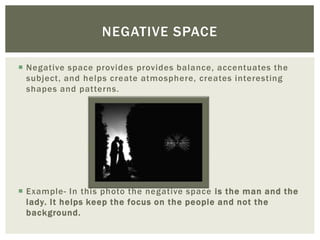
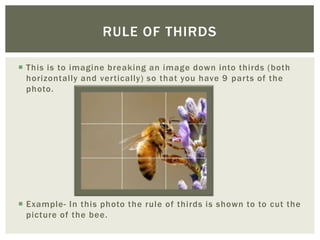
THE PRINCIPALS OF       By-
                    Elizabeth
    PHOTOGRAPHY     Rawding
SHAPE AND FORM

 Shape is the distinguished outline of the object. While form is
  the nuances of shadow that help give the shape depth.


 Example- In this photo of a car light shape and form is shown
  to outline the main light and the shadows on the car.
LEADING LINES

 Leading lines create meaningful compositions. They are used to draw
  the viewers eye straight to the main focus.


  Example- In this photo the leading lines are the lines of pink flowers
   leading straight to the main focus point, which is the building.
TEXTURE

 Photographers want images that have impact, and the proper
  utilization of texture. Texture can become visible when
  illuminated from an oblique light source .


 Example- In this photo the photographer took a picture of a
  rope tied in a interesting design and really showed the texture
  of the rope in general.
COLOR (HUE)

 Color encompasses three parameters, or properties which are
  known as hue, saturation and brightness. Hue are actually just
  colors.


 Example- In this photo color is really brought out by the
  saturation and brightness of the colors.
SYMMETRICAL
                      BALANCE
 In photography there is two types of balance, symmetrical
  asymmetrical. Symmetrical is the main type of balance in
  photography. Its when the pictures are balanced in each side.


 Example- In this photo the columns are the main focus of
  symmetrical balance. They are both on each side.
ASYMMETRICAL
                    BALANCE
 Asymmetrical Balance shows a pictures balance in a less
  ridged manner.


 Example- In this picture its not exactly the same on each side
  but there is an even distribution of the building and sky.
GRADATION

 Gradation is the tonal contrast between the black and white in
  a photo. This includes paying attention to density, and detail
  in a photo.


 Example- In this photo the black and white are shared evenly
  throughout the photo to almost make it look like a dirty sky.
REPETITION

 The main word you think of when you hear repetition is repeat.
  When you repeat a certain size, or shape or color you add
  strength to the overall image.


 Example- In this photo repetition is shown by the apple being
  brought all the way back to the back of the photo and the
  repetition of the green colored apples.
PATTERN

 Patterns can either be man made, or be apart of nature.
  Patterns add a visual rhythm and harmony to photographs.


 Example- In this photo patterns are shown by the pattern of
  shopping carts being stacked together.
CONTRAST

 Some photographers use contrast to direct the viewers eye to
  the focus point. Contrast shows the lightest tone to the
  darkest tone, the lightest tone being the focus point.


 Example- In this photo the contrast is the yellow flower
  against the dull sky.
DOMINANCE

 This is used as a color tool. It is when the color of the main
  object or focus stands out much more then the rest.


 Example- The color dominance in this photo is the clouds and
  the sun peaking trough the clouds.
PROPORTION

 This is the size of the object or person in the picture
  compared to the rest of the surroundings.


 Example- In this photo the people are so tiny compared to the
  rest of the picture.
UNIT Y

 Unity is a principle and is achieved through repetition.
  Whether that is through shape, value or color.


 Example- In this photo unity is shown by the value of people
  and the how they are all doing the same thing.
NEGATIVE SPACE

 Negative space provides provides balance, accentuates the
  subject, and helps create atmosphere, creates interesting
  shapes and patterns.


 Example- In this photo the negative space is the man and the
  lady. It helps keep the focus on the people and not the
  background.
RULE OF THIRDS

 This is to imagine breaking an image down into thirds (both
  horizontally and vertically) so that you have 9 parts of the
  photo.


 Example- In this photo the rule of thirds is shown to to cut the
  picture of the bee.
VISUAL CENTER

 Placing the most important element in the center, also known
  as the focal point of the photo.


 Example- In this photo the track is the focus point of the
  photo.

Presentation1

  • 1.
    THE PRINCIPALS OF By- Elizabeth PHOTOGRAPHY Rawding
  • 2.
    SHAPE AND FORM Shape is the distinguished outline of the object. While form is the nuances of shadow that help give the shape depth.  Example- In this photo of a car light shape and form is shown to outline the main light and the shadows on the car.
  • 3.
    LEADING LINES  Leadinglines create meaningful compositions. They are used to draw the viewers eye straight to the main focus.  Example- In this photo the leading lines are the lines of pink flowers leading straight to the main focus point, which is the building.
  • 4.
    TEXTURE  Photographers wantimages that have impact, and the proper utilization of texture. Texture can become visible when illuminated from an oblique light source .  Example- In this photo the photographer took a picture of a rope tied in a interesting design and really showed the texture of the rope in general.
  • 5.
    COLOR (HUE)  Colorencompasses three parameters, or properties which are known as hue, saturation and brightness. Hue are actually just colors.  Example- In this photo color is really brought out by the saturation and brightness of the colors.
  • 6.
    SYMMETRICAL BALANCE  In photography there is two types of balance, symmetrical asymmetrical. Symmetrical is the main type of balance in photography. Its when the pictures are balanced in each side.  Example- In this photo the columns are the main focus of symmetrical balance. They are both on each side.
  • 7.
    ASYMMETRICAL BALANCE  Asymmetrical Balance shows a pictures balance in a less ridged manner.  Example- In this picture its not exactly the same on each side but there is an even distribution of the building and sky.
  • 8.
    GRADATION  Gradation isthe tonal contrast between the black and white in a photo. This includes paying attention to density, and detail in a photo.  Example- In this photo the black and white are shared evenly throughout the photo to almost make it look like a dirty sky.
  • 9.
    REPETITION  The mainword you think of when you hear repetition is repeat. When you repeat a certain size, or shape or color you add strength to the overall image.  Example- In this photo repetition is shown by the apple being brought all the way back to the back of the photo and the repetition of the green colored apples.
  • 10.
    PATTERN  Patterns caneither be man made, or be apart of nature. Patterns add a visual rhythm and harmony to photographs.  Example- In this photo patterns are shown by the pattern of shopping carts being stacked together.
  • 11.
    CONTRAST  Some photographersuse contrast to direct the viewers eye to the focus point. Contrast shows the lightest tone to the darkest tone, the lightest tone being the focus point.  Example- In this photo the contrast is the yellow flower against the dull sky.
  • 12.
    DOMINANCE  This isused as a color tool. It is when the color of the main object or focus stands out much more then the rest.  Example- The color dominance in this photo is the clouds and the sun peaking trough the clouds.
  • 13.
    PROPORTION  This isthe size of the object or person in the picture compared to the rest of the surroundings.  Example- In this photo the people are so tiny compared to the rest of the picture.
  • 14.
    UNIT Y  Unityis a principle and is achieved through repetition. Whether that is through shape, value or color.  Example- In this photo unity is shown by the value of people and the how they are all doing the same thing.
  • 15.
    NEGATIVE SPACE  Negativespace provides provides balance, accentuates the subject, and helps create atmosphere, creates interesting shapes and patterns.  Example- In this photo the negative space is the man and the lady. It helps keep the focus on the people and not the background.
  • 16.
    RULE OF THIRDS This is to imagine breaking an image down into thirds (both horizontally and vertically) so that you have 9 parts of the photo.  Example- In this photo the rule of thirds is shown to to cut the picture of the bee.
  • 17.
    VISUAL CENTER  Placingthe most important element in the center, also known as the focal point of the photo.  Example- In this photo the track is the focus point of the photo.