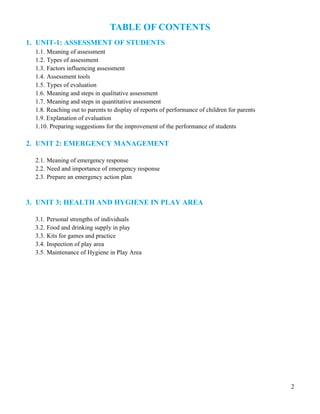
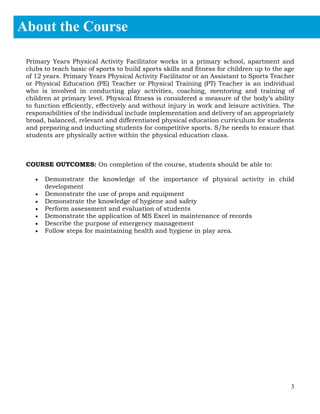
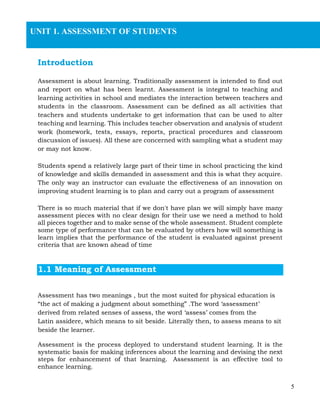
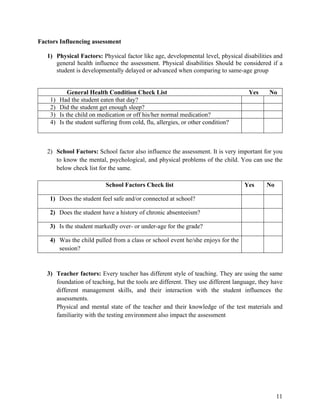
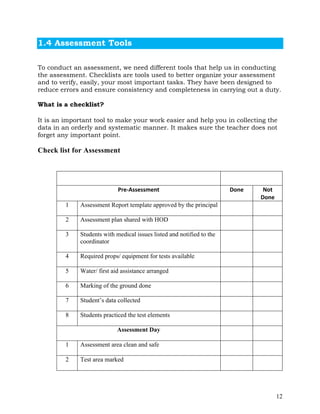
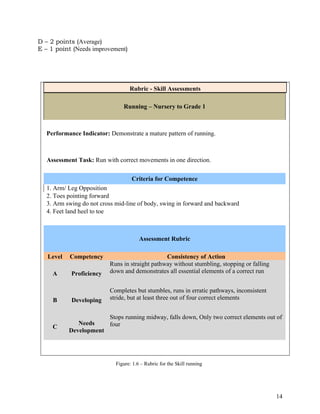
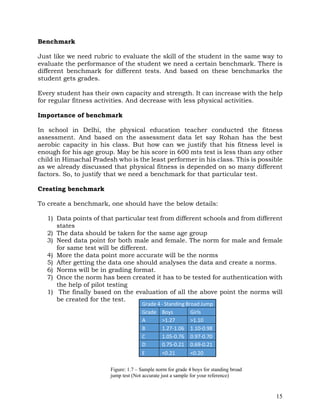
1
Primary Years Physical
Activity Facilitator
For Class
XII
Primary Years Physical Activity Facilitator
2
TABLE OF CONTENTS
1. UNIT-1: ASSESSMENT OF STUDENTS
1.1. Meaning of assessment
1.2. Types of assessment
1.3. Factors influencing assessment
1.4. Assessment tools
1.5. Types of evaluation
1.6. Meaning and steps in qualitative assessment
1.7. Meaning and steps in quantitative assessment
1.8. Reaching out to parents to display of reports of performance of children for parents
1.9. Explanation of evaluation
1.10. Preparing suggestions for the improvement of the performance of students
2. UNIT 2: EMERGENCY MANAGEMENT
2.1. Meaning of emergency response
2.2. Need and importance of emergency response
2.3. Prepare an emergency action plan
3. UNIT 3: HEALTH AND HYGIENE IN PLAY AREA
3.1. Personal strengths of individuals
3.2. Food and drinking supply in play
3.3. Kits for games and practice
3.4. Inspection of play area
3.5. Maintenance of Hygiene in Play Area
3
Primary Years Physical Activity Facilitator works in a primary school, apartment and
clubs to teach basic of sports to build sports skills and fitness for children up to the age
of 12 years. Primary Years Physical Activity Facilitator or an Assistant to Sports Teacher
or Physical Education (PE) Teacher or Physical Training (PT) Teacher is an individual
who is involved in conducting play activities, coaching, mentoring and training of
children at primary level. Physical fitness is considered a measure of the body’s ability
to function efficiently, effectively and without injury in work and leisure activities. The
responsibilities of the individual include implementation and delivery of an appropriately
broad, balanced, relevant and differentiated physical education curriculum for students
and preparing and inducting students for competitive sports. S/he needs to ensure that
students are physically active within the physical education class.
COURSE OUTCOMES: On completion of the course, students should be able to:
• Demonstrate the knowledge of the importance of physical activity in child
development
• Demonstrate the use of props and equipment
• Demonstrate the knowledge of hygiene and safety
• Perform assessment and evaluation of students
• Demonstrate the application of MS Excel in maintenance of records
• Describe the purpose of emergency management
• Follow steps for maintaining health and hygiene in play area.
About the Course
1.
4
1. Prof. Vinay Swarup Mehrotra, Professor & Head, PSS central institute of
Vocational education, Bhopal
2. Mr. Tahsin Zahid, CEO, Sports Physical Education Fitness and Leisure Sector
Council
3. Ms. Priya Dwivedi, Associate General Manager, Sports Physical Education
Fitness and Leisure Sector Council
4. Mr. Hassaan Ahmad Noori, Manager - Product and Training, Sportz Village Pvt.
Ltd.
5. Mr. Azad Khan, Head –Product and Training, Vocational Education, Sportz
Village Pvt. Ltd.
Acknowledgements
5
Introduction
Assessment is about learning. Traditionally assessment is intended to find out
and report on what has been learnt. Assessment is integral to teaching and
learning activities in school and mediates the interaction between teachers and
students in the classroom. Assessment can be defined as all activities that
teachers and students undertake to get information that can be used to alter
teaching and learning. This includes teacher observation and analysis of student
work (homework, tests, essays, reports, practical procedures and classroom
discussion of issues). All these are concerned with sampling what a student may
or may not know.
Students spend a relatively large part of their time in school practicing the kind
of knowledge and skills demanded in assessment and this is what they acquire.
The only way an instructor can evaluate the effectiveness of an innovation on
improving student learning is to plan and carry out a program of assessment
There is so much material that if we don't have plan we will simply have many
assessment pieces with no clear design for their use we need a method to hold
all pieces together and to make sense of the whole assessment. Student complete
some type of performance that can be evaluated by others how will something is
learn implies that the performance of the student is evaluated against present
criteria that are known ahead of time
1.1 Meaning of Assessment
Assessment has two meanings , but the most suited for physical education is
“the act of making a judgment about something” .The word ‘assessment’
derived from related senses of assess, the word ‘assess’ comes from the
Latin assidere, which means to sit beside. Literally then, to assess means to sit
beside the learner.
Assessment is the process deployed to understand student learning. It is the
systematic basis for making inferences about the learning and devising the next
steps for enhancement of that learning. Assessment is an effective tool to
enhance learning.
UNIT 1. ASSESSMENT OF STUDENTS
6
Assessment should answer two questions:
1. What was learnt?
2. How well was it learnt?
1.2 Types of Assessment
The main goal is to see what students have learned. Are they moving toward the
goal? Or they achieved their goal? We need to make sure that we make
assessment part of our daily teaching, and not a separate entity at the end of the
unit.
There are two key points to remember as you are choosing or designing any
assessment option: (1) You cannot assess it if you didn’t teach it.
(2) You can’t assess without a goal.
The first point, not assessing without first teaching, is largely, self- explanatory
– you must teach precisely what it is that you want to assess. The second point,
not assessing without a goal, is related to the first but slightly different.
Teacher Observation
Teacher observation is the most common form of assessment utilised in physical
education classes. It is generally employed to assess psychomotor performance
but can be applied to the effective domain as well. It is highly appropriate for
assessing the acquisition of critical elements of skill that together form a more
mature motor pattern.
Figure 1.1 shows a teacher checklist used to assess the critical elements of
running. There are different observation techniques, but the back of the wall
technique and scanning are the most valuable techniques. The teacher should
be in the position to observe the full class. Teacher should be standing outside
the activity area.
7
Skill: Running
Sl.no. Student Name Grade Roll No.
Arm/
Leg
Opposition
Toes
pointing
forward
Arm
swing
do
not
cross
mid-line
of
body
swing
in
forward
and
backward
Feet
land
heel
to
toe
1
2
3
4
5
6
7
8
9
10
Homework
Homework is work, a student completes outside of the physical education class
it can be used to practice psychomotor skill of fitness or to enhance cognitive
understanding. It can produce records of student progress, process and
participation or writing assignment such as report or observation of sporting
events. Physical education homework is similar to reports of reading done at
home, and we have found work homework quite useful, especially in terms of
fitness or activity participation.
Figure: 1.1 – Teacher Observation checklist for Running
8
Peer observation
Peer observation of students by other students can be used to assess competence
in performance of skills and demonstration of selected critical elements. Peer
observation is easily built into task by asking students to work as partners and
to provide each other with selected feedback regarding performance. For example,
while working on dribbling with the hands, one student can be asked to watch
the other and see if the partner use the fingerpads, bends the knee, and has a
staggered stance.
Children enjoy peer observation, but the teacher need to make sure that they
must define the cues clearly enough so that the partner can observe and
comment on the performance. Also, the teacher should structure the task so that
children observe only one cue at a time.
Figure: 1.2 – Teacher Observing the flexibility test
9
Self-assessment:
Self-assessment can be used to assess psychomotor, cognitive and affective
aspects of children's work. Although peer and teacher observations are quite a
useful tool for assessment of the critical cues for skills, self-assessment provide
a unique opportunity to evaluate larger components of a skill or the beginning
use of a skill. For example, in the case of learning to dribble we might ask
children if they could dribble using the preferred hand, the non-preferred hand,
while walking, while travelling at a jog, without a defensive player, and with the
defensive player
Alternatively, the self-assessment may be used throughout a unit as each of the
components is introduced and practiced. In this case, each individual
assessment would be dated and would be provide a record of the child's
achievement of the various components. Regardless of when self-assessment is
used children need to have ample opportunity to practice the various
Figure: 1.3 – Peer observation for football dribbling
10
components before completing it. If it is used at the end, children should have a
chance for a brief practice period before completing the assessment.
Skill: Basketball Dribbling
Name of the Child: Grade: Roll No:
Self-Assessment of Basketball Dribbling
Cues Need some time I am good
I want my teacher to
see this skill
Dribbling with prefered Hand
Dribbling with other hand
Dribbling while walking
Dribbling while jogging
Dribbling at full speed
Dribbling against the defense
Test for student's understanding
Critical cues for dribbling 1) 2) 3)
Teacher Comments:
1.3 Factors influencing Assessment
When used appropriately assessments can be expected to provide useable information about
students. However, in addition to whether standardized testing is a good indicator of student
performance, there is also debate on whether certain aspects in life- physical, mental, or situational-
affect students’ assessment results.
Physical Education provides an environment to develop fundamental movement skills. In addition,
assessment ‘for’ learning, focusing on the ‘process’ of the skill has potential to raise the overall
achievement of low achievers. Therefore, assessment ‘for’ learning may have the potential to raise
the standards of fundamental movement skills performance, positively influencing girls’ physical
activity.
There are so many factors which influencing assessment like age group, weather etc.
Figure: 1.4 – Self assessment for basketball dribbling
11
Factors Influencing assessment
1) Physical Factors: Physical factor like age, developmental level, physical disabilities and
general health influence the assessment. Physical disabilities Should be considered if a
student is developmentally delayed or advanced when comparing to same-age group
General Health Condition Check List Yes No
1) Had the student eaten that day?
2) Did the student get enough sleep?
3) Is the child on medication or off his/her normal medication?
4) Is the student suffering from cold, flu, allergies, or other condition?
2) School Factors: School factor also influence the assessment. It is very important for you
to know the mental, psychological, and physical problems of the child. You can use the
below check list for the same.
School Factors Check list Yes No
1) Does the student feel safe and/or connected at school?
2) Does the student have a history of chronic absenteeism?
3) Is the student markedly over- or under-age for the grade?
4) Was the child pulled from a class or school event he/she enjoys for the
session?
3) Teacher factors: Every teacher has different style of teaching. They are using the same
foundation of teaching, but the tools are different. They use different language, they have
different management skills, and their interaction with the student influences the
assessments.
Physical and mental state of the teacher and their knowledge of the test materials and
familiarity with the testing environment also impact the assessment
12
1.4 Assessment Tools
To conduct an assessment, we need different tools that help us in conducting
the assessment. Checklists are tools used to better organize your assessment
and to verify, easily, your most important tasks. They have been designed to
reduce errors and ensure consistency and completeness in carrying out a duty.
What is a checklist?
It is an important tool to make your work easier and help you in collecting the
data in an orderly and systematic manner. It makes sure the teacher does not
forget any important point.
Check list for Assessment
Pre-Assessment Done Not
Done
1 Assessment Report template approved by the principal
2 Assessment plan shared with HOD
3 Students with medical issues listed and notified to the
coordinator
4 Required props/ equipment for tests available
5 Water/ first aid assistance arranged
6 Marking of the ground done
7 Student’s data collected
8 Students practiced the test elements
Assessment Day
1 Assessment area clean and safe
2 Test area marked
13
3 Rules and instructions explained to students
4 Student Attendance marked on assessment day
5 Students have been given a warm-up
6 Recheck the input sheet if any student is missing the
test
7 Students cool down before leaving the testing area
Post Assessment
1 Program coordinator informed about the conclusion of
the tests
2 Test score uploaded on excel sheet carefully
3 Confirmed date of report availability
4 Report handed over to the principal/ program
coordinator/ class teachers
5 PTM completed
Assessment Rubric
The word rubric comes from the Latin word for red. A rubric is a coherent set of
criteria for students' skills that includes descriptions of levels of performance
quality on the criteria. The main purpose of rubrics is to assess performances.
The scoring is based on 3-point or 5-point grading system
Skill Assessment with A 3-point grading scale:
A is Proficient, has a weight of 3 points.
B is Developing, has a weight of 2 points and
C is Needs Development, has a weight of 1 point.
Skill Assessment A 5-point grading scale:
A – 5 points (Excellent)
B – 4 points (Very good)
C – 3 points (Good)
Figure: 1.5 – Checklist for Assessment
14
D – 2 points (Average)
E – 1 point (Needs improvement)
Rubric - Skill Assessments
Running – Nursery to Grade 1
Performance Indicator: Demonstrate a mature pattern of running.
Assessment Task: Run with correct movements in one direction.
Criteria for Competence
1. Arm/ Leg Opposition
2. Toes pointing forward
3. Arm swing do not cross mid-line of body, swing in forward and backward
4. Feet land heel to toe
Assessment Rubric
Level Competency Consistency of Action
A Proficiency
Runs in straight pathway without stumbling, stopping or falling
down and demonstrates all essential elements of a correct run
B Developing
Completes but stumbles, runs in erratic pathways, inconsistent
stride, but at least three out of four correct elements
C
Needs
Development
Stops running midway, falls down, Only two correct elements out of
four
Figure: 1.6 – Rubric for the Skill running
15
Benchmark
Just like we need rubric to evaluate the skill of the student in the same way to
evaluate the performance of the student we need a certain benchmark. There is
different benchmark for different tests. And based on these benchmarks the
student gets grades.
Every student has their own capacity and strength. It can increase with the help
for regular fitness activities. And decrease with less physical activities.
Importance of benchmark
In school in Delhi, the physical education teacher conducted the fitness
assessment. And based on the assessment data let say Rohan has the best
aerobic capacity in his class. But how can we justify that his fitness level is
enough for his age group. May be his score in 600 mts test is less than any other
child in Himachal Pradesh who is the least performer in his class. This is possible
as we already discussed that physical fitness is depended on so many different
factors. So, to justify that we need a benchmark for that particular test.
Creating benchmark
To create a benchmark, one should have the below details:
1) Data points of that particular test from different schools and from different
states
2) The data should be taken for the same age group
3) Need data point for both male and female. The norm for male and female
for same test will be different.
4) More the data point more accurate will be the norms
5) After getting the data one should analyses the data and create a norms.
6) Norms will be in grading format.
7) Once the norm has been created it has to be tested for authentication with
the help of pilot testing
1) The finally based on the evaluation of all the above point the norms will
be created for the test.
Grade 4 - Standing Broad Jump
Grade Boys Girls
A >1.27 >1.10
B 1.27-1.06 1.10-0.98
C 1.05-0.76 0.97-0.70
D 0.75-0.21 0.69-0.21
E <0.21 <0.20
Figure: 1.7 – Sample norm for grade 4 boys for standing broad
jump test (Not accurate just a sample for your reference)
16
1.5. Type of Evaluation
Evaluation focuses on grades. An evaluation can be used as a final review to
gauge the quality of instruction. It’s product oriented. This means that the main
question is: “What’s been learned?” In short, evaluation is judgmental.
After the Assessment, the result has been evaluated to know what the student
learned. Both assessment and evaluation require criteria, use measures and are
evidence driven.
Difference between Assessment and Evaluation:
• Assessment is ongoing and evaluation provide closure.
• Assessment improves learning quality and evaluation judges learning level.
• Assessment upgraded and evaluation graded.
• Assessment provides feedback and evaluation shows shortfalls.
Type of evaluation
Formative Evaluation: Formative evaluation is ongoing process. It is evaluation
used to monitor students learning progress during instruction with the purpose
of providing on going feedback to students and teachers
Summative Evaluation: Summative evaluation evaluate the outcome of the
program. This type of evaluation is given at the end of the course to what extent
the student has mastered the intended learning outcomes.
Diagnostic Evaluation: Diagnostic means to find out the exact problem.
Through diagnostic evaluation the teacher can know the student (their strength
and weakness). This evaluation also helps to find out the causes of learning
problem. This can be fixed with the remedial actions
17
1.6. Meaning and steps in qualitative assessment
In qualitative assessment, as the name suggests, we are looking for changes in
the quality of the skill as it is performed rather than the outcome.
A qualitative assessment is based on the experience, judgment, and wisdom of
the teacher who knows and teaches the skills to the students.
Qualitative methods are a good starting point when you begin your assessment.
These methods can be useful for describing a situation and can provide insight
for your intervention approach.
Qualitative assessment is based on cues or rubrics. To assess the skill the
teacher must have Rubrics which includes Performance Indicator and Criteria
Steps in qualitative assessment
Assessment Planning
Planning is the most important part in any assessment. Planning has different
elements. It should include such things as purpose for assessment, methods and
tools that will be used, the duration and the resources and materials.
Assessment plan outline:
• Objectives – describe the objectives for assessments from Students,
Teacher’s, School’s and Parent’s point of view.
• Techniques – indicate methods to be used for test.
• Time-Line – indicate the plan of testing, When, which students will come
to the ground, which tests would be conducted, when data will be collected
and analyzed, when reports will be available, and when inference
/recommendations will be made.
• Resources and Materials – indicate who has responsibility for seeing the
plan is carried out, who will conduct and analyze data, and who will
18
summarize/report results, ground and equipment conditions, first aid and
drinking water availability.
Pre, During and Post assessment:
Pre-Assessment: Preparation Phase
1. Students should know what assessments they will go through and should
have practiced before their assessments.
2. Assessment schedule should be discussed school coordinator
3. Parents should be informed of the assessment schedule and requested to
provide consent. Students having any physical/ medical issue should be
identified and should not participate in the test. This information should
be provided to the school coordinator.
4. Approval for report template should be taken from the Principal.
5. Weather conditions should be checked while planning assessment as all
these assessments are outdoors.
6. Collection of the student’s data should be done through program
coordinator in the school. Cross check student’s data with class
attendance register and fix the discrepancies (if any).
7. Once student’s data is collected, generation of on-ground input sheets.
8. Check the school props/equipment list for their availability for assessment.
If any prop/ equipment is damaged or not usable, inform school
coordinator and get them replaced beforehand. This is to be done
simultaneously when you are working on student’s data collection.
9. Ground marking should be complete.
10. Drinking water availability and first aid assistance should be in
place. If school nurse is involved explain the process of assessments and
the need for her assistance.
Day of the Assessment:
19
1. Visit the assessment area and ensure that it is safe. (stones, nails, glass
pieces, thorns etc. should have been cleared from the grounds).
2. All stations are marked.
3. Students are informed of the proceedings. Rules are explained with clear
and concise instructions. Cross check if students have understood
instruction given to them. Give students an opportunity to clarify their
doubts.
4. On ground input sheet is available on paper. Student attendance is taken.
5. Props/ Equipment is checked for safety.
6. Students are given warm-up before the test starts.
7. Encourage students to drink water to replace lost fluids especially on hot
days.
8. Recheck the inputs before concluding the session and retest the student
if any error/inaccuracy is seen.
9. Let students leave the testing area after a small cool down exercise.
Post Assessment:
1. Inform the coordinator about the conclusion of the testing in the school.
2. Upload well checked data on excel sheets
3. Communicate with coordinator for expected date of report generation and
collect it on due date. Check the report for any possible error (commonly-
Name & Gender).
4. Handover the reports to the coordinator. If instructed, give assessment
reports to the class teachers for distribution.
5. Update the information to the coordinator about distribution of report.
20
School: ABC
School Std: 4
Section:
B
Section:
B
Sl.
No.
Previous
Name Name
New
Student Gender
Previo
us
DOB DOB
Previ
ous
Stan
dard
Stan
dard
Previous
section
Sect
ion
1
Ankit
Thakur
Ankit K.
Thakur NO M
04-10-
2011
04-
10-
2011 3 4 A B
2
3
4
5
Skill Assessment (Nur) – Input Sheet Proficie
ncy
Developing
Needs
Develop
ment
Please put
Grades (A, B
or C) as
indicators of
level.
School Name & City:
Class & Section:
A B C
Assessment Date:
Assesor's Name:
Sl.
No.
Student
Name
Date of
Birth
(Day/Mont
h/Year
Gend
er
Heig
ht in
cm.
Weig
ht in
KG's
Locomotor
Non-
Manipulative
Manipulative
M/F Run
H
o
p
Self
Space
Balan
ce
Jumpi
ng
Throwin
g
Strik
e
with
Pad
dle
Catch
ing
Figure: 1.8 – Base Data Collection Sheet
Figure: 1.9 – Skill assessment input sheet for Nur
21
1.7. Meaning and steps in quantitative assessment
Currently the most widely-used assessments in PE are fitness tests. As you know,
with most of these tests a student score is compared to a table of norms and
given a rating. This is an example of a norm-referenced or quantitative
assessment. For physical educators, a measure of learning and conversely
teaching effectiveness would become available.
For physical educators, a measure of learning and conversely teaching
effectiveness would become available.
In Fitness test we are measuring different capacity of a child.
Aerobic Capacity
This is the capacity to sustain an activity for longer duration in the presence of
oxygen. Beep test and 600mts run/walk are the favorite to test to measure the
aerobic capacity.
Anaerobic Capacity
Anaerobic means maximum amount of force one can generates with lesser
amount of oxygen (no oxygen). To measure anaerobic capacity of the student, a
30-meter run test is conducted in a predetermined safe area between two lines
marked as start and finish lines. The minimum time taken to complete the
distance in seconds is the test score.
Flexibility
To measure flexibility of the back which is the range of motion of the back, Sit
and reach test is conducted and distance in centimeters covered is the test score.
22
Abdominal Strength
It is measured by conducting Sit-ups (curl-ups) test. Total number of sit-ups in
predefined time duration is the test score.
Explosive strength (Lower body)
This is measured using Standing broad jump test. Distance covered in meters is
the test score.
Explosive strength (Upper body)
The test used to measure upper body explosive strength is Over head medicine
ball throw. Maximum distance the medicine ball covers at its first bounce after
release from the hands of the student is the test score measured in meters.
Height and Weight
Height and weight of the child in relation to his age is a good indicator of his
health and development.
Fitness Assessment
Sl. no. Fitness Parameters Tests Age limit Comments
1 Aerobic Capacity
1. Beep Test
2. Walk or run test
3. Step test
4. Beep Test
5. 600mts Run/walk
7 year and above
Clear Instruction with
Demonstration
Proper warm-up required
2 Anaerobic Capacity
1. 20 mts Sprint
2. 30 mts Sprint
3. Flying 30 mts sprint
6 year and above
Clear Instruction with
Demonstration
Proper warm-up required
3 Upper Body Strength
1. Seated Medicine Ball
Throw
2. Standing Medicine
Ball Throw
3. Push-ups
4. Pull ups
6 year and above Specific warm up required
4 Lower Body Strength
1. Vertical Jump Tests
2. Standing Long
(Broad) Jump Test
6 year and above Specific warm up required
23
5 Abdominal strength
1. Curl ups
2. Sit Ups
3. Plank test
8 year and above Specific warm up required
6 Flexibility
1. Sit & reach test
2. V-Sit test
3. Toe Touch
6 year and above Proper warm up required
Figure: 1.11 – Student performing medicine ball
throw test
Figure: 1.12 – Stand long jump and Medicine ball
throw marking
24
Figure: 1.13 – Correct way of performing Sit up test
Figure: 1.14 – Correct way of performing sit & reach
25
Figure: 1.15 – Correct way of performing stand broad jump
Figure: 1.16 – Correct way of performing medicine ball throw
26
Steps in quantitative assessment
Assessment Planning
As we already discussed that planning is the most important part in any
assessment. So, in quantitative assessment also the planning will be the same
as qualitative assessment.
There are few points that can be added in the planning apart from what we
already discussed:
1. In your plan ensure that Endurance test is done on a single day with no
other tests if possible as this test is tiring. Test for flexibility can however
be done on the same day. It is recommended that a minimum of two days
be taken for the tests.
2. Give appropriate amount of recovery between tests.
3. Be attentive when recording the score on your input sheets. Minor errors
can lead to wrong inference about the student’s ability.
School Name & City:
Class & Section: 6 B
Assessment
Month/Year
:
Actual Date of Assessment:
Assessor’s Name:
Name
Ne
w_ Ge
nd
er
DOB
S
e
c
Heig
ht_c
m
Weig
ht_k
g
Stu
den
t
_ddm
myyyy
Grade 6
Beep_Test
_Laps_Cou
nt
Spee
d_se
c
Sit_re
ach_c
m
Standing_br
oad_jump_
m
Medicine_b
all_throw_
m
Sit_Up
s_1mi
n
Ankit
Thaku
r
Ye
s
M
ale
16-
02-
2010
B
24
6.0
2 27 1.79 6.21 17
Figure: 1.17 – Fitness assessment input sheet for Grade 6
27
1.8. Interaction with Parents Post Assessments
Parent Teacher Meeting
This is the opportunity for you to interact with the parents by explaining the
report. Parents will ask a lot of questions about the performance of their children.
Here are few tips on how to manage PTMs:
Managing a Parent–Teacher meetings
• A two-way conversation. The parent–teacher meeting is not only an
opportunity for parents to learn from you, but for you to learn from them.
Nobody knows your students better than their families. Their insights into
their child’s strengths and needs, learning styles and non-school learning
opportunities can help you improve your instructional methods. Your efforts
to better understand their aspirations and perspectives make parents feel
respected and build trust with them.
• Emphasis on learning. You can make the most of parent–teacher meetings,
and other forms of parent involvement, by “linking them to learning.” This
means communication back to discussing strategies to support student
learning. You can arm parents with knowledge and suggestions for how to
help their children learn.
• Opportunities and challenges. We all need praise and constructive criticism
to grow. All parents are proud of their children and need to hear about their
strengths as well as their challenges from you. This helps show parents that
you value the unique strengths of their children and have high expectations
for their ability to succeed in school and in life.
Pre PTM Preparation
• Confirm the date and time of the PTM from the school
• Inform your coordinator of the upcoming PTM and check for his / her
availability
• Ensure error-free report cards are delivered to the school
28
• Identify a spot where the props can be showcased (preferably outside the
classroom)
• Update the EduSports dashboard
• Keep parent testimonial forms ready
During the PTM
• Reach the school well in advance
• Be presentable
• Display clean and usable props
• Be available outside the classroom
Things to Remember
• Be on time
• Stay calm
• Communication should be polite.
• Understand the question first before you answer it. If you don’t have an
answer, ask them to write to us at assessments@edusports.in
• If parents are willing, ask them to fill the testimonial
• Always be positive when speaking about the child, school or EduSports
Post PTM
• Send the event completion report and testimonials to the coordinator on
the same day
• If there are any major issues / escalations, report to the concerned
functions immediately
29
1.9. Explanation of Performance Evaluation
Most of the time parents are not aware of the actual performance of the child.
They just see some grading and evaluate their children based on their own
understanding. Hence, it is very important for the physical education teachers
to make them understand the grading system and also the performance of their
children.
Explaining evaluation
Skill Assessment is qualitative assessment and based on the rubrics so the result
will be in the grading format. To measure the result and to convert it into
numbers, we can use 2 type of grading scale 1) A 3- point grading scale 2) A
5-point grading scale.
A 3-point grading scale with different weight
• A -3 points
• B -2 points
• C - 1 point
A is Proficient.
B is Developing.
C is Needs Development.
A 5-point grading scale with different weight
• A – 5 points
• B – 4 points
• C – 3 points
• D – 2 points
• E – 1 point
5-point grading scale is used to show the ratings for all fitness parameters
A – Excellent
30
B – Very good
C – Good
D – Average
E – Needs improvement
1.10. Steps for the improvement of the performance
slow learners
After the evaluation, the most important question is what next? For students
requiring further support, the teacher must introduce some remedial measures
to improve their performance. These remedial measures are designed in such a
way that it helps the student to improve the shortcomings and provide them to
perform better.
Remedial measure
Every student possesses a different level of learning abilities and fitness level.
One cannot depend on one remedial for all the students. It should be specific to
the different skill as well as for different fitness capacities.
Sample remedial measure to improve the aerobic capacity
AEROBIC CAPACITY
Aerobic capacity expressed by taking a measure of the amount of oxygen you
can use in one minute per kilogram of body weight. Cardio training increases
your aerobic capacity by making your body more efficient at utilizing available
oxygen and by increasing your cardiovascular system's ability to transport
oxygen.
Walking/Running
Walking leads to better cardiovascular fitness, stronger leg muscles, lower blood
pressure, lower risk of heart disease, diabetes, bowel cancer. Also running is an
inexpensive exercise you can do anywhere at a time that suits you.
31
Jumping Rope
Don’t have time to head to the ground? Head to your local sports store and pick
up a jump rope. Jumping rope burns up to 13 calories a minute, and is great for
a quick workout on the go and also to improve your aerobic capacity.
Swimming
If it’s too hot to walk or run, swimming can be a cool way to get fit. It’s a low-cost
workout for the whole body especially the muscles of the back, shoulder and
arms and improves flexibility as well.
Cycling
Cycling does double duty as an aerobic workout as well as being a low-cost, eco-
friendly form of transport. It’s good exercise for improving leg strength and toning
the leg and buttock muscles.
Dancing
Faster styles of dancing such as Jazz, Hip hop, African and Latin American can
provide an aerobic workout and improve flexibility and bone strength while being
a lot of fun.
32
Figure: 1.18 – Sample Report Cards
33
What have you learnt?
After completing this session, you will be able to
• Describe the various types of assessment and purpose of evaluation.
• Qualitative and quantitative assessment.
• Organise assessment and evaluation of students.
• Demonstrate the knowledge of organising interaction with parents.
Activity
Materials Required:
Props and equipment mentioned in the above Session.
1. Conduct on-ground skill and fitness assessment with the props available and
relate the use to age appropriateness.
2. Organise a role play on the below topics:
1) PTM explaining the norms and the grading to the student playing as a
parents
2) Explain the steps involved in Skill assessment
Check Your Progress
Fill in the blanks
1. ………………….is the most common form of assessment utilised in physical
education classes.
2. …………………….. is an important tool to make your work easier and help you in
collecting the data in an orderly and systematic manner.
3. In 5-point grading system grade -A has a weightage of …….points
4. Just like rubric is important for evaluate the skill, in the same way ………… is
important evaluate the performance of the student
Subjective Question
1. Describe assessment? And name different type of assessment?
2. What are the different factors influencing assessments?
3. Describe any 2 important assessment tools?
34
Introduction
During an emergency normal procedure are interrupted, and immediate
measures (management) need to be taken to prevent it from becoming disaster,
which is even harder to recover from. Disaster management is a related term but
should not be equated to emergency management.
2.1 Emergency response
Emergency response is sometimes a cyclical process, involving repeated
assessment, planning, action and review. It starts with an initial assessment and
may be triggered spontaneously by the disaster event, or officials may authorize
the mobilization of people and resources.
Emergency Action Plans are essential to properly manage injuries and illnesses
in physical education and sport. However, most literature discusses Emergency
Action Plans in the athletic arena instead of physical education. In this unit we
will try to examine what physical education instructors' experiences of student
illness and injury, discuss the steps of an Emergency Action Plans, and provide
a template for physical educators to develop a customized Emergency Action
Plans at their school.
2.2 Need and importance of emergency response
Emergency action plans provide a systematic approach to addressing medical,
environmental, and security emergencies. In schools, emergency action plans
are designed to guide people to respond quickly to sports-related injuries and
medical conditions that are serious or life-threatening. Emergency action plans
help ensure that sports organizations are prepared for serious medical events by
putting critical training, equipment, and protocols in place before they are
needed.
UNIT 2. EMERGENCY MANAGEMENT
35
Examples of conditions and injuries
Heatstroke
Heatstroke occurs when your body temperature rises rapidly and you're unable
to cool down. It can be life-threatening by causing damage to your brain and
other vital organs. It may be caused by strenuous activity in the heat or by being
in a hot place for too long.
Heatstroke can occur without any previous heat-related condition, such as heat
exhaustion.
Signs and symptoms
• Fever of 104 F or greater
• Changes in mental status or behavior, such as confusion, agitation,
slurred speech
• Hot, dry skin or heavy sweating
• Nausea and vomiting
• Flushed skin
• Rapid pulse
• Rapid breathing
• Headache
• Fainting, which may be the first sign in older adults
Emergency first aid for Heatstroke
• Place in a tub of cool water or a cool shower.
• Spray with a water pipe.
• Sponge with cool water.
• Fan while misting with cool water.
• Place ice packs or cool wet towels on the neck, armpits and groin.
• Cover with cool damp sheets.
Allergic reactions and asthma
Symptoms of a severe allergic reaction
ü difficult or noisy breathing
ü swelling of the tongue
36
ü swelling or tightness of the throat
ü difficulty talking
ü persistent cough
ü persistent dizziness or collapse
ü paleness and floppiness in young children
ü abdominal pain and vomiting.
Emergency responses for severe allergic reaction (anaphylaxis) are:
ü lay the person flat. Do not allow them to stand or walk
ü administer adrenaline with an autoinjector (such as an EpiPen®)
ü call an ambulance in a medical emergency.
Symptoms of asthma attacks
ü finds it very difficult to breathe
ü is unable to speak comfortably or if their lips are turning blue
ü has symptoms that get worse very quickly
ü is getting little or no relief from their reliever inhaler.
Emergency first aid for asthma attacks
ü relievers that act quickly to relax the muscles around the airways – this
is the medication used during an asthma attack
ü preventers that slowly make the airways less sensitive to triggers and
reduce inflammation inside the airways – they are taken daily to help
keep you well
ü combination therapies that are preventers containing two different
medications.
Cardiac arrest
CPR is executed during an emergency when someone to save a person’s life if
their heart stops beating from sudden cardiac arrest. CPR can increase the
chances of survival if performed immediately.
37
For non-healthcare providers or bystanders without formal CPR training:
The recommendation is for compression-only CPR, or hands-only CPR, without
mouth-to-mouth breathing. This version of CPR is recommended for people
without formal training who see an adult or teen suddenly collapse outside of a
hospital or medical facility, for example at home, at work, in a park, or place of
business.
If you see a teen or adult suddenly collapse, it’s important to act fast and follow
these steps for hands-only CPR:
STEP 1: CHECK FOR BREATHING
Check for signs of breathing—either the chest rising and falling or feel or hear
the breath.
STEP 2: CALL FOR HELP (AMBULANCE – 112)
If the person is not breathing or is gasping, ask someone to call 112 or call
yourself.
STEP 3: ADJUST YOUR BODY TO PERFORM CHEST COMPRESSIONS
Kneel next to victim. Use your fingers to locate the end of the victim’s
breastbone, where the ribs come together. Place two fingers at the tip of the
breastbone. Place the heel of your other hand above your fingers (on the side
closest to the victim’s face). Then put the heel of your other hand on top of the
first hand, so your hands are stacked (intertwining fingers is recommended).
STEP 4: PERFORM CHEST COMPRESSIONS
Push hard and fast in the center of the chest until help arrives. You can use
the weight of your body to add strength to your pushes. It’s important to push,
giving 100 to 120 compressions per minute. Which is about the same tempo as
the song “Stayin’ Alive” by the Bee Gees.
For adult and teenage victims, the recommended compression depth is at least
2 inches (5 cm), while avoiding chest compression depths greater than 2.4
38
inches (6 cm). For children (age 1 year to puberty), recommended compression
depth is about 2 inches (5cm).
Don’t remove your hands from the victim’s chest, just your weight. Avoid
leaning on the victim between compressions—allow the chest to return to its
normal position.
STEP 5: WAIT FOR HELP
Continue to perform compressions until help arrives.
39
2.3 Emergency action plan
First Aid
First Aid is a combination of simple but quite effective and active
measures to prevent possible complications. First Aid means the treatment
given to a ‘patient’ till proper medical aid comes.
Giving First aid is an important skill. By performing simple procedures and
following certain guidelines, it may be possible to save lives by giving basic
treatment until professional medical help arrives.
ABC in first aid is part of St Johns Ambulance DR ABC, a general set of first
aid steps. The ‘DR’ part makes sure that the person is safe from further harm,
but if not, ABC is used to diagnose a problem
DRABC of first aid
D for Danger
Make sure that the general area is free of risks
R for Response
Check if the person is unconscious or not by trying to talk to them – check for
responses to alerts, voice, in addition to placing hands on the body
A for Airways
An airway allows oxygen into the body. If a person is unconscious, it is possible
that his/her airway is blocked. This is because the tongue can fall back into
the mouth and block the throat. To fix the problem, place the patient on their
side with their head up, to open the throat. In preparation for CPR, airways
must be clear.
B for Breathing
When arriving at an incident, you need to check if someone is breathing. You
can look for visual signs like the chest moving up and down. Or placing your
hand near their nose and mouth. If you find the person breathing abnormally
or not at all, calmly move onto checking for circulation.
C for Circulation
40
Check for signs of a heartbeat and blood circulation. Obvious signs of
circulation are movement and coughing, but the person is most likely
unconscious if the previous two signs are absent.
First Aid – Purpose and basic principles
The purpose of First Aid is to preserve life, assist recovery and prevent
aggravation of the injury, until the services of a doctor can be obtained or
during transport to hospital or to the patient’s home. Always send someone to
call for help while you perform first aid.
Principles:
1. Do first things first quickly, quietly and without panic
2. Guard against or treat for shock by moving the patient as little as
possible.
3. Do not attempt too much
4. Reassure the patient and those around in order to reduce tension
5. Stop any bleeding
6. Give artificial respiration if breathing has stopped.
Cuts and Bruises
Cuts and bruises are part of growing up. Do not become paranoid about the
children’s safety and prevent them from exploring. At the same time know what
to do when they injure themselves. If cuts are deep and do not stop bleeding,
seek medical help.
41
What to do?
• Rinse the wound clean with water.
• If the wound is bleeding, then apply pressure to stop the blood flow.
• Use a sterile gauze or bandage to do that.
• Raise the injured part to above the heart level to slow down the bleeding.
• When the bleeding stops, cover the wound, if necessary with a clean
bandage.
Prevention: Teach the children to handle sharp objects with the right
technique. Supervise them when they do. Make the children’s environment in
school and at home safe, i.e. avoid sharp corners, glass furniture, access to
sharp objects like knives etc.
Heat Exhaustion
Signs and Symptoms
• Severe Thirst
• Muscle weakness
• Nausea, sometimes vomiting
• Headache
• Increased sweating
• Decreased responsiveness or loss of consciousness
• Difficulty in breathing
What to do?
• Bring the child under shade, undress him and make him lie with his feet
elevated.
• If the child is alert, use a cold sponge on his head.
• Give him sips of cool water or sports drinks
• If he vomits, turn him to the side to prevent choking.
• In the case of heatstroke seek medical help immediately.
Breathing Difficulties
If someone stops breathing, see if the person can speak or respond when
touched on the shoulder. If not, call for help – and immediately begin first aid.
Send bystanders for help. But if you're alone, perform basic life support for one
minute before going for help.
42
1. Place the person on his or her back on the floor.
2. Tilt the head, so that the chin is pointing upwards. Do this by placing the
fingertips under the jawbone, then lift gently while pressing down softly
on the person's forehead. This is done to make sure the tongue is not
blocking the throat.
3. Keep holding the head in this way while checking for breathing. Look if
the chest is rising and falling, or place your ear next to their mouth to
listen for breathing and feel breath on your cheek. Only check for 10
seconds.
4. If there's normal breathing, hold the head as described above until help
arrives. If there's no breathing or gasping breaths, start basic life
support.
Cuts
Bleeding
With all types of bleeding, it's important to stop the flow of blood as quickly as
possible.
Small cuts
Small cuts in the veins stop bleeding and clot within a few minutes. The area
should then be washed, and a plaster placed gently on top.
Deeper cuts
Deeper cuts in the veins produce dark blood that seeps out slowly and steadily.
It can be stopped by gentle pressure on the wound with a sterile or clean cloth,
followed by the application of a clean or sterile bandage. Often, these wounds
need sewing or gluing, and therefore medical treatment will be necessary after
first aid.
Choking
Choking is the mechanical obstruction of the flow of air from the environment
into the lungs. This usually occurs when food that has not been thoroughly
chewed gets stuck. It also occurs when a foreign body or object is lodged in the
throat or wind pipe. A person who is choking can usually communicate with
hand movements, and may place their hand against their throat. In such a
case he/she will definitely need help, so summon assistance for him/her.
Because choking cuts off oxygen to the brain, first aid should be administered
as quickly as possible.
43
First Aid
To give first aid, perform abdominal thrusts (Heimlich maneuver), as given below:
• Stand behind the person. Wrap your arms around the waist. Tip the person
forward slightly.
• Make a fist with one hand. Position it slightly above the person's navel.
• Grasp the fist with the other hand. Press hard into the abdomen with a
quick, upward thrust — as if trying to lift the person up.
• Perform a total of 5 abdominal thrusts, if needed. If the blockage still isn't
dislodged, repeat the five-and-five cycle.
To clear the airway of an unconscious person:
• Lower the person on his or her back onto the floor.
• Clear the airway. If a blockage is visible at the back of the throat or high in
the throat, reach a finger into the mouth and sweep out the cause of the
blockage. Be careful not to push the food or object deeper into the airway,
which can happen easily in young children.
• Begin cardiopulmonary resuscitation (CPR) if the object remains lodged
and the person doesn't respond after you take the above measures. The chest
compressions used in CPR may dislodge the object. Remember to recheck the
mouth periodically.
Basic Sports Injuries
Sports injuries are injuries that typically occur while participating in organised
sports, training sessions or fitness activity. These injuries may be caused due to
lack of proper safety equipment, improper training, etc. Injury could be acute
traumatic or chronic injury. Acute traumatic injury are caused by a single
application of force, for example a strain, sprain, fracture etc. whereas chronic
injury happens over a period of time due to repetitive incorrect training. These
include stress fracture, tendinitis etc.
1. Sprain: Ligaments are tissues that stabilize and support the body’s joints.
A sprain is an injury to a ligament caused by tearing of the fibres of the
ligament. The ligament can have a partial tear, or it can be completely torn
apart. Sprained ligaments swell rapidly and generally, the greater the pain
and swelling, the more severe the injury is.
44
2. Muscle strain: A muscle strain is injury to muscle as a result of strenuous
activity. A strain is a twist, pull or a tear of a muscle or tendon.
First Aid for Sprains
Follow the instructions for R.I.C.E.
1. Rest the injured limb and avoid all activities.
2. Ice the area. Use a cold pack to help limit swelling after an injury. Try to
ice the area as soon as possible after the injury and continue to ice it for
15 to 20 minutes, four to eight times a day, for the first 48 hours or until
swelling improves. Do not to use it too long, as this could cause tissue
damage.
3. Compress the area with an elastic wrap or bandage.
4. Elevate the injured limb above your heart whenever possible to help
prevent or limit swelling.
The concept of first aid kit
A well-stocked first-aid kit is as important as props for every physical education
classes. The first aid kit should be within an easy reach for the teacher to use in case
45
there any emergencies. A well-stocked first aid kit will enable you to respond effectively
to common injuries during a physical education class.
Usually a first aid kit is available in all medical stores. Though it is available in the
medical stores, it is essential for a physical education teacher to know what are the items
included in a first aid kit. Below is the list of items required for a first aid kit;
• First-aid manual
• Sterile gauze pads of different sizes
• Adhesive/ glue tape
• Adhesive bandages in several sizes
• Elastic bandage
• A splint
• Antiseptic wipes
• Soap
• Antibiotic ointment
• Antiseptic solution
(like hydrogen
peroxide)
• Hydrocortisone
cream (1%)
• Acetaminophen and
ibuprofen
• Tweezers – small
instruments for
plucking hairs and
picking up small
object
• Sharp scissors
• Safety pins
• Disposable instant cold packs (if available)
• Calamine lotion
• Dettol or savolin lotion
• Thermometer
• Plastic non-latex gloves (at least 2 pairs)
• Touch and extra batteries
• A blanket
• Mouthpiece for administering CPR (can be obtained from your local medical
shop)
• A list of emergency phone numbers – nearest hospital, school principal, a
reliable taxi driver
• Blanket (stored nearby)
46
What have you learnt?
After completing this session, you will be able to
• Describe emergency response
• Identify and respond to emergencies in play field
• Prepare an emergency action plan
Activity
Materials Required:
Props and equipment mentioned in the above Session.
1.Organise an emergency drill/ response under the guidance of a teacher for the
following situations:
A) drill assuming a child fall and break his leg and also bleeding due to a small cut
on his hand
B) Drill to give CPR to a patient
Check Your Progress
Fill in the blanks
A. ………………….occurs when your body temperature rises rapidly and you're
unable to cool down
B. Emergency management is the management of the resources and responsibilities
for dealing with all ………………………..of emergencies
C. Difficulty in breathing and swelling of the tongue are the symptom of
……………………………
D. ……………is important to save a life if the patient’s heart stops beating from
sudden cardiac arrest
Subjective Questions
A. What is the importance of first aid?
B. What is the first aid for heatstroke?
C. Write the steps of CPR?
D. Explain the ABC of first aid?
47
Introduction
Drinking, eating, washing, excreting – these are things we do every day of our
lives. But the way we do them can have a major impact on our health. Good
hygiene practices are an essential part of daily life and we all need to understand
what hygiene means, why it is important for our health and wellbeing, and how
we can change our behavior to safeguard our health. Promoting good hygiene in
your community and educating people in ways to protect themselves and their
families from ill health is one of the most important aspects of your work.
Health is a state of complete physical, mental and social well-being and not
merely the absence of disease or infirmity.
Hygiene is the practice of keeping yourself and your surroundings clean,
especially in order to prevent the spread of disease. Having good personal hygiene
practices means taking care of yourself and leading a healthy lifestyle.
Good personal hygiene is the first step to good health. It not only protects you
from poor health, but also shields those around you from suffering illness that
arise from poor personal habits.
Some general hygiene and sanitation rules:
• Take bath every day after practice
• When you come home after playing a game, always wash hands, face and
feet.
• Change clothes and undergarments frequently.
• Cut hand and foot nails regularly.
• Never go to bed in your daily clothes.
• Do not eat fruits and vegetables without washing.
In the following text you will learn about some of the general rules of
hygiene and sanitation and you would also understand and appreciate the
reasons for doing so. If you follow healthy practices, you will live a healthy and
long life. You will also be more productive and efficient.
UNIT 3. HEALTH AND HYGIENE IN PLAY AREA
48
3.2 Food and drinking supply in play
Hygiene is the most important part of sports. From the food that you eat at home
to the food that was served to you during the matches all should be clean,
healthy and hygienic.
Bacteria that cause food poisoning can be on everyone. You can spread
bacteria from yourself to the food if you touch your nose, mouth, hair or your
clothes, and then food.
Hygiene tips for the person who supply food and drinks during play
ü wash and dry your hands thoroughly before handling food, and wash
and dry them again frequently during work
ü dry your hands with a clean towel, disposable paper towel or under an
air dryer
ü never smoke, chew gum, spit, change a baby’s nappy or eat in a food
handling or food storage area
ü never cough or sneeze over food, or where food is being prepared or
stored
ü wear clean protective clothing, such as an apron
ü keep your spare clothes and other personal items (including mobile
phones) away from where food is stored and prepared
ü tie back or cover long hair
ü keep fingernails short so they are easy to clean, and don’t wear nail
polish because it can chip into the food
ü avoid wearing jewellery, or only wear plain-banded rings and sleeper
earrings
ü completely cover all cuts and wounds with a wound strip or bandage
(brightly coloured waterproof bandages are recommended)
ü wear disposable gloves over the top of the wound strip if you have
wounds on your hands
ü change disposable gloves regularly
ü if you feel unwell inform the person above you, and don’t handle food.
49
3.3 Kits for games and practice
Inspection and maintenance of sports facilities and kits
The play space (ground, court, etc.) and play equipment are subject to changes
based on usage and other factors. Therefore, they must be inspected on a
regular basis. The frequency of inspection will be determined by many factors
including use, overuse, equipment age and materials, and external factors like
the age of the users, climate, in accidents like fire.
Low Frequency Inspections
Often performed quarterly or semi-annually, low frequency inspections are in-
depth investigations of the equipment and surfacing looking for wear and tear.
This inspection requires a staff member with mechanical knowledge and
extensive knowledge about play equipment and surfacing standards. During or
immediately after the inspection, staff should do preventive maintenance and
repairs and/or remove damaged equipment to remedy problems discovered in
the inspection. An example of this type of maintenance would be replacing
heavily worn chains that were noted during the inspection.
High Frequency Inspections
Often performed daily or weekly, high frequency inspections look at frequently
changing conditions caused by use, weather, and/or vandalism. During a high
frequency inspection, staff checks and corrects playground conditions such as
loose-fill surfacing depths, sanitation issues, and the presence of trash and
debris. If any hazards are discovered, staff should follow school or agency
procedures such as completing documentation, taking the area out of use,
and/or correcting the problem.
Keeping kit and equipment clean
Maintaining and cleaning your personal protective equipment is essential to
ensure it remains effective and operational over time.
Each item of personal protective equipment has specific Standards that apply
to the care, fitting and maintenance of these items. This information will
normally be found on the items. The information in this article should be used
as additional information to these standards.
50
Specific Protection Items
Specific protection items are those pieces of personal protective equipment
which protect a specific body area. The items we will be looking at include:
• Leather gloves
• Rubber gloves
• Safety Gloves
• Safety & Protective Goggles
• Safety Eyewear & Glasses
• Guards
• Helmet
Contraindications
Never use:
• Harsh chemicals
• Paint
• Glues unless manufacturer approved
• Solvent based adhesives
• Permanent markers
Personal items and kits
Inspection
Personal items and kits should be clean and odour free. Cleaning items
regularly is essential. It should be inspected for signs of damage prior to
cleaning. Damage could show through:
• Cracks
• Fraying of edges and cuffs
• Worn
• Chemical contact areas
• Holes
• Tear
Once a visual inspection has been completed, run your fingers over the items,
seeking areas of roughness, damage or weaknesses. Place the items on and
search again for areas of weakness or excessive roughness and damage.
51
If damaged, the items should be disposed
Cleaning
If the items are free of damage, the dirt should be removed. Once dirt free, it
can be washed.
1. Dampening the items (don't immerse in water) with a mixture of either
warm soapy water. Baby soap is the preferred cleaning agent because the
additional moisturising agents assist if any leather item is there.
2. Scrub with a small, soft bristled brush.
3. Rinse, again being careful to avoid immersion, in fresh warm water. A 2-
5 ml of white vinegar added to the water will remove any odours if you
are washing any leather items
4. Dry naturally on a flat surface, away from direct sunlight.
5. Once dry, keep it safely
Storage
Keep your items out of direct sunlight in a cool location in an area. Kits in
cupboard and other personal items in store
52
3.4 Inspection of play area
Maintenance and service of sport facilities
To keep quality of sports surfaces, it is necessary to do regular
maintenance like
• Remove leaves, stones, pebbles, flints, pieces of sharp objects from the
pitch
• Swipe the floor daily; if it is a cemented floor
• Allow only recommended footwear on the court
• Maintain cleanliness of pitch and its surroundings.
• Maintain cleanliness and quality of props and equipment
• Periodically check the maintenance of goal posts, volleyball poles,
basketball post, etc.
• Keep sufficient dustbins
53
Special maintenance at least once a year:
• Level and slope of the ground should be such that the is no water logging
• Repair and check for drainage systems
• Special brushing with professional machinery (e.g. for cemented floor)
• Follow the maintenance instructions carefully for all artificial turf
Examples of Props and Equipment Maintenance:
Check the pressure carefully. Pressures for
various balls are as follows;
Football – 5.5-16PS
Basketball – 7-9PS
Volleyball – 5.8-6.5PS
Before using the balls:
ü Inflate balls to correct pressures.
ü Before you inflate the balls moisten the needle.
ü To inflate balls, squeeze balls while gradually
adding a small amount of air at a time.
ü Inflating balls with too much air at once will
damage the inner tube/ bladder.
ü Avoid inflating balls with machines as it may over inflate.
After using the balls:
ü Deflate little air after use. If the same air pressure remains in balls after use,
balls may expand or deform.
ü Wipe the surface with a soft cloth.
ü If you are unable to remove dirt easily, wipe balls with a moistened cloth.
54
ü If you are unable to remove dirt
with moistened cloth, wipe balls
with a cloth moistened with
water-diluted mild detergent.
ü If you use mild detergent to clean
balls, thoroughly wipe off any
remaining detergent to ensure
that it does not remain on the
ball surface. (detergent may
cause stain).
ü Wipe the ball afterwards with a
dry cloth.
ü Dry balls out of direct sunlight in a well-ventilated place. Do not keep it under
direct sunlight for long.
ü If the ball has been soaked by rain, wipe away moisture and dirt using a cloth.
Dry the ball out of direct sunlight in a well-ventilated place
To store balls:
ü Avoid leaving balls in a place that is exposed to direct sunlight.
ü Avoid storing balls in hot or damp places.
ü Store balls in a well-ventilated place.
ü Inflate balls regularly and store them in a well-ventilated place out of direct
sunlight.
Even if the equipment is not in use, it requires regular cleaning and
maintenance. To maintain Props and Equipment you should perform the
following activities:
1. After the activity, use a dry cloth to wipe the props/ equipment and store
in a well-ventilated place out of direct sunlight.
2. Check the condition of the props/ equipment regularly to avoid using a
damaged prop.
3. Do not leave the props/ equipment in direct sunlight for the whole day. It
would reduce the life of props/ equipment.
4. Do not store the props and equipment made of iron/ metal in a damp
place. The moisture may lead to rusting.
5. Do not apply water on any leather props and equipment. Always use dry
cloth to clean.
55
3.5 Maintenance of Hygiene in Play Area
Playground Hygiene
Our surroundings affect of health. It is very important that we take care of our
surrounding and play are to stay fit and healthy. We must demonstrate a
responsible behavior towards our surroundings in order to get the best out of it
as well as to preserve them for the future.
These are some of the things you can do to help.
• Do not litter, always carry a bag with you to bring waste and dispose it
off in a dustbin
• Throw garbage only in a dustbin
• Do not spit in public places or on the ground
• Keep your changing room clean
• Do not destroy plants; do not pluck flowers and leaves around the play
area
• Segregate waste into biodegradable and non-biodegradable categories
Use disinfecting and cleaning agents to maintain health and prevent the spread
of germs and illness, it is a process aiming at providing a healthy environment.
It can also be described as activities aimed at improving and maintaining the
standard of basic environmental conditions affecting the well-being of people.
56
Whether you play indoor or outdoor, it is important to take a general look at
the equipment to make sure that it is clean and well maintained. Some of the
points that you need to keep in mind are as follows:
• There should be no broken equipment and props
• Wooden equipment should not be cracked or splintered
• Metal equipment should not be rusted
• Children should be aware of the unsafe and dangerous areas/ locations,
if any
• Surface materials on the playground should be maintained regularly so
that the surfacing is loosely packed and covers all appropriate areas —
especially the fall zones surrounding playground equipment
• Playground equipment should be made of durable materials that won't
fall apart or worn down too much by the weather
• Make sure that there is enough free space in front of equipment like
slides, swings etc. Do not allow children to be in close proximity when
equipment is in use
• Check for objects (like hardware, S-shaped hooks, bolts, nails and sharp
or unfinished edges) that stick out on equipment and could cut a child or
cause clothing to become entangled
• All hardware on equipment should be secure, with no loose or broken
parts. Plastic and wood should show no signs of weakening, and there
should not be any splintered or rusted surfaces
• If the playground has a sandpit, check for hazardous debris such as
sharp sticks or broken glass, and be sure that the sand is free of bugs. It
is advisable to cover sand pits when not in use to prevent contamination
from animals
• Keep your playground clean and safe by picking up garbage and using
the equipment properly. Report to higher authorities for any problem
immediately related to safety
• If any of the equipment seems broken, loose, or in need of maintenance,
designate it as off-limits immediately; report the problem to the
appropriate authorities and follow up for completion
57
58
59
What have you learnt?
After completing this session, you will be able to
• Demonstrate knowledge about players health
• Describe the hygiene and health in play area
Activity
Materials Required:
Props and equipment mentioned in the above Session.
1.Conduct safety & hygiene survey in your school playground .
2. Maintenance of ball before and after the play
3. Rearrange the props after the class
Check Your Progress
Match the column
1) Football A) 7-9PS
2) Basketball B) 5.8-6.5PS
3) Volleyball C) 5.5-16PS
Subjective Question
A) List the steps to maintain hygiene at playground?
B) What should be the hygiene tips for the person who supply food and drinks
during play?
C) What should be the Inspection and maintenance of sports facilities and kits?
60
ANSWERS/HINTS
Unit 1
Fill in the blanks
1. Teacher observation 2. Checklist 3. 5 4. Benchmark
Unit 2
Fill in the blanks
A) Heatstroke B) humanitarian aspects C) allergic reaction D) CRP
Unit 3
Match the column
1 C 2 A 3 B

Physical_Activity_Trainer_XII (1).pdfddddddd

  • 1.
    1 Primary Years Physical ActivityFacilitator For Class XII Primary Years Physical Activity Facilitator
  • 2.
    2 TABLE OF CONTENTS 1.UNIT-1: ASSESSMENT OF STUDENTS 1.1. Meaning of assessment 1.2. Types of assessment 1.3. Factors influencing assessment 1.4. Assessment tools 1.5. Types of evaluation 1.6. Meaning and steps in qualitative assessment 1.7. Meaning and steps in quantitative assessment 1.8. Reaching out to parents to display of reports of performance of children for parents 1.9. Explanation of evaluation 1.10. Preparing suggestions for the improvement of the performance of students 2. UNIT 2: EMERGENCY MANAGEMENT 2.1. Meaning of emergency response 2.2. Need and importance of emergency response 2.3. Prepare an emergency action plan 3. UNIT 3: HEALTH AND HYGIENE IN PLAY AREA 3.1. Personal strengths of individuals 3.2. Food and drinking supply in play 3.3. Kits for games and practice 3.4. Inspection of play area 3.5. Maintenance of Hygiene in Play Area
  • 3.
    3 Primary Years PhysicalActivity Facilitator works in a primary school, apartment and clubs to teach basic of sports to build sports skills and fitness for children up to the age of 12 years. Primary Years Physical Activity Facilitator or an Assistant to Sports Teacher or Physical Education (PE) Teacher or Physical Training (PT) Teacher is an individual who is involved in conducting play activities, coaching, mentoring and training of children at primary level. Physical fitness is considered a measure of the body’s ability to function efficiently, effectively and without injury in work and leisure activities. The responsibilities of the individual include implementation and delivery of an appropriately broad, balanced, relevant and differentiated physical education curriculum for students and preparing and inducting students for competitive sports. S/he needs to ensure that students are physically active within the physical education class. COURSE OUTCOMES: On completion of the course, students should be able to: • Demonstrate the knowledge of the importance of physical activity in child development • Demonstrate the use of props and equipment • Demonstrate the knowledge of hygiene and safety • Perform assessment and evaluation of students • Demonstrate the application of MS Excel in maintenance of records • Describe the purpose of emergency management • Follow steps for maintaining health and hygiene in play area. About the Course 1.
  • 4.
    4 1. Prof. VinaySwarup Mehrotra, Professor & Head, PSS central institute of Vocational education, Bhopal 2. Mr. Tahsin Zahid, CEO, Sports Physical Education Fitness and Leisure Sector Council 3. Ms. Priya Dwivedi, Associate General Manager, Sports Physical Education Fitness and Leisure Sector Council 4. Mr. Hassaan Ahmad Noori, Manager - Product and Training, Sportz Village Pvt. Ltd. 5. Mr. Azad Khan, Head –Product and Training, Vocational Education, Sportz Village Pvt. Ltd. Acknowledgements
  • 5.
    5 Introduction Assessment is aboutlearning. Traditionally assessment is intended to find out and report on what has been learnt. Assessment is integral to teaching and learning activities in school and mediates the interaction between teachers and students in the classroom. Assessment can be defined as all activities that teachers and students undertake to get information that can be used to alter teaching and learning. This includes teacher observation and analysis of student work (homework, tests, essays, reports, practical procedures and classroom discussion of issues). All these are concerned with sampling what a student may or may not know. Students spend a relatively large part of their time in school practicing the kind of knowledge and skills demanded in assessment and this is what they acquire. The only way an instructor can evaluate the effectiveness of an innovation on improving student learning is to plan and carry out a program of assessment There is so much material that if we don't have plan we will simply have many assessment pieces with no clear design for their use we need a method to hold all pieces together and to make sense of the whole assessment. Student complete some type of performance that can be evaluated by others how will something is learn implies that the performance of the student is evaluated against present criteria that are known ahead of time 1.1 Meaning of Assessment Assessment has two meanings , but the most suited for physical education is “the act of making a judgment about something” .The word ‘assessment’ derived from related senses of assess, the word ‘assess’ comes from the Latin assidere, which means to sit beside. Literally then, to assess means to sit beside the learner. Assessment is the process deployed to understand student learning. It is the systematic basis for making inferences about the learning and devising the next steps for enhancement of that learning. Assessment is an effective tool to enhance learning. UNIT 1. ASSESSMENT OF STUDENTS
  • 6.
    6 Assessment should answertwo questions: 1. What was learnt? 2. How well was it learnt? 1.2 Types of Assessment The main goal is to see what students have learned. Are they moving toward the goal? Or they achieved their goal? We need to make sure that we make assessment part of our daily teaching, and not a separate entity at the end of the unit. There are two key points to remember as you are choosing or designing any assessment option: (1) You cannot assess it if you didn’t teach it. (2) You can’t assess without a goal. The first point, not assessing without first teaching, is largely, self- explanatory – you must teach precisely what it is that you want to assess. The second point, not assessing without a goal, is related to the first but slightly different. Teacher Observation Teacher observation is the most common form of assessment utilised in physical education classes. It is generally employed to assess psychomotor performance but can be applied to the effective domain as well. It is highly appropriate for assessing the acquisition of critical elements of skill that together form a more mature motor pattern. Figure 1.1 shows a teacher checklist used to assess the critical elements of running. There are different observation techniques, but the back of the wall technique and scanning are the most valuable techniques. The teacher should be in the position to observe the full class. Teacher should be standing outside the activity area.
  • 7.
    7 Skill: Running Sl.no. StudentName Grade Roll No. Arm/ Leg Opposition Toes pointing forward Arm swing do not cross mid-line of body swing in forward and backward Feet land heel to toe 1 2 3 4 5 6 7 8 9 10 Homework Homework is work, a student completes outside of the physical education class it can be used to practice psychomotor skill of fitness or to enhance cognitive understanding. It can produce records of student progress, process and participation or writing assignment such as report or observation of sporting events. Physical education homework is similar to reports of reading done at home, and we have found work homework quite useful, especially in terms of fitness or activity participation. Figure: 1.1 – Teacher Observation checklist for Running
  • 8.
    8 Peer observation Peer observationof students by other students can be used to assess competence in performance of skills and demonstration of selected critical elements. Peer observation is easily built into task by asking students to work as partners and to provide each other with selected feedback regarding performance. For example, while working on dribbling with the hands, one student can be asked to watch the other and see if the partner use the fingerpads, bends the knee, and has a staggered stance. Children enjoy peer observation, but the teacher need to make sure that they must define the cues clearly enough so that the partner can observe and comment on the performance. Also, the teacher should structure the task so that children observe only one cue at a time. Figure: 1.2 – Teacher Observing the flexibility test
  • 9.
    9 Self-assessment: Self-assessment can beused to assess psychomotor, cognitive and affective aspects of children's work. Although peer and teacher observations are quite a useful tool for assessment of the critical cues for skills, self-assessment provide a unique opportunity to evaluate larger components of a skill or the beginning use of a skill. For example, in the case of learning to dribble we might ask children if they could dribble using the preferred hand, the non-preferred hand, while walking, while travelling at a jog, without a defensive player, and with the defensive player Alternatively, the self-assessment may be used throughout a unit as each of the components is introduced and practiced. In this case, each individual assessment would be dated and would be provide a record of the child's achievement of the various components. Regardless of when self-assessment is used children need to have ample opportunity to practice the various Figure: 1.3 – Peer observation for football dribbling
  • 10.
    10 components before completingit. If it is used at the end, children should have a chance for a brief practice period before completing the assessment. Skill: Basketball Dribbling Name of the Child: Grade: Roll No: Self-Assessment of Basketball Dribbling Cues Need some time I am good I want my teacher to see this skill Dribbling with prefered Hand Dribbling with other hand Dribbling while walking Dribbling while jogging Dribbling at full speed Dribbling against the defense Test for student's understanding Critical cues for dribbling 1) 2) 3) Teacher Comments: 1.3 Factors influencing Assessment When used appropriately assessments can be expected to provide useable information about students. However, in addition to whether standardized testing is a good indicator of student performance, there is also debate on whether certain aspects in life- physical, mental, or situational- affect students’ assessment results. Physical Education provides an environment to develop fundamental movement skills. In addition, assessment ‘for’ learning, focusing on the ‘process’ of the skill has potential to raise the overall achievement of low achievers. Therefore, assessment ‘for’ learning may have the potential to raise the standards of fundamental movement skills performance, positively influencing girls’ physical activity. There are so many factors which influencing assessment like age group, weather etc. Figure: 1.4 – Self assessment for basketball dribbling
  • 11.
    11 Factors Influencing assessment 1)Physical Factors: Physical factor like age, developmental level, physical disabilities and general health influence the assessment. Physical disabilities Should be considered if a student is developmentally delayed or advanced when comparing to same-age group General Health Condition Check List Yes No 1) Had the student eaten that day? 2) Did the student get enough sleep? 3) Is the child on medication or off his/her normal medication? 4) Is the student suffering from cold, flu, allergies, or other condition? 2) School Factors: School factor also influence the assessment. It is very important for you to know the mental, psychological, and physical problems of the child. You can use the below check list for the same. School Factors Check list Yes No 1) Does the student feel safe and/or connected at school? 2) Does the student have a history of chronic absenteeism? 3) Is the student markedly over- or under-age for the grade? 4) Was the child pulled from a class or school event he/she enjoys for the session? 3) Teacher factors: Every teacher has different style of teaching. They are using the same foundation of teaching, but the tools are different. They use different language, they have different management skills, and their interaction with the student influences the assessments. Physical and mental state of the teacher and their knowledge of the test materials and familiarity with the testing environment also impact the assessment
  • 12.
    12 1.4 Assessment Tools Toconduct an assessment, we need different tools that help us in conducting the assessment. Checklists are tools used to better organize your assessment and to verify, easily, your most important tasks. They have been designed to reduce errors and ensure consistency and completeness in carrying out a duty. What is a checklist? It is an important tool to make your work easier and help you in collecting the data in an orderly and systematic manner. It makes sure the teacher does not forget any important point. Check list for Assessment Pre-Assessment Done Not Done 1 Assessment Report template approved by the principal 2 Assessment plan shared with HOD 3 Students with medical issues listed and notified to the coordinator 4 Required props/ equipment for tests available 5 Water/ first aid assistance arranged 6 Marking of the ground done 7 Student’s data collected 8 Students practiced the test elements Assessment Day 1 Assessment area clean and safe 2 Test area marked
  • 13.
    13 3 Rules andinstructions explained to students 4 Student Attendance marked on assessment day 5 Students have been given a warm-up 6 Recheck the input sheet if any student is missing the test 7 Students cool down before leaving the testing area Post Assessment 1 Program coordinator informed about the conclusion of the tests 2 Test score uploaded on excel sheet carefully 3 Confirmed date of report availability 4 Report handed over to the principal/ program coordinator/ class teachers 5 PTM completed Assessment Rubric The word rubric comes from the Latin word for red. A rubric is a coherent set of criteria for students' skills that includes descriptions of levels of performance quality on the criteria. The main purpose of rubrics is to assess performances. The scoring is based on 3-point or 5-point grading system Skill Assessment with A 3-point grading scale: A is Proficient, has a weight of 3 points. B is Developing, has a weight of 2 points and C is Needs Development, has a weight of 1 point. Skill Assessment A 5-point grading scale: A – 5 points (Excellent) B – 4 points (Very good) C – 3 points (Good) Figure: 1.5 – Checklist for Assessment
  • 14.
    14 D – 2points (Average) E – 1 point (Needs improvement) Rubric - Skill Assessments Running – Nursery to Grade 1 Performance Indicator: Demonstrate a mature pattern of running. Assessment Task: Run with correct movements in one direction. Criteria for Competence 1. Arm/ Leg Opposition 2. Toes pointing forward 3. Arm swing do not cross mid-line of body, swing in forward and backward 4. Feet land heel to toe Assessment Rubric Level Competency Consistency of Action A Proficiency Runs in straight pathway without stumbling, stopping or falling down and demonstrates all essential elements of a correct run B Developing Completes but stumbles, runs in erratic pathways, inconsistent stride, but at least three out of four correct elements C Needs Development Stops running midway, falls down, Only two correct elements out of four Figure: 1.6 – Rubric for the Skill running
  • 15.
    15 Benchmark Just like weneed rubric to evaluate the skill of the student in the same way to evaluate the performance of the student we need a certain benchmark. There is different benchmark for different tests. And based on these benchmarks the student gets grades. Every student has their own capacity and strength. It can increase with the help for regular fitness activities. And decrease with less physical activities. Importance of benchmark In school in Delhi, the physical education teacher conducted the fitness assessment. And based on the assessment data let say Rohan has the best aerobic capacity in his class. But how can we justify that his fitness level is enough for his age group. May be his score in 600 mts test is less than any other child in Himachal Pradesh who is the least performer in his class. This is possible as we already discussed that physical fitness is depended on so many different factors. So, to justify that we need a benchmark for that particular test. Creating benchmark To create a benchmark, one should have the below details: 1) Data points of that particular test from different schools and from different states 2) The data should be taken for the same age group 3) Need data point for both male and female. The norm for male and female for same test will be different. 4) More the data point more accurate will be the norms 5) After getting the data one should analyses the data and create a norms. 6) Norms will be in grading format. 7) Once the norm has been created it has to be tested for authentication with the help of pilot testing 1) The finally based on the evaluation of all the above point the norms will be created for the test. Grade 4 - Standing Broad Jump Grade Boys Girls A >1.27 >1.10 B 1.27-1.06 1.10-0.98 C 1.05-0.76 0.97-0.70 D 0.75-0.21 0.69-0.21 E <0.21 <0.20 Figure: 1.7 – Sample norm for grade 4 boys for standing broad jump test (Not accurate just a sample for your reference)
  • 16.
    16 1.5. Type ofEvaluation Evaluation focuses on grades. An evaluation can be used as a final review to gauge the quality of instruction. It’s product oriented. This means that the main question is: “What’s been learned?” In short, evaluation is judgmental. After the Assessment, the result has been evaluated to know what the student learned. Both assessment and evaluation require criteria, use measures and are evidence driven. Difference between Assessment and Evaluation: • Assessment is ongoing and evaluation provide closure. • Assessment improves learning quality and evaluation judges learning level. • Assessment upgraded and evaluation graded. • Assessment provides feedback and evaluation shows shortfalls. Type of evaluation Formative Evaluation: Formative evaluation is ongoing process. It is evaluation used to monitor students learning progress during instruction with the purpose of providing on going feedback to students and teachers Summative Evaluation: Summative evaluation evaluate the outcome of the program. This type of evaluation is given at the end of the course to what extent the student has mastered the intended learning outcomes. Diagnostic Evaluation: Diagnostic means to find out the exact problem. Through diagnostic evaluation the teacher can know the student (their strength and weakness). This evaluation also helps to find out the causes of learning problem. This can be fixed with the remedial actions
  • 17.
    17 1.6. Meaning andsteps in qualitative assessment In qualitative assessment, as the name suggests, we are looking for changes in the quality of the skill as it is performed rather than the outcome. A qualitative assessment is based on the experience, judgment, and wisdom of the teacher who knows and teaches the skills to the students. Qualitative methods are a good starting point when you begin your assessment. These methods can be useful for describing a situation and can provide insight for your intervention approach. Qualitative assessment is based on cues or rubrics. To assess the skill the teacher must have Rubrics which includes Performance Indicator and Criteria Steps in qualitative assessment Assessment Planning Planning is the most important part in any assessment. Planning has different elements. It should include such things as purpose for assessment, methods and tools that will be used, the duration and the resources and materials. Assessment plan outline: • Objectives – describe the objectives for assessments from Students, Teacher’s, School’s and Parent’s point of view. • Techniques – indicate methods to be used for test. • Time-Line – indicate the plan of testing, When, which students will come to the ground, which tests would be conducted, when data will be collected and analyzed, when reports will be available, and when inference /recommendations will be made. • Resources and Materials – indicate who has responsibility for seeing the plan is carried out, who will conduct and analyze data, and who will
  • 18.
    18 summarize/report results, groundand equipment conditions, first aid and drinking water availability. Pre, During and Post assessment: Pre-Assessment: Preparation Phase 1. Students should know what assessments they will go through and should have practiced before their assessments. 2. Assessment schedule should be discussed school coordinator 3. Parents should be informed of the assessment schedule and requested to provide consent. Students having any physical/ medical issue should be identified and should not participate in the test. This information should be provided to the school coordinator. 4. Approval for report template should be taken from the Principal. 5. Weather conditions should be checked while planning assessment as all these assessments are outdoors. 6. Collection of the student’s data should be done through program coordinator in the school. Cross check student’s data with class attendance register and fix the discrepancies (if any). 7. Once student’s data is collected, generation of on-ground input sheets. 8. Check the school props/equipment list for their availability for assessment. If any prop/ equipment is damaged or not usable, inform school coordinator and get them replaced beforehand. This is to be done simultaneously when you are working on student’s data collection. 9. Ground marking should be complete. 10. Drinking water availability and first aid assistance should be in place. If school nurse is involved explain the process of assessments and the need for her assistance. Day of the Assessment:
  • 19.
    19 1. Visit theassessment area and ensure that it is safe. (stones, nails, glass pieces, thorns etc. should have been cleared from the grounds). 2. All stations are marked. 3. Students are informed of the proceedings. Rules are explained with clear and concise instructions. Cross check if students have understood instruction given to them. Give students an opportunity to clarify their doubts. 4. On ground input sheet is available on paper. Student attendance is taken. 5. Props/ Equipment is checked for safety. 6. Students are given warm-up before the test starts. 7. Encourage students to drink water to replace lost fluids especially on hot days. 8. Recheck the inputs before concluding the session and retest the student if any error/inaccuracy is seen. 9. Let students leave the testing area after a small cool down exercise. Post Assessment: 1. Inform the coordinator about the conclusion of the testing in the school. 2. Upload well checked data on excel sheets 3. Communicate with coordinator for expected date of report generation and collect it on due date. Check the report for any possible error (commonly- Name & Gender). 4. Handover the reports to the coordinator. If instructed, give assessment reports to the class teachers for distribution. 5. Update the information to the coordinator about distribution of report.
  • 20.
    20 School: ABC School Std:4 Section: B Section: B Sl. No. Previous Name Name New Student Gender Previo us DOB DOB Previ ous Stan dard Stan dard Previous section Sect ion 1 Ankit Thakur Ankit K. Thakur NO M 04-10- 2011 04- 10- 2011 3 4 A B 2 3 4 5 Skill Assessment (Nur) – Input Sheet Proficie ncy Developing Needs Develop ment Please put Grades (A, B or C) as indicators of level. School Name & City: Class & Section: A B C Assessment Date: Assesor's Name: Sl. No. Student Name Date of Birth (Day/Mont h/Year Gend er Heig ht in cm. Weig ht in KG's Locomotor Non- Manipulative Manipulative M/F Run H o p Self Space Balan ce Jumpi ng Throwin g Strik e with Pad dle Catch ing Figure: 1.8 – Base Data Collection Sheet Figure: 1.9 – Skill assessment input sheet for Nur
  • 21.
    21 1.7. Meaning andsteps in quantitative assessment Currently the most widely-used assessments in PE are fitness tests. As you know, with most of these tests a student score is compared to a table of norms and given a rating. This is an example of a norm-referenced or quantitative assessment. For physical educators, a measure of learning and conversely teaching effectiveness would become available. For physical educators, a measure of learning and conversely teaching effectiveness would become available. In Fitness test we are measuring different capacity of a child. Aerobic Capacity This is the capacity to sustain an activity for longer duration in the presence of oxygen. Beep test and 600mts run/walk are the favorite to test to measure the aerobic capacity. Anaerobic Capacity Anaerobic means maximum amount of force one can generates with lesser amount of oxygen (no oxygen). To measure anaerobic capacity of the student, a 30-meter run test is conducted in a predetermined safe area between two lines marked as start and finish lines. The minimum time taken to complete the distance in seconds is the test score. Flexibility To measure flexibility of the back which is the range of motion of the back, Sit and reach test is conducted and distance in centimeters covered is the test score.
  • 22.
    22 Abdominal Strength It ismeasured by conducting Sit-ups (curl-ups) test. Total number of sit-ups in predefined time duration is the test score. Explosive strength (Lower body) This is measured using Standing broad jump test. Distance covered in meters is the test score. Explosive strength (Upper body) The test used to measure upper body explosive strength is Over head medicine ball throw. Maximum distance the medicine ball covers at its first bounce after release from the hands of the student is the test score measured in meters. Height and Weight Height and weight of the child in relation to his age is a good indicator of his health and development. Fitness Assessment Sl. no. Fitness Parameters Tests Age limit Comments 1 Aerobic Capacity 1. Beep Test 2. Walk or run test 3. Step test 4. Beep Test 5. 600mts Run/walk 7 year and above Clear Instruction with Demonstration Proper warm-up required 2 Anaerobic Capacity 1. 20 mts Sprint 2. 30 mts Sprint 3. Flying 30 mts sprint 6 year and above Clear Instruction with Demonstration Proper warm-up required 3 Upper Body Strength 1. Seated Medicine Ball Throw 2. Standing Medicine Ball Throw 3. Push-ups 4. Pull ups 6 year and above Specific warm up required 4 Lower Body Strength 1. Vertical Jump Tests 2. Standing Long (Broad) Jump Test 6 year and above Specific warm up required
  • 23.
    23 5 Abdominal strength 1.Curl ups 2. Sit Ups 3. Plank test 8 year and above Specific warm up required 6 Flexibility 1. Sit & reach test 2. V-Sit test 3. Toe Touch 6 year and above Proper warm up required Figure: 1.11 – Student performing medicine ball throw test Figure: 1.12 – Stand long jump and Medicine ball throw marking
  • 24.
    24 Figure: 1.13 –Correct way of performing Sit up test Figure: 1.14 – Correct way of performing sit & reach
  • 25.
    25 Figure: 1.15 –Correct way of performing stand broad jump Figure: 1.16 – Correct way of performing medicine ball throw
  • 26.
    26 Steps in quantitativeassessment Assessment Planning As we already discussed that planning is the most important part in any assessment. So, in quantitative assessment also the planning will be the same as qualitative assessment. There are few points that can be added in the planning apart from what we already discussed: 1. In your plan ensure that Endurance test is done on a single day with no other tests if possible as this test is tiring. Test for flexibility can however be done on the same day. It is recommended that a minimum of two days be taken for the tests. 2. Give appropriate amount of recovery between tests. 3. Be attentive when recording the score on your input sheets. Minor errors can lead to wrong inference about the student’s ability. School Name & City: Class & Section: 6 B Assessment Month/Year : Actual Date of Assessment: Assessor’s Name: Name Ne w_ Ge nd er DOB S e c Heig ht_c m Weig ht_k g Stu den t _ddm myyyy Grade 6 Beep_Test _Laps_Cou nt Spee d_se c Sit_re ach_c m Standing_br oad_jump_ m Medicine_b all_throw_ m Sit_Up s_1mi n Ankit Thaku r Ye s M ale 16- 02- 2010 B 24 6.0 2 27 1.79 6.21 17 Figure: 1.17 – Fitness assessment input sheet for Grade 6
  • 27.
    27 1.8. Interaction withParents Post Assessments Parent Teacher Meeting This is the opportunity for you to interact with the parents by explaining the report. Parents will ask a lot of questions about the performance of their children. Here are few tips on how to manage PTMs: Managing a Parent–Teacher meetings • A two-way conversation. The parent–teacher meeting is not only an opportunity for parents to learn from you, but for you to learn from them. Nobody knows your students better than their families. Their insights into their child’s strengths and needs, learning styles and non-school learning opportunities can help you improve your instructional methods. Your efforts to better understand their aspirations and perspectives make parents feel respected and build trust with them. • Emphasis on learning. You can make the most of parent–teacher meetings, and other forms of parent involvement, by “linking them to learning.” This means communication back to discussing strategies to support student learning. You can arm parents with knowledge and suggestions for how to help their children learn. • Opportunities and challenges. We all need praise and constructive criticism to grow. All parents are proud of their children and need to hear about their strengths as well as their challenges from you. This helps show parents that you value the unique strengths of their children and have high expectations for their ability to succeed in school and in life. Pre PTM Preparation • Confirm the date and time of the PTM from the school • Inform your coordinator of the upcoming PTM and check for his / her availability • Ensure error-free report cards are delivered to the school
  • 28.
    28 • Identify aspot where the props can be showcased (preferably outside the classroom) • Update the EduSports dashboard • Keep parent testimonial forms ready During the PTM • Reach the school well in advance • Be presentable • Display clean and usable props • Be available outside the classroom Things to Remember • Be on time • Stay calm • Communication should be polite. • Understand the question first before you answer it. If you don’t have an answer, ask them to write to us at assessments@edusports.in • If parents are willing, ask them to fill the testimonial • Always be positive when speaking about the child, school or EduSports Post PTM • Send the event completion report and testimonials to the coordinator on the same day • If there are any major issues / escalations, report to the concerned functions immediately
  • 29.
    29 1.9. Explanation ofPerformance Evaluation Most of the time parents are not aware of the actual performance of the child. They just see some grading and evaluate their children based on their own understanding. Hence, it is very important for the physical education teachers to make them understand the grading system and also the performance of their children. Explaining evaluation Skill Assessment is qualitative assessment and based on the rubrics so the result will be in the grading format. To measure the result and to convert it into numbers, we can use 2 type of grading scale 1) A 3- point grading scale 2) A 5-point grading scale. A 3-point grading scale with different weight • A -3 points • B -2 points • C - 1 point A is Proficient. B is Developing. C is Needs Development. A 5-point grading scale with different weight • A – 5 points • B – 4 points • C – 3 points • D – 2 points • E – 1 point 5-point grading scale is used to show the ratings for all fitness parameters A – Excellent
  • 30.
    30 B – Verygood C – Good D – Average E – Needs improvement 1.10. Steps for the improvement of the performance slow learners After the evaluation, the most important question is what next? For students requiring further support, the teacher must introduce some remedial measures to improve their performance. These remedial measures are designed in such a way that it helps the student to improve the shortcomings and provide them to perform better. Remedial measure Every student possesses a different level of learning abilities and fitness level. One cannot depend on one remedial for all the students. It should be specific to the different skill as well as for different fitness capacities. Sample remedial measure to improve the aerobic capacity AEROBIC CAPACITY Aerobic capacity expressed by taking a measure of the amount of oxygen you can use in one minute per kilogram of body weight. Cardio training increases your aerobic capacity by making your body more efficient at utilizing available oxygen and by increasing your cardiovascular system's ability to transport oxygen. Walking/Running Walking leads to better cardiovascular fitness, stronger leg muscles, lower blood pressure, lower risk of heart disease, diabetes, bowel cancer. Also running is an inexpensive exercise you can do anywhere at a time that suits you.
  • 31.
    31 Jumping Rope Don’t havetime to head to the ground? Head to your local sports store and pick up a jump rope. Jumping rope burns up to 13 calories a minute, and is great for a quick workout on the go and also to improve your aerobic capacity. Swimming If it’s too hot to walk or run, swimming can be a cool way to get fit. It’s a low-cost workout for the whole body especially the muscles of the back, shoulder and arms and improves flexibility as well. Cycling Cycling does double duty as an aerobic workout as well as being a low-cost, eco- friendly form of transport. It’s good exercise for improving leg strength and toning the leg and buttock muscles. Dancing Faster styles of dancing such as Jazz, Hip hop, African and Latin American can provide an aerobic workout and improve flexibility and bone strength while being a lot of fun.
  • 32.
    32 Figure: 1.18 –Sample Report Cards
  • 33.
    33 What have youlearnt? After completing this session, you will be able to • Describe the various types of assessment and purpose of evaluation. • Qualitative and quantitative assessment. • Organise assessment and evaluation of students. • Demonstrate the knowledge of organising interaction with parents. Activity Materials Required: Props and equipment mentioned in the above Session. 1. Conduct on-ground skill and fitness assessment with the props available and relate the use to age appropriateness. 2. Organise a role play on the below topics: 1) PTM explaining the norms and the grading to the student playing as a parents 2) Explain the steps involved in Skill assessment Check Your Progress Fill in the blanks 1. ………………….is the most common form of assessment utilised in physical education classes. 2. …………………….. is an important tool to make your work easier and help you in collecting the data in an orderly and systematic manner. 3. In 5-point grading system grade -A has a weightage of …….points 4. Just like rubric is important for evaluate the skill, in the same way ………… is important evaluate the performance of the student Subjective Question 1. Describe assessment? And name different type of assessment? 2. What are the different factors influencing assessments? 3. Describe any 2 important assessment tools?
  • 34.
    34 Introduction During an emergencynormal procedure are interrupted, and immediate measures (management) need to be taken to prevent it from becoming disaster, which is even harder to recover from. Disaster management is a related term but should not be equated to emergency management. 2.1 Emergency response Emergency response is sometimes a cyclical process, involving repeated assessment, planning, action and review. It starts with an initial assessment and may be triggered spontaneously by the disaster event, or officials may authorize the mobilization of people and resources. Emergency Action Plans are essential to properly manage injuries and illnesses in physical education and sport. However, most literature discusses Emergency Action Plans in the athletic arena instead of physical education. In this unit we will try to examine what physical education instructors' experiences of student illness and injury, discuss the steps of an Emergency Action Plans, and provide a template for physical educators to develop a customized Emergency Action Plans at their school. 2.2 Need and importance of emergency response Emergency action plans provide a systematic approach to addressing medical, environmental, and security emergencies. In schools, emergency action plans are designed to guide people to respond quickly to sports-related injuries and medical conditions that are serious or life-threatening. Emergency action plans help ensure that sports organizations are prepared for serious medical events by putting critical training, equipment, and protocols in place before they are needed. UNIT 2. EMERGENCY MANAGEMENT
  • 35.
    35 Examples of conditionsand injuries Heatstroke Heatstroke occurs when your body temperature rises rapidly and you're unable to cool down. It can be life-threatening by causing damage to your brain and other vital organs. It may be caused by strenuous activity in the heat or by being in a hot place for too long. Heatstroke can occur without any previous heat-related condition, such as heat exhaustion. Signs and symptoms • Fever of 104 F or greater • Changes in mental status or behavior, such as confusion, agitation, slurred speech • Hot, dry skin or heavy sweating • Nausea and vomiting • Flushed skin • Rapid pulse • Rapid breathing • Headache • Fainting, which may be the first sign in older adults Emergency first aid for Heatstroke • Place in a tub of cool water or a cool shower. • Spray with a water pipe. • Sponge with cool water. • Fan while misting with cool water. • Place ice packs or cool wet towels on the neck, armpits and groin. • Cover with cool damp sheets. Allergic reactions and asthma Symptoms of a severe allergic reaction ü difficult or noisy breathing ü swelling of the tongue
  • 36.
    36 ü swelling ortightness of the throat ü difficulty talking ü persistent cough ü persistent dizziness or collapse ü paleness and floppiness in young children ü abdominal pain and vomiting. Emergency responses for severe allergic reaction (anaphylaxis) are: ü lay the person flat. Do not allow them to stand or walk ü administer adrenaline with an autoinjector (such as an EpiPen®) ü call an ambulance in a medical emergency. Symptoms of asthma attacks ü finds it very difficult to breathe ü is unable to speak comfortably or if their lips are turning blue ü has symptoms that get worse very quickly ü is getting little or no relief from their reliever inhaler. Emergency first aid for asthma attacks ü relievers that act quickly to relax the muscles around the airways – this is the medication used during an asthma attack ü preventers that slowly make the airways less sensitive to triggers and reduce inflammation inside the airways – they are taken daily to help keep you well ü combination therapies that are preventers containing two different medications. Cardiac arrest CPR is executed during an emergency when someone to save a person’s life if their heart stops beating from sudden cardiac arrest. CPR can increase the chances of survival if performed immediately.
  • 37.
    37 For non-healthcare providersor bystanders without formal CPR training: The recommendation is for compression-only CPR, or hands-only CPR, without mouth-to-mouth breathing. This version of CPR is recommended for people without formal training who see an adult or teen suddenly collapse outside of a hospital or medical facility, for example at home, at work, in a park, or place of business. If you see a teen or adult suddenly collapse, it’s important to act fast and follow these steps for hands-only CPR: STEP 1: CHECK FOR BREATHING Check for signs of breathing—either the chest rising and falling or feel or hear the breath. STEP 2: CALL FOR HELP (AMBULANCE – 112) If the person is not breathing or is gasping, ask someone to call 112 or call yourself. STEP 3: ADJUST YOUR BODY TO PERFORM CHEST COMPRESSIONS Kneel next to victim. Use your fingers to locate the end of the victim’s breastbone, where the ribs come together. Place two fingers at the tip of the breastbone. Place the heel of your other hand above your fingers (on the side closest to the victim’s face). Then put the heel of your other hand on top of the first hand, so your hands are stacked (intertwining fingers is recommended). STEP 4: PERFORM CHEST COMPRESSIONS Push hard and fast in the center of the chest until help arrives. You can use the weight of your body to add strength to your pushes. It’s important to push, giving 100 to 120 compressions per minute. Which is about the same tempo as the song “Stayin’ Alive” by the Bee Gees. For adult and teenage victims, the recommended compression depth is at least 2 inches (5 cm), while avoiding chest compression depths greater than 2.4
  • 38.
    38 inches (6 cm).For children (age 1 year to puberty), recommended compression depth is about 2 inches (5cm). Don’t remove your hands from the victim’s chest, just your weight. Avoid leaning on the victim between compressions—allow the chest to return to its normal position. STEP 5: WAIT FOR HELP Continue to perform compressions until help arrives.
  • 39.
    39 2.3 Emergency actionplan First Aid First Aid is a combination of simple but quite effective and active measures to prevent possible complications. First Aid means the treatment given to a ‘patient’ till proper medical aid comes. Giving First aid is an important skill. By performing simple procedures and following certain guidelines, it may be possible to save lives by giving basic treatment until professional medical help arrives. ABC in first aid is part of St Johns Ambulance DR ABC, a general set of first aid steps. The ‘DR’ part makes sure that the person is safe from further harm, but if not, ABC is used to diagnose a problem DRABC of first aid D for Danger Make sure that the general area is free of risks R for Response Check if the person is unconscious or not by trying to talk to them – check for responses to alerts, voice, in addition to placing hands on the body A for Airways An airway allows oxygen into the body. If a person is unconscious, it is possible that his/her airway is blocked. This is because the tongue can fall back into the mouth and block the throat. To fix the problem, place the patient on their side with their head up, to open the throat. In preparation for CPR, airways must be clear. B for Breathing When arriving at an incident, you need to check if someone is breathing. You can look for visual signs like the chest moving up and down. Or placing your hand near their nose and mouth. If you find the person breathing abnormally or not at all, calmly move onto checking for circulation. C for Circulation
  • 40.
    40 Check for signsof a heartbeat and blood circulation. Obvious signs of circulation are movement and coughing, but the person is most likely unconscious if the previous two signs are absent. First Aid – Purpose and basic principles The purpose of First Aid is to preserve life, assist recovery and prevent aggravation of the injury, until the services of a doctor can be obtained or during transport to hospital or to the patient’s home. Always send someone to call for help while you perform first aid. Principles: 1. Do first things first quickly, quietly and without panic 2. Guard against or treat for shock by moving the patient as little as possible. 3. Do not attempt too much 4. Reassure the patient and those around in order to reduce tension 5. Stop any bleeding 6. Give artificial respiration if breathing has stopped. Cuts and Bruises Cuts and bruises are part of growing up. Do not become paranoid about the children’s safety and prevent them from exploring. At the same time know what to do when they injure themselves. If cuts are deep and do not stop bleeding, seek medical help.
  • 41.
    41 What to do? •Rinse the wound clean with water. • If the wound is bleeding, then apply pressure to stop the blood flow. • Use a sterile gauze or bandage to do that. • Raise the injured part to above the heart level to slow down the bleeding. • When the bleeding stops, cover the wound, if necessary with a clean bandage. Prevention: Teach the children to handle sharp objects with the right technique. Supervise them when they do. Make the children’s environment in school and at home safe, i.e. avoid sharp corners, glass furniture, access to sharp objects like knives etc. Heat Exhaustion Signs and Symptoms • Severe Thirst • Muscle weakness • Nausea, sometimes vomiting • Headache • Increased sweating • Decreased responsiveness or loss of consciousness • Difficulty in breathing What to do? • Bring the child under shade, undress him and make him lie with his feet elevated. • If the child is alert, use a cold sponge on his head. • Give him sips of cool water or sports drinks • If he vomits, turn him to the side to prevent choking. • In the case of heatstroke seek medical help immediately. Breathing Difficulties If someone stops breathing, see if the person can speak or respond when touched on the shoulder. If not, call for help – and immediately begin first aid. Send bystanders for help. But if you're alone, perform basic life support for one minute before going for help.
  • 42.
    42 1. Place theperson on his or her back on the floor. 2. Tilt the head, so that the chin is pointing upwards. Do this by placing the fingertips under the jawbone, then lift gently while pressing down softly on the person's forehead. This is done to make sure the tongue is not blocking the throat. 3. Keep holding the head in this way while checking for breathing. Look if the chest is rising and falling, or place your ear next to their mouth to listen for breathing and feel breath on your cheek. Only check for 10 seconds. 4. If there's normal breathing, hold the head as described above until help arrives. If there's no breathing or gasping breaths, start basic life support. Cuts Bleeding With all types of bleeding, it's important to stop the flow of blood as quickly as possible. Small cuts Small cuts in the veins stop bleeding and clot within a few minutes. The area should then be washed, and a plaster placed gently on top. Deeper cuts Deeper cuts in the veins produce dark blood that seeps out slowly and steadily. It can be stopped by gentle pressure on the wound with a sterile or clean cloth, followed by the application of a clean or sterile bandage. Often, these wounds need sewing or gluing, and therefore medical treatment will be necessary after first aid. Choking Choking is the mechanical obstruction of the flow of air from the environment into the lungs. This usually occurs when food that has not been thoroughly chewed gets stuck. It also occurs when a foreign body or object is lodged in the throat or wind pipe. A person who is choking can usually communicate with hand movements, and may place their hand against their throat. In such a case he/she will definitely need help, so summon assistance for him/her. Because choking cuts off oxygen to the brain, first aid should be administered as quickly as possible.
  • 43.
    43 First Aid To givefirst aid, perform abdominal thrusts (Heimlich maneuver), as given below: • Stand behind the person. Wrap your arms around the waist. Tip the person forward slightly. • Make a fist with one hand. Position it slightly above the person's navel. • Grasp the fist with the other hand. Press hard into the abdomen with a quick, upward thrust — as if trying to lift the person up. • Perform a total of 5 abdominal thrusts, if needed. If the blockage still isn't dislodged, repeat the five-and-five cycle. To clear the airway of an unconscious person: • Lower the person on his or her back onto the floor. • Clear the airway. If a blockage is visible at the back of the throat or high in the throat, reach a finger into the mouth and sweep out the cause of the blockage. Be careful not to push the food or object deeper into the airway, which can happen easily in young children. • Begin cardiopulmonary resuscitation (CPR) if the object remains lodged and the person doesn't respond after you take the above measures. The chest compressions used in CPR may dislodge the object. Remember to recheck the mouth periodically. Basic Sports Injuries Sports injuries are injuries that typically occur while participating in organised sports, training sessions or fitness activity. These injuries may be caused due to lack of proper safety equipment, improper training, etc. Injury could be acute traumatic or chronic injury. Acute traumatic injury are caused by a single application of force, for example a strain, sprain, fracture etc. whereas chronic injury happens over a period of time due to repetitive incorrect training. These include stress fracture, tendinitis etc. 1. Sprain: Ligaments are tissues that stabilize and support the body’s joints. A sprain is an injury to a ligament caused by tearing of the fibres of the ligament. The ligament can have a partial tear, or it can be completely torn apart. Sprained ligaments swell rapidly and generally, the greater the pain and swelling, the more severe the injury is.
  • 44.
    44 2. Muscle strain:A muscle strain is injury to muscle as a result of strenuous activity. A strain is a twist, pull or a tear of a muscle or tendon. First Aid for Sprains Follow the instructions for R.I.C.E. 1. Rest the injured limb and avoid all activities. 2. Ice the area. Use a cold pack to help limit swelling after an injury. Try to ice the area as soon as possible after the injury and continue to ice it for 15 to 20 minutes, four to eight times a day, for the first 48 hours or until swelling improves. Do not to use it too long, as this could cause tissue damage. 3. Compress the area with an elastic wrap or bandage. 4. Elevate the injured limb above your heart whenever possible to help prevent or limit swelling. The concept of first aid kit A well-stocked first-aid kit is as important as props for every physical education classes. The first aid kit should be within an easy reach for the teacher to use in case
  • 45.
    45 there any emergencies.A well-stocked first aid kit will enable you to respond effectively to common injuries during a physical education class. Usually a first aid kit is available in all medical stores. Though it is available in the medical stores, it is essential for a physical education teacher to know what are the items included in a first aid kit. Below is the list of items required for a first aid kit; • First-aid manual • Sterile gauze pads of different sizes • Adhesive/ glue tape • Adhesive bandages in several sizes • Elastic bandage • A splint • Antiseptic wipes • Soap • Antibiotic ointment • Antiseptic solution (like hydrogen peroxide) • Hydrocortisone cream (1%) • Acetaminophen and ibuprofen • Tweezers – small instruments for plucking hairs and picking up small object • Sharp scissors • Safety pins • Disposable instant cold packs (if available) • Calamine lotion • Dettol or savolin lotion • Thermometer • Plastic non-latex gloves (at least 2 pairs) • Touch and extra batteries • A blanket • Mouthpiece for administering CPR (can be obtained from your local medical shop) • A list of emergency phone numbers – nearest hospital, school principal, a reliable taxi driver • Blanket (stored nearby)
  • 46.
    46 What have youlearnt? After completing this session, you will be able to • Describe emergency response • Identify and respond to emergencies in play field • Prepare an emergency action plan Activity Materials Required: Props and equipment mentioned in the above Session. 1.Organise an emergency drill/ response under the guidance of a teacher for the following situations: A) drill assuming a child fall and break his leg and also bleeding due to a small cut on his hand B) Drill to give CPR to a patient Check Your Progress Fill in the blanks A. ………………….occurs when your body temperature rises rapidly and you're unable to cool down B. Emergency management is the management of the resources and responsibilities for dealing with all ………………………..of emergencies C. Difficulty in breathing and swelling of the tongue are the symptom of …………………………… D. ……………is important to save a life if the patient’s heart stops beating from sudden cardiac arrest Subjective Questions A. What is the importance of first aid? B. What is the first aid for heatstroke? C. Write the steps of CPR? D. Explain the ABC of first aid?
  • 47.
    47 Introduction Drinking, eating, washing,excreting – these are things we do every day of our lives. But the way we do them can have a major impact on our health. Good hygiene practices are an essential part of daily life and we all need to understand what hygiene means, why it is important for our health and wellbeing, and how we can change our behavior to safeguard our health. Promoting good hygiene in your community and educating people in ways to protect themselves and their families from ill health is one of the most important aspects of your work. Health is a state of complete physical, mental and social well-being and not merely the absence of disease or infirmity. Hygiene is the practice of keeping yourself and your surroundings clean, especially in order to prevent the spread of disease. Having good personal hygiene practices means taking care of yourself and leading a healthy lifestyle. Good personal hygiene is the first step to good health. It not only protects you from poor health, but also shields those around you from suffering illness that arise from poor personal habits. Some general hygiene and sanitation rules: • Take bath every day after practice • When you come home after playing a game, always wash hands, face and feet. • Change clothes and undergarments frequently. • Cut hand and foot nails regularly. • Never go to bed in your daily clothes. • Do not eat fruits and vegetables without washing. In the following text you will learn about some of the general rules of hygiene and sanitation and you would also understand and appreciate the reasons for doing so. If you follow healthy practices, you will live a healthy and long life. You will also be more productive and efficient. UNIT 3. HEALTH AND HYGIENE IN PLAY AREA
  • 48.
    48 3.2 Food anddrinking supply in play Hygiene is the most important part of sports. From the food that you eat at home to the food that was served to you during the matches all should be clean, healthy and hygienic. Bacteria that cause food poisoning can be on everyone. You can spread bacteria from yourself to the food if you touch your nose, mouth, hair or your clothes, and then food. Hygiene tips for the person who supply food and drinks during play ü wash and dry your hands thoroughly before handling food, and wash and dry them again frequently during work ü dry your hands with a clean towel, disposable paper towel or under an air dryer ü never smoke, chew gum, spit, change a baby’s nappy or eat in a food handling or food storage area ü never cough or sneeze over food, or where food is being prepared or stored ü wear clean protective clothing, such as an apron ü keep your spare clothes and other personal items (including mobile phones) away from where food is stored and prepared ü tie back or cover long hair ü keep fingernails short so they are easy to clean, and don’t wear nail polish because it can chip into the food ü avoid wearing jewellery, or only wear plain-banded rings and sleeper earrings ü completely cover all cuts and wounds with a wound strip or bandage (brightly coloured waterproof bandages are recommended) ü wear disposable gloves over the top of the wound strip if you have wounds on your hands ü change disposable gloves regularly ü if you feel unwell inform the person above you, and don’t handle food.
  • 49.
    49 3.3 Kits forgames and practice Inspection and maintenance of sports facilities and kits The play space (ground, court, etc.) and play equipment are subject to changes based on usage and other factors. Therefore, they must be inspected on a regular basis. The frequency of inspection will be determined by many factors including use, overuse, equipment age and materials, and external factors like the age of the users, climate, in accidents like fire. Low Frequency Inspections Often performed quarterly or semi-annually, low frequency inspections are in- depth investigations of the equipment and surfacing looking for wear and tear. This inspection requires a staff member with mechanical knowledge and extensive knowledge about play equipment and surfacing standards. During or immediately after the inspection, staff should do preventive maintenance and repairs and/or remove damaged equipment to remedy problems discovered in the inspection. An example of this type of maintenance would be replacing heavily worn chains that were noted during the inspection. High Frequency Inspections Often performed daily or weekly, high frequency inspections look at frequently changing conditions caused by use, weather, and/or vandalism. During a high frequency inspection, staff checks and corrects playground conditions such as loose-fill surfacing depths, sanitation issues, and the presence of trash and debris. If any hazards are discovered, staff should follow school or agency procedures such as completing documentation, taking the area out of use, and/or correcting the problem. Keeping kit and equipment clean Maintaining and cleaning your personal protective equipment is essential to ensure it remains effective and operational over time. Each item of personal protective equipment has specific Standards that apply to the care, fitting and maintenance of these items. This information will normally be found on the items. The information in this article should be used as additional information to these standards.
  • 50.
    50 Specific Protection Items Specificprotection items are those pieces of personal protective equipment which protect a specific body area. The items we will be looking at include: • Leather gloves • Rubber gloves • Safety Gloves • Safety & Protective Goggles • Safety Eyewear & Glasses • Guards • Helmet Contraindications Never use: • Harsh chemicals • Paint • Glues unless manufacturer approved • Solvent based adhesives • Permanent markers Personal items and kits Inspection Personal items and kits should be clean and odour free. Cleaning items regularly is essential. It should be inspected for signs of damage prior to cleaning. Damage could show through: • Cracks • Fraying of edges and cuffs • Worn • Chemical contact areas • Holes • Tear Once a visual inspection has been completed, run your fingers over the items, seeking areas of roughness, damage or weaknesses. Place the items on and search again for areas of weakness or excessive roughness and damage.
  • 51.
    51 If damaged, theitems should be disposed Cleaning If the items are free of damage, the dirt should be removed. Once dirt free, it can be washed. 1. Dampening the items (don't immerse in water) with a mixture of either warm soapy water. Baby soap is the preferred cleaning agent because the additional moisturising agents assist if any leather item is there. 2. Scrub with a small, soft bristled brush. 3. Rinse, again being careful to avoid immersion, in fresh warm water. A 2- 5 ml of white vinegar added to the water will remove any odours if you are washing any leather items 4. Dry naturally on a flat surface, away from direct sunlight. 5. Once dry, keep it safely Storage Keep your items out of direct sunlight in a cool location in an area. Kits in cupboard and other personal items in store
  • 52.
    52 3.4 Inspection ofplay area Maintenance and service of sport facilities To keep quality of sports surfaces, it is necessary to do regular maintenance like • Remove leaves, stones, pebbles, flints, pieces of sharp objects from the pitch • Swipe the floor daily; if it is a cemented floor • Allow only recommended footwear on the court • Maintain cleanliness of pitch and its surroundings. • Maintain cleanliness and quality of props and equipment • Periodically check the maintenance of goal posts, volleyball poles, basketball post, etc. • Keep sufficient dustbins
  • 53.
    53 Special maintenance atleast once a year: • Level and slope of the ground should be such that the is no water logging • Repair and check for drainage systems • Special brushing with professional machinery (e.g. for cemented floor) • Follow the maintenance instructions carefully for all artificial turf Examples of Props and Equipment Maintenance: Check the pressure carefully. Pressures for various balls are as follows; Football – 5.5-16PS Basketball – 7-9PS Volleyball – 5.8-6.5PS Before using the balls: ü Inflate balls to correct pressures. ü Before you inflate the balls moisten the needle. ü To inflate balls, squeeze balls while gradually adding a small amount of air at a time. ü Inflating balls with too much air at once will damage the inner tube/ bladder. ü Avoid inflating balls with machines as it may over inflate. After using the balls: ü Deflate little air after use. If the same air pressure remains in balls after use, balls may expand or deform. ü Wipe the surface with a soft cloth. ü If you are unable to remove dirt easily, wipe balls with a moistened cloth.
  • 54.
    54 ü If youare unable to remove dirt with moistened cloth, wipe balls with a cloth moistened with water-diluted mild detergent. ü If you use mild detergent to clean balls, thoroughly wipe off any remaining detergent to ensure that it does not remain on the ball surface. (detergent may cause stain). ü Wipe the ball afterwards with a dry cloth. ü Dry balls out of direct sunlight in a well-ventilated place. Do not keep it under direct sunlight for long. ü If the ball has been soaked by rain, wipe away moisture and dirt using a cloth. Dry the ball out of direct sunlight in a well-ventilated place To store balls: ü Avoid leaving balls in a place that is exposed to direct sunlight. ü Avoid storing balls in hot or damp places. ü Store balls in a well-ventilated place. ü Inflate balls regularly and store them in a well-ventilated place out of direct sunlight. Even if the equipment is not in use, it requires regular cleaning and maintenance. To maintain Props and Equipment you should perform the following activities: 1. After the activity, use a dry cloth to wipe the props/ equipment and store in a well-ventilated place out of direct sunlight. 2. Check the condition of the props/ equipment regularly to avoid using a damaged prop. 3. Do not leave the props/ equipment in direct sunlight for the whole day. It would reduce the life of props/ equipment. 4. Do not store the props and equipment made of iron/ metal in a damp place. The moisture may lead to rusting. 5. Do not apply water on any leather props and equipment. Always use dry cloth to clean.
  • 55.
    55 3.5 Maintenance ofHygiene in Play Area Playground Hygiene Our surroundings affect of health. It is very important that we take care of our surrounding and play are to stay fit and healthy. We must demonstrate a responsible behavior towards our surroundings in order to get the best out of it as well as to preserve them for the future. These are some of the things you can do to help. • Do not litter, always carry a bag with you to bring waste and dispose it off in a dustbin • Throw garbage only in a dustbin • Do not spit in public places or on the ground • Keep your changing room clean • Do not destroy plants; do not pluck flowers and leaves around the play area • Segregate waste into biodegradable and non-biodegradable categories Use disinfecting and cleaning agents to maintain health and prevent the spread of germs and illness, it is a process aiming at providing a healthy environment. It can also be described as activities aimed at improving and maintaining the standard of basic environmental conditions affecting the well-being of people.
  • 56.
    56 Whether you playindoor or outdoor, it is important to take a general look at the equipment to make sure that it is clean and well maintained. Some of the points that you need to keep in mind are as follows: • There should be no broken equipment and props • Wooden equipment should not be cracked or splintered • Metal equipment should not be rusted • Children should be aware of the unsafe and dangerous areas/ locations, if any • Surface materials on the playground should be maintained regularly so that the surfacing is loosely packed and covers all appropriate areas — especially the fall zones surrounding playground equipment • Playground equipment should be made of durable materials that won't fall apart or worn down too much by the weather • Make sure that there is enough free space in front of equipment like slides, swings etc. Do not allow children to be in close proximity when equipment is in use • Check for objects (like hardware, S-shaped hooks, bolts, nails and sharp or unfinished edges) that stick out on equipment and could cut a child or cause clothing to become entangled • All hardware on equipment should be secure, with no loose or broken parts. Plastic and wood should show no signs of weakening, and there should not be any splintered or rusted surfaces • If the playground has a sandpit, check for hazardous debris such as sharp sticks or broken glass, and be sure that the sand is free of bugs. It is advisable to cover sand pits when not in use to prevent contamination from animals • Keep your playground clean and safe by picking up garbage and using the equipment properly. Report to higher authorities for any problem immediately related to safety • If any of the equipment seems broken, loose, or in need of maintenance, designate it as off-limits immediately; report the problem to the appropriate authorities and follow up for completion
  • 57.
  • 58.
  • 59.
    59 What have youlearnt? After completing this session, you will be able to • Demonstrate knowledge about players health • Describe the hygiene and health in play area Activity Materials Required: Props and equipment mentioned in the above Session. 1.Conduct safety & hygiene survey in your school playground . 2. Maintenance of ball before and after the play 3. Rearrange the props after the class Check Your Progress Match the column 1) Football A) 7-9PS 2) Basketball B) 5.8-6.5PS 3) Volleyball C) 5.5-16PS Subjective Question A) List the steps to maintain hygiene at playground? B) What should be the hygiene tips for the person who supply food and drinks during play? C) What should be the Inspection and maintenance of sports facilities and kits?
  • 60.
    60 ANSWERS/HINTS Unit 1 Fill inthe blanks 1. Teacher observation 2. Checklist 3. 5 4. Benchmark Unit 2 Fill in the blanks A) Heatstroke B) humanitarian aspects C) allergic reaction D) CRP Unit 3 Match the column 1 C 2 A 3 B