Brittany Taft
CI350
TR 9:30am

Photoshop Assignment
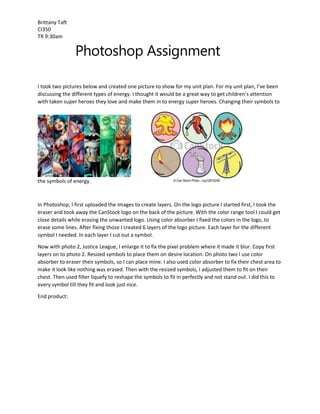
I took two pictures below and created one picture to show for my unit plan. For my unit plan, I’ve been
discussing the different types of energy. I thought it would be a great way to get children’s attention
with taken super heroes they love and make them in to energy super heroes. Changing their symbols to

the symbols of energy.

In Photoshop, I first uploaded the images to create layers. On the logo picture I started first, I took the
eraser and took away the CanStock logo on the back of the picture. With the color range tool I could get
close details while erasing the unwanted logo. Using color absorber I fixed the colors in the logo, to
erase some lines. After fixing those I created 6 layers of the logo picture. Each layer for the different
symbol I needed. In each layer I cut out a symbol.
Now with photo 2, Justice League, I enlarge it to fix the pixel problem where it made it blur. Copy first
layers on to photo 2. Resized symbols to place them on desire location. On photo two I use color
absorber to eraser their symbols, so I can place mine. I also used color absorber to fix their chest area to
make it look like nothing was erased. Then with the resized symbols, I adjusted them to fit on their
chest. Then used filter liquefy to reshape the symbols to fit in perfectly and not stand out. I did this to
every symbol till they fit and look just nice.
End product:
Brittany Taft
CI350
TR 9:30am

Super Energy League!!

Photoshop assignment

  • 1.
    Brittany Taft CI350 TR 9:30am PhotoshopAssignment I took two pictures below and created one picture to show for my unit plan. For my unit plan, I’ve been discussing the different types of energy. I thought it would be a great way to get children’s attention with taken super heroes they love and make them in to energy super heroes. Changing their symbols to the symbols of energy. In Photoshop, I first uploaded the images to create layers. On the logo picture I started first, I took the eraser and took away the CanStock logo on the back of the picture. With the color range tool I could get close details while erasing the unwanted logo. Using color absorber I fixed the colors in the logo, to erase some lines. After fixing those I created 6 layers of the logo picture. Each layer for the different symbol I needed. In each layer I cut out a symbol. Now with photo 2, Justice League, I enlarge it to fix the pixel problem where it made it blur. Copy first layers on to photo 2. Resized symbols to place them on desire location. On photo two I use color absorber to eraser their symbols, so I can place mine. I also used color absorber to fix their chest area to make it look like nothing was erased. Then with the resized symbols, I adjusted them to fit on their chest. Then used filter liquefy to reshape the symbols to fit in perfectly and not stand out. I did this to every symbol till they fit and look just nice. End product:
  • 2.