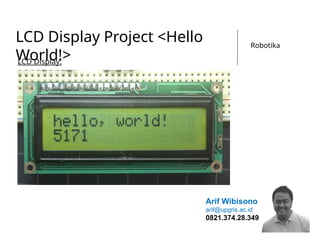
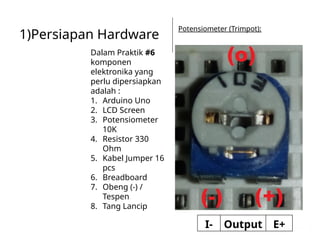
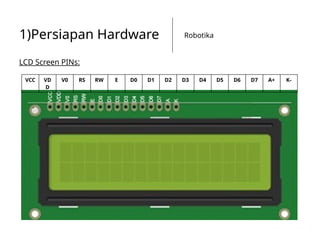
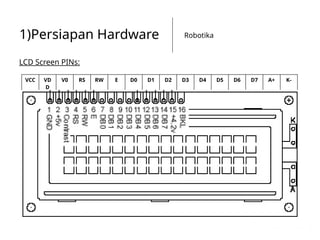
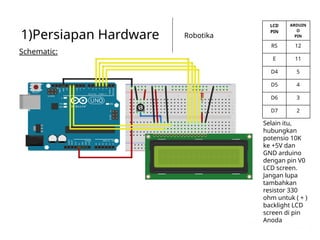
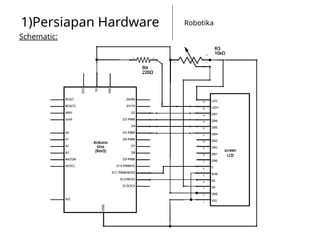
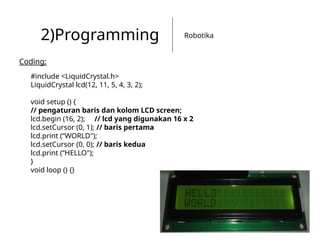
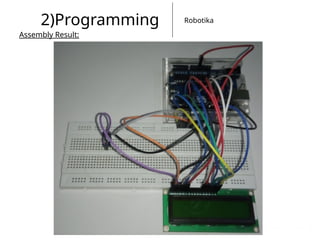
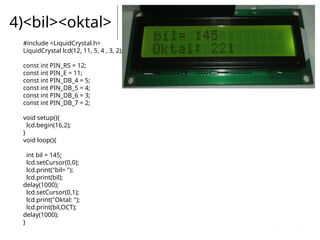
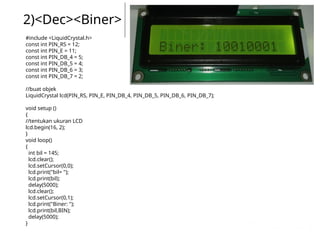
Robotika
LCD Display Project <Hello
World!>
LCD Display:
Arif Wibisono
arif@upgris.ac.id
0821.374.28.349
1)Persiapan Hardware
Dalam Praktik #6
komponen
elektronika yang
perlu dipersiapkan
adalah :
1. Arduino Uno
2. LCD Screen
3. Potensiometer
10K
4. Resistor 330
Ohm
5. Kabel Jumper 16
pcs
6. Breadboard
7. Obeng (-) /
Tespen
8. Tang Lancip
Potensiometer (Trimpot):
I- Output E+
Robotika
1)Persiapan Hardware
LCD Screen PINs:
VCC VD
D
V0 RS RW E D0 D1 D2 D3 D4 D5 D6 D7 A+ K-
Robotika
1)Persiapan Hardware
LCD Screen PINs:
VCC VD
D
V0 RS RW E D0 D1 D2 D3 D4 D5 D6 D7 A+ K-
Robotika
1)Persiapan Hardware
Schematic:
LCD
PIN
ARDUIN
O
PIN
RS 12
E 11
D4 5
D5 4
D6 3
D7 2
Selain itu,
hubungkan
potensio 10K
ke +5V dan
GND arduino
dengan pin V0
LCD screen.
Jangan lupa
tambahkan
resistor 330
ohm untuk ( + )
backlight LCD
screen di pin
Anoda
Robotika
1)Persiapan Hardware
Schematic:
Robotika
2)Programming
Coding:
#include <LiquidCrystal.h>
LiquidCrystal lcd(12, 11, 5, 4, 3, 2);
void setup () {
// pengaturan baris dan kolom LCD screen;
lcd.begin (16, 2); // lcd yang digunakan 16 x 2
lcd.setCursor (0, 1); // baris pertama
lcd.print (“WORLD");
lcd.setCursor (0, 0); // baris kedua
lcd.print (“HELLO");
}
void loop () {}
Robotika
2)Programming
Arduino IDE:
Robotika
2)Programming
Assembly Result:
3)Hello World<Timer>
#include <LiquidCrystal.h>
LiquidCrystal lcd(12, 11, 5, 4, 3, 2);
void setup() {
// set up the LCD's number of columns and rows:
lcd.begin(16, 2);
// Print a message to the LCD.
lcd.print("hello, world!");
}
void loop() {
// set the cursor to column 0, line 1
// (note: line 1 is the second row, since counting begins with 0):
lcd.setCursor(0, 1);
// print the number of seconds since reset:
lcd.print(millis() / 1000);
}
4)<bil><oktal>
#include <LiquidCrystal.h>
LiquidCrystal lcd(12, 11, 5, 4 , 3, 2);
const int PIN_RS = 12;
const int PIN_E = 11;
const int PIN_DB_4 = 5;
const int PIN_DB_5 = 4;
const int PIN_DB_6 = 3;
const int PIN_DB_7 = 2;
void setup(){
lcd.begin(16,2);
}
void loop(){
int bil = 145;
lcd.setCursor(0,0);
lcd.print("bil= ");
lcd.print(bil);
delay(1000);
lcd.setCursor(0,1);
lcd.print("Oktal: ");
lcd.print(bil,OCT);
delay(1000);
}
2)<Dec><Biner>
#include <LiquidCrystal.h>
const int PIN_RS = 12;
const int PIN_E = 11;
const int PIN_DB_4 = 5;
const int PIN_DB_5 = 4;
const int PIN_DB_6 = 3;
const int PIN_DB_7 = 2;
//buat objek
LiquidCrystal lcd(PIN_RS, PIN_E, PIN_DB_4, PIN_DB_5, PIN_DB_6, PIN_DB_7);
void setup ()
{
//tentukan ukuran LCD
lcd.begin(16, 2);
}
void loop()
{
int bil = 145;
lcd.clear();
lcd.setCursor(0,0);
lcd.print("bil= ");
lcd.print(bil);
delay(5000);
lcd.clear();
lcd.setCursor(0,1);
lcd.print("Biner: ");
lcd.print(bil,BIN);
delay(5000);
}
Arif Wibisono
arif@upgris.ac.id
0821.374.28.349
Robotika
Akhirul kalam
“Sekian dan Terima Kasih”

pertemuan-keenam-lcd-display-project.pptx