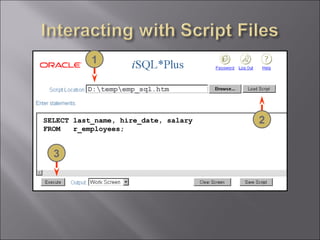
2. After completing this lesson, you should be able to
do the following:
List the capabilities of SQL SELECT statements
Execute a basic SELECT statement
Differentiate between SQL statements and
iSQL*Plus commands
4. SELECT
SELECT *|{[DISTINCT] column|expression [alias],...}
*|{[DISTINCT] column|expression [alias],...}
FROM
FROM table;
table;
SELECT identifies what columns
FROM identifies which table
7. SQL statements are not case sensitive.
SQL statements can be on one or more lines.
Keywords cannot be abbreviated or split
across lines.
Clauses are usually placed on separate lines.
Indents are used to enhance readability.
8. iSQL*Plus:
Default heading justification: Center
Default heading display: Uppercase
SQL*Plus:
Character and Date column headings are left-
justified
Number column headings are right-justified
Default heading display: Uppercase
9. Create expressions with number and date data by using
arithmetic operators.
Operator Description
+ Add
- Subtract
* Multiply
/ Divide
11. _
* / +
Multiplication and division take priority over
addition and subtraction.
Operators of the same priority are evaluated
from left to right.
Parentheses are used to force prioritized
evaluation and to clarify statements.
14. A null is a value that is unavailable, unassigned,
unknown, or inapplicable.
A null is not the same as zero or a blank space.
LECT last_name, job_id, salary, commission_pct
OM r_employees;
…
…
16. A column alias:
Renames a column heading
Is useful with calculations
Immediately follows the column name - there can
also be the optional AS keyword between the
column name and alias
Requires double quotation marks if it contains
spaces or special characters or is case sensitive
17. SELECT last_name AS name, commission_pct comm
FROM r_employees;
…
SELECT last_name "Name", salary*12 "Annual Salary"
FROM employees;
…
18. A concatenation operator:
Concatenates columns or character strings to
other columns
Is represented by two vertical bars (||)
Creates a resultant column that is a character
expression
19. SELECT last_name||job_id AS "Employees"
FROM r_employees;
…
20. A literal is a character, a number, or a date
included in the SELECT list.
Date and character literal values must be
enclosed within single quotation marks.
Each character string is output once for each
row returned.
22. The default display of queries is all rows, including
duplicate rows.
SELECT
SELECT department_id
department_id
FROM
FROM r_employees;
r_employees;
…
23. Eliminate duplicate rows by using the DISTINCT
keyword in the SELECT clause.
SELECT DISTINCT department_id
FROM r_employees;
24. SQL statements
iSQL*Plus Oracle
Internet server
Browser
iSQL*Plus Query results
commands
Formatted report
Client
25. SQL iSQL*Plus
• A language • An environment
• ANSI standard • Oracle proprietary
• Keyword cannot be • Keywords can be
abbreviated abbreviated
• Statements manipulate • Commands do not allow
data and table definitions manipulation of values in
in the database the database
• Runs on a browser
• Centrally loaded, does not
have to be implemented
on each machine
SQL iSQL*Plus
statements commands
26. After you log into iSQL*Plus, you can:
Describe the table structure
Edit your SQL statement
Execute SQL from iSQL*Plus
Save SQL statements to files and append
SQL statements to files
Execute statements stored in saved files
Load commands from a text file into the
iSQL*Plus Edit window
34. In this lesson, you should have learned how to:
• Write a SELECT statement that:
– Returns all rows and columns from a table
– Returns specified columns from a table
– Uses column aliases to give descriptive column
headings
• Use the iSQL*Plus environment to write, save, and
execute SQL statements and iSQL*Plus commands.
SELECT
SELECT *|{[DISTINCT] column|expression [alias],...}
*|{[DISTINCT] column|expression [alias],...}
FROM
FROM table;
table;
35. This practice covers the following topics:
Selecting all data from different tables
Describing the structure of tables
Performing arithmetic calculations and
specifying column names
Using iSQL*Plus
Editor's Notes
Schedule: Timing Topic 40 minutes Lecture 25 minutes Practice 65 minutes Total
Lesson Aim To extract data from the database, you need to use the structured query language ( SQL ) SELECT statement. You may need to restrict the columns that are displayed. This lesson describes all the SQL statements needed to perform these actions. You may want to create SELECT statements that can be used more than once. This lesson also covers the i SQL*Plus environment where you execute SQL statements. Note: i SQL*Plus is new in the Oracle9 i product. It is a browser environment where you execute SQL commands. In prior releases of Oracle, SQL*Plus was the default environment where you executed SQL commands. SQL*Plus is still available and is described in Appendix C.
Capabilities of SQL SELECT Statements A SELECT statement retrieves information from the database. Using a SELECT statement, you can do the following: Projection: You can use the projection capability in SQL to choose the columns in a table that you want returned by your query. You can choose as few or as many columns of the table as you require. Selection: You can use the selection capability in SQL to choose the rows in a table that you want returned by a query. You can use various criteria to restrict the rows that you see. Joining: You can use the join capability in SQL to bring together data that is stored in different tables by creating a link between them. You learn more about joins in a later lesson. Instructor Note Inform students that selection and projection are often considered horizontal and vertical partitioning.
Basic SELECT Statement In its simplest form, a SELECT statement must include the following: A SELECT clause , which specifies the columns to be displayed A FROM clause, which specifies the table containing the columns listed in the SELECT clause In the syntax: SELECT is a list of one or more columns * selects all columns DISTINCT suppresses duplicates column|expression selects the named column or the expression alias gives selected columns different headings FROM table specifies the table containing the columns Note: Throughout this course, the words keyword , clause , and statement are used as follows: A keyword refers to an individual SQL element. For example, SELECT and FROM are keywords. A clause is a part of a SQL statement. For example, SELECT employee_id, last_name, ... is a clause. A statement is a combination of two or more clauses. For example, SELECT * FROM employees is a SQL statement.
Selecting All Columns of All Rows You can display all columns of data in a table by following the SELECT keyword with an asterisk ( * ). In the example on the slide, the department table contains four columns: DEPARTMENT_ID , DEPARTMENT_NAME , MANAGER_ID , and LOCATION_ID . The table contains seven rows, one for each department. You can also display all columns in the table by listing all the columns after the SELECT keyword. For example, the following SQL statement, like the example on the slide, displays all columns and all rows of the DEPARTMENTS table: SELECT department_id, department_name, manager_id, location_id FROM departments; Instructor Note Let the students know that details of all the tables are given in Appendix B.
Selecting Specific Columns of All Rows You can use the SELECT statement to display specific columns of the table by specifying the column names, separated by commas. The example on the slide displays all the department numbers and location numbers from the DEPARTMENTS table. In the SELECT clause, specify the columns that you want, in the order in which you want them to appear in the output. For example, to display location before department number going from left to right, you use the following statement: SELECT location_id, department_id FROM departments; Instructor Note You can also select from pseudocolumns. A pseudocolumn behaves like a table column but is not actually stored in the table. You cannot insert or delete values of the pseudocolumns. Some available pseudocolumns are CURRVAL , NEXTVAL , LEVEL , ROWID , and ROWNUM . …
Writing SQL Statements Using the following simple rules and guidelines, you can construct valid statements that are both easy to read and easy to edit: • SQL statements are not case sensitive, unless indicated. SQL statements can be entered on one or many lines. • Keywords cannot be split across lines or abbreviated. Clauses are usually placed on separate lines for readability and ease of editing. • Indents should be used to make code more readable. Keywords typically are entered in uppercase; all other words, such as table names and columns, are entered in lowercase. Executing SQL Statements Using i SQL*Plus , click the Execute button to run the command or commands in the editing window. Instructor Note Although not required in i SQL*Plus, placing a semicolon (;) at the end of the last clause is recommended. Other environments, such as PL/SQL programs, require that the end of each statement contains a semicolon.
Column Heading Defaults In i SQL*Plus, column headings are displayed in uppercase and centered. SELECT last_name, hire_date, salary FROM employees; You can override the column heading display with an alias. Column aliases are covered later in this lesson. …
Arithmetic Expressions You may need to modify the way in which data is displayed, perform calculations, or look at what-if scenarios. These are all possible using arithmetic expressions . An arithmetic expression can contain column names, constant numeric values, and the arithmetic operators. Arithmetic Operators The slide lists the arithmetic operators available in SQL. You can use arithmetic operators in any clause of a SQL statement except in the FROM clause. Instructor Note You can use the addition and subtraction operators only with DATE and TIMESTAMP data types.
Using Arithmetic Operators The example in the slide uses the addition operator to calculate a salary increase of $300 for all employees and displays a new SALARY+300 column in the output. Note that the resultant calculated column SALARY+300 is not a new column in the EMPLOYEES table; it is for display only. By default, the name of a new column comes from the calculation that generated it—in this case, salary+300 . Note: The Oracle9 i server ignores blank spaces before and after the arithmetic operator.
Operator Precedence If an arithmetic expression contains more than one operator, multiplication and division are evaluated first. If operators within an expression are of same priority, then evaluation is done from left to right. You can use parentheses to force the expression within parentheses to be evaluated first.
Operator Precedence (continued) The example on the slide displays the last name, salary, and annual compensation of employees. It calculates the annual compensation as 12 multiplied by the monthly salary, plus a one-time bonus of $100. Notice that multiplication is performed before addition. Note: Use parentheses to reinforce the standard order of precedence and to improve clarity. For example, the expression on the slide can be written as (12*salary)+100 with no change in the result. Instructor Note Demo: 1_prec1.sql , 1_prec2.sql Purpose: To illustrate viewing a query containing no parentheses and executing a query with parentheses to override rules of precedence.
Using Parentheses You can override the rules of precedence by using parentheses to specify the order in which operators are executed. The example on the slide displays the last name, salary, and annual compensation of employees. It calculates the annual compensation as monthly salary plus a monthly bonus of $100, multiplied by 12. Because of the parentheses, addition takes priority over multiplication.
Null Values If a row lacks the data value for a particular column, that value is said to be null , or to contain a null. A null is a value that is unavailable, unassigned, unknown, or inapplicable. A null is not the same as zero or a space. Zero is a number, and a space is a character. Columns of any data type can contain nulls. However, some constraints, NOT NULL and PRIMARY KEY , prevent nulls from being used in the column. In the COMMISSION_PCT column in the EMPLOYEES table, notice that only a sales manager or sales representative can earn a commission. Other employees are not entitled to earn commissions. A null represents that fact. Instructor Note Demo: 1_null.sql Purpose: To illustrate calculating with null values.
Null Values (continued) If any column value in an arithmetic expression is null, the result is null. For example, if you attempt to perform division with zero, you get an error. However, if you divide a number by null, the result is a null or unknown. In the example on the slide, employee King does not get any commission. Because the COMMISSION_PCT column in the arithmetic expression is null, the result is null. For more information, see Oracle9i SQL Reference, “Basic Elements of SQL.”
Column Aliases When displaying the result of a query, i SQL*Plus normally uses the name of the selected column as the column heading. This heading may not be descriptive and hence may be difficult to understand. You can change a column heading by using a column alias. Specify the alias after the column in the SELECT list using a space as a separator. By default, alias headings appear in uppercase. If the alias contains spaces or special characters (such as # or $), or is case sensitive, enclose the alias in double quotation marks (" "). Instructor Note Within a SQL statement, a column alias can be used in both the SELECT clause and the ORDER BY clause. You cannot use column aliases in the WHERE clause. Both alias features comply with the ANSI SQL 92 standard. Demo: 1_alias.sql Purpose: To illustrate the use of aliases in expressions.
Column Aliases (continued) The first example displays the names and the commission percentages of all the employees. Notice that the optional AS keyword has been used before the column alias name. The result of the query is the same whether the AS keyword is used or not. Also notice that the SQL statement has the column aliases, name and comm, in lowercase, whereas the result of the query displays the column headings in uppercase. As mentioned in a previous slide, column headings appear in uppercase by default. The second example displays the last names and annual salaries of all the employees. Because Annual Salary contain a space, it has been enclosed in double quotation marks. Notice that the column heading in the output is exactly the same as the column alias. Instructor Note Point out the optional AS keyword in the first example and the double quotation marks in the second example. Also show that the aliases always appear in uppercase, unless enclosed within double quotation marks.
Concatenation Operator You can link columns to other columns, arithmetic expressions, or constant values to create a character expression by using the concatenation operator (||). Columns on either side of the operator are combined to make a single output column.
Concatenation Operator (continued) In the example, LAST_NAME and JOB_ID are concatenated, and they are given the alias Employees . Notice that the employee last name and job code are combined to make a single output column. The AS keyword before the alias name makes the SELECT clause easier to read.
Literal Character Strings A literal is a character, a number, or a date that is included in the SELECT list and that is not a column name or a column alias. It is printed for each row returned. Literal strings of free-format text can be included in the query result and are treated the same as a column in the SELECT list. Date and character literals must be enclosed within single quotation marks ( ' ' ); number literals need not.
Literal Character Strings (continued) The example on the slide displays last names and job codes of all employees. The column has the heading Employee Details. Notice the spaces between the single quotation marks in the SELECT statement. The spaces improve the readability of the output. In the following example, the last name and salary for each employee are concatenated with a literal to give the returned rows more meaning. SELECT last_name ||': 1 Month salary = '||salary Monthly FROM employees; …
Duplicate Rows Unless you indicate otherwise, i SQL*Plus displays the results of a query without eliminating duplicate rows. The example on the slide displays all the department numbers from the EMPLOYEES table. Notice that the department numbers are repeated.
Duplicate Rows (continued) To eliminate duplicate rows in the result, include the DISTINCT keyword in the SELECT clause immediately after the SELECT keyword. In the example on the slide, the EMPLOYEES table actually contains 20 rows but there are only seven unique department numbers in the table. You can specify multiple columns after the DISTINCT qualifier. The DISTINCT qualifier affects all the selected columns, and the result is every distinct combination of the columns. SELECT DISTINCT department_id, job_id FROM employees; …
SQL and i SQL*Plus SQL is a command language for communication with the Oracle server from any tool or application. Oracle SQL contains many extensions. iSQL*Plus is an Oracle tool that recognizes and submits SQL statements to the Oracle server for execution and contains its own command language. Features of SQL Can be used by a range of users, including those with little or no programming experience Is a nonprocedural language Reduces the amount of time required for creating and maintaining systems Is an English-like language Features of i SQL*Plus Accessed from a browser Accepts ad hoc entry of statements Provides online editing for modifying SQL statements Controls environmental settings Formats query results into a basic report Accesses local and remote databases
SQL and i SQL*Plus (continued) The following table compares SQL and i SQL*Plus :
i SQL*Plus i SQL*Plus is an environment in which you can do the following: Execute SQL statements to retrieve, modify, add, and remove data from the database Format, perform calculations on, store, and print query results in the form of reports Create script files to store SQL statements for repetitive use in the future i SQL*Plus commands can be divided into the following main categories:
Logging In to i SQL*Plus To log in through a browser environment: 1. Start the browser. 2. Enter the URL address of the i SQL*Plus environment. 3. Fill in the username, password and Oracle Connection Identifier fields.
The i SQL*Plus Environment Within the Windows browser, the i SQL*Plus window has several key areas: 1. Edit window: The area where you type the SQL statements and i SQL*Plus commands. 2. Execute button: Click to execute the statements and commands in the edit window. 3. Output Option: Defaults to Work Screen, which displays the results of the SQL statement beneath the edit window. The other options are File or Window. File saves the contents to a specified file. Window places the output on the screen, but in a separate window. 4. Clear Screen button: Click to clear text from the edit window. 5. Save Script button: Saves the contents of the edit window to a file. 6. Script Locator: Identifies the name and location of a script file that you want to execute. 7. Browse button: Used to search for a script file using the Windows File Open dialog box. 8. Exit icon: Click to end the i SQL*Plus session and return to the i SQL*Plus LogOn window. 9. Help icon: Provides access to i SQL*Plus Help documentation. 10. Password button: Is used to change your password.
Displaying the Table Structure In i SQL*Plus, you can display the structure of a table using the DESCRIBE command . The command shows the column names and data types, as well as whether a column must contain data. In the syntax: tablename is the name of any existing table, view, or synonym accessible to the user
Displaying the Table Structure (continued) The example on the slide displays the information about the structure of the DEPARTMENTS table. In the result: Null? indicates whether a column must contain data; NOT NULL indicates that a column must contain data Type displays the data type for a column The data types are described in the following table: Instructor Note Inform students that the column sequence in DESCRIBE tablename is the same as that in SELECT * FROM tablename . The order in which the columns are displayed is determined when the table is created.
Interacting with Script Files Placing Statements and Commands into a Text Script File You can save commands and statements from the Edit window in i SQL*Plus to a text script file as follows: 1. Type the SQL statements into the edit window in i SQL*Plus. 2. Click the Save Script button. This opens the Windows File Save dialog box. Identify the name of the file. It defaults to .html extension. You can change the file type to a text file or save it as a .sql file.
Interacting with Script Files Using Statements and Commands from a Script File in i SQL*Plus You can use previously saved commands and statements from a script file in i SQL*Plus as follows: 1. Type in the script name and location. Or, you can click the Browse button to find the script name and location. 2. Click the Load Script button. The file contents are loaded into the i SQL*Plus edit window. 3. Click the Execute button to run the contents of the i SQL*Plus edit window.
Interacting with Script Files Saving Output to a File You can save the results generated from a SQL statement or i SQL*Plus command to a file: 1. Type the SQL statements and i SQL*Plus commands into the edit window in i SQL*Plus. 2. Change the output option to Save. 3. Click the Execute button to run the contents of the i SQL*Plus edit window. This opens the Windows File Save dialog box. Identify the name of the file. It defaults to a .html extension. You can change the file type. The results are sent to the file specified.
SELECT Statement In this lesson, you should have learned about retrieving data from a database table with the SELECT statement. SELECT *|{[DISTINCT] column [ alias ],...} FROM table ; In the syntax: SELECT is a list of one or more columns * selects all columns DISTINCT suppresses duplicates column|expression selects the named column or the expression alias gives selected columns different headings FROM table specifies the table containing the columns i SQL*Plus i SQL*Plus is an execution environment that you can use to send SQL statements to the database server and to edit and save SQL statements. Statements can be executed from the SQL prompt or from a script file. Note: The SQL*Plus environment is covered in Appendix C.
Practice 1 Overview This is the first of many practices. The solutions (if you require them) can be found in Appendix A. Practices are intended to introduce all topics covered in the lesson. Questions 2–4 are paper-based. In any practice, there may be “if you have time” or “if you want an extra challenge” questions. Do these only if you have completed all other questions within the allocated time and would like a further challenge to your skills. Perform the practices slowly and precisely. You can experiment with saving and running command files. If you have any questions at any time, attract the instructor’s attention. Paper-Based Questions For questions 2–4, circle either True or False. Instructor Note Let the students know that to get a listing of the tables they can access during the course, the command is: SELECT * FROM TAB;
Practice 1 1. Initiate an i SQL*Plus session using the user ID and password provided by the instructor. 2. i SQL*Plus commands access the database. True/False 3. The following SELECT statement executes successfully: SELECT last_name, job_id, salary AS Sal FROM employees; True/False 4. The following SELECT statement executes successfully: SELECT * FROM job_grades; True/False 5. There are four coding errors in this statement. Can you identify them? SELECT employee_id, last_name sal x 12 ANNUAL SALARY FROM employees; 6. Show the structure of the DEPARTMENTS table. Select all data from the table.
Practice 1 (continued) 7. Show the structure of the EMPLOYEES table. Create a query to display the last name, job code, hire date, and employee number for each employee, with employee number appearing first. Provide an alias STARTDATE for the HIRE_DATE column. Save your SQL statement to a file named lab1_7.sql . 8. Run your query in the file lab1_7.sql . …
Practice 1 (continued) 9. Create a query to display unique job codes from the EMPLOYEES table. If you have time, complete the following exercises: 10. Copy the statement from lab1_7.sql into the i SQL*Plus Edit window. Name the column headings Emp # , Employee , Job , and Hire Date , respectively. Run your query again. …
Practice 1 (continued) 11. Display the last name concatenated with the job ID, separated by a comma and space, and name the column Employee and Title . If you want an extra challenge, complete the following exercise: 12. Create a query to display all the data from the EMPLOYEES table. Separate each column by a comma. Name the column THE_OUTPUT . … …