O pening Files w ith LOCI Bio - Formats
•
0 likes•203 views

Other file types, particularly proprietary formats that contain batches of images such as OpenLab .LIFs, Leica .LEI and .LIF and SlideBook .SLD files, can be opened using the LOCI Bio - Formats plugin.
Report
Share
Report
Share
Download to read offline

Recommended
Netsnippets introduction
Net Snippets is a reference management software that allows users to capture references from web pages, PDFs, emails, and other documents. It installs toolbars in Internet Explorer that allow users to highlight text and capture citations with details like name, comments, and keywords. Captured references can be searched, sorted, and output into a Word document or bibliography with different styles. The software has both free basic and paid professional versions available for download and trial.
Http
This Powtoon presentation discusses the benefits of using Powtoon for creating animated videos and presentations. It highlights that Powtoon is easy to use and allows anyone to create professional looking videos without needing design or animation skills. Powtoon also provides many pre-made templates and animated objects that can be dragged and dropped to quickly create engaging explainer, marketing, or training videos.
Proposiciones de mejora app parlamento 2012 Ezequiel Villa
Este documento propone tres mejoras a la aplicación del Parlamento 2012: 1) Modificar la ventana de resultados para comparar más fácilmente los datos de 2012 y 2010; 2) Incluir datos de participación final en la ventana de participación; 3) Mostrar los resultados de las elecciones anteriores por provincias en la ventana de candidaturas para permitir una comparación. El objetivo general es facilitar la comparación de datos entre años y partidos políticos.
Kirby Haywood Resume
This document is a resume for Kirby Haywood, who is seeking a summer internship in civil engineering. Haywood is currently studying civil engineering at Texas A&M University with a 3.32 major GPA and expected graduation in Spring 2017. Notable experience includes designing a go-kart track that complied with safety standards and developing drainage and budget plans. Haywood also has experience in leadership roles with a fraternity and Episcopal student group, coordinating activities and planning visions. Relevant coursework includes statics, engineering economics, and fluid mechanics.
841- Advanced Computer ForensicsUnix Forensics LabDue Date.docx
841- Advanced Computer Forensics
Unix Forensics Lab
Due Date: Please submit your answers to the Linux Lab dropbox by midnight of July 2nd 2013.
******************************************************************************
To challenge yourself, you may work on the advanced Unix forensics lab analyzing the Lewis USB image and writing a report about this case. See the file UNIXForensicslab-usb for details.
******************************************************************************
Objective
This lab will use Autopsy, PTK, Sleuthkit and foremost to analyze a given image. Read the entire document before starting to be sure you have all the necessary tools and files required to complete the lab. You should further explore the tools used in this lab to ensure your familiarity with alternative investigation options.
Deliverable
Answer all the exercise questions and include screenshots as supporting data if necessary.
OPTIONS:
You can work on this lab by
1. using a bootable live CD, for example, backtrack 5
2. using the RLES vCloud.
3. using SANS Investigate Forensic Toolkit (SIFT) Workstation, http://computer-forensics.sans.org/community/downloads.
4. installing the software on your own system (check the appendix for more installation details).
If you choose to use the RLES vCloud, please continue.
Lab Setup for using RLES vCloud
This lab is designed to function on the RLES vCloud via https://rlesvcloud.rit.edu/cloud/org/NAT. Please FIRST read the RLES VCLOUD user guide in myCourses > Content > Hands-on Labs.
Special Browser Setting Requirement (See RLES VCLOUD user guide)
In order to view the console of virtual machines, the VMRC plugin must be installed within the browser. The first time the console is accessed, the plugin can be downloaded. In Internet Explorer, https://rlesvlcoud.rit.edu must be added to the Local intranet zone.
(Go to Tools -> Internet Options -> Security tab -> Local intranet, click the Sites button, click Advanced and add the URL.)
The interface is available by navigating to https://rlesvcloud.rit.edu/cloud/org/NAT. (Yes, we know the certificate wasn’t issued by a commonly trusted certificate authority. Also check the user guide for your browser compatibility).
Use your RIT Computer Account credentials to gain access to the rlesvcloud interface.
To start, you will first create your vApp by following the instructions of Add a vApp Template to My Cloud in the RLES VCLOUND user guide. Make sure to follow the vApp name convention defined in the RLES VCLOUND user guide and select the vApp template, 841_Linux_Forensics, from the Public Catalogs. No network/IP address is needed for this lab.
Double click on the virtual machine to power it on, now you should have a Linux forensics machine with all the forensics’ tools to provide you with a highly interesting experience in forensics investigation. Login to the virtual machine with
Username: root
Password: netsys
Exercise 1:Using Autopsy and Sleuthkit
Require.
Windows FTK Forensics.pdf
The document provides instructions for analyzing a disk image using Forensic Toolkit (FTK). It describes adding evidence, setting the time zone, processing data, exploring different tabs in FTK including Overview, Explore, Graphics, and using the Registry Viewer. Specific files, folders, and registry keys are investigated to reveal URLs searched, favorite links, deleted files in the recycling bin, and graphics with changed extensions. Bookmarking is also demonstrated to tag files of interest for later reporting.
ITFT - Window explorer
This document provides instructions and explanations for basic file and folder management tasks in Windows Explorer. It discusses how to open Windows Explorer, what files and folders are, how to name and organize files using folders, how to view files and arrange them, how to copy, move, and delete files and folders, how to save files, create shortcuts, and use the Recycle Bin.
CS101S. ThompsonUniversity of BridgeportLab 7 Files, File.docx
CS101 S. Thompson
University of Bridgeport Lab 7: Files, File Choosers, and Scanners
Lab 4_2 Files, File Choosers, and Scanners
There are two ways to identify a file in Java.
1. The name of a file
2. Using the File object. This is a type of object that describes a file as it is stored on the computer's file system. The file system is the system of directories (folders) that the operating system uses to organize stored files so users can find them easily.
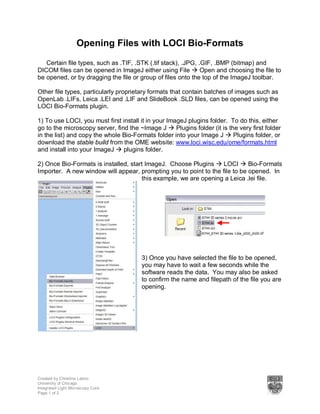
Here we just need to know that when you use a file chooser (which we will discuss next) to locate a file in the file system, the file chooser gives you access to the file selected by the user through a File object. You can see an example of a Java file chooser dialog in action below.
Here the user has used the JFileChooser dialog box to navigate to the Documents folder and select a file named infix.txt.
To use a JFileChooser, you need to know about the following constructor and methods:
JFileChooser()
int showOpenDialog(Component owner)
File getSelectedFile()
Using a JFileChooser
Look up the JFileChooser documentation online so you know what package to import. To use it, create a JFileChooser object and then call its showOpenDialog(). If you have a GUI application, pass it the Component you want it to appear on top of. This will generally be the JFrame for your application. If you are using a console application, just pass it null. Calling this method will cause a dialog box like the one below to appear:
The user will use the dialog to navigate to some folder and select a file, and then click on the Open button to accept the selected file. If the user changes his (or her) mind, he or she can click on Cancel. Either, way, the showOpenDialog will return an integer to your program indicating the user's choice. If the the user selected a file, the method will return the value JFileChooser.APPROVE_OPTION. At this point, you can call the getSelectedFile() to retrieve a File object that you can use to access the file.
Here is example code for using a file chooser object.
File file = null;
JFileChooser chooser = new JFileChooser();
int result = chooser.showOpenDialog(null);
if (result == JFileChooser.APPROVE_OPTION)
file = chooser.getSelectedFile();
else
{
JOptionPane.showMessageDialog(null, "No file selected");
System.exit(1);
}
If this code does not exit, you will have a File object named file. Next, let us look at how you can use this object to open and read a text file using a Stream object named a FileReader.
FileReader
A FileReader object is used to read text files. Text files are files that are human-readable, usually created by a text editor such as Notepad. Many applications, for example MS Word, Excel, and Access, do not create text files. Instead, they create a different type of file named a binary file. You cannot use a FileReader to read a binary file.
If you look up the documentation for the FileRea.
Joomdoc
This document provides an overview and instructions for the JoomDOC document management system. It describes how to install and configure JoomDOC, upload documents, manage documents and their versions, and use additional plugins and modules. Key features include document and file versioning, remote file editing, and fulltext search of documents.
Find Duplicate Files in Office 365 SharePoint
This presentation lays out a couple of handy methods for the users to get rid of any duplicate files in their Office 365 SharePoint data.
Regain Your Valuable Disk Space
This document provides steps to find and remove duplicate files using a program called Duplicate Finder 2009. It describes how to scan folders and drives to find duplicate files based on criteria like file type, size and date. Once duplicate files are found, they can be previewed, marked and then deleted, moved or renamed to remove duplicates and free up disk space. The duplicate files can fragment disks and reduce performance by decreasing available storage and slowing down computers.
Comodo presentation
Comodo Backup is free backup software that allows users to automatically back up files, folders, and system data. It supports various backup methods and sources. Backups can be saved locally or to cloud services. The tutorial demonstrates how to create a backup job by selecting files and folders to back up, choosing an external hard drive as the destination, and optionally adding password protection or system tasks before and after backup completion.
YouTube instructional
1. The document provides step-by-step instructions for uploading a recorded Zoom lecture video to YouTube. It explains how to locate the recorded Zoom file, create a YouTube account, select the video file for upload, edit video settings and privacy options, and view the uploaded video on the YouTube dashboard.
2. Key steps include finding the auto-saved Zoom recording, clicking the "+" camera icon on YouTube to upload the file, processing the video while customizing settings, and accessing analytics and comments through the YouTube Create dashboard.
3. Uploading a video to YouTube allows professors to share recorded lectures in a mobile-friendly format for students to access remotely with options for viewer interaction and response.
Introduction to gui based operating system
This document provides instructions for performing various tasks in a Windows operating system, including:
1. Configuring the desktop by setting wallpaper, arranging icons, and managing folders and files.
2. Customizing the taskbar by auto-hiding, locking, and showing/hiding elements like the quick launch toolbar.
3. Installing and managing programs, and using the Windows search option to find files on the computer.
downloading_moodle.pdf
To download files from Moodle:
1) Log into your course on Moodle using your UCID and password.
2) Different file types like PDF, Word, and PowerPoint are available with their own icons.
3) PDF files will open in a new window or embedded in Moodle if you have the Adobe plugin. PowerPoint files will open in your browser or PowerPoint depending on your choice to open or save. Word files need to be saved and opened in Word.
FTK report PART I Familiar with FTK ImagerBonus Exerc.docx
FTK report
PART I: Familiar with FTK Imager
Bonus Exercise 1 (5 points): Assume that you have a write-protected USB device.
Image a USB device or a floppy disk to create an image in a DD format. (Note: You are not able to use the 841_Win_Forensics_Updated VM to perform this bonus exercise. You have to use your own computer for this exercise).
Provide a snapshot from FTK Imager.
Requires: a USB device or a floppy disk
Launch FTK Imager
Click File > Create Disk Image
Click Physical Drive and Next
Select the device and select Raw (dd) Image Type
Exercise 2: View images
Click File > Add Evidence Item
Select Image file and then click Next
Browse to your WinLabEnCase.E01 image and click Finish
View the image in the Evidence Tree view
Question 1: What is the VBR file used for? How to export this file? How to export a file Hash?
VBR file contain information that will enable client machine to use the remote application . we can export this file by press export , hash file will export as a plain text.
Exercise 3: Convert the WinLabEnCase image to a DD image
Exercise 4: Verify images
Question 2: What are the results of verification? Comparing both hashes, are they same or not?
The verification matched and both hashes are the same
PART II: Working with FTK 1.8x
DETAILED PROCEDURES THAT MAY HELP YOU TO GO THROUGH THE FTK SOFTWARE
Exercise 1: Starting a New Case
Question 3: What information is required to create a new case using the FTK New Case Wizard?
The information needed are : investigator name , address , phone , email , case number , case name , case path , case folder and case destination
Question 4: What are the types of evidence that can be added to a case in FTK?
Image of drive , local drive , folders and individual file
Exercise 2: Working with FTK
Click the OVERVIEW tab; note the numbers for each type of file.
Question 5: How to make the number of the Checked Items to go up? How to make the number of Flagged Thumbnails to go up?
After open each file , items will added to the checked item folder , flagged thumbnails will go up with each file we change the point which down it from red to green .
File Signatures
A file type (JPEG, Word Document, MP3 file) can be determined by the file’s extension and by a header that precedes the data in the file. If a file’s extension has been changed, then the only way to determine its type is by looking at its header.
Question 6: Click on Bad Extension from Overview tab. Do you find any signature mismatch? What are they?
There are 11 files , 8 of them are TMP extension , 1 XLS , 1 PDF and 1 DOC
Data Carved Files:
Question 7: Check the number of Data Carved Files, what is the number?
zero
Question 8: Check the number of Data Carved Files from Overview, how many files added to the case by data carving?
TWO
Question 9: What are those files found by performing data carving process? Why is this process so important?
The files which found are the files with GIF extension , th.
Lesson 5 - Create Projects And Upload Files
How This Lesson Will Help You
This lesson will provide you with the steps used to setup the collaborative
workspace where you can upload and share artwork, images, and other digital
assets with your colleagues.
Topics in This Lesson
After completing this lesson, you will be able to:
• Define and Create a Project
• Upload Files Into a Project
• Describe Additional Upload Options
Why You Need A Duplicate File Explorer
Avoid disorganization and duplicate files clean up duplicate files you can't live with anymore.....100% match resemblance and instant scan
Photoshop7 user
This document provides instructions for a Photoshop 7 basic training module. It includes 9 exercises that teach how to open and create documents, select/copy/paste images, save files in different formats, print documents, save for web, work with layers and history, and add text. The final section provides a criterion test to assess understanding of the skills covered in the module like pasting multiple images into a document, adding text, and saving/printing the file.
Images And Files in PBWorks
1. To upload images or files to a workspace, click the "Upload files" link and select the file from your computer.
2. To add images or files to workspace pages, go into edit mode, click the "Images and Files" tab, upload the file, then click the file name to insert it.
3. To resize images, select the image and drag the corner, or right click and enter pixel sizes in the image properties window. Changing size on the workspace does not change the original file size.
Downloading Steps
The document discusses different file formats for downloading pictures, documents, and videos. It provides descriptions of common image file formats like JPG, PNG, GIF, and TIFF. Document file formats discussed include DOC for Word documents, XLS for Excel files, PPT for PowerPoint presentations, and PDF for Adobe Acrobat files. The document also gives instructions for downloading files using Mozilla Firefox by searching online, clicking to view an item, right clicking to save it, and saving the file to a desktop folder.
Examine Evidence PartitionsAnalysis of four small partitions ext.docx
Examine Evidence Partitions
Analysis of four small partitions extracted from a suspect's hard drive. Your analysis will assess the nature of each partition—specifically, whether each partition is encrypted, compressed, wiped, or none.
Demonstration and hands-on training are always most effective, so you turn to the former in Step 2. Digital forensic investigators need to understand how to examine evidence partitions. In a case that you are working on currently, the suspect's computer contains four disk partitions. A disk partition is a portion of a whole disk with its own file system. Access the virtual lab to examine evidence partitions in order to determine whether files on each partition are encrypted, defragmented, securely deleted, or none of these. If they have been encrypted, what process was used: NTFS encrypted file systems, BitLocker, PGP, etc.?
After conducting your analysis, you demonstrate how you would document your findings in a formal forensic report. Include descriptions of destruction strategies such as wiping, overwriting, corruption, and degaussing. Make sure these strategies are explained in terms that IT temps, recent hires, and other nonexperts can understand in a consistent way. This will be the first section of your investigative report.
Share this section of the report with a colleague (your instructor) for review and feedback before continuing to the next step, where you will search for hidden data in files. Make sure to incorporate any suggested changes. This will be the first section of the sample investigative report to be included in the job aid submitted in the final step.
Lab Work Instruction:
Examine Evidence Partitions
You are provided four NTFS partitions from a hard drive, each about 100MB in size. One of the partitions has been defragmented, one used file encryption, and one used secure file deletion; no action has been taken on the other. Your task is to determine which action (if any) has been applied to each partition.
You will examine each partition using FTK (Imager is sufficient) and the Windows operating system. Your guidance for determining which actions have been taken on a specific partition are as follows:
Normal (no action):
· files are scattered throughout the partition
· you will see deleted files with content
· you will see data in file slack space
Defragmentation:
· files are stored in contiguous locations
· file slack space is zeroed out
· measurable with native OS tools
Encryption:
· file contents are “jibberish” (very little readable plain text)
· FTK may show a "key" icon
· OS may indicate encryption (e.g., "lock" icon)
Secure Wipe:
· deleted files in unallocated space will not contain any readable content
· there will not be any data in file slack space
To examine each of the partitions, perform the following steps until you are confident about which action was applied to each partition. The partitions for this exercise are raw dumps and are named partition_blue.d.
pointer, structure ,union and intro to file handling
This document discusses file handling in C++. It defines what a file is and how they are named. It explains the process of opening, reading from, writing to, and closing files. It discusses file stream objects and how to check for errors when opening or reading/writing files. Functions like open(), close(), <<, >>, eof() and their usage are explained along with examples. Passing file streams to functions and more detailed error checking using stream state bits are also covered.
Diploma ii cfpc- u-5.2 pointer, structure ,union and intro to file handling
1) A file is a collection of stored information that can be accessed by a program. Files have names and extensions that identify the file type and contents.
2) To use a file, a program must open the file, read or write data, and then close the file. Files can be opened for input, output, or both.
3) The stream insertion and extraction operators << and >> are used to write and read data to and from files similar to screen input/output. Files must be properly opened before data can be accessed.
Memory error-talk
You get an OutOfMemoryError because your program requires more memory than the JVM has available. There is nothing you can specifically do at run time to help this.
Mongo db m101j
This document outlines the topics covered in a 6-week MongoDB course for Java developers. Week 2 covers CRUD operations like insert, find, update and delete. Week 3 discusses schema design including embedding documents and linking collections. Week 4 focuses on performance topics such as indexing, profiling queries, and monitoring tools. Week 5 covers the aggregation framework. Week 6 addresses replication and sharding configurations. Each week includes explanations and code examples of relevant Java driver APIs.
More Related Content
Similar to O pening Files w ith LOCI Bio - Formats
841- Advanced Computer ForensicsUnix Forensics LabDue Date.docx
841- Advanced Computer Forensics
Unix Forensics Lab
Due Date: Please submit your answers to the Linux Lab dropbox by midnight of July 2nd 2013.
******************************************************************************
To challenge yourself, you may work on the advanced Unix forensics lab analyzing the Lewis USB image and writing a report about this case. See the file UNIXForensicslab-usb for details.
******************************************************************************
Objective
This lab will use Autopsy, PTK, Sleuthkit and foremost to analyze a given image. Read the entire document before starting to be sure you have all the necessary tools and files required to complete the lab. You should further explore the tools used in this lab to ensure your familiarity with alternative investigation options.
Deliverable
Answer all the exercise questions and include screenshots as supporting data if necessary.
OPTIONS:
You can work on this lab by
1. using a bootable live CD, for example, backtrack 5
2. using the RLES vCloud.
3. using SANS Investigate Forensic Toolkit (SIFT) Workstation, http://computer-forensics.sans.org/community/downloads.
4. installing the software on your own system (check the appendix for more installation details).
If you choose to use the RLES vCloud, please continue.
Lab Setup for using RLES vCloud
This lab is designed to function on the RLES vCloud via https://rlesvcloud.rit.edu/cloud/org/NAT. Please FIRST read the RLES VCLOUD user guide in myCourses > Content > Hands-on Labs.
Special Browser Setting Requirement (See RLES VCLOUD user guide)
In order to view the console of virtual machines, the VMRC plugin must be installed within the browser. The first time the console is accessed, the plugin can be downloaded. In Internet Explorer, https://rlesvlcoud.rit.edu must be added to the Local intranet zone.
(Go to Tools -> Internet Options -> Security tab -> Local intranet, click the Sites button, click Advanced and add the URL.)
The interface is available by navigating to https://rlesvcloud.rit.edu/cloud/org/NAT. (Yes, we know the certificate wasn’t issued by a commonly trusted certificate authority. Also check the user guide for your browser compatibility).
Use your RIT Computer Account credentials to gain access to the rlesvcloud interface.
To start, you will first create your vApp by following the instructions of Add a vApp Template to My Cloud in the RLES VCLOUND user guide. Make sure to follow the vApp name convention defined in the RLES VCLOUND user guide and select the vApp template, 841_Linux_Forensics, from the Public Catalogs. No network/IP address is needed for this lab.
Double click on the virtual machine to power it on, now you should have a Linux forensics machine with all the forensics’ tools to provide you with a highly interesting experience in forensics investigation. Login to the virtual machine with
Username: root
Password: netsys
Exercise 1:Using Autopsy and Sleuthkit
Require.
Windows FTK Forensics.pdf
The document provides instructions for analyzing a disk image using Forensic Toolkit (FTK). It describes adding evidence, setting the time zone, processing data, exploring different tabs in FTK including Overview, Explore, Graphics, and using the Registry Viewer. Specific files, folders, and registry keys are investigated to reveal URLs searched, favorite links, deleted files in the recycling bin, and graphics with changed extensions. Bookmarking is also demonstrated to tag files of interest for later reporting.
ITFT - Window explorer
This document provides instructions and explanations for basic file and folder management tasks in Windows Explorer. It discusses how to open Windows Explorer, what files and folders are, how to name and organize files using folders, how to view files and arrange them, how to copy, move, and delete files and folders, how to save files, create shortcuts, and use the Recycle Bin.
CS101S. ThompsonUniversity of BridgeportLab 7 Files, File.docx
CS101 S. Thompson
University of Bridgeport Lab 7: Files, File Choosers, and Scanners
Lab 4_2 Files, File Choosers, and Scanners
There are two ways to identify a file in Java.
1. The name of a file
2. Using the File object. This is a type of object that describes a file as it is stored on the computer's file system. The file system is the system of directories (folders) that the operating system uses to organize stored files so users can find them easily.
Here we just need to know that when you use a file chooser (which we will discuss next) to locate a file in the file system, the file chooser gives you access to the file selected by the user through a File object. You can see an example of a Java file chooser dialog in action below.
Here the user has used the JFileChooser dialog box to navigate to the Documents folder and select a file named infix.txt.
To use a JFileChooser, you need to know about the following constructor and methods:
JFileChooser()
int showOpenDialog(Component owner)
File getSelectedFile()
Using a JFileChooser
Look up the JFileChooser documentation online so you know what package to import. To use it, create a JFileChooser object and then call its showOpenDialog(). If you have a GUI application, pass it the Component you want it to appear on top of. This will generally be the JFrame for your application. If you are using a console application, just pass it null. Calling this method will cause a dialog box like the one below to appear:
The user will use the dialog to navigate to some folder and select a file, and then click on the Open button to accept the selected file. If the user changes his (or her) mind, he or she can click on Cancel. Either, way, the showOpenDialog will return an integer to your program indicating the user's choice. If the the user selected a file, the method will return the value JFileChooser.APPROVE_OPTION. At this point, you can call the getSelectedFile() to retrieve a File object that you can use to access the file.
Here is example code for using a file chooser object.
File file = null;
JFileChooser chooser = new JFileChooser();
int result = chooser.showOpenDialog(null);
if (result == JFileChooser.APPROVE_OPTION)
file = chooser.getSelectedFile();
else
{
JOptionPane.showMessageDialog(null, "No file selected");
System.exit(1);
}
If this code does not exit, you will have a File object named file. Next, let us look at how you can use this object to open and read a text file using a Stream object named a FileReader.
FileReader
A FileReader object is used to read text files. Text files are files that are human-readable, usually created by a text editor such as Notepad. Many applications, for example MS Word, Excel, and Access, do not create text files. Instead, they create a different type of file named a binary file. You cannot use a FileReader to read a binary file.
If you look up the documentation for the FileRea.
Joomdoc
This document provides an overview and instructions for the JoomDOC document management system. It describes how to install and configure JoomDOC, upload documents, manage documents and their versions, and use additional plugins and modules. Key features include document and file versioning, remote file editing, and fulltext search of documents.
Find Duplicate Files in Office 365 SharePoint
This presentation lays out a couple of handy methods for the users to get rid of any duplicate files in their Office 365 SharePoint data.
Regain Your Valuable Disk Space
This document provides steps to find and remove duplicate files using a program called Duplicate Finder 2009. It describes how to scan folders and drives to find duplicate files based on criteria like file type, size and date. Once duplicate files are found, they can be previewed, marked and then deleted, moved or renamed to remove duplicates and free up disk space. The duplicate files can fragment disks and reduce performance by decreasing available storage and slowing down computers.
Comodo presentation
Comodo Backup is free backup software that allows users to automatically back up files, folders, and system data. It supports various backup methods and sources. Backups can be saved locally or to cloud services. The tutorial demonstrates how to create a backup job by selecting files and folders to back up, choosing an external hard drive as the destination, and optionally adding password protection or system tasks before and after backup completion.
YouTube instructional
1. The document provides step-by-step instructions for uploading a recorded Zoom lecture video to YouTube. It explains how to locate the recorded Zoom file, create a YouTube account, select the video file for upload, edit video settings and privacy options, and view the uploaded video on the YouTube dashboard.
2. Key steps include finding the auto-saved Zoom recording, clicking the "+" camera icon on YouTube to upload the file, processing the video while customizing settings, and accessing analytics and comments through the YouTube Create dashboard.
3. Uploading a video to YouTube allows professors to share recorded lectures in a mobile-friendly format for students to access remotely with options for viewer interaction and response.
Introduction to gui based operating system
This document provides instructions for performing various tasks in a Windows operating system, including:
1. Configuring the desktop by setting wallpaper, arranging icons, and managing folders and files.
2. Customizing the taskbar by auto-hiding, locking, and showing/hiding elements like the quick launch toolbar.
3. Installing and managing programs, and using the Windows search option to find files on the computer.
downloading_moodle.pdf
To download files from Moodle:
1) Log into your course on Moodle using your UCID and password.
2) Different file types like PDF, Word, and PowerPoint are available with their own icons.
3) PDF files will open in a new window or embedded in Moodle if you have the Adobe plugin. PowerPoint files will open in your browser or PowerPoint depending on your choice to open or save. Word files need to be saved and opened in Word.
FTK report PART I Familiar with FTK ImagerBonus Exerc.docx
FTK report
PART I: Familiar with FTK Imager
Bonus Exercise 1 (5 points): Assume that you have a write-protected USB device.
Image a USB device or a floppy disk to create an image in a DD format. (Note: You are not able to use the 841_Win_Forensics_Updated VM to perform this bonus exercise. You have to use your own computer for this exercise).
Provide a snapshot from FTK Imager.
Requires: a USB device or a floppy disk
Launch FTK Imager
Click File > Create Disk Image
Click Physical Drive and Next
Select the device and select Raw (dd) Image Type
Exercise 2: View images
Click File > Add Evidence Item
Select Image file and then click Next
Browse to your WinLabEnCase.E01 image and click Finish
View the image in the Evidence Tree view
Question 1: What is the VBR file used for? How to export this file? How to export a file Hash?
VBR file contain information that will enable client machine to use the remote application . we can export this file by press export , hash file will export as a plain text.
Exercise 3: Convert the WinLabEnCase image to a DD image
Exercise 4: Verify images
Question 2: What are the results of verification? Comparing both hashes, are they same or not?
The verification matched and both hashes are the same
PART II: Working with FTK 1.8x
DETAILED PROCEDURES THAT MAY HELP YOU TO GO THROUGH THE FTK SOFTWARE
Exercise 1: Starting a New Case
Question 3: What information is required to create a new case using the FTK New Case Wizard?
The information needed are : investigator name , address , phone , email , case number , case name , case path , case folder and case destination
Question 4: What are the types of evidence that can be added to a case in FTK?
Image of drive , local drive , folders and individual file
Exercise 2: Working with FTK
Click the OVERVIEW tab; note the numbers for each type of file.
Question 5: How to make the number of the Checked Items to go up? How to make the number of Flagged Thumbnails to go up?
After open each file , items will added to the checked item folder , flagged thumbnails will go up with each file we change the point which down it from red to green .
File Signatures
A file type (JPEG, Word Document, MP3 file) can be determined by the file’s extension and by a header that precedes the data in the file. If a file’s extension has been changed, then the only way to determine its type is by looking at its header.
Question 6: Click on Bad Extension from Overview tab. Do you find any signature mismatch? What are they?
There are 11 files , 8 of them are TMP extension , 1 XLS , 1 PDF and 1 DOC
Data Carved Files:
Question 7: Check the number of Data Carved Files, what is the number?
zero
Question 8: Check the number of Data Carved Files from Overview, how many files added to the case by data carving?
TWO
Question 9: What are those files found by performing data carving process? Why is this process so important?
The files which found are the files with GIF extension , th.
Lesson 5 - Create Projects And Upload Files
How This Lesson Will Help You
This lesson will provide you with the steps used to setup the collaborative
workspace where you can upload and share artwork, images, and other digital
assets with your colleagues.
Topics in This Lesson
After completing this lesson, you will be able to:
• Define and Create a Project
• Upload Files Into a Project
• Describe Additional Upload Options
Why You Need A Duplicate File Explorer
Avoid disorganization and duplicate files clean up duplicate files you can't live with anymore.....100% match resemblance and instant scan
Photoshop7 user
This document provides instructions for a Photoshop 7 basic training module. It includes 9 exercises that teach how to open and create documents, select/copy/paste images, save files in different formats, print documents, save for web, work with layers and history, and add text. The final section provides a criterion test to assess understanding of the skills covered in the module like pasting multiple images into a document, adding text, and saving/printing the file.
Images And Files in PBWorks
1. To upload images or files to a workspace, click the "Upload files" link and select the file from your computer.
2. To add images or files to workspace pages, go into edit mode, click the "Images and Files" tab, upload the file, then click the file name to insert it.
3. To resize images, select the image and drag the corner, or right click and enter pixel sizes in the image properties window. Changing size on the workspace does not change the original file size.
Downloading Steps
The document discusses different file formats for downloading pictures, documents, and videos. It provides descriptions of common image file formats like JPG, PNG, GIF, and TIFF. Document file formats discussed include DOC for Word documents, XLS for Excel files, PPT for PowerPoint presentations, and PDF for Adobe Acrobat files. The document also gives instructions for downloading files using Mozilla Firefox by searching online, clicking to view an item, right clicking to save it, and saving the file to a desktop folder.
Examine Evidence PartitionsAnalysis of four small partitions ext.docx
Examine Evidence Partitions
Analysis of four small partitions extracted from a suspect's hard drive. Your analysis will assess the nature of each partition—specifically, whether each partition is encrypted, compressed, wiped, or none.
Demonstration and hands-on training are always most effective, so you turn to the former in Step 2. Digital forensic investigators need to understand how to examine evidence partitions. In a case that you are working on currently, the suspect's computer contains four disk partitions. A disk partition is a portion of a whole disk with its own file system. Access the virtual lab to examine evidence partitions in order to determine whether files on each partition are encrypted, defragmented, securely deleted, or none of these. If they have been encrypted, what process was used: NTFS encrypted file systems, BitLocker, PGP, etc.?
After conducting your analysis, you demonstrate how you would document your findings in a formal forensic report. Include descriptions of destruction strategies such as wiping, overwriting, corruption, and degaussing. Make sure these strategies are explained in terms that IT temps, recent hires, and other nonexperts can understand in a consistent way. This will be the first section of your investigative report.
Share this section of the report with a colleague (your instructor) for review and feedback before continuing to the next step, where you will search for hidden data in files. Make sure to incorporate any suggested changes. This will be the first section of the sample investigative report to be included in the job aid submitted in the final step.
Lab Work Instruction:
Examine Evidence Partitions
You are provided four NTFS partitions from a hard drive, each about 100MB in size. One of the partitions has been defragmented, one used file encryption, and one used secure file deletion; no action has been taken on the other. Your task is to determine which action (if any) has been applied to each partition.
You will examine each partition using FTK (Imager is sufficient) and the Windows operating system. Your guidance for determining which actions have been taken on a specific partition are as follows:
Normal (no action):
· files are scattered throughout the partition
· you will see deleted files with content
· you will see data in file slack space
Defragmentation:
· files are stored in contiguous locations
· file slack space is zeroed out
· measurable with native OS tools
Encryption:
· file contents are “jibberish” (very little readable plain text)
· FTK may show a "key" icon
· OS may indicate encryption (e.g., "lock" icon)
Secure Wipe:
· deleted files in unallocated space will not contain any readable content
· there will not be any data in file slack space
To examine each of the partitions, perform the following steps until you are confident about which action was applied to each partition. The partitions for this exercise are raw dumps and are named partition_blue.d.
pointer, structure ,union and intro to file handling
This document discusses file handling in C++. It defines what a file is and how they are named. It explains the process of opening, reading from, writing to, and closing files. It discusses file stream objects and how to check for errors when opening or reading/writing files. Functions like open(), close(), <<, >>, eof() and their usage are explained along with examples. Passing file streams to functions and more detailed error checking using stream state bits are also covered.
Diploma ii cfpc- u-5.2 pointer, structure ,union and intro to file handling
1) A file is a collection of stored information that can be accessed by a program. Files have names and extensions that identify the file type and contents.
2) To use a file, a program must open the file, read or write data, and then close the file. Files can be opened for input, output, or both.
3) The stream insertion and extraction operators << and >> are used to write and read data to and from files similar to screen input/output. Files must be properly opened before data can be accessed.
Similar to O pening Files w ith LOCI Bio - Formats (20)
841- Advanced Computer ForensicsUnix Forensics LabDue Date.docx
841- Advanced Computer ForensicsUnix Forensics LabDue Date.docx
CS101S. ThompsonUniversity of BridgeportLab 7 Files, File.docx
CS101S. ThompsonUniversity of BridgeportLab 7 Files, File.docx
FTK report PART I Familiar with FTK ImagerBonus Exerc.docx
FTK report PART I Familiar with FTK ImagerBonus Exerc.docx
Examine Evidence PartitionsAnalysis of four small partitions ext.docx
Examine Evidence PartitionsAnalysis of four small partitions ext.docx
pointer, structure ,union and intro to file handling
pointer, structure ,union and intro to file handling
Diploma ii cfpc- u-5.2 pointer, structure ,union and intro to file handling
Diploma ii cfpc- u-5.2 pointer, structure ,union and intro to file handling
More from Jay Thakkar
Memory error-talk
You get an OutOfMemoryError because your program requires more memory than the JVM has available. There is nothing you can specifically do at run time to help this.
Mongo db m101j
This document outlines the topics covered in a 6-week MongoDB course for Java developers. Week 2 covers CRUD operations like insert, find, update and delete. Week 3 discusses schema design including embedding documents and linking collections. Week 4 focuses on performance topics such as indexing, profiling queries, and monitoring tools. Week 5 covers the aggregation framework. Week 6 addresses replication and sharding configurations. Each week includes explanations and code examples of relevant Java driver APIs.
Exploring-javafx-3d
This document provides an overview of JavaFX 3D capabilities including: creating 3D shapes using primitive shapes, meshes, and user-defined geometry; applying materials and textures to shapes; using lights and cameras in the 3D scene; picking 3D nodes; and an example ZenGuitar3D application that demonstrates multi-touch interaction with 3D objects. The document outlines the nuts and bolts of working with 3D in JavaFX including meshes, materials, textures, lights and cameras and provides examples and resources for learning more.
Talk 8-Kevin-Imagej2
The LOCI laboratory develops new optical instrumentation and software to study living specimens dynamically in 3D. It has been a partner in the Open Microscopy Environment project since 2003. The laboratory focuses on multidimensional fluorescence, spectra, and lifetime imaging and analysis. It leads development of the open-source Bio-Formats and ImageJ software projects for reading diverse bioimaging data formats and processing/analyzing images. The laboratory currently includes several programmers working on these projects and seeks to integrate quantitative imaging with systems biology.
Basic image processing
This document outlines an introductory course on basic image processing taught by Dr. Arne Seitz at the Swiss Institute of Technology (EPFL). It discusses key topics like file formats, image viewers, representation and processing programs. Specific techniques covered include lookup tables, brightness/contrast adjustment, filtering, thresholding, and measurements. ImageJ is demonstrated as a tool for visualizing and manipulating digital images. The goal is to provide foundational concepts for working with and analyzing digital microscope images.
Architectural Design
Architectural design decisions
Architectural views
Architectural patterns (styles)
Application architectures
Learn Java 3D
The document provides an introduction and tutorial to Java 3D, a library for displaying three-dimensional graphics in Java. It covers installing Java 3D, creating a basic 3D program with a cube, adding lighting, positioning objects in 3D space using transformations, changing object appearances using materials and textures, and more. Examples of Java 3D code are provided throughout to demonstrate key concepts.
Dicom standard-of-china 2011-03
The document summarizes a debriefing on the DICOM Standard of China. It introduces the drafting of the standard, including background, aims, and procedures. It discusses the progress of standard staffing and provides an introduction to the submitted version of the standard, covering its range, references, terminology, character set solutions, rules, and conformance testing for worklist and DICOM print services. The goal is to realize processing of medical image information in Chinese and to incorporate the DICOM Standard of China into the national DICOM standard.
More from Jay Thakkar (8)
Recently uploaded
一比一原版(USF毕业证)旧金山大学毕业证如何办理
USF硕士毕业证成绩单【微信95270640】一比一伪造旧金山大学文凭@假冒USF毕业证成绩单+Q微信95270640办理USF学位证书@仿造USF毕业文凭证书@购买旧金山大学毕业证成绩单USF真实使馆认证/真实留信认证回国人员证明
#一整套旧金山大学文凭证件办理#—包含旧金山大学旧金山大学本科毕业证成绩单学历认证|使馆认证|归国人员证明|教育部认证|留信网认证永远存档教育部学历学位认证查询办理国外文凭国外学历学位认证#我们提供全套办理服务。
一整套留学文凭证件服务:
一:旧金山大学旧金山大学本科毕业证成绩单毕业证 #成绩单等全套材料从防伪到印刷水印底纹到钢印烫金
二:真实使馆认证(留学人员回国证明)使馆存档
三:真实教育部认证教育部存档教育部留服网站永久可查
四:留信认证留学生信息网站永久可查
国外毕业证学位证成绩单办理方法:
1客户提供办理旧金山大学旧金山大学本科毕业证成绩单信息:姓名生日专业学位毕业时间等(如信息不确定可以咨询顾问:我们有专业老师帮你查询);
2开始安排制作毕业证成绩单电子图;
3毕业证成绩单电子版做好以后发送给您确认;
4毕业证成绩单电子版您确认信息无误之后安排制作成品;
5成品做好拍照或者视频给您确认;
6快递给客户(国内顺丰国外DHLUPS等快读邮寄)。
教育部文凭学历认证认证的用途:
如果您计划在国内发展那么办理国内教育部认证是必不可少的。事业性用人单位如银行国企公务员在您应聘时都会需要您提供这个认证。其他私营 #外企企业无需提供!办理教育部认证所需资料众多且烦琐所有材料您都必须提供原件我们凭借丰富的经验帮您快速整合材料让您少走弯路。
实体公司专业为您服务如有需要请联系我: 微信95270640奈一次次令他失望山娃今年岁上五年级识得很多字从走出小屋开始山娃就知道父亲的家和工地共有一个很动听的名字——天河工地的底层空空荡荡很宽阔很凉爽在地上铺上报纸和水泥袋父亲和工人们中午全睡在地上地面坑坑洼洼山娃曾多次绊倒过也曾有长铁钉穿透凉鞋刺在脚板上但山娃不怕工地上也常有五六个从乡下来的小学生他们的父母亲也是高楼上的建筑工人小伙伴来自不同省份都操着带有浓重口音的普通话可不知为啥山娃不仅很快与他们熟识了
Using Query Store in Azure PostgreSQL to Understand Query Performance
Microsoft has added an excellent new extension in PostgreSQL on their Azure Platform. This session, presented at Posette 2024, covers what Query Store is and the types of information you can get out of it.
Enums On Steroids - let's look at sealed classes !
These are slides for my session"Enums On Steroids - let's look at sealed classes !" - delivered among others, on Devoxx UK 2024 conference
Oracle Database 19c New Features for DBAs and Developers.pptx
Oracle Database 19c New Features for DBAs and Developers. This video you can watch from my youtube channel at https://youtu.be/m-F-mZA3MkU
Energy consumption of Database Management - Florina Jonuzi
Presentation from Florina Jonuzi at the GSD Community Stage Meetup on June 06, 2024
Measures in SQL (SIGMOD 2024, Santiago, Chile)
SQL has attained widespread adoption, but Business Intelligence tools still use their own higher level languages based upon a multidimensional paradigm. Composable calculations are what is missing from SQL, and we propose a new kind of column, called a measure, that attaches a calculation to a table. Like regular tables, tables with measures are composable and closed when used in queries.
SQL-with-measures has the power, conciseness and reusability of multidimensional languages but retains SQL semantics. Measure invocations can be expanded in place to simple, clear SQL.
To define the evaluation semantics for measures, we introduce context-sensitive expressions (a way to evaluate multidimensional expressions that is consistent with existing SQL semantics), a concept called evaluation context, and several operations for setting and modifying the evaluation context.
A talk at SIGMOD, June 9–15, 2024, Santiago, Chile
Authors: Julian Hyde (Google) and John Fremlin (Google)
https://doi.org/10.1145/3626246.3653374
J-Spring 2024 - Going serverless with Quarkus, GraalVM native images and AWS ...
Presented at NLJUG's J-Spring 2024.
Need for Speed: Removing speed bumps from your Symfony projects ⚡️
No one wants their application to drag like a car stuck in the slow lane! Yet it’s all too common to encounter bumpy, pothole-filled solutions that slow the speed of any application. Symfony apps are not an exception.
In this talk, I will take you for a spin around the performance racetrack. We’ll explore common pitfalls - those hidden potholes on your application that can cause unexpected slowdowns. Learn how to spot these performance bumps early, and more importantly, how to navigate around them to keep your application running at top speed.
We will focus in particular on tuning your engine at the application level, making the right adjustments to ensure that your system responds like a well-oiled, high-performance race car.
Webinar On-Demand: Using Flutter for Embedded
Flutter is a popular open source, cross-platform framework developed by Google. In this webinar we'll explore Flutter and its architecture, delve into the Flutter Embedder and Flutter’s Dart language, discover how to leverage Flutter for embedded device development, learn about Automotive Grade Linux (AGL) and its consortium and understand the rationale behind AGL's choice of Flutter for next-gen IVI systems. Don’t miss this opportunity to discover whether Flutter is right for your project.
KuberTENes Birthday Bash Guadalajara - Introducción a Argo CD
Charla impartida en el evento de "KuberTENes Birthday Bash Guadalajara" para celebrar el 10mo. aniversario de Kubernetes #kuberTENes #celebr8k8s #k8s
How Can Hiring A Mobile App Development Company Help Your Business Grow?
ToXSL Technologies is an award-winning Mobile App Development Company in Dubai that helps businesses reshape their digital possibilities with custom app services. As a top app development company in Dubai, we offer highly engaging iOS & Android app solutions. https://rb.gy/necdnt
Artificia Intellicence and XPath Extension Functions
The purpose of this presentation is to provide an overview of how you can use AI from XSLT, XQuery, Schematron, or XML Refactoring operations, the potential benefits of using AI, and some of the challenges we face.
Transform Your Communication with Cloud-Based IVR Solutions
Discover the power of Cloud-Based IVR Solutions to streamline communication processes. Embrace scalability and cost-efficiency while enhancing customer experiences with features like automated call routing and voice recognition. Accessible from anywhere, these solutions integrate seamlessly with existing systems, providing real-time analytics for continuous improvement. Revolutionize your communication strategy today with Cloud-Based IVR Solutions. Learn more at: https://thesmspoint.com/channel/cloud-telephony
Unveiling the Advantages of Agile Software Development.pdf
Learn about Agile Software Development's advantages. Simplify your workflow to spur quicker innovation. Jump right in! We have also discussed the advantages.
Modelling Up - DDDEurope 2024 - Amsterdam
What to do when you have a perfect model for your software but you are constrained by an imperfect business model?
This talk explores the challenges of bringing modelling rigour to the business and strategy levels, and talking to your non-technical counterparts in the process.
一比一原版(UMN毕业证)明尼苏达大学毕业证如何办理
UMN硕士毕业证成绩单【微信95270640】购买(明尼苏达大学毕业证成绩单硕士学历)Q微信95270640代办UMN学历认证留信网伪造明尼苏达大学学位证书精仿明尼苏达大学本科/硕士文凭证书补办明尼苏达大学 diplomaoffer,Transcript购买明尼苏达大学毕业证成绩单购买UMN假毕业证学位证书购买伪造明尼苏达大学文凭证书学位证书,专业办理雅思、托福成绩单,学生ID卡,在读证明,海外各大学offer录取通知书,毕业证书,成绩单,文凭等材料:1:1完美还原毕业证、offer录取通知书、学生卡等各种在读或毕业材料的防伪工艺(包括 烫金、烫银、钢印、底纹、凹凸版、水印、防伪光标、热敏防伪、文字图案浮雕,激光镭射,紫外荧光,温感光标)学校原版上有的工艺我们一样不会少,不论是老版本还是最新版本,都能保证最高程度还原,力争完美以求让所有同学都能享受到完美的品质服务。
#毕业证成绩单 #毕业証 #成绩单 #學生卡 #OFFER录取通知书 #雅思#托福等……
国外大学明尼苏达大学明尼苏达大学毕业证offer制作方法(一对一专业服务)
1客户提供办理信息:姓名生日专业学位毕业时间等(如信息不确定可以咨询顾问:我们有专业老师帮你查询);
2开始安排制作毕业证成绩单电子图;
3毕业证成绩单电子版做好以后发送给您确认;
4毕业证成绩单电子版您确认信息无误之后安排制作成品;
5成品做好拍照或者视频给您确认;
6快递给客户(国内顺丰国外DHLUPS等快读邮寄)
— — 制作工艺 【高仿真】— —
凭借多年的制作经验本公司制作明尼苏达大学明尼苏达大学毕业证offer《激光》《水印》《钢印》《烫金》《紫外线》凹凸版uv版等防伪技术一流高精仿度几乎跟学校100%相同!让您绝对满意。
— — -公司理念 【诚信为主】— — —
我們以質量求生存.以服务求发展有雄厚的实力专业的团队咨询顾问为您细心解答可详谈是真是假眼见为实让您真正放心平凡人生,尽我所能助您一臂之力让我們携手圆您梦想!
此贴长年有效【贴心专线/微-信: 95270640】敬请保留此联系方式以备用!如有不在线请给我们留言!我们将在第一时间给您回复!上散发着一抹抹的光晕而这每处自然形成的细节融合在一起浑然天成的美实在令人心生愉悦小道的周边无秩序的生长着几株艳丽的野花红的粉的紫的虽混乱无章却给这幅美景更增添一份性感夹杂着一份纯洁的妖娆毫无违和感实在给人带来一份悠然幸福的心情如果说现在的审美已经断然拒绝了无声的话那么在树林间飞掠而过的小鸟叽叽咋咋的叫声是否就是这最后的点睛之笔悠然走在林间的小路上宁静与清香一丝丝的盛夏气息吸入身体昔日生活里的繁忙多
原版定制美国纽约州立大学奥尔巴尼分校毕业证学位证书原版一模一样
原版一模一样【微信:741003700 】【美国纽约州立大学奥尔巴尼分校毕业证学位证书】【微信:741003700 】学位证,留信认证(真实可查,永久存档)offer、雅思、外壳等材料/诚信可靠,可直接看成品样本,帮您解决无法毕业带来的各种难题!外壳,原版制作,诚信可靠,可直接看成品样本。行业标杆!精益求精,诚心合作,真诚制作!多年品质 ,按需精细制作,24小时接单,全套进口原装设备。十五年致力于帮助留学生解决难题,包您满意。
本公司拥有海外各大学样板无数,能完美还原海外各大学 Bachelor Diploma degree, Master Degree Diploma
1:1完美还原海外各大学毕业材料上的工艺:水印,阴影底纹,钢印LOGO烫金烫银,LOGO烫金烫银复合重叠。文字图案浮雕、激光镭射、紫外荧光、温感、复印防伪等防伪工艺。材料咨询办理、认证咨询办理请加学历顾问Q/微741003700
留信网认证的作用:
1:该专业认证可证明留学生真实身份
2:同时对留学生所学专业登记给予评定
3:国家专业人才认证中心颁发入库证书
4:这个认证书并且可以归档倒地方
5:凡事获得留信网入网的信息将会逐步更新到个人身份内,将在公安局网内查询个人身份证信息后,同步读取人才网入库信息
6:个人职称评审加20分
7:个人信誉贷款加10分
8:在国家人才网主办的国家网络招聘大会中纳入资料,供国家高端企业选择人才
How to write a program in any programming language
How to write a program in any programming language
在线购买加拿大英属哥伦比亚大学毕业证本科学位证书原版一模一样
原版一模一样【微信:741003700 】【加拿大英属哥伦比亚大学毕业证本科学位证书】【微信:741003700 】学位证,留信认证(真实可查,永久存档)offer、雅思、外壳等材料/诚信可靠,可直接看成品样本,帮您解决无法毕业带来的各种难题!外壳,原版制作,诚信可靠,可直接看成品样本。行业标杆!精益求精,诚心合作,真诚制作!多年品质 ,按需精细制作,24小时接单,全套进口原装设备。十五年致力于帮助留学生解决难题,包您满意。
本公司拥有海外各大学样板无数,能完美还原海外各大学 Bachelor Diploma degree, Master Degree Diploma
1:1完美还原海外各大学毕业材料上的工艺:水印,阴影底纹,钢印LOGO烫金烫银,LOGO烫金烫银复合重叠。文字图案浮雕、激光镭射、紫外荧光、温感、复印防伪等防伪工艺。材料咨询办理、认证咨询办理请加学历顾问Q/微741003700
留信网认证的作用:
1:该专业认证可证明留学生真实身份
2:同时对留学生所学专业登记给予评定
3:国家专业人才认证中心颁发入库证书
4:这个认证书并且可以归档倒地方
5:凡事获得留信网入网的信息将会逐步更新到个人身份内,将在公安局网内查询个人身份证信息后,同步读取人才网入库信息
6:个人职称评审加20分
7:个人信誉贷款加10分
8:在国家人才网主办的国家网络招聘大会中纳入资料,供国家高端企业选择人才
Recently uploaded (20)
Using Query Store in Azure PostgreSQL to Understand Query Performance
Using Query Store in Azure PostgreSQL to Understand Query Performance
Enums On Steroids - let's look at sealed classes !
Enums On Steroids - let's look at sealed classes !
Oracle Database 19c New Features for DBAs and Developers.pptx
Oracle Database 19c New Features for DBAs and Developers.pptx
Energy consumption of Database Management - Florina Jonuzi
Energy consumption of Database Management - Florina Jonuzi
J-Spring 2024 - Going serverless with Quarkus, GraalVM native images and AWS ...
J-Spring 2024 - Going serverless with Quarkus, GraalVM native images and AWS ...
Need for Speed: Removing speed bumps from your Symfony projects ⚡️
Need for Speed: Removing speed bumps from your Symfony projects ⚡️
KuberTENes Birthday Bash Guadalajara - Introducción a Argo CD
KuberTENes Birthday Bash Guadalajara - Introducción a Argo CD
How Can Hiring A Mobile App Development Company Help Your Business Grow?
How Can Hiring A Mobile App Development Company Help Your Business Grow?
Artificia Intellicence and XPath Extension Functions
Artificia Intellicence and XPath Extension Functions
Transform Your Communication with Cloud-Based IVR Solutions
Transform Your Communication with Cloud-Based IVR Solutions
Unveiling the Advantages of Agile Software Development.pdf
Unveiling the Advantages of Agile Software Development.pdf
How to write a program in any programming language
How to write a program in any programming language
O pening Files w ith LOCI Bio - Formats
- 1. Created by Christine Labno University of Chicago Integrated Light Microscopy Core Page 1 of 2 Opening Files with LOCI Bio-Formats Certain file types, such as .TIF, .STK (.tif stack), .JPG, .GIF, .BMP (bitmap) and DICOM files can be opened in ImageJ either using File Open and choosing the file to be opened, or by dragging the file or group of files onto the top of the ImageJ toolbar. Other file types, particularly proprietary formats that contain batches of images such as OpenLab .LIFs, Leica .LEI and .LIF and SlideBook .SLD files, can be opened using the LOCI Bio-Formats plugin. 1) To use LOCI, you must first install it in your ImageJ plugins folder. To do this, either go to the microscopy server, find the ~Image J Plugins folder (it is the very first folder in the list) and copy the whole Bio-Formats folder into your Image J Plugins folder, or download the stable build from the OME website: www.loci.wisc.edu/ome/formats.html and install into your ImageJ plugins folder. 2) Once Bio-Formats is installed, start ImageJ. Choose Plugins LOCI Bio-Formats Importer. A new window will appear, prompting you to point to the file to be opened. In this example, we are opening a Leica .lei file. 3) Once you have selected the file to be opened, you may have to wait a few seconds while the software reads the data. You may also be asked to confirm the name and filepath of the file you are opening.
- 2. Created by Christine Labno University of Chicago Integrated Light Microscopy Core Page 2 of 2 4) When the Import Options window opens, you can choose how you want your data to be displayed. The safest option is to choose Standard ImageJ and leave all other options unchecked. If you cannot see an image in your file when it opens, try checking “autoscale.” To learn more about the other options, hover over any option and information about that option will be displayed at the bottom of the window. When you have set the display the way you want it, click OK. 5) After a few more seconds, a new window will appear with the names and thumbnails of all the images/image stacks in the file. Choose which image(s) or stack(s) to open by clicking on the checkbox next to the name. The first image is always set to open, but you can undo this. Keep in mind, the more images you set to open, the longer it will take to import all the data. Your data will then open as images or stacks that can be modified and saved as individual .TIF or .TIF stack files.