1. To upload images or files to a workspace, click the "Upload files" link and select the file from your computer.
2. To add images or files to workspace pages, go into edit mode, click the "Images and Files" tab, upload the file, then click the file name to insert it.
3. To resize images, select the image and drag the corner, or right click and enter pixel sizes in the image properties window. Changing size on the workspace does not change the original file size.
The short brown fox jumps over the lazy moon.
The short brown fox jumps over the lazy moon.
The short brown fox jumps over the lazy moon.
The short brown fox jumps over the lazy moon.
The short brown fox jumps over the lazy moon.
The short brown fox jumps over the lazy moon.
The short brown fox jumps over the lazy moon.
The short brown fox jumps over the lazy moon.
This is a presentation by Dada Robert in a Your Skill Boost masterclass organised by the Excellence Foundation for South Sudan (EFSS) on Saturday, the 25th and Sunday, the 26th of May 2024.
He discussed the concept of quality improvement, emphasizing its applicability to various aspects of life, including personal, project, and program improvements. He defined quality as doing the right thing at the right time in the right way to achieve the best possible results and discussed the concept of the "gap" between what we know and what we do, and how this gap represents the areas we need to improve. He explained the scientific approach to quality improvement, which involves systematic performance analysis, testing and learning, and implementing change ideas. He also highlighted the importance of client focus and a team approach to quality improvement.
Operation “Blue Star” is the only event in the history of Independent India where the state went into war with its own people. Even after about 40 years it is not clear if it was culmination of states anger over people of the region, a political game of power or start of dictatorial chapter in the democratic setup.
The people of Punjab felt alienated from main stream due to denial of their just demands during a long democratic struggle since independence. As it happen all over the word, it led to militant struggle with great loss of lives of military, police and civilian personnel. Killing of Indira Gandhi and massacre of innocent Sikhs in Delhi and other India cities was also associated with this movement.
The Art Pastor's Guide to Sabbath | Steve ThomasonSteve Thomason
What is the purpose of the Sabbath Law in the Torah. It is interesting to compare how the context of the law shifts from Exodus to Deuteronomy. Who gets to rest, and why?
How to Split Bills in the Odoo 17 POS ModuleCeline George
Bills have a main role in point of sale procedure. It will help to track sales, handling payments and giving receipts to customers. Bill splitting also has an important role in POS. For example, If some friends come together for dinner and if they want to divide the bill then it is possible by POS bill splitting. This slide will show how to split bills in odoo 17 POS.
Model Attribute Check Company Auto PropertyCeline George
In Odoo, the multi-company feature allows you to manage multiple companies within a single Odoo database instance. Each company can have its own configurations while still sharing common resources such as products, customers, and suppliers.
Students, digital devices and success - Andreas Schleicher - 27 May 2024..pptxEduSkills OECD
Andreas Schleicher presents at the OECD webinar ‘Digital devices in schools: detrimental distraction or secret to success?’ on 27 May 2024. The presentation was based on findings from PISA 2022 results and the webinar helped launch the PISA in Focus ‘Managing screen time: How to protect and equip students against distraction’ https://www.oecd-ilibrary.org/education/managing-screen-time_7c225af4-en and the OECD Education Policy Perspective ‘Students, digital devices and success’ can be found here - https://oe.cd/il/5yV
2024.06.01 Introducing a competency framework for languag learning materials ...Sandy Millin
http://sandymillin.wordpress.com/iateflwebinar2024
Published classroom materials form the basis of syllabuses, drive teacher professional development, and have a potentially huge influence on learners, teachers and education systems. All teachers also create their own materials, whether a few sentences on a blackboard, a highly-structured fully-realised online course, or anything in between. Despite this, the knowledge and skills needed to create effective language learning materials are rarely part of teacher training, and are mostly learnt by trial and error.
Knowledge and skills frameworks, generally called competency frameworks, for ELT teachers, trainers and managers have existed for a few years now. However, until I created one for my MA dissertation, there wasn’t one drawing together what we need to know and do to be able to effectively produce language learning materials.
This webinar will introduce you to my framework, highlighting the key competencies I identified from my research. It will also show how anybody involved in language teaching (any language, not just English!), teacher training, managing schools or developing language learning materials can benefit from using the framework.
2024.06.01 Introducing a competency framework for languag learning materials ...
Images And Files in PBWorks
1. 1
Images and Files Information
Uploading images or files
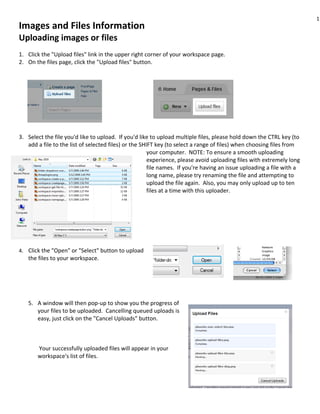
1. Click the "Upload files" link in the upper right corner of your workspace page.
2. On the files page, click the "Upload files" button.
3. Select the file you'd like to upload. If you'd like to upload multiple files, please hold down the CTRL key (to
add a file to the list of selected files) or the SHIFT key (to select a range of files) when choosing files from
your computer. NOTE: To ensure a smooth uploading
experience, please avoid uploading files with extremely
long file names. If you're having an issue uploading a file
with a long name, please try renaming the file and
attempting to upload the file again. Also, you may only
upload up to ten files at a time with this uploader.
4. Click the "Open" or "Select" button to upload
the files to your workspace.
5. A window will then pop-up to show you the progress of
your files to be uploaded. Cancelling queued uploads is
easy, just click on the "Cancel Uploads" button.
Your successfully uploaded files will appear in your
workspace's list of files.
2. 2
Images and Files Information
Adding images or files to workspace pages
1. Go into "Edit Mode" on any page by clicking the edit tab.
2. Click "Images and Files" tab under the "Insert Links" "Page Tool" on the right-side of your screen;
3. Click the Upload Files link to find the file on your computer;
4. When you locate the file, select it, then click “upload”. After uploading, the file will appear in your file
list.
5. Click on the text of the file name to insert it into your workspace.
Note: If you want to see a list of your files and pictures without going into "Edit" mode, click the “Upload/view
files” link while viewing the workspace. From here you may also rename and delete files or pictures from
there. However, only Editors and Admins can remove files. If you don't see the option to delete in the Pages
& Files manager, then you probably don't have permission on the workspace to delete files.
TIP: Have a lot of images and files and don't like scrolling through a huge list to find the one you want? Use
your browser's "Search" function (CTRL+F) to find the image or file in a flash!
Image files are usually in these types of extensions: .jpg, .jpeg, .gif, .png, .bmp, .tiff
Documents are usually in: .doc, .docx, .pdf, .xls, .xlt, .ppt, .pptx, .dot, .dotx
3. 3
Images and Files Information
Resizing Images
Using your mouse
To set the size quickly using your mouse:
1. When in editing mode, click the picture you want to resize in order to select it.
2. Click and hold on the
lower right corner of
the picture and drag
to make the picture
bigger or smaller.
The new image size
will be displayed in
pixels in a Width x
Height format.
3. When you've
achieved the desired
size, release the
mouse button to
complete the resizing process.
Using precise sizes
To precisely set the size of an image you can also edit the Image
Properties:
1. Select the image you want to resize by clicking on it.
2. Right-click (or Command+click on the Mac), on the
selected image and select image properties
3. In the Width or height field, you can manually enter in precise
pixel sizes. By default the height and width are in locked proportion, signalled by the lock icon, so that
any change you make to one, will make a proportional adjustment to the other. This is the best way to
keep the image's height and width in proportion. To unlock them, just click the lock icon. Then, you
can set both width and height to whatever value needed.
4. 4
Images and Files Information
Image file sizes
Changing the image size on the workspace does NOT change the actual file size of the
image, so if it is extremely large, it will take just as long to load as it did before. If you
need to resize a file to make it load faster (and preserve image quality), you
will need to resize it on your own computer, then upload the smaller file. One
useful program for this purpose is Irfanview , which is a lightweight image editing
program for Windows. Any other image editing program is also suitable.
How to resize pictures online (web-based)…
http://www.picresize.com
Batch Resize
1. To resize a set of pictures you can use the
“Automater” apps.
5. 5
Images and Files Information
2. There are two apps. One resizes to 50% and the other to 25%.
3. You can run one of these apps (double-click) and choose all the pictures at once (dragging).
4. They will save into the “Pictures” folder. To access this folder, go to the hard drive icon and it should be
on the left panel.
How to resize images using iPhoto on Macintosh ...
http://www.aaps.k12.mi.us/aaps.sm/resizing_an_image_using_iphoto
How to resize images using Irfanview on a PC.
http://www.somewhere-in-time.net/tutorial/irfanview/
Deleting Images and Files
6. 6
Images and Files Information
Important: Deleting pages and files is an irreversible action, and once a page or file has been deleted it cannot
be recovered. The backups we make of your workspace are in the event of catastrophic system failure, and
cannot be used to retrieve specific pages and files on your workspace. In order to minimize the risk of
deletion, you may want to put your users' permission level to "Writer." Writers can edit pages and add files,
but cannot delete.
Please delete carefully, and at your own risk.
Method 1
1. Click the Pages & Files link in the upper right corner of your workspace.
2. Find the page or file you want to delete in the list.
Check the box next to the file you wish to delete.
You can check more than one page or file if you
want to delete more than one page or file at a
time.
3. Click the Delete button. You'll also have to click a dialogue box to make
sure you want to delete the page or file. The confirm dialog will tell
you how many pages you're about to delete. Click the "OK" button in
the confirm
dialog box to delete the page or file.
4. Please note that all links to the deleted page
will be broken. You can find which pages link
to the deleted page by doing a Search for
"src:<page name>" (with spaces in the page name replaced with +s), and then remove the links from
each page.