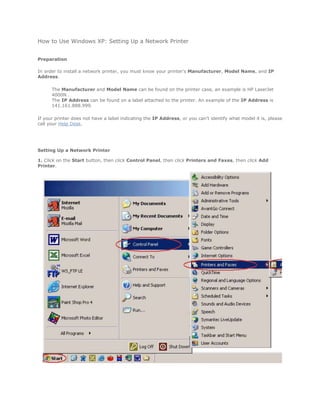
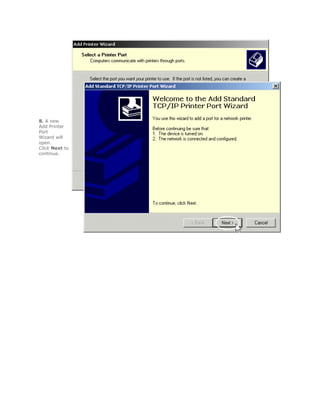
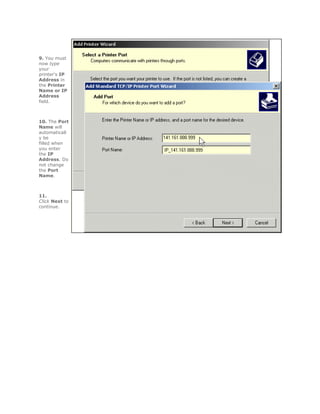
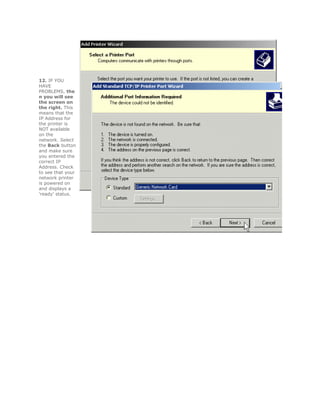
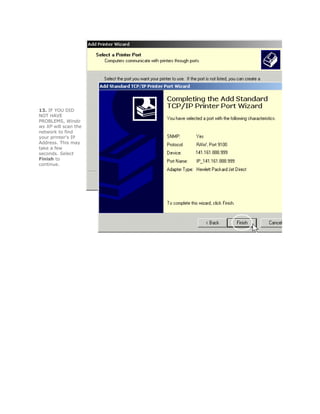
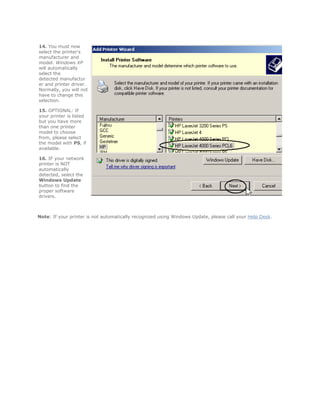
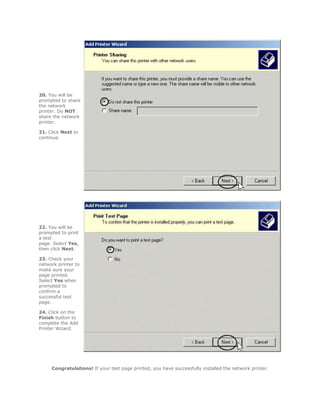
How to Use Windows XP: Setting Up a Network Printer


Preparation

In order to install a network printer, you must know your printer's Manufacturer, Model Name, and IP
Address.

      The Manufacturer and Model Name can be found on the printer case, an example is HP LaserJet
      4000N .
      The IP Address can be found on a label attached to the printer. An example of the IP Address is
      141.161.888.999.

If your printer does not have a label indicating the IP Address, or you can't identify what model it is, please
call your Help Desk.


Setting Up a Network Printer

1. Click on the Start button, then click Control Panel, then click Printers and Faxes, then click Add
Printer.
2. A new Add
Printer Wizard
window opens.
Click Next to
start.


3.
Select Local printe
r attached to this
computer. Make
sure Automatically
detect and install
my Plug and Play
printer is NOT
checked.


4. Then click Next
to continue.
5. We will create
a new port for
your network
printer.
Select Create a
new port.


6. Beside Type
of Port, click on
the down arrow,
then click on
Standard
TCP/IP Port.


7. Click Next to
continue.
8. A new
Add Printer
Port
Wizard will
open.
Click Next to
continue.
9. You must
now type
your
printer's IP
Address in
the Printer
Name or IP
Address
field.


10. The Port
Name will
automaticall
y be
filled when
you enter
the IP
Address. Do
not change
the Port
Name.


11.
Click Next to
continue.
12. IF YOU
HAVE
PROBLEMS, the
n you will see
the screen on
the right. This
means that the
IP Address for
the printer is
NOT available
on the
network. Select
the Back button
and make sure
you entered the
correct IP
Address. Check
to see that your
network printer
is powered on
and displays a
'ready' status.
13. IF YOU DID
NOT HAVE
PROBLEMS, Windo
ws XP will scan the
network to find
your printer's IP
Address. This may
take a few
seconds. Select
Finish to
continue.
14. You must now
select the printer's
manufacturer and
model. Windows XP
will automatically
select the
detected manufactur
er and printer driver.
Normally, you will not
have to change this
selection.

15. OPTIONAL: If
your printer is listed
but you have more
than one printer
model to choose
from, please select
the model with PS, if
available.

16. IF your network
printer is NOT
automatically
detected, select the
Windows Update
button to find the
proper software
drivers.


Note: If your printer is not automatically recognized using Windows Update, please call your Help Desk.
17. You will be
prompted to
confirm the
selected printer
driver. Make sure
Keep existing
driver is selected,
then click Next to
continue.


18. You will be
prompted to assign
the printer a Name.
You can use the
default name, or
add more info to
indicate the printer
location, such as My
Office, Hallway,
Foyer, Room 222,
etc.

19. Select Yes
if you want to
use the printer as
the default
printer. Click Next t
o continue.
20. You will be
prompted to share
the network
printer. Do NOT
share the network
printer.

21. Click Next to
continue.


22. You will be
prompted to print
a test
page. Select Yes,
then click Next.

23. Check your
network printer to
make sure your
page printed.
Select Yes when
prompted to
confirm a
successful test
page.

24. Click on the
Finish button to
complete the Add
Printer Wizard.


     Congratulations! If your test page printed, you have successfully installed the network printer.
Note: If you had problems and did not get a test page, please call your Help Desk.

Network printer

  • 1.
    How to UseWindows XP: Setting Up a Network Printer Preparation In order to install a network printer, you must know your printer's Manufacturer, Model Name, and IP Address. The Manufacturer and Model Name can be found on the printer case, an example is HP LaserJet 4000N . The IP Address can be found on a label attached to the printer. An example of the IP Address is 141.161.888.999. If your printer does not have a label indicating the IP Address, or you can't identify what model it is, please call your Help Desk. Setting Up a Network Printer 1. Click on the Start button, then click Control Panel, then click Printers and Faxes, then click Add Printer.
  • 2.
    2. A newAdd Printer Wizard window opens. Click Next to start. 3. Select Local printe r attached to this computer. Make sure Automatically detect and install my Plug and Play printer is NOT checked. 4. Then click Next to continue.
  • 3.
    5. We willcreate a new port for your network printer. Select Create a new port. 6. Beside Type of Port, click on the down arrow, then click on Standard TCP/IP Port. 7. Click Next to continue.
  • 4.
    8. A new AddPrinter Port Wizard will open. Click Next to continue.
  • 5.
    9. You must nowtype your printer's IP Address in the Printer Name or IP Address field. 10. The Port Name will automaticall y be filled when you enter the IP Address. Do not change the Port Name. 11. Click Next to continue.
  • 6.
    12. IF YOU HAVE PROBLEMS,the n you will see the screen on the right. This means that the IP Address for the printer is NOT available on the network. Select the Back button and make sure you entered the correct IP Address. Check to see that your network printer is powered on and displays a 'ready' status.
  • 7.
    13. IF YOUDID NOT HAVE PROBLEMS, Windo ws XP will scan the network to find your printer's IP Address. This may take a few seconds. Select Finish to continue.
  • 8.
    14. You mustnow select the printer's manufacturer and model. Windows XP will automatically select the detected manufactur er and printer driver. Normally, you will not have to change this selection. 15. OPTIONAL: If your printer is listed but you have more than one printer model to choose from, please select the model with PS, if available. 16. IF your network printer is NOT automatically detected, select the Windows Update button to find the proper software drivers. Note: If your printer is not automatically recognized using Windows Update, please call your Help Desk.
  • 9.
    17. You willbe prompted to confirm the selected printer driver. Make sure Keep existing driver is selected, then click Next to continue. 18. You will be prompted to assign the printer a Name. You can use the default name, or add more info to indicate the printer location, such as My Office, Hallway, Foyer, Room 222, etc. 19. Select Yes if you want to use the printer as the default printer. Click Next t o continue.
  • 10.
    20. You willbe prompted to share the network printer. Do NOT share the network printer. 21. Click Next to continue. 22. You will be prompted to print a test page. Select Yes, then click Next. 23. Check your network printer to make sure your page printed. Select Yes when prompted to confirm a successful test page. 24. Click on the Finish button to complete the Add Printer Wizard. Congratulations! If your test page printed, you have successfully installed the network printer.
  • 11.
    Note: If youhad problems and did not get a test page, please call your Help Desk.