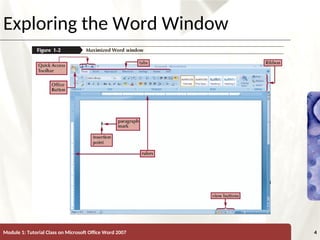
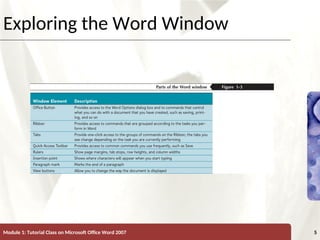
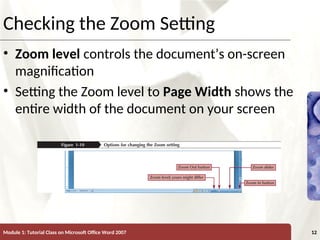
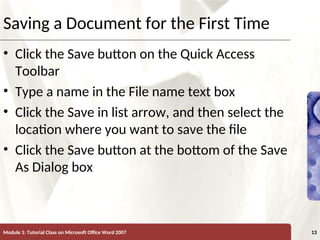
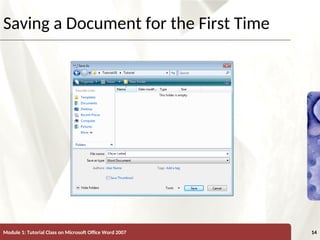
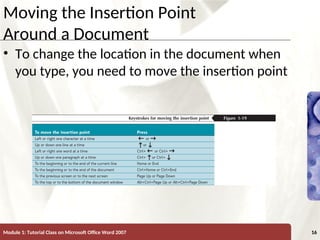
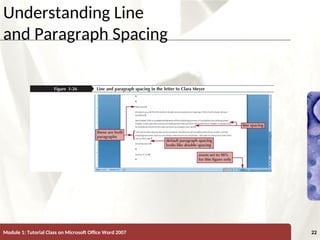
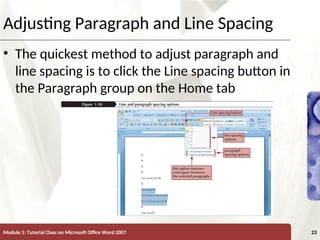
XP
XP
Module 1: Tutorial Class on Microsoft Office Word 2007 1
Microsoft word
Creating a Document
XP
XP
Objectives
• Identify the components of the Word window
• Set up the Word window
• Create a new document
• Scroll a document and move the insertion point
• Correct errors and undo and redo changes
• Enter the date with AutoComplete
Module 1: Tutorial Class on Microsoft Office Word 2007 2
XP
XP
Objectives
• Change a document’s line and paragraph spacing
• Save, preview, and print a document
• Create an envelope
Module 1: Tutorial Class on Microsoft Office Word 2007 3
XP
XP
Exploring the Word Window
Module 1: Tutorial Class on Microsoft Office Word 2007 4
XP
XP
Exploring the Word Window
Module 1: Tutorial Class on Microsoft Office Word 2007 5
XP
XP
Opening a New Document
• Click the Office Button in the upper-left corner of
the Word window and view the menu of
commands that opens
• Click New
• Verify that the Blank document option is
selected (that is, highlighted in orange), and then
click the Create button at the bottom of the
dialog box
Module 1: Tutorial Class on Microsoft Office Word 2007 6
XP
XP
Opening a New Document
Module 1: Tutorial Class on Microsoft Office Word 2007 7
XP
XP
Selecting Print Layout View
• You can use the View buttons in the lower-right
corner of the Word window to change the way
your document is displayed
Module 1: Tutorial Class on Microsoft Office Word 2007 8
XP
XP
Displaying the Rulers
• Click the View tab
• In the Show/Hide group, click the Ruler check
box to display a checkmark
Module 1: Tutorial Class on Microsoft Office Word 2007 9
XP
XP
Displaying Nonprinting Characters
• Nonprinting characters are symbols that appear
on the screen but are not visible on the printed
page
• In the Paragraph group on the Home tab, click
the Show/Hide ¶ button
Module 1: Tutorial Class on Microsoft Office Word 2007 10
XP
XP
Checking the Font and Font Size
• The term font refers to the shape of the
characters in a document
• Font size refers to the size of the characters
Module 1: Tutorial Class on Microsoft Office Word 2007 11
XP
XP
Checking the Zoom Setting
• Zoom level controls the document’s on-screen
magnification
• Setting the Zoom level to Page Width shows the
entire width of the document on your screen
Module 1: Tutorial Class on Microsoft Office Word 2007 12
XP
XP
Saving a Document for the First Time
• Click the Save button on the Quick Access
Toolbar
• Type a name in the File name text box
• Click the Save in list arrow, and then select the
location where you want to save the file
• Click the Save button at the bottom of the Save
As Dialog box
Module 1: Tutorial Class on Microsoft Office Word 2007 13
XP
XP
Saving a Document for the First Time
Module 1: Tutorial Class on Microsoft Office Word 2007 14
XP
XP
Scrolling a Document
Module 1: Tutorial Class on Microsoft Office Word 2007 15
XP
XP
Moving the Insertion Point
Around a Document
• To change the location in the document when
you type, you need to move the insertion point
Module 1: Tutorial Class on Microsoft Office Word 2007 16
XP
XP
Using the Undo and Redo Commands
• To undo (or reverse) the last thing you did in a
document, you can click the Undo button on the
Quick Access Toolbar
• If you want to restore your original change, the
Redo button reverses the action of the Undo
button (or redoes the undo)
Module 1: Tutorial Class on Microsoft Office Word 2007 17
XP
XP
Correcting Errors
• If you notice a typing error as soon as you make
it, you can press the Backspace key
• AutoCorrect automatically corrects common
typing errors, such as typing “adn” for “and”
• Word’s spelling checker continually checks your
document against Word’s built-in dictionary
• Before you can practice using AutoCorrect and
the spelling checker, you need to verify that you
have the correct settings in the Word Options
dialog box
Module 1: Tutorial Class on Microsoft Office Word 2007 18
XP
XP
Correcting Errors
Module 1: Tutorial Class on Microsoft Office Word 2007 19
XP
XP
Correcting Spelling Errors
Module 1: Tutorial Class on Microsoft Office Word 2007 20
XP
XP
Understanding Line
and Paragraph Spacing
• Line spacing determines the amount of space
between lines of text within a paragraph
• Paragraph spacing determines the amount of
space before and after a paragraph
• Paragraph spacing is measured in points
– A point is approximately 1⁄72 of an inch
Module 1: Tutorial Class on Microsoft Office Word 2007 21
XP
XP
Understanding Line
and Paragraph Spacing
Module 1: Tutorial Class on Microsoft Office Word 2007 22
XP
XP
Adjusting Paragraph and Line Spacing
• The quickest method to adjust paragraph and
line spacing is to click the Line spacing button in
the Paragraph group on the Home tab
Module 1: Tutorial Class on Microsoft Office Word 2007 23
XP
XP
Previewing and Printing a Document
• To avoid wasting paper and time, you should first
display your document in the Print Preview
window
• Click the Office Button , point to Print, and then
click Print Preview
• To print your document, click the Office Button ,
and then click Print
– Verify settings in the Print dialog box, and then click
the OK button
Module 1: Tutorial Class on Microsoft Office Word 2007 24
XP
XP
Previewing and Printing a Document
Module 1: Tutorial Class on Microsoft Office Word 2007 25
XP
XP
Creating an Envelope
• Creating an envelope is a simple process because Word
automatically uses the inside address from the letter as
the address on the envelope
• Click the Mailings tab on the Ribbon
• In the Create group, click the Envelopes button to open
the Envelopes and Labels dialog box
• Verify that the Delivery address box contains the correct
address. If necessary, type a new address or edit the
existing one
• If necessary, type a return address. If you are using
preprinted stationery that already includes a return
address, click the Omit check box to insert a check mark
Module 1: Tutorial Class on Microsoft Office Word 2007 26
XP
XP
Creating an Envelope
• To print the envelope immediately, insert an
envelope in your printer, and then click the Print
button
• To store the envelope along with the rest of the
document, click the Add to Document button
• To print the envelope after you have added it to
the document, insert an envelope in your
printer, open the Print dialog box, and print the
page containing the envelope
Module 1: Tutorial Class on Microsoft Office Word 2007 27
XP
XP
Creating an Envelope
Module 1: Tutorial Class on Microsoft Office Word 2007 28
XP
XP
Continued…..
Module 1: Tutorial Class on Microsoft Office Word 2007 29

MS Word document for beginners to learn and

  • 1.
    XP XP Module 1: TutorialClass on Microsoft Office Word 2007 1 Microsoft word Creating a Document
  • 2.
    XP XP Objectives • Identify thecomponents of the Word window • Set up the Word window • Create a new document • Scroll a document and move the insertion point • Correct errors and undo and redo changes • Enter the date with AutoComplete Module 1: Tutorial Class on Microsoft Office Word 2007 2
  • 3.
    XP XP Objectives • Change adocument’s line and paragraph spacing • Save, preview, and print a document • Create an envelope Module 1: Tutorial Class on Microsoft Office Word 2007 3
  • 4.
    XP XP Exploring the WordWindow Module 1: Tutorial Class on Microsoft Office Word 2007 4
  • 5.
    XP XP Exploring the WordWindow Module 1: Tutorial Class on Microsoft Office Word 2007 5
  • 6.
    XP XP Opening a NewDocument • Click the Office Button in the upper-left corner of the Word window and view the menu of commands that opens • Click New • Verify that the Blank document option is selected (that is, highlighted in orange), and then click the Create button at the bottom of the dialog box Module 1: Tutorial Class on Microsoft Office Word 2007 6
  • 7.
    XP XP Opening a NewDocument Module 1: Tutorial Class on Microsoft Office Word 2007 7
  • 8.
    XP XP Selecting Print LayoutView • You can use the View buttons in the lower-right corner of the Word window to change the way your document is displayed Module 1: Tutorial Class on Microsoft Office Word 2007 8
  • 9.
    XP XP Displaying the Rulers •Click the View tab • In the Show/Hide group, click the Ruler check box to display a checkmark Module 1: Tutorial Class on Microsoft Office Word 2007 9
  • 10.
    XP XP Displaying Nonprinting Characters •Nonprinting characters are symbols that appear on the screen but are not visible on the printed page • In the Paragraph group on the Home tab, click the Show/Hide ¶ button Module 1: Tutorial Class on Microsoft Office Word 2007 10
  • 11.
    XP XP Checking the Fontand Font Size • The term font refers to the shape of the characters in a document • Font size refers to the size of the characters Module 1: Tutorial Class on Microsoft Office Word 2007 11
  • 12.
    XP XP Checking the ZoomSetting • Zoom level controls the document’s on-screen magnification • Setting the Zoom level to Page Width shows the entire width of the document on your screen Module 1: Tutorial Class on Microsoft Office Word 2007 12
  • 13.
    XP XP Saving a Documentfor the First Time • Click the Save button on the Quick Access Toolbar • Type a name in the File name text box • Click the Save in list arrow, and then select the location where you want to save the file • Click the Save button at the bottom of the Save As Dialog box Module 1: Tutorial Class on Microsoft Office Word 2007 13
  • 14.
    XP XP Saving a Documentfor the First Time Module 1: Tutorial Class on Microsoft Office Word 2007 14
  • 15.
    XP XP Scrolling a Document Module1: Tutorial Class on Microsoft Office Word 2007 15
  • 16.
    XP XP Moving the InsertionPoint Around a Document • To change the location in the document when you type, you need to move the insertion point Module 1: Tutorial Class on Microsoft Office Word 2007 16
  • 17.
    XP XP Using the Undoand Redo Commands • To undo (or reverse) the last thing you did in a document, you can click the Undo button on the Quick Access Toolbar • If you want to restore your original change, the Redo button reverses the action of the Undo button (or redoes the undo) Module 1: Tutorial Class on Microsoft Office Word 2007 17
  • 18.
    XP XP Correcting Errors • Ifyou notice a typing error as soon as you make it, you can press the Backspace key • AutoCorrect automatically corrects common typing errors, such as typing “adn” for “and” • Word’s spelling checker continually checks your document against Word’s built-in dictionary • Before you can practice using AutoCorrect and the spelling checker, you need to verify that you have the correct settings in the Word Options dialog box Module 1: Tutorial Class on Microsoft Office Word 2007 18
  • 19.
    XP XP Correcting Errors Module 1:Tutorial Class on Microsoft Office Word 2007 19
  • 20.
    XP XP Correcting Spelling Errors Module1: Tutorial Class on Microsoft Office Word 2007 20
  • 21.
    XP XP Understanding Line and ParagraphSpacing • Line spacing determines the amount of space between lines of text within a paragraph • Paragraph spacing determines the amount of space before and after a paragraph • Paragraph spacing is measured in points – A point is approximately 1⁄72 of an inch Module 1: Tutorial Class on Microsoft Office Word 2007 21
  • 22.
    XP XP Understanding Line and ParagraphSpacing Module 1: Tutorial Class on Microsoft Office Word 2007 22
  • 23.
    XP XP Adjusting Paragraph andLine Spacing • The quickest method to adjust paragraph and line spacing is to click the Line spacing button in the Paragraph group on the Home tab Module 1: Tutorial Class on Microsoft Office Word 2007 23
  • 24.
    XP XP Previewing and Printinga Document • To avoid wasting paper and time, you should first display your document in the Print Preview window • Click the Office Button , point to Print, and then click Print Preview • To print your document, click the Office Button , and then click Print – Verify settings in the Print dialog box, and then click the OK button Module 1: Tutorial Class on Microsoft Office Word 2007 24
  • 25.
    XP XP Previewing and Printinga Document Module 1: Tutorial Class on Microsoft Office Word 2007 25
  • 26.
    XP XP Creating an Envelope •Creating an envelope is a simple process because Word automatically uses the inside address from the letter as the address on the envelope • Click the Mailings tab on the Ribbon • In the Create group, click the Envelopes button to open the Envelopes and Labels dialog box • Verify that the Delivery address box contains the correct address. If necessary, type a new address or edit the existing one • If necessary, type a return address. If you are using preprinted stationery that already includes a return address, click the Omit check box to insert a check mark Module 1: Tutorial Class on Microsoft Office Word 2007 26
  • 27.
    XP XP Creating an Envelope •To print the envelope immediately, insert an envelope in your printer, and then click the Print button • To store the envelope along with the rest of the document, click the Add to Document button • To print the envelope after you have added it to the document, insert an envelope in your printer, open the Print dialog box, and print the page containing the envelope Module 1: Tutorial Class on Microsoft Office Word 2007 27
  • 28.
    XP XP Creating an Envelope Module1: Tutorial Class on Microsoft Office Word 2007 28
  • 29.
    XP XP Continued….. Module 1: TutorialClass on Microsoft Office Word 2007 29