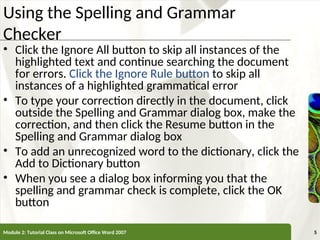
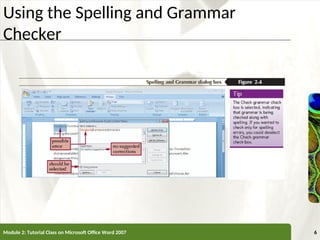
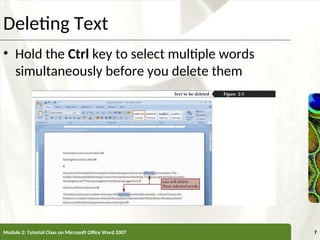
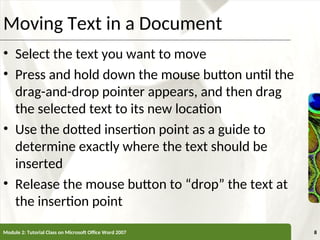
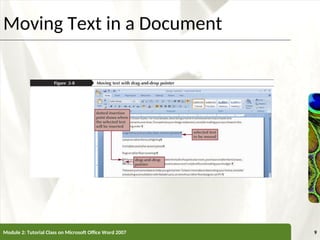
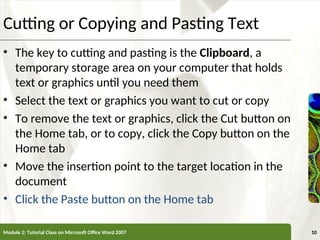
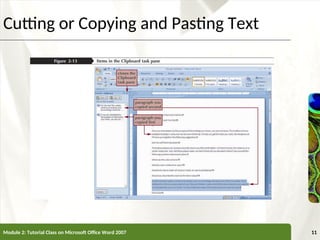
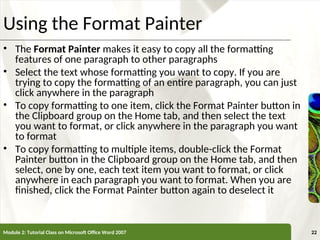
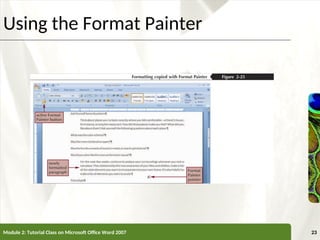
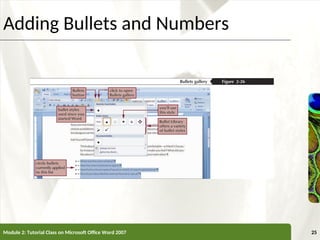
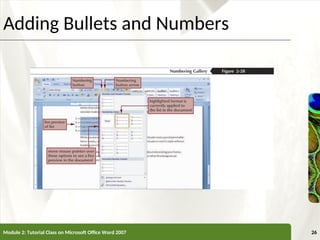
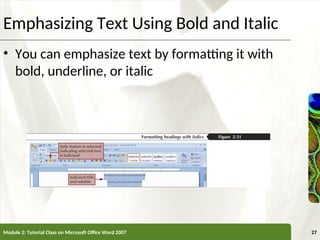
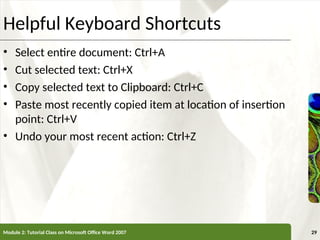
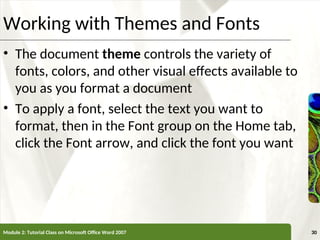
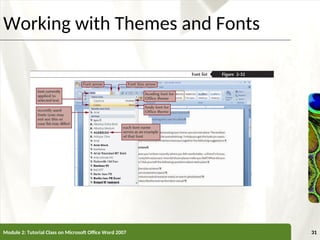
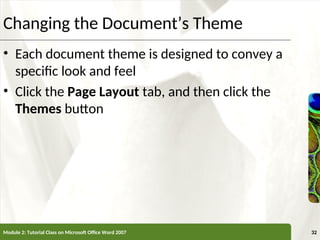
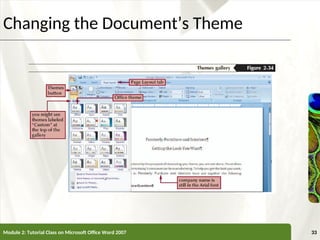
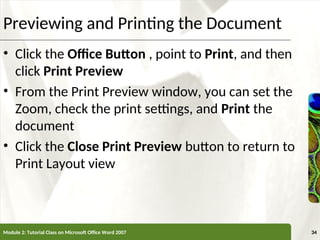
COMPREHENSIVE
Microsoft Word 2007
Editing and Formatting a
Document
XP
XP
Objectives
• Check spelling and grammar
• Select and delete text
• Move text within a document
• Find and replace text
• Change margins
• Change alignment and paragraph indents
• Copy formatting with the Format Painter
Module 2: Tutorial Class on Microsoft Office Word 2007 2
XP
XP
Objectives
• Emphasize points with bullets, numbering, bold,
and italic
• Change fonts and adjust font sizes
• Change the document theme
• Preview and print a document
Module 2: Tutorial Class on Microsoft Office Word 2007 3
XP
XP
Using the Spelling and Grammar
Checker
• Move the insertion point to the beginning of the document, click
the Review tab on the Ribbon, and then, in the Proofing group,
click the Spelling & Grammar button
• In the Spelling and Grammar dialog box, review any items
highlighted in color. Possible grammatical errors appear in green;
possible spelling errors appear in red. Review the suggested
corrections in the Suggestions list box
• To accept a suggested correction, click on it in the Suggestions list
box, click the Change button to make the correction, and then
continue searching the document for errors
• To skip the current instance of the highlighted text and continue
searching the document for errors, click the Ignore Once button
Module 2: Tutorial Class on Microsoft Office Word 2007 4
XP
XP
Using the Spelling and Grammar
Checker
• Click the Ignore All button to skip all instances of the
highlighted text and continue searching the document
for errors. Click the Ignore Rule button to skip all
instances of a highlighted grammatical error
• To type your correction directly in the document, click
outside the Spelling and Grammar dialog box, make the
correction, and then click the Resume button in the
Spelling and Grammar dialog box
• To add an unrecognized word to the dictionary, click the
Add to Dictionary button
• When you see a dialog box informing you that the
spelling and grammar check is complete, click the OK
button
Module 2: Tutorial Class on Microsoft Office Word 2007 5
XP
XP
Using the Spelling and Grammar
Checker
Module 2: Tutorial Class on Microsoft Office Word 2007 6
XP
XP
Deleting Text
• Hold the Ctrl key to select multiple words
simultaneously before you delete them
Module 2: Tutorial Class on Microsoft Office Word 2007 7
XP
XP
Moving Text in a Document
• Select the text you want to move
• Press and hold down the mouse button until the
drag-and-drop pointer appears, and then drag
the selected text to its new location
• Use the dotted insertion point as a guide to
determine exactly where the text should be
inserted
• Release the mouse button to “drop” the text at
the insertion point
Module 2: Tutorial Class on Microsoft Office Word 2007 8
XP
XP
Moving Text in a Document
Module 2: Tutorial Class on Microsoft Office Word 2007 9
XP
XP
Cutting or Copying and Pasting Text
• The key to cutting and pasting is the Clipboard, a
temporary storage area on your computer that holds
text or graphics until you need them
• Select the text or graphics you want to cut or copy
• To remove the text or graphics, click the Cut button on
the Home tab, or to copy, click the Copy button on the
Home tab
• Move the insertion point to the target location in the
document
• Click the Paste button on the Home tab
Module 2: Tutorial Class on Microsoft Office Word 2007 10
XP
XP
Cutting or Copying and Pasting Text
Module 2: Tutorial Class on Microsoft Office Word 2007 11
XP
XP
Finding and Replacing Text
• When you’re working with a longer document, the quickest and
easiest way to locate a particular character, word, or phrase is to
use the Find and Replace dialog box
• Click either the Find button or the Replace button on the Home tab
• Click the More button to expand the dialog box to display additional
options, including the Find whole words only option. If you see the
Less button, the additional options are already displayed
• In the Search list box, select Down if you want to search from the
insertion point to the end of the document, select Up if you want to
search from the insertion point to the beginning of the document,
or select All to search the entire document
• Type the characters you want to find in the Find what text box
• If you are replacing text, type the replacement text in the Replace
with text box
Module 2: Tutorial Class on Microsoft Office Word 2007 12
XP
XP
Finding and Replacing Text
• Click the Find whole words only check box to search for complete
words
• Click the Match case check box to insert the replacement text
with the same case (upper or lower) as in the Replace with text
box. For example, if the Replace with text box contained the
words “Pemberly Interiors,” this would ensure that Word
inserted the text with a capital (uppercase) “P” and a capital
(uppercase) “I”
• Click the Find Next button
• Click the Replace button to substitute the found text with the
replacement text and find the next occurrence
• Click the Replace All button to substitute all occurrences of the
found text with the replacement text, without reviewing each
occurrence
Module 2: Tutorial Class on Microsoft Office Word 2007 13
XP
XP
Finding and Replacing Text
Module 2: Tutorial Class on Microsoft Office Word 2007 14
XP
XP
Changing Margins for a Document
• Make sure no text is selected, and then, in the Page Setup group
on the Page Layout tab, click the Dialog Box Launcher. If
necessary, click the Margins tab to display the margin settings
• Use the arrows to change the settings in the Top, Bottom, Left, or
Right text boxes, or type a new margin value in each text box
• Make sure the Apply to list box displays Whole document
• Click the OK button
• To choose from groups of predefined margin settings, click the
Page Layout tab on the Ribbon, and then click the Margins
button. In the Margins menu, click the group of margin settings
that is appropriate for your document
Module 2: Tutorial Class on Microsoft Office Word 2007 15
XP
XP
Changing Margins for a Document
Module 2: Tutorial Class on Microsoft Office Word 2007 16
XP
XP
Changing Margins for a Document
Module 2: Tutorial Class on Microsoft Office Word 2007 17
XP
XP
Aligning Text
• The term alignment refers to the way a
paragraph lines up horizontally between the
margins
Module 2: Tutorial Class on Microsoft Office Word 2007 18
XP
XP
Aligning Text
Module 2: Tutorial Class on Microsoft Office Word 2007 19
XP
XP
Indenting a Paragraph
• When you indent a paragraph, you move the
entire paragraph to the right
– Indent markers show the paragraph’s current indent settings
– In a Hanging indent, all lines except the first line of the
paragraph are indented from the left margin
– In a Right indent, all lines of the paragraph are indented from
the right margin
Module 2: Tutorial Class on Microsoft Office Word 2007 20
XP
XP
Indenting a Paragraph
Module 2: Tutorial Class on Microsoft Office Word 2007 21
XP
XP
Using the Format Painter
• The Format Painter makes it easy to copy all the formatting
features of one paragraph to other paragraphs
• Select the text whose formatting you want to copy. If you are
trying to copy the formatting of an entire paragraph, you can just
click anywhere in the paragraph
• To copy formatting to one item, click the Format Painter button in
the Clipboard group on the Home tab, and then select the text
you want to format, or click anywhere in the paragraph you want
to format
• To copy formatting to multiple items, double-click the Format
Painter button in the Clipboard group on the Home tab, and then
select, one by one, each text item you want to format, or click
anywhere in each paragraph you want to format. When you are
finished, click the Format Painter button again to deselect it
Module 2: Tutorial Class on Microsoft Office Word 2007 22
XP
XP
Using the Format Painter
Module 2: Tutorial Class on Microsoft Office Word 2007 23
XP
XP
Adding Bullets and Numbers
• You can emphasize a list of items by adding a
heavy dot, or bullet, before each item in the list
– Much easier to read and follow than lists that do not
have bullets
Module 2: Tutorial Class on Microsoft Office Word 2007 24
XP
XP
Adding Bullets and Numbers
Module 2: Tutorial Class on Microsoft Office Word 2007 25
XP
XP
Adding Bullets and Numbers
Module 2: Tutorial Class on Microsoft Office Word 2007 26
XP
XP
Emphasizing Text Using Bold and Italic
• You can emphasize text by formatting it with
bold, underline, or italic
Module 2: Tutorial Class on Microsoft Office Word 2007 27
XP
XP
Helpful Keyboard Shortcuts
• For common tasks, such as applying bold and
italics, it’s often faster to use a keyboard
shortcut
• Bold selected text: Ctrl+B
• Italicize selected text: Ctrl+I
• Underline selected text: Ctrl+U
Module 2: Tutorial Class on Microsoft Office Word 2007 28
XP
XP
Helpful Keyboard Shortcuts
• Select entire document: Ctrl+A
• Cut selected text: Ctrl+X
• Copy selected text to Clipboard: Ctrl+C
• Paste most recently copied item at location of insertion
point: Ctrl+V
• Undo your most recent action: Ctrl+Z
Module 2: Tutorial Class on Microsoft Office Word 2007 29
XP
XP
Working with Themes and Fonts
• The document theme controls the variety of
fonts, colors, and other visual effects available to
you as you format a document
• To apply a font, select the text you want to
format, then in the Font group on the Home tab,
click the Font arrow, and click the font you want
Module 2: Tutorial Class on Microsoft Office Word 2007 30
XP
XP
Working with Themes and Fonts
Module 2: Tutorial Class on Microsoft Office Word 2007 31
XP
XP
Changing the Document’s Theme
• Each document theme is designed to convey a
specific look and feel
• Click the Page Layout tab, and then click the
Themes button
Module 2: Tutorial Class on Microsoft Office Word 2007 32
XP
XP
Changing the Document’s Theme
Module 2: Tutorial Class on Microsoft Office Word 2007 33
XP
XP
Previewing and Printing the Document
• Click the Office Button , point to Print, and then
click Print Preview
• From the Print Preview window, you can set the
Zoom, check the print settings, and Print the
document
• Click the Close Print Preview button to return to
Print Layout view
Module 2: Tutorial Class on Microsoft Office Word 2007 34
XP
XP
Continued…..
Module 2: Tutorial Class on Microsoft Office Word 2007 35

MS Word document for beginners to learn and

  • 1.
  • 2.
    XP XP Objectives • Check spellingand grammar • Select and delete text • Move text within a document • Find and replace text • Change margins • Change alignment and paragraph indents • Copy formatting with the Format Painter Module 2: Tutorial Class on Microsoft Office Word 2007 2
  • 3.
    XP XP Objectives • Emphasize pointswith bullets, numbering, bold, and italic • Change fonts and adjust font sizes • Change the document theme • Preview and print a document Module 2: Tutorial Class on Microsoft Office Word 2007 3
  • 4.
    XP XP Using the Spellingand Grammar Checker • Move the insertion point to the beginning of the document, click the Review tab on the Ribbon, and then, in the Proofing group, click the Spelling & Grammar button • In the Spelling and Grammar dialog box, review any items highlighted in color. Possible grammatical errors appear in green; possible spelling errors appear in red. Review the suggested corrections in the Suggestions list box • To accept a suggested correction, click on it in the Suggestions list box, click the Change button to make the correction, and then continue searching the document for errors • To skip the current instance of the highlighted text and continue searching the document for errors, click the Ignore Once button Module 2: Tutorial Class on Microsoft Office Word 2007 4
  • 5.
    XP XP Using the Spellingand Grammar Checker • Click the Ignore All button to skip all instances of the highlighted text and continue searching the document for errors. Click the Ignore Rule button to skip all instances of a highlighted grammatical error • To type your correction directly in the document, click outside the Spelling and Grammar dialog box, make the correction, and then click the Resume button in the Spelling and Grammar dialog box • To add an unrecognized word to the dictionary, click the Add to Dictionary button • When you see a dialog box informing you that the spelling and grammar check is complete, click the OK button Module 2: Tutorial Class on Microsoft Office Word 2007 5
  • 6.
    XP XP Using the Spellingand Grammar Checker Module 2: Tutorial Class on Microsoft Office Word 2007 6
  • 7.
    XP XP Deleting Text • Holdthe Ctrl key to select multiple words simultaneously before you delete them Module 2: Tutorial Class on Microsoft Office Word 2007 7
  • 8.
    XP XP Moving Text ina Document • Select the text you want to move • Press and hold down the mouse button until the drag-and-drop pointer appears, and then drag the selected text to its new location • Use the dotted insertion point as a guide to determine exactly where the text should be inserted • Release the mouse button to “drop” the text at the insertion point Module 2: Tutorial Class on Microsoft Office Word 2007 8
  • 9.
    XP XP Moving Text ina Document Module 2: Tutorial Class on Microsoft Office Word 2007 9
  • 10.
    XP XP Cutting or Copyingand Pasting Text • The key to cutting and pasting is the Clipboard, a temporary storage area on your computer that holds text or graphics until you need them • Select the text or graphics you want to cut or copy • To remove the text or graphics, click the Cut button on the Home tab, or to copy, click the Copy button on the Home tab • Move the insertion point to the target location in the document • Click the Paste button on the Home tab Module 2: Tutorial Class on Microsoft Office Word 2007 10
  • 11.
    XP XP Cutting or Copyingand Pasting Text Module 2: Tutorial Class on Microsoft Office Word 2007 11
  • 12.
    XP XP Finding and ReplacingText • When you’re working with a longer document, the quickest and easiest way to locate a particular character, word, or phrase is to use the Find and Replace dialog box • Click either the Find button or the Replace button on the Home tab • Click the More button to expand the dialog box to display additional options, including the Find whole words only option. If you see the Less button, the additional options are already displayed • In the Search list box, select Down if you want to search from the insertion point to the end of the document, select Up if you want to search from the insertion point to the beginning of the document, or select All to search the entire document • Type the characters you want to find in the Find what text box • If you are replacing text, type the replacement text in the Replace with text box Module 2: Tutorial Class on Microsoft Office Word 2007 12
  • 13.
    XP XP Finding and ReplacingText • Click the Find whole words only check box to search for complete words • Click the Match case check box to insert the replacement text with the same case (upper or lower) as in the Replace with text box. For example, if the Replace with text box contained the words “Pemberly Interiors,” this would ensure that Word inserted the text with a capital (uppercase) “P” and a capital (uppercase) “I” • Click the Find Next button • Click the Replace button to substitute the found text with the replacement text and find the next occurrence • Click the Replace All button to substitute all occurrences of the found text with the replacement text, without reviewing each occurrence Module 2: Tutorial Class on Microsoft Office Word 2007 13
  • 14.
    XP XP Finding and ReplacingText Module 2: Tutorial Class on Microsoft Office Word 2007 14
  • 15.
    XP XP Changing Margins fora Document • Make sure no text is selected, and then, in the Page Setup group on the Page Layout tab, click the Dialog Box Launcher. If necessary, click the Margins tab to display the margin settings • Use the arrows to change the settings in the Top, Bottom, Left, or Right text boxes, or type a new margin value in each text box • Make sure the Apply to list box displays Whole document • Click the OK button • To choose from groups of predefined margin settings, click the Page Layout tab on the Ribbon, and then click the Margins button. In the Margins menu, click the group of margin settings that is appropriate for your document Module 2: Tutorial Class on Microsoft Office Word 2007 15
  • 16.
    XP XP Changing Margins fora Document Module 2: Tutorial Class on Microsoft Office Word 2007 16
  • 17.
    XP XP Changing Margins fora Document Module 2: Tutorial Class on Microsoft Office Word 2007 17
  • 18.
    XP XP Aligning Text • Theterm alignment refers to the way a paragraph lines up horizontally between the margins Module 2: Tutorial Class on Microsoft Office Word 2007 18
  • 19.
    XP XP Aligning Text Module 2:Tutorial Class on Microsoft Office Word 2007 19
  • 20.
    XP XP Indenting a Paragraph •When you indent a paragraph, you move the entire paragraph to the right – Indent markers show the paragraph’s current indent settings – In a Hanging indent, all lines except the first line of the paragraph are indented from the left margin – In a Right indent, all lines of the paragraph are indented from the right margin Module 2: Tutorial Class on Microsoft Office Word 2007 20
  • 21.
    XP XP Indenting a Paragraph Module2: Tutorial Class on Microsoft Office Word 2007 21
  • 22.
    XP XP Using the FormatPainter • The Format Painter makes it easy to copy all the formatting features of one paragraph to other paragraphs • Select the text whose formatting you want to copy. If you are trying to copy the formatting of an entire paragraph, you can just click anywhere in the paragraph • To copy formatting to one item, click the Format Painter button in the Clipboard group on the Home tab, and then select the text you want to format, or click anywhere in the paragraph you want to format • To copy formatting to multiple items, double-click the Format Painter button in the Clipboard group on the Home tab, and then select, one by one, each text item you want to format, or click anywhere in each paragraph you want to format. When you are finished, click the Format Painter button again to deselect it Module 2: Tutorial Class on Microsoft Office Word 2007 22
  • 23.
    XP XP Using the FormatPainter Module 2: Tutorial Class on Microsoft Office Word 2007 23
  • 24.
    XP XP Adding Bullets andNumbers • You can emphasize a list of items by adding a heavy dot, or bullet, before each item in the list – Much easier to read and follow than lists that do not have bullets Module 2: Tutorial Class on Microsoft Office Word 2007 24
  • 25.
    XP XP Adding Bullets andNumbers Module 2: Tutorial Class on Microsoft Office Word 2007 25
  • 26.
    XP XP Adding Bullets andNumbers Module 2: Tutorial Class on Microsoft Office Word 2007 26
  • 27.
    XP XP Emphasizing Text UsingBold and Italic • You can emphasize text by formatting it with bold, underline, or italic Module 2: Tutorial Class on Microsoft Office Word 2007 27
  • 28.
    XP XP Helpful Keyboard Shortcuts •For common tasks, such as applying bold and italics, it’s often faster to use a keyboard shortcut • Bold selected text: Ctrl+B • Italicize selected text: Ctrl+I • Underline selected text: Ctrl+U Module 2: Tutorial Class on Microsoft Office Word 2007 28
  • 29.
    XP XP Helpful Keyboard Shortcuts •Select entire document: Ctrl+A • Cut selected text: Ctrl+X • Copy selected text to Clipboard: Ctrl+C • Paste most recently copied item at location of insertion point: Ctrl+V • Undo your most recent action: Ctrl+Z Module 2: Tutorial Class on Microsoft Office Word 2007 29
  • 30.
    XP XP Working with Themesand Fonts • The document theme controls the variety of fonts, colors, and other visual effects available to you as you format a document • To apply a font, select the text you want to format, then in the Font group on the Home tab, click the Font arrow, and click the font you want Module 2: Tutorial Class on Microsoft Office Word 2007 30
  • 31.
    XP XP Working with Themesand Fonts Module 2: Tutorial Class on Microsoft Office Word 2007 31
  • 32.
    XP XP Changing the Document’sTheme • Each document theme is designed to convey a specific look and feel • Click the Page Layout tab, and then click the Themes button Module 2: Tutorial Class on Microsoft Office Word 2007 32
  • 33.
    XP XP Changing the Document’sTheme Module 2: Tutorial Class on Microsoft Office Word 2007 33
  • 34.
    XP XP Previewing and Printingthe Document • Click the Office Button , point to Print, and then click Print Preview • From the Print Preview window, you can set the Zoom, check the print settings, and Print the document • Click the Close Print Preview button to return to Print Layout view Module 2: Tutorial Class on Microsoft Office Word 2007 34
  • 35.
    XP XP Continued….. Module 2: TutorialClass on Microsoft Office Word 2007 35