Microsoft officeword 2007 is one of the several
components of the office suite from Microsoft
cooperation. Amongst the office suit
components includes; ms access, ms excel, ms
power point and word which are the most
widely used.
BRIEF OVERVIEW
3.
Menus
When you beginto explore Word 2007 you will notice a
new look to the menu bar. You should remember three
features as you work within Word 2007:
the Microsoft Office Button
the Quick Access Toolbar
the Ribbon (formerly toolbar)
These three features contain many of the functions that
were in the menu of previous versions of Word. The
functions of these three features will be outlined below.
EXPLORING THE MS WORD 2007
USER INTERFACE
The Microsoft Officebutton performs many of
the functions that were located in the File
menu of older versions of Word. This button
allows you to create a new document, open an
existing document, save or save as, print, send
(through email or fax), publish or close.
7.
The Ribbonis the panel at the top portion of the
document. It has seven tabs: Home, Insert, Page
Layout, References, Mailings, Review, and View that
contain many new and existing features of Word.
Each tab is divided into groups. The groups are
logical collections of features designed to perform
functions that you will utilize in developing or
editing your Word document. Commonly used
features are displayed on the Ribbon, to view
additional features within each group, click on the
arrow at the bottom right of each group.
THE RIBBON
Each of thetabs contains the following tools:
Home: Clipboard, Fonts, Paragraph, Styles,
and Editing.
Insert: Pages, Tables, Illustrations, Links,
Header & Footer, Text, and Symbols Page
Layout: Themes, Page Setup, Page
Background, Paragraph, Arrange
DETAILS OF EACH OF THE TABBS
The quickaccess toolbar is a customizable
toolbar that contains commands that you may
want to use. You can place the quick access
toolbar above or below the ribbon. To change
the location of the quick access toolbar, click on
the arrow at the end of the toolbar and click on
Show Below the Ribbon.
15.
You canalso add items to the quick access
toolbar. Right click on any item in the Office
Button or the Ribbon and click on Add to Quick
Access Toolbar and a shortcut will be added to
the Quick Access Toolbar.
Create a NewDocument
There are several ways to create new
documents, open existing documents, and
save documents in Word:
Click the Microsoft Office Button and Click
New or
Press CTRL+N (Depress the CTRL key while
pressing the “N”) on the keyboard
WORKING WITH DOCUMENTS
18.
You willnotice that when you click on the
Microsoft Office Button and Click New, you
have many choices about the types of
documents you can create. If you wish to
start from a blank document, click Blank. If
you wish to start from a template, you can
browse through your choices on the left, see
the choices on center screen, and preview
the selection on the right screen.
20.
Click theMicrosoft Office Button and Click
Open, or
Press CTRL+O (Depress the CTRL key while
pressing the “O”) on the keyboard, or
If you have recently used the document you
can click the Microsoft Office Button and
click the name of the document in the
Recent Documents section of the window
Insert picture of recent docs
OPENING AN EXISTING DOCUMENT
21.
Click theMicrosoft Office Button and Click
Save or Save As (remember, if you’re sending
the document to someone who does not
have Office 2007, you will need to click the
Office Button, click Save As, and Click Word
97-2003 Document), or
Press CTRL+S (Depress the CTRL key while
pressing the “S”) on the keyboard, or
Click the File icon on the Quick Access
Toolbar
SAVING A DOCUMENT
To renamea Word document while using the
program:
Click the Office Button and find the file you
want to rename.
Right-click the document name with the
mouse and select Rename from the shortcut
menu.
Type the new name for the file and press the
ENTER key.
RENAMING DOCUMENTS
25.
Typing andinserting Text
To enter text just start typing! The text will
appear where the blinking cursor is located.
Move the cursor by using the arrow buttons
on the keyboard or positioning the mouse
and clicking the left button. The keyboard
shortcuts listed below are also helpful when
moving through the text of a document:
EDITING A DOCUMENT
26.
MOVE ACTION KEYSTROKE
Beginning of the line HOME
End of the line END
Top of the document CTRL+HOME
End of the document CTRL+END
27.
To change anyattributes of text it must be
highlighted first. Select the text by dragging
the mouse over the desired text while
keeping the left mouse button depressed, or
hold down the SHIFT key on the keyboard
while using the arrow buttons to highlight
the text. The following table contains
shortcuts for selecting a portion of the text:
SELECTING TEXT
29.
Deselect thetext by clicking anywhere outside
of the selection on the page or press an arrow
key on the keyboard.
30.
Text can beinserted in a document at any point using any of
the following methods:
Type Text: Put your cursor where you want to add the text
and begin typing
Copy and Paste Text: Highlight the text you wish to copy
and right click and click Copy, put your cursor where you
want the text in the document and right click and click Paste.
Cut and Paste Text: Highlight the text you wish to copy,
right click, and click Cut, put your cursor where you want the
text in the document, right click, and click Paste.
Drag Text: Highlight the text you wish to move, click on it
and drag it to the place where you want the text in the
document.
INSERTING ADDITIONAL TEXT
32.
To rearrangetext within a document, you can
utilize the Clipboard Group on the Home Tab of
the Ribbon. Insert picture of clipboard group
labeled
Move text: Cut and Paste or Drag as shown above
Copy Text: Copy and Paste as above or use the
Clipboard group on the Ribbon
Paste Text: Ctrl + V (hold down the CTRL and the
“V” key at the same time) or use the Clipboard
group to Paste, Paste Special, or Paste as
Hyperlink
REARRANGING BLOCKS OF TEXT
33.
Use theBACKSPACE and DELETE keys on the
keyboard to delete text. Backspace will
delete text to the left of the cursor and
Delete will erase text to the right. To delete
a large selection of text, highlight it using
any of the methods outlined above and
press the DELETE key.
DELETING BLOCKS OF TEXT
34.
To finda particular word or phrase in a
document:
Click Find on the Editing Group on the
Ribbon
To find and replace a word or phrase in the
document, click Replace on the Editing Group
of the Ribbon.
SEARCH AND REPLACE TEXT
36.
A styleis a format-enhancing tool that
includes font typefaces, font size, effects
(bold, italics, underline, etc.), colors and
more. You will notice that on the Home Tab
of the Ribbon, that you have several areas
that will control the style of your document:
Font, Paragraph, and Styles.
STYLES
38.
To changethe font typeface:
Click the arrow next to the font name and
choose a font.
Remember that you can preview how the new
font will look by highlighting the text, and
hovering over the new font typeface.
CHANGE FONT TYPEFACE AND SIZE
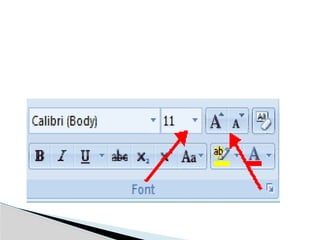
40.
Click thearrow next to the font size and
choose the appropriate size, or
Click the increase or decrease font size
buttons.
TO CHANGE THE FONT SIZE
42.
Font stylesare predefined formatting
options that are used to emphasize text.
They include: Bold, Italic, and Underline. To
add these to text:
Select the text and click the Font Styles
included on the Font Group of the Ribbon, or
Select the text and right click to display the
font tools
FONT STYLES AND EFFECTS
44.
Select thetext and click the Colors button
included on the Font Group of the Ribbon, or
Highlight the text, right click, and choose the
colors tool.
Select the color by clicking the down arrow
next to the font color button.
CHANGE TEXT COLOR
47.
If youhave already formatted text the way you
want it and would like another portion of the
document to have the same formatting, you can
copy the formatting. To copy the formatting, do
the following:
Select the text with the formatting you want to copy.
Copy the format of the text selected by clicking the
Format Painter button on the Clipboard Group of
the Home Tab
Apply the copied format by selecting the text and
clicking on it.
COPY FORMATTING
49.
To cleartext formatting:
Select the text you wish to clear the formatting
Click the Styles dialogue box on the Styles
Group on the Home Tab
Click Clear All
CLEAR FORMATTING
51.
Formatting paragraphsallows you to change
the look of the overall document. You can
access many of the tools of paragraph
formatting by clicking the Page Layout Tab of
the Ribbon or the Paragraph Group on the
Home Tab of the Ribbon.
FORMATTING PARAGRAPHS
53.
Change ParagraphAlignment The paragraph
alignment allows you to set how you want text to
appear. To change the alignment:
Click the Home Tab
Choose the appropriate button for alignment on the
Paragraph Group.
◦ Align Left: the text is aligned with your left margin
◦ Center: The text is centered within your margins
◦ Align Right: Aligns text with the right margin
◦ Justify: Aligns text to both the left and right margins.
55.
Indenting paragraphsallows you set text within a paragraph at
different margins. There are several options for indenting:
First Line: Controls the left boundary for the first line of a
paragraph
Hanging: Controls the left boundary of every line in a
paragraph except the first one
Left: Controls the left boundary for every line in a paragraph
Right: Controls the right boundary for every line in a paragraph
To indent paragraphs, you can do the following:
Click the Indent buttons to control the indent.
Click the Indent button repeated times to increase the size of the
indent.
INDENT PARAGRAPHS
57.
Click thedialog box of the Paragraph Group
Click the Indents and Spacing Tab
Select your indents
59.
Add Bordersand Shading You can add
borders and shading to paragraphs and
entire pages. To create a border around a
paragraph or paragraphs:
Select the area of text where you want the
border or shading.
Click the Borders Button on the Paragraph
Group on the Home Tab
Choose the Border and Shading
Choose the appropriate options
61.
Apply Stylesare a present collection of
formatting that you can apply to text. To
utilize Quick Styles:
Select the text you wish to format.
Click the dialog box next to the Styles Group
on the Home Tab.
Click the style you wish to apply.
63.
You canchange the space between lines and
paragraphs by doing the following:
Select the paragraph or paragraphs you wish to
change.
On the Home Tab, Click the Paragraph Dialog Box
Click the Indents and Spacing Tab
In the Spacing section, adjust your spacing
accordingly
Change Spacing Between
Paragraphs and Lines
65.
Tables areused to display data in a table format.
Create a Table
To create a table:
Place the cursor on the page where you want the new table
Click the Insert Tab of the Ribbon
Click the Tables Button on the Tables Group. You can create a
table one of four ways:
◦ Highlight the number of row and columns
◦ Click Insert Table and enter the number of rows and columns
◦ Click the Draw Table, create your table by clicking and entering the rows
and columns
◦ Click Quick Tables and choose a table
ADDING TABLES
67.
To modifythe structure of a table:
Click the table and notice that you have two
new tabs on the Ribbon: Design and Layout.
These pertain to the table design and
layout.
Modify the Table Structure and Format a
Table
69.
Table Style Options
TableStyles
Draw Borders
To format a table, click the table and then click the Layout Tab
on the Ribbon. This Layout tab allows you to:
View Gridlines and Properties (from the Table Group)
Insert Rows and Columns (from the Rows & Columns Group)
Delete the Table, Rows and/or Columns (from the Rows &
Columns Group)
Merge or Split Cells (from the Merge Group)
Increase and Decrease cell size (Cell Size Group)
Align text within the cells and change text directions
(Alignment Group)
On the Design Tab, you can choose:
71.
Graphics
Word 2007 allowsyou to insert special characters, symbols, pictures,
illustrations, and watermarks.
72.
Special charactersare punctuation, spacing,
or typographical characters that are not
generally available on the standard keyboard.
To insert symbols and special characters:
Place your cursor in the document where you
want the symbol
Click the Insert Tab on the Ribbon
Click the Symbol button on the Symbols Group
Choose the appropriate symbol.
Symbols and Special
Characters
74.
Word 2007also allows you to insert
mathematical equations. To access the
mathematical equations tool:
Place your cursor in the document where you
want the symbol
Click the Insert Tab on the Ribbon
Click the Equation Button on the Symbols Group
Choose the appropriate equation and structure or
click Insert New Equation
Equations
76.
To edit theequation click the equation and the Design Tab will be
available in the Ribbon
77.
Word 2007allows you to insert illustrations
and pictures into a document. To insert
illustrations:
Place your cursor in the document where you
want the illustration/picture
Click the Insert Tab on the Ribbon
Click the Clip Art Button
The dialog box will open on the screen and you
can search for clip art.
Choose the illustration you wish to include
Illustrations, Pictures, and Smart Art
79.
To inserta picture:
Place your cursor in the document where you
want the illustration/picture
Click the Insert Tab on the Ribbon
Click the Picture Button
Browse to the picture you wish to include
Click the Picture
Click Insert
81.
Smart Artis a collection of graphics you can utilize
to organize information within your document. It
includes timelines, processes, or workflow.
To insert Smart Art
Place your cursor in the document where you want
the illustration/picture
Click the Insert Tab on the Ribbon
Click the Smart Art button
Click the Smart Art you wish to include in your
document
Click the arrow on the left side of the graphic to
insert text or type the text in the graphic.
Smart Art
83.
Resize Graphics
Resize GraphicsAll graphics can be resized by clicking the image
and clicking one corner of the image and dragging the cursor to
the size you want the picture.
84.
A watermarkis a translucent image that
appears behind the primary text in a document.
To insert a watermark:
Click the Page Layout Tab in the Ribbon
Click the Watermark Button in the Page
Background Group
Click the Watermark you want for the document
or click Custom Watermark and create your own
watermark
To remove a watermark, follow the steps above,
but click Remove Watermark
Watermarks
86.
There aremany features to help you proofread
your document. These include: Spelling and
Grammar, Thesaurus, AutoCorrect, Default
Dictionary, and Word Count.
Spelling and Grammar To check the spelling and
grammar of a document
Place the cursor at the beginning of the document
or the beginning of the section that you want to
check
Click the Review Tab on the Ribbon
Click Spelling & Grammar on the Proofing Group.
Proofing a Document
88.
Any errors willdisplay a dialog box that allows you to choose a more
appropriate spelling or phrasing.
89.
If you wishto check the spelling of an individual word, you can right
click any word that has been underlined by Word and choose a
substitution.
90.
The Thesaurusallows you to view synonyms. To
use the thesaurus:
Click the Review Tab of the Ribbon
Click the Thesaurus Button on the Proofing
Group.
The thesaurus tool will appear on the right side of
the screen and you can view word options.
You can also access the thesaurus by right-clicking
any word and choosing Synonyms on the menu.
Thesaurus
92.
To checkthe word count in Word 2007 look at
the bottom left corner of the screen. It will give
you a total word count or if you have text
highlighted it will tell you how many words are
highlighted out of the total.
Check Word Count