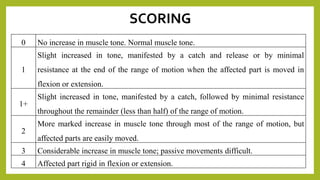
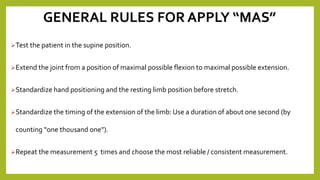
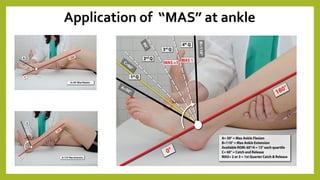
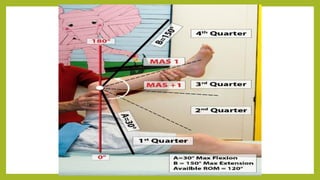
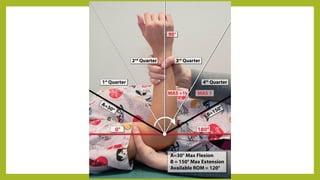
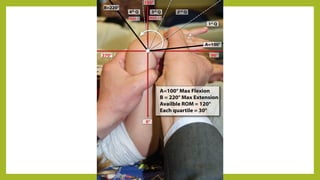
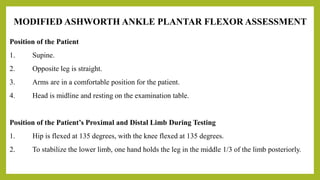
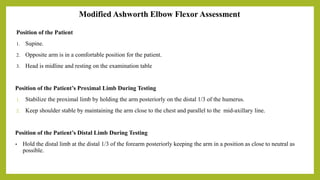
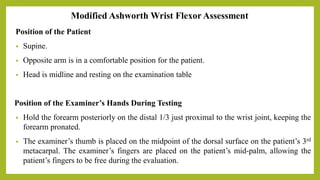
MODIFIED
ASHWORTH SCALE
INTRODUCTION
➢The ModifiedAshworth Scale is used as clinical measure of muscle spasticity in
patients with neurological conditions.
➢The ModifiedAshworth Scale is a 6-point scale.
➢Scores range from 0 to 4, where lower scores represent normal muscle tone and
higher scores represent spasticity or increased resistance to passive movement.
SCORING
0 No increase in muscle tone. Normal muscle tone.
1
Slight increased in tone, manifested by a catch and release or by minimal
resistance at the end of the range of motion when the affected part is moved in
flexion or extension.
1+
Slight increased in tone, manifested by a catch, followed by minimal resistance
throughout the remainder (less than half) of the range of motion.
2
More marked increase in muscle tone through most of the range of motion, but
affected parts are easily moved.
3 Considerable increase in muscle tone; passive movements difficult.
4 Affected part rigid in flexion or extension.
GENERAL RULES FOR APPLY “MAS”
➢Test the patient in the supine position.
➢Extend the joint from a position of maximal possible flexion to maximal possible extension.
➢Standardize hand positioning and the resting limb position before stretch.
➢Standardize the timing of the extension of the limb: Use a duration of about one second (by
counting “one thousand one”).
➢Repeat the measurement 5 times and choose the most reliable / consistent measurement.
Application of “MAS” at ankle
MODIFIED ASHWORTH ANKLE PLANTAR FLEXOR ASSESSMENT
Position of the Patient
1. Supine.
2. Opposite leg is straight.
3. Arms are in a comfortable position for the patient.
4. Head is midline and resting on the examination table.
Position of the Patient’s Proximal and Distal Limb During Testing
1. Hip is flexed at 135 degrees, with the knee flexed at 135 degrees.
2. To stabilize the lower limb, one hand holds the leg in the middle 1/3 of the limb posteriorly.
Position of the Patient’s Distal Limb During Testing
1. Hold the foot in a neutral position, neither varus nor valgus.
2. Grasp at forefoot from the plantar aspect.
Procedure: Measurement
1. The examiner rates the resistance while dorsiflexing the ankle, over a duration of about one second
(by counting “one thousand one”), moving the foot from maximum plantar flexion to maximum dorsiflexion.
2. Repeat the measurement 5 times (choose the most reliable / consistent measurement)
Modified Ashworth Knee Flexor Assessment:
Position of the Patient
1. Supine.
2. Opposite leg is straight with hip flexed at 180 degrees.
3. Arms are in a comfortable position for the patient.
4. Head is midline and resting on the examination table.
Position of the Patient’s Proximal Limb During Testing
1. One hand maintains hip stabilization at 90 degrees of hip flexion by grasping the femoral medial and lateral
condyles anteriorly at the top of the knee.
2. As much as possible, avoid any hip adduction, abduction, or rotation.
Position of the Patient’s Distal Limb During Testing
1. One hand holds the distal 1/3rd of the limb proximal to the ankle posteriorly.
Procedure: Measurement
1. The examiner rates the resistance while extending the knee, over a duration of about one second (by
counting “one thousand one”), moving the distal lower limb from maximum flexion to maximum extension.
2. Repeat the measurement 5 times (choose the most reliable / consistent measurement)
Modified Ashworth Elbow Flexor Assessment
Position of the Patient
1. Supine.
2. Opposite arm is in a comfortable position for the patient.
3. Head is midline and resting on the examination table
Position of the Patient’s Proximal Limb During Testing
1. Stabilize the proximal limb by holding the arm posteriorly on the distal 1/3 of the humerus.
2. Keep shoulder stable by maintaining the arm close to the chest and parallel to the mid-axillary line.
Position of the Patient’s Distal Limb During Testing
• Hold the distal limb at the distal 1/3 of the forearm posteriorly keeping the arm in a position as close to neutral as
possible.
Modified Ashworth Wrist Flexor Assessment
Position of the Patient
• Supine.
• Opposite arm is in a comfortable position for the patient.
• Head is midline and resting on the examination table
Position of the Examiner’s Hands During Testing
• Hold the forearm posteriorly on the distal 1/3 just proximal to the wrist joint, keeping the
forearm pronated.
• The examiner’s thumb is placed on the midpoint of the dorsal surface on the patient’s 3rd
metacarpal. The examiner’s fingers are placed on the patient’s mid-palm, allowing the
patient’s fingers to be free during the evaluation.
THANK YOU

Modified ashworth scale application

  • 1.
  • 2.
    INTRODUCTION ➢The ModifiedAshworth Scaleis used as clinical measure of muscle spasticity in patients with neurological conditions. ➢The ModifiedAshworth Scale is a 6-point scale. ➢Scores range from 0 to 4, where lower scores represent normal muscle tone and higher scores represent spasticity or increased resistance to passive movement.
  • 3.
    SCORING 0 No increasein muscle tone. Normal muscle tone. 1 Slight increased in tone, manifested by a catch and release or by minimal resistance at the end of the range of motion when the affected part is moved in flexion or extension. 1+ Slight increased in tone, manifested by a catch, followed by minimal resistance throughout the remainder (less than half) of the range of motion. 2 More marked increase in muscle tone through most of the range of motion, but affected parts are easily moved. 3 Considerable increase in muscle tone; passive movements difficult. 4 Affected part rigid in flexion or extension.
  • 4.
    GENERAL RULES FORAPPLY “MAS” ➢Test the patient in the supine position. ➢Extend the joint from a position of maximal possible flexion to maximal possible extension. ➢Standardize hand positioning and the resting limb position before stretch. ➢Standardize the timing of the extension of the limb: Use a duration of about one second (by counting “one thousand one”). ➢Repeat the measurement 5 times and choose the most reliable / consistent measurement.
  • 5.
  • 9.
    MODIFIED ASHWORTH ANKLEPLANTAR FLEXOR ASSESSMENT Position of the Patient 1. Supine. 2. Opposite leg is straight. 3. Arms are in a comfortable position for the patient. 4. Head is midline and resting on the examination table. Position of the Patient’s Proximal and Distal Limb During Testing 1. Hip is flexed at 135 degrees, with the knee flexed at 135 degrees. 2. To stabilize the lower limb, one hand holds the leg in the middle 1/3 of the limb posteriorly.
  • 10.
    Position of thePatient’s Distal Limb During Testing 1. Hold the foot in a neutral position, neither varus nor valgus. 2. Grasp at forefoot from the plantar aspect. Procedure: Measurement 1. The examiner rates the resistance while dorsiflexing the ankle, over a duration of about one second (by counting “one thousand one”), moving the foot from maximum plantar flexion to maximum dorsiflexion. 2. Repeat the measurement 5 times (choose the most reliable / consistent measurement)
  • 12.
    Modified Ashworth KneeFlexor Assessment: Position of the Patient 1. Supine. 2. Opposite leg is straight with hip flexed at 180 degrees. 3. Arms are in a comfortable position for the patient. 4. Head is midline and resting on the examination table. Position of the Patient’s Proximal Limb During Testing 1. One hand maintains hip stabilization at 90 degrees of hip flexion by grasping the femoral medial and lateral condyles anteriorly at the top of the knee. 2. As much as possible, avoid any hip adduction, abduction, or rotation.
  • 13.
    Position of thePatient’s Distal Limb During Testing 1. One hand holds the distal 1/3rd of the limb proximal to the ankle posteriorly. Procedure: Measurement 1. The examiner rates the resistance while extending the knee, over a duration of about one second (by counting “one thousand one”), moving the distal lower limb from maximum flexion to maximum extension. 2. Repeat the measurement 5 times (choose the most reliable / consistent measurement)
  • 15.
    Modified Ashworth ElbowFlexor Assessment Position of the Patient 1. Supine. 2. Opposite arm is in a comfortable position for the patient. 3. Head is midline and resting on the examination table Position of the Patient’s Proximal Limb During Testing 1. Stabilize the proximal limb by holding the arm posteriorly on the distal 1/3 of the humerus. 2. Keep shoulder stable by maintaining the arm close to the chest and parallel to the mid-axillary line. Position of the Patient’s Distal Limb During Testing • Hold the distal limb at the distal 1/3 of the forearm posteriorly keeping the arm in a position as close to neutral as possible.
  • 17.
    Modified Ashworth WristFlexor Assessment Position of the Patient • Supine. • Opposite arm is in a comfortable position for the patient. • Head is midline and resting on the examination table Position of the Examiner’s Hands During Testing • Hold the forearm posteriorly on the distal 1/3 just proximal to the wrist joint, keeping the forearm pronated. • The examiner’s thumb is placed on the midpoint of the dorsal surface on the patient’s 3rd metacarpal. The examiner’s fingers are placed on the patient’s mid-palm, allowing the patient’s fingers to be free during the evaluation.
  • 19.