Melting point determination Analytical Chemistrypdf
1.
Lecture 3
Melting PointDetermination
By
MSc. Elham Faisal
MSc. Wafaa Ajam
MSc. Issa Farahan
Organic chemistry(practical)
Ministry of higher education and scientific research
AL-Mustaqbal University college
Department of medical physics
2.
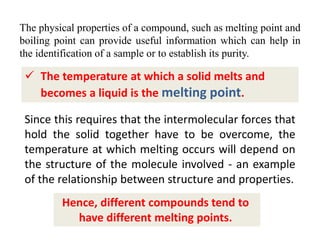
The physical propertiesof a compound, such as melting point and
boiling point can provide useful information which can help in
the identification of a sample or to establish its purity.
The temperature at which a solid melts and
becomes a liquid is the melting point.
Since this requires that the intermolecular forces that
hold the solid together have to be overcome, the
temperature at which melting occurs will depend on
the structure of the molecule involved - an example
of the relationship between structure and properties.
Hence, different compounds tend to
have different melting points.
3.
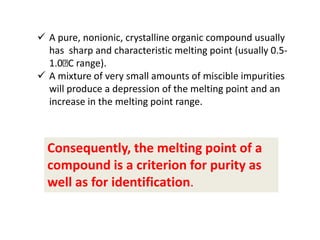
A pure,nonionic, crystalline organic compound usually
has sharp and characteristic melting point (usually 0.5-
1.0 C range).
A mixture of very small amounts of miscible impurities
will produce a depression of the melting point and an
increase in the melting point range.
Consequently, the melting point of a
compound is a criterion for purity as
well as for identification.
4.
The meltingpoint of an organic solid can be determined by
introducing a tiny amount into a small capillary tube, attaching this
to the stem of a thermometer centred in a heating bath, heating the
bath slowly, and observing the temperatures at which melting begins
and is complete.
Pure samples usually have sharp melting points, for example 149.5-
150C or 189-190 C; impure samples of the same compounds melt at
lower temperatures and over a wider range, for example 145-148C
or 186-189C. .
It is standard practice (in order to make the most effective use of
time) to carry out a rapid melting point determination initially (by
heating rapidly) to establish an approximate melting point and then
carry out at least two further careful determinations (by heating
more gently, i.e. temperature changing only about 2oC/min) until
you obtain two consistent values.
Melting Point Determination:-
5.
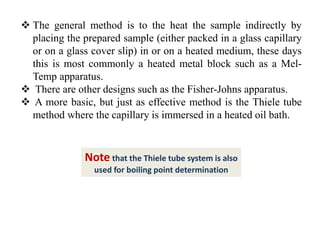
The generalmethod is to the heat the sample indirectly by
placing the prepared sample (either packed in a glass capillary
or on a glass cover slip) in or on a heated medium, these days
this is most commonly a heated metal block such as a Mel-
Temp apparatus.
There are other designs such as the Fisher-Johns apparatus.
A more basic, but just as effective method is the Thiele tube
method where the capillary is immersed in a heated oil bath.
Note that the Thiele tube system is also
used for boiling point determination
6.
unlike boiling point,the melting
point is relatively insensitive to
pressure and no pressure
correction needs to be made
7.
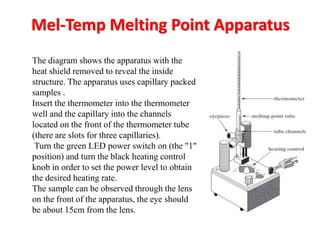
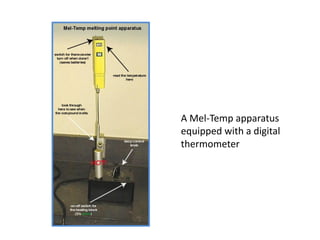
Mel-Temp Melting PointApparatus
The diagram shows the apparatus with the
heat shield removed to reveal the inside
structure. The apparatus uses capillary packed
samples .
Insert the thermometer into the thermometer
well and the capillary into the channels
located on the front of the thermometer tube
(there are slots for three capillaries).
Turn the green LED power switch on (the "1"
position) and turn the black heating control
knob in order to set the power level to obtain
the desired heating rate.
The sample can be observed through the lens
on the front of the apparatus, the eye should
be about 15cm from the lens.
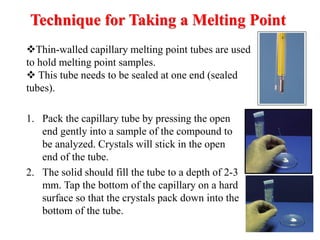
Technique for Takinga Melting Point
1. Pack the capillary tube by pressing the open
end gently into a sample of the compound to
be analyzed. Crystals will stick in the open
end of the tube.
2. The solid should fill the tube to a depth of 2-3
mm. Tap the bottom of the capillary on a hard
surface so that the crystals pack down into the
bottom of the tube.
Thin-walled capillary melting point tubes are used
to hold melting point samples.
This tube needs to be sealed at one end (sealed
tubes).
10.
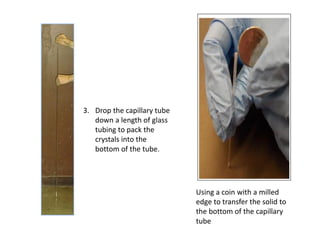
Using a coinwith a milled
edge to transfer the solid to
the bottom of the capillary
tube
3. Drop the capillary tube
down a length of glass
tubing to pack the
crystals into the
bottom of the tube.
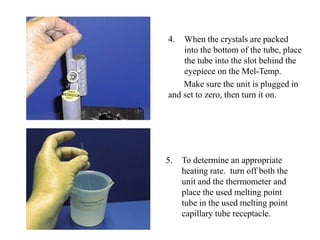
11.
4. When thecrystals are packed
into the bottom of the tube, place
the tube into the slot behind the
eyepiece on the Mel-Temp.
Make sure the unit is plugged in
and set to zero, then turn it on.
5. To determine an appropriate
heating rate. turn off both the
unit and the thermometer and
place the used melting point
tube in the used melting point
capillary tube receptacle.
12.
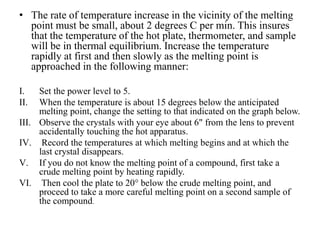
• The rateof temperature increase in the vicinity of the melting
point must be small, about 2 degrees C per min. This insures
that the temperature of the hot plate, thermometer, and sample
will be in thermal equilibrium. Increase the temperature
rapidly at first and then slowly as the melting point is
approached in the following manner:
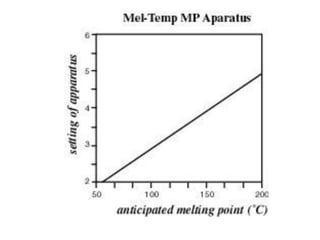
I. Set the power level to 5.
II. When the temperature is about 15 degrees below the anticipated
melting point, change the setting to that indicated on the graph below.
III. Observe the crystals with your eye about 6" from the lens to prevent
accidentally touching the hot apparatus.
IV. Record the temperatures at which melting begins and at which the
last crystal disappears.
V. If you do not know the melting point of a compound, first take a
crude melting point by heating rapidly.
VI. Then cool the plate to 20° below the crude melting point, and
proceed to take a more careful melting point on a second sample of
the compound.
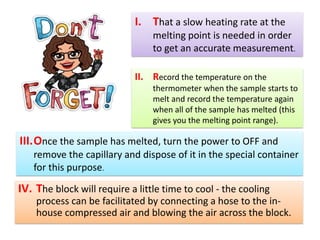
14.
IV. The blockwill require a little time to cool - the cooling
process can be facilitated by connecting a hose to the in-
house compressed air and blowing the air across the block.
I. That a slow heating rate at the
melting point is needed in order
to get an accurate measurement.
II. Record the temperature on the
thermometer when the sample starts to
melt and record the temperature again
when all of the sample has melted (this
gives you the melting point range).
III.Once the sample has melted, turn the power to OFF and
remove the capillary and dispose of it in the special container
for this purpose.
15.
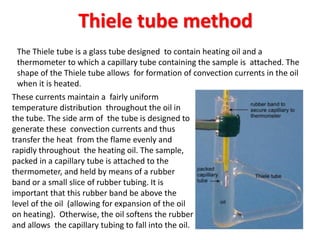
Thiele tube method
Thesecurrents maintain a fairly uniform
temperature distribution throughout the oil in
the tube. The side arm of the tube is designed to
generate these convection currents and thus
transfer the heat from the flame evenly and
rapidly throughout the heating oil. The sample,
packed in a capillary tube is attached to the
thermometer, and held by means of a rubber
band or a small slice of rubber tubing. It is
important that this rubber band be above the
level of the oil (allowing for expansion of the oil
on heating). Otherwise, the oil softens the rubber
and allows the capillary tubing to fall into the oil.
The Thiele tube is a glass tube designed to contain heating oil and a
thermometer to which a capillary tube containing the sample is attached. The
shape of the Thiele tube allows for formation of convection currents in the oil
when it is heated.
16.
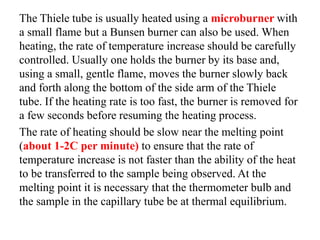
The Thiele tubeis usually heated using a microburner with
a small flame but a Bunsen burner can also be used. When
heating, the rate of temperature increase should be carefully
controlled. Usually one holds the burner by its base and,
using a small, gentle flame, moves the burner slowly back
and forth along the bottom of the side arm of the Thiele
tube. If the heating rate is too fast, the burner is removed for
a few seconds before resuming the heating process.
The rate of heating should be slow near the melting point
(about 1-2C per minute) to ensure that the rate of
temperature increase is not faster than the ability of the heat
to be transferred to the sample being observed. At the
melting point it is necessary that the thermometer bulb and
the sample in the capillary tube be at thermal equilibrium.
17.
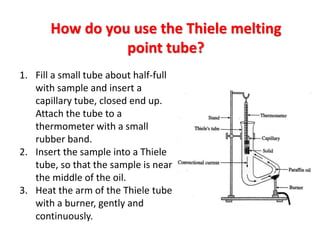
How do youuse the Thiele melting
point tube?
1. Fill a small tube about half-full
with sample and insert a
capillary tube, closed end up.
Attach the tube to a
thermometer with a small
rubber band.
2. Insert the sample into a Thiele
tube, so that the sample is near
the middle of the oil.
3. Heat the arm of the Thiele tube
with a burner, gently and
continuously.
18.
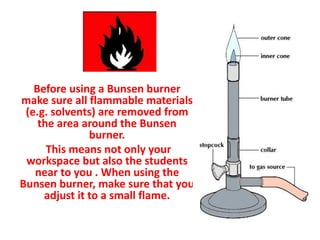
Before using aBunsen burner
make sure all flammable materials
(e.g. solvents) are removed from
the area around the Bunsen
burner.
This means not only your
workspace but also the students
near to you . When using the
Bunsen burner, make sure that you
adjust it to a small flame.


![THERMOGRAVIMETRY ANALYSIS [TGA] AS PER PCI](https://cdn.slidesharecdn.com/ss_thumbnails/30tga-191218113650-thumbnail.jpg?width=640&height=640&fit=bounds)
![THERMOGRAVIMETRY ANALYSIS [TGA] AS PER PCI[M.PHARM]](https://cdn.slidesharecdn.com/ss_thumbnails/49-191219085241-thumbnail.jpg?width=640&height=640&fit=bounds)


