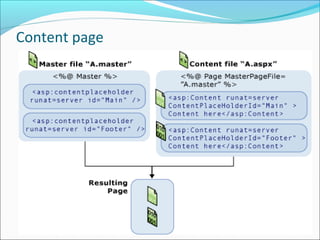
2. Master pages
Master page defines a combination of fixed content
and content place holder to hold the web page(.aspx)
3. Master Page
An ASP.NET file with a .master file extension. A
master page contains a layout that includes text,
HTML, and server controls. Instead of an “@ Page”
directive, it contains an “@ Master” directive. The
master page contains all top-level HTML elements for a
page, including <html>, <head>, and <form>. A master
page typically includes the page structure (usually an
HTML table), company name and logo, and site
navigation. To enable pages to insert content, a master
page contains one or more ContentPlaceHolder
controls. A master page inherits from the MasterPage
class.
4. Content Page
A content page defines the ContentPlaceHolder
controls in a master page, essentially filling in the
blanks. A content page is a standard .aspx file and is
bound to the master page using the MasterPageFile
attribute in the “@ Page” directive.
Master pages provide templates that you can use to
create consistent Web pages throughout an
application.
5. continued
To use master pages, first create a master page and
add layout tables and other common elements. Then
add ContentPlaceHolder controls to the master page.
To create the content pages, add standard Web forms,
select the master page check box when creating the
page, select the master page, and then add content to
the page.
6. Master pages
To reference public properties in a master page, add
the “@ MasterType” declaration to the content page
and reference the property using
Master.Property_Name. To reference controls in a
master page, call Master.FindControl from the content
page.
7.
8. Master pages
ASP.NET master pages allow you to create a consistent layout for the
pages in your application. A single master page defines the look and
feel and standard behavior that you want for all of the pages (or a
group of pages) in your application. You can then create individual
content pages that contain the content you want to display. When
users request the content pages, they merge with the master page to
produce output that combines the layout of the master page with the
content from the content page.
9. How master page works
A master page is an ASP.NET file with the extension
.master (for example, MySite.master) with a predefined
layout that can include static text, HTML elements, and
server controls. The master page is identified by a
special @ Master directive that replaces the @ Page
directive that is used for ordinary .aspx pages. The
directive looks like the following.
<%@ Master Language="C#" CodeFile="MasterPage.master.cs"
Inherits="MasterPage" %>
10. Content page
You define the content for the master page's
placeholder controls by creating individual content
pages, which are ASP.NET pages (.aspx files and,
optionally, code-behind files) that are bound to a
specific master page. The binding is established in the
content page's @ Page directive by including a
MasterPageFile attribute that points to the master
page to be used. For example, a content page might
have the following @ Page directive, which binds it to
the Master1.master page.
<%@ Page Language="C#"
MasterPageFile="~/MasterPages/Master1.master" Title="Content
Page"%>
13. Advantages of master pages
They allow you to centralize the common functionality of
your pages so that you can make updates in just one place.
They make it easy to create one set of controls and code
and apply the results to a set of pages. For example, you
can use controls on the master page to create a menu that
applies to all pages.
They give you fine-grained control over the layout of the
final page by allowing you to control how the placeholder
controls are rendered.
They provide an object model that allows you to
customize the master page from individual content pages.
14. Run time behaviour of the master page
At run time, master pages are handled in the following sequence:
1.Users request a page by typing the URL of the content page.
2.When the page is fetched, the @ Page directive is read. If the
directive references a master page, the master page is read as well.
If this is the first time the pages have been requested, both pages
are compiled.
3.The master page with the updated content is merged into the
control tree of the content page.
4.The content of individual Content controls is merged into the
corresponding ContentPlaceHolder control in the master page.
5.The resulting merged page is rendered to the browser
16. Themes and skin files
Themes are a feature similar to style sheets as they
help to supply a standard look and feel to web
controls. You can use CSS style sheets to supply styles
to HTML elements but if you wanted to use a set of
predefined styling attributes to your web controls
then you should use a Theme.
Editor's Notes
With most web sites, only part of the page changes when you go from one page to another. The parts
that don’t change usually include common regions like the header, a menu, and the footer. To create
web pages with a consistent layout you need a way to define these relatively static regions in a single
template file.
Master pages defines a combination of fixed content and contentPlace holders which are filled by individual web pages.
Themes are contained in a special ASP.NET folder called App_Themes and each Theme you want to add in your web application should reside in a separate folder under this App_Themes folder. Let’s say you want to create a Theme called Dallas for the visitors that are coming from Dallas then you can create a DallasTheme folder under App_Themes folder to represent this Theme. In this folder you need to create a skin file. A skin file a file in which you describe the visual styles that are used by pages that will use this Theme. The name if the skin file is not important but the extension should be .skin.
In the skin file you just need to add the exact definitions of the web controls with all the visual attributes you want. You need to add the runat=”server” attribute but beware of adding the ID attribute because that will cause an error. For example I have a skin file with the following contents
&lt;asp:TextBox runat=&quot;server&quot; Font-Names=&quot;Verdana&quot; Font-Size=&quot;11px&quot; Width=&quot;200px&quot; BorderStyle=&quot;Solid&quot; BorderColor=&quot;#cc6666&quot; BackColor=&quot;#ffcccc&quot; /&gt;
And this file is placed in the App_Themes/DallasTheme folder. Remember that the theme is identified by the theme folder name in this case DallasTheme.
After you’ve placed the skin file you need to set a web page to use this Theme. You can enable a Theme for the entire page by setting the Theme attribute of the page equal to the name of the Theme. In this case it would be
Now at every place where a Textbox web control is used, it will be rendered with the styles defined in the skin file. If you want to disable the Theme for a specific control you can set its EnableTheming property to false and it won’t get the styles from the skin file and instead you can add your own b specifying attributes.
You can also define more than one style for a web control in the skin file by adding the SkinID attribute to the web control definition in the skin file and in the web page that is utilizing the Theme you can set the control’s SkinID equal to the one you want to use from the skin file.