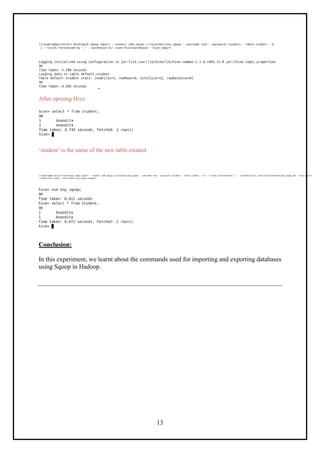
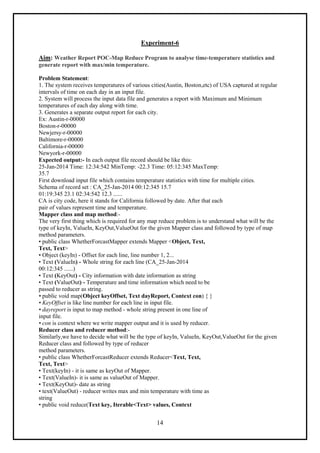
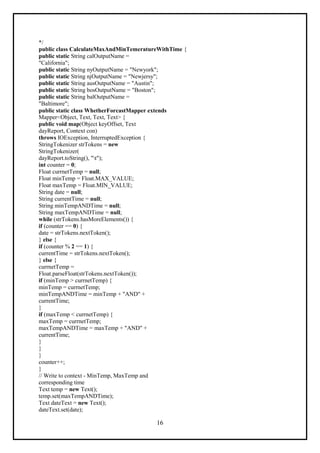
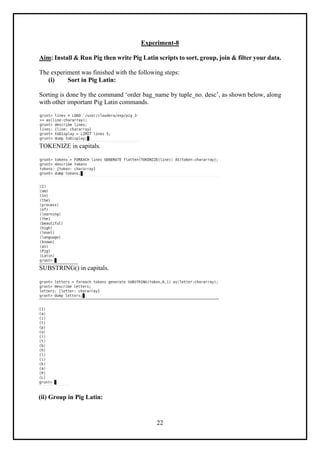
This document outlines a practical course file for MBA students at Chandigarh University, focusing on big data technologies in Hadoop and Hive. It details a series of experiments including file management tasks in Hadoop, database operations in Hive, and data manipulation using Sqoop, culminating in a MapReduce project for analyzing weather data. Each experiment demonstrates specific commands executed in a step-by-step manner, covering various aspects of managing and processing large datasets.


![17
try {
con.write(dateText, temp);
} catch (Exception e) {
e.printStackTrace();
}
temp.set(minTempANDTime);
dateText.set(date);
con.write(dateText, temp);
}
}
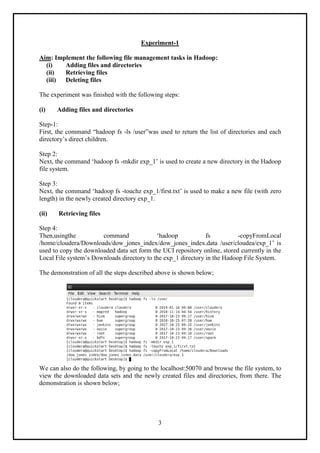
public static class WhetherForcastReducer extends
Reducer<Text, Text, Text, Text> {
MultipleOutputs<Text, Text> mos;
public void setup(Context context) {
mos = new MultipleOutputs<Text,
Text>(context);
}
public void reduce(Text key, Iterable<Text>
values, Context context)
throws IOException, InterruptedException {
int counter = 0;
String reducerInputStr[] = null;
String f1Time = "";
String f2Time = "";
String f1 = "", f2 = "";
Text result = new Text();
for (Text value : values) {
if (counter == 0) {
reducerInputStr =
value.toString().split("AND");
f1 = reducerInputStr[0];
f1Time = reducerInputStr[1];
}
else {
reducerInputStr =
value.toString().split("AND");
f2 = reducerInputStr[0];
f2Time = reducerInputStr[1];
}
counter = counter + 1;
}
if (Float.parseFloat(f1) >
Float.parseFloat(f2)) {
result = new Text("Time: " + f2Time + "
MinTemp: " + f2 + "t"
+ "Time: " + f1Time + " MaxTemp: " + f1);
} else {
result = new Text("Time: " + f1Time + "
MinTemp: " + f1 + "t"
+ "Time: " + f2Time + " MaxTemp: " + f2);
}
String fileName = "";
if (key.toString().substring(0, 2).equals("CA"))
{
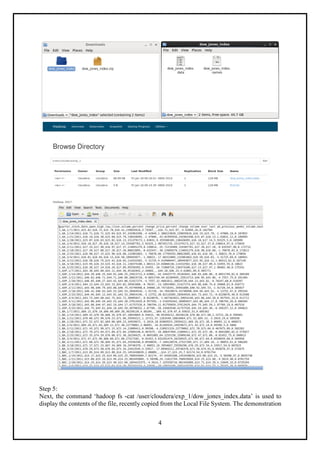
fileName =](https://image.slidesharecdn.com/manual-bigdatatechnologieslab-231123183830-8edd9615/85/Vikas-500-BIG-DATA-TECHNOLOGIES-LAB-pdf-17-320.jpg)
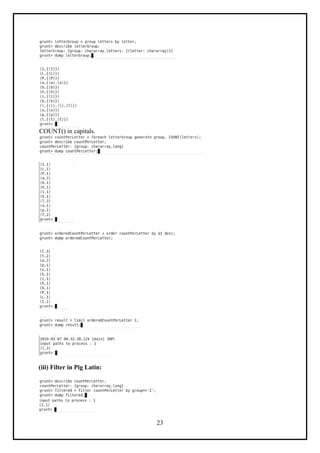
![18
CalculateMaxAndMinTemeratureTime.calOutputName;
} else if (key.toString().substring(0,
2).equals("NY")) {
fileName =
CalculateMaxAndMinTemeratureTime.nyOutputName;
} else if (key.toString().substring(0,
2).equals("NJ")) {
fileName =
CalculateMaxAndMinTemeratureTime.njOutputName;
} else if (key.toString().substring(0,
3).equals("AUS")) {
fileName =
CalculateMaxAndMinTemeratureTime.ausOutputName;
} else if (key.toString().substring(0,
3).equals("BOS")) {
fileName =
CalculateMaxAndMinTemeratureTime.bosOutputName;
} else if (key.toString().substring(0,
3).equals("BAL")) {
fileName =
CalculateMaxAndMinTemeratureTime.balOutputName;
}
String strArr[] = key.toString().split("_");
key.set(strArr[1]); //Key is date value
mos.write(fileName, key, result);
}
@Override
public void cleanup(Context context) throws
IOException,
InterruptedException {
mos.close();
}
}
public static void main(String[] args) throws
IOException,
ClassNotFoundException,
InterruptedException {
Configuration conf = new Configuration();
Job job = Job.getInstance(conf, "Wheather
Statistics of USA");
job.setJarByClass(CalculateMaxAndMinTemeratureW
ithTime.class);
job.setMapperClass(WhetherForcastMapper.class);
job.setReducerClass(WhetherForcastReducer.class)
;
job.setMapOutputKeyClass(Text.class);
job.setMapOutputValueClass(Text.class);
job.setOutputKeyClass(Text.class);
job.setOutputValueClass(Text.class);
MultipleOutputs.addNamedOutput(job,
calOutputName,
TextOutputFormat.class, Text.class,
Text.class);
MultipleOutputs.addNamedOutput(job,
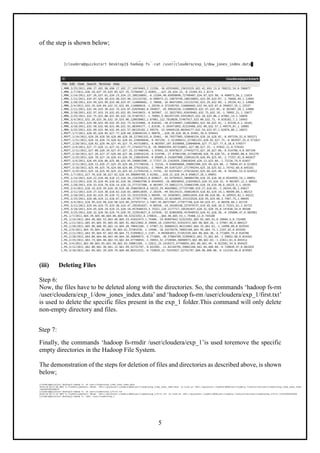
nyOutputName,](https://image.slidesharecdn.com/manual-bigdatatechnologieslab-231123183830-8edd9615/85/Vikas-500-BIG-DATA-TECHNOLOGIES-LAB-pdf-18-320.jpg)
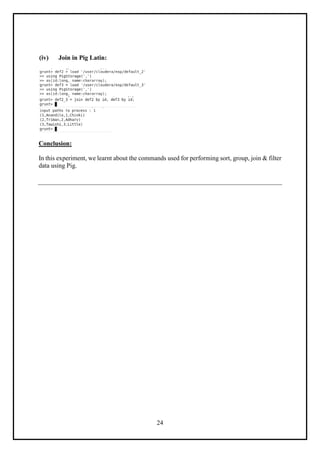
![19
TextOutputFormat.class, Text.class,
Text.class);
MultipleOutputs.addNamedOutput(job,
njOutputName,
TextOutputFormat.class, Text.class,
Text.class);
MultipleOutputs.addNamedOutput(job,
bosOutputName,
TextOutputFormat.class, Text.class,
Text.class);
MultipleOutputs.addNamedOutput(job,
ausOutputName,
TextOutputFormat.class, Text.class,
Text.class);
MultipleOutputs.addNamedOutput(job,
balOutputName,
TextOutputFormat.class, Text.class,
Text.class);
// FileInputFormat.addInputPath(job, new
Path(args[0]));
// FileOutputFormat.setOutputPath(job, new
Path(args[1]));
Path pathInput = new Path(
"hdfs://192.168.213.133:54310/weatherInputData/
input_temp.txt");
Path pathOutputDir = new Path(
"hdfs://192.168.213.133:54310/user/hduser1/
testfs/output_mapred3");
FileInputFormat.addInputPath(job, pathInput);
FileOutputFormat.setOutputPath(job,
pathOutputDir);
try {
System.exit(job.waitForCompletion(true) ? 0 :
1);
} catch (Exception e) {
// TODO Auto-generated catch block
e.printStackTrace();
}
}
}](https://image.slidesharecdn.com/manual-bigdatatechnologieslab-231123183830-8edd9615/85/Vikas-500-BIG-DATA-TECHNOLOGIES-LAB-pdf-19-320.jpg)

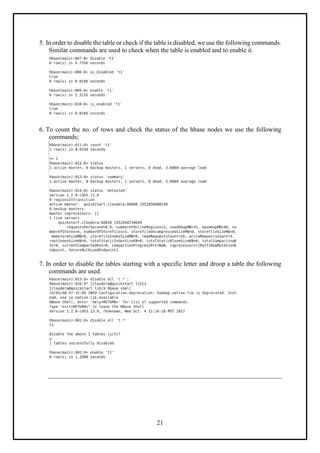

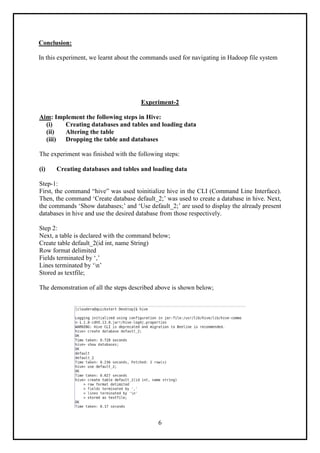
![27
Experiment-10
Aim: Run a basic Word Count Map Reduce program to understand Map Reduce
Paradigm with data set
WordCount is a simple program which counts the number of occurrences of each word in a given
text input data set. WordCount fits very well with the MapReduce programming model making it
a great example to understand the Hadoop Map/Reduce programming style. Our implementation
consists of three main parts:
1. Mapper
2. Reducer
3. Driver
Source code:
import java.io.IOException;
import java.util.StringTokenizer;
import org.apache.hadoop.io.IntWritable;
import org.apache.hadoop.io.LongWritable;
import org.apache.hadoop.io.Text;
import org.apache.hadoop.mapreduce.Mapper;
import org.apache.hadoop.mapreduce.Reducer;
import org.apache.hadoop.conf.Configuration;
import org.apache.hadoop.mapreduce.Job;
import org.apache.hadoop.mapreduce.lib.input.TextInputFormat;
import org.apache.hadoop.mapreduce.lib.output.TextOutputFormat;
import org.apache.hadoop.mapreduce.lib.input.FileInputFormat;
import org.apache.hadoop.mapreduce.lib.output.FileOutputFormat;
import org.apache.hadoop.fs.Path;
public class WordCount
{
public static class Map extends Mapper<LongWritable,Text,Text,IntWritable> {
public void map(LongWritable key, Text value,Context context) throws
IOException,InterruptedException{
String line = value.toString();
StringTokenizer tokenizer = new StringTokenizer(line);
while (tokenizer.hasMoreTokens()) {
value.set(tokenizer.nextToken());
context.write(value, new IntWritable(1));
}
}
}
public static class Reduce extends Reducer<Text,IntWritable,Text,IntWritable> {
public void reduce(Text key, Iterable<IntWritable> values,Context context)
throws IOException,InterruptedException {
int sum=0;
for(IntWritable x: values)
{
sum+=x.get();
}
context.write(key, new IntWritable(sum));
}
}
public static void main(String[] args) throws Exception {
Configuration conf= new Configuration();
Job job = new Job(conf,"My Word Count Program");
job.setJarByClass(WordCount.class);
job.setMapperClass(Map.class);](https://image.slidesharecdn.com/manual-bigdatatechnologieslab-231123183830-8edd9615/85/Vikas-500-BIG-DATA-TECHNOLOGIES-LAB-pdf-27-320.jpg)
![28
job.setReducerClass(Reduce.class);
job.setOutputKeyClass(Text.class);
job.setOutputValueClass(IntWritable.class);
job.setInputFormatClass(TextInputFormat.class);
job.setOutputFormatClass(TextOutputFormat.class);
Path outputPath = new Path(args[1]);
//Configuring the input/output path from the filesystem into the job
FileInputFormat.addInputPath(job, new Path(args[0]));
FileOutputFormat.setOutputPath(job, new Path(args[1]));
//deleting the output path automatically from hdfs so that we don't have to
delete it explicitly
outputPath.getFileSystem(conf).delete(outputPath);
//exiting the job only if the flag value becomes false
System.exit(job.waitForCompletion(true) ? 0 : 1);
}
}
The entire MapReduce program can be fundamentally divided
into three parts:
• Mapper Phase Code
• Reducer Phase Code
• Driver Code
We will understand the code for each of these three parts sequentially.
Mapper code:
public static class Map extends
Mapper<LongWritable,Text,Text,IntWritable> {
public void map(LongWritable key, Text value, Context context) throws
IOException,InterruptedException {
String line = value.toString();
StringTokenizer tokenizer = new StringTokenizer(line);
while (tokenizer.hasMoreTokens()) {
value.set(tokenizer.nextToken());
context.write(value, new IntWritable(1));
}
We have created a class Map that extends the class Mapper which is already defined in the
MapReduce Framework.
• We define the data types of input and output key/value pair after the class declaration using
angle brackets.
• Both the input and output of the Mapper is a key/value pair.
• Input:
◦ The key is nothing but the offset of each line in the text file:LongWritable
◦ The value is each individual line (as shown in the figure at the right): Text
• Output:
◦ The key is the tokenized words: Text
◦ We have the hardcoded value in our case which is 1: IntWritable
◦ Example – Dear 1, Bear 1, etc.
• We have written a java code where we have tokenized each word and assigned them a
hardcoded value equal to 1.
Reducer Code:
public static class Reduce extends
Reducer<Text,IntWritable,Text,IntWritable> {
public void reduce(Text key, Iterable<IntWritable> values,Context
context)
throws IOException,InterruptedException {](https://image.slidesharecdn.com/manual-bigdatatechnologieslab-231123183830-8edd9615/85/Vikas-500-BIG-DATA-TECHNOLOGIES-LAB-pdf-28-320.jpg)
![29
int sum=0;
for(IntWritable x: values)
{
sum+=x.get();
}
context.write(key, new IntWritable(sum));
}}
• We have created a class Reduce which extends class Reducer like that of Mapper.
• We define the data types of input and output key/value pair after the class declaration using
angle brackets as done for Mapper.
• Both the input and the output of the Reducer is a keyvalue pair.
• Input:
The key nothing but those unique words which have been generated after the sorting
and shuffling phase: Text
The value is a list of integers corresponding to each key: IntWritable
Example – Bear, [1, 1], etc.
• Output:
◦ The key is all the unique words present in the input text file: Text
◦ The value is the number of occurrences of each of the unique words: IntWritable
◦ Example – Bear, 2; Car, 3, etc.
We have aggregated the values present in each of the list corresponding to each key and
produced the final answer.
In general, a single reducer is created for each of the unique words, but, you can specify the
number of reducer in mapred-site.xml.
Driver Code:
Configuration conf= new Configuration();
Job job = new Job(conf,"My Word Count Program");
job.setJarByClass(WordCount.class);
job.setMapperClass(Map.class);
job.setReducerClass(Reduce.class);
job.setOutputKeyClass(Text.class);
job.setOutputValueClass(IntWritable.class);
job.setInputFormatClass(TextInputFormat.class);
job.setOutputFormatClass(TextOutputFormat.class);
Path outputPath = new Path(args[1]);
//Configuring the input/output path from the filesystem into the job
FileInputFormat.addInputPath(job, new Path(args[0]));
FileOutputFormat.setOutputPath(job, new Path(args[1]));
• In the driver class, we set the configuration of our
MapReduce job to run in Hadoop.
• We specify the name of the job , the data type of input/
output of the mapper and reducer.
• We also specify the names of the mapper and reducer
classes.
• The path of the input and output folder is also specified.
• The method setInputFormatClass () is used for specifying that how a Mapper will read the
input data or what will be the unit of work. Here, we have chosen TextInputFormat so that
single line is read by the mapper at a time from the input text file.
• The main () method is the entry point for the driver.
In this method, we instantiate a new Configuration object for the job.](https://image.slidesharecdn.com/manual-bigdatatechnologieslab-231123183830-8edd9615/85/Vikas-500-BIG-DATA-TECHNOLOGIES-LAB-pdf-29-320.jpg)


![7.__Developing_a_Research_Proposal[1].pptx](https://cdn.slidesharecdn.com/ss_thumbnails/7-260131073037-df92dd7d-thumbnail.jpg?width=640&height=640&fit=bounds)


![제 23회 보아즈(BOAZ) 빅데이터 컨퍼런스 - [MBOAX] : ABSA를 활용한 소비자 반응 분석 기반 운영 효율화 대시보드 설계](https://cdn.slidesharecdn.com/ss_thumbnails/3-1boaz23rdconferencemboax-260203102709-9d519923-thumbnail.jpg?width=640&height=640&fit=bounds)


