Download as PDF, PPTX

![Copyright information
→ Followed by—the order of options or
menus you must select to perform a step; Rights to all technologies and products that
for example: In Menu mode, select comprise this phone are the property of their
Messages → Create message (represents respective owners:
Messages, followed by Create message) • Bluetooth® is a registered trademark of the
using this manual
Bluetooth SIG, Inc. worldwide.
[ ] Square brackets—phone keys; for Bluetooth QD ID: B015931
example: [ ] (represents the Power/ • Java™ is a trademark of Sun Microsystems, Inc.
Menu exit key) • Windows Media Player® is a registered trademark
of Microsoft Corporation.
• Wi-Fi®, the Wi-Fi CERTIFIED logo, and the Wi-Fi
logo are registered trademarks of the Wi-Fi
Alliance.
iii](https://image.slidesharecdn.com/manual-instructiuni-samsung-b5310-corby-pro-ruby-red-110516014952-phpapp01/75/Manual-instructiuni-samsung-b5310-corby-pro-ruby-red-4-2048.jpg)
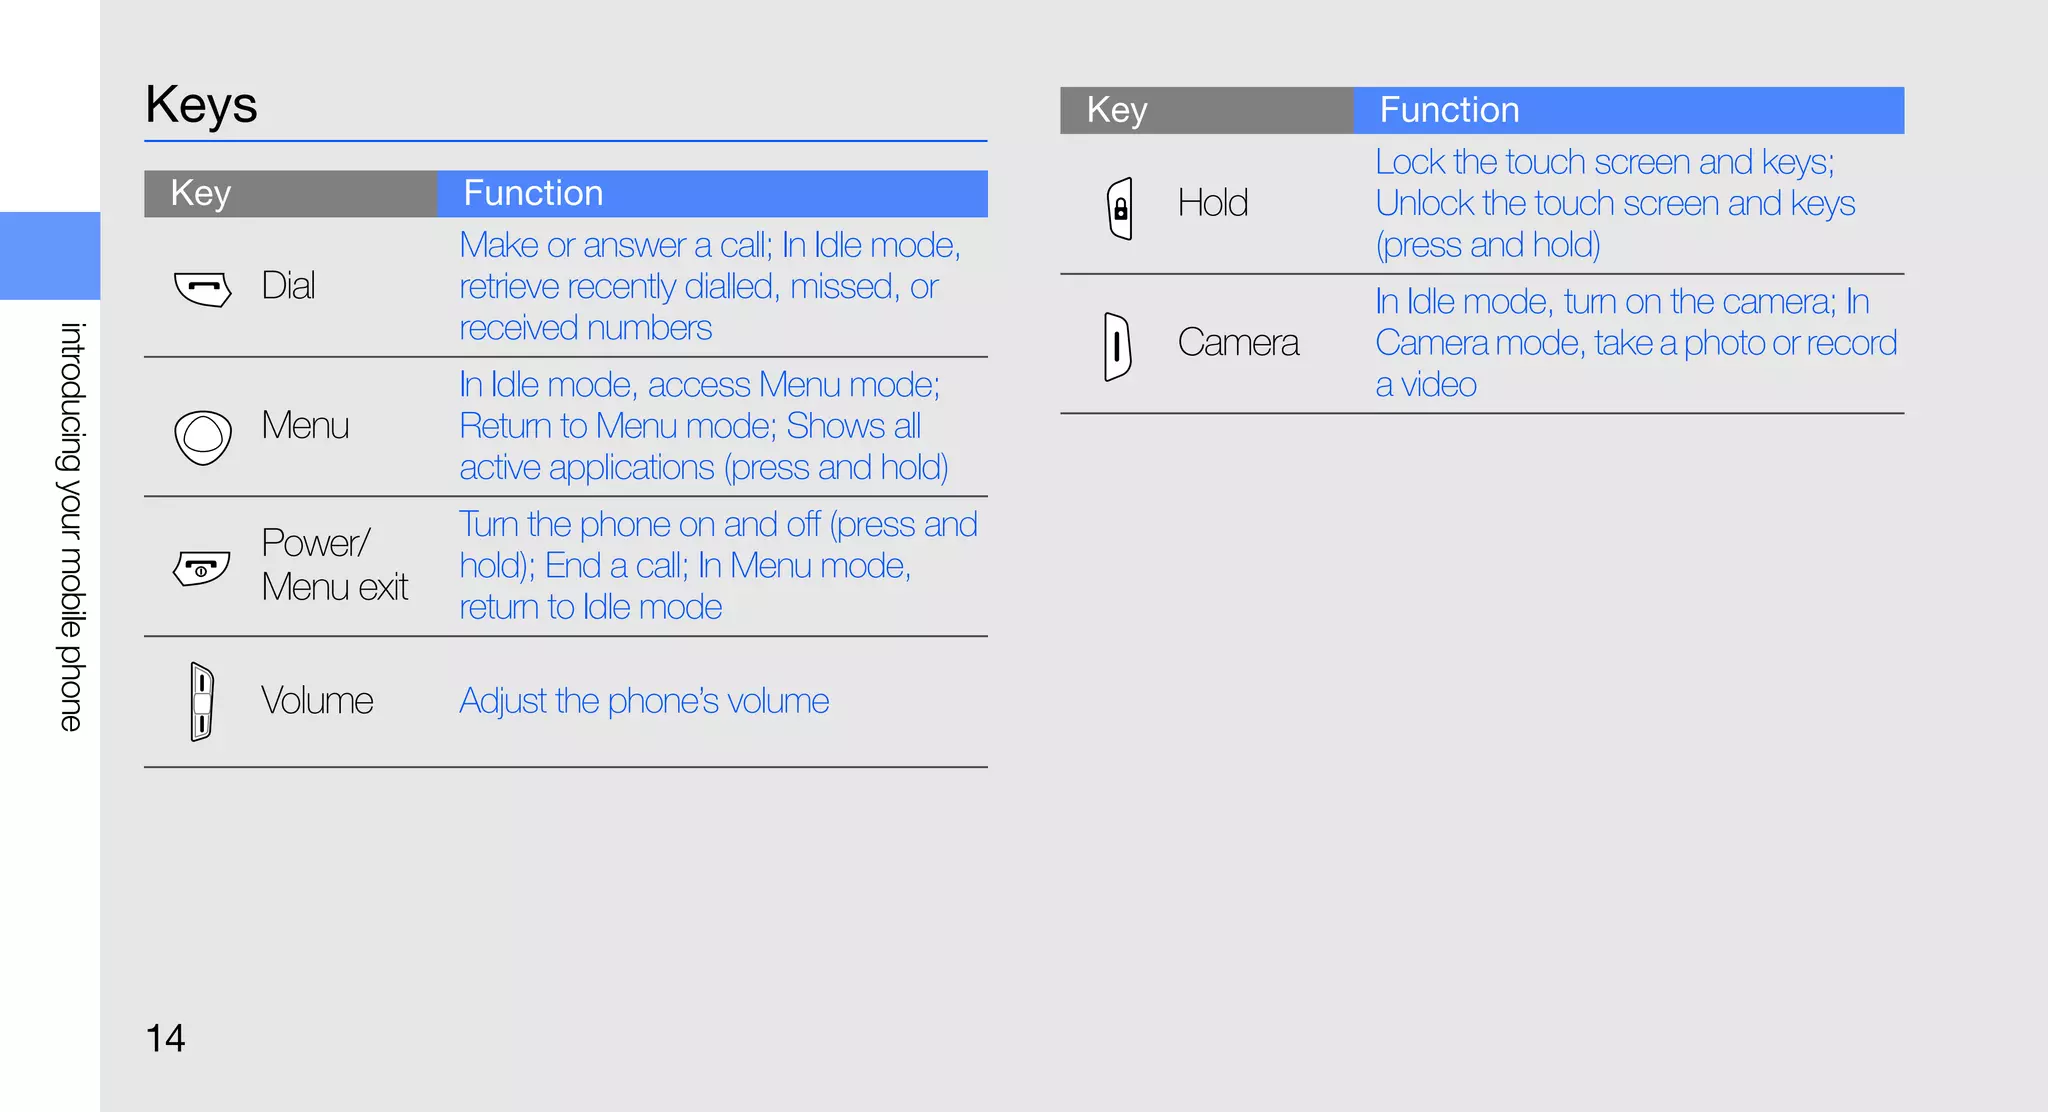
![Phone layout The rear of your phone includes the following keys
and features:
The front and inside of your phone include the
following keys and features: Headset jack Rear camera
lens
Front camera
lens for video Speaker
introducing your mobile phone
Earpiece Multifunction
calls jack
Hold key
Volume Touch
screen Battery cover
key
Camera key
QWERTY
keyboard
Power/ Internal antenna
Menu exit
key You can lock the touch screen and keys to
Mouthpiece prevent any unwanted phone operations. To
Send key Menu key lock, press [ ]. To unlock, press and hold [ ].
13](https://image.slidesharecdn.com/manual-instructiuni-samsung-b5310-corby-pro-ruby-red-110516014952-phpapp01/75/Manual-instructiuni-samsung-b5310-corby-pro-ruby-red-20-2048.jpg)
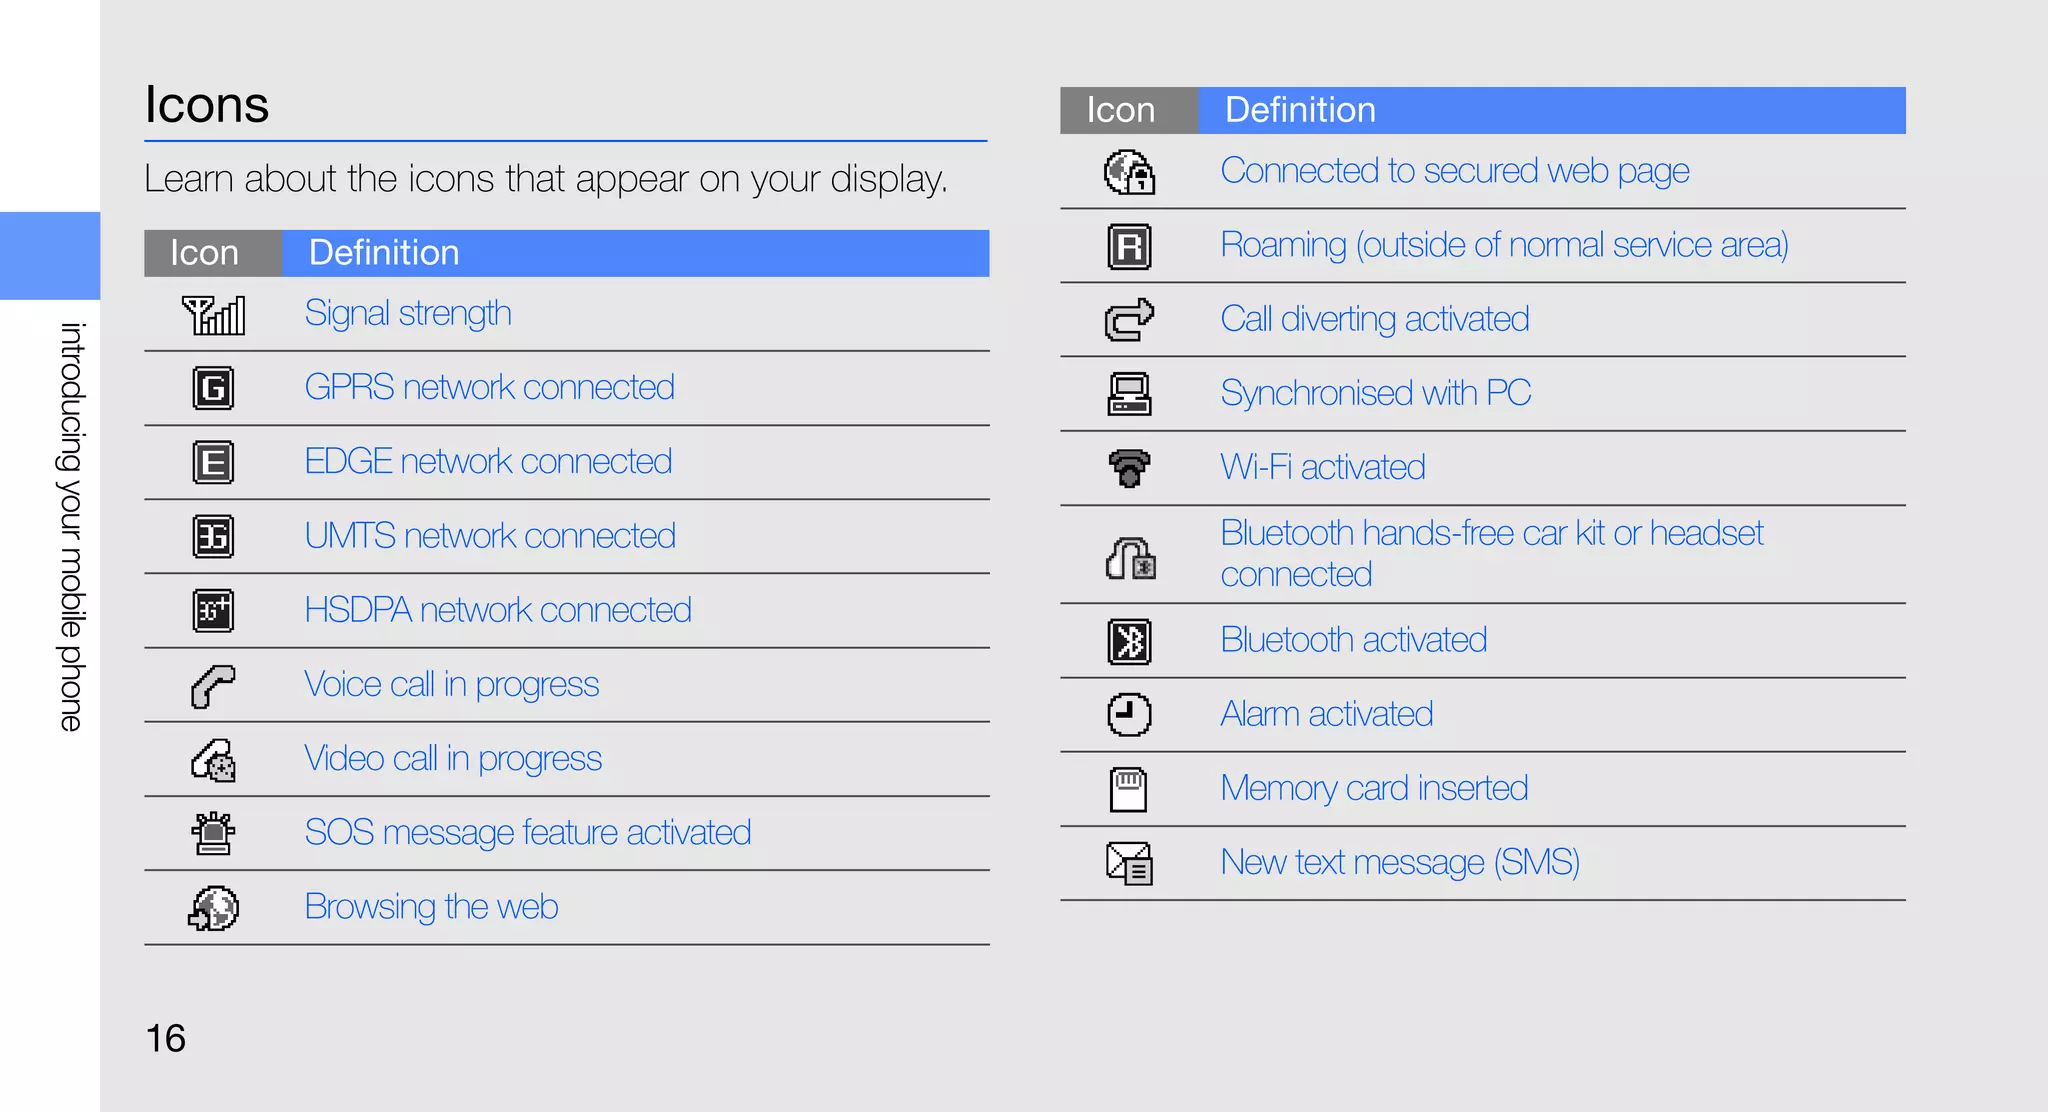
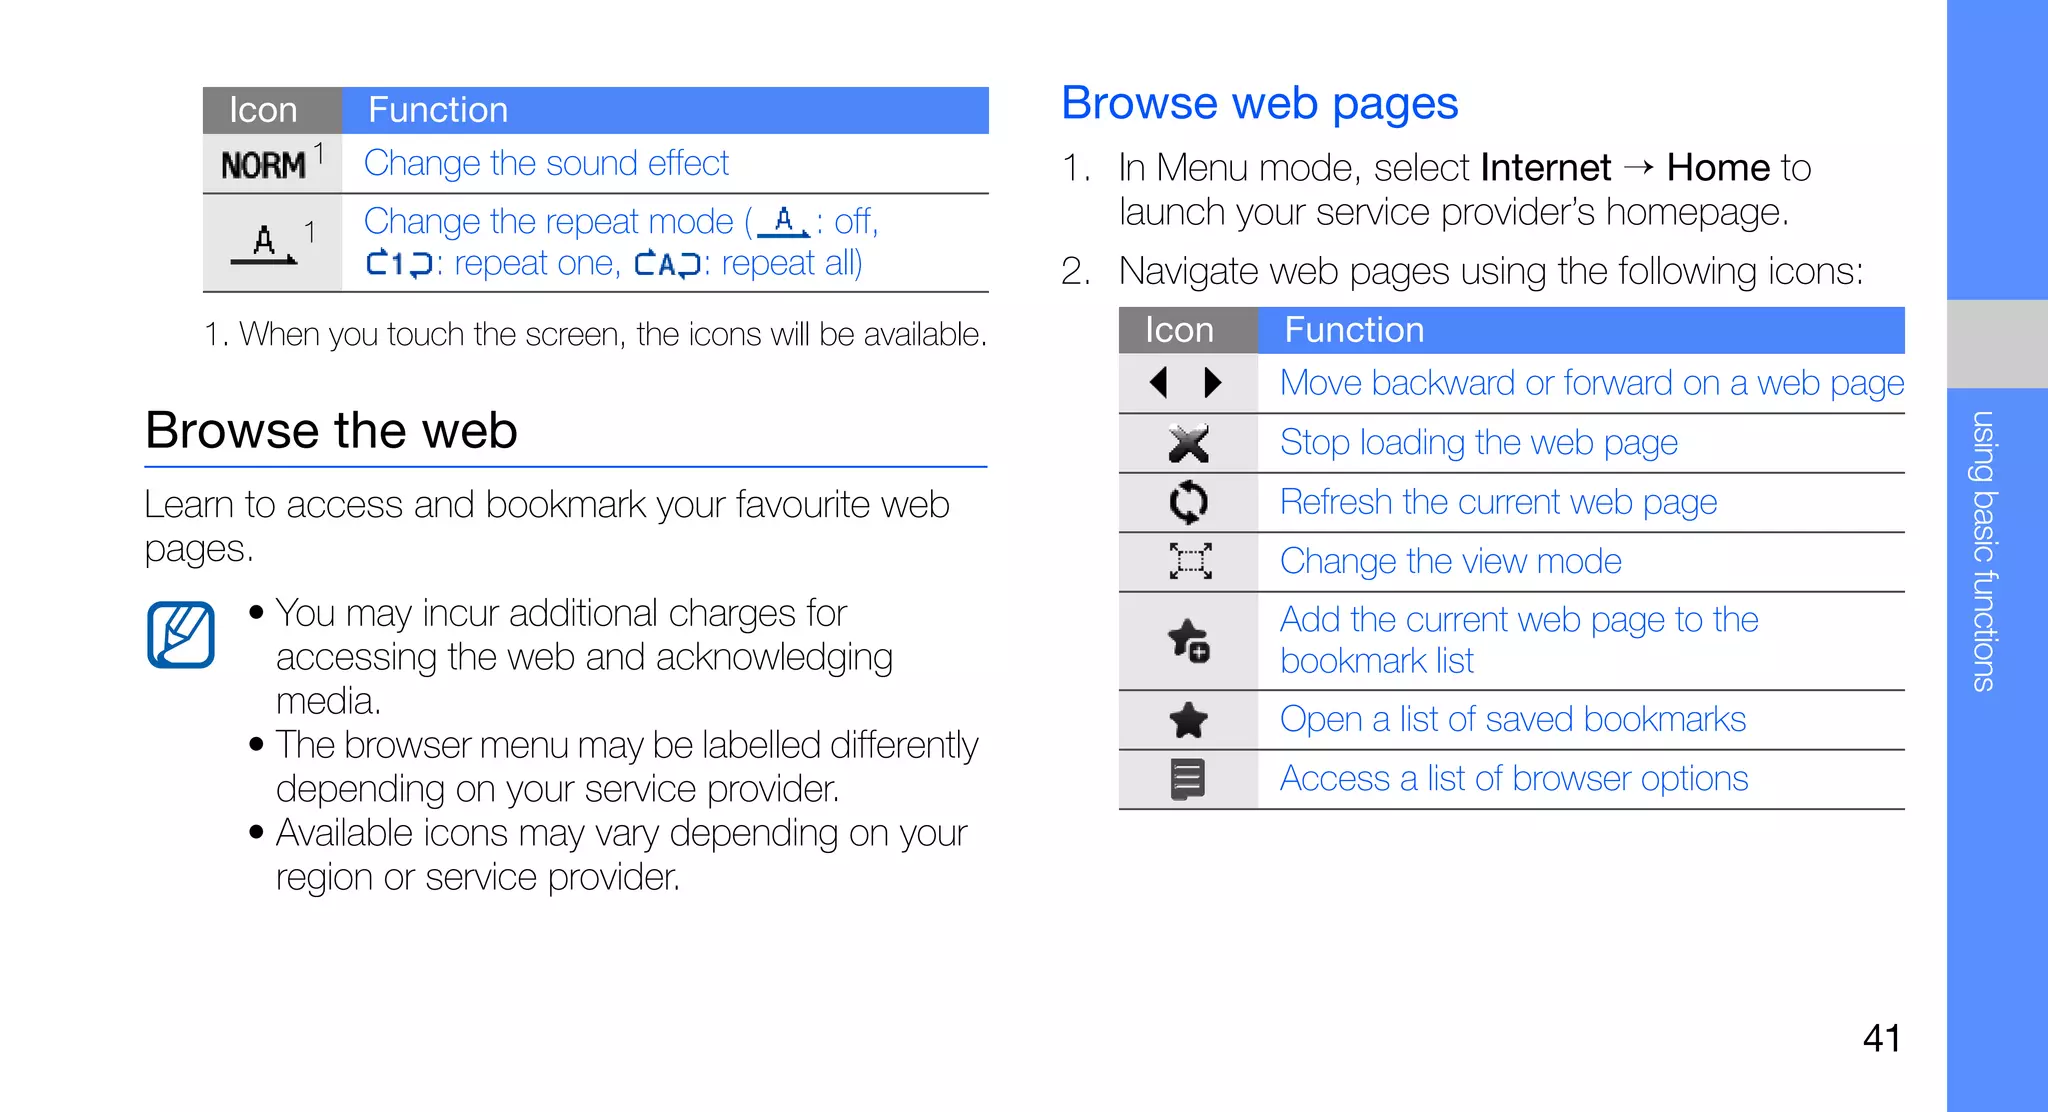
![QWERTY keyboard Key Function
Web
The composition of the QWERTY keyboard may In Idle mode, launch the web browser
browser
differ depending on your region.
In Idle mode, press and hold for the
Space silent profile; Insert a space in a text
Key Function
introducing your mobile phone
input field
Enter letters, numbers, and special
Alphabet/ characters; In Idle mode, press and 4-way In Menu mode, scroll through menu
Symbol hold [1] to access voice mails and [0] navigation options
to enter an international call prefix In Idle mode, access Menu mode; In
Confirm Menu mode, select the highlighted
Shift Change case in a text input field
menu option or confirm an input
Use characters on the upper half of In Menu mode, return to the previous
Alt Back/
the keys in a text input field level; Delete characters in a text input
Delete field
Enter special characters and
Symbol
emoticons
Enter Start a new line in a text input field
In Idle mode, open the new message
Message screen; Access the Inbox (press and
hold)
15](https://image.slidesharecdn.com/manual-instructiuni-samsung-b5310-corby-pro-ruby-red-110516014952-phpapp01/75/Manual-instructiuni-samsung-b5310-corby-pro-ruby-red-22-2048.jpg)
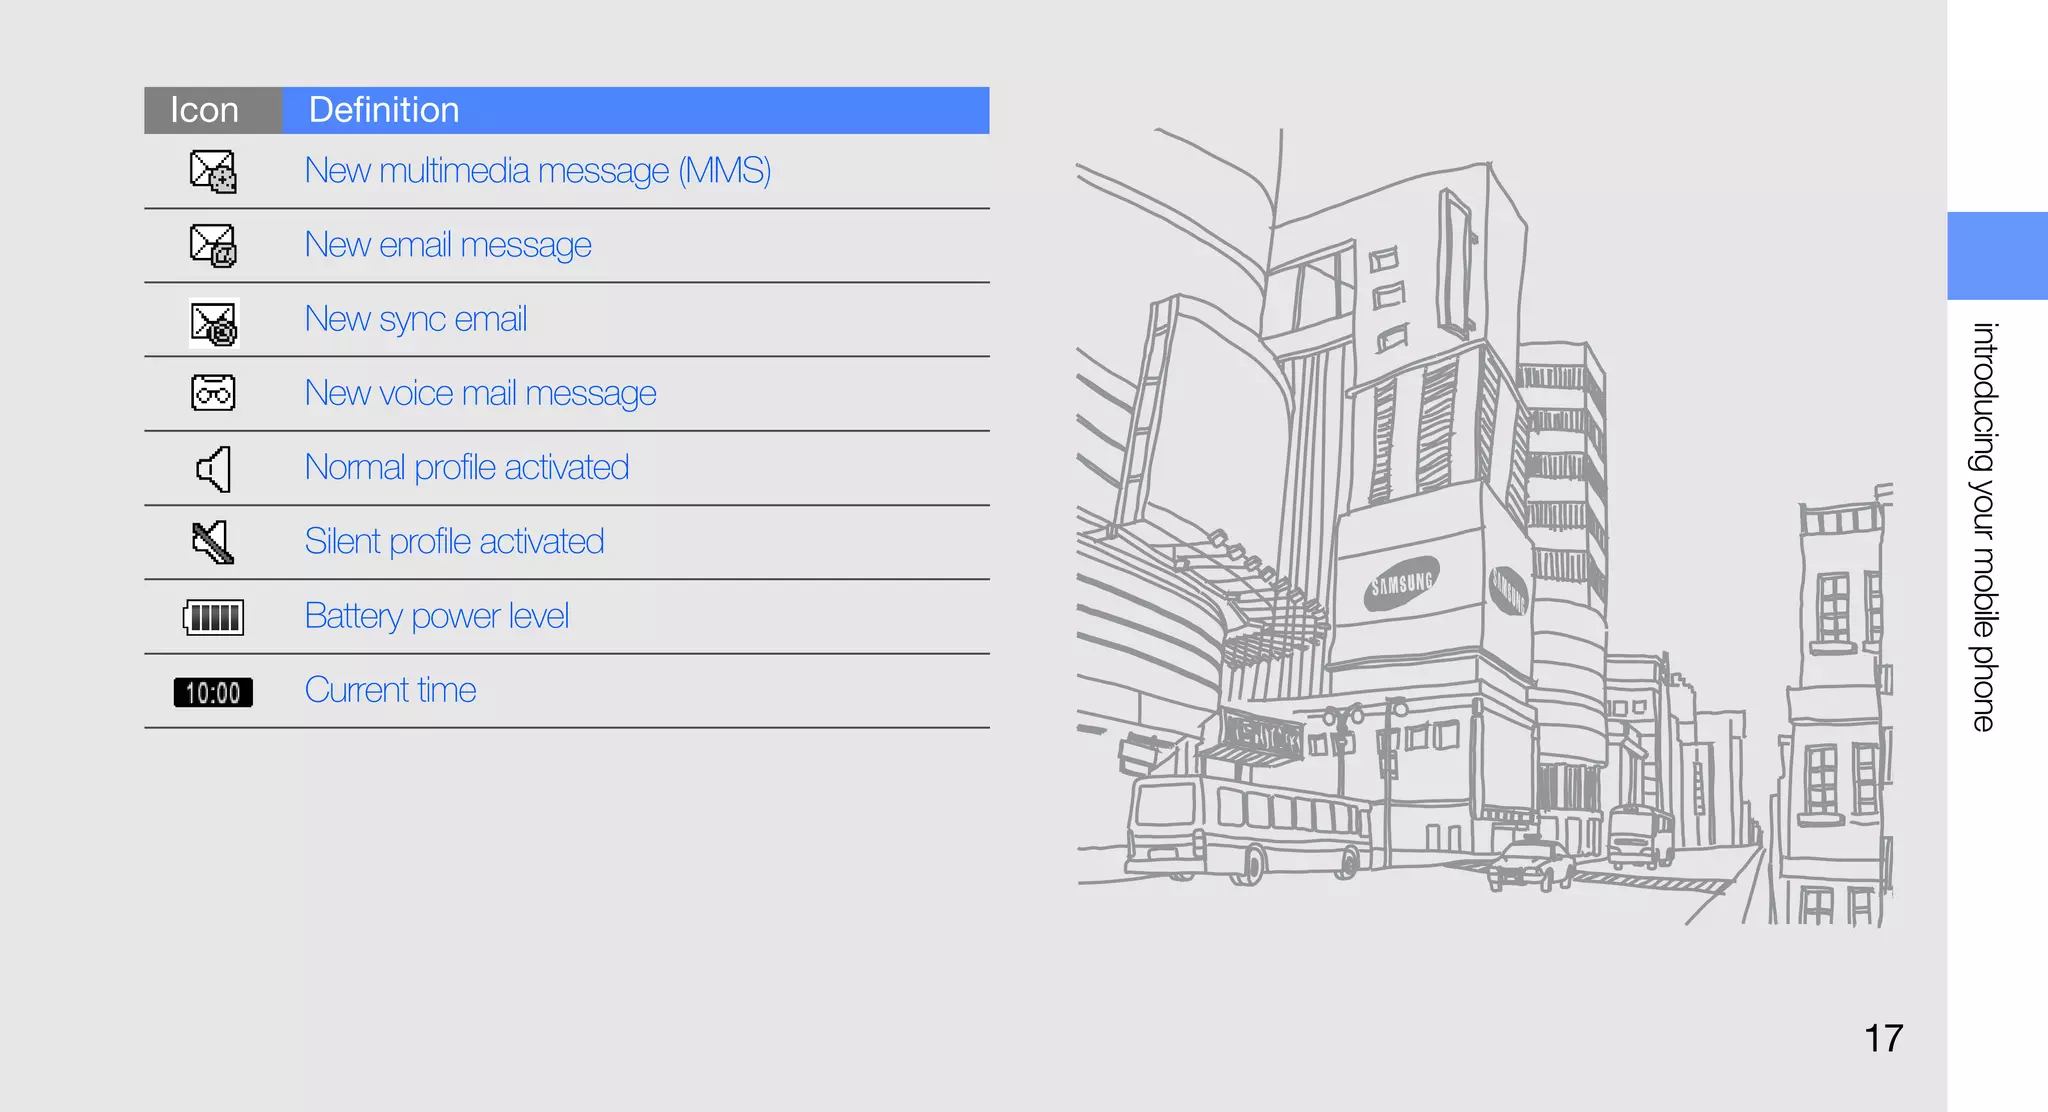
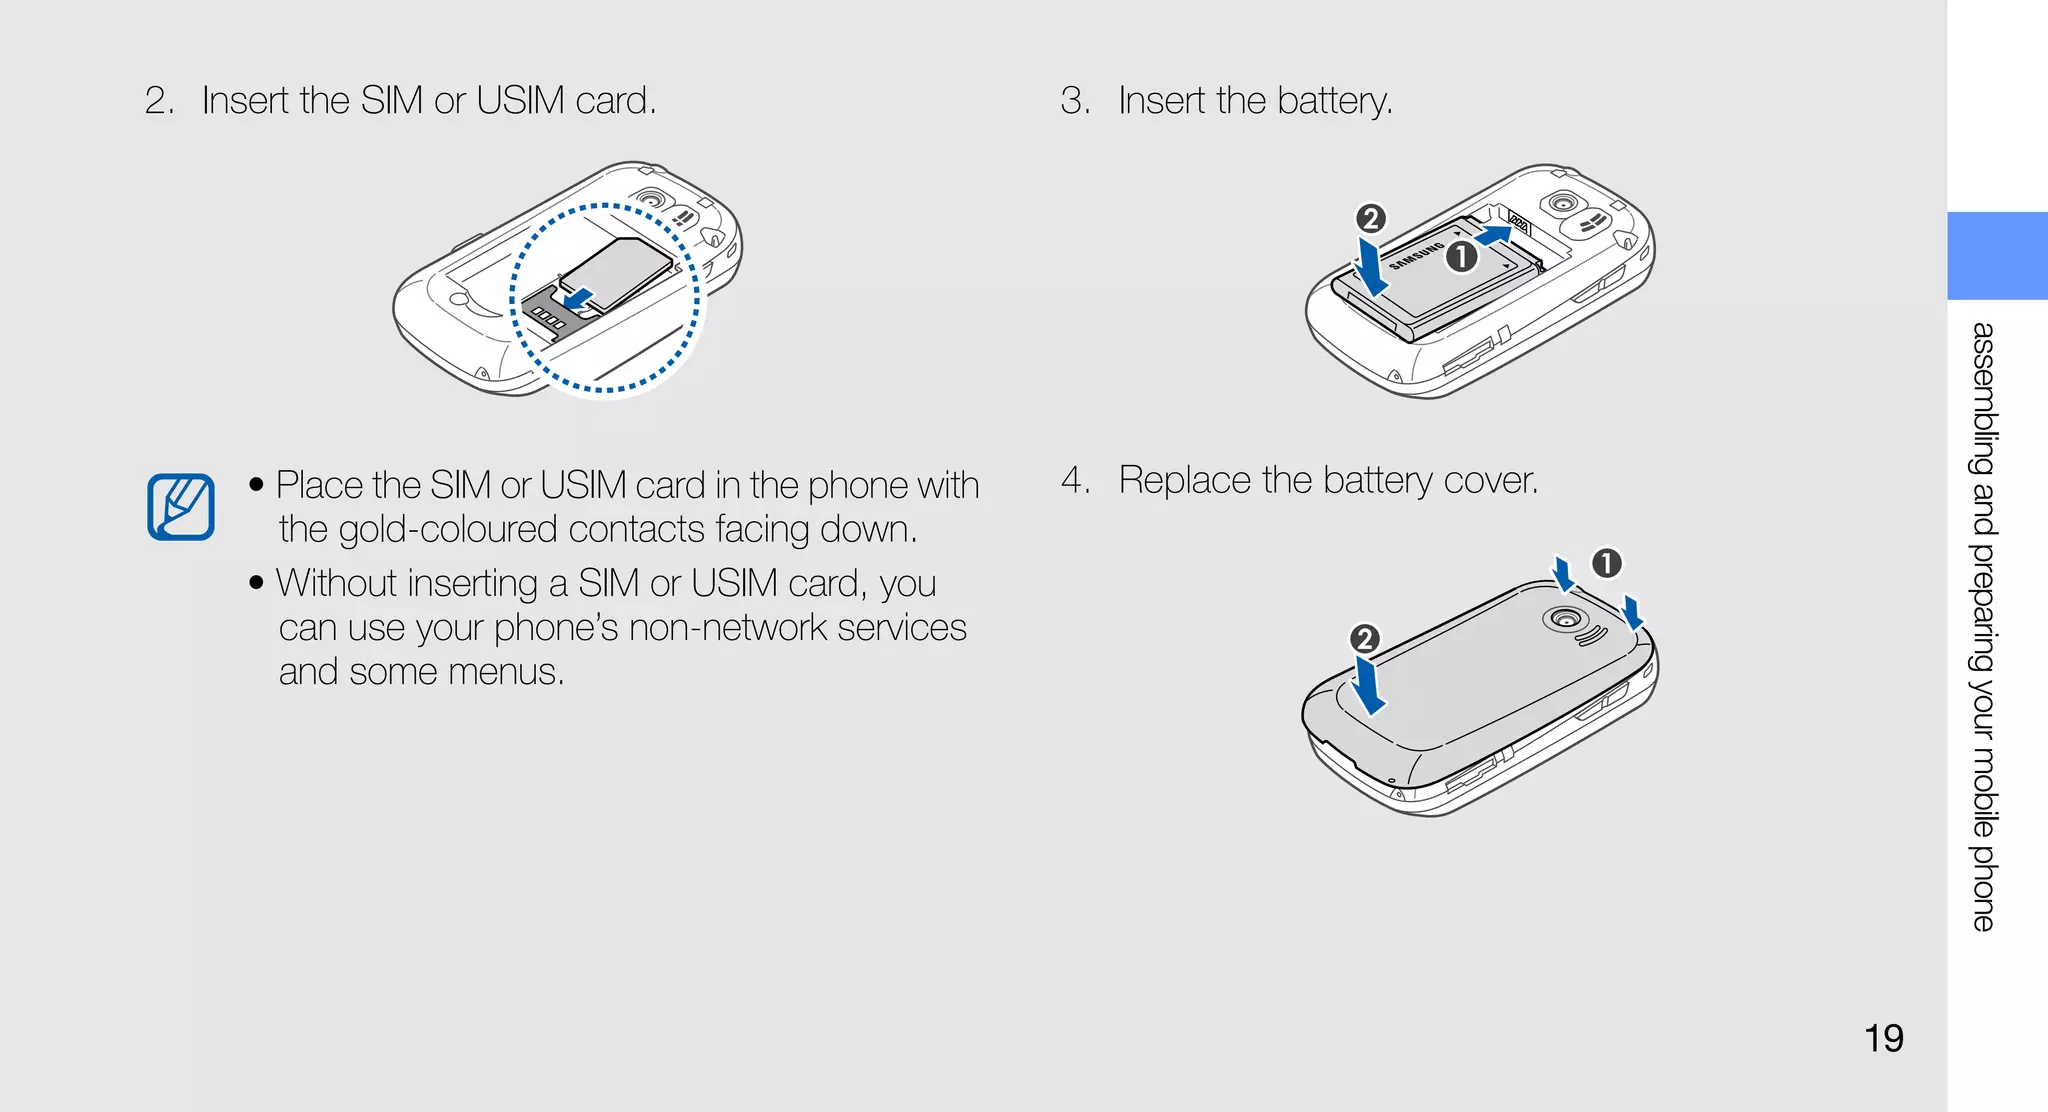
![Install the SIM or USIM card and
assembling and battery
When you subscribe to a cellular service, you will
preparing your receive a Subscriber Identity Module (SIM) card with
subscription details, such as your personal
identification number (PIN) and optional services. To
mobile phone use UMTS or HSDPA services, you can purchase a
Universal Subscriber Identity Module (USIM) card.
To install the SIM or USIM card and battery,
Get started by assembling and setting up
your mobile phone for its first use. 1. Remove the battery cover.
If the phone is on, press and hold [ ] to turn
it off.
18](https://image.slidesharecdn.com/manual-instructiuni-samsung-b5310-corby-pro-ruby-red-110516014952-phpapp01/75/Manual-instructiuni-samsung-b5310-corby-pro-ruby-red-25-2048.jpg)
![Turn your phone on and off
using basic To turn your phone on,
1. Press and hold [ ].
functions 2. Enter your PIN and select Confirm (if necessary).
To turn your phone off, repeat step 1 above.
Learn how to perform basic operations and use the Switch to the offline profile
main features of your mobile phone.
By switching to the offline profile, you can use your
phone’s non-network services in areas where
wireless devices are prohibited, such as aeroplanes
and hospitals.
To switch to the offline profile, in Menu mode, select
Settings → Phone profiles → Offline.
Follow all posted warnings and directions from
official personnel when in areas where wireless
devices are prohibited.
23](https://image.slidesharecdn.com/manual-instructiuni-samsung-b5310-corby-pro-ruby-red-110516014952-phpapp01/75/Manual-instructiuni-samsung-b5310-corby-pro-ruby-red-30-2048.jpg)
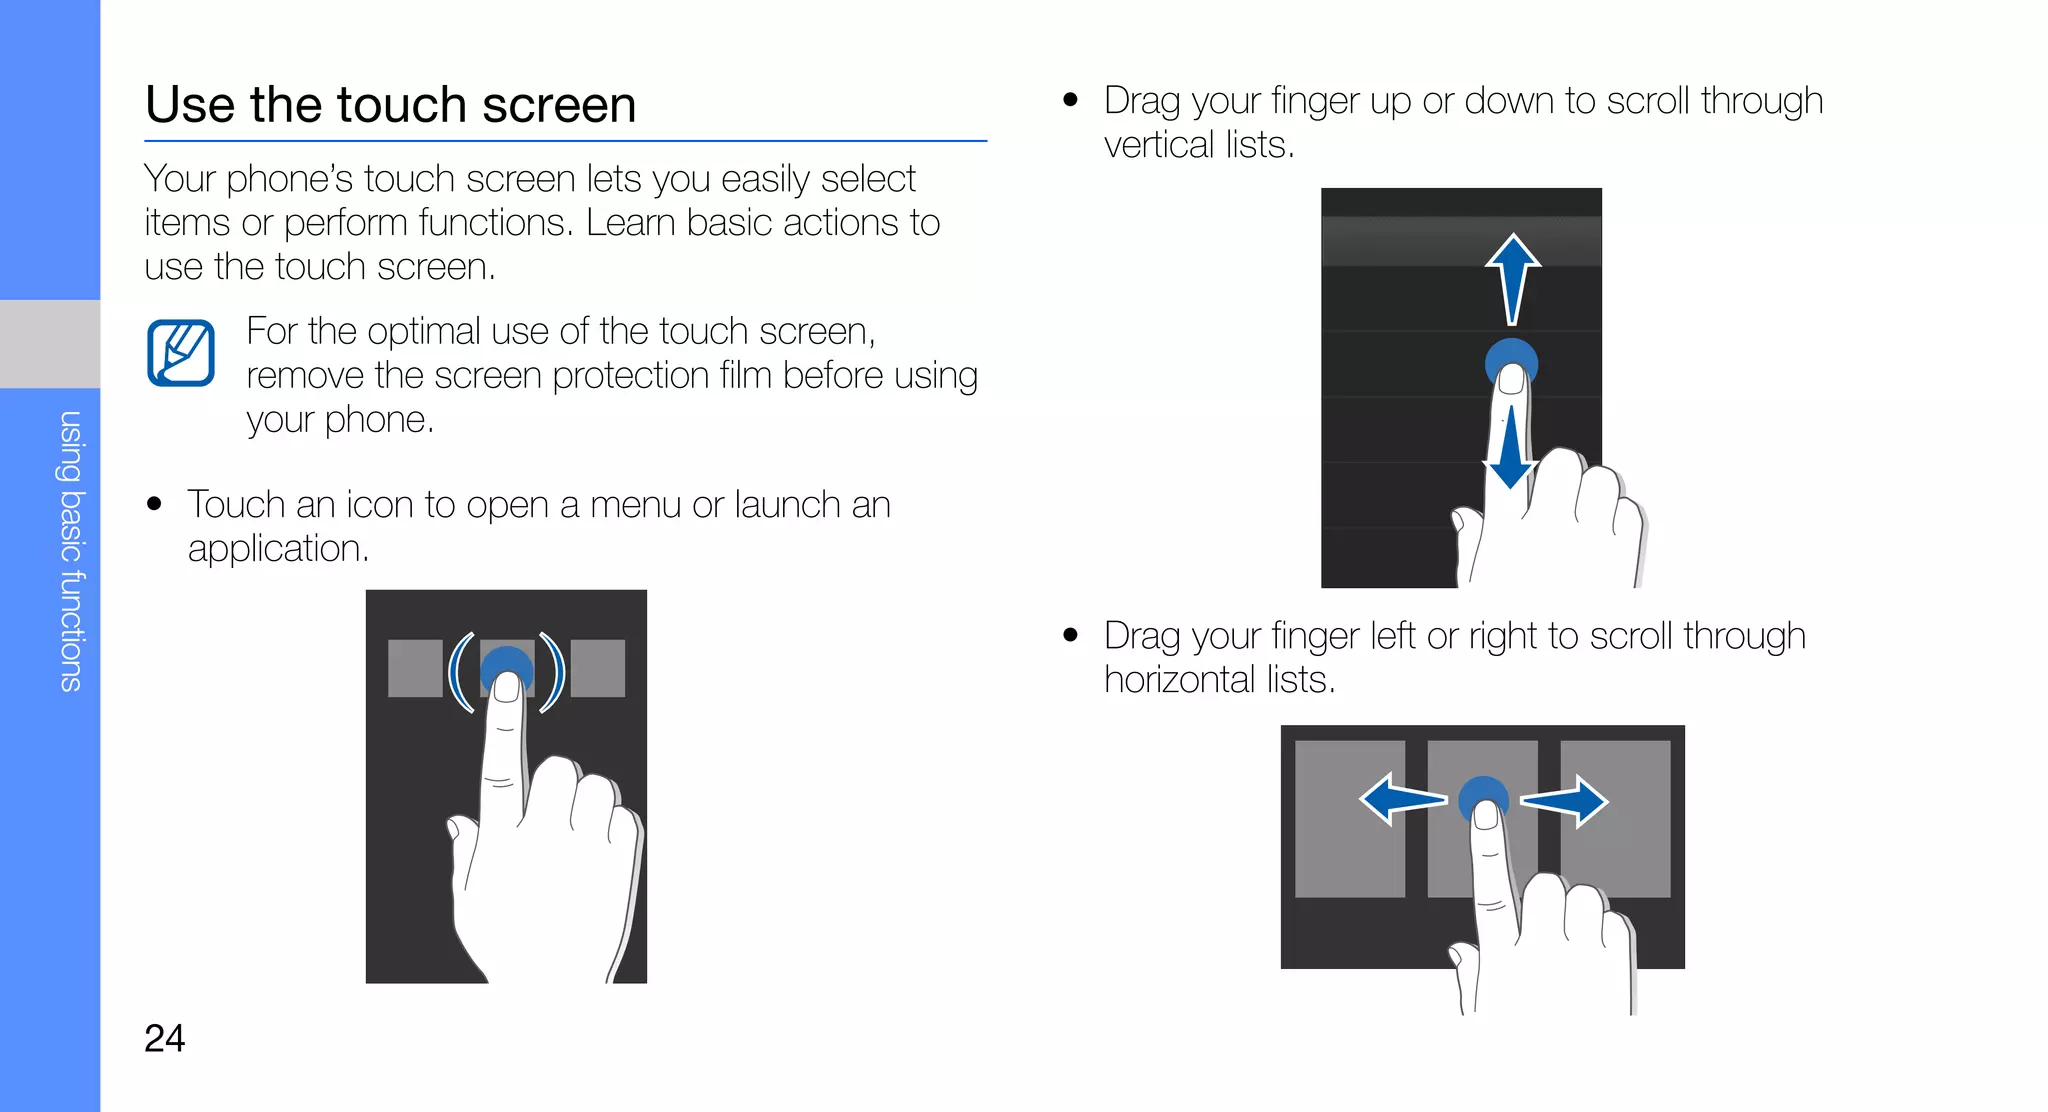
![Access menus You can organise applications in the Menu mode
screen or set titles to each screen to match your
To access your phone’s menus, preferences and needs.
1. In Idle mode, select Menu or press the Menu 1. In Menu mode, scroll left or right to a Menu mode
key to access Menu mode. screen.
2. Scroll left or right to a Menu mode screen. 2. Select to switch to Edit mode.
3. Select a menu or option. 3. Customise the screens as desired.
using basic functions
4. Select to move up one level; Press [ ] to • To rename the menu screen, enter a title in
return to Idle mode. the text input field at the top of the screen.
• To rearrange applications, select and drag an
Customise Menu mode application icon to the location you want.
This feature may be unavailable depending on 4. Select Save.
the software of the phone. Select Reset to restore the default order of
applications.
25](https://image.slidesharecdn.com/manual-instructiuni-samsung-b5310-corby-pro-ruby-red-110516014952-phpapp01/75/Manual-instructiuni-samsung-b5310-corby-pro-ruby-red-32-2048.jpg)
![Switch applications Close applications
Your phone allows you to multi-task by running To close the current application, press [ ].
multiple applications at the same time. To close an application that is running in the
background,
Switch from one active application to
1. Press and hold the Menu key to open a list of
another applications.
using basic functions
1. Press and hold the Menu key to open a list of 2. Scroll to an application and select .
applications.
2. Scroll to an application and select it. Use widgets
To change the view mode, select Grid view.
Learn to use widgets on the widget toolbar.
• Some of your widgets connect to web
services. Selecting a web-based widget may
incur additional charges.
• Available widgets may vary depending on
your region or service provider.
26](https://image.slidesharecdn.com/manual-instructiuni-samsung-b5310-corby-pro-ruby-red-110516014952-phpapp01/75/Manual-instructiuni-samsung-b5310-corby-pro-ruby-red-33-2048.jpg)
![Use shortcuts in Quick access mode Menu Description
Learn to use some shortcuts in Quick access mode View photos and videos on the
MySpace
web via websites
by sliding open the phone.
Instant
1. In Menu mode, select Settings → Phone messenger
Chat with your friends instantly
settings → Quick access.
2. Select one of the following options. 3. Select Save.
using basic functions
Menu Description 4. Press [ ] to return to Idle mode.
Messaging/ Access one of the messaging or 5. Slide open the phone and rotate the phone anti-
Social tabs social menus clockwise to landscape view.
Create Create a new text or multimedia If you selected Messaging/Social tabs, scroll
message message left or right to a menu.
Create email Create a new email message
View messages you have sent Customise your phone
Conversations
and received Get more from your phone by customising it to
View photos and videos on the match your preferences.
Facebook
web via websites
28](https://image.slidesharecdn.com/manual-instructiuni-samsung-b5310-corby-pro-ruby-red-110516014952-phpapp01/75/Manual-instructiuni-samsung-b5310-corby-pro-ruby-red-35-2048.jpg)
![Use basic call functions Answer a call
Learn to make or answer calls and use basic call 1. When a call comes in, press [ ].
functions. 2. For a video call, press [ ] and select Show
During a call, your phone automatically locks me to allow the caller to see you via the front
the touch screen to prevent accidental inputs. camera lens.
To unlock, press and hold [ ]. 3. To end the call, press [ ].
using basic functions
Make a call Adjust the volume
1. In Idle mode, select Keypad and enter an area To adjust the volume during a call, press the Volume
code and a phone number. key up or down.
2. Press [ ] to dial the number.
For a video call, select → Video call. Use the speakerphone feature
3. To end the call, press [ ]. 1. During a call, select Speaker → Yes to activate
the speaker.
2. To switch back to the earpiece, select Speaker.
32](https://image.slidesharecdn.com/manual-instructiuni-samsung-b5310-corby-pro-ruby-red-110516014952-phpapp01/75/Manual-instructiuni-samsung-b5310-corby-pro-ruby-red-39-2048.jpg)
![Mode Function Enter text on the QWERTY keyboard
Select an appropriate virtual key to enter a Open the phone and rotate anti-clockwise to
Number landscape view. You can use the QWERTY
number.
Select an appropriate virtual key to enter a keyboard. Enter text as you would use a computer’s
Symbol keyboard.
symbol.
When entering text on the QWERTY keyboard, you
Enter text using the writing box 1 can use the following functions:
using basic functions
1. Change the text input method to Writing box 1. • Press [ ] to change case.
2. Write each character in the writing area. • Press [Alt] to enter characters on the upper half of
Write numbers and symbols in the ?1 box at the the keys; press twice quickly to set Number and
bottom right of the writing area. Symbol lock.
To change case, select Abc. • Press [Sym] to switch to Symbol mode; press
Enter text using the writing box 2 twice to open the emoticon list.
• Press [ ] to insert a space.
1. Change the text input method to Writing box 2.
• Press [ ] to delete characters.
2. Write each character in the writing area.
• Press [ ] to start a new line.
To change case or use numbers or symbols,
select Abc.
35](https://image.slidesharecdn.com/manual-instructiuni-samsung-b5310-corby-pro-ruby-red-110516014952-phpapp01/75/Manual-instructiuni-samsung-b5310-corby-pro-ruby-red-42-2048.jpg)

![Use advanced call functions
using advanced Learn about your phone’s additional calling
capabilities.
functions View and dial missed calls
Your phone will display calls you have missed on the
display.
Learn how to perform advanced operations and use
additional features of your mobile phone. When you have one missed call, select the call from
the event alert widget and select Voice call to dial.
When you have two missed calls or more, select the
call from the event alert widget and select Logs → a
missed call.
Call a recently dialled number
1. In Idle mode, press [ ] to display a list of
recent numbers.
2. Scroll to the number you want and select or
press [ ] to dial.
44](https://image.slidesharecdn.com/manual-instructiuni-samsung-b5310-corby-pro-ruby-red-110516014952-phpapp01/75/Manual-instructiuni-samsung-b5310-corby-pro-ruby-red-51-2048.jpg)
![Hold a call or retrieve a held call Answer a second call
Select Hold to place a call on hold or select If your network supports this function, you can
Retrieve to retrieve a held call. answer a second incoming call:
1. Press [ ] to answer the second call.
Dial a second call The first call is automatically placed on hold.
If your network supports this function, you can dial
2. Select Swap to switch between the calls.
another number during a call:
using advanced functions
1. Select Hold to place the first call on hold. Make a multiparty call (conference call)
2. Enter the second number to dial and select New 1. Call the first party you want to add to the
call or press [ ]. multiparty call.
3. Select Swap to switch between the two calls. 2. While connected to the first party, call the
4. To end the call on hold, select On hold → . second party.
The first party is automatically placed on hold.
5. To end the current call, press [ ].
3. When connected to the second party, select
Join.
45](https://image.slidesharecdn.com/manual-instructiuni-samsung-b5310-corby-pro-ruby-red-110516014952-phpapp01/75/Manual-instructiuni-samsung-b5310-corby-pro-ruby-red-52-2048.jpg)
![4. Repeat steps 2 and 3 to add more parties (if Reject a call
necessary).
To reject an incoming call, press [ ]. The caller will
5. To end the multiparty call, press [ ]. hear a busy tone.
Call an international number To reject calls from certain numbers automatically,
use the auto rejection. To activate the auto rejection
1. In Idle mode, select Keypad and touch and hold and set up the reject list,
0 to insert the + character.
1. In Menu mode, select Settings → Application
using advanced functions
2. Enter the complete number you want to dial settings → Call → All calls → Auto reject.
(country code, area code, and phone number),
and then press [ ] to dial. 2. Select On under Activation.
3. Select Add number.
Call a contact from the phonebook 4. Select the number input field.
You can call numbers directly from the phonebook 5. Enter a number to reject and select Done.
using stored contacts. p. 37
6. Select Save.
1. In Menu mode, select Phonebook.
7. Repeat steps 3-6 to add more numbers.
2. Select the contact you want.
8. Select the check boxes next to the numbers.
3. Select next to the number you want to dial →
9. Select Save.
(voice call) or (video call).
46](https://image.slidesharecdn.com/manual-instructiuni-samsung-b5310-corby-pro-ruby-red-110516014952-phpapp01/75/Manual-instructiuni-samsung-b5310-corby-pro-ruby-red-53-2048.jpg)
![Use advanced music functions Copy music files to a memory card
Learn to prepare music files, create playlists, and 1. Insert a memory card.
store radio stations. 2. In Menu mode, select Settings → Phone
settings → PC connections → Mass storage
Copy music files via Samsung Kies → Save.
1. In Menu mode, select Settings → Phone 3. Press [ ] to return to Idle mode.
settings → PC connections → Samsung Kies
using advanced functions
4. Using an optional PC data cable, connect the
or Mass storage → Save. multifunction jack on your phone to a PC.
2. Press [ ] to return to Idle mode. When connected, a pop-up window will appear
3. Using an optional PC data cable, connect the on the PC.
multifunction jack on your phone to a PC. 5. Open the folder to view files.
4. Run Samsung Kies and copy files from the PC to 6. Copy files from the PC to the memory card.
the phone.
Refer to the Samsung Kies help for more
information.
53](https://image.slidesharecdn.com/manual-instructiuni-samsung-b5310-corby-pro-ruby-red-110516014952-phpapp01/75/Manual-instructiuni-samsung-b5310-corby-pro-ruby-red-60-2048.jpg)
![Synchronise your phone with Windows 7. Select and drag the music files you want to the
Media Player sync list.
1. Insert a memory card (if necessary). 8. Start synchronisation.
2. In Menu mode, select Settings → Phone Create a playlist
settings → PC connections → Media player →
Save. 1. In Menu mode, select Music player → Playlists.
2. Select Create.
using advanced functions
3. Press [ ] to return to Idle mode.
4. Using an optional PC data cable, connect the 3. Select the text input field.
multifunction jack on your phone to a PC with 4. Enter a title for your new playlist and select
Windows Media Player installed. Done.
When connected, a pop-up window will appear 5. To assign an image to the playlist, select Tap to
on the PC. edit and select an image or capture a new
5. Open Windows Media Player to synchronise photo.
music files. 6. Select Save.
6. Edit or enter your phone’s name in the pop-up 7. Select the new playlist.
window (if necessary).
8. Select Add → Tracks.
9. Select the files you want to include and select
Add.
54](https://image.slidesharecdn.com/manual-instructiuni-samsung-b5310-corby-pro-ruby-red-110516014952-phpapp01/75/Manual-instructiuni-samsung-b5310-corby-pro-ruby-red-61-2048.jpg)
![Activate and send an SOS message 7. When you are finished selecting contacts, select
Save to save the recipients.
In case of an emergency, you can send an SOS
message asking for help. 8. Select the Once drop-down menu and select
the number of times to repeat the SOS
This feature may be unavailable depending on message.
your region or service provider.
9. Select Save → Yes.
1. In Menu mode, select Messages → SOS To send an SOS message, the touch screen and
using tools and applications
messages → Sending options. keys must be locked. Press the Volume key four
times.
2. Select On to turn on the SOS messaging
feature. Once you send an SOS message, all phone
functions will be suspended until you press and
3. Select the recipient field to open the recipient list.
hold [ ] or press [ ]. If you press [ ],
4. Select to open your contact list. phone functions will be available, but the keys
5. Select the contacts you want and select Add. will remain locked.
6. Select a phone number (if necessary).
61](https://image.slidesharecdn.com/manual-instructiuni-samsung-b5310-corby-pro-ruby-red-110516014952-phpapp01/75/Manual-instructiuni-samsung-b5310-corby-pro-ruby-red-68-2048.jpg)


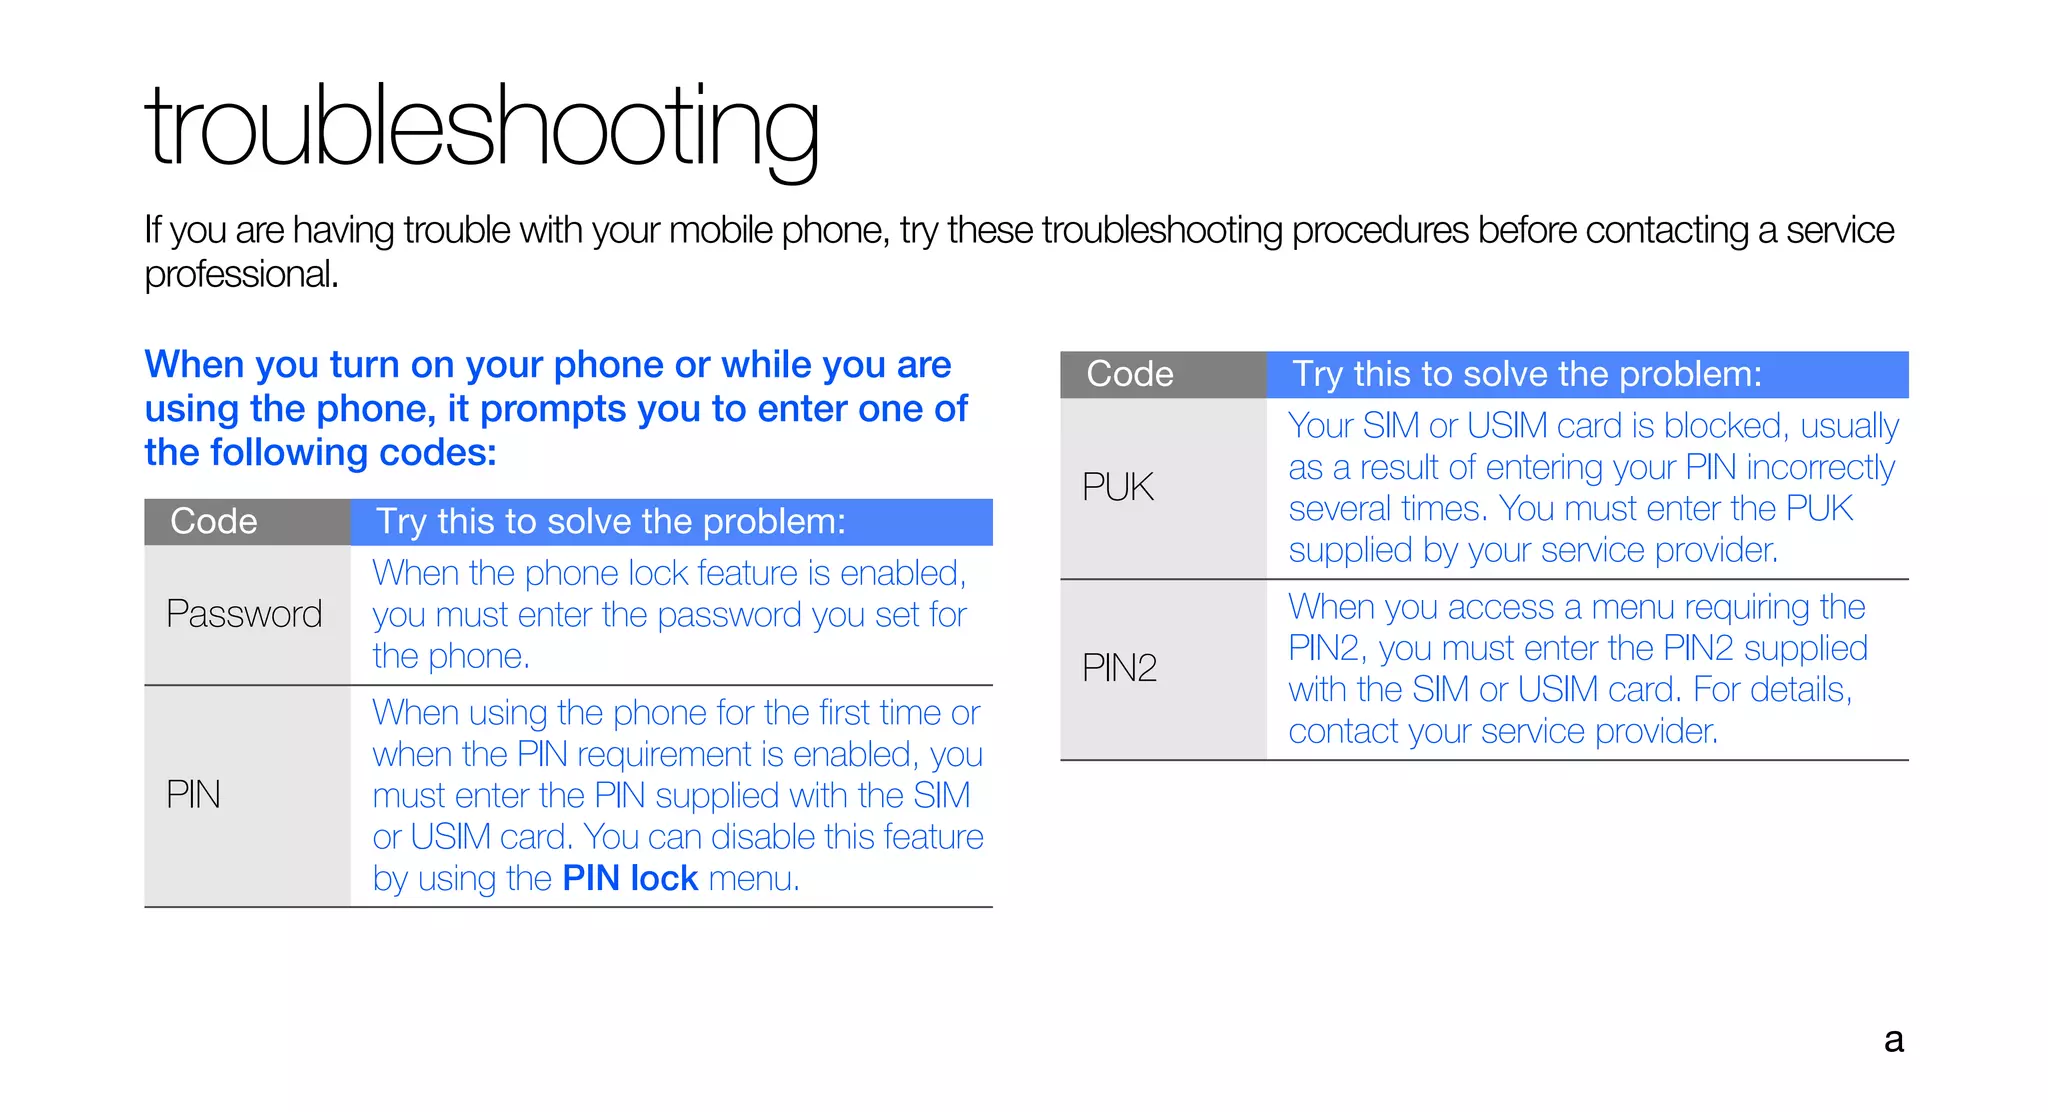
![The phone prompts you to insert the SIM card. Another caller cannot reach you.
Ensure that the SIM or USIM card is installed • Ensure that your phone is turned on.
correctly. • Ensure that you have accessed the right cellular
Your phone displays “Service unavailable” or network.
“Network connection Error.” • Ensure that you have not set call barring for the
phone number.
• When you are in areas with weak signals or poor
reception, you may lose reception. Move to Another caller cannot hear you speaking.
another area and try again.
• Ensure that you are not covering the built-in
troubleshooting
• You cannot access some options without a microphone.
subscription. Contact your service provider for
• Ensure that the microphone is close to your
more details.
mouth.
You enter a number, but the call is not dialled. • If using a headset, ensure that it is properly
• Ensure that you have pressed the Dial key: [ ]. connected.
• Ensure that you have accessed the right cellular
network.
• Ensure that you have not set call barring for the
phone number.
b](https://image.slidesharecdn.com/manual-instructiuni-samsung-b5310-corby-pro-ruby-red-110516014952-phpapp01/75/Manual-instructiuni-samsung-b5310-corby-pro-ruby-red-85-2048.jpg)

![Declaration of Conformity (R&TTE) We hereby declare that [all essential radio test suites have been carried
out and that] the above named product is in conformity to all the
essential requirements of Directive 1999/5/EC.
We, Samsung Electronics
The conformity assessment procedure referred to in Article 10 and
declare under our sole responsibility that the product detailed in Annex[IV] of Directive 1999/5/EC has been followed with the
involvement of the following Notified Body(ies):
GSM Mobile Phone : GT-B5310 BABT, Forsyth House,
Churchfield Road,
to which this declaration relates, is in conformity with the following Walton-on-Thames,
standards and/or other normative documents. Surrey, KT12 2TD, UK*
SAFETY EN 60950- 1 : 2001 +A11:2004 Identification mark: 0168
SAR EN 50360 : 2001 The technical documentation kept at :
EN 62209-1 : 2006 Samsung Electronics QA Lab.
EMC EN 301 489- 01 V1.6.1 (09-2005)
which will be made available upon request.
EN 301 489- 07 V1.3.1 (11-2005)
(Representative in the EU)
EN 301 489- 17 V1.2.1 (08-2002)
EN 301 489- 19 V1.2.1 (11-2002) Samsung Electronics Euro QA Lab.
EN 301 489- 24 V1.4.1 (09-2007) Blackbushe Business Park, Saxony Way,
Yateley, Hampshire, GU46 6GG, UK*
RADIO EN 301 511 V9.0.2 (03-2003) 2009.10.09 Yong-Sang Park / S. Manager
EN 300 328 V1.7.1 (10-2006)
(place and date of issue) (name and signature of authorised person)
EN 301 908- 1 V3.2.1 (05-2007)
EN 301 908- 2 V3.2.1 (05-2007) * It is not the address of Samsung Service Centre. For the address or the
phone number of Samsung Service Centre, see the warranty card or contact
the retailer where you purchased your product..](https://image.slidesharecdn.com/manual-instructiuni-samsung-b5310-corby-pro-ruby-red-110516014952-phpapp01/75/Manual-instructiuni-samsung-b5310-corby-pro-ruby-red-92-2048.jpg)

This document provides safety warnings and precautions for using a mobile phone. It advises keeping the phone away from small children, protecting hearing from loud volumes, and avoiding interference with pacemakers. It also warns against use in explosive environments and cautions proper battery and charger handling. Overall, the document outlines safety guidelines for mobile phone use.


