This user manual provides instructions for using the basic and advanced functions of your mobile phone. It summarizes the phone layout, buttons, display, and icons. It also provides setup instructions and guides you through basic functions such as making calls, sending messages, taking photos, and more. The manual is divided into sections for using basic functions, advanced functions, tools and applications, and troubleshooting.

![Copyright information
→ Followed by—the order of options or
menus you must select to perform a step; Rights to all technologies and products that
for example: In Menu mode, select comprise this phone are the property of their
Messages → Create message respective owners:
(represents Messages, followed by Create • Bluetooth® is a registered trademark of the
using this manual
message) Bluetooth SIG, Inc. worldwide.
Bluetooth QD ID: B015813
[ ] Square brackets—phone keys; for • Java™ is a trademark of Sun Microsystems, Inc.
example: [ ] (represents the Power/ • Windows Media Player® is a registered trademark
Menu exit key) of Microsoft Corporation.
< > Angled brackets—softkeys that control
different functions at each screen; for
example: <OK> (represents the OK
softkey)
iii](https://image.slidesharecdn.com/gt-c6112umopenengrev-1-1091117-100331184841-phpapp02/75/Gt-C6112-Um-Open-Eng-Rev-1-1-091117-3-2048.jpg)
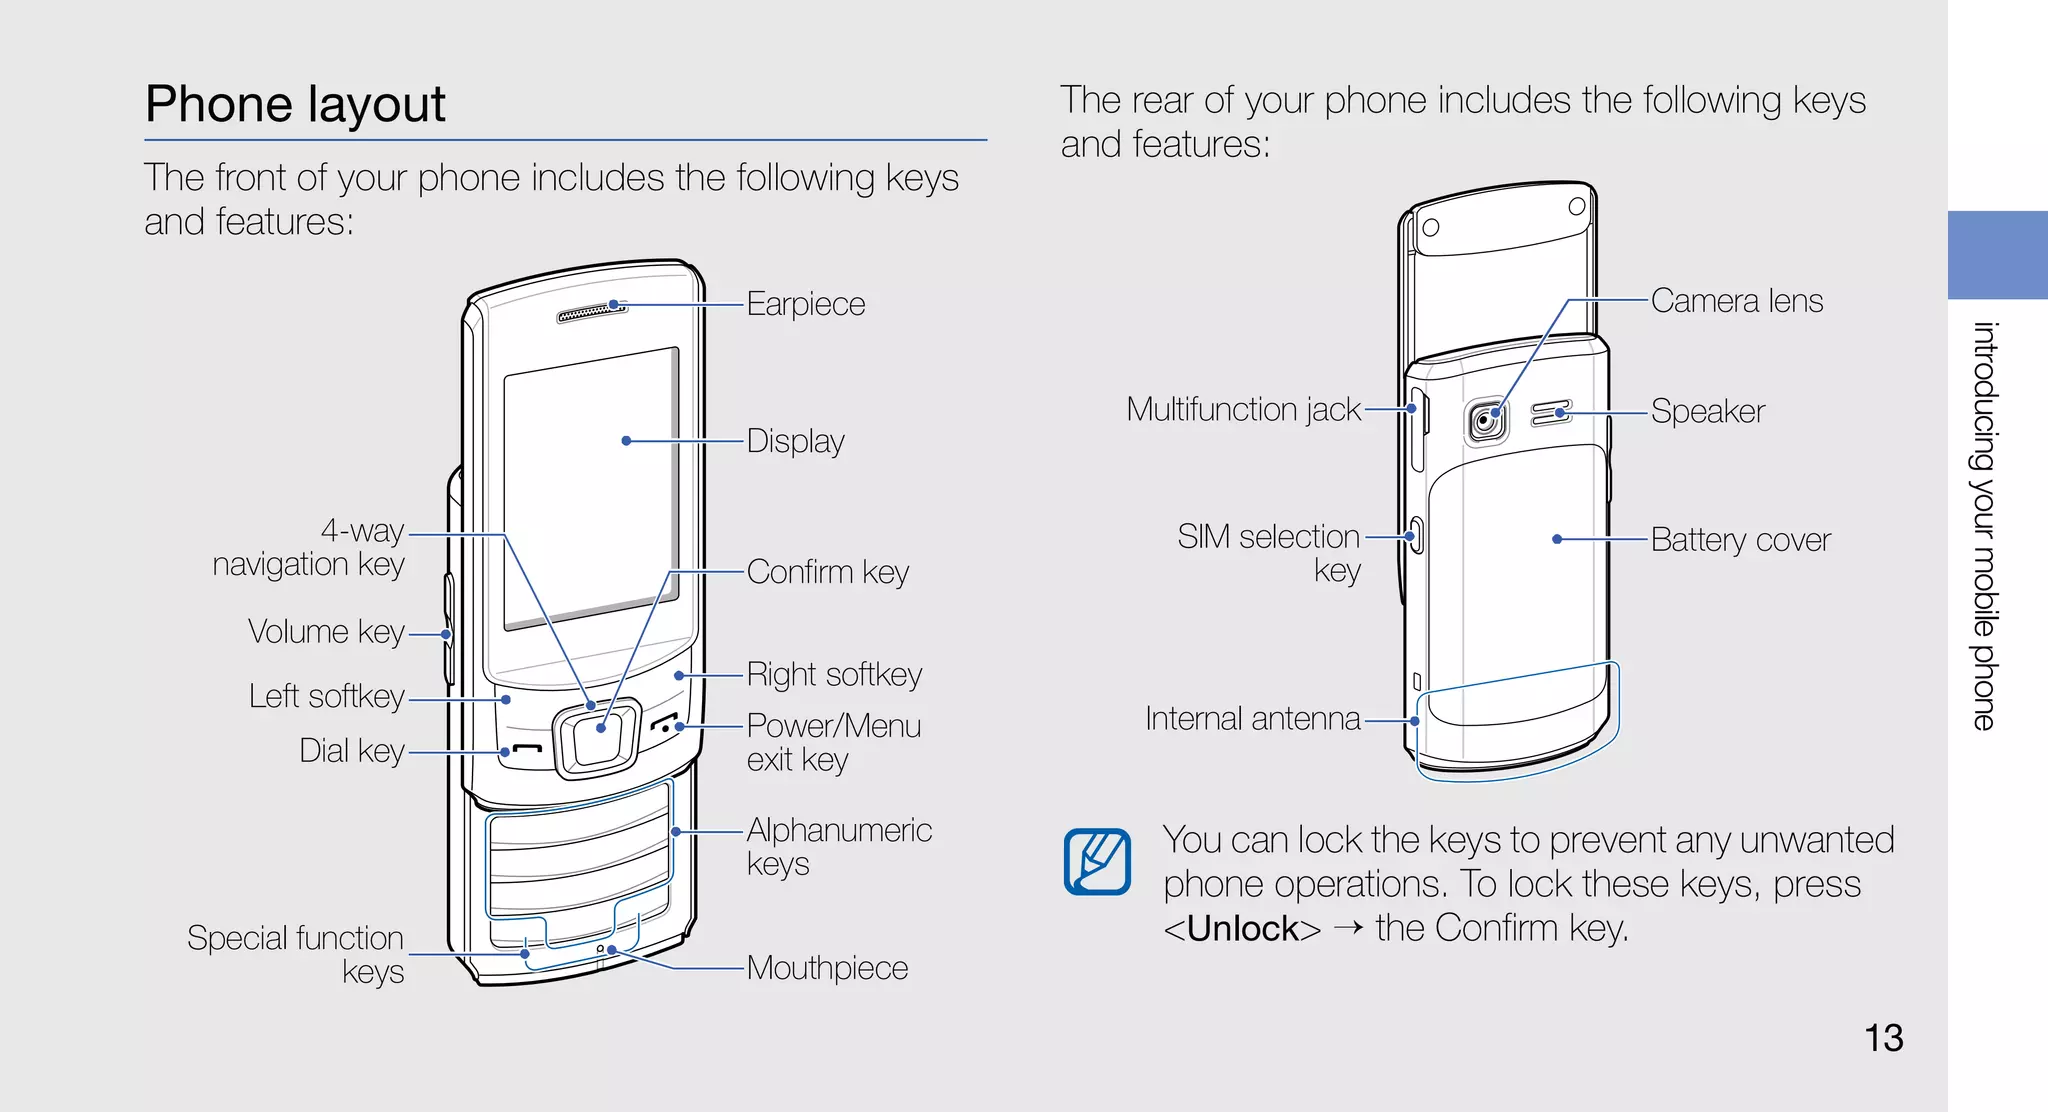
![Keys Key Function
Make or answer a call; In Idle
Key Function Dial mode, retrieve recently dialled,
Perform actions indicated at the missed, or received numbers
Softkeys
bottom of the display Turn the phone on and off (press
introducing your mobile phone
In Idle mode, access user-defined Power/ and hold); End a call; In Menu
4-way menus (depending on your service Menu exit mode, cancel input and return to
navigation provider, pre-defined menus may Idle mode
differ); Scroll through menu options Enter numbers, letters and special
In Idle mode, launch the web characters; In Idle mode, press
Alpha-
browser or access Menu mode and hold [1] to access voice mails
(depending on your service
numeric and [0] to enter an international call
Confirm provider or region, the key may prefix
perform differently); Select the
highlighted menu option or confirm
input
14](https://image.slidesharecdn.com/gt-c6112umopenengrev-1-1091117-100331184841-phpapp02/75/Gt-C6112-Um-Open-Eng-Rev-1-1-091117-20-2048.jpg)
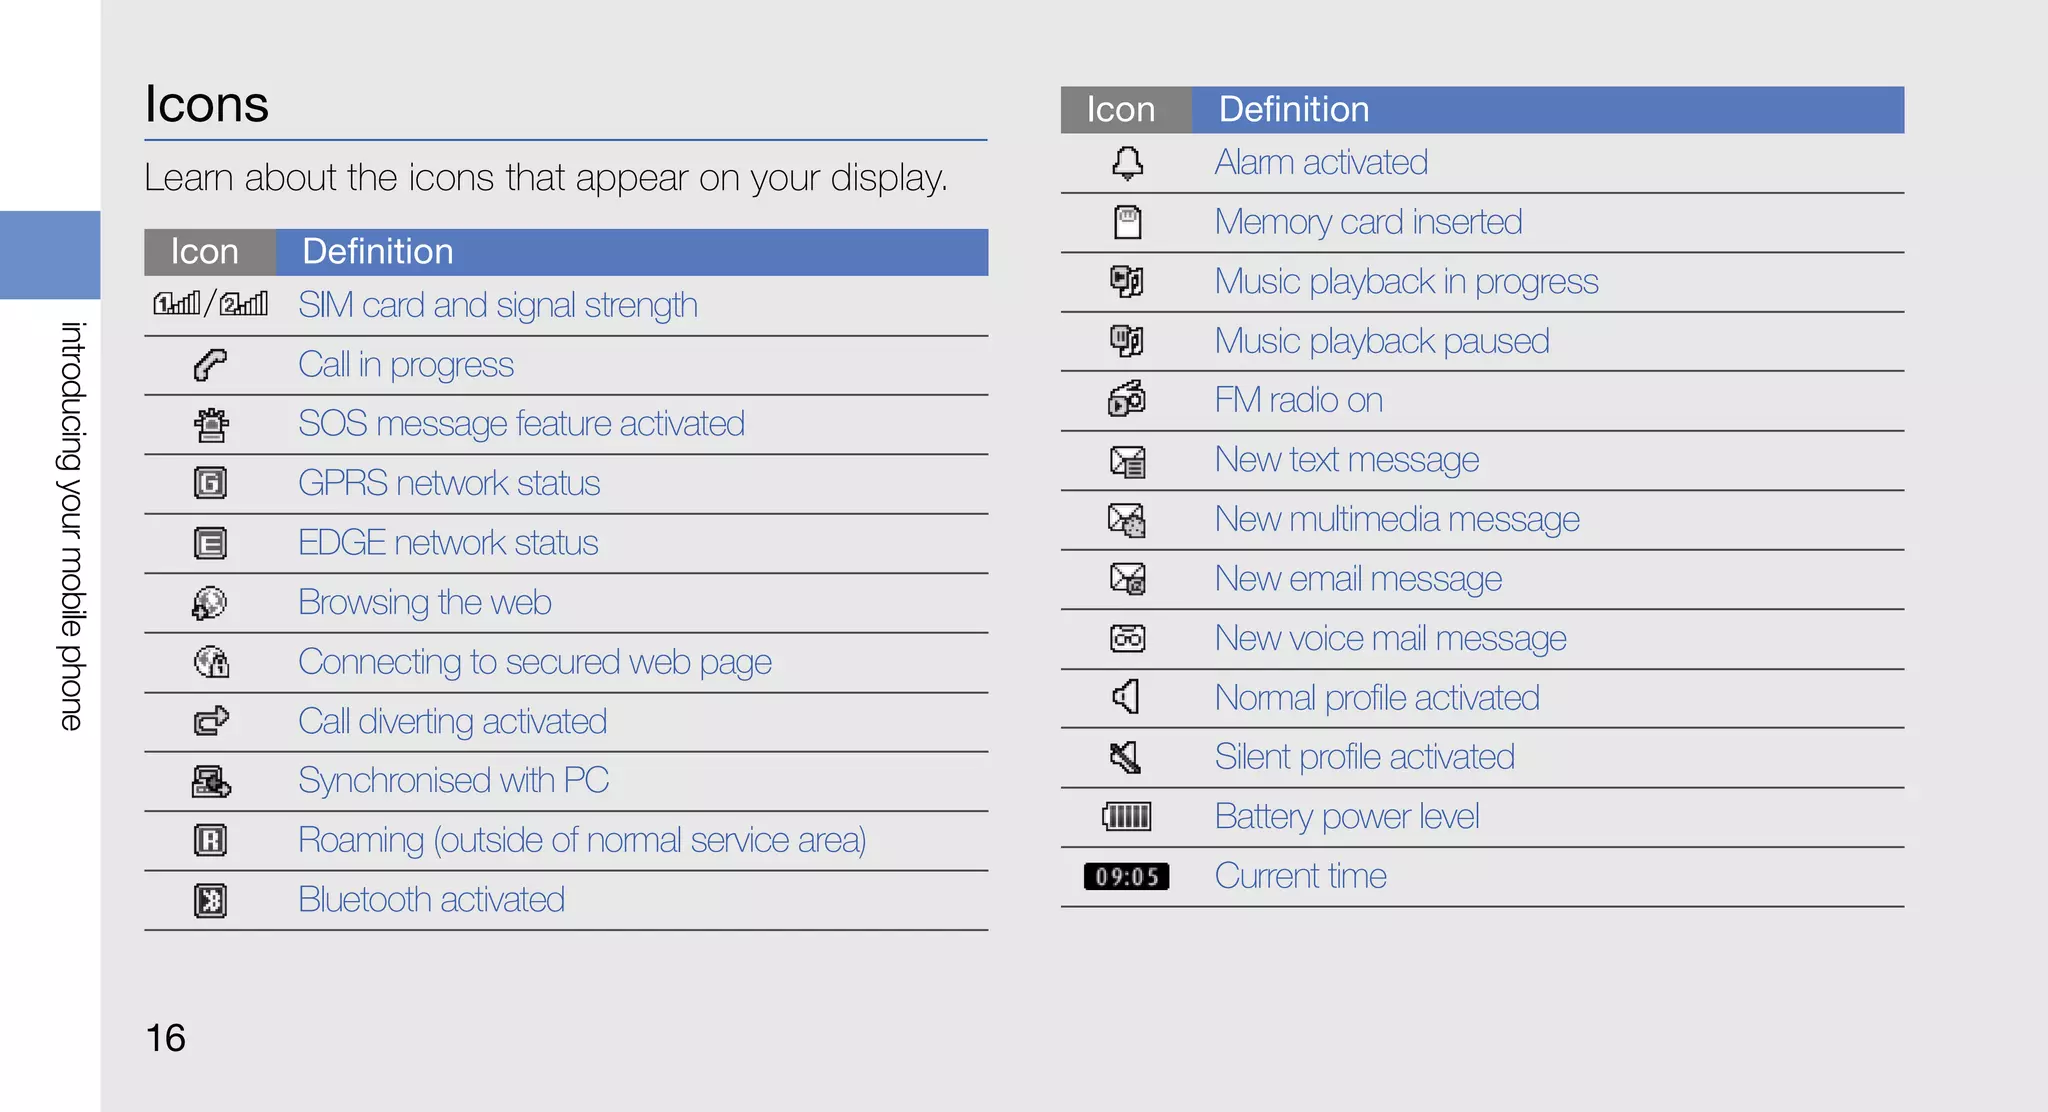
![Key Function Display
Enter special characters or perform Your phone’s display consists of three areas:
special functions; In Idle mode,
Special press and hold [ ] for the silent Icon line
function profile; In Idle mode, press and Displays various icons
hold [ ] to enter a pause between
introducing your mobile phone
numbers Text and graphic area
Displays messages,
instructions, and information
Volume Adjust the phone’s volume you enter
Switch between SIM cards when Softkey line
you make calls or send messages; Displays the current actions
SIM In Idle mode, switch between SIM assigned to each softkey
selection cards; Access the SIM card
management menu (press and
hold)
15](https://image.slidesharecdn.com/gt-c6112umopenengrev-1-1091117-100331184841-phpapp02/75/Gt-C6112-Um-Open-Eng-Rev-1-1-091117-21-2048.jpg)
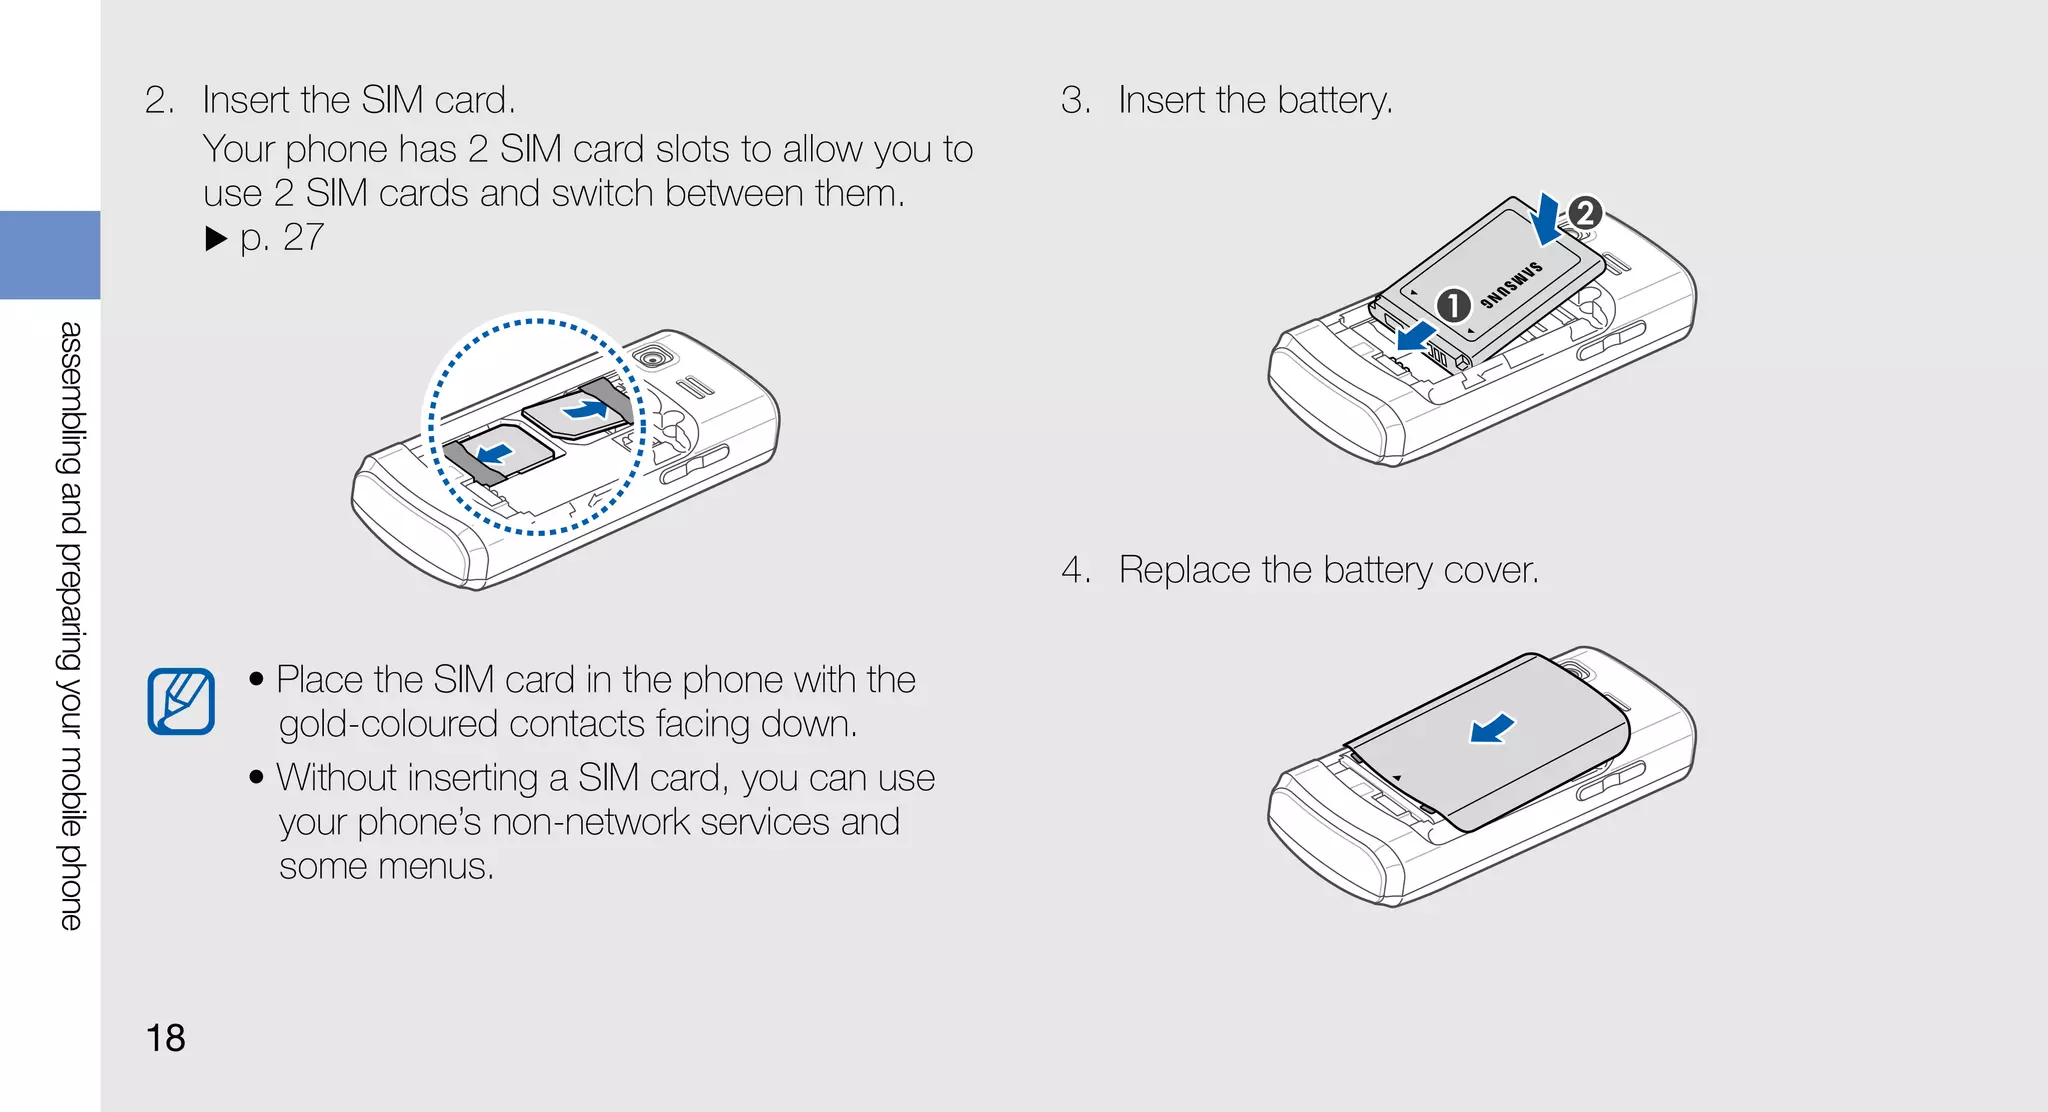
![Install the SIM card and battery
assembling and When you subscribe to a cellular service, you will
receive a Subscriber Identity Module (SIM) card, with
subscription details, such as your personal
preparing your identification number (PIN) and optional services.
To install the SIM card and battery,
mobile phone 1. Remove the battery cover.
Get started by assembling and setting up your
mobile phone for its first use.
If the phone is on, press and hold [ ] to turn
it off.
17](https://image.slidesharecdn.com/gt-c6112umopenengrev-1-1091117-100331184841-phpapp02/75/Gt-C6112-Um-Open-Eng-Rev-1-1-091117-23-2048.jpg)

![Turn your phone on and off
using basic To turn your phone on,
1. Press and hold [ ].
functions 2. Enter your PIN and press <OK> (if necessary).
3. Press <OK>.
4. Press <Next> to assign a name and an icon for
Learn how to perform basic operations and use the
the SIM card.
main features of your mobile phone.
5. Assign a name to the SIM card 1 and press
<Next>.
6. Assign an icon to the SIM card 1 and press
<Next>.
7. Repeat steps 4-6 to assign a name and icon to
the SIM card 2.
8. Press <Next> → <OK>.
To turn your phone off, repeat step 1 above.
22](https://image.slidesharecdn.com/gt-c6112umopenengrev-1-1091117-100331184841-phpapp02/75/Gt-C6112-Um-Open-Eng-Rev-1-1-091117-28-2048.jpg)
![Switch to the offline profile You may need to press the Confirm key to
access Menu mode depending on your region
By switching to the offline profile, you can use your
or service provider. When you are using the
phone’s non-network services in areas where
smart home screen, you cannot use the
wireless devices are prohibited, such as aeroplanes
Confirm key to access Menu mode.
and hospitals.
To switch to the offline profile, in Menu mode, select 2. Use the Navigation key to scroll to a menu or
Settings → Sound profiles → Offline. option.
using basic functions
Follow all posted warnings and directions from 3. Press <Select>, <OK>, or the Confirm key to
official personnel when in areas where wireless confirm the highlighted option.
devices are prohibited. 4. Press <Back> to move up one level; Press [ ]
to return to Idle mode.
Access menus
To access your phone’s menus, Use the smart home screen
1. In Idle mode, press <Menu> to access Menu The screen allows you to access your favourite
mode. applications and contacts and view upcoming
events or tasks. You can customise the smart home
screen to fit your preferences and needs.
23](https://image.slidesharecdn.com/gt-c6112umopenengrev-1-1091117-100331184841-phpapp02/75/Gt-C6112-Um-Open-Eng-Rev-1-1-091117-29-2048.jpg)
![4. Scroll to Shortcuts toolbar and press Switch to or from the silent profile
<Options> → Edit shortcuts.
In Idle mode, press and hold [ ] to silence or
5. Select a menu to change or an empty location unsilence your phone.
and select Edit.
6. Select the menus you want. Set the phone profile
Press <Options> → Open to select submenus To change the ringtone of the current profile,
(if necessary).
1. In Menu mode, select Settings → Sound
using basic functions
7. Press <Save>, or press <Options> → Save. profiles.
2. Scroll to the profile you are using.
Customise your phone
If you are using the silent, offline, or meeting
Get more from your phone by customising it to profile, you are not allowed to change the
match your preferences. ringtone.
Adjust the volume of the key tones 3. Press <Edit>.
In Idle mode, press the Volume key up or down to 4. Scroll left or right to a SIM card (if necessary).
adjust the key tone volume. 5. Select Voice call ringtone.
6. Select a ringtone category → a ringtone.
To switch to another profile, select it from the list.
25](https://image.slidesharecdn.com/gt-c6112umopenengrev-1-1091117-100331184841-phpapp02/75/Gt-C6112-Um-Open-Eng-Rev-1-1-091117-31-2048.jpg)
![3. Select a menu to assign to the shortcut key. Use Recycle bin
When you are using the smart home screen, With Recycle bin, the data you deleted, such as
the Navigation keys do not work as shortcuts. messages, contacts, and tasks, will be sent to the
recycle bin instead of being deleted permanently.
Lock your phone You can later restore the data or empty your recycle
1. In Menu mode, select Settings → Security → bin to permanently delete.
Phone → Phone lock. To access the recycle bin, in Menu mode, select
using basic functions
2. Enter a new 4- to 8-digit password and press Settings → Recycle bin.
<OK>.
3. Enter the new password again and press <OK>. Manage your SIM cards
• The first time you access a menu that Your phone supports the Dual SIM mode, enabling
requires a password, you will be prompted to you to use two SIM cards at the same time without
create and confirm a password. changing them. Learn to select a default SIM card
• Samsung is not responsible for any loss of and set the SIM cards settings.
passwords or private information or other
damages caused by illegal software. Select a default SIM card
1. In Idle mode, press and hold [ ].
2. Select Network.
27](https://image.slidesharecdn.com/gt-c6112umopenengrev-1-1091117-100331184841-phpapp02/75/Gt-C6112-Um-Open-Eng-Rev-1-1-091117-33-2048.jpg)
![3. Scroll down to Default network and press 3. Select Card name and change the name for the
<Change> → <Yes>. SIM card and press the Confirm key.
Your phone will automatically reboot. 4. Select Icon and change the icon for the SIM
card and press the Confirm key.
Switch the SIM cards automatically
1. In Menu mode, select Settings → SIM cards Use basic call functions
management → SIM auto switch.
Learn to make or answer calls and use basic call
using basic functions
2. Press <Change>. functions.
3. Select a SIM card.
4. Specify the schedule that the SIM card will be Make a call
active and press <Save>. 1. In Idle mode, enter an area code and a phone
number.
Change the names and icons of the SIM 2. Press [ ] to dial the number.
cards
3. To end the call, press [ ].
1. In Menu mode, select Settings → SIM cards
management → Register card.
2. Select a SIM card.
28](https://image.slidesharecdn.com/gt-c6112umopenengrev-1-1091117-100331184841-phpapp02/75/Gt-C6112-Um-Open-Eng-Rev-1-1-091117-34-2048.jpg)
![Answer a call Use the headset
1. When a call comes in, press [ ]. By plugging the supplied headset into the
2. To end the call, press [ ]. multifunction jack, you can make and answer calls:
• To redial the last call, press and hold the headset
Adjust the volume button.
To adjust the volume during a call, press the Volume • To answer a call, press the headset button.
key up or down.
using basic functions
• To end a call, press and hold the headset button.
Use the speakerphone feature Send and view messages
1. During a call, press the Confirm key to activate
the speaker. Learn to send and view text (SMS), multimedia
(MMS), and email messages.
2. To switch back to the earpiece, press the
Confirm key again. Send a text or multimedia message
In noisy environments, you may have difficulty 1. In Menu mode, select Messages → Create
hearing the calls while using the speakerphone message.
feature. For better performance, use the normal
phone mode. 2. Enter a recipient number and scroll down.
29](https://image.slidesharecdn.com/gt-c6112umopenengrev-1-1091117-100331184841-phpapp02/75/Gt-C6112-Um-Open-Eng-Rev-1-1-091117-35-2048.jpg)
![3. Enter your message text. p. 30 5. Press <Options> → Attach items and attach a
For sending as a text message, skip to step 5. file (if necessary).
For attaching multimedia, continue with step 4. 6. Press the Confirm key to send the message.
4. Press <Options> → Add multimedia and add
an item. Enter text
5. Press the Confirm key to send the message. When entering text, you can change the text input
mode:
using basic functions
Send an email • Press and hold [ ] to switch between T9 and
1. In Menu mode, select Messages → Create ABC modes. Depending on your country, you
email. may be able to access an input mode for your
specific language.
2. Enter a subject and scroll up.
• Press [ ] to change case or switch to Number
3. Enter an email address and scroll down to the mode.
message field.
• Press [ ] to switch to Symbol mode.
4. Enter your email text.
• Press and hold [ ] to select an input mode or
change the input language.
30](https://image.slidesharecdn.com/gt-c6112umopenengrev-1-1091117-100331184841-phpapp02/75/Gt-C6112-Um-Open-Eng-Rev-1-1-091117-36-2048.jpg)
![Enter text in one of the following modes: View text or multimedia messages
Mode Function 1. In Menu mode, select Messages → Inbox.
Press an appropriate alphanumeric key until 2. Select a text or multimedia message.
ABC the character you want appears on the
display. View an email
1. Press the appropriate alphanumeric 1. In Menu mode, select Messages → Email
keys to enter an entire word. inbox.
using basic functions
2. When the word displays correctly, press
T9 2. Select an email account.
[0] to insert a space. If the correct word
does not display, select an alternate 3. Press Download.
word from the list that appears.
4. Select an email or a header.
Press an appropriate alphanumeric key to
Number
enter a number.
5. If you selected a header, press <Options> →
Retrieve to view the body of the email.
Press an appropriate alphanumeric key to
Symbol
enter a symbol.
31](https://image.slidesharecdn.com/gt-c6112umopenengrev-1-1091117-100331184841-phpapp02/75/Gt-C6112-Um-Open-Eng-Rev-1-1-091117-37-2048.jpg)
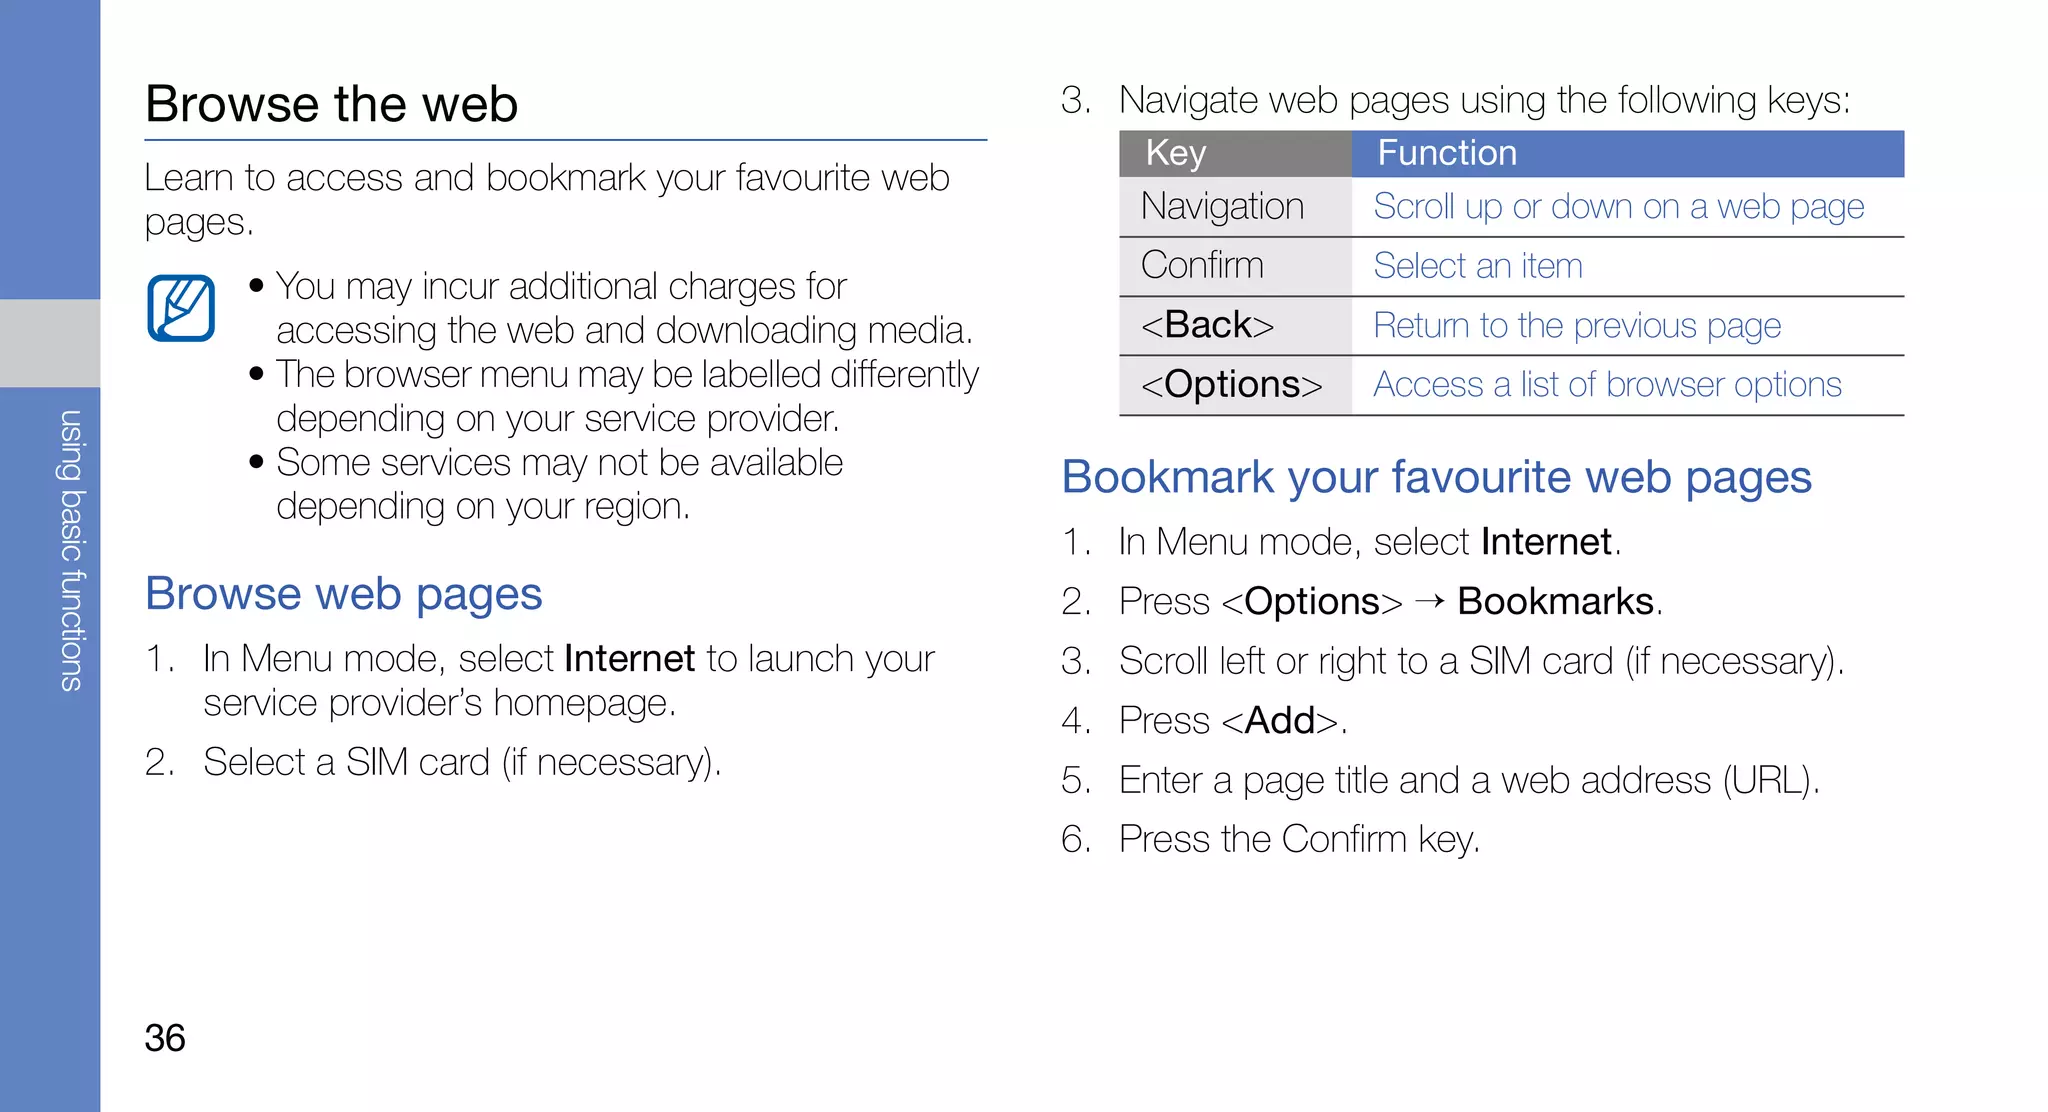
![Add and find contacts 3. Select the contact’s name from the search list.
Learn the basics of using the phonebook feature. Once you have found a contact, you can:
• call the contact by pressing [ ]
Add a new contact • edit the contact information by pressing the
Confirm key
1. In Idle mode, enter a phone number and press
<Options>.
Use basic camera functions
using basic functions
2. Select Add to Phonebook → a memory location
(phone, SIM 1, or SIM 2) → Create contact. Learn the basics to capture and view photos and
3. Select a number type (if necessary). videos.
4. Enter contact information. Capture photos
5. Press <Options> → Save or press the Confirm
1. In Menu mode, select Camera to turn on the
key to add the contact to memory.
camera.
Find a contact 2. Aim the lens at the subject and make any
adjustments.
1. In Menu mode, select Phonebook.
• To change the preview screen, press the
2. Enter the first few letters of the name you want to Navigation key up ( ).
find. • To adjust the brightness, press the Navigation
key left or right ( or ).
32](https://image.slidesharecdn.com/gt-c6112umopenengrev-1-1091117-100331184841-phpapp02/75/Gt-C6112-Um-Open-Eng-Rev-1-1-091117-38-2048.jpg)
![• To change the time delay, press the • To change the preview screen, press the
Navigation key down ( ). Navigation key up ( ).
• To zoom in or out, press the Volume key. • To adjust the brightness, press the Navigation
3. Press the Confirm key to take a photo. key left or right ( or ).
The photo is saved automatically. • To change the time delay, press the
Navigation key down ( ).
After capturing photos, press <View> to view
• To zoom in or out, press the Volume key.
photos.
using basic functions
4. Press the Confirm key to start recording.
View photos 5. Press <Stop> to stop recording.
In Menu mode, select My files → Images → a photo The video is saved automatically.
file. After capturing videos, press <View> to view videos.
Capture videos View videos
1. In Menu mode, select Camera to turn on the Use one of the following methods to view videos:
camera.
• In Menu mode, select My files → Videos → a
2. Press [1] to switch to Recording mode. video file.
3. Aim the lens at the subject and make any • In Menu mode, select Applications → Video
adjustments. player → a video file.
33](https://image.slidesharecdn.com/gt-c6112umopenengrev-1-1091117-100331184841-phpapp02/75/Gt-C6112-Um-Open-Eng-Rev-1-1-091117-39-2048.jpg)
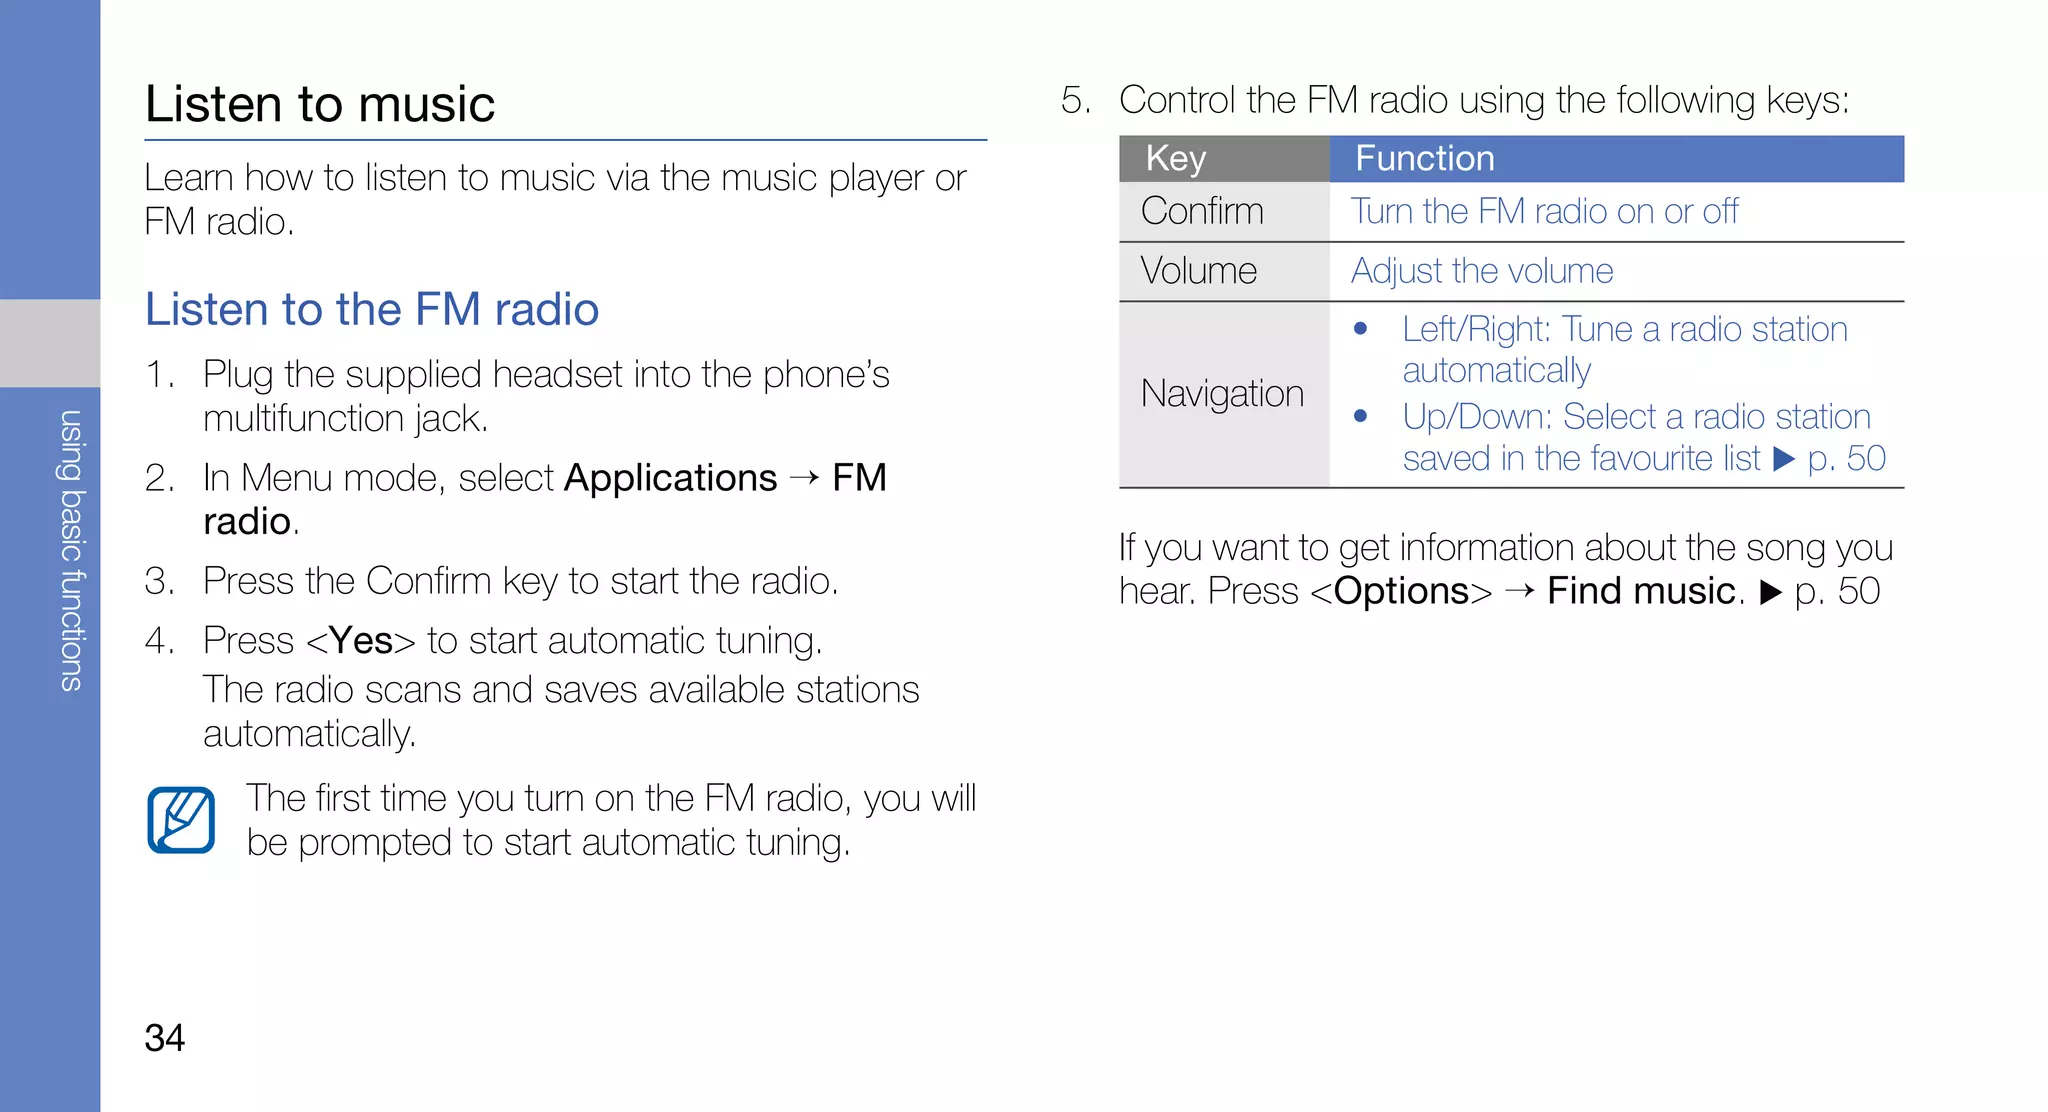
![Listen to music files 3. Control playback using the following keys:
Start by transferring files to your phone or memory Key Function
card: Confirm Pause or resume playback
• Download from the wireless web. p. 36 Volume Adjust the volume
• Download from a PC with the optional Samsung • Left: Restart playback; Skip
PC Studio. p. 47 backward (press within 3
seconds); Scan backward in a file
using basic functions
• Receive via Bluetooth. p. 52
(press and hold)
• Copy to your memory card. p. 47 Navigation • Right: Skip forward; Scan forward
• Synchronise with Windows Media Player 11. in a file (press and hold)
p. 47 • Up: Open the playlist
After transferring music files to your phone or • Down: Stop playback
memory card, [1] Rate the current track
1. In Menu mode, select Music → Library. [2] Change the sound effect
2. Select a music category → a music file. [3] Activate Shuffle mode
[4] Change the repeat mode
[5] Select a skin type
35](https://image.slidesharecdn.com/gt-c6112umopenengrev-1-1091117-100331184841-phpapp02/75/Gt-C6112-Um-Open-Eng-Rev-1-1-091117-41-2048.jpg)
![Use advanced call functions
using advanced Learn about your phone’s additional calling
capabilities.
functions View and dial missed calls
Your phone will display calls you have missed on the
display. To dial the number of a missed call,
Learn how to perform advanced operations and use
additional features of your mobile phone. 1. Press <Open>.
2. Scroll to the missed call you want to dial.
3. Press [ ] to dial.
Call a recently dialled number
1. In Idle mode, press [ ] to display a list of
recent numbers.
2. Scroll to the number you want and press [ ] to
dial.
38](https://image.slidesharecdn.com/gt-c6112umopenengrev-1-1091117-100331184841-phpapp02/75/Gt-C6112-Um-Open-Eng-Rev-1-1-091117-44-2048.jpg)
![Hold a call or retrieve a held call Answer a second call
Press <Hold> to place a call on hold or press If your network supports this function, you can
<Retrieve> to retrieve a held call. answer a second incoming call:
1. Press [ ] to answer the second call.
Dial a second call The first call is automatically placed on hold.
If your network supports this function, you can dial
2. Press <Swap> to switch between the calls.
another number during a call:
using advanced functions
1. Press <Hold> to place the first call on hold. Make a multiparty call (conference call)
2. Enter the second number to dial and press [ ]. 1. Call the first party you want to add to the
3. Press <Swap> to switch between the two calls. multiparty call.
4. To end the call on hold, press <Options> → End 2. While connected to the first party, call the
→ Held call. second party.
The first party is automatically placed on hold.
5. To end the current call, press [ ].
3. When connected to the second party, press
<Options> → Conference call.
39](https://image.slidesharecdn.com/gt-c6112umopenengrev-1-1091117-100331184841-phpapp02/75/Gt-C6112-Um-Open-Eng-Rev-1-1-091117-45-2048.jpg)
![4. Repeat steps 2 and 3 to add more parties (if Reject a call
necessary).
To reject an incoming call, press [ ]. The caller will
5. To end the multiparty call, press [ ]. hear a busy tone.
Call an international number To reject calls from certain numbers automatically,
use the auto rejection. To activate the auto rejection
1. In Idle mode, press and hold [0] to insert the + and set up the reject list,
character.
1. In Menu mode, select Settings → Call → All
using advanced functions
2. Enter the complete number you want to dial calls → Auto reject.
(country code, area code, and phone number),
and then press [ ] to dial. 2. Select Activation → On (if necessary).
3. Select Reject list.
Call a contact from the phonebook 4. Press <Options> → Create.
You can call numbers directly from the phonebook 5. Enter a number to reject.
using stored contacts. p. 32
6. Select Match criteria → an option (if necessary).
1. In Menu mode, select Phonebook.
7. Press <Save> or the Confirm key.
2. Scroll to the number you want to dial and press
8. To add more numbers, repeat steps 4-6 above.
[ ] to dial.
40](https://image.slidesharecdn.com/gt-c6112umopenengrev-1-1091117-100331184841-phpapp02/75/Gt-C6112-Um-Open-Eng-Rev-1-1-091117-46-2048.jpg)
![Activate and send an SOS message 8. Press the Confirm key to save the recipients.
When you have an emergency, you can send an 9. Scroll down and press the Confirm key.
SOS message asking for help. 10. Select the number of times to repeat the SOS
message.
This feature may be unavailable depending on
your region or service provider. 11. Press <Back> → <Yes>.
To send an SOS message, the keys must be
1. In Menu mode, select Messages → Settings → locked. Press the Volume key four times.
using tools and applications
SOS messages → Sending options. Once you send an SOS message, all phone
2. Select Sending SOS → On. functions will be suspended until you press
3. Scroll down and press the Confirm key to open [ ].
the recipient list.
4. Press <Options> → Phonebook to open your Make fake calls
contact list. You can simulate an incoming call when you want to
5. Scroll to a contact and press the Confirm key. get out of meetings or unwanted conversations. You
can also make it appear as if you are talking on the
6. Select a number (if necessary).
phone by playing back a recorded voice.
7. Press <Options> → Add.
53](https://image.slidesharecdn.com/gt-c6112umopenengrev-1-1091117-100331184841-phpapp02/75/Gt-C6112-Um-Open-Eng-Rev-1-1-091117-59-2048.jpg)
![Stop an alarm Convert currencies or
When the alarm sounds, measurements
• Press <Confirm> or the Confirm key to stop the 1. In Menu mode, select Organiser → Convertor
alarm without snooze. → a conversion type.
• Press <Confirm> or the Confirm key to stop the 2. Enter the currencies measurements and units in
alarm with snooze or press <Snooze> to silence the appropriate fields.
the alarm for the snooze period.
using tools and applications
Deactivate an alarm Set a countdown timer
1. In Menu mode, select Organiser → Alarms. 1. In Menu mode, select Applications → Timer.
2. Select the alarm you want to deactivate. 2. Enter the length of time to count down and press
3. Scroll up and press <Change> → <Save>. <Start>.
3. Press [ ] → <Yes> to set the timer to run in
Use the calculator the background.
4. When the timer expires, press <OK> to stop the
1. In Menu mode, select Organiser → Calculator. alert.
2. Use the keys that corresponds to the calculator
display to perform basic mathematical
operations.
60](https://image.slidesharecdn.com/gt-c6112umopenengrev-1-1091117-100331184841-phpapp02/75/Gt-C6112-Um-Open-Eng-Rev-1-1-091117-66-2048.jpg)

![The phone prompts you to insert the SIM card. Another caller cannot reach you.
Ensure that the SIM card is installed correctly. • Ensure that your phone is turned on.
Your phone displays “No networks found” or • Ensure that you have accessed the right cellular
“Network error.” network.
• Ensure that you have not set call barring for the
• When you are in areas with weak signals or poor
phone number.
reception, you may lose reception. Move to
another area and try again. Another caller cannot hear you speaking.
• You cannot access some options without a • Ensure that you are not covering the built-in
troubleshooting
subscription. Contact your service provider for microphone.
more details.
• Ensure that the microphone is close to your
You enter a number, but the call is not dialled. mouth.
• Ensure that you have pressed the Dial key: [ ]. • If using a headset, ensure that it is properly
connected.
• Ensure that you have accessed the right cellular
network. The phone beeps and the battery icon flashes.
• Ensure that you have not set call barring for the Your battery is low. Recharge or replace the battery to
phone number. continue using the phone.
b](https://image.slidesharecdn.com/gt-c6112umopenengrev-1-1091117-100331184841-phpapp02/75/Gt-C6112-Um-Open-Eng-Rev-1-1-091117-70-2048.jpg)

![Declaration of Conformity (R&TTE) The conformity assessment procedure referred to in Article 10 and
detailed in Annex[IV] of Directive 1999/5/EC has been followed with the
involvement of the following Notified Body(ies):
We, Samsung Electronics
BABT, Forsyth House,
declare under our sole responsibility that the product Chruchfield Road,
Walton-on-Thames,
Surrey, KT12 2TD, UK*
GSM Mobile Phone : GT-C6112 Idenditication mark: 0168
to which this declaration relates, is in conformity with the following The technical documentation kept at :
standards and/or other normative documents.
Samsung Electronics QA Lab.
SAFETY EN 60950- 1 : 2001 +A11:2004
which will be made available upon request.
EMC EN 301 489- 01 V1.6.1 (09-2005) (Representative in the EU)
EN 301 489- 07 V1.3.1 (11-2005)
EN 301 489- 17 V1.2.1 (08-2002) Samsung Electronics Euro QA Lab.
Blackbushe Business Park, Saxony Way,
SAR EN 50360 : 2001 Yateley, Hampshire, GU46 6GG, UK*
EN 62209-1 : 2006 2009.10.19 Yong-Sang Park / S. Manager
RADIO EN 301 511 V9.0.2 (03-2003) (place and date of issue) (name and signature of authorised person)
EN 300 328 V1.7.1 (10-2006)
* It is not the address of Samsung Service Centre. For the address or the
We hereby declare that [all essential radio test suites have been carried phone number of Samsung Service Centre, see the warranty card or contact
out and that] the above named product is in conformity to all the the retailer where you purchased your phone.
essential requirements of Directive 1999/5/EC.](https://image.slidesharecdn.com/gt-c6112umopenengrev-1-1091117-100331184841-phpapp02/75/Gt-C6112-Um-Open-Eng-Rev-1-1-091117-77-2048.jpg)