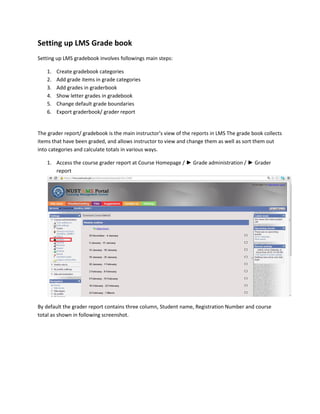
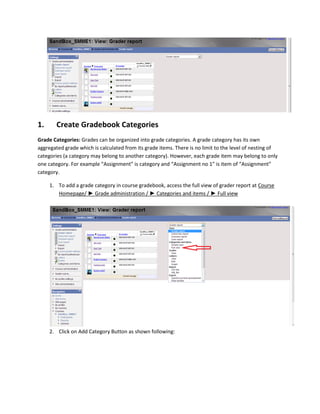
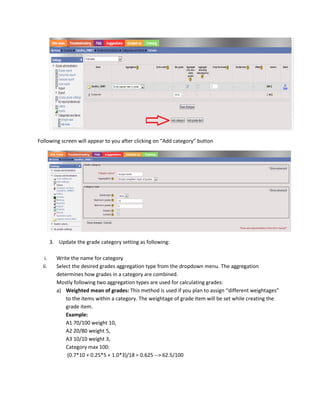
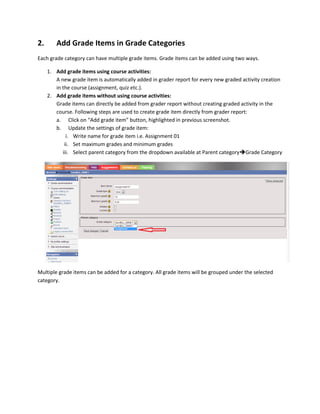
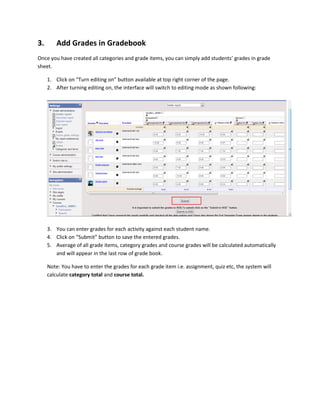
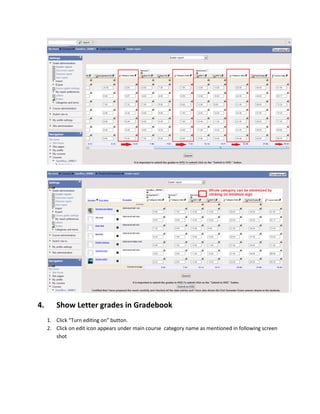
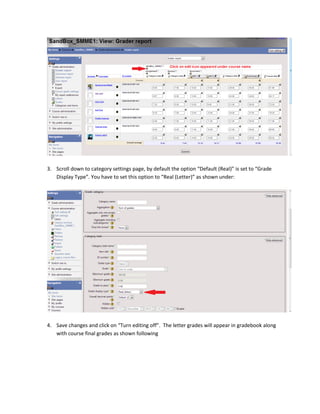
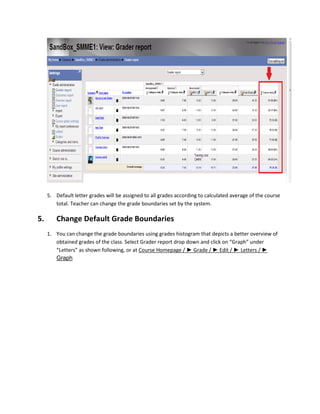
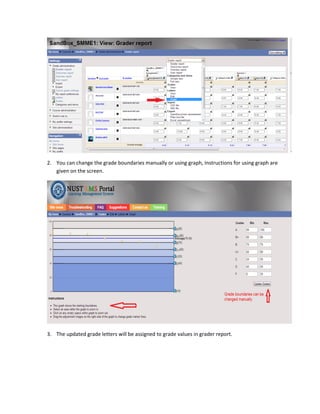
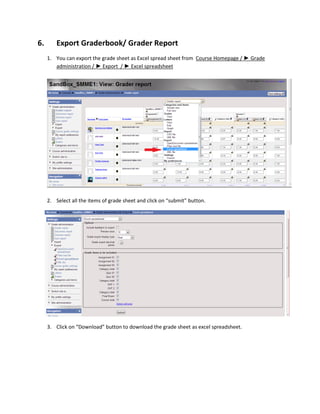
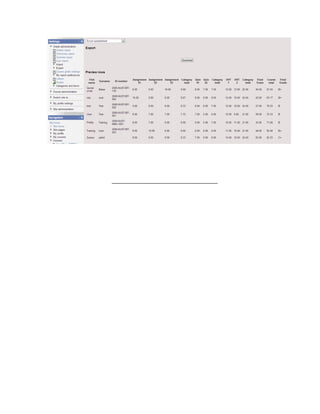
SlideShare a Scribd company logo
1 of 14
Download to read offline
LMS User Manual


  LMS Grade Book


        NUST LMS

   lms.team@nust.edu.pk
Setting up LMS Grade book
Setting up LMS gradebook involves followings main steps:

    1.   Create gradebook categories
    2.   Add grade items in grade categories
    3.   Add grades in graderbook
    4.   Show letter grades in gradebook
    5.   Change default grade boundaries
    6.   Export graderbook/ grader report


The grader report/ gradebook is the main instructor’s view of the reports in LMS The grade book collects
items that have been graded, and allows instructor to view and change them as well as sort them out
into categories and calculate totals in various ways.

    1. Access the course grader report at Course Homepage / ► Grade administration / ► Grader
       report


By default the grader report contains three column, Student name, Registration Number and course
total as shown in following screenshot.
1.      Create Gradebook Categories
Grade Categories: Grades can be organized into grade categories. A grade category has its own
aggregated grade which is calculated from its grade items. There is no limit to the level of nesting of
categories (a category may belong to another category). However, each grade item may belong to only
one category. For example “Assignment” is category and “Assignment no 1” is item of “Assignment”
category.

     1. To add a grade category in course gradebook, access the full view of grader report at Course
        Homepage/ ► Grade administration / ► Categories and items / ► Full view


     2. Click on Add Category Button as shown following:
Following screen will appear to you after clicking on “Add category” button


        3. Update the grade category setting as following:

   i.     Write the name for category
  ii.     Select the desired grades aggregation type from the dropdown menu. The aggregation
          determines how grades in a category are combined.
          Mostly following two aggregation types are used for calculating grades:
          a) Weighted mean of grades: This method is used if you plan to assign “different weightages”
              to the items within a category. The weightage of grade item will be set while creating the
              grade item.
              Example:
              A1 70/100 weight 10,
              A2 20/80 weight 5,
              A3 10/10 weight 3,
              Category max 100:
               (0.7*10 + 0.25*5 + 1.0*3)/18 = 0.625 --> 62.5/100
b) Simple weighted mean of grades: This method is selected if you plan to assign “same
              weightages” to all items within a category, or if you want to set “all items weightages as
              their total marks within a category”.
              Example:
               A1 70/100,
              A2 20/80,
              A3 10/10,
              Category max 100:
              (0.7*100 + 0.25*80 + 1.0*10)/190 = 0.526 --> 52.6/100
          c) Any other aggregation type can be selected.
                   Mean of grades - The sum of all grades divided by the total number of grades
                   Median of grades - The middle grade when grades are arranged in order of size
                   Lowest grade -
                   Highest grade -
                   Mode of grades - The grade that occurs the most frequently
                   Sum of grades - The sum of all grade values, with scale grades being ignored
               For further details please visit http://docs.moodle.org/24/en/grade/aggregation
 iii.     “Grade type” should be set to “value” for assigning numerical values to grades.
 iv.      Maximum grade determines the total grades for that specific category.
          Example: If assignments category has 10% weightage out of course total 100 marks, maximum
          grade for assignment category should be set to 10, all items (assignments) placed in this
          category will be aggregated for the total of 10 marks.
  v.      Grade category can be set to hidden and locked if required.
 vi.      Save the changes.

The created category will be visible under main course category when you switch to full view of grader
report at Course Homepage / ► Grade administration / ► Categories and items / ► Full view


        4. Grade category can be edited at any stage using edit icon.

Multiple course categories can be created this way i.e. Assignments, quizzes, projects, sessional exams,
final exam etc. Each category can be given a different weightage accordingly.
2.      Add Grade Items in Grade Categories
Each grade category can have multiple grade items. Grade items can be added using two ways.

     1. Add grade items using course activities:
        A new grade item is automatically added in grader report for every new graded activity creation
        in the course (assignment, quiz etc.).
     2. Add grade items without using course activities:
        Grade items can directly be added from grader report without creating graded activity in the
        course. Following steps are used to create grade item directly from grader report:
        a. Click on “Add grade item” button, highlighted in previous screenshot.
        b. Update the settings of grade item:
             i. Write name for grade item i.e. Assignment 01
            ii. Set maximum grades and minimum grades
           iii. Select parent category from the dropdown available at Parent categoryGrade Category


Multiple grade items can be added for a category. All grade items will be grouped under the selected
category.
Different icons under “Action” column can be used to edit grade items.

      &    are used to edit grade item settings.

     to delete a grade item

      to change the location of a grade item

      to hide a grade item

      to lock the grading

After creation of multiple categories and multiple grade items under each category the final grader
report view will be like following screenshot.
3.       Add Grades in Gradebook
Once you have created all categories and grade items, you can simply add students’ grades in grade
sheet.

     1. Click on “Turn editing on” button available at top right corner of the page.
     2. After turning editing on, the interface will switch to editing mode as shown following:


     3. You can enter grades for each activity against each student name.
     4. Click on “Submit” button to save the entered grades.
     5. Average of all grade items, category grades and course grades will be calculated automatically
        and will appear in the last row of grade book.

     Note: You have to enter the grades for each grade item i.e. assignment, quiz etc, the system will
     calculate category total and course total.
4.      Show Letter grades in Gradebook
     1. Click “Turn editing on” button.
     2. Click on edit icon appears under main course category name as mentioned in following screen
        shot
3. Scroll down to category settings page, by default the option “Default (Real)” is set to “Grade
   Display Type”. You have to set this option to “Real (Letter)” as shown under:


4. Save changes and click on “Turn editing off”. The letter grades will appear in gradebook along
   with course final grades as shown following
5. Default letter grades will be assigned to all grades according to calculated average of the course
        total. Teacher can change the grade boundaries set by the system.

5.       Change Default Grade Boundaries
     1. You can change the grade boundaries using grades histogram that depicts a better overview of
        obtained grades of the class. Select Grader report drop down and click on “Graph” under
        “Letters” as shown following, or at Course Homepage / ► Grade / ► Edit / ► Letters / ►
        Graph
2. You can change the grade boundaries manually or using graph, Instructions for using graph are
   given on the screen.


3. The updated grade letters will be assigned to grade values in grader report.
6.       Export Graderbook/ Grader Report
     1. You can export the grade sheet as Excel spread sheet from Course Homepage / ► Grade
        administration / ► Export / ► Excel spreadsheet


     2. Select all the items of grade sheet and click on “submit” button.


     3. Click on “Download” button to download the grade sheet as excel spreadsheet.
_____________________________________

More Related Content

Similar to Lms gradebook manual

Training For Grade Mark V.2
Training For Grade Mark V.2Training For Grade Mark V.2
Training For Grade Mark V.2esyin
 
Moodle 2.4 introducing grading and the gradebook
Moodle 2.4   introducing grading and the gradebookMoodle 2.4   introducing grading and the gradebook
Moodle 2.4 introducing grading and the gradebooklearnict
 
Grades - Moodle Instructor
Grades - Moodle InstructorGrades - Moodle Instructor
Grades - Moodle Instructorcreativeone32
 
Easy Grade Pro 101
Easy Grade Pro 101Easy Grade Pro 101
Easy Grade Pro 101Hans Mundahl
 
Using marking guides in moodle
Using marking guides in moodleUsing marking guides in moodle
Using marking guides in moodleBecky Quigley
 
Gradebook working copy2
Gradebook working copy2Gradebook working copy2
Gradebook working copy2gsedwrds
 
Power teacher gradebook part one
Power teacher gradebook part onePower teacher gradebook part one
Power teacher gradebook part oneDavid Lozano
 
VLE GSA - How to use the Grade Centre
VLE GSA - How to use the Grade CentreVLE GSA - How to use the Grade Centre
VLE GSA - How to use the Grade Centrevlegsa
 
UIC Blackboard Learn Quick Start Guide
UIC Blackboard Learn Quick Start GuideUIC Blackboard Learn Quick Start Guide
UIC Blackboard Learn Quick Start GuideElizabeth Romero
 
Moodle grader For SIT
Moodle grader For SITMoodle grader For SIT
Moodle grader For SITSITLibrary
 
Staff training edline session june
Staff training edline session juneStaff training edline session june
Staff training edline session juneTarah Kutch
 
The VLE @ GSA - assessment tools
The VLE @ GSA - assessment toolsThe VLE @ GSA - assessment tools
The VLE @ GSA - assessment toolsvlegsa
 
Using ExamSoft Rubrics to Assess Student Medical Research
Using ExamSoft Rubrics to Assess Student Medical Research Using ExamSoft Rubrics to Assess Student Medical Research
Using ExamSoft Rubrics to Assess Student Medical Research ExamSoft
 

Similar to Lms gradebook manual (20)

Training For Grade Mark V.2
Training For Grade Mark V.2Training For Grade Mark V.2
Training For Grade Mark V.2
 
Rubrics
RubricsRubrics
Rubrics
 
Moodle 2.4 introducing grading and the gradebook
Moodle 2.4   introducing grading and the gradebookMoodle 2.4   introducing grading and the gradebook
Moodle 2.4 introducing grading and the gradebook
 
Moodle Teachers doc
Moodle Teachers docMoodle Teachers doc
Moodle Teachers doc
 
Grades - Moodle Instructor
Grades - Moodle InstructorGrades - Moodle Instructor
Grades - Moodle Instructor
 
Easy Grade Pro 101
Easy Grade Pro 101Easy Grade Pro 101
Easy Grade Pro 101
 
Using marking guides in moodle
Using marking guides in moodleUsing marking guides in moodle
Using marking guides in moodle
 
Gradebook working copy2
Gradebook working copy2Gradebook working copy2
Gradebook working copy2
 
Power teacher gradebook part one
Power teacher gradebook part onePower teacher gradebook part one
Power teacher gradebook part one
 
VLE GSA - How to use the Grade Centre
VLE GSA - How to use the Grade CentreVLE GSA - How to use the Grade Centre
VLE GSA - How to use the Grade Centre
 
Power Teacher
Power TeacherPower Teacher
Power Teacher
 
The Moodle Gradebook
The Moodle GradebookThe Moodle Gradebook
The Moodle Gradebook
 
CAI-DD User's Manual
CAI-DD User's ManualCAI-DD User's Manual
CAI-DD User's Manual
 
UIC Blackboard Learn Quick Start Guide
UIC Blackboard Learn Quick Start GuideUIC Blackboard Learn Quick Start Guide
UIC Blackboard Learn Quick Start Guide
 
Blackboard
BlackboardBlackboard
Blackboard
 
Moodle grader For SIT
Moodle grader For SITMoodle grader For SIT
Moodle grader For SIT
 
Gc handout
Gc handoutGc handout
Gc handout
 
Staff training edline session june
Staff training edline session juneStaff training edline session june
Staff training edline session june
 
The VLE @ GSA - assessment tools
The VLE @ GSA - assessment toolsThe VLE @ GSA - assessment tools
The VLE @ GSA - assessment tools
 
Using ExamSoft Rubrics to Assess Student Medical Research
Using ExamSoft Rubrics to Assess Student Medical Research Using ExamSoft Rubrics to Assess Student Medical Research
Using ExamSoft Rubrics to Assess Student Medical Research
 

More from lmsnust

How to activate your lms account
How to activate your  lms accountHow to activate your  lms account
How to activate your lms accountlmsnust
 
Quiz manual (simple calculated question)
Quiz manual (simple calculated question)Quiz manual (simple calculated question)
Quiz manual (simple calculated question)lmsnust
 
Plagiarism detection of code via j plag
Plagiarism detection of code via j plagPlagiarism detection of code via j plag
Plagiarism detection of code via j plaglmsnust
 
Lms online quiz
Lms online quizLms online quiz
Lms online quizlmsnust
 
Instructions for conducting exam on lms
Instructions for conducting exam on lmsInstructions for conducting exam on lms
Instructions for conducting exam on lmslmsnust
 
How to import_google_calendar_into_moodle
How to import_google_calendar_into_moodleHow to import_google_calendar_into_moodle
How to import_google_calendar_into_moodlelmsnust
 
Creating groups on lms (advanced)
Creating groups on lms (advanced)Creating groups on lms (advanced)
Creating groups on lms (advanced)lmsnust
 
Adding groups (basics)
Adding groups (basics)Adding groups (basics)
Adding groups (basics)lmsnust
 
How teacher can add any user in his course
How teacher can add any user in his courseHow teacher can add any user in his course
How teacher can add any user in his courselmsnust
 
Lms Attendance Module
Lms Attendance ModuleLms Attendance Module
Lms Attendance Modulelmsnust
 

More from lmsnust (10)

How to activate your lms account
How to activate your  lms accountHow to activate your  lms account
How to activate your lms account
 
Quiz manual (simple calculated question)
Quiz manual (simple calculated question)Quiz manual (simple calculated question)
Quiz manual (simple calculated question)
 
Plagiarism detection of code via j plag
Plagiarism detection of code via j plagPlagiarism detection of code via j plag
Plagiarism detection of code via j plag
 
Lms online quiz
Lms online quizLms online quiz
Lms online quiz
 
Instructions for conducting exam on lms
Instructions for conducting exam on lmsInstructions for conducting exam on lms
Instructions for conducting exam on lms
 
How to import_google_calendar_into_moodle
How to import_google_calendar_into_moodleHow to import_google_calendar_into_moodle
How to import_google_calendar_into_moodle
 
Creating groups on lms (advanced)
Creating groups on lms (advanced)Creating groups on lms (advanced)
Creating groups on lms (advanced)
 
Adding groups (basics)
Adding groups (basics)Adding groups (basics)
Adding groups (basics)
 
How teacher can add any user in his course
How teacher can add any user in his courseHow teacher can add any user in his course
How teacher can add any user in his course
 
Lms Attendance Module
Lms Attendance ModuleLms Attendance Module
Lms Attendance Module
 

Lms gradebook manual

  • 1. LMS User Manual LMS Grade Book NUST LMS lms.team@nust.edu.pk
  • 2. Setting up LMS Grade book Setting up LMS gradebook involves followings main steps: 1. Create gradebook categories 2. Add grade items in grade categories 3. Add grades in graderbook 4. Show letter grades in gradebook 5. Change default grade boundaries 6. Export graderbook/ grader report The grader report/ gradebook is the main instructor’s view of the reports in LMS The grade book collects items that have been graded, and allows instructor to view and change them as well as sort them out into categories and calculate totals in various ways. 1. Access the course grader report at Course Homepage / ► Grade administration / ► Grader report By default the grader report contains three column, Student name, Registration Number and course total as shown in following screenshot.
  • 3. 1. Create Gradebook Categories Grade Categories: Grades can be organized into grade categories. A grade category has its own aggregated grade which is calculated from its grade items. There is no limit to the level of nesting of categories (a category may belong to another category). However, each grade item may belong to only one category. For example “Assignment” is category and “Assignment no 1” is item of “Assignment” category. 1. To add a grade category in course gradebook, access the full view of grader report at Course Homepage/ ► Grade administration / ► Categories and items / ► Full view 2. Click on Add Category Button as shown following:
  • 4. Following screen will appear to you after clicking on “Add category” button 3. Update the grade category setting as following: i. Write the name for category ii. Select the desired grades aggregation type from the dropdown menu. The aggregation determines how grades in a category are combined. Mostly following two aggregation types are used for calculating grades: a) Weighted mean of grades: This method is used if you plan to assign “different weightages” to the items within a category. The weightage of grade item will be set while creating the grade item. Example: A1 70/100 weight 10, A2 20/80 weight 5, A3 10/10 weight 3, Category max 100: (0.7*10 + 0.25*5 + 1.0*3)/18 = 0.625 --> 62.5/100
  • 5. b) Simple weighted mean of grades: This method is selected if you plan to assign “same weightages” to all items within a category, or if you want to set “all items weightages as their total marks within a category”. Example: A1 70/100, A2 20/80, A3 10/10, Category max 100: (0.7*100 + 0.25*80 + 1.0*10)/190 = 0.526 --> 52.6/100 c) Any other aggregation type can be selected.  Mean of grades - The sum of all grades divided by the total number of grades  Median of grades - The middle grade when grades are arranged in order of size  Lowest grade -  Highest grade -  Mode of grades - The grade that occurs the most frequently  Sum of grades - The sum of all grade values, with scale grades being ignored For further details please visit http://docs.moodle.org/24/en/grade/aggregation iii. “Grade type” should be set to “value” for assigning numerical values to grades. iv. Maximum grade determines the total grades for that specific category. Example: If assignments category has 10% weightage out of course total 100 marks, maximum grade for assignment category should be set to 10, all items (assignments) placed in this category will be aggregated for the total of 10 marks. v. Grade category can be set to hidden and locked if required. vi. Save the changes. The created category will be visible under main course category when you switch to full view of grader report at Course Homepage / ► Grade administration / ► Categories and items / ► Full view 4. Grade category can be edited at any stage using edit icon. Multiple course categories can be created this way i.e. Assignments, quizzes, projects, sessional exams, final exam etc. Each category can be given a different weightage accordingly.
  • 6. 2. Add Grade Items in Grade Categories Each grade category can have multiple grade items. Grade items can be added using two ways. 1. Add grade items using course activities: A new grade item is automatically added in grader report for every new graded activity creation in the course (assignment, quiz etc.). 2. Add grade items without using course activities: Grade items can directly be added from grader report without creating graded activity in the course. Following steps are used to create grade item directly from grader report: a. Click on “Add grade item” button, highlighted in previous screenshot. b. Update the settings of grade item: i. Write name for grade item i.e. Assignment 01 ii. Set maximum grades and minimum grades iii. Select parent category from the dropdown available at Parent categoryGrade Category Multiple grade items can be added for a category. All grade items will be grouped under the selected category.
  • 7. Different icons under “Action” column can be used to edit grade items. & are used to edit grade item settings. to delete a grade item to change the location of a grade item to hide a grade item to lock the grading After creation of multiple categories and multiple grade items under each category the final grader report view will be like following screenshot.
  • 8. 3. Add Grades in Gradebook Once you have created all categories and grade items, you can simply add students’ grades in grade sheet. 1. Click on “Turn editing on” button available at top right corner of the page. 2. After turning editing on, the interface will switch to editing mode as shown following: 3. You can enter grades for each activity against each student name. 4. Click on “Submit” button to save the entered grades. 5. Average of all grade items, category grades and course grades will be calculated automatically and will appear in the last row of grade book. Note: You have to enter the grades for each grade item i.e. assignment, quiz etc, the system will calculate category total and course total.
  • 9. 4. Show Letter grades in Gradebook 1. Click “Turn editing on” button. 2. Click on edit icon appears under main course category name as mentioned in following screen shot
  • 10. 3. Scroll down to category settings page, by default the option “Default (Real)” is set to “Grade Display Type”. You have to set this option to “Real (Letter)” as shown under: 4. Save changes and click on “Turn editing off”. The letter grades will appear in gradebook along with course final grades as shown following
  • 11. 5. Default letter grades will be assigned to all grades according to calculated average of the course total. Teacher can change the grade boundaries set by the system. 5. Change Default Grade Boundaries 1. You can change the grade boundaries using grades histogram that depicts a better overview of obtained grades of the class. Select Grader report drop down and click on “Graph” under “Letters” as shown following, or at Course Homepage / ► Grade / ► Edit / ► Letters / ► Graph
  • 12. 2. You can change the grade boundaries manually or using graph, Instructions for using graph are given on the screen. 3. The updated grade letters will be assigned to grade values in grader report.
  • 13. 6. Export Graderbook/ Grader Report 1. You can export the grade sheet as Excel spread sheet from Course Homepage / ► Grade administration / ► Export / ► Excel spreadsheet 2. Select all the items of grade sheet and click on “submit” button. 3. Click on “Download” button to download the grade sheet as excel spreadsheet.