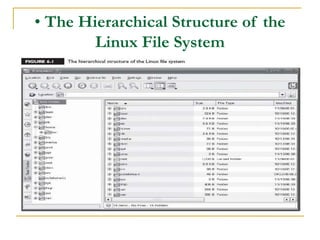
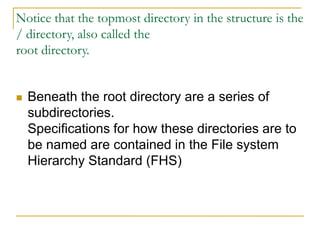
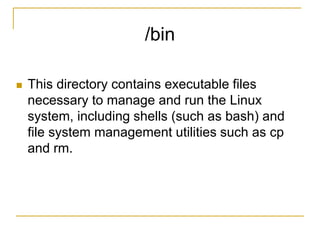
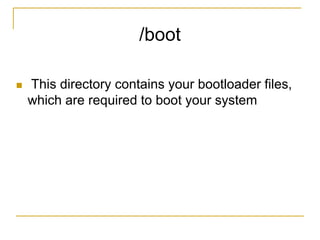
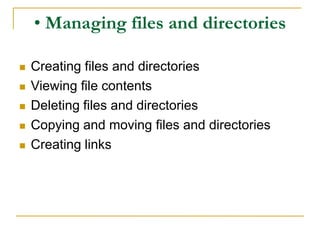
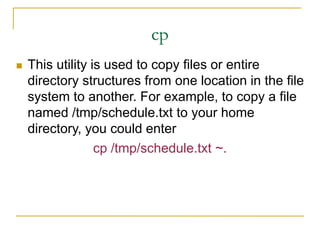
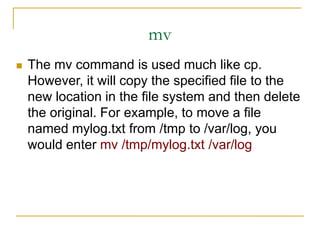
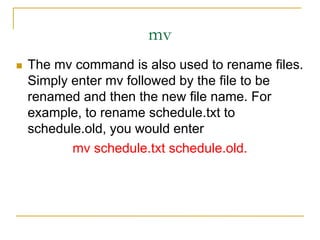
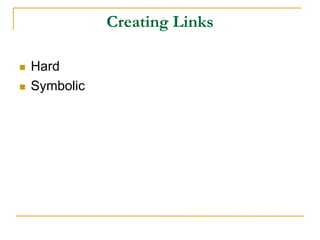
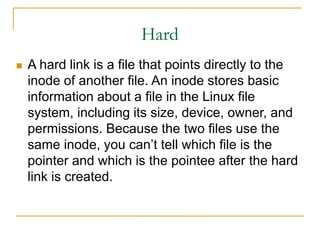
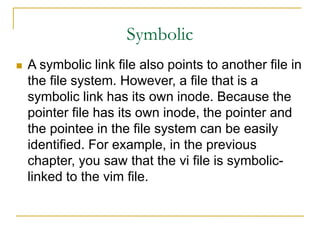
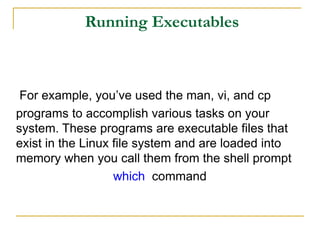
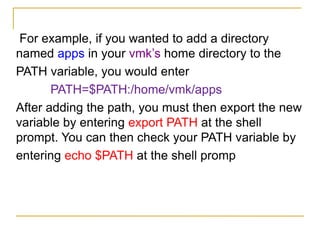
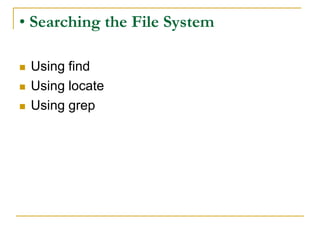
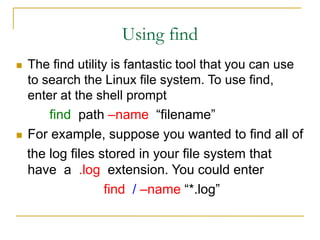
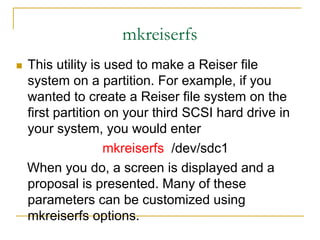
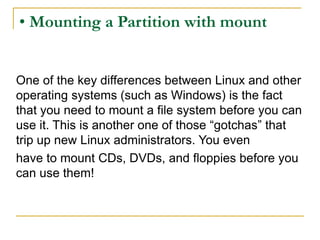
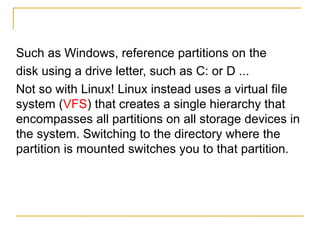
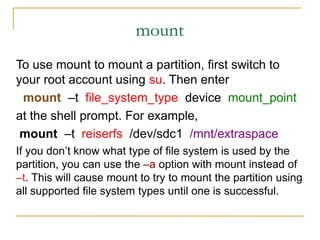
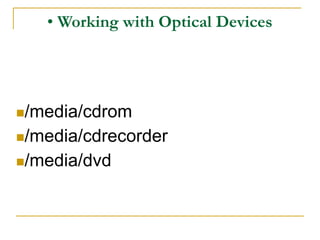
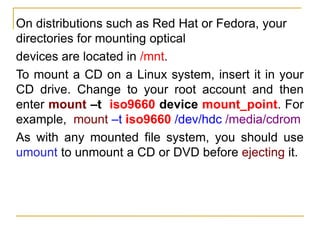
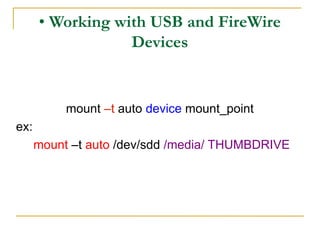
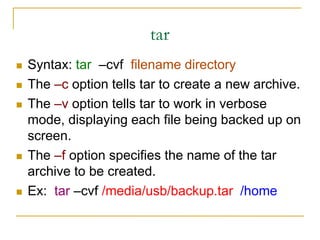
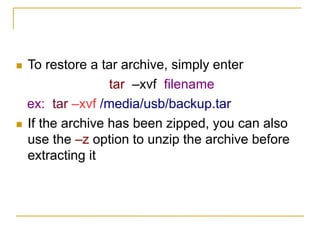
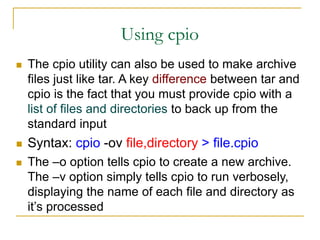
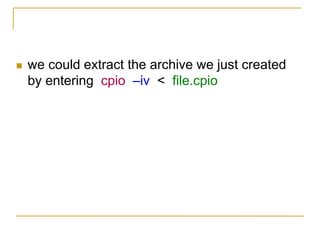
SlideShare a Scribd company logo
Managing the Linux file
system
Managing the Linux file system
1. Describe the Linux file system
2. Complete common file system tasks
3. Manage disk partitions
4. Use removable media
5. Back up data
1. Describe the Linux file system
- The Role of the Linux File System
- The Hierarchical Structure of the Linux File
System
- Types of Files Used by Linux
• The Role of the Linux File System
- The data is organized and can be easily
located .
- The data can be easily retrieved at any later
point in time
-The integrity of the data is preserved
• The Hierarchical Structure of the
Linux File System
Notice that the topmost directory in the structure is the
/ directory, also called the
root directory.
 Beneath the root directory are a series of
subdirectories.
Specifications for how these directories are to
be named are contained in the File system
Hierarchy Standard (FHS)
/bin
 This directory contains executable files
necessary to manage and run the Linux
system, including shells (such as bash) and
file system management utilities such as cp
and rm.
/boot
 This directory contains your bootloader files,
which are required to boot your system
/dev
 This directory contains special files that are
used to represent the various hardware
devices installed in the system
 EX: hda, hdb ...
/etc
 This directory contains text-based
configuration files used by the system as well
as services running on the system. You can
edit these files with a text editor to customize
how Linux behaves
/home
 This directory contains subdirectories that
serve as home directories for each user
account on your Linux system.
/lib
 This directory contains code libraries used by
programs in /bin and /sbin. Your kernel
modules are also stored in the modules
subdirectory of /lib.
/media
 This directory is used by some Linux
distributions (such as SUSE Linux) to mount
external devices, including CD drives, DVD
drives, and floppy drives.
/mnt
 This directory is used by some Linux
distributions (such as Fedora or Red Hat) to
mount external devices, including CD drives,
DVD drives, and floppy drives
/opt
 This directory contains files for some programs
you install on the system
/proc
 This directory is a little different from the other
directories in this list.
 /proc doesn’t actually exist in the file system
 Within /proc are a number of different
subdirectories,Notice that each of these
subdirectories is identified with a number, not
a name. These numbers correspond to the
process ID (PID) number of theassociated
process running on the system
/root
 This directory is the root user’s home directory.
Notice that it is located separately from the
home directories for other users in /home.
/sbin
 This directory contains important system
management and administration files, such as
fdisk, fsck, ifconfig, init, mkfs, shutdown, and
halt.
/srv
 This directory contains subdirectories where
services running on the system (such as httpd
and ftpd) save their files.
/sys
 This directory contains information about the
hardware in your system.
/tmp
 This directory contains temporary files created
by you or by the system.
/usr
 This directory contains application files. In fact,
most of the application files used on your
system are saved in a subdirectory of /usr
/var
 This directory contains a variety of variable
data, including your system log files
• Types of Files Used by Linux
 With a Windows file system you basically
have two entry types in the file system:
Directories & Files. You can have normal
files, hidden files, shortcut files, word
processing files, executable files, and so on.
 With Linux, however, there are a variety of
different file types used by the file system.
Linux File Types
 Regular files: These files are similar to those
used by the file systems of other operating
systems - forexample, executable files,
OpenOffice.org files, images, text
configuration files, etc.
 Links : These files are pointers that point to
other files in the file system.
Linux File Types
 FIFOs: FIFO stands for First In First Out. These
are special files used to move data from one
running process on the system to another. A FIFO
file is basically a queue where the first chunk of
data added to the queue is the first chunk of data
removed from the queue. Data can only move in
one direction through a FIFO.
 Sockets: Sockets are similar to FIFOs in that they
are used to transfer information between sockets.
With a socket, however, data can move bi-
directionally.
2. Complete Common File System
Tasks
 Navigating the file system
 Managing files and directories
 Running executable files
 Searching the file system
With Linux, however, you should become proficient
with the shell commands first and then use the GUI
utilities for convenience
 Reasons?
 Most employers and co-workers won’t take
you seriously as a Linux administrator if you
can’t use the shell prompt. It just goes with the
territory.
 Many Linux systems, especially those
deployed as servers, don’t run X Windows.
Supporting a GUI environment requires a lot of
CPU overhead. Many server admins prefer to
devote those CPU cycles to system services
instead of moving the mouse cursor on the
screen. In this situation, you need to know how
to do things from the shell prompt.
 You need to know how to complete these
tasks from the shell prompt to pass your
Linux+ exam.
• Navigating the File System
 Pwd (Present Working Directory)
 cd
 ls
Using the pwd Command
Using the cd Command
cd
 If you enter cd at the shell prompt without
specifying a path, it will automatically change
directories to the home directory of the
currently logged-in user.
Using the ls Command
ls
 –a Displays all files, including hidden files.
 –l Displays a long listing of the directory
contents. This is a very useful option. You can
use it to see the file names, ownership,
permissions, modification date, and size.
 –R Displays directory contents recursively;
that is, it displays the contents of the current
directory as well as the contents of all
subdirectories.
• Managing files and directories
 Creating files and directories
 Viewing file contents
 Deleting files and directories
 Copying and moving files and directories
 Creating links
Creating Files and Directories
touch new_file
Creating Files and Directories
mkdir new_directory
Viewing Text File Contents
 cat
 less
 head
 tail
cat
 The cat filename command will display the
specified text file on screen. This command
doesn’t pause the output, so if you use it to
view a long file, you may need to append
|more to the command to pause the output a
page a time.
less
 The less filename command can also be used
to display the specified text file on screen,
much like cat. However, the less command
automatically pauses a long text file one page
at time.
head
 The head filename command is used to
display the first couple of lines of a text file on
the screen.
tail
 The tail filename command is used to display
the last couple of lines of a text file on screen.
The tail command is particularly useful when
displaying a log file on screen. When viewing a
log file, you probably only want to see the end
of the file.
 The tail command also includes the –f option,
which is very useful. You can use this to
monitor the file specified in the command
Deleting Files and Directories
 rmdir
 rm
rmdir
 This utility can be used to delete an existing
directory. To use it, simply enter rmdir
directory_name—for example, rmdir MyFiles.
Be aware, however, that rmdir requires that
the directory be empty before it will delete it.
rm
 The rm utility is a more powerful deletion utility
that can be used to delete either a file or a
populated directory. To delete a file, simply
enter rm filename. To delete a directory, enter
rm –r directory_name.
rm
 Be careful with rm! By default, it won’t prompt
you to confirm a deletion operation. It assumes
that you really meant to delete the file or
directory. If you want rm to prompt you before
deleting a file or directory, include the –i
option.
Copying and Moving Files and
Directories
 cp
 mv
cp
 This utility is used to copy files or entire
directory structures from one location in the file
system to another. For example, to copy a file
named /tmp/schedule.txt to your home
directory, you could enter
cp /tmp/schedule.txt ~.
mv
 The mv command is used much like cp.
However, it will copy the specified file to the
new location in the file system and then delete
the original. For example, to move a file
named mylog.txt from /tmp to /var/log, you
would enter mv /tmp/mylog.txt /var/log
mv
 The mv command is also used to rename files.
Simply enter mv followed by the file to be
renamed and then the new file name. For
example, to rename schedule.txt to
schedule.old, you would enter
mv schedule.txt schedule.old.
Creating Links
 Hard
 Symbolic
Hard
 A hard link is a file that points directly to the
inode of another file. An inode stores basic
information about a file in the Linux file
system, including its size, device, owner, and
permissions. Because the two files use the
same inode, you can’t tell which file is the
pointer and which is the pointee after the hard
link is created.
Symbolic
 A symbolic link file also points to another file in
the file system. However, a file that is a
symbolic link has its own inode. Because the
pointer file has its own inode, the pointer and
the pointee in the file system can be easily
identified. For example, in the previous
chapter, you saw that the vi file is symbolic-
linked to the vim file.
syntax
ln pointee_ file pointer_file
 Using ln without any options creates a hard
link
 If you want to create a symbolic link, you use
the –s option
Running Executables
For example, you’ve used the man, vi, and cp
programs to accomplish various tasks on your
system. These programs are executable files that
exist in the Linux file system and are loaded into
memory when you call them from the shell prompt
which command
You can view all of your environment variables
by entering env |more or echo $PATH at the
shell prompt.
To add the path to the executable to your PATH
environment variable. Enter
PATH=$PATH:new_path
For example, if you wanted to add a directory
named apps in your vmk’s home directory to the
PATH variable, you would enter
PATH=$PATH:/home/vmk/apps
After adding the path, you must then export the new
variable by entering export PATH at the shell
prompt. You can then check your PATH variable by
entering echo $PATH at the shell promp
• Searching the File System
 Using find
 Using locate
 Using grep
Using find
 The find utility is fantastic tool that you can use
to search the Linux file system. To use find,
enter at the shell prompt
find path –name “filename”
 For example, suppose you wanted to find all of
the log files stored in your file system that
have a .log extension. You could enter
find / –name “*.log”
 The find utility is flexible. You can also use the
–user “username” option to search for files
owned by a specific user, or use the
–size “size” option to search for files of a
specified size.
 You can use a + sign before the size value to
search for files larger than the specified size,
or a – sign before the size value to search for
files smaller than the specified size. The find
utility has many other options
Using locate
 The locate utility functions in much the same
manner as find. However, it has one distinct
advantage over find. Whenever you execute a
search with find, it manually walks through
each directory in the path you name in the
command looking for the specified files. This
process can take some time.
locate
 Alternatively, the locate utility builds an index
of the files in the file system. Then, when you
execute a search, locate simply runs a query
of the index. It doesn’t actually search the file
system directly. The result is that locate runs
much faster than find in most situations.To use
locate, you must first install the findutils-locate
package on your system.
 With the index updated, you can search for
files by simply entering:
locate filename
at the shell prompt. For example, if you
wanted to search for a file named snmpd.conf,
you could enter locate snmpd.conf
Using grep
 Linux also provides a utility called grep that you
can use to search for content within a file. Using
grep, you can search through a file for a
particular text string. To use grep, you would
enter grep search_text file. For example, let’s
suppose you want to want to search through
your /var/log/messages file for any log entries
related to the VNC service running on your
Linux system. You would enter
grep vnc /var/log/messages
grep
options:
 –i Ignores case when searching for the
search text.
 –l Doesn’t display the actual matching line of
text. Only displays the names of the files that
contain the matching text.
 –r Searches recursively through
subdirectories of the path specified.
3. Manage Disk Partitions
 Using fdisk to create disk partitions
 Building a file system with mkfs
 Mounting a partition with mount
 Checking the file system with fsck
• Using fdisk to Create Disk Partitions
The fdisk utility is used from the command line to
create or delete partitions at the shell prompt. To
use fdisk to create a new partition, first open a
terminal session. Then, at the shell prompt, change
to your root account by entering su – followed by
your root user’s password.
fdisk
At the shell prompt, enter fdisk device. For example,
if you wanted to create a partition on the third SCSI
hard disk in your system, you would enter
fdisk /dev/sdc
With fdisk running, you have a Command:
prompt that you can use to enter fdisk
commands
Before creating a partition, you should press P to
view any existing partitions on the disk. This will
help you determine if there is sufficient space and, if
there is, what number must be assigned to a new
partition created on the disk.
To create a new partition, you press N.
You can then specify whether you want to create a
primary disk partition or an extended disk partition.
To create a primary partition, press P when
prompted.
To create an extended partition, press E
For example: You could press T and specify a
partition ID of 82 if you wanted to change the
partition to a swap partition.
• Building a file system with mkfs
 Even though we’ve created a partition
with fdisk, we can’t use it yet. That’s
because it hasn’t been formatted with a
file system yet. This is accomplished
using one of the following commands:
 mkfs
 mkreiserfs
mkfs
 This utility is used to make an ext2 or ext3 file
system on a partition. You can even use it to
create a FAT file system on the partition (which
is used by Windows and DOS). You specify
which file system you want to use by entering
the –t option and the type of file system. For
example, if you wanted to create an ext3 file
system on the first partition on your third SCSI
hard disk drive in your system, you would
enter mkfs –t ext3 /dev/sdc1
mkreiserfs
 This utility is used to make a Reiser file
system on a partition. For example, if you
wanted to create a Reiser file system on the
first partition on your third SCSI hard drive in
your system, you would enter
mkreiserfs /dev/sdc1
When you do, a screen is displayed and a
proposal is presented. Many of these
parameters can be customized using
mkreiserfs options.
• Mounting a Partition with mount
One of the key differences between Linux and other
operating systems (such as Windows) is the fact
that you need to mount a file system before you can
use it. This is another one of those “gotchas” that
trip up new Linux administrators. You even
have to mount CDs, DVDs, and floppies before you
can use them!
Such as Windows, reference partitions on the
disk using a drive letter, such as C: or D ...
Not so with Linux! Linux instead uses a virtual file
system (VFS) that creates a single hierarchy that
encompasses all partitions on all storage devices in
the system. Switching to the directory where the
partition is mounted switches you to that partition.
mount
To use mount to mount a partition, first switch to
your root account using su. Then enter
mount –t file_system_type device mount_point
at the shell prompt. For example,
mount –t reiserfs /dev/sdc1 /mnt/extraspace
If you don’t know what type of file system is used by the
partition, you can use the –a option with mount instead of
–t. This will cause mount to try to mount the partition using
all supported file system types until one is successful.
umount
If, for some reason, you wanted to unmount a
partition, you can use the umount command. To
umount a partition, simply enter umount followed by
the device or the mount directory for the partition.
For example,
umount /dev/sdc1
or
umount /mnt/extraspace.
You can also use command-line utilities to create
and mount swap partitions on your Linux system.
You can create swap partitions using the mkswap
command. First, create the partition that will be
used as a swap partition using fdisk. Then enter
mkswap device at the shell prompt. For example, to
covert the second partition on the second IDE hard
drive in your system to a swap partition, you would
enter mkswap /dev/hdb2 at the shell prompt. After
converting the partition to a swap partition, you
need to enable it using the /sbin/swapon command.
• Checking the File System with fsck
Syntax: fsck device
For example if you wanted to check the file system
on the first partition of the third SCSI hard drive in
your system, you would enter fsck /dev/sdc1. The
utility will then check the file system and report any
errors encountered (or the lack thereof)
4. Use Removable Media
 Working with floppies
 Working with optical devices
 Working with USB and FireWire devices
• Working with Floppies
Syntax: mount –t vfat device mount_point
On other distributions, such as Red Hat or Fedora,
the default mount point for floppy diskettes is
/mnt/floppy
EX: mount –t vfat /dev/fd0 /media/floppy
Therefore, you can simply enter mount /dev/fd0 at
the shell prompt and the floppy will be automatically
mounted using these parameters.
Before you remove a mounted floppy diskette from
a drive, you must also unmount it. Just as with
partitions, this is done using the umount command.
To unmount a floppy, you enter umount device or
umount mount_point. For example, to unmount your
A: drive, you would enter umount /dev/fd0
• Working with Optical Devices
/media/cdrom
/media/cdrecorder
/media/dvd
On distributions such as Red Hat or Fedora, your
directories for mounting optical
devices are located in /mnt.
To mount a CD on a Linux system, insert it in your
CD drive. Change to your root account and then
enter mount –t iso9660 device mount_point. For
example, mount –t iso9660 /dev/hdc /media/cdrom
As with any mounted file system, you should use
umount to unmount a CD or DVD before ejecting it.
• Working with USB and FireWire
Devices
mount –t auto device mount_point
ex:
mount –t auto /dev/sdd /media/ THUMBDRIVE
5. Back Up Data
 Selecting a backup medium
 Selecting a backup strategy
 Using Linux backup utilities
• Selecting a Backup Medium
 “old days”: floppies or a tape drive
 Today, USB or FireWire hard drive
• Selecting a Backup Strategy
 Selecting a backup type
 Selecting a backup schedule
 Determining what to back up
Selecting a Backup Type
 Full
 Incremental: During an incremental backup,
only the files that have been modified since
the last backup (full or incremental) are
backed up. After being backed up, each file is
flagged as having been backed up.
 Differential: only the files that have been
modified since the last full backup are backed
up
Selecting a Backup Schedule
 You can use whatever backup schedule works
best for you. However, most admins work on a
weekly rotation, as discussed previously. Pick
one day for your full backup and then the
remaining days of the week for your incremental
or differential backups. You should also
schedule your backups to occur when the load
on the system is at its lightest. Late in the
evening or in the early morning are usually best,
depending on your organization’s schedule.
Determining What to Back Up
 /etc
 /home
 /opt
 /root
 /var
 /srv
• Using Linux Backup Utilities
 Using tar
 Using cpio
Using tar
 The tar utility has been around for a very long
time and is a very commonly used Linux
backup tool. The acronym “tar” stands for tape
archive. The tar utility takes a list of specified
files and copies them into a single archive file
(.tar). The .tar file can then be compressed
with the gzip utility on your Linux system,
resulting in a file with a .tar.gz extension.
tar
 Syntax: tar –cvf filename directory
 The –c option tells tar to create a new archive.
 The –v option tells tar to work in verbose
mode, displaying each file being backed up on
screen.
 The –f option specifies the name of the tar
archive to be created.
 Ex: tar –cvf /media/usb/backup.tar /home
 To restore a tar archive, simply enter
tar –xvf filename
ex: tar –xvf /media/usb/backup.tar
 If the archive has been zipped, you can also
use the –z option to unzip the archive before
extracting it
Using cpio
 The cpio utility can also be used to make archive
files just like tar. A key difference between tar and
cpio is the fact that you must provide cpio with a
list of files and directories to back up from the
standard input
 Syntax: cpio -ov file,directory > file.cpio
 The –o option tells cpio to create a new archive.
The –v option simply tells cpio to run verbosely,
displaying the name of each file and directory as
it’s processed
 we could extract the archive we just created
by entering cpio –iv < file.cpio

More Related Content

Similar to linux-file-system01.ppt

Linux file system nevigation
Linux file system nevigationLinux file system nevigation
Linux file system nevigation
hetaldobariya
 
Linux 4 you
Linux 4 youLinux 4 you
Linux 4 you
Shashwat Shriparv
 
UNIX.pptx
UNIX.pptxUNIX.pptx
UNIX.pptx
P S Rani
 
Unix/Linux Basic Commands and Shell Script
Unix/Linux Basic Commands and Shell ScriptUnix/Linux Basic Commands and Shell Script
Unix/Linux Basic Commands and Shell Script
sbmguys
 
linux-lecture4.ppt
linux-lecture4.pptlinux-lecture4.ppt
linux-lecture4.ppt
LuigysToro
 
Linux commands and file structure
Linux commands and file structureLinux commands and file structure
Linux commands and file structure
Sreenatha Reddy K R
 
Linux administration training
Linux administration trainingLinux administration training
Linux administration training
iman darabi
 
Linux standard file system
Linux standard file systemLinux standard file system
Linux standard file system
Taaanu01
 
Linux introduction-commands2338
Linux introduction-commands2338Linux introduction-commands2338
Linux introduction-commands2338Cam YP Co., Ltd
 
Linux introduction-commands2338
Linux introduction-commands2338Linux introduction-commands2338
Linux introduction-commands2338
Cam YP Co., Ltd
 
Linux Introduction (Commands)
Linux Introduction (Commands)Linux Introduction (Commands)
Linux Introduction (Commands)
anandvaidya
 
LinuxLabBasics.ppt
LinuxLabBasics.pptLinuxLabBasics.ppt
LinuxLabBasics.ppt
CharuJain396881
 
Introduction to linux day1
Introduction to linux day1Introduction to linux day1
Introduction to linux day1
UtpalenduChakrobortt1
 
Unix training session 1
Unix training   session 1Unix training   session 1
Unix training session 1
Anil Kumar Kapil,PMP®
 
Programming Embedded linux
Programming Embedded linuxProgramming Embedded linux
Programming Embedded linux
Liran Ben Haim
 
File system hiearchy
File system hiearchyFile system hiearchy
File system hiearchy
sritolia
 
Linux File System.docx
Linux File System.docxLinux File System.docx
Linux File System.docx
BhuvanaR13
 

Similar to linux-file-system01.ppt (20)

Linux file system nevigation
Linux file system nevigationLinux file system nevigation
Linux file system nevigation
 
Linux 4 you
Linux 4 youLinux 4 you
Linux 4 you
 
UNIX.pptx
UNIX.pptxUNIX.pptx
UNIX.pptx
 
Linux ppt
Linux pptLinux ppt
Linux ppt
 
Unix/Linux Basic Commands and Shell Script
Unix/Linux Basic Commands and Shell ScriptUnix/Linux Basic Commands and Shell Script
Unix/Linux Basic Commands and Shell Script
 
linux-lecture4.ppt
linux-lecture4.pptlinux-lecture4.ppt
linux-lecture4.ppt
 
Linux commands and file structure
Linux commands and file structureLinux commands and file structure
Linux commands and file structure
 
Linux administration training
Linux administration trainingLinux administration training
Linux administration training
 
Linux standard file system
Linux standard file systemLinux standard file system
Linux standard file system
 
Linux introduction-commands2338
Linux introduction-commands2338Linux introduction-commands2338
Linux introduction-commands2338
 
Linux introduction-commands2338
Linux introduction-commands2338Linux introduction-commands2338
Linux introduction-commands2338
 
Linux Introduction (Commands)
Linux Introduction (Commands)Linux Introduction (Commands)
Linux Introduction (Commands)
 
LinuxLabBasics.ppt
LinuxLabBasics.pptLinuxLabBasics.ppt
LinuxLabBasics.ppt
 
Introduction to linux day1
Introduction to linux day1Introduction to linux day1
Introduction to linux day1
 
Unix training session 1
Unix training   session 1Unix training   session 1
Unix training session 1
 
Programming Embedded linux
Programming Embedded linuxProgramming Embedded linux
Programming Embedded linux
 
File system hiearchy
File system hiearchyFile system hiearchy
File system hiearchy
 
Tutorial 2
Tutorial 2Tutorial 2
Tutorial 2
 
Linux File System.docx
Linux File System.docxLinux File System.docx
Linux File System.docx
 
Linux Presentation
Linux PresentationLinux Presentation
Linux Presentation
 

Recently uploaded

Navigating the Metaverse: A Journey into Virtual Evolution"
Navigating the Metaverse: A Journey into Virtual Evolution"Navigating the Metaverse: A Journey into Virtual Evolution"
Navigating the Metaverse: A Journey into Virtual Evolution"
Donna Lenk
 
BoxLang: Review our Visionary Licenses of 2024
BoxLang: Review our Visionary Licenses of 2024BoxLang: Review our Visionary Licenses of 2024
BoxLang: Review our Visionary Licenses of 2024
Ortus Solutions, Corp
 
In 2015, I used to write extensions for Joomla, WordPress, phpBB3, etc and I ...
In 2015, I used to write extensions for Joomla, WordPress, phpBB3, etc and I ...In 2015, I used to write extensions for Joomla, WordPress, phpBB3, etc and I ...
In 2015, I used to write extensions for Joomla, WordPress, phpBB3, etc and I ...
Juraj Vysvader
 
Globus Connect Server Deep Dive - GlobusWorld 2024
Globus Connect Server Deep Dive - GlobusWorld 2024Globus Connect Server Deep Dive - GlobusWorld 2024
Globus Connect Server Deep Dive - GlobusWorld 2024
Globus
 
SOCRadar Research Team: Latest Activities of IntelBroker
SOCRadar Research Team: Latest Activities of IntelBrokerSOCRadar Research Team: Latest Activities of IntelBroker
SOCRadar Research Team: Latest Activities of IntelBroker
SOCRadar
 
Understanding Globus Data Transfers with NetSage
Understanding Globus Data Transfers with NetSageUnderstanding Globus Data Transfers with NetSage
Understanding Globus Data Transfers with NetSage
Globus
 
Prosigns: Transforming Business with Tailored Technology Solutions
Prosigns: Transforming Business with Tailored Technology SolutionsProsigns: Transforming Business with Tailored Technology Solutions
Prosigns: Transforming Business with Tailored Technology Solutions
Prosigns
 
top nidhi software solution freedownload
top nidhi software solution freedownloadtop nidhi software solution freedownload
top nidhi software solution freedownload
vrstrong314
 
Lecture 1 Introduction to games development
Lecture 1 Introduction to games developmentLecture 1 Introduction to games development
Lecture 1 Introduction to games development
abdulrafaychaudhry
 
Globus Compute Introduction - GlobusWorld 2024
Globus Compute Introduction - GlobusWorld 2024Globus Compute Introduction - GlobusWorld 2024
Globus Compute Introduction - GlobusWorld 2024
Globus
 
Quarkus Hidden and Forbidden Extensions
Quarkus Hidden and Forbidden ExtensionsQuarkus Hidden and Forbidden Extensions
Quarkus Hidden and Forbidden Extensions
Max Andersen
 
Accelerate Enterprise Software Engineering with Platformless
Accelerate Enterprise Software Engineering with PlatformlessAccelerate Enterprise Software Engineering with Platformless
Accelerate Enterprise Software Engineering with Platformless
WSO2
 
Innovating Inference - Remote Triggering of Large Language Models on HPC Clus...
Innovating Inference - Remote Triggering of Large Language Models on HPC Clus...Innovating Inference - Remote Triggering of Large Language Models on HPC Clus...
Innovating Inference - Remote Triggering of Large Language Models on HPC Clus...
Globus
 
Climate Science Flows: Enabling Petabyte-Scale Climate Analysis with the Eart...
Climate Science Flows: Enabling Petabyte-Scale Climate Analysis with the Eart...Climate Science Flows: Enabling Petabyte-Scale Climate Analysis with the Eart...
Climate Science Flows: Enabling Petabyte-Scale Climate Analysis with the Eart...
Globus
 
Large Language Models and the End of Programming
Large Language Models and the End of ProgrammingLarge Language Models and the End of Programming
Large Language Models and the End of Programming
Matt Welsh
 
Enhancing Project Management Efficiency_ Leveraging AI Tools like ChatGPT.pdf
Enhancing Project Management Efficiency_ Leveraging AI Tools like ChatGPT.pdfEnhancing Project Management Efficiency_ Leveraging AI Tools like ChatGPT.pdf
Enhancing Project Management Efficiency_ Leveraging AI Tools like ChatGPT.pdf
Jay Das
 
AI Pilot Review: The World’s First Virtual Assistant Marketing Suite
AI Pilot Review: The World’s First Virtual Assistant Marketing SuiteAI Pilot Review: The World’s First Virtual Assistant Marketing Suite
AI Pilot Review: The World’s First Virtual Assistant Marketing Suite
Google
 
Graphic Design Crash Course for beginners
Graphic Design Crash Course for beginnersGraphic Design Crash Course for beginners
Graphic Design Crash Course for beginners
e20449
 
How Recreation Management Software Can Streamline Your Operations.pptx
How Recreation Management Software Can Streamline Your Operations.pptxHow Recreation Management Software Can Streamline Your Operations.pptx
How Recreation Management Software Can Streamline Your Operations.pptx
wottaspaceseo
 
Cyaniclab : Software Development Agency Portfolio.pdf
Cyaniclab : Software Development Agency Portfolio.pdfCyaniclab : Software Development Agency Portfolio.pdf
Cyaniclab : Software Development Agency Portfolio.pdf
Cyanic lab
 

Recently uploaded (20)

Navigating the Metaverse: A Journey into Virtual Evolution"
Navigating the Metaverse: A Journey into Virtual Evolution"Navigating the Metaverse: A Journey into Virtual Evolution"
Navigating the Metaverse: A Journey into Virtual Evolution"
 
BoxLang: Review our Visionary Licenses of 2024
BoxLang: Review our Visionary Licenses of 2024BoxLang: Review our Visionary Licenses of 2024
BoxLang: Review our Visionary Licenses of 2024
 
In 2015, I used to write extensions for Joomla, WordPress, phpBB3, etc and I ...
In 2015, I used to write extensions for Joomla, WordPress, phpBB3, etc and I ...In 2015, I used to write extensions for Joomla, WordPress, phpBB3, etc and I ...
In 2015, I used to write extensions for Joomla, WordPress, phpBB3, etc and I ...
 
Globus Connect Server Deep Dive - GlobusWorld 2024
Globus Connect Server Deep Dive - GlobusWorld 2024Globus Connect Server Deep Dive - GlobusWorld 2024
Globus Connect Server Deep Dive - GlobusWorld 2024
 
SOCRadar Research Team: Latest Activities of IntelBroker
SOCRadar Research Team: Latest Activities of IntelBrokerSOCRadar Research Team: Latest Activities of IntelBroker
SOCRadar Research Team: Latest Activities of IntelBroker
 
Understanding Globus Data Transfers with NetSage
Understanding Globus Data Transfers with NetSageUnderstanding Globus Data Transfers with NetSage
Understanding Globus Data Transfers with NetSage
 
Prosigns: Transforming Business with Tailored Technology Solutions
Prosigns: Transforming Business with Tailored Technology SolutionsProsigns: Transforming Business with Tailored Technology Solutions
Prosigns: Transforming Business with Tailored Technology Solutions
 
top nidhi software solution freedownload
top nidhi software solution freedownloadtop nidhi software solution freedownload
top nidhi software solution freedownload
 
Lecture 1 Introduction to games development
Lecture 1 Introduction to games developmentLecture 1 Introduction to games development
Lecture 1 Introduction to games development
 
Globus Compute Introduction - GlobusWorld 2024
Globus Compute Introduction - GlobusWorld 2024Globus Compute Introduction - GlobusWorld 2024
Globus Compute Introduction - GlobusWorld 2024
 
Quarkus Hidden and Forbidden Extensions
Quarkus Hidden and Forbidden ExtensionsQuarkus Hidden and Forbidden Extensions
Quarkus Hidden and Forbidden Extensions
 
Accelerate Enterprise Software Engineering with Platformless
Accelerate Enterprise Software Engineering with PlatformlessAccelerate Enterprise Software Engineering with Platformless
Accelerate Enterprise Software Engineering with Platformless
 
Innovating Inference - Remote Triggering of Large Language Models on HPC Clus...
Innovating Inference - Remote Triggering of Large Language Models on HPC Clus...Innovating Inference - Remote Triggering of Large Language Models on HPC Clus...
Innovating Inference - Remote Triggering of Large Language Models on HPC Clus...
 
Climate Science Flows: Enabling Petabyte-Scale Climate Analysis with the Eart...
Climate Science Flows: Enabling Petabyte-Scale Climate Analysis with the Eart...Climate Science Flows: Enabling Petabyte-Scale Climate Analysis with the Eart...
Climate Science Flows: Enabling Petabyte-Scale Climate Analysis with the Eart...
 
Large Language Models and the End of Programming
Large Language Models and the End of ProgrammingLarge Language Models and the End of Programming
Large Language Models and the End of Programming
 
Enhancing Project Management Efficiency_ Leveraging AI Tools like ChatGPT.pdf
Enhancing Project Management Efficiency_ Leveraging AI Tools like ChatGPT.pdfEnhancing Project Management Efficiency_ Leveraging AI Tools like ChatGPT.pdf
Enhancing Project Management Efficiency_ Leveraging AI Tools like ChatGPT.pdf
 
AI Pilot Review: The World’s First Virtual Assistant Marketing Suite
AI Pilot Review: The World’s First Virtual Assistant Marketing SuiteAI Pilot Review: The World’s First Virtual Assistant Marketing Suite
AI Pilot Review: The World’s First Virtual Assistant Marketing Suite
 
Graphic Design Crash Course for beginners
Graphic Design Crash Course for beginnersGraphic Design Crash Course for beginners
Graphic Design Crash Course for beginners
 
How Recreation Management Software Can Streamline Your Operations.pptx
How Recreation Management Software Can Streamline Your Operations.pptxHow Recreation Management Software Can Streamline Your Operations.pptx
How Recreation Management Software Can Streamline Your Operations.pptx
 
Cyaniclab : Software Development Agency Portfolio.pdf
Cyaniclab : Software Development Agency Portfolio.pdfCyaniclab : Software Development Agency Portfolio.pdf
Cyaniclab : Software Development Agency Portfolio.pdf
 

linux-file-system01.ppt

  • 1. Managing the Linux file system
  • 2. Managing the Linux file system 1. Describe the Linux file system 2. Complete common file system tasks 3. Manage disk partitions 4. Use removable media 5. Back up data
  • 3. 1. Describe the Linux file system - The Role of the Linux File System - The Hierarchical Structure of the Linux File System - Types of Files Used by Linux
  • 4. • The Role of the Linux File System - The data is organized and can be easily located . - The data can be easily retrieved at any later point in time -The integrity of the data is preserved
  • 5. • The Hierarchical Structure of the Linux File System
  • 6. Notice that the topmost directory in the structure is the / directory, also called the root directory.  Beneath the root directory are a series of subdirectories. Specifications for how these directories are to be named are contained in the File system Hierarchy Standard (FHS)
  • 7. /bin  This directory contains executable files necessary to manage and run the Linux system, including shells (such as bash) and file system management utilities such as cp and rm.
  • 8. /boot  This directory contains your bootloader files, which are required to boot your system
  • 9. /dev  This directory contains special files that are used to represent the various hardware devices installed in the system  EX: hda, hdb ...
  • 10. /etc  This directory contains text-based configuration files used by the system as well as services running on the system. You can edit these files with a text editor to customize how Linux behaves
  • 11. /home  This directory contains subdirectories that serve as home directories for each user account on your Linux system.
  • 12. /lib  This directory contains code libraries used by programs in /bin and /sbin. Your kernel modules are also stored in the modules subdirectory of /lib.
  • 13. /media  This directory is used by some Linux distributions (such as SUSE Linux) to mount external devices, including CD drives, DVD drives, and floppy drives.
  • 14. /mnt  This directory is used by some Linux distributions (such as Fedora or Red Hat) to mount external devices, including CD drives, DVD drives, and floppy drives
  • 15. /opt  This directory contains files for some programs you install on the system
  • 16. /proc  This directory is a little different from the other directories in this list.  /proc doesn’t actually exist in the file system  Within /proc are a number of different subdirectories,Notice that each of these subdirectories is identified with a number, not a name. These numbers correspond to the process ID (PID) number of theassociated process running on the system
  • 17. /root  This directory is the root user’s home directory. Notice that it is located separately from the home directories for other users in /home.
  • 18. /sbin  This directory contains important system management and administration files, such as fdisk, fsck, ifconfig, init, mkfs, shutdown, and halt.
  • 19. /srv  This directory contains subdirectories where services running on the system (such as httpd and ftpd) save their files.
  • 20. /sys  This directory contains information about the hardware in your system.
  • 21. /tmp  This directory contains temporary files created by you or by the system.
  • 22. /usr  This directory contains application files. In fact, most of the application files used on your system are saved in a subdirectory of /usr
  • 23. /var  This directory contains a variety of variable data, including your system log files
  • 24. • Types of Files Used by Linux  With a Windows file system you basically have two entry types in the file system: Directories & Files. You can have normal files, hidden files, shortcut files, word processing files, executable files, and so on.  With Linux, however, there are a variety of different file types used by the file system.
  • 25. Linux File Types  Regular files: These files are similar to those used by the file systems of other operating systems - forexample, executable files, OpenOffice.org files, images, text configuration files, etc.  Links : These files are pointers that point to other files in the file system.
  • 26. Linux File Types  FIFOs: FIFO stands for First In First Out. These are special files used to move data from one running process on the system to another. A FIFO file is basically a queue where the first chunk of data added to the queue is the first chunk of data removed from the queue. Data can only move in one direction through a FIFO.  Sockets: Sockets are similar to FIFOs in that they are used to transfer information between sockets. With a socket, however, data can move bi- directionally.
  • 27. 2. Complete Common File System Tasks  Navigating the file system  Managing files and directories  Running executable files  Searching the file system
  • 28. With Linux, however, you should become proficient with the shell commands first and then use the GUI utilities for convenience  Reasons?  Most employers and co-workers won’t take you seriously as a Linux administrator if you can’t use the shell prompt. It just goes with the territory.
  • 29.  Many Linux systems, especially those deployed as servers, don’t run X Windows. Supporting a GUI environment requires a lot of CPU overhead. Many server admins prefer to devote those CPU cycles to system services instead of moving the mouse cursor on the screen. In this situation, you need to know how to do things from the shell prompt.  You need to know how to complete these tasks from the shell prompt to pass your Linux+ exam.
  • 30. • Navigating the File System  Pwd (Present Working Directory)  cd  ls
  • 31. Using the pwd Command
  • 32. Using the cd Command
  • 33. cd  If you enter cd at the shell prompt without specifying a path, it will automatically change directories to the home directory of the currently logged-in user.
  • 34. Using the ls Command
  • 35. ls  –a Displays all files, including hidden files.  –l Displays a long listing of the directory contents. This is a very useful option. You can use it to see the file names, ownership, permissions, modification date, and size.  –R Displays directory contents recursively; that is, it displays the contents of the current directory as well as the contents of all subdirectories.
  • 36. • Managing files and directories  Creating files and directories  Viewing file contents  Deleting files and directories  Copying and moving files and directories  Creating links
  • 37. Creating Files and Directories touch new_file
  • 38. Creating Files and Directories mkdir new_directory
  • 39. Viewing Text File Contents  cat  less  head  tail
  • 40. cat  The cat filename command will display the specified text file on screen. This command doesn’t pause the output, so if you use it to view a long file, you may need to append |more to the command to pause the output a page a time.
  • 41. less  The less filename command can also be used to display the specified text file on screen, much like cat. However, the less command automatically pauses a long text file one page at time.
  • 42. head  The head filename command is used to display the first couple of lines of a text file on the screen.
  • 43. tail  The tail filename command is used to display the last couple of lines of a text file on screen. The tail command is particularly useful when displaying a log file on screen. When viewing a log file, you probably only want to see the end of the file.  The tail command also includes the –f option, which is very useful. You can use this to monitor the file specified in the command
  • 44. Deleting Files and Directories  rmdir  rm
  • 45. rmdir  This utility can be used to delete an existing directory. To use it, simply enter rmdir directory_name—for example, rmdir MyFiles. Be aware, however, that rmdir requires that the directory be empty before it will delete it.
  • 46. rm  The rm utility is a more powerful deletion utility that can be used to delete either a file or a populated directory. To delete a file, simply enter rm filename. To delete a directory, enter rm –r directory_name.
  • 47. rm  Be careful with rm! By default, it won’t prompt you to confirm a deletion operation. It assumes that you really meant to delete the file or directory. If you want rm to prompt you before deleting a file or directory, include the –i option.
  • 48. Copying and Moving Files and Directories  cp  mv
  • 49. cp  This utility is used to copy files or entire directory structures from one location in the file system to another. For example, to copy a file named /tmp/schedule.txt to your home directory, you could enter cp /tmp/schedule.txt ~.
  • 50. mv  The mv command is used much like cp. However, it will copy the specified file to the new location in the file system and then delete the original. For example, to move a file named mylog.txt from /tmp to /var/log, you would enter mv /tmp/mylog.txt /var/log
  • 51. mv  The mv command is also used to rename files. Simply enter mv followed by the file to be renamed and then the new file name. For example, to rename schedule.txt to schedule.old, you would enter mv schedule.txt schedule.old.
  • 53. Hard  A hard link is a file that points directly to the inode of another file. An inode stores basic information about a file in the Linux file system, including its size, device, owner, and permissions. Because the two files use the same inode, you can’t tell which file is the pointer and which is the pointee after the hard link is created.
  • 54. Symbolic  A symbolic link file also points to another file in the file system. However, a file that is a symbolic link has its own inode. Because the pointer file has its own inode, the pointer and the pointee in the file system can be easily identified. For example, in the previous chapter, you saw that the vi file is symbolic- linked to the vim file.
  • 55. syntax ln pointee_ file pointer_file  Using ln without any options creates a hard link  If you want to create a symbolic link, you use the –s option
  • 56. Running Executables For example, you’ve used the man, vi, and cp programs to accomplish various tasks on your system. These programs are executable files that exist in the Linux file system and are loaded into memory when you call them from the shell prompt which command
  • 57. You can view all of your environment variables by entering env |more or echo $PATH at the shell prompt. To add the path to the executable to your PATH environment variable. Enter PATH=$PATH:new_path
  • 58. For example, if you wanted to add a directory named apps in your vmk’s home directory to the PATH variable, you would enter PATH=$PATH:/home/vmk/apps After adding the path, you must then export the new variable by entering export PATH at the shell prompt. You can then check your PATH variable by entering echo $PATH at the shell promp
  • 59. • Searching the File System  Using find  Using locate  Using grep
  • 60. Using find  The find utility is fantastic tool that you can use to search the Linux file system. To use find, enter at the shell prompt find path –name “filename”  For example, suppose you wanted to find all of the log files stored in your file system that have a .log extension. You could enter find / –name “*.log”
  • 61.  The find utility is flexible. You can also use the –user “username” option to search for files owned by a specific user, or use the –size “size” option to search for files of a specified size.  You can use a + sign before the size value to search for files larger than the specified size, or a – sign before the size value to search for files smaller than the specified size. The find utility has many other options
  • 62. Using locate  The locate utility functions in much the same manner as find. However, it has one distinct advantage over find. Whenever you execute a search with find, it manually walks through each directory in the path you name in the command looking for the specified files. This process can take some time.
  • 63. locate  Alternatively, the locate utility builds an index of the files in the file system. Then, when you execute a search, locate simply runs a query of the index. It doesn’t actually search the file system directly. The result is that locate runs much faster than find in most situations.To use locate, you must first install the findutils-locate package on your system.
  • 64.  With the index updated, you can search for files by simply entering: locate filename at the shell prompt. For example, if you wanted to search for a file named snmpd.conf, you could enter locate snmpd.conf
  • 65. Using grep  Linux also provides a utility called grep that you can use to search for content within a file. Using grep, you can search through a file for a particular text string. To use grep, you would enter grep search_text file. For example, let’s suppose you want to want to search through your /var/log/messages file for any log entries related to the VNC service running on your Linux system. You would enter grep vnc /var/log/messages
  • 66. grep options:  –i Ignores case when searching for the search text.  –l Doesn’t display the actual matching line of text. Only displays the names of the files that contain the matching text.  –r Searches recursively through subdirectories of the path specified.
  • 67. 3. Manage Disk Partitions  Using fdisk to create disk partitions  Building a file system with mkfs  Mounting a partition with mount  Checking the file system with fsck
  • 68. • Using fdisk to Create Disk Partitions The fdisk utility is used from the command line to create or delete partitions at the shell prompt. To use fdisk to create a new partition, first open a terminal session. Then, at the shell prompt, change to your root account by entering su – followed by your root user’s password.
  • 69. fdisk At the shell prompt, enter fdisk device. For example, if you wanted to create a partition on the third SCSI hard disk in your system, you would enter fdisk /dev/sdc
  • 70.
  • 71. With fdisk running, you have a Command: prompt that you can use to enter fdisk commands
  • 72. Before creating a partition, you should press P to view any existing partitions on the disk. This will help you determine if there is sufficient space and, if there is, what number must be assigned to a new partition created on the disk. To create a new partition, you press N. You can then specify whether you want to create a primary disk partition or an extended disk partition.
  • 73. To create a primary partition, press P when prompted. To create an extended partition, press E For example: You could press T and specify a partition ID of 82 if you wanted to change the partition to a swap partition.
  • 74. • Building a file system with mkfs  Even though we’ve created a partition with fdisk, we can’t use it yet. That’s because it hasn’t been formatted with a file system yet. This is accomplished using one of the following commands:  mkfs  mkreiserfs
  • 75. mkfs  This utility is used to make an ext2 or ext3 file system on a partition. You can even use it to create a FAT file system on the partition (which is used by Windows and DOS). You specify which file system you want to use by entering the –t option and the type of file system. For example, if you wanted to create an ext3 file system on the first partition on your third SCSI hard disk drive in your system, you would enter mkfs –t ext3 /dev/sdc1
  • 76. mkreiserfs  This utility is used to make a Reiser file system on a partition. For example, if you wanted to create a Reiser file system on the first partition on your third SCSI hard drive in your system, you would enter mkreiserfs /dev/sdc1 When you do, a screen is displayed and a proposal is presented. Many of these parameters can be customized using mkreiserfs options.
  • 77. • Mounting a Partition with mount One of the key differences between Linux and other operating systems (such as Windows) is the fact that you need to mount a file system before you can use it. This is another one of those “gotchas” that trip up new Linux administrators. You even have to mount CDs, DVDs, and floppies before you can use them!
  • 78. Such as Windows, reference partitions on the disk using a drive letter, such as C: or D ... Not so with Linux! Linux instead uses a virtual file system (VFS) that creates a single hierarchy that encompasses all partitions on all storage devices in the system. Switching to the directory where the partition is mounted switches you to that partition.
  • 79. mount To use mount to mount a partition, first switch to your root account using su. Then enter mount –t file_system_type device mount_point at the shell prompt. For example, mount –t reiserfs /dev/sdc1 /mnt/extraspace If you don’t know what type of file system is used by the partition, you can use the –a option with mount instead of –t. This will cause mount to try to mount the partition using all supported file system types until one is successful.
  • 80. umount If, for some reason, you wanted to unmount a partition, you can use the umount command. To umount a partition, simply enter umount followed by the device or the mount directory for the partition. For example, umount /dev/sdc1 or umount /mnt/extraspace.
  • 81. You can also use command-line utilities to create and mount swap partitions on your Linux system. You can create swap partitions using the mkswap command. First, create the partition that will be used as a swap partition using fdisk. Then enter mkswap device at the shell prompt. For example, to covert the second partition on the second IDE hard drive in your system to a swap partition, you would enter mkswap /dev/hdb2 at the shell prompt. After converting the partition to a swap partition, you need to enable it using the /sbin/swapon command.
  • 82. • Checking the File System with fsck Syntax: fsck device For example if you wanted to check the file system on the first partition of the third SCSI hard drive in your system, you would enter fsck /dev/sdc1. The utility will then check the file system and report any errors encountered (or the lack thereof)
  • 83. 4. Use Removable Media  Working with floppies  Working with optical devices  Working with USB and FireWire devices
  • 84. • Working with Floppies Syntax: mount –t vfat device mount_point On other distributions, such as Red Hat or Fedora, the default mount point for floppy diskettes is /mnt/floppy EX: mount –t vfat /dev/fd0 /media/floppy
  • 85. Therefore, you can simply enter mount /dev/fd0 at the shell prompt and the floppy will be automatically mounted using these parameters. Before you remove a mounted floppy diskette from a drive, you must also unmount it. Just as with partitions, this is done using the umount command. To unmount a floppy, you enter umount device or umount mount_point. For example, to unmount your A: drive, you would enter umount /dev/fd0
  • 86. • Working with Optical Devices /media/cdrom /media/cdrecorder /media/dvd
  • 87. On distributions such as Red Hat or Fedora, your directories for mounting optical devices are located in /mnt. To mount a CD on a Linux system, insert it in your CD drive. Change to your root account and then enter mount –t iso9660 device mount_point. For example, mount –t iso9660 /dev/hdc /media/cdrom As with any mounted file system, you should use umount to unmount a CD or DVD before ejecting it.
  • 88. • Working with USB and FireWire Devices mount –t auto device mount_point ex: mount –t auto /dev/sdd /media/ THUMBDRIVE
  • 89. 5. Back Up Data  Selecting a backup medium  Selecting a backup strategy  Using Linux backup utilities
  • 90. • Selecting a Backup Medium  “old days”: floppies or a tape drive  Today, USB or FireWire hard drive
  • 91. • Selecting a Backup Strategy  Selecting a backup type  Selecting a backup schedule  Determining what to back up
  • 92. Selecting a Backup Type  Full  Incremental: During an incremental backup, only the files that have been modified since the last backup (full or incremental) are backed up. After being backed up, each file is flagged as having been backed up.  Differential: only the files that have been modified since the last full backup are backed up
  • 93. Selecting a Backup Schedule  You can use whatever backup schedule works best for you. However, most admins work on a weekly rotation, as discussed previously. Pick one day for your full backup and then the remaining days of the week for your incremental or differential backups. You should also schedule your backups to occur when the load on the system is at its lightest. Late in the evening or in the early morning are usually best, depending on your organization’s schedule.
  • 94. Determining What to Back Up  /etc  /home  /opt  /root  /var  /srv
  • 95. • Using Linux Backup Utilities  Using tar  Using cpio
  • 96. Using tar  The tar utility has been around for a very long time and is a very commonly used Linux backup tool. The acronym “tar” stands for tape archive. The tar utility takes a list of specified files and copies them into a single archive file (.tar). The .tar file can then be compressed with the gzip utility on your Linux system, resulting in a file with a .tar.gz extension.
  • 97. tar  Syntax: tar –cvf filename directory  The –c option tells tar to create a new archive.  The –v option tells tar to work in verbose mode, displaying each file being backed up on screen.  The –f option specifies the name of the tar archive to be created.  Ex: tar –cvf /media/usb/backup.tar /home
  • 98.  To restore a tar archive, simply enter tar –xvf filename ex: tar –xvf /media/usb/backup.tar  If the archive has been zipped, you can also use the –z option to unzip the archive before extracting it
  • 99. Using cpio  The cpio utility can also be used to make archive files just like tar. A key difference between tar and cpio is the fact that you must provide cpio with a list of files and directories to back up from the standard input  Syntax: cpio -ov file,directory > file.cpio  The –o option tells cpio to create a new archive. The –v option simply tells cpio to run verbosely, displaying the name of each file and directory as it’s processed
  • 100.  we could extract the archive we just created by entering cpio –iv < file.cpio