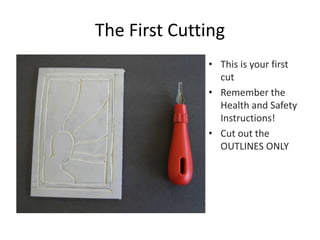
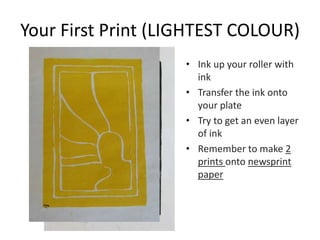
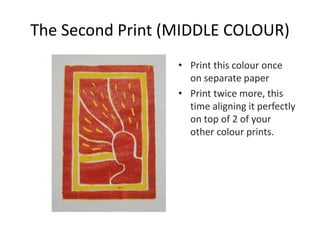
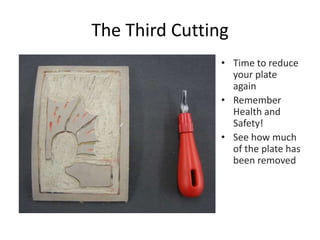
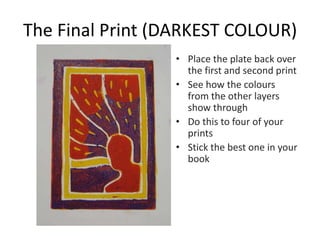
Lino step by Step
First Things First
• Put your name and
form on the back
• You only get one of
these plates so its
important that it
doesn’t get lost!
The First Cutting
• This is your first
cut
• Remember the
Health and Safety
Instructions!
• Cut out the
OUTLINES ONLY
Your First Print (LIGHTEST COLOUR)
• Ink up your roller with
ink
• Transfer the ink onto
your plate
• Try to get an even layer
of ink
• Remember to make 2
prints onto newsprint
paper
The Second Cutting
• After washing and
drying your plate
you are ready to cut
away (or reduce)
more of your plate
• Remember Health
and Safety!
• This time any thing
you cut away will
stay the same colour
as the first ink layer
The Second Print (MIDDLE COLOUR)
• Print this colour once
on separate paper
• Print twice more, this
time aligning it perfectly
on top of 2 of your
other colour prints.
The Third Cutting
• Time to reduce
your plate
again
• Remember
Health and
Safety!
• See how much
of the plate has
been removed
The Final Print (DARKEST COLOUR)
• Place the plate back over
the first and second print
• See how the colours
from the other layers
show through
• Do this to four of your
prints
• Stick the best one in your
book

Lino step by step

  • 1.
  • 2.
    First Things First •Put your name and form on the back • You only get one of these plates so its important that it doesn’t get lost!
  • 3.
    The First Cutting •This is your first cut • Remember the Health and Safety Instructions! • Cut out the OUTLINES ONLY
  • 4.
    Your First Print(LIGHTEST COLOUR) • Ink up your roller with ink • Transfer the ink onto your plate • Try to get an even layer of ink • Remember to make 2 prints onto newsprint paper
  • 5.
    The Second Cutting •After washing and drying your plate you are ready to cut away (or reduce) more of your plate • Remember Health and Safety! • This time any thing you cut away will stay the same colour as the first ink layer
  • 6.
    The Second Print(MIDDLE COLOUR) • Print this colour once on separate paper • Print twice more, this time aligning it perfectly on top of 2 of your other colour prints.
  • 7.
    The Third Cutting •Time to reduce your plate again • Remember Health and Safety! • See how much of the plate has been removed
  • 8.
    The Final Print(DARKEST COLOUR) • Place the plate back over the first and second print • See how the colours from the other layers show through • Do this to four of your prints • Stick the best one in your book