1. The document describes the process of creating a reduction lino print using multiple colors. It begins with drawing a simple design of a mug and bowl, then tracing it onto a lino plate and cutting out areas to create the first print layer in brown.
2. A placeholder is used to ensure accurate alignment when printing additional layers. The first layer is printed, then more areas are cut from the lino plate to create the second print layer.
3. Both print layers are completed using an Albion press, with the second layer printed directly over the first to create the final multi-colored reduction lino print. Issues with the second layer design and colors are noted.
This shows you how to make a rough mock up of your zine before making the complete original. This will help with your thinking process as well as keep you from making layout mistakes.
Simple and hassle-free. This is an art book with 100+ of the best personal project ideas you'll find on the market. today. This is an art book with 100+ of the best personal project ideas you'll find on the market today.
All the prompts are easy to follow and can be done by anyone, no matter how much experience you have with art.
Includes one monthly delivery of a painting idea for the novice painter.
Hadj Ounis's most notable work is his sculpture titled "Metamorphosis." This piece showcases Ounis's mastery of form and texture, as he seamlessly combines metal and wood to create a dynamic and visually striking composition. The juxtaposition of the two materials creates a sense of tension and harmony, inviting viewers to contemplate the relationship between nature and industry.
2137ad - Characters that live in Merindol and are at the center of main storiesluforfor
Kurgan is a russian expatriate that is secretly in love with Sonia Contado. Henry is a british soldier that took refuge in Merindol Colony in 2137ad. He is the lover of Sonia Contado.
Explore the multifaceted world of Muntadher Saleh, an Iraqi polymath renowned for his expertise in visual art, writing, design, and pharmacy. This SlideShare delves into his innovative contributions across various disciplines, showcasing his unique ability to blend traditional themes with modern aesthetics. Learn about his impactful artworks, thought-provoking literary pieces, and his vision as a Neo-Pop artist dedicated to raising awareness about Iraq's cultural heritage. Discover why Muntadher Saleh is celebrated as "The Last Polymath" and how his multidisciplinary talents continue to inspire and influence.
2137ad Merindol Colony Interiors where refugee try to build a seemengly norm...luforfor
This are the interiors of the Merindol Colony in 2137ad after the Climate Change Collapse and the Apocalipse Wars. Merindol is a small Colony in the Italian Alps where there are around 4000 humans. The Colony values mainly around meritocracy and selection by effort.
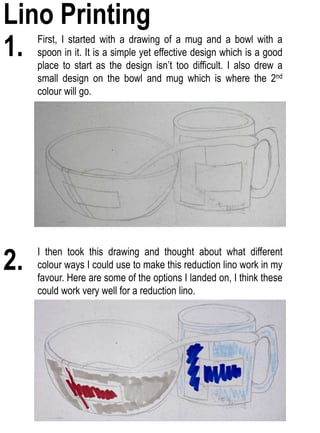
1. 1. First, I started with a drawing of a mug and a bowl with a
spoon in it. It is a simple yet effective design which is a good
place to start as the design isn’t too difficult. I also drew a
small design on the bowl and mug which is where the 2nd
colour will go.
2.
I then took this drawing and thought about what different
colour ways I could use to make this reduction lino work in my
favour. Here are some of the options I landed on, I think these
could work very well for a reduction lino.
Lino Printing
2. 3.I then traced over the design I had made, and then I flipped the design
over and re-traced the lines on to the lino plate.
4.After tracing the design onto the lino, I shaded in the parts that I needed
to cut out for the first print.
5.
I then cut out the shaded areas to make the first plate. Cutting out the
lino, was a challenge at first, but I managed to get the hang of it and the
gouges after a while. I did a good job with cutting the first layer and the
first print came out quite nice.
3. 6. To print the first plate, I used a placeholder. I used this so when I came
to do the second layer, I could put the paper and the plate in the exact
same place so the final piece come out correctly.
This is the place holder I used, the lino
plate rests in the cardboard corner and
the paper in the masking tape corner. I
also made a little sketch on the side of
the placeholder with the mug and the
bowl so I knew which way the plate
sits in the holder.
This isn’t the colours that I used for
my prints but when I was printing
the colours that I first used, I didn’t
get any pictures of the fist print, so
I recreated the plate and printed
this with a black block ink that I had
at home. But this is what the first
print looked like.
To print the lino, I used a Albion Press. To print
using this, you place the placeholder down first,
put the lino plate in the holder and also the
paper, then you place some felt blankets over
the top of the paper and plate, to add some extra
pressure to the press. After that you use the
lever on the side to move the board under the
press, and then you use the other lever on the
top and pull it to yourself. Pull the lever
completely towards yourself so all the pressure
is put onto the plate. Then you use the side lever
again to move it out an you’ve got your print.
4. 7.
After printing the first layer I took the plate out and I shaded
in the parts of the plate that I wanted to cut out. I cut out all
the parts I would like to stay the first colour that I printed. I
then cut the shaded area out with the gouges.
8.
I then printed the second layer just as it is so I could see if
there was anything that I needed to change.
I printed this so I could see if any of those
lines around the piece, where the linos
catching, would print over the first colour
and take away from the print.
5. 9.
Then using the place holder and the Albion Press I printed the second
layer on top of the first layer.
These are the final lino prints that I came out with. I feel like the colours in the first print, with
the light brown and the red, work better together than the second. I like how the design has
come out, even though I did make a mistake when cutting the second plate. On the mug, I
had originally wanted the shape to be a cross like the bowl, but I accidentally cut the wrong
part of the lino, and didn’t realise until I had done that much that I couldn’t work round it, so
we ended up with the design of 3 boxes instead of the cross. Even with this I do think that
the design worked well I do just wish that I had cut the second layer as I meant to. The red
on the blue print didn’t really work very well. I though that the red would be strong enough to
show up on top of the blue but unfortunately that didn’t happen.