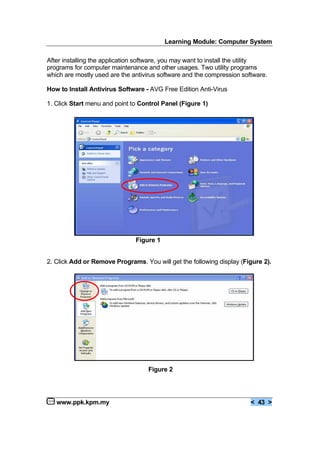
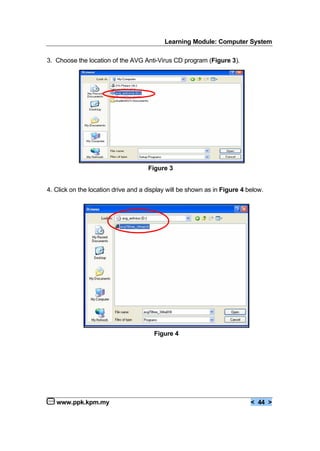
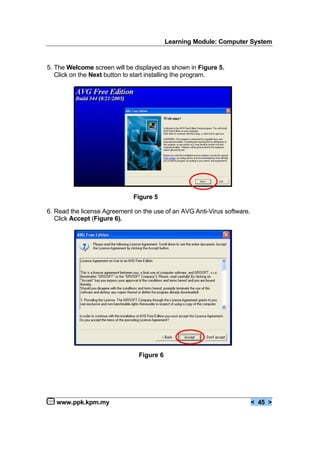
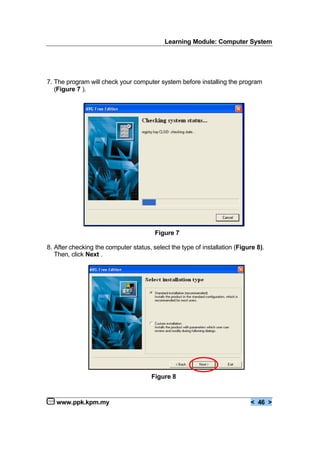
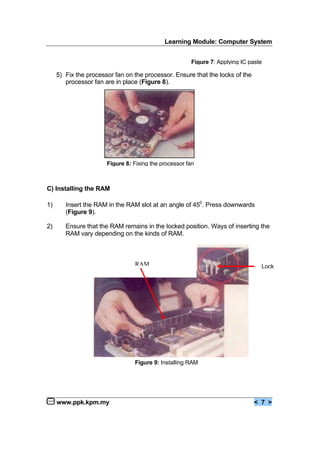
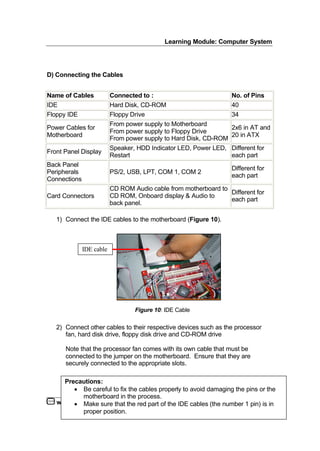
Learning Module: Computer System
www.ppk.kpm.my < 1 >
1. What is it?
This is a learning module for a specific Learning Outcome as stipulated in
the HSP that is :
€ 2.4.1 Personal Computer (PC) Assembling
€ 2.4.2 Hard disk partitioning and formatting
€ 2.4.3 Software Installation
2. Who is it for?
This module is for students who are taking the ICT subject as their elective
and for those who are interested in ICT.
3. What can be achieved?
Upon completion of this module, you will be able to :
€ assemble the components of a PC correctly.
€ format and partition the hard disk.
€ install operating system, application software and utility programs.
4. Is previous knowledge necessary?
Yes. Before using this module, you should have learnt about basic
concepts of networks and communications, hardware requirements and
software requirements.
Learning Module: Computer System
www.ppk.kpm.my < 2 >
TOPIC : 2.4 - INSTALLATION
LEARNING OUTCOMES
By using this module, you will be able to:
1. assemble the parts of a PC correctly
2. format and partition the hard disk
3. install operating system, application software and utility programs
DURATION : 12 periods
REFERENCES
Suggested Reference Books
1. Discovering Computers 2006, A Gateway to Information. Complete.
Shelly Cashman Series, 2005
2. The Architecture of Computer Hardware and Systems Software,
An Information Technology Approach: Second Edition.
Irv Englander, 2000
3. Managing and Maintaining the Personal Computers, Fifth Edition. J.
Andrews 2003
Websites Addresses
1. http://www.scsite.com
2. http://webopedia.com/
3. http://www.microsoft.com/assemble
4. http://www.microsoft.com/biossetup
5. http://www.grisoft.com
6. http://www.pcguide.com
Learning Module: Computer System
www.ppk.kpm.my < 3 >
ACTIVITIES
Individual / Group work
1. Teacher demonstration.
2. Study the procedure of assembling parts, formatting and partitioning hard disk
and installing software. This can be carried out as group work.
3. Carry out the installation in a small group.
Learning Module: Computer System
www.ppk.kpm.my < 4 >
Personal Computer (PC) Assembling
Before assembling the PC, you should check the list of components needed to
complete the task.
Components
Tick (v) if
available
1. CPU casing and power supply
2. CPU chip
3. Motherboard
4. Hard disk
5. Floppy disk drive
6. CD Rom drive
7. Cables
- IDE cable
- floppy cable
- audio cable
8. Cards
- modem card
- display card
- sound card
- network card
(unnecessary if all devices are
integrated on-board)
9. RAM chips
10.Mouse
11.Speakers
12. Keyboard
Learning Module: Computer System
www.ppk.kpm.my < 5 >
A) Assembling the Motherboard
1. Ensure the casing has appropriate risers or spacers installed between the
motherboard and the casing (Figure 1). This keeps the motherboard from
touching the metal surfaces of the casing and prevents any short circuit.
2. Place the casing panel on the table and gently fix the motherboard on it
(Figure 2).Tighten the screws on the motherboard to the panel
Precautions:
€ It is advisable to wear an anti-static wrist strap that is properly grounded,
to avoid damage to the motherboard and cards by static electricity.
€ Handle all the components with great care.
Figure 2: Fixing the motherboard on the casing panel
Figure 1: Risers or Spacers
Riser
Spacers
Learning Module: Computer System
www.ppk.kpm.my < 6 >
B) Fixing the Processor
1) Place the CPU (Figure 3) into the ZIF (Zero Insertion Force) Socket
(Figure 4).
2) Gently lower the CPU into the ZIF socket (Figure 5). Ensure that the
Number 1 pin is placed correctly.
3) Lock the socket using the Locking lever (Figure 6).
4) Apply the IC paste (silicone heat sink compound) that comes with the
processor to the bottom of the heat sink (Figure 7).
lever
lever
Figure 3
Figure 6 Figure 5
Figure 4
Number 1 pin
ZIF Socket
Learning Module: Computer System
www.ppk.kpm.my < 7 >
5) Fix the processor fan on the processor. Ensure that the locks of the
processor fan are in place (Figure 8).
C) Installing the RAM
1) Insert the RAM in the RAM slot at an angle of 450
. Press downwards
(Figure 9).
2) Ensure that the RAM remains in the locked position. Ways of inserting the
RAM vary depending on the kinds of RAM.
Figure 7: Applying IC paste
Figure 8: Fixing the processor fan
Lock
Figure 9: Installing RAM
RAM
Learning Module: Computer System
www.ppk.kpm.my < 8 >
D) Connecting the Cables
1) Connect the IDE cables to the motherboard (Figure 10).
2) Connect other cables to their respective devices such as the processor
fan, hard disk drive, floppy disk drive and CD-ROM drive
Note that the processor fan comes with its own cable that must be
connected to the jumper on the motherboard. Ensure that they are
securely connected to the appropriate slots.
Name of Cables Connected to : No. of Pins
IDE Hard Disk, CD-ROM 40
Floppy IDE Floppy Drive 34
Power Cables for
Motherboard
From power supply to Motherboard
From power supply to Floppy Drive
From power supply to Hard Disk, CD-ROM
2x6 in AT and
20 in ATX
Front Panel Display
Speaker, HDD Indicator LED, Power LED,
Restart
Different for
each part
Back Panel
Peripherals
Connections
PS/2, USB, LPT, COM 1, COM 2
Different for
each part
Card Connectors
CD ROM Audio cable from motherboard to
CD ROM, Onboard display & Audio to
back panel.
Different for
each part
Precautions:
€ Be careful to fix the cables properly to avoid damaging the pins or the
motherboard in the process.
€ Make sure that the red part of the IDE cables (the number 1 pin) is in
proper position.
Figure 10: IDE Cable
IDE cable
Learning Module: Computer System
www.ppk.kpm.my < 9 >
Pin Configuration on Motherboard - Cables can be connected to a number of
slots on the motherboard. The following are the number of pins for all the slots on
the motherboard (Table 2).
3) When you place the motherboard into the casing, remove the faceplate
(Figure 11).
4) Place the motherboard (Figure 2) inside the casing and fasten it with
plastic pegs or metal screws given (Figure 12).
Device/Slot Name No of pins
LPT 26
COM 10
IDE 40
IDE Floppy 36
Table 2
Figure 12:
Placing the motherboard inside the casing
faceplate
Slots without
metal covering
Figure 11: Ports
Serial port
Parallel port
Joystick port
Learning Module: Computer System
www.ppk.kpm.my < 10 >
E) Installing the Floppy Drive
1) Ensure that one of the 3.5 inch bays in your casing is open.
2) Attach the drive to the rails on the casing and slide it into the front of the
computer until it clicks into place.
3) Once the power cable and the floppy cable are in place, screw the floppy
drive securely on both sides.
4) Plug in the power cable carefully (Figure 13).
5) Plug in the floppy (data) cable.
6) Ensure that the floppy data cable runs parallel with the floppy drive power
cable. You can do this by aligning the red stripe on the floppy IDE cable
with the red wire on the floppy drive cable (Figure 14).
Figure 13: Plugging in the power cable
Figure 14: Plugging in the power cable
Floppy Cable
Learning Module: Computer System
www.ppk.kpm.my < 11 >
F) Installing the Hard Disk
1) Ensure that the hard disk is set up to be the master drive on its IDE cable.
If you have two IDE devices, one must be designated the master device,
and the other, the slave device.
2) Examine the top of your hard disk. Set the jumpers to make the drive a
master or slave device. The jumpers are located on the back of the drive
(Figure 15). The jumper settings are indicated in the chart which comes
along with the hard disk. Ensure that they are set correctly to enable the
drive as a master.
3) Insert the hard drive into the drive-tray and screw it in securely on both
sides (Figure 16).
Jumpers
Figure 15: Location of the jumpers
Figure 16: Inserting the hard drive into the drive tray
Learning Module: Computer System
www.ppk.kpm.my < 12 >
G) Installing the Optical Drive (DVD/CD-ROM)
1) Ensure that at least one full sized 5.25" bay is open in the casing.
2) Insert the drive into the front of the casing until it clicks into place
(Figure 17).
3) Screw it in securely on both sides.
4) Attach the power cable to the drive.
5) Attach the secondary IDE cable to the drive.
6) Set the jumper on the CD-ROM drive as ‘master’.
If you are using the same IDE cable that connects to the hard disk, you
have to set the CD-ROM drive as ‘slave’.
7) Connect the audio cable of the CD-ROM to the jumper on the board.
H) Installing Power Supply
There are two main types of casings available today with reference to Power
Supply - AT and ATX - and both have different connectors (Figure 18).
Bay
Figure 17: Inserting the hard drive into the drive tray
AT – 2x6 (12) pinsATX – 20 pins Figure 18
Learning Module: Computer System
www.ppk.kpm.my < 13 >
1) Identify the type of power supply and insert it into the right place.
The ATX cables must be connected in such a way that the black cables of
both plugs are aligned (Figure 19).
2) Connect the wires from behind the computer casing to your motherboard
jumpers (Figure 20). Their functions are to control the ‘on’, ‘off’, ‘reset’,
‘hard disk activity’, ‘speaker’ and ‘power switch’. Every motherboard is
different. Refer to the motherboard manual to identify the correct jumpers
to be connected to.
3) Ensure all connections are firmly attached, and that no wires run close to
the top of the processor fan.
4) Replace the casing and screw it tight (Figure 21). Set it in an upright
position.
Figure 19: Aligning the black cables
Figure 20: Connecting to the motherboard
Figure 21: Replacing the casing and screwing it tight
Learning Module: Computer System
www.ppk.kpm.my < 14 >
I) Connecting other Peripherals
1) Plug the video cable of the monitor to the display port. The monitor symbol
is shown on the back panel of the casing.
2) Connect the keyboard, speakers and mouse to the respective ports.
3) Connect other peripherals available such as the printer, external
modem, scanner and others to their respective ports (Figure 22).
Figure 22: Ports
Learning Module: Computer System
www.ppk.kpm.my < 15 >
Upon completion of the assembling process, use the checklist below.
Steps Tick (€) if completed
A Installing the Motherboard
B Fixing the Processor
C Installing the RAM
D Connecting the Cables
E Installing the Floppy Drive
F Installing the Hard Disk
G Installing the Optical Drive (DVD/CD-ROM)
H Installing the Cards
I Connecting the Peripherals
DONE!
J) Powering the System
1) Plug in the power cord and switch on the power supply.
2) Press the power button. If everything is connected as it should be, all
system fans should start spinning, you will hear a single beep, and after
about 2-5 seconds, the computer starts to boot.
3) Post-test running will appear for a while and then the system will halt
because an operating system is not installed yet.
Learning Module: Computer System
www.ppk.kpm.my < 16 >
K) Configuring the BIOS Setting
BIOS is Basic Input Output System. It loads basic operating system from ROM
into the memory.
Turn off the main power supply and switch on the computer again. To enter BIOS
setup, press the Delete key immediately during the post-test (power on self-test)
Review and edit the BIOS setting if necessary.
Go to the Main menu.
1. Change the system time and date.
Figure 23: BIOS Setup Interface
WARNING - Do not change any other settings.
€ The disk drives, DRIVE A and DRIVE B, are currently
always 1.44 MB for A and None (no) for B.
€ The hard disk and the memory are detected automatically.
Learning Module: Computer System
www.ppk.kpm.my < 17 >
2. Review other settings in Advanced, Security, Power and Boot menu
(Figures 24-27).
Do not change any settings.
Figure 24: Advanced Interface
Figure 25: Security Interface
Learning Module: Computer System
www.ppk.kpm.my < 18 >
Figure 27: Boot Interface
Figure 26: Power Interface
Learning Module: Computer System
www.ppk.kpm.my < 19 >
3. Go to the Exit menu and choose Save Changes to exit (Figure 28).
4. Type ‘Y’ for Yes to save and exit from the BIOS setup.
Note :
€ Read the troubleshooting guide for instructions to solve any problems that
may arise.
Figure 28: Exit Menu
The system is now ready!
The operating system can be installed now.
Learning Module: Computer System
www.ppk.kpm.my < 20 >
ASSESSMENT
Suggested assessment
Exercise
1. Identify the following components by matching them with the appropriate
terms.
a.
b.
c.
d.
e.
Heat Sink
RAM
Processor
CD Drive
IDE Cable
Learning Module: Computer System
www.ppk.kpm.my < 21 >
2. Mark T for True statements and F for False statements.
____ a. Replacing RAM is a fairly simple process, whereas
replacing a processor is much more complicated.
____ b. Computers can use only one processor at a time.
____ c. Floppy disk drive is only available in internal bays.
____ d. The processor is also called the central processing unit (CPU).
____ e. PC Card slot is a socket on the motherboard that can hold an
adapter card.
Learning Module: Computer System
www.ppk.kpm.my < 22 >
A. HARD DISK PARTITIONING
AND FORMATTING
and
OPERATING SYSTEM INSTALLATION
Learning Module: Computer System
www.ppk.kpm.my < 23 >
Insert your Windows XP Professional Setup CD.
1) Welcome to Setup:
When the Welcome to Setup screen appears (Figure 1). Choose one of the
following instructions:
Press ENTER to Continue Setup.
2) Windows XP Licensing Agreement:
W
hen the Windows XP Licensing Agreement screen appears (Figure 2).
Press F8 to agree with the terms.
Figure 1: Windows XP Professional Setup
Learning Module: Computer System
www.ppk.kpm.my < 24 >
3) Hard drive partition information
a. If partition is defined
Hard drive partition information is now displayed. This example already has a
partition defined (Figure 3).
Press ENTER to install on the selected partition.
Figure 2: Windows XP Licensing Agreement
Figure 3: Hard Drive Partition
Learning Module: Computer System
www.ppk.kpm.my < 25 >
b. If no partitions have been previously defined
If no partitions have been previously defined, this screen will be displayed
(Figure 4). You can create as many partitions as you wish.
Press Enter to create a partition.
You may create a partition through automatic partitioning or manual partitioning.
If you decide on automatic partitioning, press Enter.
If you decide on manual partitioning, choose the minimum and maximum
perimeters that appear on the screen. Work within these perimeters.
Figure 4: Automatic partitioning
Learning Module: Computer System
www.ppk.kpm.my < 26 >
4) Install the partition
Choose Drive C : or partition 1 to install the operating system (Figure 5).
Click Enter to install the system.
Figure 5: Install the operating system
Learning Module: Computer System
www.ppk.kpm.my < 27 >
5) Format the partition
This Operating System (OS) supports Network File System (NTFS), so format
the partition using this system.
Select format partition using NTFS file system (Figure 6).
Press Enter to confirm your selection.
6) Setup formats the partition (Figure 7).
Wait until the process is completed.
Figure 6: Format the partition using NTFS file system
Figure 7: Setup formats the partition
Learning Module: Computer System
www.ppk.kpm.my < 28 >
7) Setup copies and configures various files (Figure 8).
8) Press Enter to restart and the new windows XP boot screen is displayed
(Figure 9).
Figure 8: Setup copies and configures various files automatically
Figure 9: Windows XP boot screen
Learning Module: Computer System
www.ppk.kpm.my < 29 >
Wait until the Regional and Language Options screen appears (Figure 10).
Click NEXT.
Figure 10: The Regional and Language Options screen
Learning Module: Computer System
www.ppk.kpm.my < 30 >
B. OPERATING SYSTEM INSTALLATION
Learning Module: Computer System
www.ppk.kpm.my < 31 >
9) Windows XP installation
The new windows XP screen appears while the installation process takes
place (Figure 11). Wait until the process is completed.
Figure 11: Windows XP installation screen
Learning Module: Computer System
www.ppk.kpm.my < 32 >
10) Region and Input language (Figure 12)
Click Next
11) Enter your name
Enter your name and organization (Figure 13).
Then, click Next.
Figure 12: Regional and Language Options
Figure 13: Personalize Your Software
Learning Module: Computer System
www.ppk.kpm.my < 33 >
11) 25 Digit Product Key
Enter the 25 digit product key that comes with your CD (Figure 14).
Click Next.
14) Enter computer name and an administrator password
Enter the computer name and administrator password as required
(Figure 15). It is important that you remember this password.
Figure 14: Product key
Figure 15: Computer name and Administrator password
Learning Module: Computer System
www.ppk.kpm.my < 34 >
15) Date, Time and Time Zone
Fill in the required information for the Date, Time and Time Zone
(Figure 16).
Figure 16: Date and Time Settings
16) Network is installed
Figure 17: Installing Network
Learning Module: Computer System
www.ppk.kpm.my < 35 >
17) Network setting
Choose typical setting (Figure 18).
Click Next
18) Workgroup or computer domain
You can change the workgroup if you want to (Figure 19).
Click Next.
Figure 19: Workgroup or Computer Domain
Figure 18: Network Settings
Learning Module: Computer System
www.ppk.kpm.my < 36 >
19) Install screen
All the files have been copied.
The system will automatically reboot (Figure 20).
Figure 20: Install screen
Learning Module: Computer System
www.ppk.kpm.my < 37 >
ASSESSMENT
Suggested Assessment
Exercise 1
1. In hard disk partitioning, there are several keys that are involved. Identify the
functions of the keys below.
Keys Functions
a. R
b. F3
c. F8
d. Esc
2. Explain briefly how to create a partition.
__________________________________________________
__________________________________________________
__________________________________________________
3. Explain briefly how to format the hard disk using Windows XP.
__________________________________________________
__________________________________________________
__________________________________________________
4. What is an operating system?
__________________________________________________
__________________________________________________
__________________________________________________
5. Name three examples of operating system.
__________________________________________________
__________________________________________________
__________________________________________________
Learning Module: Computer System
www.ppk.kpm.my < 38 >
C. APPLICATION SOFTWARE
INSTALLATION
Learning Module: Computer System
www.ppk.kpm.my < 39 >
How To Install Microsoft Office XP Professional with FrontPage
This application comes with Word, Excel, Access, PowerPoint, Outlook and
FrontPage.
Minimum System Requirements that you need before you install Microsoft Office
are as follows.
€ Processor: 133 MHz or higher; Pentium III is recommended.
€ Memory (RAM): 128 MB minimum
€ Hard drive space: 410 MB; additional 115 MB is required on the hard disk
where the operating system is installed.
Procedure to Install
1. Insert the Microsoft Office XP Professional CD into the CD ROM drive.
In the first Microsoft Office XP Professional Setup window, fill in the
User information. Enter your User name, Initials, and Organization
as you would like, and click Next (Figure 1).
Figure 1
2. In the next window, choose the type of installation you need.
Check the Complete button (Figure2).
Learning Module: Computer System
www.ppk.kpm.my < 40 >
3. Click Install to begin installation (Figure 3).
Figure 3
4. The installation process begins (Figure 4).
Figure 2
NOTE: The Install Now option will install only the most common components
for Microsoft Office XP Professional. Selecting Complete will install all
applications and components in their entirety to your computer which is
recommended for Microsoft Office. The Custom option will allow you to install
only the specific applications or components that you need. If you select Run
from Network, in the future, you may not be able to use the component that
you have not selected. Therefore, you must be connected to the network in
order for the component to be installed if you need to use it. .
Learning Module: Computer System
www.ppk.kpm.my < 41 >
Figure 4
5. When done, click OK. You have completed the installation of Microsoft
Office XP Professional successfully (Figure 5).
Figure 5
6. Opening a Microsoft Office Application
A. To open an Office application, select the Start menu, point to
Programs (or All Programs), and click whichever Office
application you would like to open.
Learning Module: Computer System
www.ppk.kpm.my < 42 >
D. UTILITY SOFTWARE INSTALLATION
Learning Module: Computer System
www.ppk.kpm.my < 43 >
After installing the application software, you may want to install the utility
programs for computer maintenance and other usages. Two utility programs
which are mostly used are the antivirus software and the compression software.
How to Install Antivirus Software - AVG Free Edition Anti-Virus
1. Click Start menu and point to Control Panel (Figure 1)
Figure 1
2. Click Add or Remove Programs. You will get the following display (Figure 2).
Figure 2
Learning Module: Computer System
www.ppk.kpm.my < 44 >
3. Choose the location of the AVG Anti-Virus CD program (Figure 3).
Figure 3
4. Click on the location drive and a display will be shown as in Figure 4 below.
Figure 4
Learning Module: Computer System
www.ppk.kpm.my < 45 >
5. The Welcome screen will be displayed as shown in Figure 5.
Click on the Next button to start installing the program.
Figure 5
6. Read the license Agreement on the use of an AVG Anti-Virus software.
Click Accept (Figure 6).
Figure 6
Learning Module: Computer System
www.ppk.kpm.my < 46 >
7. The program will check your computer system before installing the program
(Figure 7 ).
Figure 7
8. After checking the computer status, select the type of installation (Figure 8).
Then, click Next .
Figure 8
Learning Module: Computer System
www.ppk.kpm.my < 47 >
9. Type the User Name and License Number shown in Figure 9.
Figure 9
10. Click Finish when the following screen is displayed (Figure10).
Figure 10
Learning Module: Computer System
www.ppk.kpm.my < 48 >
11. The following screen appears(Figure 11).
Figure 11
12. Click the OK when the installation process is completed (Figure 12).
Figure 12
Learning Module: Computer System
www.ppk.kpm.my < 49 >
13. AVG Antivirus has been successfully installed. Click Next to proceed
(Figure 13).
Figure 13
14. Just click Cancel to proceed (Figure 14).
Figure 14
Learning Module: Computer System
www.ppk.kpm.my < 50 >
15. AVG Free Registration screen appears as shown in Figure 15 below.
Click Next to register automatically.
Figure 15
16. Your Anti-Virus installation program is completed. Click Continue to run
your AVG Anti-Virus program ( Figure 16).
Figure16
Learning Module: Computer System
www.ppk.kpm.my < 51 >
17. Once the AVG Anti-Virus program installation process has completed, the
Test
Center screen appears as shown in Figure 17 below. Choose your options to
scan.
Figure 17
Learning Module: Computer System
www.ppk.kpm.my < 52 >
ASSESSMENT
Suggested Assessment
Exercise 1
1. List three types of application software in Microsoft Office XP.
__________________________________________________
__________________________________________________
__________________________________________________
2. Name any three anti-virus programs.
__________________________________________________
__________________________________________________
__________________________________________________
3. Explain briefly how to install anti-virus software.
__________________________________________________
__________________________________________________
__________________________________________________
4. What is a utility software? Give two examples.
__________________________________________________
__________________________________________________
__________________________________________________
CONGRATULATIONS !!
YOU HAVE SUCCESSFULLY COMPLETED THIS MODULE. YOU ARE NOW
ABLE TO RUN YOUR COMPUTER AND THE PROGRAMS THAT YOU HAVE
INSTALLED.

Learning area 2 computer system

  • 2.
    Learning Module: ComputerSystem www.ppk.kpm.my < 1 > 1. What is it? This is a learning module for a specific Learning Outcome as stipulated in the HSP that is : € 2.4.1 Personal Computer (PC) Assembling € 2.4.2 Hard disk partitioning and formatting € 2.4.3 Software Installation 2. Who is it for? This module is for students who are taking the ICT subject as their elective and for those who are interested in ICT. 3. What can be achieved? Upon completion of this module, you will be able to : € assemble the components of a PC correctly. € format and partition the hard disk. € install operating system, application software and utility programs. 4. Is previous knowledge necessary? Yes. Before using this module, you should have learnt about basic concepts of networks and communications, hardware requirements and software requirements.
  • 3.
    Learning Module: ComputerSystem www.ppk.kpm.my < 2 > TOPIC : 2.4 - INSTALLATION LEARNING OUTCOMES By using this module, you will be able to: 1. assemble the parts of a PC correctly 2. format and partition the hard disk 3. install operating system, application software and utility programs DURATION : 12 periods REFERENCES Suggested Reference Books 1. Discovering Computers 2006, A Gateway to Information. Complete. Shelly Cashman Series, 2005 2. The Architecture of Computer Hardware and Systems Software, An Information Technology Approach: Second Edition. Irv Englander, 2000 3. Managing and Maintaining the Personal Computers, Fifth Edition. J. Andrews 2003 Websites Addresses 1. http://www.scsite.com 2. http://webopedia.com/ 3. http://www.microsoft.com/assemble 4. http://www.microsoft.com/biossetup 5. http://www.grisoft.com 6. http://www.pcguide.com
  • 4.
    Learning Module: ComputerSystem www.ppk.kpm.my < 3 > ACTIVITIES Individual / Group work 1. Teacher demonstration. 2. Study the procedure of assembling parts, formatting and partitioning hard disk and installing software. This can be carried out as group work. 3. Carry out the installation in a small group.
  • 5.
    Learning Module: ComputerSystem www.ppk.kpm.my < 4 > Personal Computer (PC) Assembling Before assembling the PC, you should check the list of components needed to complete the task. Components Tick (v) if available 1. CPU casing and power supply 2. CPU chip 3. Motherboard 4. Hard disk 5. Floppy disk drive 6. CD Rom drive 7. Cables - IDE cable - floppy cable - audio cable 8. Cards - modem card - display card - sound card - network card (unnecessary if all devices are integrated on-board) 9. RAM chips 10.Mouse 11.Speakers 12. Keyboard
  • 6.
    Learning Module: ComputerSystem www.ppk.kpm.my < 5 > A) Assembling the Motherboard 1. Ensure the casing has appropriate risers or spacers installed between the motherboard and the casing (Figure 1). This keeps the motherboard from touching the metal surfaces of the casing and prevents any short circuit. 2. Place the casing panel on the table and gently fix the motherboard on it (Figure 2).Tighten the screws on the motherboard to the panel Precautions: € It is advisable to wear an anti-static wrist strap that is properly grounded, to avoid damage to the motherboard and cards by static electricity. € Handle all the components with great care. Figure 2: Fixing the motherboard on the casing panel Figure 1: Risers or Spacers Riser Spacers
  • 7.
    Learning Module: ComputerSystem www.ppk.kpm.my < 6 > B) Fixing the Processor 1) Place the CPU (Figure 3) into the ZIF (Zero Insertion Force) Socket (Figure 4). 2) Gently lower the CPU into the ZIF socket (Figure 5). Ensure that the Number 1 pin is placed correctly. 3) Lock the socket using the Locking lever (Figure 6). 4) Apply the IC paste (silicone heat sink compound) that comes with the processor to the bottom of the heat sink (Figure 7). lever lever Figure 3 Figure 6 Figure 5 Figure 4 Number 1 pin ZIF Socket
  • 8.
    Learning Module: ComputerSystem www.ppk.kpm.my < 7 > 5) Fix the processor fan on the processor. Ensure that the locks of the processor fan are in place (Figure 8). C) Installing the RAM 1) Insert the RAM in the RAM slot at an angle of 450 . Press downwards (Figure 9). 2) Ensure that the RAM remains in the locked position. Ways of inserting the RAM vary depending on the kinds of RAM. Figure 7: Applying IC paste Figure 8: Fixing the processor fan Lock Figure 9: Installing RAM RAM
  • 9.
    Learning Module: ComputerSystem www.ppk.kpm.my < 8 > D) Connecting the Cables 1) Connect the IDE cables to the motherboard (Figure 10). 2) Connect other cables to their respective devices such as the processor fan, hard disk drive, floppy disk drive and CD-ROM drive Note that the processor fan comes with its own cable that must be connected to the jumper on the motherboard. Ensure that they are securely connected to the appropriate slots. Name of Cables Connected to : No. of Pins IDE Hard Disk, CD-ROM 40 Floppy IDE Floppy Drive 34 Power Cables for Motherboard From power supply to Motherboard From power supply to Floppy Drive From power supply to Hard Disk, CD-ROM 2x6 in AT and 20 in ATX Front Panel Display Speaker, HDD Indicator LED, Power LED, Restart Different for each part Back Panel Peripherals Connections PS/2, USB, LPT, COM 1, COM 2 Different for each part Card Connectors CD ROM Audio cable from motherboard to CD ROM, Onboard display & Audio to back panel. Different for each part Precautions: € Be careful to fix the cables properly to avoid damaging the pins or the motherboard in the process. € Make sure that the red part of the IDE cables (the number 1 pin) is in proper position. Figure 10: IDE Cable IDE cable
  • 10.
    Learning Module: ComputerSystem www.ppk.kpm.my < 9 > Pin Configuration on Motherboard - Cables can be connected to a number of slots on the motherboard. The following are the number of pins for all the slots on the motherboard (Table 2). 3) When you place the motherboard into the casing, remove the faceplate (Figure 11). 4) Place the motherboard (Figure 2) inside the casing and fasten it with plastic pegs or metal screws given (Figure 12). Device/Slot Name No of pins LPT 26 COM 10 IDE 40 IDE Floppy 36 Table 2 Figure 12: Placing the motherboard inside the casing faceplate Slots without metal covering Figure 11: Ports Serial port Parallel port Joystick port
  • 11.
    Learning Module: ComputerSystem www.ppk.kpm.my < 10 > E) Installing the Floppy Drive 1) Ensure that one of the 3.5 inch bays in your casing is open. 2) Attach the drive to the rails on the casing and slide it into the front of the computer until it clicks into place. 3) Once the power cable and the floppy cable are in place, screw the floppy drive securely on both sides. 4) Plug in the power cable carefully (Figure 13). 5) Plug in the floppy (data) cable. 6) Ensure that the floppy data cable runs parallel with the floppy drive power cable. You can do this by aligning the red stripe on the floppy IDE cable with the red wire on the floppy drive cable (Figure 14). Figure 13: Plugging in the power cable Figure 14: Plugging in the power cable Floppy Cable
  • 12.
    Learning Module: ComputerSystem www.ppk.kpm.my < 11 > F) Installing the Hard Disk 1) Ensure that the hard disk is set up to be the master drive on its IDE cable. If you have two IDE devices, one must be designated the master device, and the other, the slave device. 2) Examine the top of your hard disk. Set the jumpers to make the drive a master or slave device. The jumpers are located on the back of the drive (Figure 15). The jumper settings are indicated in the chart which comes along with the hard disk. Ensure that they are set correctly to enable the drive as a master. 3) Insert the hard drive into the drive-tray and screw it in securely on both sides (Figure 16). Jumpers Figure 15: Location of the jumpers Figure 16: Inserting the hard drive into the drive tray
  • 13.
    Learning Module: ComputerSystem www.ppk.kpm.my < 12 > G) Installing the Optical Drive (DVD/CD-ROM) 1) Ensure that at least one full sized 5.25" bay is open in the casing. 2) Insert the drive into the front of the casing until it clicks into place (Figure 17). 3) Screw it in securely on both sides. 4) Attach the power cable to the drive. 5) Attach the secondary IDE cable to the drive. 6) Set the jumper on the CD-ROM drive as ‘master’. If you are using the same IDE cable that connects to the hard disk, you have to set the CD-ROM drive as ‘slave’. 7) Connect the audio cable of the CD-ROM to the jumper on the board. H) Installing Power Supply There are two main types of casings available today with reference to Power Supply - AT and ATX - and both have different connectors (Figure 18). Bay Figure 17: Inserting the hard drive into the drive tray AT – 2x6 (12) pinsATX – 20 pins Figure 18
  • 14.
    Learning Module: ComputerSystem www.ppk.kpm.my < 13 > 1) Identify the type of power supply and insert it into the right place. The ATX cables must be connected in such a way that the black cables of both plugs are aligned (Figure 19). 2) Connect the wires from behind the computer casing to your motherboard jumpers (Figure 20). Their functions are to control the ‘on’, ‘off’, ‘reset’, ‘hard disk activity’, ‘speaker’ and ‘power switch’. Every motherboard is different. Refer to the motherboard manual to identify the correct jumpers to be connected to. 3) Ensure all connections are firmly attached, and that no wires run close to the top of the processor fan. 4) Replace the casing and screw it tight (Figure 21). Set it in an upright position. Figure 19: Aligning the black cables Figure 20: Connecting to the motherboard Figure 21: Replacing the casing and screwing it tight
  • 15.
    Learning Module: ComputerSystem www.ppk.kpm.my < 14 > I) Connecting other Peripherals 1) Plug the video cable of the monitor to the display port. The monitor symbol is shown on the back panel of the casing. 2) Connect the keyboard, speakers and mouse to the respective ports. 3) Connect other peripherals available such as the printer, external modem, scanner and others to their respective ports (Figure 22). Figure 22: Ports
  • 16.
    Learning Module: ComputerSystem www.ppk.kpm.my < 15 > Upon completion of the assembling process, use the checklist below. Steps Tick (€) if completed A Installing the Motherboard B Fixing the Processor C Installing the RAM D Connecting the Cables E Installing the Floppy Drive F Installing the Hard Disk G Installing the Optical Drive (DVD/CD-ROM) H Installing the Cards I Connecting the Peripherals DONE! J) Powering the System 1) Plug in the power cord and switch on the power supply. 2) Press the power button. If everything is connected as it should be, all system fans should start spinning, you will hear a single beep, and after about 2-5 seconds, the computer starts to boot. 3) Post-test running will appear for a while and then the system will halt because an operating system is not installed yet.
  • 17.
    Learning Module: ComputerSystem www.ppk.kpm.my < 16 > K) Configuring the BIOS Setting BIOS is Basic Input Output System. It loads basic operating system from ROM into the memory. Turn off the main power supply and switch on the computer again. To enter BIOS setup, press the Delete key immediately during the post-test (power on self-test) Review and edit the BIOS setting if necessary. Go to the Main menu. 1. Change the system time and date. Figure 23: BIOS Setup Interface WARNING - Do not change any other settings. € The disk drives, DRIVE A and DRIVE B, are currently always 1.44 MB for A and None (no) for B. € The hard disk and the memory are detected automatically.
  • 18.
    Learning Module: ComputerSystem www.ppk.kpm.my < 17 > 2. Review other settings in Advanced, Security, Power and Boot menu (Figures 24-27). Do not change any settings. Figure 24: Advanced Interface Figure 25: Security Interface
  • 19.
    Learning Module: ComputerSystem www.ppk.kpm.my < 18 > Figure 27: Boot Interface Figure 26: Power Interface
  • 20.
    Learning Module: ComputerSystem www.ppk.kpm.my < 19 > 3. Go to the Exit menu and choose Save Changes to exit (Figure 28). 4. Type ‘Y’ for Yes to save and exit from the BIOS setup. Note : € Read the troubleshooting guide for instructions to solve any problems that may arise. Figure 28: Exit Menu The system is now ready! The operating system can be installed now.
  • 21.
    Learning Module: ComputerSystem www.ppk.kpm.my < 20 > ASSESSMENT Suggested assessment Exercise 1. Identify the following components by matching them with the appropriate terms. a. b. c. d. e. Heat Sink RAM Processor CD Drive IDE Cable
  • 22.
    Learning Module: ComputerSystem www.ppk.kpm.my < 21 > 2. Mark T for True statements and F for False statements. ____ a. Replacing RAM is a fairly simple process, whereas replacing a processor is much more complicated. ____ b. Computers can use only one processor at a time. ____ c. Floppy disk drive is only available in internal bays. ____ d. The processor is also called the central processing unit (CPU). ____ e. PC Card slot is a socket on the motherboard that can hold an adapter card.
  • 23.
    Learning Module: ComputerSystem www.ppk.kpm.my < 22 > A. HARD DISK PARTITIONING AND FORMATTING and OPERATING SYSTEM INSTALLATION
  • 24.
    Learning Module: ComputerSystem www.ppk.kpm.my < 23 > Insert your Windows XP Professional Setup CD. 1) Welcome to Setup: When the Welcome to Setup screen appears (Figure 1). Choose one of the following instructions: Press ENTER to Continue Setup. 2) Windows XP Licensing Agreement: W hen the Windows XP Licensing Agreement screen appears (Figure 2). Press F8 to agree with the terms. Figure 1: Windows XP Professional Setup
  • 25.
    Learning Module: ComputerSystem www.ppk.kpm.my < 24 > 3) Hard drive partition information a. If partition is defined Hard drive partition information is now displayed. This example already has a partition defined (Figure 3). Press ENTER to install on the selected partition. Figure 2: Windows XP Licensing Agreement Figure 3: Hard Drive Partition
  • 26.
    Learning Module: ComputerSystem www.ppk.kpm.my < 25 > b. If no partitions have been previously defined If no partitions have been previously defined, this screen will be displayed (Figure 4). You can create as many partitions as you wish. Press Enter to create a partition. You may create a partition through automatic partitioning or manual partitioning. If you decide on automatic partitioning, press Enter. If you decide on manual partitioning, choose the minimum and maximum perimeters that appear on the screen. Work within these perimeters. Figure 4: Automatic partitioning
  • 27.
    Learning Module: ComputerSystem www.ppk.kpm.my < 26 > 4) Install the partition Choose Drive C : or partition 1 to install the operating system (Figure 5). Click Enter to install the system. Figure 5: Install the operating system
  • 28.
    Learning Module: ComputerSystem www.ppk.kpm.my < 27 > 5) Format the partition This Operating System (OS) supports Network File System (NTFS), so format the partition using this system. Select format partition using NTFS file system (Figure 6). Press Enter to confirm your selection. 6) Setup formats the partition (Figure 7). Wait until the process is completed. Figure 6: Format the partition using NTFS file system Figure 7: Setup formats the partition
  • 29.
    Learning Module: ComputerSystem www.ppk.kpm.my < 28 > 7) Setup copies and configures various files (Figure 8). 8) Press Enter to restart and the new windows XP boot screen is displayed (Figure 9). Figure 8: Setup copies and configures various files automatically Figure 9: Windows XP boot screen
  • 30.
    Learning Module: ComputerSystem www.ppk.kpm.my < 29 > Wait until the Regional and Language Options screen appears (Figure 10). Click NEXT. Figure 10: The Regional and Language Options screen
  • 31.
    Learning Module: ComputerSystem www.ppk.kpm.my < 30 > B. OPERATING SYSTEM INSTALLATION
  • 32.
    Learning Module: ComputerSystem www.ppk.kpm.my < 31 > 9) Windows XP installation The new windows XP screen appears while the installation process takes place (Figure 11). Wait until the process is completed. Figure 11: Windows XP installation screen
  • 33.
    Learning Module: ComputerSystem www.ppk.kpm.my < 32 > 10) Region and Input language (Figure 12) Click Next 11) Enter your name Enter your name and organization (Figure 13). Then, click Next. Figure 12: Regional and Language Options Figure 13: Personalize Your Software
  • 34.
    Learning Module: ComputerSystem www.ppk.kpm.my < 33 > 11) 25 Digit Product Key Enter the 25 digit product key that comes with your CD (Figure 14). Click Next. 14) Enter computer name and an administrator password Enter the computer name and administrator password as required (Figure 15). It is important that you remember this password. Figure 14: Product key Figure 15: Computer name and Administrator password
  • 35.
    Learning Module: ComputerSystem www.ppk.kpm.my < 34 > 15) Date, Time and Time Zone Fill in the required information for the Date, Time and Time Zone (Figure 16). Figure 16: Date and Time Settings 16) Network is installed Figure 17: Installing Network
  • 36.
    Learning Module: ComputerSystem www.ppk.kpm.my < 35 > 17) Network setting Choose typical setting (Figure 18). Click Next 18) Workgroup or computer domain You can change the workgroup if you want to (Figure 19). Click Next. Figure 19: Workgroup or Computer Domain Figure 18: Network Settings
  • 37.
    Learning Module: ComputerSystem www.ppk.kpm.my < 36 > 19) Install screen All the files have been copied. The system will automatically reboot (Figure 20). Figure 20: Install screen
  • 38.
    Learning Module: ComputerSystem www.ppk.kpm.my < 37 > ASSESSMENT Suggested Assessment Exercise 1 1. In hard disk partitioning, there are several keys that are involved. Identify the functions of the keys below. Keys Functions a. R b. F3 c. F8 d. Esc 2. Explain briefly how to create a partition. __________________________________________________ __________________________________________________ __________________________________________________ 3. Explain briefly how to format the hard disk using Windows XP. __________________________________________________ __________________________________________________ __________________________________________________ 4. What is an operating system? __________________________________________________ __________________________________________________ __________________________________________________ 5. Name three examples of operating system. __________________________________________________ __________________________________________________ __________________________________________________
  • 39.
    Learning Module: ComputerSystem www.ppk.kpm.my < 38 > C. APPLICATION SOFTWARE INSTALLATION
  • 40.
    Learning Module: ComputerSystem www.ppk.kpm.my < 39 > How To Install Microsoft Office XP Professional with FrontPage This application comes with Word, Excel, Access, PowerPoint, Outlook and FrontPage. Minimum System Requirements that you need before you install Microsoft Office are as follows. € Processor: 133 MHz or higher; Pentium III is recommended. € Memory (RAM): 128 MB minimum € Hard drive space: 410 MB; additional 115 MB is required on the hard disk where the operating system is installed. Procedure to Install 1. Insert the Microsoft Office XP Professional CD into the CD ROM drive. In the first Microsoft Office XP Professional Setup window, fill in the User information. Enter your User name, Initials, and Organization as you would like, and click Next (Figure 1). Figure 1 2. In the next window, choose the type of installation you need. Check the Complete button (Figure2).
  • 41.
    Learning Module: ComputerSystem www.ppk.kpm.my < 40 > 3. Click Install to begin installation (Figure 3). Figure 3 4. The installation process begins (Figure 4). Figure 2 NOTE: The Install Now option will install only the most common components for Microsoft Office XP Professional. Selecting Complete will install all applications and components in their entirety to your computer which is recommended for Microsoft Office. The Custom option will allow you to install only the specific applications or components that you need. If you select Run from Network, in the future, you may not be able to use the component that you have not selected. Therefore, you must be connected to the network in order for the component to be installed if you need to use it. .
  • 42.
    Learning Module: ComputerSystem www.ppk.kpm.my < 41 > Figure 4 5. When done, click OK. You have completed the installation of Microsoft Office XP Professional successfully (Figure 5). Figure 5 6. Opening a Microsoft Office Application A. To open an Office application, select the Start menu, point to Programs (or All Programs), and click whichever Office application you would like to open.
  • 43.
    Learning Module: ComputerSystem www.ppk.kpm.my < 42 > D. UTILITY SOFTWARE INSTALLATION
  • 44.
    Learning Module: ComputerSystem www.ppk.kpm.my < 43 > After installing the application software, you may want to install the utility programs for computer maintenance and other usages. Two utility programs which are mostly used are the antivirus software and the compression software. How to Install Antivirus Software - AVG Free Edition Anti-Virus 1. Click Start menu and point to Control Panel (Figure 1) Figure 1 2. Click Add or Remove Programs. You will get the following display (Figure 2). Figure 2
  • 45.
    Learning Module: ComputerSystem www.ppk.kpm.my < 44 > 3. Choose the location of the AVG Anti-Virus CD program (Figure 3). Figure 3 4. Click on the location drive and a display will be shown as in Figure 4 below. Figure 4
  • 46.
    Learning Module: ComputerSystem www.ppk.kpm.my < 45 > 5. The Welcome screen will be displayed as shown in Figure 5. Click on the Next button to start installing the program. Figure 5 6. Read the license Agreement on the use of an AVG Anti-Virus software. Click Accept (Figure 6). Figure 6
  • 47.
    Learning Module: ComputerSystem www.ppk.kpm.my < 46 > 7. The program will check your computer system before installing the program (Figure 7 ). Figure 7 8. After checking the computer status, select the type of installation (Figure 8). Then, click Next . Figure 8
  • 48.
    Learning Module: ComputerSystem www.ppk.kpm.my < 47 > 9. Type the User Name and License Number shown in Figure 9. Figure 9 10. Click Finish when the following screen is displayed (Figure10). Figure 10
  • 49.
    Learning Module: ComputerSystem www.ppk.kpm.my < 48 > 11. The following screen appears(Figure 11). Figure 11 12. Click the OK when the installation process is completed (Figure 12). Figure 12
  • 50.
    Learning Module: ComputerSystem www.ppk.kpm.my < 49 > 13. AVG Antivirus has been successfully installed. Click Next to proceed (Figure 13). Figure 13 14. Just click Cancel to proceed (Figure 14). Figure 14
  • 51.
    Learning Module: ComputerSystem www.ppk.kpm.my < 50 > 15. AVG Free Registration screen appears as shown in Figure 15 below. Click Next to register automatically. Figure 15 16. Your Anti-Virus installation program is completed. Click Continue to run your AVG Anti-Virus program ( Figure 16). Figure16
  • 52.
    Learning Module: ComputerSystem www.ppk.kpm.my < 51 > 17. Once the AVG Anti-Virus program installation process has completed, the Test Center screen appears as shown in Figure 17 below. Choose your options to scan. Figure 17
  • 53.
    Learning Module: ComputerSystem www.ppk.kpm.my < 52 > ASSESSMENT Suggested Assessment Exercise 1 1. List three types of application software in Microsoft Office XP. __________________________________________________ __________________________________________________ __________________________________________________ 2. Name any three anti-virus programs. __________________________________________________ __________________________________________________ __________________________________________________ 3. Explain briefly how to install anti-virus software. __________________________________________________ __________________________________________________ __________________________________________________ 4. What is a utility software? Give two examples. __________________________________________________ __________________________________________________ __________________________________________________ CONGRATULATIONS !! YOU HAVE SUCCESSFULLY COMPLETED THIS MODULE. YOU ARE NOW ABLE TO RUN YOUR COMPUTER AND THE PROGRAMS THAT YOU HAVE INSTALLED.