Lander Standing Desk Base Assembly Guide
•
0 likes•36,532 views

Follow this guide to assemble your DIY Lander Desk!

Recommended
Recommended
More Related Content
What's hot
What's hot (20)
Similar to Lander Standing Desk Base Assembly Guide
Similar to Lander Standing Desk Base Assembly Guide (20)
More from iMovR
More from iMovR (20)
Recently uploaded
Recently uploaded (20)
Lander Standing Desk Base Assembly Guide
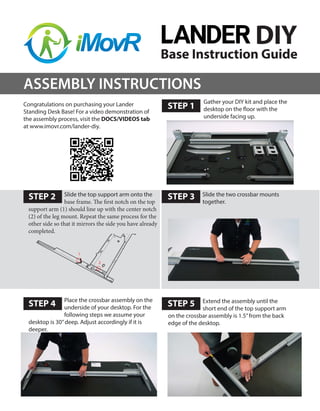
- 1. Base Instruction Guide STEP 1 Congratulations on purchasing your Lander Standing Desk Base! For a video demonstration of the assembly process, visit the DOCS/VIDEOS tab at www.imovr.com/lander-diy. Slide the two crossbar mounts together. STEP 2 STEP 3 STEP 4 STEP 5 ASSEMBLY INSTRUCTIONS Gather your DIY kit and place the desktop on the floor with the underside facing up. DIY Slide the top support arm onto the base frame. The first notch on the top support arm (1) should line up with the center notch (2) of the leg mount. Repeat the same process for the other side so that it mirrors the side you have already completed. Extend the assembly until the short end of the top support arm on the crossbar assembly is 1.5”from the back edge of the desktop. Place the crossbar assembly on the underside of your desktop. For the following steps we assume your desktop is 30”deep. Adjust accordingly if it is deeper.
- 2. Align the top support arm crossbar assembly so that it is 3”from the side edge of the desktop (recommended, but you may choose to have it closer or further from the edge). Repeat the same process for the other side. Pre-drilling pilot holes is highly recommended. Verify that your screws are the correct length for your desktop and won’t push through your desktop. Screws are included with your kit, but you may need to substitute as needed depending upon the thickness of your own desktop. BE CAREFUL - DO NOT DRILL THROUGH YOUR DESKTOP. Now that you are ready to screw the assembly to the desktop. First secure opposing corners of the assembly to ensure that the assembly remains aligned during the install process. Next, finish securing the desktop to the base by inserting all remaining screws. Align the short side of the foot with the short side of the top support arm. Place the motor end of the leg into the motor housing. STEP 6 STEP 7 STEP 8 STEP 9 STEP 10 STEP 11 NOTE: The Lander Base is a C-Leg mechanism and is designed to be mounted closer to the back edge of the desktop. Ensure your base is aligned properly on the desktop as shown in the diagram.
- 3. Plug the control cable into the connector on the leg base. Place the clamp on the housing with the arrow pointing towards the leg and press down firmly. Repeat the same process for the other leg. Place the lock in the clamp. The arrow on the lock should face the arrow on the clamp. Connect the leg cables black Bluetooth dongle, hand controller cable and power cable into the control box. STEP 12 STEP 13 STEP 14 STEP 18 STEP 15 STEP 19 Step down firmly on the clamp lock to fix the lock in place. This may require some force, wear a stiff shoe/boot and apply standing weight forcing down. Repeat the same process for the other side STEP 16 STEP 17 Screw down the control box in the center of the desk and between the crossbar and back edge of the desktop. BE CAREFUL - DO NOT DRILL THROUGH YOUR DESKTOP.
- 4. Install the hand controller 3”to 4” from the left or right edge of the desk. Bring the housing of the hand controller a half inch back from the front edge of the desk. BE CAREFUL - DO NOT DRILL THROUGH YOUR DESKTOP. With a friend, turn over your desk. Plug the power cable into the wall socket. STEP 20 STEP 21 STEP 22 STEP 23 Download the mobile app! For easy programming, advanced controller options, and instructions, visit: imovr.com/lander-app See full Lander Manual for details including hand controller instructions, troubleshooting, and more. Initialize the desk by lowering the desk to its lowest limit. Release paddle. Hold paddle down for 5 seconds until the height is displayed. Release. To learn how to program the desk from the handset see the Lander Desk Manual on the DOCS/VIDEO tab of any Lander desk on iMovR. com. For instructions on how to program the desk via your smartphone use the QR code below. IMovR Contact Information: Phone: (888) 208-6770 or (425) 999-3550 Fax: (425) 999-3550 E-mail: customercare@iMovR.com Live Chat: www.iMovR.com Hours: See iMovR.com/hours