SlideShare a Scribd company logo
1 of 4
Download to read offline
Stowaway Ergonomic
Keyboard Tray
Installation Guide Version 2.0
Installerā€™s Note:
This manual supersedes any keyboard tray installation instructions included with the desk.
If you have any questions during the assembly process please contact our Customer Care team:
Hours: See www.iMovR.com/hours E-mail: customercare@imovr.com
Phone: (888) 208-6770 or (425) 999-3550 Live chat: www.iMovR.com
Whatā€™s in the Box
Before beginning installation, please check that all the necessary parts were included in the box. Note: the small
parts kit for attaching the keyboard tray to the arm mechanism is taped to the underside of the keyboard tray.
Adjustability Features
This keyboard tray allows for maximum ergonomic adjustability. The height and tilt angle of the keyboard
platform can be independently set. The mouse platform can clip onto the left or right side of the keyboard tray.
This platform can also be independently set for both height and tilt. The entire tray can be rotated under the
desk and completely out of the way when not in use.
Installing the Baseframe (ā€œMounting Railā€)
If you are installing the keyboard tray on any ThermoDesk adjustable-height table then please follow the
instructions in this booklet. If you are installing on a different desk, or on a ThermoDesk but in a different
position than where the pre-drilled holes have been provided, please use the enclosed mounting template for
positioning instructions. Alternatively, you can use the baseframe itself as a template to mark drilling points. Use
a 1/8ā€ diameter drill bit, and drill Ā½ā€ deep. Take care not to drill through the table surface.
Selecting the Best Mounting Position for the Baseframe
All ThermoDesk table tops come pre-drilled for easy baseframe attachment, with two positioning options
depending on the userā€™s preference. See the respective diagram for your table topā€™s depth on the opposite
page for placement options.
The keyboard tray can be mounted along the leading edge of the desk (using the first two rows of mounting
holes) in order to maximize its vertical adjustment range ā€“ a benefit to taller individuals who may want that
extra inch or two of adjustment range. Otherwise, most people will prefer to use the rear position (back two
rows of mounting holes). This position keeps the keyboard and the user closer to the desk, and minimizes the
ā€œlever arm effectā€ when pressing down on the keyboard. This position will also minimize monitor shake.
2
Front-Edge Mounting Option for Taller Users
Standard Mounting Option
Keyboard and Clip-On Mouse Platforms
Keyboard
Tray Arm
Baseframe
Screws, nuts and washers
for attaching keyboard
platform to arm mechanism
Stopper bar and machine screws
#12 wood screws for securing
baseframe to desktop
Step 1: Mounting the Baseframe
The baseframe rails are greased; handle with care not to get your hands dirty (washes off with soap and water).
Place the table top upside-down on the floor, with the front edge of the desk facing you. Note the orientation of
the baseframe in the picture below. The two notched metal tabs go on the right.
Position the baseframe so that all six pre-drilled holes are in line with the holes in the plate. Use six of the #12
wood screws provided to secure the baseframe to the tabletop.
ThermoDesk Stowaway Ergonomic Keyboard Tray ā€“ Installation Manual
Keyboard tray baseframe orientation
Right ļƒ 
ļƒŸ Left
Step 2: Assembling the Keyboard Platform
Attach the keyboard platform to the tray arm using the four sets of nuts, toothed washers, spacers and screws
provided. Place the spacer, and then the toothed washer, onto each screw, in that order. You can clip on the mouse
platform after the rest of the keyboard tray is assembled, following the pictorial guide on the keyboard platform.
Once assembled, slide the keyboard tray mechanism onto the baseframe from the left side.
Final Step: Installing the Stopping Bar
Insert the plastic stopping bar into the left end of the baseframe and secure in place using the two screws provided.
1
Mounting Positions on a 24ā€ Deep Tabletop:
ā—¦
ā—¦
ā—¦
ā—¦
ā—¦
ā—¦
ā—¦
ā—¦
ā—¦
ā—¦
ā—¦
ā—¦
ā—¦
ā—¦
ā—¦
ā—¦
ā—¦
ā—¦
Mounting Positions on a 30ā€ Deep Tabletop:
ā—¦
ā—¦
ā—¦
ā—¦
ā—¦
ā—¦
ā—¦
ā—¦
ā—¦
ā—¦ ā—¦ ā—¦
ā—¦
ā—¦
ā—¦
ā—¦
ā—¦
ā—¦
ā—¦
ā—¦
ā—¦
ā—¦ ā—¦ ā—¦
Preferred position for most users Use this position for maximum vertical height extension
(taller users may prefer)
Preferred position for most users Use this position for maximum vertical height extension
(taller users may prefer)
3
Use #12 wood screws
In the six pre-drilled holes
Stowing Away
The baseframe is mounted left-to-right instead of front-to-back ā€“ as many common keyboard trays are ā€“ for
two reasons. First, all adjustable-height desks have a cross bar that interferes with the full retraction of a
keyboard tray, so swinging it underneath (see pictures below) is the only way to get the keyboard tray
completely out of the way. Second, different keyboards have different centers; those with a ā€œnum padā€ built in
are going to be off-center compared to ergonomic models that have a separate num pad keyboard.
By mounting the baseframe in a left-to-right orientation as we recommend, regardless of what type of
keyboard you use today - or switch to in the future - youā€™ll never have to re-install the entire keyboard tray just
to center your keyboard properly.
Notes for 40ā€ and 48ā€ wide table top users: it may be necessary to slide the keyboard tray to the left or right a
few inches before rotating it under the desk, to avoid hitting the lifting leg.
Adjusting the Keyboard and Mouse Platforms
The keyboard tray adjusts with a very simple ā€œlift-and-lockā€ mechanism. To adjust the height of the keyboard
hold the tray firmly and lift up its front edge. This unlocks the position hold. Once unlocked, you'll be able to
move the arm up or down to the desired height. Simply lower the front edge of the tray back down to lock it
into place.
To adjust the tilt angle of the keyboard platform, rotate the knob near the back of the keyboard tray.
To tilt the mouse platform, hold both sides of the mouse platform and firmly tilt it toward or away from you.
To adjust the vertical height of mouse platform, press in the gray button in the center of the mouse platform's
attachment joint, then rotate the platform until youā€™ve reached the desired height.
Customizing for Different Keyboard Types
If you use an ergonomic keyboard that has a built-in palm rest, e.g. the Microsoft Natural, you may want to
remove the gel pad from the keyboard platform. Once removed, youā€™ll notice that the user-facing edge of the
keyboard platform is curved to match the contour of the Microsoft Natural and similar ā€œwave formā€ keyboard
styles.
IMovR Contact Information:
Phone: (888) 208-6770 or (425) 999-3550 E-mail: customercare@iMovR.com

More Related Content

What's hot

Lesson 1 introduction to spreadsheet
Lesson 1 introduction to spreadsheet Lesson 1 introduction to spreadsheet
Lesson 1 introduction to spreadsheet afrimkofielias
Ā 
Excel slide show
Excel slide showExcel slide show
Excel slide showRemon sai
Ā 
ppt on data tab in ms.excel
ppt on data tab in ms.excelppt on data tab in ms.excel
ppt on data tab in ms.excelMayank Aggarwal
Ā 
LOGO command worksheet
LOGO command worksheetLOGO command worksheet
LOGO command worksheetSagar Thota
Ā 
Formulas and functions - By Amresh Tiwari
Formulas and functions - By Amresh TiwariFormulas and functions - By Amresh Tiwari
Formulas and functions - By Amresh TiwariAmresh Tiwari
Ā 
Microsoft Word
Microsoft WordMicrosoft Word
Microsoft WordJack Frost
Ā 
Ms word Presentation
Ms word PresentationMs word Presentation
Ms word PresentationMadhab Behera
Ā 
Ejercicio 02 de word
Ejercicio 02 de wordEjercicio 02 de word
Ejercicio 02 de wordcarmen andrades
Ā 
Lander DIY Assembly Guide
Lander DIY Assembly GuideLander DIY Assembly Guide
Lander DIY Assembly GuideiMovR
Ā 
MOP Module 2 research paper with references
MOP Module 2   research paper with referencesMOP Module 2   research paper with references
MOP Module 2 research paper with referencesWilmington High School
Ā 
Adobe Photoshop Basics - Session 1
Adobe Photoshop Basics - Session 1Adobe Photoshop Basics - Session 1
Adobe Photoshop Basics - Session 1xneptune
Ā 
Ms word and Ms Excel Presentation
Ms word and Ms Excel PresentationMs word and Ms Excel Presentation
Ms word and Ms Excel Presentationharis601
Ā 
Ms Excel Tutorials
Ms Excel TutorialsMs Excel Tutorials
Ms Excel TutorialsLUZ PINGOL
Ā 

What's hot (20)

Lesson 1 introduction to spreadsheet
Lesson 1 introduction to spreadsheet Lesson 1 introduction to spreadsheet
Lesson 1 introduction to spreadsheet
Ā 
Rubix cube
Rubix cubeRubix cube
Rubix cube
Ā 
Tutorial in Insert Menu
Tutorial in Insert MenuTutorial in Insert Menu
Tutorial in Insert Menu
Ā 
Excel slide show
Excel slide showExcel slide show
Excel slide show
Ā 
binary search tree
binary search treebinary search tree
binary search tree
Ā 
MS Excel - Charts
MS Excel - ChartsMS Excel - Charts
MS Excel - Charts
Ā 
ppt on data tab in ms.excel
ppt on data tab in ms.excelppt on data tab in ms.excel
ppt on data tab in ms.excel
Ā 
LOGO command worksheet
LOGO command worksheetLOGO command worksheet
LOGO command worksheet
Ā 
Formulas and functions - By Amresh Tiwari
Formulas and functions - By Amresh TiwariFormulas and functions - By Amresh Tiwari
Formulas and functions - By Amresh Tiwari
Ā 
Microsoft Word
Microsoft WordMicrosoft Word
Microsoft Word
Ā 
Ms word Presentation
Ms word PresentationMs word Presentation
Ms word Presentation
Ā 
Ejercicio 02 de word
Ejercicio 02 de wordEjercicio 02 de word
Ejercicio 02 de word
Ā 
Lander DIY Assembly Guide
Lander DIY Assembly GuideLander DIY Assembly Guide
Lander DIY Assembly Guide
Ā 
MOP Module 2 research paper with references
MOP Module 2   research paper with referencesMOP Module 2   research paper with references
MOP Module 2 research paper with references
Ā 
Adobe Photoshop Basics - Session 1
Adobe Photoshop Basics - Session 1Adobe Photoshop Basics - Session 1
Adobe Photoshop Basics - Session 1
Ā 
Task 2
Task 2Task 2
Task 2
Ā 
KNOW YOUR KEYBOARD
KNOW YOUR KEYBOARDKNOW YOUR KEYBOARD
KNOW YOUR KEYBOARD
Ā 
Ms word and Ms Excel Presentation
Ms word and Ms Excel PresentationMs word and Ms Excel Presentation
Ms word and Ms Excel Presentation
Ā 
Introduction of ms excel
Introduction of ms excelIntroduction of ms excel
Introduction of ms excel
Ā 
Ms Excel Tutorials
Ms Excel TutorialsMs Excel Tutorials
Ms Excel Tutorials
Ā 

Similar to Stowaway Ergonomic Keyboard Tray Installation Manual

Freedom Manual (Cascade and Energize)
Freedom Manual (Cascade and Energize)Freedom Manual (Cascade and Energize)
Freedom Manual (Cascade and Energize)iMovR
Ā 
Freedom Manual (Cascade and Energize)
Freedom Manual (Cascade and Energize)Freedom Manual (Cascade and Energize)
Freedom Manual (Cascade and Energize)iMovR
Ā 
ThermoDesk ELITE Adjustable-Height Desk System - Installation and User Manual
ThermoDesk ELITE Adjustable-Height Desk System - Installation and User ManualThermoDesk ELITE Adjustable-Height Desk System - Installation and User Manual
ThermoDesk ELITE Adjustable-Height Desk System - Installation and User ManualiMovR
Ā 
iMovR ThermoDesk ELITE Adjustable-Height Standing Desk Installation Manual
iMovR ThermoDesk ELITE Adjustable-Height Standing Desk Installation ManualiMovR ThermoDesk ELITE Adjustable-Height Standing Desk Installation Manual
iMovR ThermoDesk ELITE Adjustable-Height Standing Desk Installation ManualiMovR
Ā 
iMovR Leg Extension Manual
iMovR Leg Extension ManualiMovR Leg Extension Manual
iMovR Leg Extension ManualiMovR
Ā 
Lander L- & U-Desk Assembly Instructions and User Manual
Lander L- & U-Desk Assembly Instructions and User ManualLander L- & U-Desk Assembly Instructions and User Manual
Lander L- & U-Desk Assembly Instructions and User ManualiMovR
Ā 
iMovR Cadence Standing Desk Converter Installation Manual
iMovR Cadence Standing Desk Converter Installation ManualiMovR Cadence Standing Desk Converter Installation Manual
iMovR Cadence Standing Desk Converter Installation ManualiMovR
Ā 
Lander L-Desk Installation Manual
Lander L-Desk Installation Manual Lander L-Desk Installation Manual
Lander L-Desk Installation Manual iMovR
Ā 
Lander L-Desk with SteadyType Installation Manual
Lander L-Desk with SteadyType Installation ManualLander L-Desk with SteadyType Installation Manual
Lander L-Desk with SteadyType Installation ManualiMovR
Ā 
iMovR Lander L-Desk User Manual
iMovR Lander L-Desk User ManualiMovR Lander L-Desk User Manual
iMovR Lander L-Desk User ManualiMovR
Ā 
Lander Standing Desk User Manual
Lander Standing Desk User ManualLander Standing Desk User Manual
Lander Standing Desk User ManualiMovR
Ā 
iMovR SteadyType User Guide
iMovR SteadyType User GuideiMovR SteadyType User Guide
iMovR SteadyType User GuideiMovR
Ā 
UpTown Adjustable-Height Desk System Installation Manual
UpTown Adjustable-Height Desk System Installation ManualUpTown Adjustable-Height Desk System Installation Manual
UpTown Adjustable-Height Desk System Installation ManualiMovR
Ā 
Lander Lite DIY Assembly Instructions Rev
Lander Lite DIY Assembly Instructions RevLander Lite DIY Assembly Instructions Rev
Lander Lite DIY Assembly Instructions ReviMovR
Ā 
Omega Everest Electric Adjustable-Height Desk Manual
Omega Everest Electric Adjustable-Height Desk ManualOmega Everest Electric Adjustable-Height Desk Manual
Omega Everest Electric Adjustable-Height Desk ManualiMovR
Ā 
iMovR Lander L-Desk Instruction Manual (w or w/o built-in SteadyType Keyboard...
iMovR Lander L-Desk Instruction Manual (w or w/o built-in SteadyType Keyboard...iMovR Lander L-Desk Instruction Manual (w or w/o built-in SteadyType Keyboard...
iMovR Lander L-Desk Instruction Manual (w or w/o built-in SteadyType Keyboard...iMovR
Ā 
Omega Denali Adjustable-Height Desk Manual
Omega Denali Adjustable-Height Desk ManualOmega Denali Adjustable-Height Desk Manual
Omega Denali Adjustable-Height Desk ManualiMovR
Ā 
iMovR ZipDesk Standing Desk Installation and User Manual
iMovR ZipDesk Standing Desk Installation and User ManualiMovR ZipDesk Standing Desk Installation and User Manual
iMovR ZipDesk Standing Desk Installation and User ManualiMovR
Ā 
iMovr Omega Olympus Manual 12 24-15
iMovr Omega Olympus Manual 12 24-15iMovr Omega Olympus Manual 12 24-15
iMovr Omega Olympus Manual 12 24-15iMovR
Ā 
Upsilon Adjustable-Height Desk System Installation Manual
Upsilon Adjustable-Height Desk System Installation ManualUpsilon Adjustable-Height Desk System Installation Manual
Upsilon Adjustable-Height Desk System Installation ManualiMovR
Ā 

Similar to Stowaway Ergonomic Keyboard Tray Installation Manual (20)

Freedom Manual (Cascade and Energize)
Freedom Manual (Cascade and Energize)Freedom Manual (Cascade and Energize)
Freedom Manual (Cascade and Energize)
Ā 
Freedom Manual (Cascade and Energize)
Freedom Manual (Cascade and Energize)Freedom Manual (Cascade and Energize)
Freedom Manual (Cascade and Energize)
Ā 
ThermoDesk ELITE Adjustable-Height Desk System - Installation and User Manual
ThermoDesk ELITE Adjustable-Height Desk System - Installation and User ManualThermoDesk ELITE Adjustable-Height Desk System - Installation and User Manual
ThermoDesk ELITE Adjustable-Height Desk System - Installation and User Manual
Ā 
iMovR ThermoDesk ELITE Adjustable-Height Standing Desk Installation Manual
iMovR ThermoDesk ELITE Adjustable-Height Standing Desk Installation ManualiMovR ThermoDesk ELITE Adjustable-Height Standing Desk Installation Manual
iMovR ThermoDesk ELITE Adjustable-Height Standing Desk Installation Manual
Ā 
iMovR Leg Extension Manual
iMovR Leg Extension ManualiMovR Leg Extension Manual
iMovR Leg Extension Manual
Ā 
Lander L- & U-Desk Assembly Instructions and User Manual
Lander L- & U-Desk Assembly Instructions and User ManualLander L- & U-Desk Assembly Instructions and User Manual
Lander L- & U-Desk Assembly Instructions and User Manual
Ā 
iMovR Cadence Standing Desk Converter Installation Manual
iMovR Cadence Standing Desk Converter Installation ManualiMovR Cadence Standing Desk Converter Installation Manual
iMovR Cadence Standing Desk Converter Installation Manual
Ā 
Lander L-Desk Installation Manual
Lander L-Desk Installation Manual Lander L-Desk Installation Manual
Lander L-Desk Installation Manual
Ā 
Lander L-Desk with SteadyType Installation Manual
Lander L-Desk with SteadyType Installation ManualLander L-Desk with SteadyType Installation Manual
Lander L-Desk with SteadyType Installation Manual
Ā 
iMovR Lander L-Desk User Manual
iMovR Lander L-Desk User ManualiMovR Lander L-Desk User Manual
iMovR Lander L-Desk User Manual
Ā 
Lander Standing Desk User Manual
Lander Standing Desk User ManualLander Standing Desk User Manual
Lander Standing Desk User Manual
Ā 
iMovR SteadyType User Guide
iMovR SteadyType User GuideiMovR SteadyType User Guide
iMovR SteadyType User Guide
Ā 
UpTown Adjustable-Height Desk System Installation Manual
UpTown Adjustable-Height Desk System Installation ManualUpTown Adjustable-Height Desk System Installation Manual
UpTown Adjustable-Height Desk System Installation Manual
Ā 
Lander Lite DIY Assembly Instructions Rev
Lander Lite DIY Assembly Instructions RevLander Lite DIY Assembly Instructions Rev
Lander Lite DIY Assembly Instructions Rev
Ā 
Omega Everest Electric Adjustable-Height Desk Manual
Omega Everest Electric Adjustable-Height Desk ManualOmega Everest Electric Adjustable-Height Desk Manual
Omega Everest Electric Adjustable-Height Desk Manual
Ā 
iMovR Lander L-Desk Instruction Manual (w or w/o built-in SteadyType Keyboard...
iMovR Lander L-Desk Instruction Manual (w or w/o built-in SteadyType Keyboard...iMovR Lander L-Desk Instruction Manual (w or w/o built-in SteadyType Keyboard...
iMovR Lander L-Desk Instruction Manual (w or w/o built-in SteadyType Keyboard...
Ā 
Omega Denali Adjustable-Height Desk Manual
Omega Denali Adjustable-Height Desk ManualOmega Denali Adjustable-Height Desk Manual
Omega Denali Adjustable-Height Desk Manual
Ā 
iMovR ZipDesk Standing Desk Installation and User Manual
iMovR ZipDesk Standing Desk Installation and User ManualiMovR ZipDesk Standing Desk Installation and User Manual
iMovR ZipDesk Standing Desk Installation and User Manual
Ā 
iMovr Omega Olympus Manual 12 24-15
iMovr Omega Olympus Manual 12 24-15iMovr Omega Olympus Manual 12 24-15
iMovr Omega Olympus Manual 12 24-15
Ā 
Upsilon Adjustable-Height Desk System Installation Manual
Upsilon Adjustable-Height Desk System Installation ManualUpsilon Adjustable-Height Desk System Installation Manual
Upsilon Adjustable-Height Desk System Installation Manual
Ā 

More from iMovR

Lander Desk DIY Assembly Manual
Lander Desk DIY Assembly ManualLander Desk DIY Assembly Manual
Lander Desk DIY Assembly ManualiMovR
Ā 
The Ensign's Standing Desk Installation and User Manual
The Ensign's Standing Desk Installation and User ManualThe Ensign's Standing Desk Installation and User Manual
The Ensign's Standing Desk Installation and User ManualiMovR
Ā 
iMovR Premium Drawer Drill Template
iMovR Premium Drawer Drill TemplateiMovR Premium Drawer Drill Template
iMovR Premium Drawer Drill TemplateiMovR
Ā 
Tech Dock Instruction Manual
Tech Dock Instruction ManualTech Dock Instruction Manual
Tech Dock Instruction ManualiMovR
Ā 
Lander Lite Standing Desk User Manual
Lander Lite Standing Desk User ManualLander Lite Standing Desk User Manual
Lander Lite Standing Desk User ManualiMovR
Ā 
Standing mat-study-texas-am-university-2013
Standing mat-study-texas-am-university-2013Standing mat-study-texas-am-university-2013
Standing mat-study-texas-am-university-2013iMovR
Ā 
INSTALLATION INSTRUCTIONS RONDO MICRO PASS-THROUGH GROMMET WITH COVER (NO POWER)
INSTALLATION INSTRUCTIONS RONDO MICRO PASS-THROUGH GROMMET WITH COVER (NO POWER)INSTALLATION INSTRUCTIONS RONDO MICRO PASS-THROUGH GROMMET WITH COVER (NO POWER)
INSTALLATION INSTRUCTIONS RONDO MICRO PASS-THROUGH GROMMET WITH COVER (NO POWER)iMovR
Ā 
Spacer kit instructions
Spacer kit instructions Spacer kit instructions
Spacer kit instructions iMovR
Ā 
Installation Instructions for Rondo Micro USB-C 18W and 60W
Installation Instructions for Rondo Micro USB-C 18W and 60WInstallation Instructions for Rondo Micro USB-C 18W and 60W
Installation Instructions for Rondo Micro USB-C 18W and 60WiMovR
Ā 
Captains Desk Instruction Manual
 Captains Desk Instruction Manual  Captains Desk Instruction Manual
Captains Desk Instruction Manual iMovR
Ā 
Rondo Micro USB-C 18W Instruction Manual
Rondo Micro USB-C 18W Instruction ManualRondo Micro USB-C 18W Instruction Manual
Rondo Micro USB-C 18W Instruction ManualiMovR
Ā 
Rondo Micro AC Outlet Instruction Manual
Rondo Micro AC Outlet Instruction ManualRondo Micro AC Outlet Instruction Manual
Rondo Micro AC Outlet Instruction ManualiMovR
Ā 
Captain's Desk Standing Desk Instruction Manual
Captain's Desk Standing Desk Instruction ManualCaptain's Desk Standing Desk Instruction Manual
Captain's Desk Standing Desk Instruction ManualiMovR
Ā 
Neemo Ergonomic Chair User Guide
Neemo Ergonomic Chair User GuideNeemo Ergonomic Chair User Guide
Neemo Ergonomic Chair User GuideiMovR
Ā 
iMovR's McHale Advanced Ergonomic Chair User Guide
iMovR's McHale Advanced Ergonomic Chair User GuideiMovR's McHale Advanced Ergonomic Chair User Guide
iMovR's McHale Advanced Ergonomic Chair User GuideiMovR
Ā 
SteadyType Exo Ergodynamic Keyboard Tray User Instructions
SteadyType Exo Ergodynamic Keyboard Tray User InstructionsSteadyType Exo Ergodynamic Keyboard Tray User Instructions
SteadyType Exo Ergodynamic Keyboard Tray User InstructionsiMovR
Ā 
ZipView Unison Dual Monitor Arm with Handle User Manual
ZipView Unison Dual Monitor Arm with Handle User ManualZipView Unison Dual Monitor Arm with Handle User Manual
ZipView Unison Dual Monitor Arm with Handle User ManualiMovR
Ā 
iMovR TopView Max Unison Monitor Arm
iMovR TopView Max Unison Monitor ArmiMovR TopView Max Unison Monitor Arm
iMovR TopView Max Unison Monitor ArmiMovR
Ā 
iMovR TopView Max Unison Monitor Arm
iMovR TopView Max Unison Monitor ArmiMovR TopView Max Unison Monitor Arm
iMovR TopView Max Unison Monitor ArmiMovR
Ā 
iMovR TopView Dual Monitor Arm
iMovR TopView Dual Monitor ArmiMovR TopView Dual Monitor Arm
iMovR TopView Dual Monitor ArmiMovR
Ā 

More from iMovR (20)

Lander Desk DIY Assembly Manual
Lander Desk DIY Assembly ManualLander Desk DIY Assembly Manual
Lander Desk DIY Assembly Manual
Ā 
The Ensign's Standing Desk Installation and User Manual
The Ensign's Standing Desk Installation and User ManualThe Ensign's Standing Desk Installation and User Manual
The Ensign's Standing Desk Installation and User Manual
Ā 
iMovR Premium Drawer Drill Template
iMovR Premium Drawer Drill TemplateiMovR Premium Drawer Drill Template
iMovR Premium Drawer Drill Template
Ā 
Tech Dock Instruction Manual
Tech Dock Instruction ManualTech Dock Instruction Manual
Tech Dock Instruction Manual
Ā 
Lander Lite Standing Desk User Manual
Lander Lite Standing Desk User ManualLander Lite Standing Desk User Manual
Lander Lite Standing Desk User Manual
Ā 
Standing mat-study-texas-am-university-2013
Standing mat-study-texas-am-university-2013Standing mat-study-texas-am-university-2013
Standing mat-study-texas-am-university-2013
Ā 
INSTALLATION INSTRUCTIONS RONDO MICRO PASS-THROUGH GROMMET WITH COVER (NO POWER)
INSTALLATION INSTRUCTIONS RONDO MICRO PASS-THROUGH GROMMET WITH COVER (NO POWER)INSTALLATION INSTRUCTIONS RONDO MICRO PASS-THROUGH GROMMET WITH COVER (NO POWER)
INSTALLATION INSTRUCTIONS RONDO MICRO PASS-THROUGH GROMMET WITH COVER (NO POWER)
Ā 
Spacer kit instructions
Spacer kit instructions Spacer kit instructions
Spacer kit instructions
Ā 
Installation Instructions for Rondo Micro USB-C 18W and 60W
Installation Instructions for Rondo Micro USB-C 18W and 60WInstallation Instructions for Rondo Micro USB-C 18W and 60W
Installation Instructions for Rondo Micro USB-C 18W and 60W
Ā 
Captains Desk Instruction Manual
 Captains Desk Instruction Manual  Captains Desk Instruction Manual
Captains Desk Instruction Manual
Ā 
Rondo Micro USB-C 18W Instruction Manual
Rondo Micro USB-C 18W Instruction ManualRondo Micro USB-C 18W Instruction Manual
Rondo Micro USB-C 18W Instruction Manual
Ā 
Rondo Micro AC Outlet Instruction Manual
Rondo Micro AC Outlet Instruction ManualRondo Micro AC Outlet Instruction Manual
Rondo Micro AC Outlet Instruction Manual
Ā 
Captain's Desk Standing Desk Instruction Manual
Captain's Desk Standing Desk Instruction ManualCaptain's Desk Standing Desk Instruction Manual
Captain's Desk Standing Desk Instruction Manual
Ā 
Neemo Ergonomic Chair User Guide
Neemo Ergonomic Chair User GuideNeemo Ergonomic Chair User Guide
Neemo Ergonomic Chair User Guide
Ā 
iMovR's McHale Advanced Ergonomic Chair User Guide
iMovR's McHale Advanced Ergonomic Chair User GuideiMovR's McHale Advanced Ergonomic Chair User Guide
iMovR's McHale Advanced Ergonomic Chair User Guide
Ā 
SteadyType Exo Ergodynamic Keyboard Tray User Instructions
SteadyType Exo Ergodynamic Keyboard Tray User InstructionsSteadyType Exo Ergodynamic Keyboard Tray User Instructions
SteadyType Exo Ergodynamic Keyboard Tray User Instructions
Ā 
ZipView Unison Dual Monitor Arm with Handle User Manual
ZipView Unison Dual Monitor Arm with Handle User ManualZipView Unison Dual Monitor Arm with Handle User Manual
ZipView Unison Dual Monitor Arm with Handle User Manual
Ā 
iMovR TopView Max Unison Monitor Arm
iMovR TopView Max Unison Monitor ArmiMovR TopView Max Unison Monitor Arm
iMovR TopView Max Unison Monitor Arm
Ā 
iMovR TopView Max Unison Monitor Arm
iMovR TopView Max Unison Monitor ArmiMovR TopView Max Unison Monitor Arm
iMovR TopView Max Unison Monitor Arm
Ā 
iMovR TopView Dual Monitor Arm
iMovR TopView Dual Monitor ArmiMovR TopView Dual Monitor Arm
iMovR TopView Dual Monitor Arm
Ā 

Recently uploaded

Dubai Call Girls O525547&19 (Asii) Call Girls Dubai
Dubai Call Girls O525547&19 (Asii) Call Girls DubaiDubai Call Girls O525547&19 (Asii) Call Girls Dubai
Dubai Call Girls O525547&19 (Asii) Call Girls Dubaikojalkojal131
Ā 
Korba Call Girls #9907093804 Contact Number Escorts Service Korba
Korba Call Girls #9907093804 Contact Number Escorts Service KorbaKorba Call Girls #9907093804 Contact Number Escorts Service Korba
Korba Call Girls #9907093804 Contact Number Escorts Service Korbasrsj9000
Ā 
Best VIP Call Girls Noida Sector 50 Call Me: 8448380779
Best VIP Call Girls Noida Sector 50 Call Me: 8448380779Best VIP Call Girls Noida Sector 50 Call Me: 8448380779
Best VIP Call Girls Noida Sector 50 Call Me: 8448380779Delhi Call girls
Ā 
The 15 Minute Breakdown: 2024 Beauty Marketing Study
The 15 Minute Breakdown: 2024 Beauty Marketing StudyThe 15 Minute Breakdown: 2024 Beauty Marketing Study
The 15 Minute Breakdown: 2024 Beauty Marketing StudyTinuiti
Ā 
Indian Call Girl In Dubai #$# O5634O3O18 #$# Dubai Call Girl
Indian Call Girl In Dubai #$# O5634O3O18 #$# Dubai Call GirlIndian Call Girl In Dubai #$# O5634O3O18 #$# Dubai Call Girl
Indian Call Girl In Dubai #$# O5634O3O18 #$# Dubai Call GirlAroojKhan71
Ā 
Film= Dubai Call Girls O525547819 Call Girls Dubai Whsatapp
Film= Dubai Call Girls O525547819 Call Girls Dubai WhsatappFilm= Dubai Call Girls O525547819 Call Girls Dubai Whsatapp
Film= Dubai Call Girls O525547819 Call Girls Dubai Whsatappkojalkojal131
Ā 
The 15 Minute Breakdown: 2024 Beauty Marketing Study
The 15 Minute Breakdown: 2024 Beauty Marketing StudyThe 15 Minute Breakdown: 2024 Beauty Marketing Study
The 15 Minute Breakdown: 2024 Beauty Marketing StudyKatherineBishop4
Ā 
Supermarket Floral Ad Roundup- Week 17 2024.pdf
Supermarket Floral Ad Roundup- Week 17 2024.pdfSupermarket Floral Ad Roundup- Week 17 2024.pdf
Supermarket Floral Ad Roundup- Week 17 2024.pdfKarliNelson4
Ā 
Best VIP Call Girls Noida Sector 55 Call Me: 8448380779
Best VIP Call Girls Noida Sector 55 Call Me: 8448380779Best VIP Call Girls Noida Sector 55 Call Me: 8448380779
Best VIP Call Girls Noida Sector 55 Call Me: 8448380779Delhi Call girls
Ā 
Best VIP Call Girls Noida Sector 51 Call Me: 8448380779
Best VIP Call Girls Noida Sector 51 Call Me: 8448380779Best VIP Call Girls Noida Sector 51 Call Me: 8448380779
Best VIP Call Girls Noida Sector 51 Call Me: 8448380779Delhi Call girls
Ā 

Recently uploaded (11)

Dubai Call Girls O525547&19 (Asii) Call Girls Dubai
Dubai Call Girls O525547&19 (Asii) Call Girls DubaiDubai Call Girls O525547&19 (Asii) Call Girls Dubai
Dubai Call Girls O525547&19 (Asii) Call Girls Dubai
Ā 
Korba Call Girls #9907093804 Contact Number Escorts Service Korba
Korba Call Girls #9907093804 Contact Number Escorts Service KorbaKorba Call Girls #9907093804 Contact Number Escorts Service Korba
Korba Call Girls #9907093804 Contact Number Escorts Service Korba
Ā 
Best VIP Call Girls Noida Sector 50 Call Me: 8448380779
Best VIP Call Girls Noida Sector 50 Call Me: 8448380779Best VIP Call Girls Noida Sector 50 Call Me: 8448380779
Best VIP Call Girls Noida Sector 50 Call Me: 8448380779
Ā 
The 15 Minute Breakdown: 2024 Beauty Marketing Study
The 15 Minute Breakdown: 2024 Beauty Marketing StudyThe 15 Minute Breakdown: 2024 Beauty Marketing Study
The 15 Minute Breakdown: 2024 Beauty Marketing Study
Ā 
Indian Call Girl In Dubai #$# O5634O3O18 #$# Dubai Call Girl
Indian Call Girl In Dubai #$# O5634O3O18 #$# Dubai Call GirlIndian Call Girl In Dubai #$# O5634O3O18 #$# Dubai Call Girl
Indian Call Girl In Dubai #$# O5634O3O18 #$# Dubai Call Girl
Ā 
Model Call Girl in Yamuna Vihar Delhi reach out to us at šŸ”9953056974šŸ”
Model Call Girl in  Yamuna Vihar Delhi reach out to us at šŸ”9953056974šŸ”Model Call Girl in  Yamuna Vihar Delhi reach out to us at šŸ”9953056974šŸ”
Model Call Girl in Yamuna Vihar Delhi reach out to us at šŸ”9953056974šŸ”
Ā 
Film= Dubai Call Girls O525547819 Call Girls Dubai Whsatapp
Film= Dubai Call Girls O525547819 Call Girls Dubai WhsatappFilm= Dubai Call Girls O525547819 Call Girls Dubai Whsatapp
Film= Dubai Call Girls O525547819 Call Girls Dubai Whsatapp
Ā 
The 15 Minute Breakdown: 2024 Beauty Marketing Study
The 15 Minute Breakdown: 2024 Beauty Marketing StudyThe 15 Minute Breakdown: 2024 Beauty Marketing Study
The 15 Minute Breakdown: 2024 Beauty Marketing Study
Ā 
Supermarket Floral Ad Roundup- Week 17 2024.pdf
Supermarket Floral Ad Roundup- Week 17 2024.pdfSupermarket Floral Ad Roundup- Week 17 2024.pdf
Supermarket Floral Ad Roundup- Week 17 2024.pdf
Ā 
Best VIP Call Girls Noida Sector 55 Call Me: 8448380779
Best VIP Call Girls Noida Sector 55 Call Me: 8448380779Best VIP Call Girls Noida Sector 55 Call Me: 8448380779
Best VIP Call Girls Noida Sector 55 Call Me: 8448380779
Ā 
Best VIP Call Girls Noida Sector 51 Call Me: 8448380779
Best VIP Call Girls Noida Sector 51 Call Me: 8448380779Best VIP Call Girls Noida Sector 51 Call Me: 8448380779
Best VIP Call Girls Noida Sector 51 Call Me: 8448380779
Ā 

Stowaway Ergonomic Keyboard Tray Installation Manual

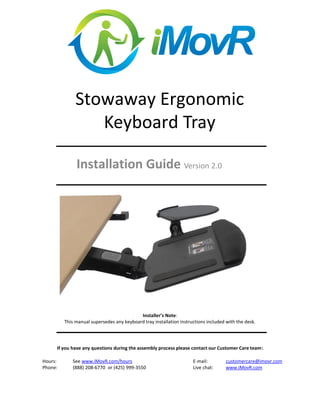
  • 1. Stowaway Ergonomic Keyboard Tray Installation Guide Version 2.0 Installerā€™s Note: This manual supersedes any keyboard tray installation instructions included with the desk. If you have any questions during the assembly process please contact our Customer Care team: Hours: See www.iMovR.com/hours E-mail: customercare@imovr.com Phone: (888) 208-6770 or (425) 999-3550 Live chat: www.iMovR.com
  • 2. Whatā€™s in the Box Before beginning installation, please check that all the necessary parts were included in the box. Note: the small parts kit for attaching the keyboard tray to the arm mechanism is taped to the underside of the keyboard tray. Adjustability Features This keyboard tray allows for maximum ergonomic adjustability. The height and tilt angle of the keyboard platform can be independently set. The mouse platform can clip onto the left or right side of the keyboard tray. This platform can also be independently set for both height and tilt. The entire tray can be rotated under the desk and completely out of the way when not in use. Installing the Baseframe (ā€œMounting Railā€) If you are installing the keyboard tray on any ThermoDesk adjustable-height table then please follow the instructions in this booklet. If you are installing on a different desk, or on a ThermoDesk but in a different position than where the pre-drilled holes have been provided, please use the enclosed mounting template for positioning instructions. Alternatively, you can use the baseframe itself as a template to mark drilling points. Use a 1/8ā€ diameter drill bit, and drill Ā½ā€ deep. Take care not to drill through the table surface. Selecting the Best Mounting Position for the Baseframe All ThermoDesk table tops come pre-drilled for easy baseframe attachment, with two positioning options depending on the userā€™s preference. See the respective diagram for your table topā€™s depth on the opposite page for placement options. The keyboard tray can be mounted along the leading edge of the desk (using the first two rows of mounting holes) in order to maximize its vertical adjustment range ā€“ a benefit to taller individuals who may want that extra inch or two of adjustment range. Otherwise, most people will prefer to use the rear position (back two rows of mounting holes). This position keeps the keyboard and the user closer to the desk, and minimizes the ā€œlever arm effectā€ when pressing down on the keyboard. This position will also minimize monitor shake. 2 Front-Edge Mounting Option for Taller Users Standard Mounting Option Keyboard and Clip-On Mouse Platforms Keyboard Tray Arm Baseframe Screws, nuts and washers for attaching keyboard platform to arm mechanism Stopper bar and machine screws #12 wood screws for securing baseframe to desktop
  • 3. Step 1: Mounting the Baseframe The baseframe rails are greased; handle with care not to get your hands dirty (washes off with soap and water). Place the table top upside-down on the floor, with the front edge of the desk facing you. Note the orientation of the baseframe in the picture below. The two notched metal tabs go on the right. Position the baseframe so that all six pre-drilled holes are in line with the holes in the plate. Use six of the #12 wood screws provided to secure the baseframe to the tabletop. ThermoDesk Stowaway Ergonomic Keyboard Tray ā€“ Installation Manual Keyboard tray baseframe orientation Right ļƒ  ļƒŸ Left Step 2: Assembling the Keyboard Platform Attach the keyboard platform to the tray arm using the four sets of nuts, toothed washers, spacers and screws provided. Place the spacer, and then the toothed washer, onto each screw, in that order. You can clip on the mouse platform after the rest of the keyboard tray is assembled, following the pictorial guide on the keyboard platform. Once assembled, slide the keyboard tray mechanism onto the baseframe from the left side. Final Step: Installing the Stopping Bar Insert the plastic stopping bar into the left end of the baseframe and secure in place using the two screws provided. 1 Mounting Positions on a 24ā€ Deep Tabletop: ā—¦ ā—¦ ā—¦ ā—¦ ā—¦ ā—¦ ā—¦ ā—¦ ā—¦ ā—¦ ā—¦ ā—¦ ā—¦ ā—¦ ā—¦ ā—¦ ā—¦ ā—¦ Mounting Positions on a 30ā€ Deep Tabletop: ā—¦ ā—¦ ā—¦ ā—¦ ā—¦ ā—¦ ā—¦ ā—¦ ā—¦ ā—¦ ā—¦ ā—¦ ā—¦ ā—¦ ā—¦ ā—¦ ā—¦ ā—¦ ā—¦ ā—¦ ā—¦ ā—¦ ā—¦ ā—¦ Preferred position for most users Use this position for maximum vertical height extension (taller users may prefer) Preferred position for most users Use this position for maximum vertical height extension (taller users may prefer) 3 Use #12 wood screws In the six pre-drilled holes
  • 4. Stowing Away The baseframe is mounted left-to-right instead of front-to-back ā€“ as many common keyboard trays are ā€“ for two reasons. First, all adjustable-height desks have a cross bar that interferes with the full retraction of a keyboard tray, so swinging it underneath (see pictures below) is the only way to get the keyboard tray completely out of the way. Second, different keyboards have different centers; those with a ā€œnum padā€ built in are going to be off-center compared to ergonomic models that have a separate num pad keyboard. By mounting the baseframe in a left-to-right orientation as we recommend, regardless of what type of keyboard you use today - or switch to in the future - youā€™ll never have to re-install the entire keyboard tray just to center your keyboard properly. Notes for 40ā€ and 48ā€ wide table top users: it may be necessary to slide the keyboard tray to the left or right a few inches before rotating it under the desk, to avoid hitting the lifting leg. Adjusting the Keyboard and Mouse Platforms The keyboard tray adjusts with a very simple ā€œlift-and-lockā€ mechanism. To adjust the height of the keyboard hold the tray firmly and lift up its front edge. This unlocks the position hold. Once unlocked, you'll be able to move the arm up or down to the desired height. Simply lower the front edge of the tray back down to lock it into place. To adjust the tilt angle of the keyboard platform, rotate the knob near the back of the keyboard tray. To tilt the mouse platform, hold both sides of the mouse platform and firmly tilt it toward or away from you. To adjust the vertical height of mouse platform, press in the gray button in the center of the mouse platform's attachment joint, then rotate the platform until youā€™ve reached the desired height. Customizing for Different Keyboard Types If you use an ergonomic keyboard that has a built-in palm rest, e.g. the Microsoft Natural, you may want to remove the gel pad from the keyboard platform. Once removed, youā€™ll notice that the user-facing edge of the keyboard platform is curved to match the contour of the Microsoft Natural and similar ā€œwave formā€ keyboard styles. IMovR Contact Information: Phone: (888) 208-6770 or (425) 999-3550 E-mail: customercare@iMovR.com