Download to read offline

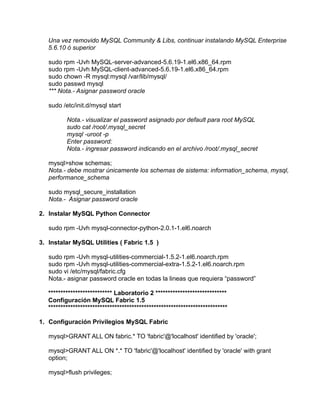
![2. Configurar Backing Store Tables
su – mysql
mysqlfabric manage setup
[INFO] 1414161265.564337 - MainThread - Initializing persister: user (fabric), server
(localhost:3306), database (fabric).
[INFO] 1414161266.288218 - MainThread - Initial password for admin/mysql set
Password set for admin/mysql from configuration file.
[INFO] 1414161266.291762 - MainThread - Password set for admin/mysql from configuration
file.
[INFO] 1414161266.292421 - MainThread - Initial password for admin/xmlrpc set
Password set for admin/xmlrpc from configuration file.
[INFO] 1414161266.295928 - MainThread - Password set for admin/xmlrpc from configuration
file.
Nota.- el comando anterior, crea el schema fabric en el nodo State Store
( Fabric Controller )
Verificar que el schema fabric aparece con el siguiente comando:
mysql -uroot -p -e "show schemas;"
Enter password:
+--------------------+
| Database |
+--------------------+
| information_schema |
| fabric |
| mysql |
| performance_schema |
| test |
+--------------------+](https://image.slidesharecdn.com/lab1mysqltutorial-141113040640-conversion-gate01/85/Lab-1-my-sql-tutorial-3-320.jpg)
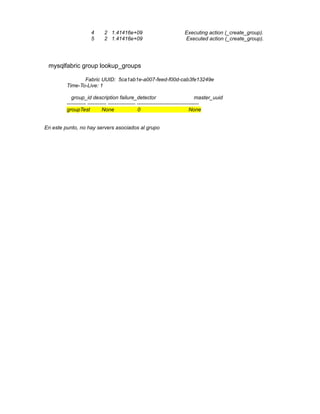
![3. Iniciar servicio de Fabric Controller:
nohup mysqlfabric manage start &
cat nohup.out
[INFO] 1414161186.229210 - MainThread - Initializing persister: user (fabric), server
(localhost:3306), database (fabric).
Error: Invalid database connection.
[INFO] 1414161201.063115 - MainThread - Initializing persister: user (fabric), server
(localhost:3306), database (fabric).
Error: Invalid database connection.
[INFO] 1414161303.457295 - MainThread - Initializing persister: user (fabric), server
(localhost:3306), database (fabric).
[INFO] 1414161303.465428 - MainThread - Loading Services.
[INFO] 1414161303.478065 - MainThread - MySQL-RPC protocol server started, listening on
localhost:32275
[INFO] 1414161303.491165 - MainThread - Fabric node starting.
[INFO] 1414161303.494004 - MainThread - Starting Executor.
[INFO] 1414161303.494116 - MainThread - Setting 5 executor(s).
[INFO] 1414161303.494521 - Executor-0 - Started.
[INFO] 1414161303.495578 - Executor-1 - Started.
[INFO] 1414161303.497107 - Executor-2 - Started.
[INFO] 1414161303.498405 - Executor-3 - Started.
[INFO] 1414161303.501844 - Executor-4 - Started.
[INFO] 1414161303.502936 - MainThread - Executor started.
[INFO] 1414161303.510773 - MainThread - Starting failure detector.
[INFO] 1414161303.512187 - XML-RPC-Server - XML-RPC protocol server ('127.0.0.1', 32274)
started.
[INFO] 1414161303.512884 - XML-RPC-Server - Setting 1 XML-RPC session(s).
[INFO] 1414161303.513301 - XML-RPC-Session-0 - Started XML-RPC-Session.
mysqlfabric manage ping
Fabric UUID: 5ca1ab1e-a007-feed-f00d-cab3fe13249e
Time-To-Live: 1
Success (empty result set)
Nota.- debe retornar success
4.- Crear grupo MySQL Fabric
mysqlfabric group create groupTest
Fabric UUID: 5ca1ab1e-a007-feed-f00d-cab3fe13249e
Time-To-Live: 1
uuid finished success result
------------------------------------ -------- ------- ------
1fe8a135-fda9-4b9b-be0f-061f51e1793c 1 1 1
state success when description
----- ------- ------------- -------------------------------------------------------------
3 2 1.41416e+09 Triggered by <mysql.fabric.events.Event object at 0x12f6190>.](https://image.slidesharecdn.com/lab1mysqltutorial-141113040640-conversion-gate01/85/Lab-1-my-sql-tutorial-4-320.jpg)


This document provides instructions on installing and configuring MySQL and MySQL Fabric on an Oracle Linux virtual machine. It outlines downloading prerequisites like Vagrant and MySQL binaries. It then details steps to install MySQL server 5.6.10 or higher, the MySQL python connector and MySQL utilities including Fabric 1.5. It describes configuring Fabric privileges, backing store tables, and starting the Fabric controller service. It also provides commands for creating a Fabric group, adding MySQL server nodes to the group, checking the group's health and promoting a master node.