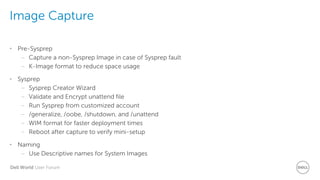
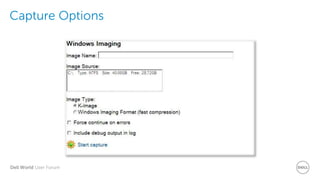
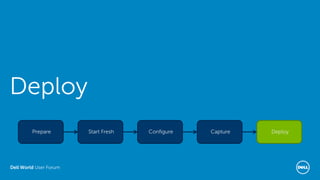
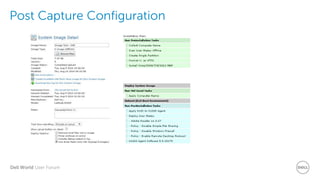
In this session we will explore K2000 Imaging. Exercises will include what’s needed to be done prior to capturing an image and after it is applied. Learn more: http://dell.to/1GDYpr8
The Essentials of Digital Experience Monitoring_ A Comprehensive Guide.pdf
K2000 Imaging
1. Dell World User Forum
UFIL504: K2000 Imaging
Timothy Woolridge, Trainer
Ron Colson, Senior Trainer
Dell World
User Forum
2. Dell World User Forum
Agenda
DeployConfigure CaptureStart FreshPrepare
3. Dell World User Forum
DeployConfigure CapturePrepare Start Fresh
Prepare
4. Dell World User Forum
WinPE
• Windows PE is…
• Windows PE 3
– Recommended for Windows 7 and below deployments
– Included in WAIK
• Windows PE 5
– Recommended for Windows 8 and above deployments
– Included in WADK 8.1
• Drivers
– Storage and Network
5. Dell World User Forum
Driver Feed
• Best method to inject drivers into Scripted Installations and Sysprep’d System Images
• Located at KBOXIPdrivers_postinstall
• Library-> Driver Feed tab to enable and check for available feeds
• Provides plug and play drivers for certain Dell models
• Automatically leveraged by Scripted Installations
• Custom feeds can be created for models not found in Driver Feed tab
7. Dell World User Forum
DeployConfigure CaptureStart FreshPrepare
Start Fresh
8. Dell World User Forum
Starting Fresh
• Virtual Machine
– Keep Gold Master free of unnecessary drivers (do not install VMWare Tools!)
– Snapshots
• Scripted Install
– Single Partition to simplify Gold Master
– Volume Media – Do not use OEM OS builds
– Start from a clean Windows OS
• Domain
– Do not join the domain
– Joining/removing can be a source of issues
9. Dell World User Forum
DeployConfigure CaptureStart FreshPrepare
Configure
10. Dell World User Forum
Pre Capture Configuration
• Applications
– Use Postinstallation Tasks for image flexibility
– Do not bake-in AV, Encryption, K1 Agent, Emulation Software, ISO Software, etc.
• Patch and Update
– OS and MS applications
– Baked-in applications
• Default User Account
– Customize local admin account
– Configure OS and applications
– Copy Profile
11. Dell World User Forum
DeployConfigure CaptureStart FreshPrepare
Capture
12. Dell World User Forum
K-Image vs WIM
• WIM
– File by File
– Single Compressed File
– Multicast Capable (3.6)
• K-Image
– File by File
– Deduplicates with other K-Images
– Can access files directly
13. Dell World User Forum
Image Capture
• Pre-Sysprep
– Capture a non-Sysprep Image in case of Sysprep fault
– K-Image format to reduce space usage
• Sysprep
– Sysprep Creator Wizard
– Validate and Encrypt unattend file
– Run Sysprep from customized account
– /generalize, /oobe, /shutdown, and /unattend
– WIM format for faster deployment times
– Reboot after capture to verify mini-setup
• Naming
– Use Descriptive names for System Images
18. Dell World User Forum
Naming
Select to retype paragraph
• Collect/Apply Computer Name
• Get/Set Computer Name – K2000 Useful Scripts
• WSName – Naming Rule Task
• Sysprep
27. Dell World User Forum
KACE Support Portal Migrating to Dell Software Support Portal
• Starting in November, all KACE
Support Portal material will be
migrated to the Dell Software Support
Portal
• All service requests will be submitted
online or by phone
• Same great content
– Knowledge base articles
– Video tutorials
– Product documentation
– JumpStart training
• Check out the Support Portal Getting
Started videos
Editor's Notes
Get yourself and your K2000 ready for the imaging process
Windows Preinstallation Environment (Windows PE) 2.0 is a minimal Win32 operating system with limited services, built on the Windows Vista kernel. It is used to prepare a computer for Windows installation, to copy disk images from a network file server, and to initiate Windows Setup.
Windows PE is not designed to be the primary operating system on a computer, but is instead used as a standalone preinstallation environment and as an integral component of other setup and recovery technologies, such as Setup for Windows Vista, Windows Deployment Services (Windows DS), the Systems Management Server (SMS) Operating System (OS) Deployment Feature Pack, and the Windows Recovery Environment (Windows RE).
A KACE boot environment utilizes either WinPE3 or WinPE5 during the build process. If you are attempting to deploy Windows 7 or below you will utilize the WinPE3 image found within the Windows Automated Installation Toolkit (WAIK). If you are attempting to deploy Windows 8.1 or below you will use the WinPE5 image found within the Windows Assessment and Deployment Kit (ADK). A common misunderstanding is that one version of KB can only deploy one operating system. This is not the case. Once we have added the correct drivers to the boot environment, we can use a single KBE like a skeleton key to boot any system into KBE and deploy multiple versions of Windows.
To get started we will need to download the Dell KACE support driver pack located at this KB article (http://www.kace.com/support/resources/kb/solutiondetail?sol=SOL111717). Again if deploying Windows 7 or below you will choose the WinPE3 driver pack. If intending on deploying Windows 8.1 or below choose the WinPE5 driver pack. Once the file has been downloaded, extract the contents of the zip. Now navigate to the K2000 Samba shares. This can be accomplished by opening Windows Explorer and navigating to \\K2000hostname\ and entering "\admin" as the username with the password being the same as the password defined in the General Settings > Samba share password area.
Driver Feed
The “Driver Feed” tab however, is different from the “Drivers” tab in two main ways. First, upon downloading a feed for a specific Dell model and operating system the contents are stored in one of the other three visible samba shares, “Drivers_Postinstall”. The second main difference is how and when they are used by a deployment. The “Drivers” share can only used by boot environments and “Scripted Installations” whereas “Driver Feeds” can be used by any of the three Windows deployment options. The reason this is possible is because unlike the “Drivers” which are added to the uploaded source media as if it was part of the original source, “Driver Feeds” are added to the deployment on the fly using DISM.
Exercise 1: Custom Driver Feed
Custom Driver Feeds can be built for almost any model of computer not available on the Driver Feed tab of the K2000 WebUI, including older Dell systems and non-Dell systems. Even though Custom Driver Feeds will not show on the Driver Feed tab, they will still be detected by the K2000 during deployment.
Custom Driver Feed: Understanding the Folder Structure of the Driver Feed
From Windows Explorer, navigate to \\k2000\drivers_postinstall share (Username: \admin Password: admin)
Note that there should be a Dell folder. Browse into that folder and there should be an OS/Architecture folder. Browsing into this folder should show model numbers
Opening this model folder should reveal Audio, Video, Network, etc. driver folders
Choose any folder here and drill down through the folders until you see RAW driver files (.cat, .inf,.sys, .dat)
Note: The Driver Feed relies on the accurate naming of the Manufacturer, OS and architecture, and Model folders. When you download a feed from the Driver Feed tab in the K2000, these folders are created automatically for you. A Custom Driver Feed requires just a bit more work.
Custom Driver: Building a Custom Driver Feed using the Driver Feed Builder
Note: Automate creating a Custom Driver Feed: http://downloads.kace.com/support/downloads/k2000/scripts/driverfeed_builder.zip
On the Technician Machine Desktop, KACE Folder, unzip and run the Driver Feed Builder executable.
Enter the IP Address: 192.168.132.5 and Samba Share password Username: /admin Password: admin for your k2000
Click Next
Select Harvest Drivers with Double Driver
Click Next
The Driver Feed Builder will now extract Plug and Play drivers from the current computer and upload them into the proper folder structure on the K2000.
From Windows Explorer, navigate to \\k2000\drivers_postinstall and view your new feed.
Note: Double Driver is a Freeware utility that is embedded into the Driver Feed Builder and is used to extract Windows driver files. Double Driver will only extract Plug and Play drivers that do not already come preinstalled in the target computers Windows Operating System. The Driver Feed Builder could, alternatively, extract drivers from downloaded executables, rather than the running system.
Virtual Machine:
Keep the image clean, free of drivers and unnecessary files that may cause the image to corrupt
Snapshots allow a good starting point before installations
The second way in which the K2000 can deploy Windows based operating systems is via a proprietary system image format referred to as a "K-Image".
A K-Image is nothing more than a carbon copy of the contents of the hard drive at the time in which the image capture was initiated. This capture occurs at the file level instead of at the sector level. The advantage of a K-Image is that since it is a file based image we are able to utilize a specialized data storage technique called data deduplication, also known as single-instance data storage. By leveraging deduplication the K2000 reduces the amount of storage needed for a given set of files that are stored on a single disk. To illustrate, if you were to capture two Windows 7 Professional 32-bit K-Images, one being 10 gigabytes and the other being 15 gigabytes, you would likely end up consuming approximately 18-20 gigabytes of disk space instead of consuming 25 gigabytes because, at minimum, 6.5 gigabytes of that image are Windows OS files and are consistent across both images. There are additional benefits to this type of capture, which we will speak to later.The third way in which the K2000 can deploy Windows based operating systems is using the Windows "native imaging" format known as a WIM image.
A little known fact about WIM images is that like our proprietary K-Image format, it too is a file based disk image. However, unlike K-Images which are uploaded and deployed file by file across the network, WIM images are compiled and compressed into a single archive while also using the single file instance technique for the files on that disk drive. Once the WIM has been completely compiled, it is at that point sent up to the K2000 appliance. The advantage of this type of image capture is that because we are deploying a single archive across the network and not small file by file transfers, we truly are able to take advantage of available network bandwidth. To further explain, when a network file transfer is initiated it starts at a very slow speed and slowly ramps up. Additionally, let's say 10 separate 1 megabyte files need to be transferred. Just as transfer speeds start to ramp up, the file has already finished transferring and it now requires that the checksum of that small file is validated that the entire file was received, at which the entire process must occur 9 more times. In contrast, a WIM which might contain those same 10 separate 1 megabyte files can ramp up to the full transfer rate and only needs the checksum of the archive itself validated. This ultimately allows for faster deployments of the same content.
When preparing a system to be used a the source for a Gold Master image, we usually have to sysprep the computer before capturing an image of it. While there is some debate to whether or not sysprep is absolutely necessary in all system image deployment, when it comes to using the K2000 sysprep is absolutely necessary. If an image is not sysprepped before the image capture, then the K2000 Driver Feed will not work with that particular system image. We want the Driver Feed to work, as this will allow us to create "hardware agnostic" system images. For example, we could create a Windows 7 master image using an HP z400 as the source computer. After sysprep, we could capture that z400 image and deploy it out to a Dell Optiplex 390, a Lenovo e440, or another HP model. As long as the K2000 has driver feeds built for each target system model type, the image would deploy successfully even though the source hardware was quite different than the destination. However, if the Sysprep process did not take place before the image capture, then the z400 image could only be deployed to z400 models. This is known as a "hardware dependent" image, and is usually not the best case scenario as having multiple hardware dependent images creates more work than is necessary and is a hindrance to productivity.
So what does Sysprep actually do? The tool prepares an installation of Windows for duplication (what we call imaging) along with some automated customizations. It also "re-seals" the Windows installation, so End Users will get a very clean looking installation of Windows even if there were OS customizations and software installations executed before the Sysprep process. Sysprep can remove all system-specific information from an installed Windows image, including the computer security identifier (SID) and installed drivers. You can think of Sysprep as removing any unique fingerprints from a particular Windows installation. This is exactly what we want when it comes to imaging, as we don't want to clone those same "fingerprints" across hundreds of computers, potentially confusing services that are looking for that piece of information to carry out tasks.
You can run Sysprep as many times as required to build and to configure your installation of Windows. However, by default you can reset Windows activation only up to three times. It is also a good idea to use Sysprep only to configure new installations of Windows instead of images that have been sysprepped many times.
If you intend to transfer a Windows image to a different computer, you must run sysprep /generalize, even if the computer has the same hardware configuration. The sysprep.exe /generalize command removes unique information from your Windows installation, which enables you to reuse that image on different computers. The next time you boot the Windows image, the specialize configuration pass runs. During this configuration pass, many components have actions that must be processed when you boot a Windows image on a new computer. Normally, this would require further interaction to setup the system (defined network location type, accept the EULA, etc). Luckily, our Sysprep Creator Wizard can generate an answer file for Sysprep. This will make the Sysprep process painless and completely automated. Let's walk through the Wizard and we'll create a Sysprep answer file:
Download from http://downloads.kace.com/support/downloads/k2000/scripts/sysprep_creator_installer.exe
Install the application. Note: If the file extension is stripped from the file after it is download, add .exe on to the file name.
Choose the OS and Architecture of the system that will be captured as an image
Choose to create the unattend file and executor
Complete each of the four tabs
Step 1
Fill in Name and Organization
Choose Time Zone
Step 2
Click Enable built-in Administrator account
Enter a password
Set the times to automatically log in to at least 2
(Optional) Copy Profile of user running Sysprep
Setup an administrative account to look and feel the way you would like for your users (remove items from system tray, remove from start menu, run applications, accept EULAs, answer IE options, etc.)
When Sysprep is run from that account, it copies the contents of that profile over to the Default User account in Windows.
When a user logs in fresh (ie domain user) they will get the look and feel that was set up
(Optional) Disable UAC
Disables UAC in Windows 7/8
(Optional) Persist all installed Plug and Play Drivers
Keeps Plug and Play drivers installed through the Generalize stage of Sysprep (which normally removes all drivers)
Can speed up deployments when deploying system images to exact hardware (NOTE: the System Image will not be able to use the Driver Feed and is dependent on the hardware of the original system configuration)
Useful when working with specialized drivers (ie Nvidia AutoDesk Performance Driver) that would not normally be reinstalled via the Driver Feed
Step 3
Enter Location (Work is default and recommended)
Choose Join a Workgroup
Step 4
Can choose whatever suits the customer best, though for training purposes Activate Later is recommended
Click Create to choose a save location for the unattend.xml and executor application.
Now that we have both an unattend file and the executor that will run Sysprep with the unattend file, all that is left is getting these files over to a system that is ready for the Sysprep process.
Open Sysprep Creator Wizard
Highlight Windows 7 x86 and Unattend and Executor
Click Next
Step 1
Filll out Name, Organization, and Time Zone
Step 2
Click Enable Built-in Administrator and fill in simple password, enable CopyProfile, Disable UAC
Step 3
Select Workgroup
Step 4
Nothing
Click Create
Save files to Desktop
Go to CLIENT/VM
Run Sysprep Executor
Browse to unattend.xml
Start Sysprep
Click OK
When preparing a system to be used a the source for a Gold Master image, we usually have to sysprep the computer before capturing an image of it. While there is some debate to whether or not sysprep is absolutely necessary in all system image deployment, when it comes to using the K2000 sysprep is absolutely necessary. If an image is not sysprepped before the image capture, then the K2000 Driver Feed will not work with that particular system image. We want the Driver Feed to work, as this will allow us to create "hardware agnostic" system images. For example, we could create a Windows 7 master image using an HP z400 as the source computer. After sysprep, we could capture that z400 image and deploy it out to a Dell Optiplex 390, a Lenovo e440, or another HP model. As long as the K2000 has driver feeds built for each target system model type, the image would deploy successfully even though the source hardware was quite different than the destination. However, if the Sysprep process did not take place before the image capture, then the z400 image could only be deployed to z400 models. This is known as a "hardware dependent" image, and is usually not the best case scenario as having multiple hardware dependent images creates more work than is necessary and is a hindrance to productivity.
So what does Sysprep actually do? The tool prepares an installation of Windows for duplication (what we call imaging) along with some automated customizations. It also "re-seals" the Windows installation, so End Users will get a very clean looking installation of Windows even if there were OS customizations and software installations executed before the Sysprep process. Sysprep can remove all system-specific information from an installed Windows image, including the computer security identifier (SID) and installed drivers. You can think of Sysprep as removing any unique fingerprints from a particular Windows installation. This is exactly what we want when it comes to imaging, as we don't want to clone those same "fingerprints" across hundreds of computers, potentially confusing services that are looking for that piece of information to carry out tasks.
You can run Sysprep as many times as required to build and to configure your installation of Windows. However, by default you can reset Windows activation only up to three times. It is also a good idea to use Sysprep only to configure new installations of Windows instead of images that have been sysprepped many times.
If you intend to transfer a Windows image to a different computer, you must run sysprep /generalize, even if the computer has the same hardware configuration. The sysprep.exe /generalize command removes unique information from your Windows installation, which enables you to reuse that image on different computers. The next time you boot the Windows image, the specialize configuration pass runs. During this configuration pass, many components have actions that must be processed when you boot a Windows image on a new computer. Normally, this would require further interaction to setup the system (defined network location type, accept the EULA, etc). Luckily, our Sysprep Creator Wizard can generate an answer file for Sysprep. This will make the Sysprep process painless and completely automated. Let's walk through the Wizard and we'll create a Sysprep answer file:
Download from http://downloads.kace.com/support/downloads/k2000/scripts/sysprep_creator_installer.exe
Install the application. Note: If the file extension is stripped from the file after it is download, add .exe on to the file name.
Choose the OS and Architecture of the system that will be captured as an image
Choose to create the unattend file and executor
Complete each of the four tabs
Step 1
Fill in Name and Organization
Choose Time Zone
Step 2
Click Enable built-in Administrator account
Enter a password
Set the times to automatically log in to at least 2
(Optional) Copy Profile of user running Sysprep
Setup an administrative account to look and feel the way you would like for your users (remove items from system tray, remove from start menu, run applications, accept EULAs, answer IE options, etc.)
When Sysprep is run from that account, it copies the contents of that profile over to the Default User account in Windows.
When a user logs in fresh (ie domain user) they will get the look and feel that was set up
(Optional) Disable UAC
Disables UAC in Windows 7/8
(Optional) Persist all installed Plug and Play Drivers
Keeps Plug and Play drivers installed through the Generalize stage of Sysprep (which normally removes all drivers)
Can speed up deployments when deploying system images to exact hardware (NOTE: the System Image will not be able to use the Driver Feed and is dependent on the hardware of the original system configuration)
Useful when working with specialized drivers (ie Nvidia AutoDesk Performance Driver) that would not normally be reinstalled via the Driver Feed
Step 3
Enter Location (Work is default and recommended)
Choose Join a Workgroup
Step 4
Can choose whatever suits the customer best, though for training purposes Activate Later is recommended
Click Create to choose a save location for the unattend.xml and executor application.
Now that we have both an unattend file and the executor that will run Sysprep with the unattend file, all that is left is getting these files over to a system that is ready for the Sysprep process.
Need screen capture of 3.7 System Image Detail with plenty of PR/PO Tasks assigned, along with deployment options (enable driver feed). Additionally show K-Image only options.
How getcomputername.exe works:
1. The active nic is found and the MAC address recorded.
2. A file is created on the X: drive with the MAC address as its name.
3. The computer name is recorded inside the file in step 2.
getcomputername can be run in 3 different ways in the commandline
getcomputername.exe Will get the computername of the existing machine, and record that in the MAC address file.
getcomputername.exe /dialog will popup a dialog asking what you would like the computername to be. This is typically used for one-offs where you want to manually set the computername.
getcomputername.exe /name:"Name of Computer" this option will assign the name in quotes to the MAC address file described above. You only need quotes if the name involves a space.
getcomputername.exe /timeout:seconds this option will set a timeout period on the dialog box that asks for a computer name. This is only used with /dialog.
See more at: http://www.itninja.com/blog/view/get-set-computername#sthash.NyL1GwRI.wrEadHEz.dpuf
How setcomputername.exe works:
1. The active nic is found and the MAC address recorded.
2. The x: drive is searched for the file, and when found, the file is read and the computername recorded.
3. The computer is scanned to determine if the machine was a sysprepped image or a scripted install.
4. If the machine is a sysprepped image, it is determined if the machine has a sysprep.inf file or unattend.xml
5. In either case, the appropriate section is updated with the computername contents found in step 2.
- See more at: http://www.itninja.com/blog/view/get-set-computername#sthash.NyL1GwRI.wrEadHEz.dpuf
Exercise 3: Naming Options
Naming Options 1: Get Computer Name
Note: This is a Preinstallation task that will capture the name of the computer and store it for eventual re-use.
Naming Options 1:
To create this task, go to Library > Preinstallation Tasks.
From the "Choose Action..." drop-down menu, select Add New Application...
Give the task a name: Get Computer Name
Click on Upload to select the appropriate getcomputername executable, 32bit or 64bit
For the command line field type "getcomputername.exe" or "getcomputername_x64.exe" (without the quotes).
Note: The pre-installation and mid-level task have different architecture versions of KBE will only run the appropriate architecture .exe
The Preinstallation task should precede any format or diskpart commands.
- See more at: http://www.itninja.com/blog/view/get-set-computername#sthash.NyL1GwRI.dpuf
Click Save
Naming Options 1: Set Computer Name
Note: This is a mid-level task that will take the computer name captured by gretcomputer.exe and inject it to the appropriate location on the target machine.
Naming Options 1:
To create this task, go to Library > Postinstallation Tasks.
From the "Choose Action..." drop-down menu, select Add New Application...
Give the task a name: Set Computer Name
Select the K2000 Boot Environment (Windows) as the runtime environment
Click on Upload to select the appropriate setcomputername executable, 32bit or 64bit
For the command line field type "setcomputername.exe" or "setcomputername_x64.exe" (without the quotes).
- See more at: http://www.itninja.com/blog/view/get-set-computername#sthash.NyL1GwRI.xf48DpsH
Click Save
Naming Options 2: Naming a system using various system attributes of that system
Note: Naming Options 2
WSName using Serialnum+Chassis Type+Year+Static Prefix
In the K2000
Under Library -> Postinstallation Task Tab
Click Create New Application task
Give the task a name: WSName Change Workstation Name
Browse to desktop of technician machine, choose the wsname.exe file and upload
Type the following CMD script: wsname.exe /n:DWUF-$SERIALNUM-$CHASSIS-$YY
Click Check Reboot Required
Click Save
PLACEHOLDER PICTURE. Get new screenshot of WIM System Image in progress from KBE.
Exercise 4: Windows Activation
Windows Activation.
Note: Windows Activation
Windows Activation: Post-Installation Tasks
In the K2000
Under Library -> Postinstallation Task Tab
Click Create new BAT Script
Give the task a name: Windows Activation
Type the following CMD:
cscript C:\Windows\System32\slmgr.vbs /IPK XXXXX-XXXXX-XXXXX-XXXXX- XXXXX
cscript C:\Windows\System32\slmgr.vbs /ato
Click Save
Create ps1 powershell script
Create bat script
(copy/paste from txt file for both)
ZIP up contents
IN k2000
Library -> Postinstallation Task
Create new application task
NAME: Join DWUF Domain
Browse and upload ZIP file
CMD: name of BAT script
Save task.
Exercise 5: Exporting Exercise Tasks
Package Management.
Note: Package Management
Package Management: Exporting Tasks
In the K2000, navigate to Settings > Package Management > Export Packages
Put a check mark next to several items listed
Click Choose Action > Export Selected
This will immediately export a PKG and XML file to the K2000’s \restore share.
Navigate to the share and inspect the exported files. Open the XML with a text editor and investigate the XML file contents. Navigate back to the Package Management tab and click on Import Packages. See how all of the exported items are displayed on this screen.