SlideShare a Scribd company logo
1 of 24
Download to read offline
ITEM #1
Examine the student task at the end of the lever investigation, which uses information from the
lever investigation below to create a procedure for a pulley.

Investigating the Lever and Pulley
A lever is another example of a simple machine. It can make lifting something much easier. In this
demonstration you will learn how the lever works. Your teacher will show how you can use a lever
when you work to lift a can or similar object.

Set-up: The diagram below shows the set-up for this investigation. In this investigation, the goal is to
lift the block straight up, as shown in the two diagrams below.


A similar investigation will also be lifting the block to the same height using various levers. The first
lever will have the fulcrum located in the center of the board. For the next two setups, you will move
the fulcrum closer and closer to the block. You will compare the force and distance in these situations.

Materials: List the materials you will need to do this investigation.
Procedure
Part 1: Lifting the block
1. Prepare the first setup by tying a string around the block.
2. Lift the block to a height of 10 cm with the spring scale, and measure the amount of force (in
newtons) you apply. Record this measurement in your data table.
3. Lift the block again to the top of the stack of books, and measure the distance (in centimeters) that
the person’s hand moves while lifting the block. Record this measurement in your data table.
Repeat this procedure three times to get three sets of measurements.

Part 2: Using the lever to lift the block
1. Attach the clamp to the ring stand near the top. Use the other half of the clamp to attach the bolt.
The bolt will be the fulcrum of your lever.
2. Slide the wooden lever onto the bolt, so that the bolt goes through the middle of the lever. Secure
the lever by screwing on the wing nut (not too tight).
3. Hook the block to one end of the lever. The arm of the lever should be horizontal. (See the diagram
above.) Hold a ruler up or attach it to the ring stand so that you can easily measure 10cm above where
the block is now hanging.
4. Lift the block by pulling straight down on the lever with the spring scale, and measure the amount of
force (in newtons) you apply. Record this measurement in your data table.
5. Lift the block again, and measure the distance (in centimeters) that the person’s hand moves while
pulling down on the lever.
Repeat this procedure three times to get three sets of measurements.

Part 3: Using the lever to lift the block (fulcrum closer to block)
1. Move the fulcrum (where the lever is attached to the bolt) to one of the holes closer to the block.
2. Hook the block to one end of the lever. The arm of the lever should be horizontal. (See the diagram
above.) Hold a ruler up or attach it to the ring stand so that you can easily measure 10cm above where
the block is now hanging.
3. Lift the block by pulling straight down on the lever with the spring scale, and measure the amount of
force (in newtons) you apply. Record this measurement in your data table.
4. Lift the block again, and measure the distance (in centimeters) that the person’s hand moves while
pulling down on the lever.
Repeat this procedure three times to get three sets of measurements.

Part 3: Using the lever to lift the block (fulcrum even closer to block)
1. Move the fulcrum even closer to the block.
2. Hook the block to one end of the lever. The arm of the lever should be horizontal. (See the diagram
above.) Hold a ruler up or attach it to the ring stand so that you can easily measure 10cm above where
the block is now hanging.
3. Lift the block by pulling straight down on the lever with the spring scale, and measure the amount of
force (in newtons) you apply. Record this measurement in your data table.
4. Lift the block again, and measure the distance (in centimeters) that the person’s hand moves while
pulling down on the lever.
Repeat this procedure three times to get three sets of measurements.
Data:
The following tables are for use in collecting data from the investigation.


             Without Lever                                       With Lever (fulcrum at center)

               Force (N)     Distance (cm)                                    Force (N)   Distance (cm)
  Trial 1                                                     Trial 1
  Trial 2                                                     Trial 2
  Trial 3                                                     Trial 3
  Total                                                        Total
 Average                                                     Average


  With Lever (fulcrum closer to block)                      With Lever (fulcrum very close to block)

               Force (N)     Distance (cm)                                    Force (N)   Distance (cm)
  Trial 1                                                     Trial 1
  Trial 2                                                     Trial 2
  Trial 3                                                     Trial 3
  Total                                                        Total
 Average                                                     Average


Graphs:
Using the averages from the data, the results for the force and distance measurements can be
graphed below.
Results (What does your data say?)
Conclusions (What can you conclude about levers in general?)
Evidence (What does your graph show to support your conclusion?)
Was your hypothesis supported? Was it complete?


Student Task:
Using the diagram and information for the pulley shown below, create a similar procedure and
hypothesis to investigate the effect on force and distance using a pulley.


Investigating the Pulley
A pulley is another example of a simple machine. It can make lifting something much easier. In this
investigation you will learn how pulleys work. You might want to use pulleys when you work on the
design challenge and build a machine to lift a can.
ITEM #2
Examine the lever investigation, and graph the data collected to answer the questions.

Investigating the Lever and Pulley
A lever is another example of a simple machine. It can make lifting something much easier. In this
investigation you will learn how the lever works. You might want to use a lever when you work on the
design challenge and build a machine to lift a can.

In this investigation you will answer the question: How do different levers help you lift an object?

Hypothesis: The greater the distance of the fulcrum from the brick, the less force that needs to be
applied to the lever.

Set-up: The diagram below shows the set-up for this investigation. You will be lifting the block straight
up and you will also be lifting the block to the same height using various levers. The first lever will
have the fulcrum located in the center of the board. For the next two setups, you will move the
fulcrum closer and closer to the block. You will compare the force and distance in these situations.
Your teacher will provide you with the materials to conduct the investigation.
Procedure
Part 1: Lifting the block
1. Prepare the first setup by tying a string around the block.
2. Lift the block to a height of 10 cm with the spring scale, and measure the amount of force (in
newtons) you apply. Record this measurement in your data table.
3. Lift the block again to the top of the stack of books, and measure the distance (in centimeters) that
the person’s hand moves while lifting the block. Record this measurement in your data table.
Repeat this procedure three times to get three sets of measurements.

Part 2: Using the lever to lift the block
1. Attach the clamp to the ring stand near the top. Use the other half of the clamp to attach the bolt.
The bolt will be the fulcrum of your lever.
2. Slide the wooden lever onto the bolt, so that the bolt goes through the middle of the lever. Secure
the lever by screwing on the wing nut (not too tight).
3. Hook the block to one end of the lever. The arm of the lever should be horizontal. (See the diagram
above.) Hold a ruler up or attach it to the ring stand so that you can easily measure 10cm above where
the block is now hanging.
4. Lift the block by pulling straight down on the lever with the spring scale, and measure the amount of
force (in newtons) you apply. Record this measurement in your data table.
5. Lift the block again, and measure the distance (in centimeters) that the person’s hand moves while
pulling down on the lever.
Repeat this procedure three times to get three sets of measurements.

Part 3: Using the lever to lift the block (fulcrum closer to block)
1. Move the fulcrum (where the lever is attached to the bolt) to one of the holes closer to the block.
2. Hook the block to one end of the lever. The arm of the lever should be horizontal. (See the diagram
above.) Hold a ruler up or attach it to the ring stand so that you can easily measure 10cm above where
the block is now hanging.
3. Lift the block by pulling straight down on the lever with the spring scale, and measure the amount of
force (in newtons) you apply. Record this measurement in your data table.
4. Lift the block again, and measure the distance (in centimeters) that the person’s hand moves while
pulling down on the lever.
Repeat this procedure three times to get three sets of measurements.

Part 4: Using the lever to lift the block (fulcrum even closer to block)
1. Move the fulcrum even closer to the block.
2. Hook the block to one end of the lever. The arm of the lever should be horizontal. (See the diagram
above.) Hold a ruler up or attach it to the ring stand so that you can easily measure 10cm above where
the block is now hanging.
3. Lift the block by pulling straight down on the lever with the spring scale, and measure the amount of
force (in newtons) you apply. Record this measurement in your data table.
4. Lift the block again, and measure the distance (in centimeters) that the person’s hand moves while
pulling down on the lever.
Repeat this procedure three times to get three sets of measurements.
Data:
Below is the data collected by a student doing this investigation.


             Without Lever                                       With Lever (fulcrum at center)

               Force (N)     Distance (cm)                                Force (N)    Distance (cm)
  Trial 1         23              18                          Trial 1         23            18
  Trial 2         22              18                          Trial 2         22            18
  Trial 3         23              18                          Trial 3         23            18
  Total                                                       Total
 Average                                                     Average


  With Lever (fulcrum closer to block)                      With Lever (fulcrum very close to block)

               Force (N)     Distance (cm)                                Force (N)    Distance (cm)
  Trial 1         17              22                          Trial 1         11            24
  Trial 2         18              21                          Trial 2         10            26
  Trial 3         17              24                          Trial 3         8             26
  Total                                                       Total
 Average                                                     Average

Use this data to construct the graphs shown below.


Was your hypothesis supported? Was it complete?
ITEM #3
Examine the lever investigation, and graph the data collected to answer the questions.

Investigating the Lever and Pulley
A lever is another example of a simple machine. It can make lifting something much easier. In this
investigation you will learn how the lever works. You might want to use a lever when you work on the
design challenge and build a machine to lift a can.

How do different levers help you lift an object?
Levers are used to reduce the amount of force that is required to lift an object, or to change the
direction of the force required to lift an object. For instance, if you lift up an object without using a
lever, and then try to lift the object with a lever, as shown in the first diagram below, the force
required to pull on the object is the same, but the direction you pull changes (pulling down instead of
pulling up on the object directly). If you move the fulcrum of the object so that it is closer to the
brick, the distance you pull will be greater, but the amount of force will be less.

This is because the amount of force and distance you move that force can be multiplied to get the
amount of work done. In other words:
  W=Fxd        (W = Work, F = force in Newtons, d = distance in cm)

Set-up: The diagram below shows the set-up for this investigation. You will be lifting the block straight
up and you will also be lifting the block to the same height using various levers. The first lever will
have the fulcrum located in the center of the board. For the next two setups, you will move the
fulcrum closer and closer to the block. You will compare the force and distance in these situations.
Your teacher will provide you with the materials to conduct the investigation.
USING THE PROCEDURE BELOW, STATE WHETHER THE DATA GATHERED BY THE STUDENT IS
ACCURATE AND FITS THE EQUATION FOR WORK.

Procedure
Part 1: Lifting the block
1. Prepare the first setup by tying a string around the block.
2. Lift the block to a height of 10 cm with the spring scale, and measure the amount of force (in
newtons) you apply. Record this measurement in your data table.
3. Lift the block again to the top of the stack of books, and measure the distance (in centimeters) that
the person’s hand moves while lifting the block. Record this measurement in your data table.
Repeat this procedure three times to get three sets of measurements.

Part 2: Using the lever to lift the block
1. Attach the clamp to the ring stand near the top. Use the other half of the clamp to attach the bolt.
The bolt will be the fulcrum of your lever.
2. Slide the wooden lever onto the bolt, so that the bolt goes through the middle of the lever. Secure
the lever by screwing on the wing nut (not too tight).
3. Hook the block to one end of the lever. The arm of the lever should be horizontal. (See the diagram
above.) Hold a ruler up or attach it to the ring stand so that you can easily measure 10cm above where
the block is now hanging.
4. Lift the block by pulling straight down on the lever with the spring scale, and measure the amount of
force (in newtons) you apply. Record this measurement in your data table.
5. Lift the block again, and measure the distance (in centimeters) that the person’s hand moves while
pulling down on the lever.
Repeat this procedure three times to get three sets of measurements.

Part 3: Using the lever to lift the block (fulcrum closer to block)
1. Move the fulcrum (where the lever is attached to the bolt) to one of the holes closer to the block.
2. Hook the block to one end of the lever. The arm of the lever should be horizontal. (See the diagram
above.) Hold a ruler up or attach it to the ring stand so that you can easily measure 10cm above where
the block is now hanging.
3. Lift the block by pulling straight down on the lever with the spring scale, and measure the amount of
force (in newtons) you apply. Record this measurement in your data table.
4. Lift the block again, and measure the distance (in centimeters) that the person’s hand moves while
pulling down on the lever.
Repeat this procedure three times to get three sets of measurements.

Part 4: Using the lever to lift the block (fulcrum even closer to block)
1. Move the fulcrum even closer to the block.
2. Hook the block to one end of the lever. The arm of the lever should be horizontal. (See the diagram
above.) Hold a ruler up or attach it to the ring stand so that you can easily measure 10cm above where
the block is now hanging.
3. Lift the block by pulling straight down on the lever with the spring scale, and measure the amount of
force (in newtons) you apply. Record this measurement in your data table.
4. Lift the block again, and measure the distance (in centimeters) that the person’s hand moves while
pulling down on the lever.
Repeat this procedure three times to get three sets of measurements.
Data:
Below is the data collected by a student doing this investigation.


             Without Lever                                       With Lever (fulcrum at center)

               Force (N)     Distance (cm)                                Force (N)    Distance (cm)
  Trial 1         23              18                          Trial 1         23            18
  Trial 2         22              18                          Trial 2         22            18
  Trial 3         23              18                          Trial 3         23            18
  Total                                                       Total
 Average                                                     Average


  With Lever (fulcrum closer to block)                      With Lever (fulcrum very close to block)

               Force (N)     Distance (cm)                                Force (N)    Distance (cm)
  Trial 1         17              22                          Trial 1         11            24
  Trial 2         18              21                          Trial 2         10            26
  Trial 3         17              24                          Trial 3         8             26
  Total                                                       Total
 Average                                                     Average

Use this data to determine if the data was collected correctly by using the formula for work.
Show your work.
ITEM #4
Examine the student task at the end of the lever investigation, which uses information from the
lever investigation below to create a procedure for a pulley.

Investigating the Lever and Pulley
A lever is another example of a simple machine. It can make lifting something much easier. In this
demonstration you will learn how the lever works. Your teacher will show how you can use a lever
when you work to lift a can or similar object.

Set-up: The diagram below shows the set-up for this investigation. In this investigation, the goal is to
lift the block straight up, as shown in the two diagrams below.


A similar investigation will also be lifting the block to the same height using various levers. The first
lever will have the fulcrum located in the center of the board. For the next two setups, you will move
the fulcrum closer and closer to the block. You will compare the force and distance in these situations.

Materials: List the materials you will need to do this investigation.
Procedure
Part 1: Lifting the block
1. Prepare the first setup by tying a string around the block.
2. Lift the block to a height of 10 cm with the spring scale, and measure the amount of force (in
newtons) you apply. Record this measurement in your data table.
3. Lift the block again to the top of the stack of books, and measure the distance (in centimeters) that
the person’s hand moves while lifting the block. Record this measurement in your data table.
Repeat this procedure three times to get three sets of measurements.

Part 2: Using the lever to lift the block
1. Attach the clamp to the ring stand near the top. Use the other half of the clamp to attach the bolt.
The bolt will be the fulcrum of your lever.
2. Slide the wooden lever onto the bolt, so that the bolt goes through the middle of the lever. Secure
the lever by screwing on the wing nut (not too tight).
3. Hook the block to one end of the lever. The arm of the lever should be horizontal. (See the diagram
above.) Hold a ruler up or attach it to the ring stand so that you can easily measure 10cm above where
the block is now hanging.
4. Lift the block by pulling straight down on the lever with the spring scale, and measure the amount of
force (in newtons) you apply. Record this measurement in your data table.
5. Lift the block again, and measure the distance (in centimeters) that the person’s hand moves while
pulling down on the lever.
Repeat this procedure three times to get three sets of measurements.

Part 3: Using the lever to lift the block (fulcrum closer to block)
1. Move the fulcrum (where the lever is attached to the bolt) to one of the holes closer to the block.
2. Hook the block to one end of the lever. The arm of the lever should be horizontal. (See the diagram
above.) Hold a ruler up or attach it to the ring stand so that you can easily measure 10cm above where
the block is now hanging.
3. Lift the block by pulling straight down on the lever with the spring scale, and measure the amount of
force (in newtons) you apply. Record this measurement in your data table.
4. Lift the block again, and measure the distance (in centimeters) that the person’s hand moves while
pulling down on the lever.
Repeat this procedure three times to get three sets of measurements.

Part 3: Using the lever to lift the block (fulcrum even closer to block)
1. Move the fulcrum even closer to the block.
2. Hook the block to one end of the lever. The arm of the lever should be horizontal. (See the diagram
above.) Hold a ruler up or attach it to the ring stand so that you can easily measure 10cm above where
the block is now hanging.
3. Lift the block by pulling straight down on the lever with the spring scale, and measure the amount of
force (in newtons) you apply. Record this measurement in your data table.
4. Lift the block again, and measure the distance (in centimeters) that the person’s hand moves while
pulling down on the lever.
Repeat this procedure three times to get three sets of measurements.
Data:
The following tables are for use in collecting data from the investigation.


             Without Lever                                       With Lever (fulcrum at center)

               Force (N)     Distance (cm)                                    Force (N)   Distance (cm)
  Trial 1         23              18                          Trial 1           -23            -18
  Trial 2         22              18                          Trial 2           -22            -18
  Trial 3         23              18                          Trial 3           -23            -18
  Total                                                        Total
 Average                                                     Average


  With Lever (fulcrum closer to block)                      With Lever (fulcrum very close to block)

               Force (N)     Distance (cm)                                    Force (N)   Distance (cm)
  Trial 1         -17             -22                         Trial 1           -11            -24
  Trial 2         -18             -21                         Trial 2           -10            -26
  Trial 3         -17             -24                         Trial 3            -8            -26
  Total                                                        Total
 Average                                                     Average

Fill in the blank in the statement below:
As the amount of force to move an object is reduced, the amount of distance the lever is moved
__________because…


Using a Pulley:
Create a hypothesis and similar procedure to investigate the effect on force and distance using a
pulley instead of a lever. Show diagrams for each step of the procedure.
ITEM #5
Examine the lever investigation, and graph the data collected to answer the questions.

Investigating the Lever and Pulley
A lever is another example of a simple machine. It can make lifting something much easier. In this
investigation you will learn how the lever works. You might want to use a lever when you work on the
design challenge and build a machine to lift a can.

In this investigation you will answer the question: How do different levers help you lift an object?

Hypothesis: The greater the distance of the fulcrum from the brick, the less force that needs to be
applied to the lever.

Set-up: The diagram below shows the set-up for this investigation. You will be lifting the block straight
up and you will also be lifting the block to the same height using various levers. The first lever will
have the fulcrum located in the center of the board. For the next two setups, you will move the
fulcrum closer and closer to the block. You will compare the force and distance in these situations.
Your teacher will provide you with the materials to conduct the investigation.
Procedure
Part 1: Lifting the block
1. Prepare the first setup by tying a string around the block.
2. Lift the block to a height of 10 cm with the spring scale, and measure the amount of force (in
newtons) you apply. Record this measurement in your data table.
3. Lift the block again to the top of the stack of books, and measure the distance (in centimeters) that
the person’s hand moves while lifting the block. Record this measurement in your data table.
Repeat this procedure three times to get three sets of measurements.

Part 2: Using the lever to lift the block
1. Attach the clamp to the ring stand near the top. Use the other half of the clamp to attach the bolt.
The bolt will be the fulcrum of your lever.
2. Slide the wooden lever onto the bolt, so that the bolt goes through the middle of the lever. Secure
the lever by screwing on the wing nut (not too tight).
3. Hook the block to one end of the lever. The arm of the lever should be horizontal. (See the diagram
above.) Hold a ruler up or attach it to the ring stand so that you can easily measure 10cm above where
the block is now hanging.
4. Lift the block by pulling straight down on the lever with the spring scale, and measure the amount of
force (in newtons) you apply. Record this measurement in your data table.
5. Lift the block again, and measure the distance (in centimeters) that the person’s hand moves while
pulling down on the lever.
Repeat this procedure three times to get three sets of measurements.

Part 3: Using the lever to lift the block (fulcrum closer to block)
1. Move the fulcrum (where the lever is attached to the bolt) to one of the holes closer to the block.
2. Hook the block to one end of the lever. The arm of the lever should be horizontal. (See the diagram
above.) Hold a ruler up or attach it to the ring stand so that you can easily measure 10cm above where
the block is now hanging.
3. Lift the block by pulling straight down on the lever with the spring scale, and measure the amount of
force (in newtons) you apply. Record this measurement in your data table.
4. Lift the block again, and measure the distance (in centimeters) that the person’s hand moves while
pulling down on the lever.
Repeat this procedure three times to get three sets of measurements.

Part 4: Using the lever to lift the block (fulcrum even closer to block)
1. Move the fulcrum even closer to the block.
2. Hook the block to one end of the lever. The arm of the lever should be horizontal. (See the diagram
above.) Hold a ruler up or attach it to the ring stand so that you can easily measure 10cm above where
the block is now hanging.
3. Lift the block by pulling straight down on the lever with the spring scale, and measure the amount of
force (in newtons) you apply. Record this measurement in your data table.
4. Lift the block again, and measure the distance (in centimeters) that the person’s hand moves while
pulling down on the lever.
Repeat this procedure three times to get three sets of measurements.
Data:
Below is the data collected by a student doing this investigation.


             Without Lever                                       With Lever (fulcrum at center)

               Force (N)     Distance (cm)                                Force (N)    Distance (cm)
  Trial 1         23              18                          Trial 1         23            18
  Trial 2         22              18                          Trial 2         22            18
  Trial 3         23              18                          Trial 3         23            18
  Total                                                       Total
 Average                                                     Average


  With Lever (fulcrum closer to block)                      With Lever (fulcrum very close to block)

               Force (N)     Distance (cm)                                Force (N)    Distance (cm)
  Trial 1         17              22                          Trial 1         11            24
  Trial 2         18              21                          Trial 2         10            26
  Trial 3         17              24                          Trial 3         8             26
  Total                                                       Total
 Average                                                     Average

Use this data to construct the graphs shown below.
Data:
Below is the data collected by a second student doing this investigation with different equipment.


             Without Lever                                     With Lever (fulcrum at center)

              Force (N)      Distance (cm)                               Force (N)    Distance (cm)
  Trial 1         35              21                        Trial 1         36             21
  Trial 2         35              21                        Trial 2         34             21
  Trial 3         33              21                        Trial 3         34             20
  Total                                                      Total
 Average                                                   Average


  With Lever (fulcrum closer to block)                    With Lever (fulcrum very close to block)

              Force (N)      Distance (cm)                               Force (N)    Distance (cm)
  Trial 1         27              24                        Trial 1         21             35
  Trial 2         25              25                        Trial 2         20             37
  Trial 3         25              25                        Trial 3         18             37
  Total                                                      Total
 Average                                                   Average

Use this data to construct the graphs shown below.
Using the data from the two students, what can you conclude about the relationship between force and
distance?


What evidence do you have for your conclusion?


What similarities or differences do you see in the graphs for the two students? What might account for
these?


Explain the general relationship between force
ITEM #6
Investigating the Lever and Pulley
A lever is another example of a simple machine. It can make lifting something much easier. In this
investigation you will learn how the lever works. You might want to use a lever when you work on the
design challenge and build a machine to lift a can.


Investigating the Lever and Pulley
A lever is another example of a simple machine. It can make lifting something much easier. In this
investigation you will learn how the lever works. You might want to use a lever to lift a can.

How do different levers help you lift an object?
Levers are used to reduce the amount of force that is required to lift an object, or to change the
direction of the force required to lift an object. For instance, if you lift up an object without using a
lever, and then try to lift the object with a lever, as shown in the first diagram below, the force
required to pull on the object is the same, but the direction you pull changes (pulling down instead of
pulling up on the object directly). If you move the fulcrum of the object so that it is closer to the
brick, the distance you pull will be greater, but the amount of force will be less.

Set-up: The diagram below shows the set-up for this investigation. In this investigation, the goal is to
lift the block straight up, as shown in the two diagrams below. A similar investigation will also be
lifting the block to the same height using various levers. The first lever will have the fulcrum located in
the center of the board. For the next two setups, you will move the fulcrum closer and closer to the
block. You will compare the force and distance in these situations.


Materials: List the materials you will need to do this investigation.
Procedure
Part 1: Lifting the block
1. Prepare the first setup by tying a string around the block.
2. Lift the block to a height of 10 cm with the spring scale, and measure the amount of force (in
newtons) you apply. Record this measurement in your data table.
3. Lift the block again to the top of the stack of books, and measure the distance (in centimeters) that
the person’s hand moves while lifting the block. Record this measurement in your data table.
Repeat this procedure three times to get three sets of measurements.

Part 2: Using the lever to lift the block
1. Attach the clamp to the ring stand near the top. Use the other half of the clamp to attach the bolt.
The bolt will be the fulcrum of your lever.
2. Slide the wooden lever onto the bolt, so that the bolt goes through the middle of the lever. Secure
the lever by screwing on the wing nut (not too tight).
3. Hook the block to one end of the lever. The arm of the lever should be horizontal. (See the diagram
above.) Hold a ruler up or attach it to the ring stand so that you can easily measure 10cm above where
the block is now hanging.
4. Lift the block by pulling straight down on the lever with the spring scale, and measure the amount of
force (in newtons) you apply. Record this measurement in your data table.
5. Lift the block again, and measure the distance (in centimeters) that the person’s hand moves while
pulling down on the lever.
Repeat this procedure three times to get three sets of measurements.

Part 3: Using the lever to lift the block (fulcrum closer to block)
1. Move the fulcrum (where the lever is attached to the bolt) to one of the holes closer to the block.
2. Hook the block to one end of the lever. The arm of the lever should be horizontal. (See the diagram
above.) Hold a ruler up or attach it to the ring stand so that you can easily measure 10cm above where
the block is now hanging.
3. Lift the block by pulling straight down on the lever with the spring scale, and measure the amount of
force (in newtons) you apply. Record this measurement in your data table.
4. Lift the block again, and measure the distance (in centimeters) that the person’s hand moves while
pulling down on the lever.
Repeat this procedure three times to get three sets of measurements.

Part 3: Using the lever to lift the block (fulcrum even closer to block)
1. Move the fulcrum even closer to the block.
2. Hook the block to one end of the lever. The arm of the lever should be horizontal. (See the diagram
above.) Hold a ruler up or attach it to the ring stand so that you can easily measure 10cm above where
the block is now hanging.
3. Lift the block by pulling straight down on the lever with the spring scale, and measure the amount of
force (in newtons) you apply. Record this measurement in your data table.
4. Lift the block again, and measure the distance (in centimeters) that the person’s hand moves while
pulling down on the lever.
Repeat this procedure three times to get three sets of measurements.
Data:
The following tables are for use in collecting data from the investigation.


             Without Lever                                       With Lever (fulcrum at center)

               Force (N)     Distance (cm)                                    Force (N)   Distance (cm)
  Trial 1         23              18                          Trial 1           -23            -18
  Trial 2         22              18                          Trial 2           -22            -18
  Trial 3         23              18                          Trial 3           -23            -18
  Total                                                        Total
 Average                                                     Average


  With Lever (fulcrum closer to block)                      With Lever (fulcrum very close to block)

               Force (N)     Distance (cm)                                    Force (N)   Distance (cm)
  Trial 1         -17             -22                         Trial 1           -11            -24
  Trial 2         -18             -21                         Trial 2           -10            -26
  Trial 3         -17             -24                         Trial 3            -8            -26
  Total                                                        Total
 Average                                                     Average

Graphs:
Using the averages from your data, graph the results for the force below. Be sure to label the
vertical axis on each graph with the appropriate units.
Investigating Pulleys
A pulley is another example of a simple machine. It can make lifting something much easier. In this
investigation you will learn how pulleys work. You might want to use pulleys when you work on the
design challenge and build a machine to lift a can.

USE THE FOLLOWING EXPERIMENTAL PROCEDURE TO CONDUCT AN INVESTIGATION OF THE FORCE
AND DISTANCE USED TO MOVE A CAN USING A PULLEY AND COMPLETE THE RELATED TABLES AND
GRAPHS.

Set-up: The diagram below shows the set-up for this investigation. You will be lifting the block straight
up and you will also be lifting the block using a variety of pulley arrangements. The first pulley
arrangement is a fixed pulley. The second is a free pulley and the third combines a fixed and a free
pulley. You will compare the force and distance in these situations.

Materials: List the materials you will need to do this investigation.
Procedure
Part 1: Lifting the block
1. Prepare the first setup by tying a string around the block.
2. Lift the block to a height of 20 cm using the spring scale, and measure the amount of force (in
newtons) you apply. Record this measurement in your data table.
3. Lift the block again to a height of 20 cm, and measure the distance (in centimeters) that the
person’s hand moves while lifting the block. Record this measurement in your data table.
Repeat this procedure three times to get three sets of measurements.

Part 2: Using a fixed pulley to lift the block
1. Set up the fixed pulley. (See diagram above.) Attach the pulley to the top of the ring stand and tie
one end of the string to the block. Thread the string through the pulley so that as you pull down on the
free end, the block moves up. Set the ruler near the block to use as a reference height.
Attach the spring scale to the free end of the string.
2. Lift the block to a height of 20cm by pulling on the string with the spring scale. You can pull at any
angle. Measure the amount of force (in newtons) you apply. Record this measurement in your data
table.
3. Lift the block again to 20 cm, and measure the distance (in centimeters) that the person’s hand
moves. Record this measurement in your data table.
Repeat this procedure three times to get three sets of measurements.

Part 3: Using a free pulley to lift the block
1. Set up the free pulley. (See the diagram above.) Tie a piece of string to the ring stand. Thread the
free end of the string through the pulley. Tie the block to the pulley so that as you pull up on the string
the pulley (with the block attached) moves up. Set the stack of books near the block to use as a
reference height. Attach the spring scale to the free end of the string.
2. Lift the block to a height of 20 cm by pulling on the string with the spring scale. You can pull at any
angle. Measure the amount of force (in newtons) you apply. Record this measurement in your data
table.
3. Lift the block again to 20 cm, and measure the distance (in centimeters) that the person’s hand
moves. Record this measurement in your data table.
Repeat this procedure three times to get three sets of measurements.

Part 4: Using a fixed and a free pulley to lift the block
1. Set up the fixed and free pulleys. (See the diagram above.) Use the free pulley setup from the
previous part. Instead of pulling on the free end of the string, attach a second pulley to the ring stand
(like the fixed pulley in the first part) and thread the free end of the string through this pulley. Set the
stack of books near the block to use as a reference height. Attach the spring scale to the free end of
the string.
2. Lift the block to a height of 20 cm by pulling on the string with the spring scale. You can pullat any
angle. Measure the amount of force (in newtons) you apply. Record this measurement in your data
table.
3. Lift the block again to 20 cm, and measure the distance (in centimeters) that the person’s hand
moves. Record this measurement in your data table.
Repeat this procedure three times to get three sets of measurements.
Data:

             Without Pulley                                           With Fixed Pulley

              Force (N)       Distance (cm)                              Force (N)    Distance (cm)
  Trial 1                                                   Trial 1
  Trial 2                                                   Trial 2
  Trial 3                                                   Trial 3
  Total                                                      Total
 Average                                                   Average


            With Free Pulley                                    With Fixed and Free Pulleys

              Force (N)     Distance (cm)                                Force (N)    Distance (cm)
  Trial 1                                                   Trial 1
  Trial 2                                                   Trial 2
  Trial 3                                                   Trial 3
  Total                                                      Total
 Average                                                   Average


Graphs:
Using the averages from your data, graph the results for the force below. Be sure to label the
vertical axis on each graph with the appropriate units.


                                                     What can you conclude about the amount of
                                                     force required to move an object using a
                                                     lever?


                                                     What can you conclude about the amount of
                                                     force required to move an object using
                                                     pulleys?


                                                     What can you conclude about the similarities
                                                     between the lever and pulley?

More Related Content

What's hot

PEShare.co.uk Shared Resource
PEShare.co.uk Shared ResourcePEShare.co.uk Shared Resource
PEShare.co.uk Shared Resourcepeshare.co.uk
 
PEShare.co.uk Shared Resource
PEShare.co.uk Shared ResourcePEShare.co.uk Shared Resource
PEShare.co.uk Shared Resourcepeshare.co.uk
 
Vectors phy2 chp7
Vectors phy2 chp7Vectors phy2 chp7
Vectors phy2 chp7Subas Nandy
 
IB Phyiscs SL - Pendulum Lab
IB Phyiscs SL - Pendulum LabIB Phyiscs SL - Pendulum Lab
IB Phyiscs SL - Pendulum LabLorrchan
 
Projectile Motion
Projectile MotionProjectile Motion
Projectile MotionChris Bush
 
Introduction to linear kinematics
Introduction to linear kinematicsIntroduction to linear kinematics
Introduction to linear kinematicsPontsho Mahlatsi
 
Sci 1010 chapter 2
Sci 1010 chapter 2Sci 1010 chapter 2
Sci 1010 chapter 2stanbridge
 
Measuring tall objects using clinometer, shadow, and mirror method
Measuring tall objects using clinometer, shadow, and mirror methodMeasuring tall objects using clinometer, shadow, and mirror method
Measuring tall objects using clinometer, shadow, and mirror methodPotchong Jackaria
 
541 powerpoint
541 powerpoint541 powerpoint
541 powerpointswartcw
 
Lab report no 2 pemdulum phyisc 212
Lab report no 2 pemdulum phyisc 212Lab report no 2 pemdulum phyisc 212
Lab report no 2 pemdulum phyisc 212Rodney Peru
 

What's hot (18)

PEShare.co.uk Shared Resource
PEShare.co.uk Shared ResourcePEShare.co.uk Shared Resource
PEShare.co.uk Shared Resource
 
PEShare.co.uk Shared Resource
PEShare.co.uk Shared ResourcePEShare.co.uk Shared Resource
PEShare.co.uk Shared Resource
 
Vectors phy2 chp7
Vectors phy2 chp7Vectors phy2 chp7
Vectors phy2 chp7
 
LabReport2
LabReport2LabReport2
LabReport2
 
IB Phyiscs SL - Pendulum Lab
IB Phyiscs SL - Pendulum LabIB Phyiscs SL - Pendulum Lab
IB Phyiscs SL - Pendulum Lab
 
Torque
TorqueTorque
Torque
 
Projectile Motion
Projectile MotionProjectile Motion
Projectile Motion
 
Pendulum~
Pendulum~Pendulum~
Pendulum~
 
Kinematics
KinematicsKinematics
Kinematics
 
Springpractice
SpringpracticeSpringpractice
Springpractice
 
Physics
PhysicsPhysics
Physics
 
Introduction to linear kinematics
Introduction to linear kinematicsIntroduction to linear kinematics
Introduction to linear kinematics
 
Sci 1010 chapter 2
Sci 1010 chapter 2Sci 1010 chapter 2
Sci 1010 chapter 2
 
Measuring tall objects using clinometer, shadow, and mirror method
Measuring tall objects using clinometer, shadow, and mirror methodMeasuring tall objects using clinometer, shadow, and mirror method
Measuring tall objects using clinometer, shadow, and mirror method
 
PHY300 Chapter 3 physics 5e
PHY300 Chapter 3 physics 5ePHY300 Chapter 3 physics 5e
PHY300 Chapter 3 physics 5e
 
541 powerpoint
541 powerpoint541 powerpoint
541 powerpoint
 
Lab report no 2 pemdulum phyisc 212
Lab report no 2 pemdulum phyisc 212Lab report no 2 pemdulum phyisc 212
Lab report no 2 pemdulum phyisc 212
 
Physics 6
Physics 6Physics 6
Physics 6
 

Similar to Investigating The Lever V1 6 Complete

Lab 3-7th Grade: Part 1- force
Lab 3-7th Grade: Part 1- forceLab 3-7th Grade: Part 1- force
Lab 3-7th Grade: Part 1- forceDSVSTraining
 
BIOEN 4250 BIOMECHANICS I Laboratory 4 – Principle Stres.docx
BIOEN 4250 BIOMECHANICS I Laboratory 4 – Principle Stres.docxBIOEN 4250 BIOMECHANICS I Laboratory 4 – Principle Stres.docx
BIOEN 4250 BIOMECHANICS I Laboratory 4 – Principle Stres.docxtarifarmarie
 
Ch 9 Rotational Dynamics
Ch 9 Rotational DynamicsCh 9 Rotational Dynamics
Ch 9 Rotational DynamicsScott Thomas
 
Physics 161Static Equilibrium and Rotational Balance Intro.docx
Physics 161Static Equilibrium and Rotational Balance Intro.docxPhysics 161Static Equilibrium and Rotational Balance Intro.docx
Physics 161Static Equilibrium and Rotational Balance Intro.docxrandymartin91030
 
1-PHYSICAL QUANTITIES, UNITS & MEASUREMENT131029195248-phpapp01.ppt
1-PHYSICAL QUANTITIES, UNITS & MEASUREMENT131029195248-phpapp01.ppt1-PHYSICAL QUANTITIES, UNITS & MEASUREMENT131029195248-phpapp01.ppt
1-PHYSICAL QUANTITIES, UNITS & MEASUREMENT131029195248-phpapp01.pptChenKahPin
 
Abstract Today’s experiment objectives are to determine the st.docx
Abstract Today’s experiment objectives are to determine the st.docxAbstract Today’s experiment objectives are to determine the st.docx
Abstract Today’s experiment objectives are to determine the st.docxannetnash8266
 
Newton's Second Law - The Effect of Force
Newton's Second Law - The Effect of ForceNewton's Second Law - The Effect of Force
Newton's Second Law - The Effect of ForceSarah Sue Calbio
 
Angling for Access, with examples 2013
 Angling for Access, with examples 2013 Angling for Access, with examples 2013
Angling for Access, with examples 2013Jenny Dixon
 
britlift_spreader vs beam.pdf
britlift_spreader vs beam.pdfbritlift_spreader vs beam.pdf
britlift_spreader vs beam.pdfssuser4af30f
 
Lab 05 – Gravitation and Keplers Laws Name __________________.docx
Lab 05 – Gravitation and Keplers Laws Name __________________.docxLab 05 – Gravitation and Keplers Laws Name __________________.docx
Lab 05 – Gravitation and Keplers Laws Name __________________.docxDIPESH30
 
1VectorAdditionofForcesObjectivesTousethe.docx
 1VectorAdditionofForcesObjectivesTousethe.docx 1VectorAdditionofForcesObjectivesTousethe.docx
1VectorAdditionofForcesObjectivesTousethe.docxShiraPrater50
 
A method for determining a physical law using the simple pendu.docx
A method for determining a physical law using the simple pendu.docxA method for determining a physical law using the simple pendu.docx
A method for determining a physical law using the simple pendu.docxransayo
 

Similar to Investigating The Lever V1 6 Complete (20)

Investigating The Lever V5 Complete
Investigating The  Lever V5 CompleteInvestigating The  Lever V5 Complete
Investigating The Lever V5 Complete
 
Investigating The Lever V5 Formatted
Investigating The  Lever V5 FormattedInvestigating The  Lever V5 Formatted
Investigating The Lever V5 Formatted
 
Lever lab
Lever labLever lab
Lever lab
 
Lab 3-7th Grade: Part 1- force
Lab 3-7th Grade: Part 1- forceLab 3-7th Grade: Part 1- force
Lab 3-7th Grade: Part 1- force
 
BIOEN 4250 BIOMECHANICS I Laboratory 4 – Principle Stres.docx
BIOEN 4250 BIOMECHANICS I Laboratory 4 – Principle Stres.docxBIOEN 4250 BIOMECHANICS I Laboratory 4 – Principle Stres.docx
BIOEN 4250 BIOMECHANICS I Laboratory 4 – Principle Stres.docx
 
Ch 9 Rotational Dynamics
Ch 9 Rotational DynamicsCh 9 Rotational Dynamics
Ch 9 Rotational Dynamics
 
Experiment 10.docx
Experiment 10.docxExperiment 10.docx
Experiment 10.docx
 
Trebuchet Paper
Trebuchet PaperTrebuchet Paper
Trebuchet Paper
 
Physics 161Static Equilibrium and Rotational Balance Intro.docx
Physics 161Static Equilibrium and Rotational Balance Intro.docxPhysics 161Static Equilibrium and Rotational Balance Intro.docx
Physics 161Static Equilibrium and Rotational Balance Intro.docx
 
1-PHYSICAL QUANTITIES, UNITS & MEASUREMENT131029195248-phpapp01.ppt
1-PHYSICAL QUANTITIES, UNITS & MEASUREMENT131029195248-phpapp01.ppt1-PHYSICAL QUANTITIES, UNITS & MEASUREMENT131029195248-phpapp01.ppt
1-PHYSICAL QUANTITIES, UNITS & MEASUREMENT131029195248-phpapp01.ppt
 
Levers
LeversLevers
Levers
 
Levers
LeversLevers
Levers
 
Abstract Today’s experiment objectives are to determine the st.docx
Abstract Today’s experiment objectives are to determine the st.docxAbstract Today’s experiment objectives are to determine the st.docx
Abstract Today’s experiment objectives are to determine the st.docx
 
Newton's Second Law - The Effect of Force
Newton's Second Law - The Effect of ForceNewton's Second Law - The Effect of Force
Newton's Second Law - The Effect of Force
 
IBDP CAS Fitness Handbook
IBDP CAS Fitness HandbookIBDP CAS Fitness Handbook
IBDP CAS Fitness Handbook
 
Angling for Access, with examples 2013
 Angling for Access, with examples 2013 Angling for Access, with examples 2013
Angling for Access, with examples 2013
 
britlift_spreader vs beam.pdf
britlift_spreader vs beam.pdfbritlift_spreader vs beam.pdf
britlift_spreader vs beam.pdf
 
Lab 05 – Gravitation and Keplers Laws Name __________________.docx
Lab 05 – Gravitation and Keplers Laws Name __________________.docxLab 05 – Gravitation and Keplers Laws Name __________________.docx
Lab 05 – Gravitation and Keplers Laws Name __________________.docx
 
1VectorAdditionofForcesObjectivesTousethe.docx
 1VectorAdditionofForcesObjectivesTousethe.docx 1VectorAdditionofForcesObjectivesTousethe.docx
1VectorAdditionofForcesObjectivesTousethe.docx
 
A method for determining a physical law using the simple pendu.docx
A method for determining a physical law using the simple pendu.docxA method for determining a physical law using the simple pendu.docx
A method for determining a physical law using the simple pendu.docx
 

More from Michigan Mathematics and Science Teacher Leadership Collaborative

More from Michigan Mathematics and Science Teacher Leadership Collaborative (20)

Nsta Web20
Nsta Web20Nsta Web20
Nsta Web20
 
Developing Teacher Leaders in Science
Developing Teacher Leaders in ScienceDeveloping Teacher Leaders in Science
Developing Teacher Leaders in Science
 
Supporting Teacher Leadership Oct09
Supporting Teacher Leadership Oct09Supporting Teacher Leadership Oct09
Supporting Teacher Leadership Oct09
 
Constructing A Model For Leadership Oct09
Constructing A Model For Leadership Oct09Constructing A Model For Leadership Oct09
Constructing A Model For Leadership Oct09
 
Water Quality Lesson 5
Water Quality Lesson 5Water Quality Lesson 5
Water Quality Lesson 5
 
Water Quality Lesson 4
Water Quality Lesson 4Water Quality Lesson 4
Water Quality Lesson 4
 
Water Quality Lesson 3
Water Quality Lesson 3Water Quality Lesson 3
Water Quality Lesson 3
 
Water Quality Lesson 2
Water Quality Lesson 2Water Quality Lesson 2
Water Quality Lesson 2
 
Water Quality Lesson 1
Water Quality Lesson 1Water Quality Lesson 1
Water Quality Lesson 1
 
2
22
2
 
Design Process Formatted
Design  Process FormattedDesign  Process Formatted
Design Process Formatted
 
Reflection On Checkpoints Formatted
Reflection On  Checkpoints FormattedReflection On  Checkpoints Formatted
Reflection On Checkpoints Formatted
 
Assessment Overview Formatted
Assessment  Overview FormattedAssessment  Overview Formatted
Assessment Overview Formatted
 
1 A Formative Assessment Cards Formatted
1 A  Formative Assessment Cards Formatted1 A  Formative Assessment Cards Formatted
1 A Formative Assessment Cards Formatted
 
Continuum Of Emerging Teacher Leadership Formatted
Continuum Of  Emerging  Teacher  Leadership FormattedContinuum Of  Emerging  Teacher  Leadership Formatted
Continuum Of Emerging Teacher Leadership Formatted
 
Bakers Dozen Handout Formatted
Bakers  Dozen  Handout FormattedBakers  Dozen  Handout Formatted
Bakers Dozen Handout Formatted
 
Detailed Agenda T S L Selection Criteria Formatted
Detailed  Agenda  T S L  Selection  Criteria FormattedDetailed  Agenda  T S L  Selection  Criteria Formatted
Detailed Agenda T S L Selection Criteria Formatted
 
Reflection T S L Criteria Formatted
Reflection  T S L  Criteria FormattedReflection  T S L  Criteria Formatted
Reflection T S L Criteria Formatted
 
Detailed Agenda Introduction To Leadership Formatted
Detailed  Agenda  Introduction To  Leadership FormattedDetailed  Agenda  Introduction To  Leadership Formatted
Detailed Agenda Introduction To Leadership Formatted
 
Reflection Intro To Leadership Resources Formatted
Reflection  Intro To  Leadership  Resources FormattedReflection  Intro To  Leadership  Resources Formatted
Reflection Intro To Leadership Resources Formatted
 

Recently uploaded

VIP Kolkata Call Girl Howrah 👉 8250192130 Available With Room
VIP Kolkata Call Girl Howrah 👉 8250192130  Available With RoomVIP Kolkata Call Girl Howrah 👉 8250192130  Available With Room
VIP Kolkata Call Girl Howrah 👉 8250192130 Available With Roomdivyansh0kumar0
 
Cash Payment 9602870969 Escort Service in Udaipur Call Girls
Cash Payment 9602870969 Escort Service in Udaipur Call GirlsCash Payment 9602870969 Escort Service in Udaipur Call Girls
Cash Payment 9602870969 Escort Service in Udaipur Call GirlsApsara Of India
 
FULL ENJOY - 9953040155 Call Girls in Chhatarpur | Delhi
FULL ENJOY - 9953040155 Call Girls in Chhatarpur | DelhiFULL ENJOY - 9953040155 Call Girls in Chhatarpur | Delhi
FULL ENJOY - 9953040155 Call Girls in Chhatarpur | DelhiMalviyaNagarCallGirl
 
Catalogue ONG NUOC PPR DE NHAT .pdf
Catalogue ONG NUOC PPR DE NHAT      .pdfCatalogue ONG NUOC PPR DE NHAT      .pdf
Catalogue ONG NUOC PPR DE NHAT .pdfOrient Homes
 
The CMO Survey - Highlights and Insights Report - Spring 2024
The CMO Survey - Highlights and Insights Report - Spring 2024The CMO Survey - Highlights and Insights Report - Spring 2024
The CMO Survey - Highlights and Insights Report - Spring 2024christinemoorman
 
Grateful 7 speech thanking everyone that has helped.pdf
Grateful 7 speech thanking everyone that has helped.pdfGrateful 7 speech thanking everyone that has helped.pdf
Grateful 7 speech thanking everyone that has helped.pdfPaul Menig
 
Lowrate Call Girls In Laxmi Nagar Delhi ❤️8860477959 Escorts 100% Genuine Ser...
Lowrate Call Girls In Laxmi Nagar Delhi ❤️8860477959 Escorts 100% Genuine Ser...Lowrate Call Girls In Laxmi Nagar Delhi ❤️8860477959 Escorts 100% Genuine Ser...
Lowrate Call Girls In Laxmi Nagar Delhi ❤️8860477959 Escorts 100% Genuine Ser...lizamodels9
 
Pitch Deck Teardown: NOQX's $200k Pre-seed deck
Pitch Deck Teardown: NOQX's $200k Pre-seed deckPitch Deck Teardown: NOQX's $200k Pre-seed deck
Pitch Deck Teardown: NOQX's $200k Pre-seed deckHajeJanKamps
 
Keppel Ltd. 1Q 2024 Business Update Presentation Slides
Keppel Ltd. 1Q 2024 Business Update  Presentation SlidesKeppel Ltd. 1Q 2024 Business Update  Presentation Slides
Keppel Ltd. 1Q 2024 Business Update Presentation SlidesKeppelCorporation
 
BEST Call Girls In Greater Noida ✨ 9773824855 ✨ Escorts Service In Delhi Ncr,
BEST Call Girls In Greater Noida ✨ 9773824855 ✨ Escorts Service In Delhi Ncr,BEST Call Girls In Greater Noida ✨ 9773824855 ✨ Escorts Service In Delhi Ncr,
BEST Call Girls In Greater Noida ✨ 9773824855 ✨ Escorts Service In Delhi Ncr,noida100girls
 
7.pdf This presentation captures many uses and the significance of the number...
7.pdf This presentation captures many uses and the significance of the number...7.pdf This presentation captures many uses and the significance of the number...
7.pdf This presentation captures many uses and the significance of the number...Paul Menig
 
Call Girls In Sikandarpur Gurgaon ❤️8860477959_Russian 100% Genuine Escorts I...
Call Girls In Sikandarpur Gurgaon ❤️8860477959_Russian 100% Genuine Escorts I...Call Girls In Sikandarpur Gurgaon ❤️8860477959_Russian 100% Genuine Escorts I...
Call Girls In Sikandarpur Gurgaon ❤️8860477959_Russian 100% Genuine Escorts I...lizamodels9
 
(8264348440) 🔝 Call Girls In Keshav Puram 🔝 Delhi NCR
(8264348440) 🔝 Call Girls In Keshav Puram 🔝 Delhi NCR(8264348440) 🔝 Call Girls In Keshav Puram 🔝 Delhi NCR
(8264348440) 🔝 Call Girls In Keshav Puram 🔝 Delhi NCRsoniya singh
 
Call Girls In Connaught Place Delhi ❤️88604**77959_Russian 100% Genuine Escor...
Call Girls In Connaught Place Delhi ❤️88604**77959_Russian 100% Genuine Escor...Call Girls In Connaught Place Delhi ❤️88604**77959_Russian 100% Genuine Escor...
Call Girls In Connaught Place Delhi ❤️88604**77959_Russian 100% Genuine Escor...lizamodels9
 
Call Girls In Radisson Blu Hotel New Delhi Paschim Vihar ❤️8860477959 Escorts...
Call Girls In Radisson Blu Hotel New Delhi Paschim Vihar ❤️8860477959 Escorts...Call Girls In Radisson Blu Hotel New Delhi Paschim Vihar ❤️8860477959 Escorts...
Call Girls In Radisson Blu Hotel New Delhi Paschim Vihar ❤️8860477959 Escorts...lizamodels9
 
Intro to BCG's Carbon Emissions Benchmark_vF.pdf
Intro to BCG's Carbon Emissions Benchmark_vF.pdfIntro to BCG's Carbon Emissions Benchmark_vF.pdf
Intro to BCG's Carbon Emissions Benchmark_vF.pdfpollardmorgan
 
Call Girls Pune Just Call 9907093804 Top Class Call Girl Service Available
Call Girls Pune Just Call 9907093804 Top Class Call Girl Service AvailableCall Girls Pune Just Call 9907093804 Top Class Call Girl Service Available
Call Girls Pune Just Call 9907093804 Top Class Call Girl Service AvailableDipal Arora
 
Call Girls in Mehrauli Delhi 💯Call Us 🔝8264348440🔝
Call Girls in Mehrauli Delhi 💯Call Us 🔝8264348440🔝Call Girls in Mehrauli Delhi 💯Call Us 🔝8264348440🔝
Call Girls in Mehrauli Delhi 💯Call Us 🔝8264348440🔝soniya singh
 
Regression analysis: Simple Linear Regression Multiple Linear Regression
Regression analysis:  Simple Linear Regression Multiple Linear RegressionRegression analysis:  Simple Linear Regression Multiple Linear Regression
Regression analysis: Simple Linear Regression Multiple Linear RegressionRavindra Nath Shukla
 
2024 Numerator Consumer Study of Cannabis Usage
2024 Numerator Consumer Study of Cannabis Usage2024 Numerator Consumer Study of Cannabis Usage
2024 Numerator Consumer Study of Cannabis UsageNeil Kimberley
 

Recently uploaded (20)

VIP Kolkata Call Girl Howrah 👉 8250192130 Available With Room
VIP Kolkata Call Girl Howrah 👉 8250192130  Available With RoomVIP Kolkata Call Girl Howrah 👉 8250192130  Available With Room
VIP Kolkata Call Girl Howrah 👉 8250192130 Available With Room
 
Cash Payment 9602870969 Escort Service in Udaipur Call Girls
Cash Payment 9602870969 Escort Service in Udaipur Call GirlsCash Payment 9602870969 Escort Service in Udaipur Call Girls
Cash Payment 9602870969 Escort Service in Udaipur Call Girls
 
FULL ENJOY - 9953040155 Call Girls in Chhatarpur | Delhi
FULL ENJOY - 9953040155 Call Girls in Chhatarpur | DelhiFULL ENJOY - 9953040155 Call Girls in Chhatarpur | Delhi
FULL ENJOY - 9953040155 Call Girls in Chhatarpur | Delhi
 
Catalogue ONG NUOC PPR DE NHAT .pdf
Catalogue ONG NUOC PPR DE NHAT      .pdfCatalogue ONG NUOC PPR DE NHAT      .pdf
Catalogue ONG NUOC PPR DE NHAT .pdf
 
The CMO Survey - Highlights and Insights Report - Spring 2024
The CMO Survey - Highlights and Insights Report - Spring 2024The CMO Survey - Highlights and Insights Report - Spring 2024
The CMO Survey - Highlights and Insights Report - Spring 2024
 
Grateful 7 speech thanking everyone that has helped.pdf
Grateful 7 speech thanking everyone that has helped.pdfGrateful 7 speech thanking everyone that has helped.pdf
Grateful 7 speech thanking everyone that has helped.pdf
 
Lowrate Call Girls In Laxmi Nagar Delhi ❤️8860477959 Escorts 100% Genuine Ser...
Lowrate Call Girls In Laxmi Nagar Delhi ❤️8860477959 Escorts 100% Genuine Ser...Lowrate Call Girls In Laxmi Nagar Delhi ❤️8860477959 Escorts 100% Genuine Ser...
Lowrate Call Girls In Laxmi Nagar Delhi ❤️8860477959 Escorts 100% Genuine Ser...
 
Pitch Deck Teardown: NOQX's $200k Pre-seed deck
Pitch Deck Teardown: NOQX's $200k Pre-seed deckPitch Deck Teardown: NOQX's $200k Pre-seed deck
Pitch Deck Teardown: NOQX's $200k Pre-seed deck
 
Keppel Ltd. 1Q 2024 Business Update Presentation Slides
Keppel Ltd. 1Q 2024 Business Update  Presentation SlidesKeppel Ltd. 1Q 2024 Business Update  Presentation Slides
Keppel Ltd. 1Q 2024 Business Update Presentation Slides
 
BEST Call Girls In Greater Noida ✨ 9773824855 ✨ Escorts Service In Delhi Ncr,
BEST Call Girls In Greater Noida ✨ 9773824855 ✨ Escorts Service In Delhi Ncr,BEST Call Girls In Greater Noida ✨ 9773824855 ✨ Escorts Service In Delhi Ncr,
BEST Call Girls In Greater Noida ✨ 9773824855 ✨ Escorts Service In Delhi Ncr,
 
7.pdf This presentation captures many uses and the significance of the number...
7.pdf This presentation captures many uses and the significance of the number...7.pdf This presentation captures many uses and the significance of the number...
7.pdf This presentation captures many uses and the significance of the number...
 
Call Girls In Sikandarpur Gurgaon ❤️8860477959_Russian 100% Genuine Escorts I...
Call Girls In Sikandarpur Gurgaon ❤️8860477959_Russian 100% Genuine Escorts I...Call Girls In Sikandarpur Gurgaon ❤️8860477959_Russian 100% Genuine Escorts I...
Call Girls In Sikandarpur Gurgaon ❤️8860477959_Russian 100% Genuine Escorts I...
 
(8264348440) 🔝 Call Girls In Keshav Puram 🔝 Delhi NCR
(8264348440) 🔝 Call Girls In Keshav Puram 🔝 Delhi NCR(8264348440) 🔝 Call Girls In Keshav Puram 🔝 Delhi NCR
(8264348440) 🔝 Call Girls In Keshav Puram 🔝 Delhi NCR
 
Call Girls In Connaught Place Delhi ❤️88604**77959_Russian 100% Genuine Escor...
Call Girls In Connaught Place Delhi ❤️88604**77959_Russian 100% Genuine Escor...Call Girls In Connaught Place Delhi ❤️88604**77959_Russian 100% Genuine Escor...
Call Girls In Connaught Place Delhi ❤️88604**77959_Russian 100% Genuine Escor...
 
Call Girls In Radisson Blu Hotel New Delhi Paschim Vihar ❤️8860477959 Escorts...
Call Girls In Radisson Blu Hotel New Delhi Paschim Vihar ❤️8860477959 Escorts...Call Girls In Radisson Blu Hotel New Delhi Paschim Vihar ❤️8860477959 Escorts...
Call Girls In Radisson Blu Hotel New Delhi Paschim Vihar ❤️8860477959 Escorts...
 
Intro to BCG's Carbon Emissions Benchmark_vF.pdf
Intro to BCG's Carbon Emissions Benchmark_vF.pdfIntro to BCG's Carbon Emissions Benchmark_vF.pdf
Intro to BCG's Carbon Emissions Benchmark_vF.pdf
 
Call Girls Pune Just Call 9907093804 Top Class Call Girl Service Available
Call Girls Pune Just Call 9907093804 Top Class Call Girl Service AvailableCall Girls Pune Just Call 9907093804 Top Class Call Girl Service Available
Call Girls Pune Just Call 9907093804 Top Class Call Girl Service Available
 
Call Girls in Mehrauli Delhi 💯Call Us 🔝8264348440🔝
Call Girls in Mehrauli Delhi 💯Call Us 🔝8264348440🔝Call Girls in Mehrauli Delhi 💯Call Us 🔝8264348440🔝
Call Girls in Mehrauli Delhi 💯Call Us 🔝8264348440🔝
 
Regression analysis: Simple Linear Regression Multiple Linear Regression
Regression analysis:  Simple Linear Regression Multiple Linear RegressionRegression analysis:  Simple Linear Regression Multiple Linear Regression
Regression analysis: Simple Linear Regression Multiple Linear Regression
 
2024 Numerator Consumer Study of Cannabis Usage
2024 Numerator Consumer Study of Cannabis Usage2024 Numerator Consumer Study of Cannabis Usage
2024 Numerator Consumer Study of Cannabis Usage
 

Investigating The Lever V1 6 Complete

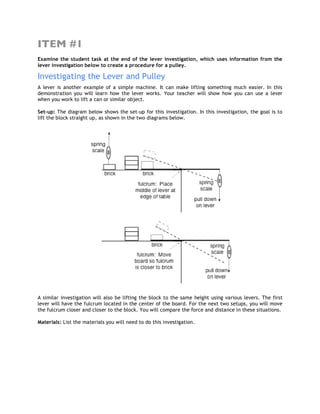
  • 1. ITEM #1 Examine the student task at the end of the lever investigation, which uses information from the lever investigation below to create a procedure for a pulley. Investigating the Lever and Pulley A lever is another example of a simple machine. It can make lifting something much easier. In this demonstration you will learn how the lever works. Your teacher will show how you can use a lever when you work to lift a can or similar object. Set-up: The diagram below shows the set-up for this investigation. In this investigation, the goal is to lift the block straight up, as shown in the two diagrams below. A similar investigation will also be lifting the block to the same height using various levers. The first lever will have the fulcrum located in the center of the board. For the next two setups, you will move the fulcrum closer and closer to the block. You will compare the force and distance in these situations. Materials: List the materials you will need to do this investigation.
  • 2. Procedure Part 1: Lifting the block 1. Prepare the first setup by tying a string around the block. 2. Lift the block to a height of 10 cm with the spring scale, and measure the amount of force (in newtons) you apply. Record this measurement in your data table. 3. Lift the block again to the top of the stack of books, and measure the distance (in centimeters) that the person’s hand moves while lifting the block. Record this measurement in your data table. Repeat this procedure three times to get three sets of measurements. Part 2: Using the lever to lift the block 1. Attach the clamp to the ring stand near the top. Use the other half of the clamp to attach the bolt. The bolt will be the fulcrum of your lever. 2. Slide the wooden lever onto the bolt, so that the bolt goes through the middle of the lever. Secure the lever by screwing on the wing nut (not too tight). 3. Hook the block to one end of the lever. The arm of the lever should be horizontal. (See the diagram above.) Hold a ruler up or attach it to the ring stand so that you can easily measure 10cm above where the block is now hanging. 4. Lift the block by pulling straight down on the lever with the spring scale, and measure the amount of force (in newtons) you apply. Record this measurement in your data table. 5. Lift the block again, and measure the distance (in centimeters) that the person’s hand moves while pulling down on the lever. Repeat this procedure three times to get three sets of measurements. Part 3: Using the lever to lift the block (fulcrum closer to block) 1. Move the fulcrum (where the lever is attached to the bolt) to one of the holes closer to the block. 2. Hook the block to one end of the lever. The arm of the lever should be horizontal. (See the diagram above.) Hold a ruler up or attach it to the ring stand so that you can easily measure 10cm above where the block is now hanging. 3. Lift the block by pulling straight down on the lever with the spring scale, and measure the amount of force (in newtons) you apply. Record this measurement in your data table. 4. Lift the block again, and measure the distance (in centimeters) that the person’s hand moves while pulling down on the lever. Repeat this procedure three times to get three sets of measurements. Part 3: Using the lever to lift the block (fulcrum even closer to block) 1. Move the fulcrum even closer to the block. 2. Hook the block to one end of the lever. The arm of the lever should be horizontal. (See the diagram above.) Hold a ruler up or attach it to the ring stand so that you can easily measure 10cm above where the block is now hanging. 3. Lift the block by pulling straight down on the lever with the spring scale, and measure the amount of force (in newtons) you apply. Record this measurement in your data table. 4. Lift the block again, and measure the distance (in centimeters) that the person’s hand moves while pulling down on the lever. Repeat this procedure three times to get three sets of measurements.
  • 3. Data: The following tables are for use in collecting data from the investigation. Without Lever With Lever (fulcrum at center) Force (N) Distance (cm) Force (N) Distance (cm) Trial 1 Trial 1 Trial 2 Trial 2 Trial 3 Trial 3 Total Total Average Average With Lever (fulcrum closer to block) With Lever (fulcrum very close to block) Force (N) Distance (cm) Force (N) Distance (cm) Trial 1 Trial 1 Trial 2 Trial 2 Trial 3 Trial 3 Total Total Average Average Graphs: Using the averages from the data, the results for the force and distance measurements can be graphed below.
  • 4. Results (What does your data say?) Conclusions (What can you conclude about levers in general?) Evidence (What does your graph show to support your conclusion?) Was your hypothesis supported? Was it complete? Student Task: Using the diagram and information for the pulley shown below, create a similar procedure and hypothesis to investigate the effect on force and distance using a pulley. Investigating the Pulley A pulley is another example of a simple machine. It can make lifting something much easier. In this investigation you will learn how pulleys work. You might want to use pulleys when you work on the design challenge and build a machine to lift a can.
  • 5. ITEM #2 Examine the lever investigation, and graph the data collected to answer the questions. Investigating the Lever and Pulley A lever is another example of a simple machine. It can make lifting something much easier. In this investigation you will learn how the lever works. You might want to use a lever when you work on the design challenge and build a machine to lift a can. In this investigation you will answer the question: How do different levers help you lift an object? Hypothesis: The greater the distance of the fulcrum from the brick, the less force that needs to be applied to the lever. Set-up: The diagram below shows the set-up for this investigation. You will be lifting the block straight up and you will also be lifting the block to the same height using various levers. The first lever will have the fulcrum located in the center of the board. For the next two setups, you will move the fulcrum closer and closer to the block. You will compare the force and distance in these situations. Your teacher will provide you with the materials to conduct the investigation.
  • 6. Procedure Part 1: Lifting the block 1. Prepare the first setup by tying a string around the block. 2. Lift the block to a height of 10 cm with the spring scale, and measure the amount of force (in newtons) you apply. Record this measurement in your data table. 3. Lift the block again to the top of the stack of books, and measure the distance (in centimeters) that the person’s hand moves while lifting the block. Record this measurement in your data table. Repeat this procedure three times to get three sets of measurements. Part 2: Using the lever to lift the block 1. Attach the clamp to the ring stand near the top. Use the other half of the clamp to attach the bolt. The bolt will be the fulcrum of your lever. 2. Slide the wooden lever onto the bolt, so that the bolt goes through the middle of the lever. Secure the lever by screwing on the wing nut (not too tight). 3. Hook the block to one end of the lever. The arm of the lever should be horizontal. (See the diagram above.) Hold a ruler up or attach it to the ring stand so that you can easily measure 10cm above where the block is now hanging. 4. Lift the block by pulling straight down on the lever with the spring scale, and measure the amount of force (in newtons) you apply. Record this measurement in your data table. 5. Lift the block again, and measure the distance (in centimeters) that the person’s hand moves while pulling down on the lever. Repeat this procedure three times to get three sets of measurements. Part 3: Using the lever to lift the block (fulcrum closer to block) 1. Move the fulcrum (where the lever is attached to the bolt) to one of the holes closer to the block. 2. Hook the block to one end of the lever. The arm of the lever should be horizontal. (See the diagram above.) Hold a ruler up or attach it to the ring stand so that you can easily measure 10cm above where the block is now hanging. 3. Lift the block by pulling straight down on the lever with the spring scale, and measure the amount of force (in newtons) you apply. Record this measurement in your data table. 4. Lift the block again, and measure the distance (in centimeters) that the person’s hand moves while pulling down on the lever. Repeat this procedure three times to get three sets of measurements. Part 4: Using the lever to lift the block (fulcrum even closer to block) 1. Move the fulcrum even closer to the block. 2. Hook the block to one end of the lever. The arm of the lever should be horizontal. (See the diagram above.) Hold a ruler up or attach it to the ring stand so that you can easily measure 10cm above where the block is now hanging. 3. Lift the block by pulling straight down on the lever with the spring scale, and measure the amount of force (in newtons) you apply. Record this measurement in your data table. 4. Lift the block again, and measure the distance (in centimeters) that the person’s hand moves while pulling down on the lever. Repeat this procedure three times to get three sets of measurements.
  • 7. Data: Below is the data collected by a student doing this investigation. Without Lever With Lever (fulcrum at center) Force (N) Distance (cm) Force (N) Distance (cm) Trial 1 23 18 Trial 1 23 18 Trial 2 22 18 Trial 2 22 18 Trial 3 23 18 Trial 3 23 18 Total Total Average Average With Lever (fulcrum closer to block) With Lever (fulcrum very close to block) Force (N) Distance (cm) Force (N) Distance (cm) Trial 1 17 22 Trial 1 11 24 Trial 2 18 21 Trial 2 10 26 Trial 3 17 24 Trial 3 8 26 Total Total Average Average Use this data to construct the graphs shown below. Was your hypothesis supported? Was it complete?
  • 8. ITEM #3 Examine the lever investigation, and graph the data collected to answer the questions. Investigating the Lever and Pulley A lever is another example of a simple machine. It can make lifting something much easier. In this investigation you will learn how the lever works. You might want to use a lever when you work on the design challenge and build a machine to lift a can. How do different levers help you lift an object? Levers are used to reduce the amount of force that is required to lift an object, or to change the direction of the force required to lift an object. For instance, if you lift up an object without using a lever, and then try to lift the object with a lever, as shown in the first diagram below, the force required to pull on the object is the same, but the direction you pull changes (pulling down instead of pulling up on the object directly). If you move the fulcrum of the object so that it is closer to the brick, the distance you pull will be greater, but the amount of force will be less. This is because the amount of force and distance you move that force can be multiplied to get the amount of work done. In other words: W=Fxd (W = Work, F = force in Newtons, d = distance in cm) Set-up: The diagram below shows the set-up for this investigation. You will be lifting the block straight up and you will also be lifting the block to the same height using various levers. The first lever will have the fulcrum located in the center of the board. For the next two setups, you will move the fulcrum closer and closer to the block. You will compare the force and distance in these situations. Your teacher will provide you with the materials to conduct the investigation.
  • 9. USING THE PROCEDURE BELOW, STATE WHETHER THE DATA GATHERED BY THE STUDENT IS ACCURATE AND FITS THE EQUATION FOR WORK. Procedure Part 1: Lifting the block 1. Prepare the first setup by tying a string around the block. 2. Lift the block to a height of 10 cm with the spring scale, and measure the amount of force (in newtons) you apply. Record this measurement in your data table. 3. Lift the block again to the top of the stack of books, and measure the distance (in centimeters) that the person’s hand moves while lifting the block. Record this measurement in your data table. Repeat this procedure three times to get three sets of measurements. Part 2: Using the lever to lift the block 1. Attach the clamp to the ring stand near the top. Use the other half of the clamp to attach the bolt. The bolt will be the fulcrum of your lever. 2. Slide the wooden lever onto the bolt, so that the bolt goes through the middle of the lever. Secure the lever by screwing on the wing nut (not too tight). 3. Hook the block to one end of the lever. The arm of the lever should be horizontal. (See the diagram above.) Hold a ruler up or attach it to the ring stand so that you can easily measure 10cm above where the block is now hanging. 4. Lift the block by pulling straight down on the lever with the spring scale, and measure the amount of force (in newtons) you apply. Record this measurement in your data table. 5. Lift the block again, and measure the distance (in centimeters) that the person’s hand moves while pulling down on the lever. Repeat this procedure three times to get three sets of measurements. Part 3: Using the lever to lift the block (fulcrum closer to block) 1. Move the fulcrum (where the lever is attached to the bolt) to one of the holes closer to the block. 2. Hook the block to one end of the lever. The arm of the lever should be horizontal. (See the diagram above.) Hold a ruler up or attach it to the ring stand so that you can easily measure 10cm above where the block is now hanging. 3. Lift the block by pulling straight down on the lever with the spring scale, and measure the amount of force (in newtons) you apply. Record this measurement in your data table. 4. Lift the block again, and measure the distance (in centimeters) that the person’s hand moves while pulling down on the lever. Repeat this procedure three times to get three sets of measurements. Part 4: Using the lever to lift the block (fulcrum even closer to block) 1. Move the fulcrum even closer to the block. 2. Hook the block to one end of the lever. The arm of the lever should be horizontal. (See the diagram above.) Hold a ruler up or attach it to the ring stand so that you can easily measure 10cm above where the block is now hanging. 3. Lift the block by pulling straight down on the lever with the spring scale, and measure the amount of force (in newtons) you apply. Record this measurement in your data table. 4. Lift the block again, and measure the distance (in centimeters) that the person’s hand moves while pulling down on the lever. Repeat this procedure three times to get three sets of measurements.
  • 10. Data: Below is the data collected by a student doing this investigation. Without Lever With Lever (fulcrum at center) Force (N) Distance (cm) Force (N) Distance (cm) Trial 1 23 18 Trial 1 23 18 Trial 2 22 18 Trial 2 22 18 Trial 3 23 18 Trial 3 23 18 Total Total Average Average With Lever (fulcrum closer to block) With Lever (fulcrum very close to block) Force (N) Distance (cm) Force (N) Distance (cm) Trial 1 17 22 Trial 1 11 24 Trial 2 18 21 Trial 2 10 26 Trial 3 17 24 Trial 3 8 26 Total Total Average Average Use this data to determine if the data was collected correctly by using the formula for work. Show your work.
  • 11. ITEM #4 Examine the student task at the end of the lever investigation, which uses information from the lever investigation below to create a procedure for a pulley. Investigating the Lever and Pulley A lever is another example of a simple machine. It can make lifting something much easier. In this demonstration you will learn how the lever works. Your teacher will show how you can use a lever when you work to lift a can or similar object. Set-up: The diagram below shows the set-up for this investigation. In this investigation, the goal is to lift the block straight up, as shown in the two diagrams below. A similar investigation will also be lifting the block to the same height using various levers. The first lever will have the fulcrum located in the center of the board. For the next two setups, you will move the fulcrum closer and closer to the block. You will compare the force and distance in these situations. Materials: List the materials you will need to do this investigation.
  • 12. Procedure Part 1: Lifting the block 1. Prepare the first setup by tying a string around the block. 2. Lift the block to a height of 10 cm with the spring scale, and measure the amount of force (in newtons) you apply. Record this measurement in your data table. 3. Lift the block again to the top of the stack of books, and measure the distance (in centimeters) that the person’s hand moves while lifting the block. Record this measurement in your data table. Repeat this procedure three times to get three sets of measurements. Part 2: Using the lever to lift the block 1. Attach the clamp to the ring stand near the top. Use the other half of the clamp to attach the bolt. The bolt will be the fulcrum of your lever. 2. Slide the wooden lever onto the bolt, so that the bolt goes through the middle of the lever. Secure the lever by screwing on the wing nut (not too tight). 3. Hook the block to one end of the lever. The arm of the lever should be horizontal. (See the diagram above.) Hold a ruler up or attach it to the ring stand so that you can easily measure 10cm above where the block is now hanging. 4. Lift the block by pulling straight down on the lever with the spring scale, and measure the amount of force (in newtons) you apply. Record this measurement in your data table. 5. Lift the block again, and measure the distance (in centimeters) that the person’s hand moves while pulling down on the lever. Repeat this procedure three times to get three sets of measurements. Part 3: Using the lever to lift the block (fulcrum closer to block) 1. Move the fulcrum (where the lever is attached to the bolt) to one of the holes closer to the block. 2. Hook the block to one end of the lever. The arm of the lever should be horizontal. (See the diagram above.) Hold a ruler up or attach it to the ring stand so that you can easily measure 10cm above where the block is now hanging. 3. Lift the block by pulling straight down on the lever with the spring scale, and measure the amount of force (in newtons) you apply. Record this measurement in your data table. 4. Lift the block again, and measure the distance (in centimeters) that the person’s hand moves while pulling down on the lever. Repeat this procedure three times to get three sets of measurements. Part 3: Using the lever to lift the block (fulcrum even closer to block) 1. Move the fulcrum even closer to the block. 2. Hook the block to one end of the lever. The arm of the lever should be horizontal. (See the diagram above.) Hold a ruler up or attach it to the ring stand so that you can easily measure 10cm above where the block is now hanging. 3. Lift the block by pulling straight down on the lever with the spring scale, and measure the amount of force (in newtons) you apply. Record this measurement in your data table. 4. Lift the block again, and measure the distance (in centimeters) that the person’s hand moves while pulling down on the lever. Repeat this procedure three times to get three sets of measurements.
  • 13. Data: The following tables are for use in collecting data from the investigation. Without Lever With Lever (fulcrum at center) Force (N) Distance (cm) Force (N) Distance (cm) Trial 1 23 18 Trial 1 -23 -18 Trial 2 22 18 Trial 2 -22 -18 Trial 3 23 18 Trial 3 -23 -18 Total Total Average Average With Lever (fulcrum closer to block) With Lever (fulcrum very close to block) Force (N) Distance (cm) Force (N) Distance (cm) Trial 1 -17 -22 Trial 1 -11 -24 Trial 2 -18 -21 Trial 2 -10 -26 Trial 3 -17 -24 Trial 3 -8 -26 Total Total Average Average Fill in the blank in the statement below: As the amount of force to move an object is reduced, the amount of distance the lever is moved __________because… Using a Pulley: Create a hypothesis and similar procedure to investigate the effect on force and distance using a pulley instead of a lever. Show diagrams for each step of the procedure.
  • 14. ITEM #5 Examine the lever investigation, and graph the data collected to answer the questions. Investigating the Lever and Pulley A lever is another example of a simple machine. It can make lifting something much easier. In this investigation you will learn how the lever works. You might want to use a lever when you work on the design challenge and build a machine to lift a can. In this investigation you will answer the question: How do different levers help you lift an object? Hypothesis: The greater the distance of the fulcrum from the brick, the less force that needs to be applied to the lever. Set-up: The diagram below shows the set-up for this investigation. You will be lifting the block straight up and you will also be lifting the block to the same height using various levers. The first lever will have the fulcrum located in the center of the board. For the next two setups, you will move the fulcrum closer and closer to the block. You will compare the force and distance in these situations. Your teacher will provide you with the materials to conduct the investigation.
  • 15. Procedure Part 1: Lifting the block 1. Prepare the first setup by tying a string around the block. 2. Lift the block to a height of 10 cm with the spring scale, and measure the amount of force (in newtons) you apply. Record this measurement in your data table. 3. Lift the block again to the top of the stack of books, and measure the distance (in centimeters) that the person’s hand moves while lifting the block. Record this measurement in your data table. Repeat this procedure three times to get three sets of measurements. Part 2: Using the lever to lift the block 1. Attach the clamp to the ring stand near the top. Use the other half of the clamp to attach the bolt. The bolt will be the fulcrum of your lever. 2. Slide the wooden lever onto the bolt, so that the bolt goes through the middle of the lever. Secure the lever by screwing on the wing nut (not too tight). 3. Hook the block to one end of the lever. The arm of the lever should be horizontal. (See the diagram above.) Hold a ruler up or attach it to the ring stand so that you can easily measure 10cm above where the block is now hanging. 4. Lift the block by pulling straight down on the lever with the spring scale, and measure the amount of force (in newtons) you apply. Record this measurement in your data table. 5. Lift the block again, and measure the distance (in centimeters) that the person’s hand moves while pulling down on the lever. Repeat this procedure three times to get three sets of measurements. Part 3: Using the lever to lift the block (fulcrum closer to block) 1. Move the fulcrum (where the lever is attached to the bolt) to one of the holes closer to the block. 2. Hook the block to one end of the lever. The arm of the lever should be horizontal. (See the diagram above.) Hold a ruler up or attach it to the ring stand so that you can easily measure 10cm above where the block is now hanging. 3. Lift the block by pulling straight down on the lever with the spring scale, and measure the amount of force (in newtons) you apply. Record this measurement in your data table. 4. Lift the block again, and measure the distance (in centimeters) that the person’s hand moves while pulling down on the lever. Repeat this procedure three times to get three sets of measurements. Part 4: Using the lever to lift the block (fulcrum even closer to block) 1. Move the fulcrum even closer to the block. 2. Hook the block to one end of the lever. The arm of the lever should be horizontal. (See the diagram above.) Hold a ruler up or attach it to the ring stand so that you can easily measure 10cm above where the block is now hanging. 3. Lift the block by pulling straight down on the lever with the spring scale, and measure the amount of force (in newtons) you apply. Record this measurement in your data table. 4. Lift the block again, and measure the distance (in centimeters) that the person’s hand moves while pulling down on the lever. Repeat this procedure three times to get three sets of measurements.
  • 16. Data: Below is the data collected by a student doing this investigation. Without Lever With Lever (fulcrum at center) Force (N) Distance (cm) Force (N) Distance (cm) Trial 1 23 18 Trial 1 23 18 Trial 2 22 18 Trial 2 22 18 Trial 3 23 18 Trial 3 23 18 Total Total Average Average With Lever (fulcrum closer to block) With Lever (fulcrum very close to block) Force (N) Distance (cm) Force (N) Distance (cm) Trial 1 17 22 Trial 1 11 24 Trial 2 18 21 Trial 2 10 26 Trial 3 17 24 Trial 3 8 26 Total Total Average Average Use this data to construct the graphs shown below.
  • 17. Data: Below is the data collected by a second student doing this investigation with different equipment. Without Lever With Lever (fulcrum at center) Force (N) Distance (cm) Force (N) Distance (cm) Trial 1 35 21 Trial 1 36 21 Trial 2 35 21 Trial 2 34 21 Trial 3 33 21 Trial 3 34 20 Total Total Average Average With Lever (fulcrum closer to block) With Lever (fulcrum very close to block) Force (N) Distance (cm) Force (N) Distance (cm) Trial 1 27 24 Trial 1 21 35 Trial 2 25 25 Trial 2 20 37 Trial 3 25 25 Trial 3 18 37 Total Total Average Average Use this data to construct the graphs shown below.
  • 18. Using the data from the two students, what can you conclude about the relationship between force and distance? What evidence do you have for your conclusion? What similarities or differences do you see in the graphs for the two students? What might account for these? Explain the general relationship between force
  • 19. ITEM #6 Investigating the Lever and Pulley A lever is another example of a simple machine. It can make lifting something much easier. In this investigation you will learn how the lever works. You might want to use a lever when you work on the design challenge and build a machine to lift a can. Investigating the Lever and Pulley A lever is another example of a simple machine. It can make lifting something much easier. In this investigation you will learn how the lever works. You might want to use a lever to lift a can. How do different levers help you lift an object? Levers are used to reduce the amount of force that is required to lift an object, or to change the direction of the force required to lift an object. For instance, if you lift up an object without using a lever, and then try to lift the object with a lever, as shown in the first diagram below, the force required to pull on the object is the same, but the direction you pull changes (pulling down instead of pulling up on the object directly). If you move the fulcrum of the object so that it is closer to the brick, the distance you pull will be greater, but the amount of force will be less. Set-up: The diagram below shows the set-up for this investigation. In this investigation, the goal is to lift the block straight up, as shown in the two diagrams below. A similar investigation will also be lifting the block to the same height using various levers. The first lever will have the fulcrum located in the center of the board. For the next two setups, you will move the fulcrum closer and closer to the block. You will compare the force and distance in these situations. Materials: List the materials you will need to do this investigation.
  • 20. Procedure Part 1: Lifting the block 1. Prepare the first setup by tying a string around the block. 2. Lift the block to a height of 10 cm with the spring scale, and measure the amount of force (in newtons) you apply. Record this measurement in your data table. 3. Lift the block again to the top of the stack of books, and measure the distance (in centimeters) that the person’s hand moves while lifting the block. Record this measurement in your data table. Repeat this procedure three times to get three sets of measurements. Part 2: Using the lever to lift the block 1. Attach the clamp to the ring stand near the top. Use the other half of the clamp to attach the bolt. The bolt will be the fulcrum of your lever. 2. Slide the wooden lever onto the bolt, so that the bolt goes through the middle of the lever. Secure the lever by screwing on the wing nut (not too tight). 3. Hook the block to one end of the lever. The arm of the lever should be horizontal. (See the diagram above.) Hold a ruler up or attach it to the ring stand so that you can easily measure 10cm above where the block is now hanging. 4. Lift the block by pulling straight down on the lever with the spring scale, and measure the amount of force (in newtons) you apply. Record this measurement in your data table. 5. Lift the block again, and measure the distance (in centimeters) that the person’s hand moves while pulling down on the lever. Repeat this procedure three times to get three sets of measurements. Part 3: Using the lever to lift the block (fulcrum closer to block) 1. Move the fulcrum (where the lever is attached to the bolt) to one of the holes closer to the block. 2. Hook the block to one end of the lever. The arm of the lever should be horizontal. (See the diagram above.) Hold a ruler up or attach it to the ring stand so that you can easily measure 10cm above where the block is now hanging. 3. Lift the block by pulling straight down on the lever with the spring scale, and measure the amount of force (in newtons) you apply. Record this measurement in your data table. 4. Lift the block again, and measure the distance (in centimeters) that the person’s hand moves while pulling down on the lever. Repeat this procedure three times to get three sets of measurements. Part 3: Using the lever to lift the block (fulcrum even closer to block) 1. Move the fulcrum even closer to the block. 2. Hook the block to one end of the lever. The arm of the lever should be horizontal. (See the diagram above.) Hold a ruler up or attach it to the ring stand so that you can easily measure 10cm above where the block is now hanging. 3. Lift the block by pulling straight down on the lever with the spring scale, and measure the amount of force (in newtons) you apply. Record this measurement in your data table. 4. Lift the block again, and measure the distance (in centimeters) that the person’s hand moves while pulling down on the lever. Repeat this procedure three times to get three sets of measurements.
  • 21. Data: The following tables are for use in collecting data from the investigation. Without Lever With Lever (fulcrum at center) Force (N) Distance (cm) Force (N) Distance (cm) Trial 1 23 18 Trial 1 -23 -18 Trial 2 22 18 Trial 2 -22 -18 Trial 3 23 18 Trial 3 -23 -18 Total Total Average Average With Lever (fulcrum closer to block) With Lever (fulcrum very close to block) Force (N) Distance (cm) Force (N) Distance (cm) Trial 1 -17 -22 Trial 1 -11 -24 Trial 2 -18 -21 Trial 2 -10 -26 Trial 3 -17 -24 Trial 3 -8 -26 Total Total Average Average Graphs: Using the averages from your data, graph the results for the force below. Be sure to label the vertical axis on each graph with the appropriate units.
  • 22. Investigating Pulleys A pulley is another example of a simple machine. It can make lifting something much easier. In this investigation you will learn how pulleys work. You might want to use pulleys when you work on the design challenge and build a machine to lift a can. USE THE FOLLOWING EXPERIMENTAL PROCEDURE TO CONDUCT AN INVESTIGATION OF THE FORCE AND DISTANCE USED TO MOVE A CAN USING A PULLEY AND COMPLETE THE RELATED TABLES AND GRAPHS. Set-up: The diagram below shows the set-up for this investigation. You will be lifting the block straight up and you will also be lifting the block using a variety of pulley arrangements. The first pulley arrangement is a fixed pulley. The second is a free pulley and the third combines a fixed and a free pulley. You will compare the force and distance in these situations. Materials: List the materials you will need to do this investigation.
  • 23. Procedure Part 1: Lifting the block 1. Prepare the first setup by tying a string around the block. 2. Lift the block to a height of 20 cm using the spring scale, and measure the amount of force (in newtons) you apply. Record this measurement in your data table. 3. Lift the block again to a height of 20 cm, and measure the distance (in centimeters) that the person’s hand moves while lifting the block. Record this measurement in your data table. Repeat this procedure three times to get three sets of measurements. Part 2: Using a fixed pulley to lift the block 1. Set up the fixed pulley. (See diagram above.) Attach the pulley to the top of the ring stand and tie one end of the string to the block. Thread the string through the pulley so that as you pull down on the free end, the block moves up. Set the ruler near the block to use as a reference height. Attach the spring scale to the free end of the string. 2. Lift the block to a height of 20cm by pulling on the string with the spring scale. You can pull at any angle. Measure the amount of force (in newtons) you apply. Record this measurement in your data table. 3. Lift the block again to 20 cm, and measure the distance (in centimeters) that the person’s hand moves. Record this measurement in your data table. Repeat this procedure three times to get three sets of measurements. Part 3: Using a free pulley to lift the block 1. Set up the free pulley. (See the diagram above.) Tie a piece of string to the ring stand. Thread the free end of the string through the pulley. Tie the block to the pulley so that as you pull up on the string the pulley (with the block attached) moves up. Set the stack of books near the block to use as a reference height. Attach the spring scale to the free end of the string. 2. Lift the block to a height of 20 cm by pulling on the string with the spring scale. You can pull at any angle. Measure the amount of force (in newtons) you apply. Record this measurement in your data table. 3. Lift the block again to 20 cm, and measure the distance (in centimeters) that the person’s hand moves. Record this measurement in your data table. Repeat this procedure three times to get three sets of measurements. Part 4: Using a fixed and a free pulley to lift the block 1. Set up the fixed and free pulleys. (See the diagram above.) Use the free pulley setup from the previous part. Instead of pulling on the free end of the string, attach a second pulley to the ring stand (like the fixed pulley in the first part) and thread the free end of the string through this pulley. Set the stack of books near the block to use as a reference height. Attach the spring scale to the free end of the string. 2. Lift the block to a height of 20 cm by pulling on the string with the spring scale. You can pullat any angle. Measure the amount of force (in newtons) you apply. Record this measurement in your data table. 3. Lift the block again to 20 cm, and measure the distance (in centimeters) that the person’s hand moves. Record this measurement in your data table. Repeat this procedure three times to get three sets of measurements.
  • 24. Data: Without Pulley With Fixed Pulley Force (N) Distance (cm) Force (N) Distance (cm) Trial 1 Trial 1 Trial 2 Trial 2 Trial 3 Trial 3 Total Total Average Average With Free Pulley With Fixed and Free Pulleys Force (N) Distance (cm) Force (N) Distance (cm) Trial 1 Trial 1 Trial 2 Trial 2 Trial 3 Trial 3 Total Total Average Average Graphs: Using the averages from your data, graph the results for the force below. Be sure to label the vertical axis on each graph with the appropriate units. What can you conclude about the amount of force required to move an object using a lever? What can you conclude about the amount of force required to move an object using pulleys? What can you conclude about the similarities between the lever and pulley?