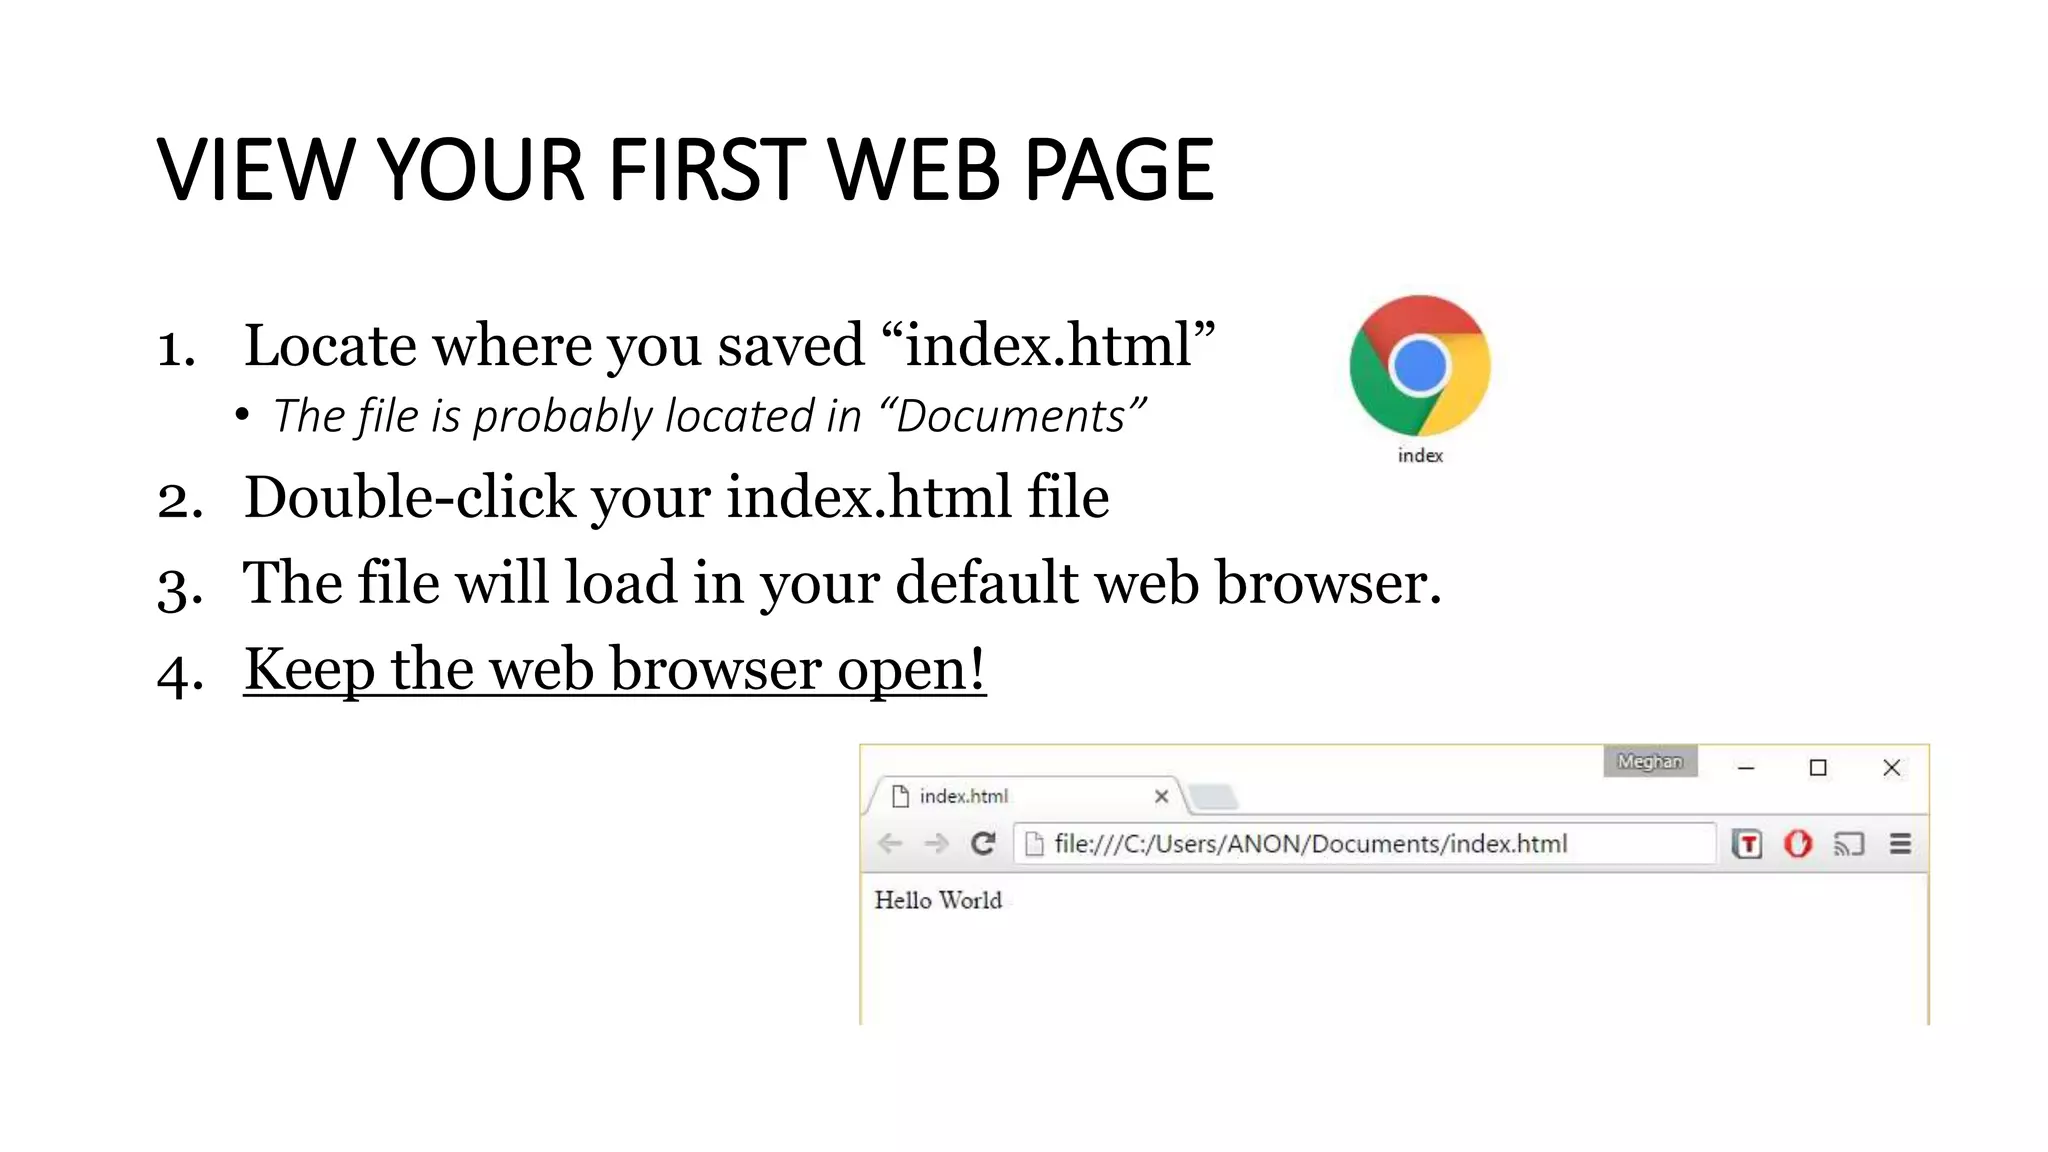
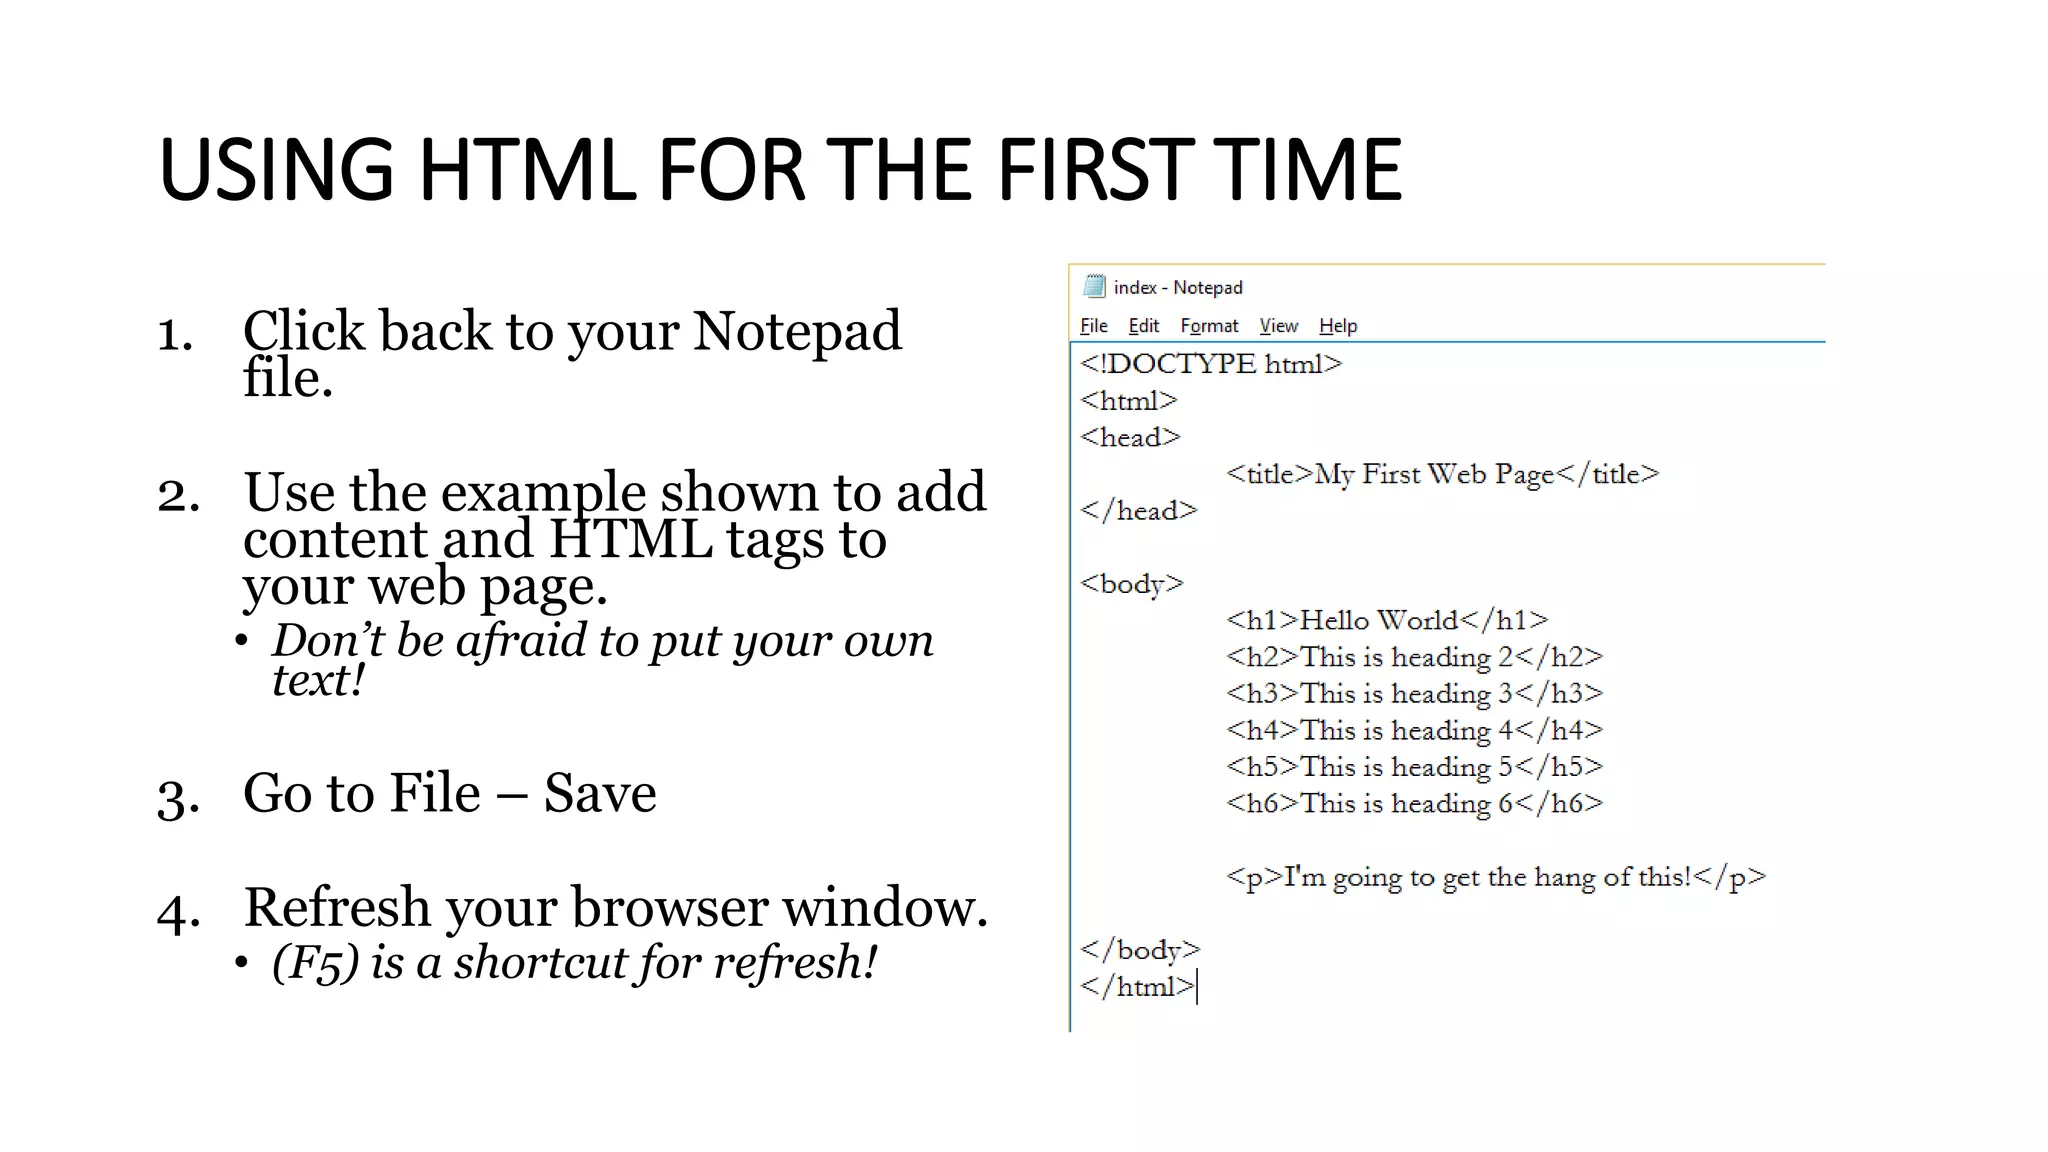
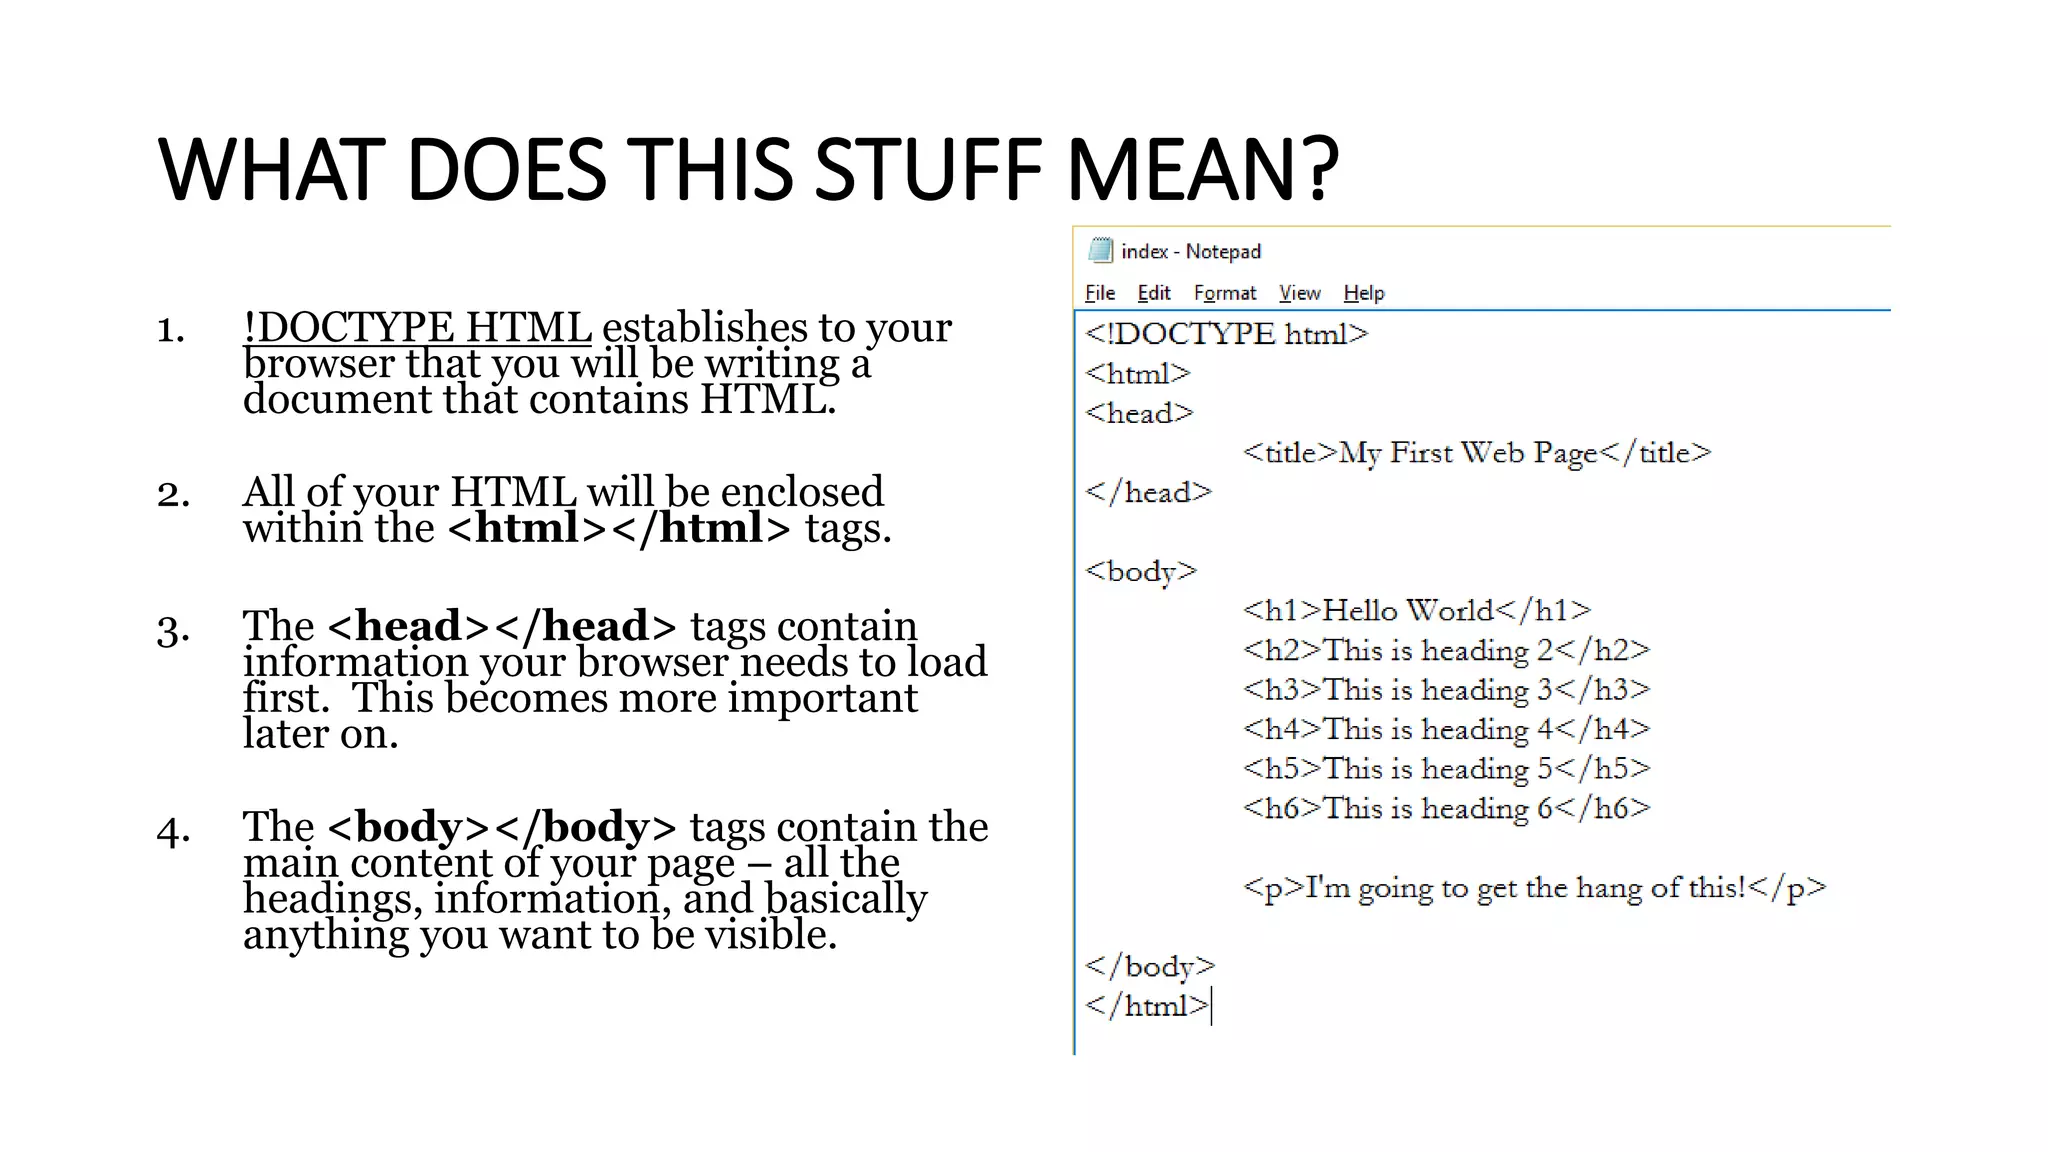
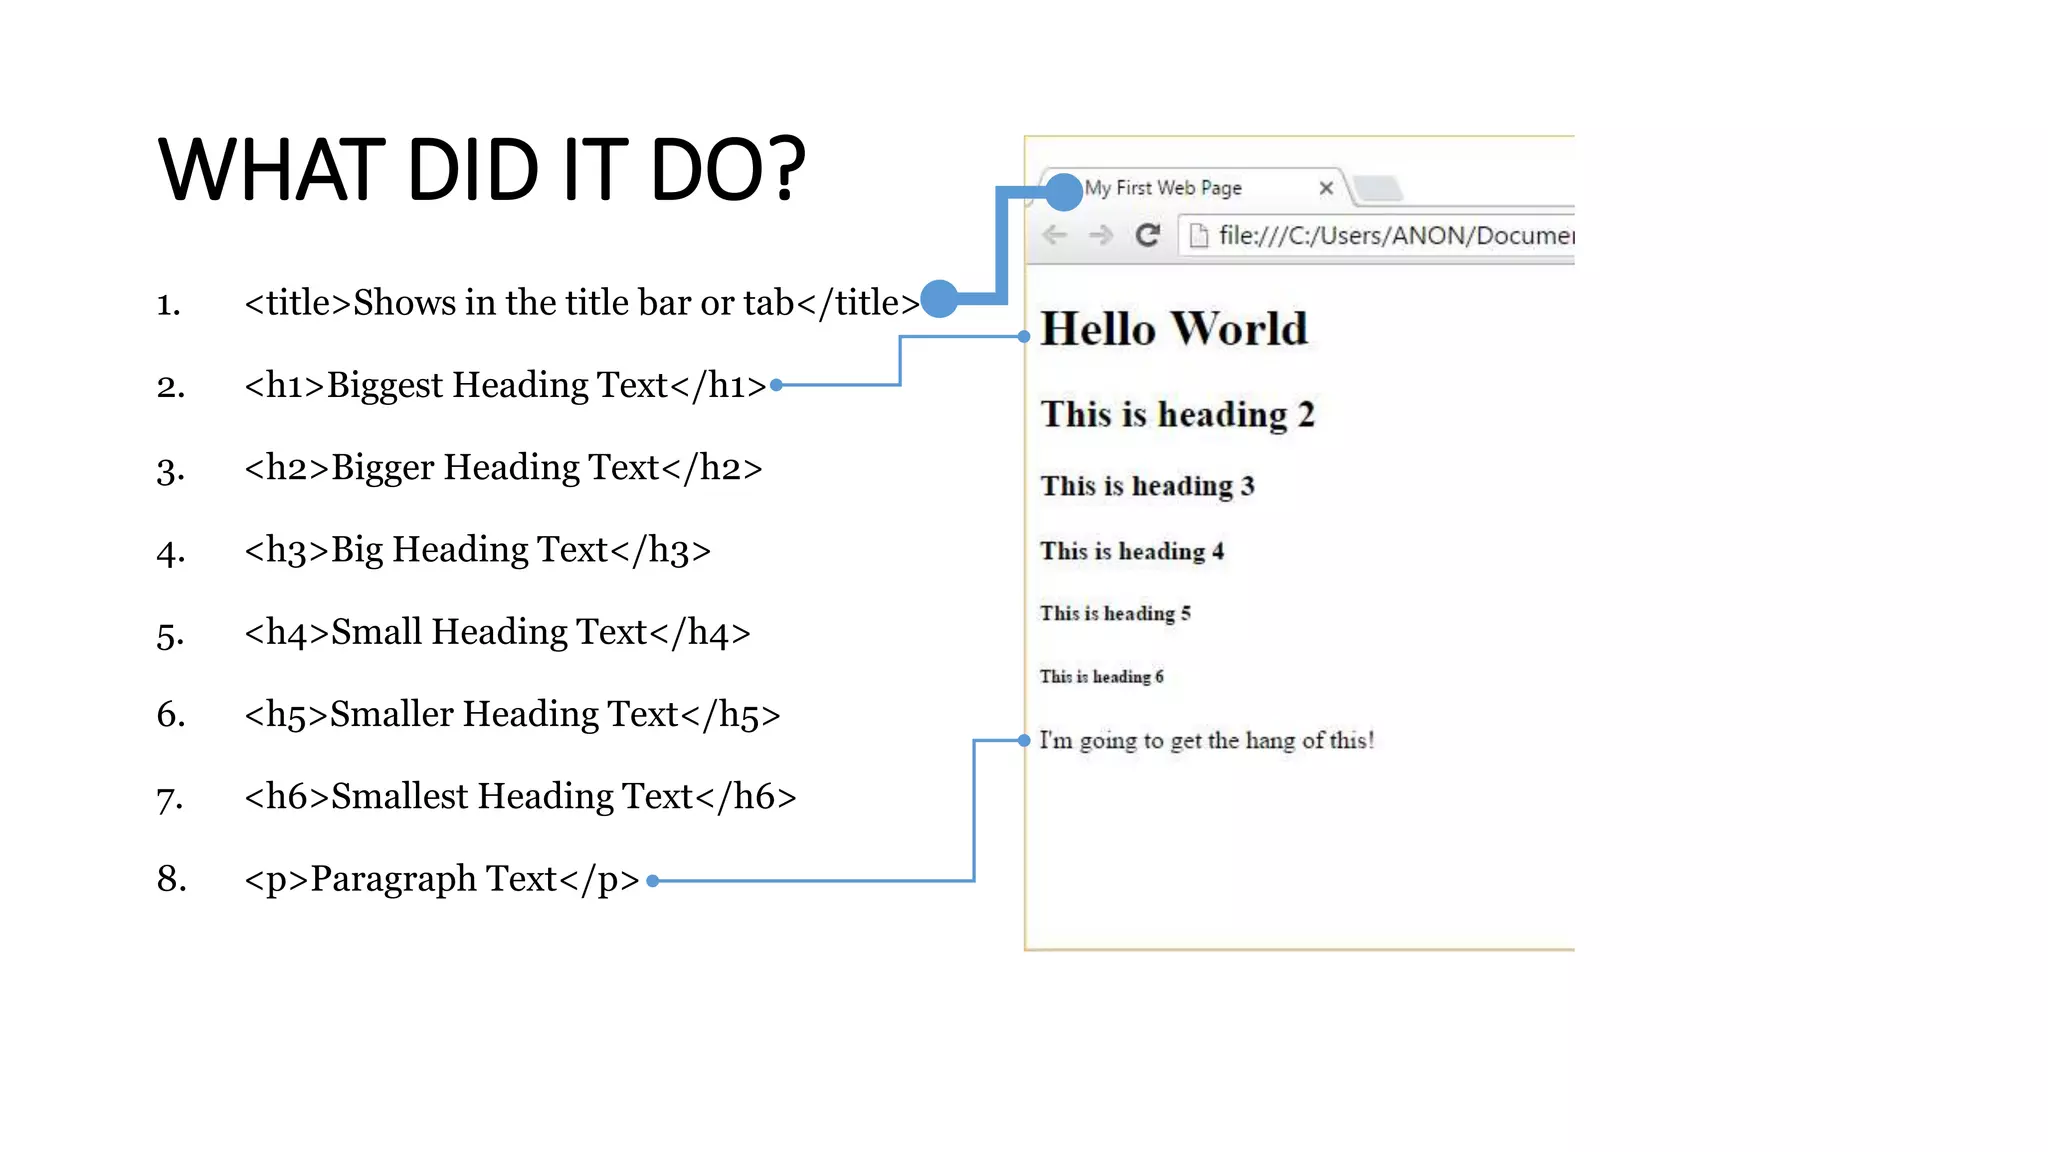
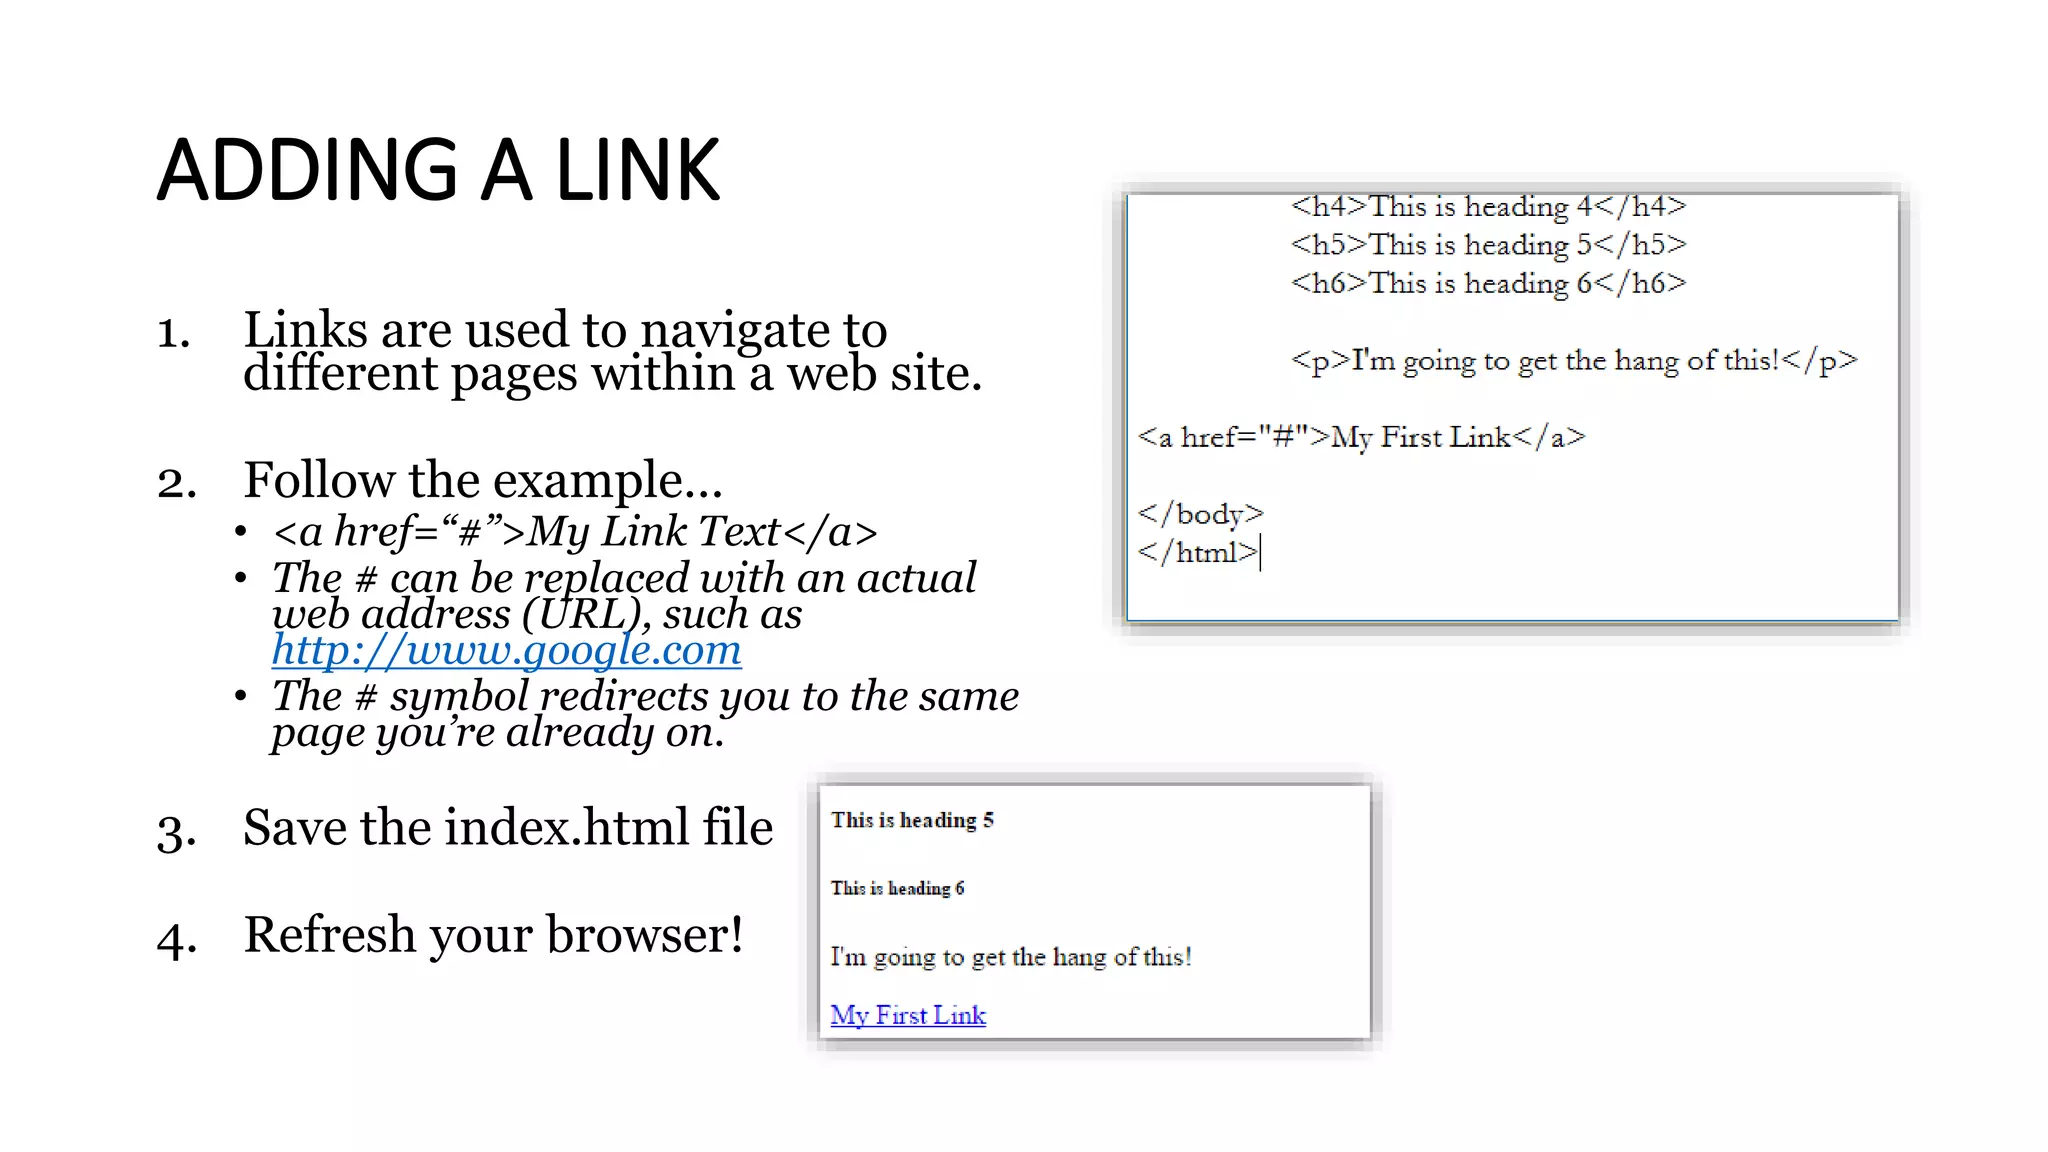
Learn the building blocks of the web: HTML.
In this lesson we go over the basics of HyperText Markup Language so you can begin designing your first web page! For more information visit www.computermentors.org
2. What is HTML?
• Web pages are built using a simple language called HTML
• HTML = HyperText Markup Language
• HTML “marks” content so the web browser knows what to do with it.
• Web Browser = Internet Explorer, Google Chrome, Firefox, Safari, etc…
• HTML is easy to identify because it uses tags, enclosed in angled
brackets
• Open Tag: <tag>
• Closing Tag: </tag>
• In Use: <tag> Your Content </tag>
4. BEGIN YOUR FIRST WEB PAGE
1. Open Notepad
2. Type “Hello World”
3. Go to File -> “Save As”
4. Name the file “index.html”
5. Click Save
6. Keep Notepad open!
5. VIEW YOUR FIRST WEB PAGE
1. Locate where you saved “index.html”
• The file is probably located in “Documents”
2. Double-click your index.html file
3. The file will load in your default web browser.
4. Keep the web browser open!
6. USING HTML FOR THE FIRST TIME
1. Click back to your Notepad
file.
2. Use the example shown to add
content and HTML tags to
your web page.
• Don’t be afraid to put your own
text!
3. Go to File – Save
4. Refresh your browser window.
• (F5) is a shortcut for refresh!
7. WHAT DOES THIS STUFF MEAN?
1. !DOCTYPE HTML establishes to your
browser that you will be writing a
document that contains HTML.
2. All of your HTML will be enclosed
within the <html></html> tags.
3. The <head></head> tags contain
information your browser needs to load
first. This becomes more important
later on.
4. The <body></body> tags contain the
main content of your page – all the
headings, information, and basically
anything you want to be visible.
8. WHAT DID IT DO?
1. <title>Shows in the title bar or tab</title>
2. <h1>Biggest Heading Text</h1>
3. <h2>Bigger Heading Text</h2>
4. <h3>Big Heading Text</h3>
5. <h4>Small Heading Text</h4>
6. <h5>Smaller Heading Text</h5>
7. <h6>Smallest Heading Text</h6>
8. <p>Paragraph Text</p>
9. ADDING AN IMAGE
1. Use a free image site like Pexels.com to find an
image you love.
2. Right-click on the image and “Copy Image
Address”
3. Click back to your Notepad file.
4. Use the example shown to add an image to your
web page.
• <img src=“______”>
• Paste your image address in place of the ______
• “s must be used around the address.
5. Go to File – Save
6. Refresh your browser window.
• (F5) is a shortcut for refresh!
10. ADDING A LINK
1. Links are used to navigate to
different pages within a web site.
2. Follow the example…
• <a href=“#”>My Link Text</a>
• The # can be replaced with an actual
web address (URL), such as
http://www.google.com
• The # symbol redirects you to the same
page you’re already on.
3. Save the index.html file
4. Refresh your browser!
11. Supplemental Learning:
• Check out General Assembly’s awesome (free) tutorial:
• http://www.dash.generalassemb.ly
• Notepad is just a stepping stone! Try a different text-editor:
• Brackets, Sublime, Microsoft Visual Studio Code, Cloud 9, Atom…and many
more!
• If you’re very serious and ready to commit a lot of time to
learning every aspect of web development, look into
FreeCodeCamp.com