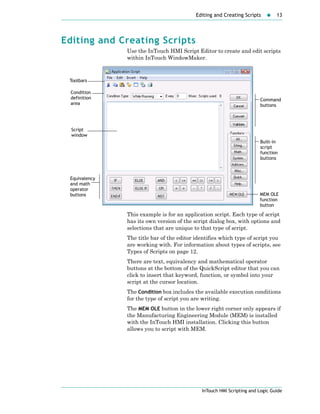
The document is a comprehensive guide to scripting and logic for the Intouch HMI, detailing various types of scripts, their execution triggers, and advanced scripting capabilities using OLE objects and ActiveX controls. It provides instructions on creating, editing, and troubleshooting scripts, along with technical support information. The guide emphasizes the importance of understanding basic scripting concepts and offers resources for utilizing predefined functions and enhancing application features.


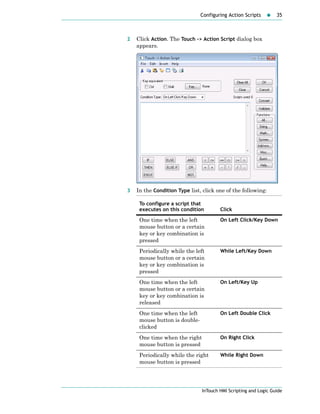
![Configuring Data Change Scripts 33
InTouch HMI Scripting and Logic Guide
Configuring Data Change Scripts
You can use data change scripts to execute a script one time
when a certain tagname or dot field changes by more than its
defined dead band.
A data change script is identified by the tagname or tagname
field that initiates the script. For example: Tag1 or
Tag2.HiHiLimit.
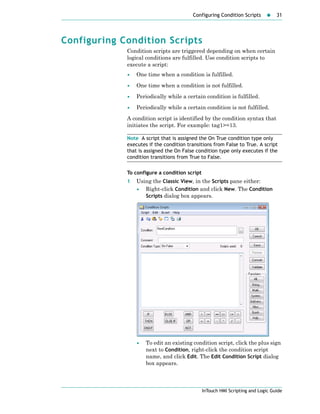
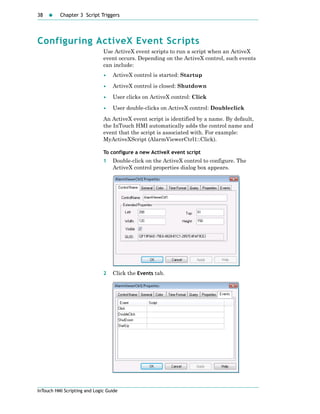
To configure a data change script
1 Using the Classic View, in the Scripts pane, right-click
Data Change and click New. The Data Change Scripts dialog
box appears.
2 In the Tagname[.field] box, enter a tagname or tagname
field.
3 Type your script in the window.
4 Click OK.
To delete a data change script
Using the Classic View, in the Scripts pane, expand Data
Change, right-click the data change script name and click
Delete. When a message appears, click Yes.](https://image.slidesharecdn.com/3887-160609132717/85/intouch-33-320.jpg)


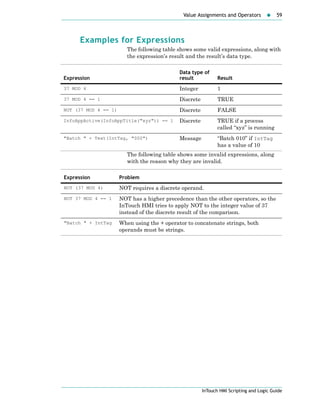
![Value Assignments and Operators 53
InTouch HMI Scripting and Logic Guide
Example
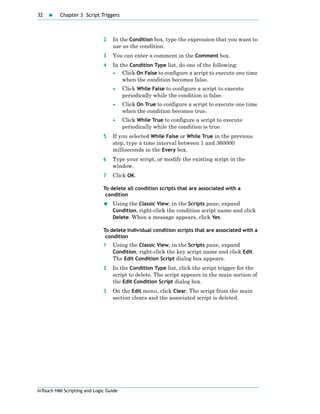
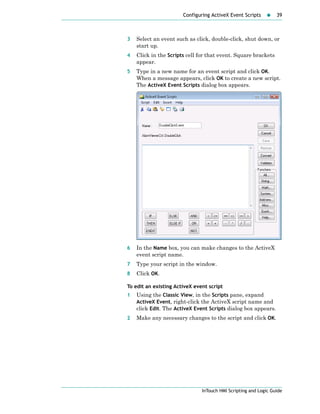
IntTag = IntTag SHL 1; has the following results when
executed repeatedly for an initial tag value of 5:
Bitwise AND: &
Compares the binary representations of two integer
numbers, bit for bit, and returns a result according to the
following table:
You can use this operator to quickly “mask out” (set to 0)
certain parts of a bit pattern. For example, the following
statement masks out the upper 24 bits of the IntTag tag:
IntTag = IntTag & 255;
As shown in the table, the result bit is always 0 if one of the
operand bits is 0. In the binary representation of 255, only
the lower 8 bits are 1, so the 24 remaining 0-bits cause all the
corresponding bits in the result to be set to 0.
Valid operands
Any Integer value.
Data type of return value
Integer
Iteration Binary pattern Tag value
Initial value 0[...]00000101 5
Execution 1 0[...]00001010 10
Execution 2 0[...]00010100 20
Bit in first operand Bit in second operand Bit in result
0 0 0
0 1 0
1 0 0
1 1 1](https://image.slidesharecdn.com/3887-160609132717/85/intouch-53-320.jpg)


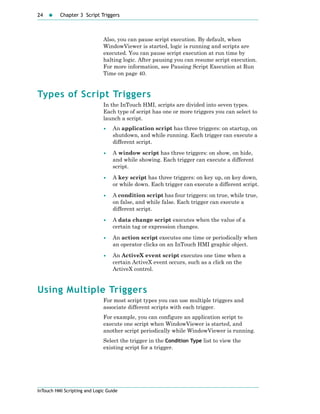
![60 Chapter 4 The Script Language
InTouch HMI Scripting and Logic Guide
Using Conditional Program Branching
Structures
You can dynamically control the execution path of a script
based on certain conditions being met. The InTouch HMI
supports IF-THEN-ELSE control structures for this purpose.
The basic syntax for an IF-THEN-ELSE control structure is as
follows:
Syntax
IF Condition THEN
... statements and/or another IF-THEN-ELSE structure
[ELSE
... statements and/or another IF-THEN-ELSE
structure]
ENDIF;
Remember the following rules when working with
IF-THEN-ELSE structures:
• IF-THEN-ELSE structures can be nested, both in the THEN
section and in the ELSE section.
• For every IF statement, there must be a closing ENDIF
statement. An ENDIF statement always applies to the
nearest prior IF statement on the same nesting level.
• Condition must be a valid discrete expression. The THEN
section is executed if Condition is TRUE. The ELSE
section is executed if Condition is FALSE.
• The ELSE section is optional.
• Some other programming languages allow you to check
multiple conditions on the same hierarchy level of an
IF-THEN-ELSE structure and have one general ELSE
section that is executed if all of the conditions evaluate to
FALSE. (The If-ElseIf-Else structure in Visual Basic
is an example of this.) This is not possible in the InTouch
HMI. For every condition to check, you must open a new
IF-THEN-ELSE structure. Therefore, to have a single
section of code to act as the ELSE code for all conditions,
you must place it in the ELSE section of the
IF-THEN-ELSE structure at the last nesting level.](https://image.slidesharecdn.com/3887-160609132717/85/intouch-60-320.jpg)
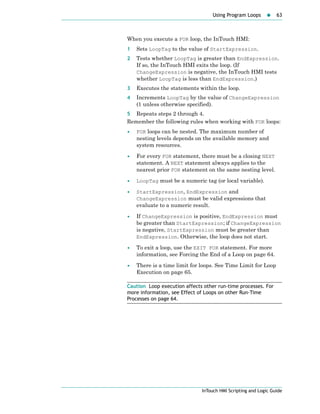
![62 Chapter 4 The Script Language
InTouch HMI Scripting and Logic Guide
Invalid Scripting Example (Incorrect Nesting)
If you are familiar with a language like Visual Basic, you
might want to write a conditional structure with multiple
conditions and a default condition like this:
IF ChoiceTag == 1 THEN
Show "Procedure 1";
ELSE IF ChoiceTag == 2 THEN
Show "Procedure 2";
ELSE IF ChoiceTag == 3 THEN
Show "Procedure 3";
ELSE
Show "Default Procedure";
ENDIF;
This does not work in the InTouch HMI. Each IF opens a new
nesting level and must have a corresponding ENDIF
statement. For a correct version of this example, see Nested
Conditional Structure on page 61.
Using Program Loops
Loops allow you to execute a section of code repeatedly. The
InTouch HMI only supports FOR loops. A FOR loop works by
monitoring the value of a numeric loop variable that is
incremented or decremented with each loop iteration. The
loop is executed until the value of the loop variable reaches a
fixed limit.
Syntax
FOR LoopTag = StartExpression TO EndExpression [STEP
ChangeExpression]
... statements or another FOR loop ...
NEXT;
• StartExpression, EndExpression and
ChangeExpression together define the number of
iterations.
• StartExpression sets the start value of the loop range.
EndExpression sets the end value of the loop range.
• STEP ChangeExpression optionally sets the value by
which the loop tag is incremented or decremented during
each loop iteration; if you do not specify this, a default of 1
is used.](https://image.slidesharecdn.com/3887-160609132717/85/intouch-62-320.jpg)

![66 Chapter 4 The Script Language
InTouch HMI Scripting and Logic Guide
Using Local Variables
You can declare local variables in a script to store temporary
or intermediate results. This increases performance and
helps to keep your tag count low. You can use local variables
just like tagnames in your script. However, there are certain
differences:
• Local variables only exist within the scope of the script in
which they are declared. They lose their value when
script execution finishes. They cannot be referenced by
any other scripts in your application.
• Local variables do not have dotfields.
• Local variables do not count towards the tag count.
Before you can use a local variable in a script, you must
declare it; otherwise, the reference is considered a tagname.
See Declaring a Local Variable on page 66.
You can declare local variables that have the same names as
tags. See Naming Conflicts between Local Variables and
Tags on page 67.
Declaring a Local Variable
You can declare local variables anywhere in your script, as
long as you declare them before their first use. To declare a
local variable, use the following statement:
DIM LocVarName [AS DataType];
LocVarName is the name of the local variable. The name must
follow the naming conventions for tagnames. For more
information, see Tag Name Conventions in Chapter 2,
Managing Tags with the Tagname Dictionary, in the
InTouch® HMI Data Management Guide.
DataType is the data type of the local variable. Valid values
are Discrete, Integer, Real, and Message. If you do not
specify this option, Integer is used as the default.
You must use a separate DIM statement for each local
variable to declare.
You can declare any number of local variables. The number is
only limited by the available memory.](https://image.slidesharecdn.com/3887-160609132717/85/intouch-66-320.jpg)


![Working with InTouch Windows at Run Time 105
InTouch HMI Scripting and Logic Guide
Working with InTouch Windows at Run Time
In a script, you can control the behavior and appearance of
InTouch windows. You can also write a script using
QuickScripts to print individual InTouch windows or the
entire screen.
Showing a List of Open Windows
In a script, you can show a dialog box containing the list of
InTouch windows that are currently open using the
OpenWindowsList() function.
OpenWindowList() Function
Shows a dialog box containing the list of InTouch windows
that are currently open.
You can not use this function in an animation link.
Syntax
[result = ]OpenWindowsList();
Example(s)
This script opens the Open Windows List dialog box and shows
all InTouch windows that are currently open.
OpenWindowsList()](https://image.slidesharecdn.com/3887-160609132717/85/intouch-105-320.jpg)


![Working with InTouch Windows at Run Time 115
InTouch HMI Scripting and Logic Guide
PrintWindow() Function
In a script, you can print an InTouch window with the
PrintWindow() function.
Syntax
[result = ] PrintWindow (windowname, leftmargin,
topmargin, width, height, options);
Parameters
windowname
The name of the window to be printed. A literal string
value, message tagname, or string expression.
leftmargin
Left margin offset (in inches). A literal numeric value,
analog tagname, or numeric expression.
topmargin
Top margin offset (in inches). A literal numeric value,
analog tagname, or numeric expression.
width
Printout width (in inches). Set this value to 0 for largest
aspect ratio. A literal numeric value, analog tagname, or
numeric expression.
height
Printout height (in inches). Set this value to 0 for largest
aspect ratio. A literal numeric value, analog tagname, or
numeric expression.
options
A discrete value, 0 or 1, that is only used if width and height
are 0. A literal Boolean value, discrete tagname or Boolean
expression. Set to:
1 - The window is printed with the largest aspect ratio
that is an integer multiple of the window size.
0 - The window is printed with the largest aspect ratio
that fits on the page.
Note If the window contains a bitmap, set options to 1 to prevent
the bitmap from being stretched.
Return Value
0 - Printing job is not queued successfully, or window
does not exist
1 - Printing job is queued successfully](https://image.slidesharecdn.com/3887-160609132717/85/intouch-115-320.jpg)


![136 Chapter 6 Built-In Functions
InTouch HMI Scripting and Logic Guide
Executing Commands and Exchanging Data using
DDE
You can write a script to interact with applications that
support DDE.
WWExecute() Function
Sends a command to an application, executes it, and returns
a status result. You can use it to have Excel to run a macro.
Syntax
Result = WWExecute (appname, topic, command)
Parameters
appname
The name of the application the command is sent to. A
literal string value, message tagname, or string expression.
topic
The name of the topic within the application that the
command is sent to. A literal string value, message
tagname, or string expression.
command
The command to be sent. A literal string value, message
tagname, or string expression.
Return Value
A value of-1, 0, or 1 indicating the following:
-1 - command not executed successfully. Possible causes are
the application not running, the topic does not exist or
the command contains an error.
0 - command not executed successfully because the
application is busy.
1 - command executed successfully.
Example(s)
This script instructs Microsoft Excel to execute the macro
Macro1 by sending the command [Run(“Macro1”,0)] to Excel.
Macro="Macro1";
Command="[Run(" + StringChar(34) + Macro +
StringChar(34) + ",0)]";
WWExecute("excel","system",Command);
Use To
WWExecute() Send and execute commands.
WWRequest() Read data from DDE items.
WWPoke() Write data to DDE items.](https://image.slidesharecdn.com/3887-160609132717/85/intouch-136-320.jpg)
![Interacting with Other Applications 137
InTouch HMI Scripting and Logic Guide
WWRequest() Function
Reads data from an item of an application. You can use it, for
example, to read the value of a spreadsheet cell in Microsoft
Excel.
Syntax
Result = WWRequest(appname, topic, item, messagetag)
Parameters
appname
The name of the application. A literal string value, message
tagname, or string expression.
topic
The name of the topic within the application. A literal
string value, message tagname, or string expression.
item
The name of the item belonging to the topic and application.
A literal string value, message tagname, or string
expression.
messagetag
A message tagname to retrieve the value of the item. The
message tagname value can be converted into an integer or
real value by using the StringToIntg() or StringToReal()
functions.
Return Value
A value of -1, 0, or 1 indicating the following:
-1 - data not read successfully. Possible causes are the
application not running or the topic or item do not exist.
0 - data not read successfully because the application is
busy.
1 - data read successfully.
Example(s)
This script reads the value contained in Microsoft Excel book
Book1.xls, sheet Sheet1 in Row 1, Column 1 to the message
tagname MTag and puts the value in the real tagname
CellValue.
Result = WWRequest("excel","[Book1.xls]sheet1",
"r1c1",Mtag);
CellValue=StringToReal(MTag);
If you are using a non-English operating system, you may
need to use the StringReplace() function to change the
contents of MTag before converting it to a different data type.
For example, for operating systems that use a comma as a
decimal separator, you may need to replace all commas with
decimal dots in MTag before converting it to a real data type.](https://image.slidesharecdn.com/3887-160609132717/85/intouch-137-320.jpg)
![138 Chapter 6 Built-In Functions
InTouch HMI Scripting and Logic Guide
WWPoke() Function
Writes data to an item of an application. You can use it, for
example, to write the value into a spreadsheet cell in Excel.
Syntax
result = WWPoke (appname, topic, item, string)
Parameters
appname
The name of the application. A literal string value, message
tagname, or string expression.
topic
The name of the topic within the application. A literal
string value, message tagname, or string expression.
item
The item name belonging to the topic and application. A
literal string value, message tagname, or string expression.
string
The value to be written. A literal string value, message
tagname, or string expression. You can use the
StringFromIntg(), StringFromReal() or Text() functions to
convert the value of an integer or real tagname to a message
tagname.
Return Value
A value of-1, 0, or 1 indicating the following:
-1 - data not written successfully. Possible causes are the
application not running or the topic or item do not exist.
0 - data not written successfully because the application is
busy.
1 - data written successfully.
Remarks
Do not use the WWPoke() or WWRequest() function to read
and write data between InTouch applications on different
nodes or sessions. To read and write data between InTouch
applications, use Access Names instead. See Setting Up
Access Names in Chapter 5, Data Access with I/O, in the
InTouch® HMI Data Management Guide.
Example(s)
This script puts the value of the real tagname CellValue in
the message tagname Mtag and writes the value to the
spreadsheet cell Row 1, Column 1 of sheet Sheet1 in Microsoft
Excel book Book1.xls.
MTag = Text(CellValue,"0");
Result = WWPoke("excel","[Book1.xls]sheet1",
"r1c1",Mtag);](https://image.slidesharecdn.com/3887-160609132717/85/intouch-138-320.jpg)


![144 Chapter 6 Built-In Functions
InTouch HMI Scripting and Logic Guide
FileReadFields() Function
Reads the values contained in a csv file into a series of
tagnames. You can use this function to load a set of tagname
values.
Commas are the only supported delimiter.
Syntax
[result = ] FileReadFields (filename, offset, starttag,
numberoffields)
Parameters
filename
Name of the csv file to read the data from. A literal string
value, a message tagname or a string expression.
offset
Location (in bytes) in the file to start reading. A literal
integer value, integer tagname, or integer expression.
starttag
Name of the first tagname that receives the first read data
item. The tagname must be enclosed with double quotes
and end in a number, such as “MyTag1”. A literal string
value, message tagname (such as a message tagname
containing the value “MyTag1”), or a string expression.
numberoffields
Number of data items to read from the csv file. A literal
integer value, integer tagname, or integer expression. The
first data item is read into the tagname defined in the
starttag parameter, subsequent data items into tagnames
with the incremented numeral suffix of the starttag
parameter (MyTag1, MyTag2, MyTag3, ...).
Return Value
Optional new file offset (in byte) after reading the data. This
can be used to read the next set of data.
Example(s)
This script reads the values “Flour” to RecipeTag1, 27.23 to
RecipeTag2, 14 to RecipeTag3, and 1 to RecipeTag4, and
returns the new file offset—if the csv file c:set.csv contains
the following data: Flour, 27.23,14,1 and if the following tags
are defined: RecipeTag1:message, RecipeTag2:real,
Recipe3:integer, RecipeTag4:discrete.
FileReadFields("c:set.csv",0,"RecipeTag1",4);](https://image.slidesharecdn.com/3887-160609132717/85/intouch-144-320.jpg)
![Working with Files 145
InTouch HMI Scripting and Logic Guide
FileWriteFields() Function
Writes the values contained in a series of tagnames to a csv
file. You can use this function to save a set of tagname
values.
Commas are the only supported delimiter.
Syntax
[result = ] FileWriteFields (filename, offset,
starttag, numberoffields)
Parameters
filename
Name of the csv file to write the data to. A new file is
created if it does not previously exist. A literal string value,
a message tagname, or a string expression.
offset
Location (in bytes) in the file to start writing to. Use -1 to
write to the end of the file (append). A literal integer value,
integer tagname, or integer expression.
starttag
Name of the first tagname that contains the first data item
to be written. The tagname must be enclosed with double
quotes and end in a number, such as “MyTag1”. A literal
string value, message tagname (such as a message tagname
containing the value “MyTag1”) or a string expression.
numberoffields
Number of data items to write to the csv file. A literal
integer value, integer tagname, or integer expression. The
first data item is written from the tagname defined in the
starttag parameter to the file, subsequent data items from
tagnames with the incremented numeral suffix of the
starttag parameter (MyTag1, MyTag2, MyTag3, ...).
Return Value
Optional new file offset (in byte) after writing the data. This
can be used to write the next set of data.](https://image.slidesharecdn.com/3887-160609132717/85/intouch-145-320.jpg)
![146 Chapter 6 Built-In Functions
InTouch HMI Scripting and Logic Guide
Example(s)
A series of InTouch tags is defined as follows:
This script writes the values contained in RecipeTag1 to
RecipeTag4 to the csv file c:set.csv.
FileWriteMessage("c:set.csv",0,"RecipeTag1",4);
So that the file c:set.csv will contain the following data:
Flour,27.23,14,1
Reading and Writing Text Data
You can write a script to read and write text data to and from
a file by using the FileReadMessage() and
FileWriteMessage() functions. You can either read/write a
specified number of bytes or an entire line of text
(demarcated by a line feed character).
FileReadMessage() Function
Reads a specified number of bytes (or one line) of string data
from a file.
Syntax
[result = ] FileReadMessage (filename, offset,
messagetag, charstoread)
Parameters
filename
Name of the file to read the data from. A literal string
value, a message tagname, or a string expression.
offset
Location (in bytes) in the file to start reading from. A literal
integer value, integer tagname, or integer expression.
messagetag
Message tagname that receives the first line or number of
bytes from the file.
charstoread
Number of bytes to read from the file. Set it to 0 to read
until the next line feed (LF) character. A literal integer
value, integer tagname, or integer expression.
Tagname Data Type Value
RecipeTag1 Message Flour
RecipeTag2 Real 27.23
RecipeTag3 Integer 14
RecipeTag4 Discrete 1](https://image.slidesharecdn.com/3887-160609132717/85/intouch-146-320.jpg)
![Working with Files 147
InTouch HMI Scripting and Logic Guide
Return Value
Contains the new byte position after the read. You can use
this for subsequent reads from the file.
Example(s)
This script reads the first line of data in the file
c:DataFile.txt to the message tagname MsgTag.
FileReadMessage ("c:DataFile.txt",0,MsgTag, 0);
FileWriteMessage() Function
Writes a specified number of bytes (or one line) of string data
to a file.
Syntax
[result = ] FileWriteMessage (filename, offset,
messagetag, linefeed)
Parameters
filename
Name of the file to write the data to. A literal string value, a
message tagname, or a string expression.
offset
Location (in bytes) in the file to start writing to. Set it to -1
to write data to the end of the file (append). A literal integer
value, integer tagname, or integer expression.
messagetag
Message tagname that contains the data to be written to
the file.
linefeed
Specifies whether to write a line feed (LF) character after
writing the data to the file. Set to 1 to write a line feed
character; otherwise, set it to 0. A literal Boolean value,
discrete tagname, or Boolean expression.
Return Value
Contains the new byte position after the write. You can use
this for subsequent writes to the file.
Example(s)
This script writes the value of a message tagname MsgTag to
the end of the file c:DataFile.txt.
FileWriteMessage("c:DataFile.txt",-1,MsgTag,1);](https://image.slidesharecdn.com/3887-160609132717/85/intouch-147-320.jpg)


![158 Chapter 6 Built-In Functions
InTouch HMI Scripting and Logic Guide
Miscellaneous Scripting
InTouch scripting supports sound output so that you can
associate human machine interaction with sounds. InTouch
scripting also supports getting and setting properties of
Wizards.
Playing Sound Files from an InTouch Application
In a script, you can associate events and conditions with
specific sounds. For example, you could associate a warning
dialog box or a critical condition with a warning sound.
PlaySound() Function
Plays a sound from a wave file or a Windows default sound.
Syntax
Playsound (soundname, flag)
Parameters
soundname
The name of the sound or wave file. A literal string value,
message tagname, or string expression. If the sound is
defined as a name, it must be defined in the Win.ini file
under the [Sounds] section, for example MC=”c:test.wav”
flag
Specifies how the sound is played. A literal integer value,
integer tagname, or integer expression with the following
meanings:
0 - Play sound one time synchronously (script execution
waits until sound has finished playing).
1 - Play sound one time asynchronously (script execution
does not wait until sound has finished playing).
9 - Play sound continuously (until the PlaySound() function
is called again).
Example(s)
This script plays the sound of the file c:welcome.wav one
time and holds script execution until it has finished playing.
PlaySound("c:welcome.wav",0);
This script plays the sound Alert continuously. In the win.ini
file [Sounds] section you need to associate the sound name
Alert with a sound file, such as:
Alert=c:alert.wav.
PlaySound("Alert",9);](https://image.slidesharecdn.com/3887-160609132717/85/intouch-158-320.jpg)