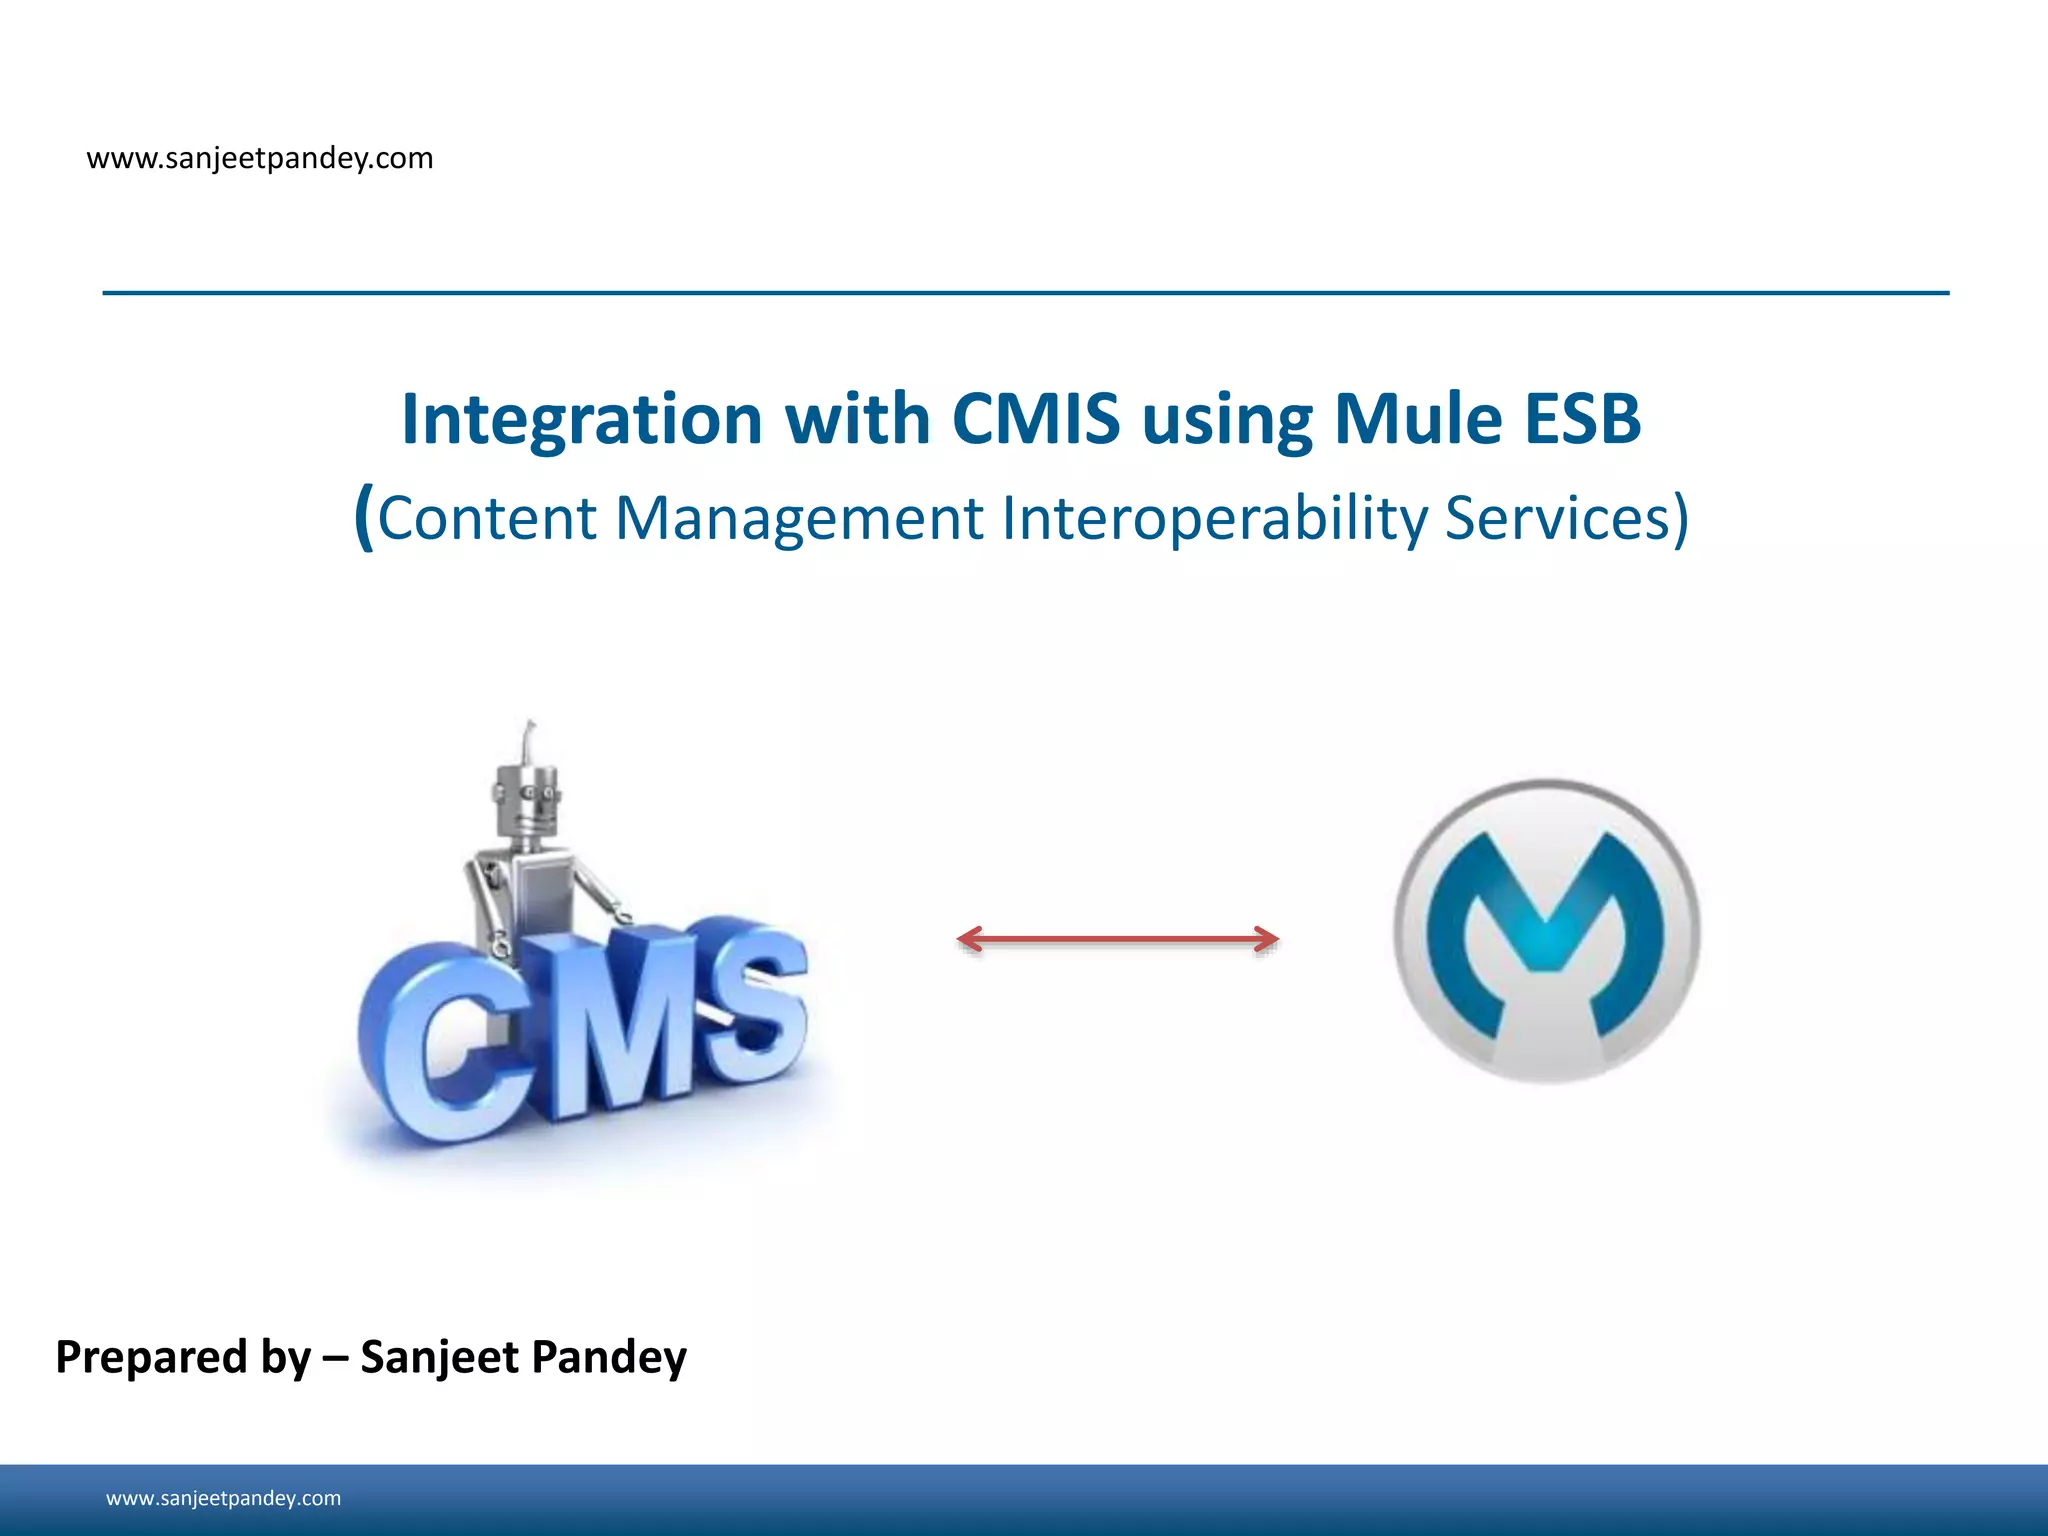
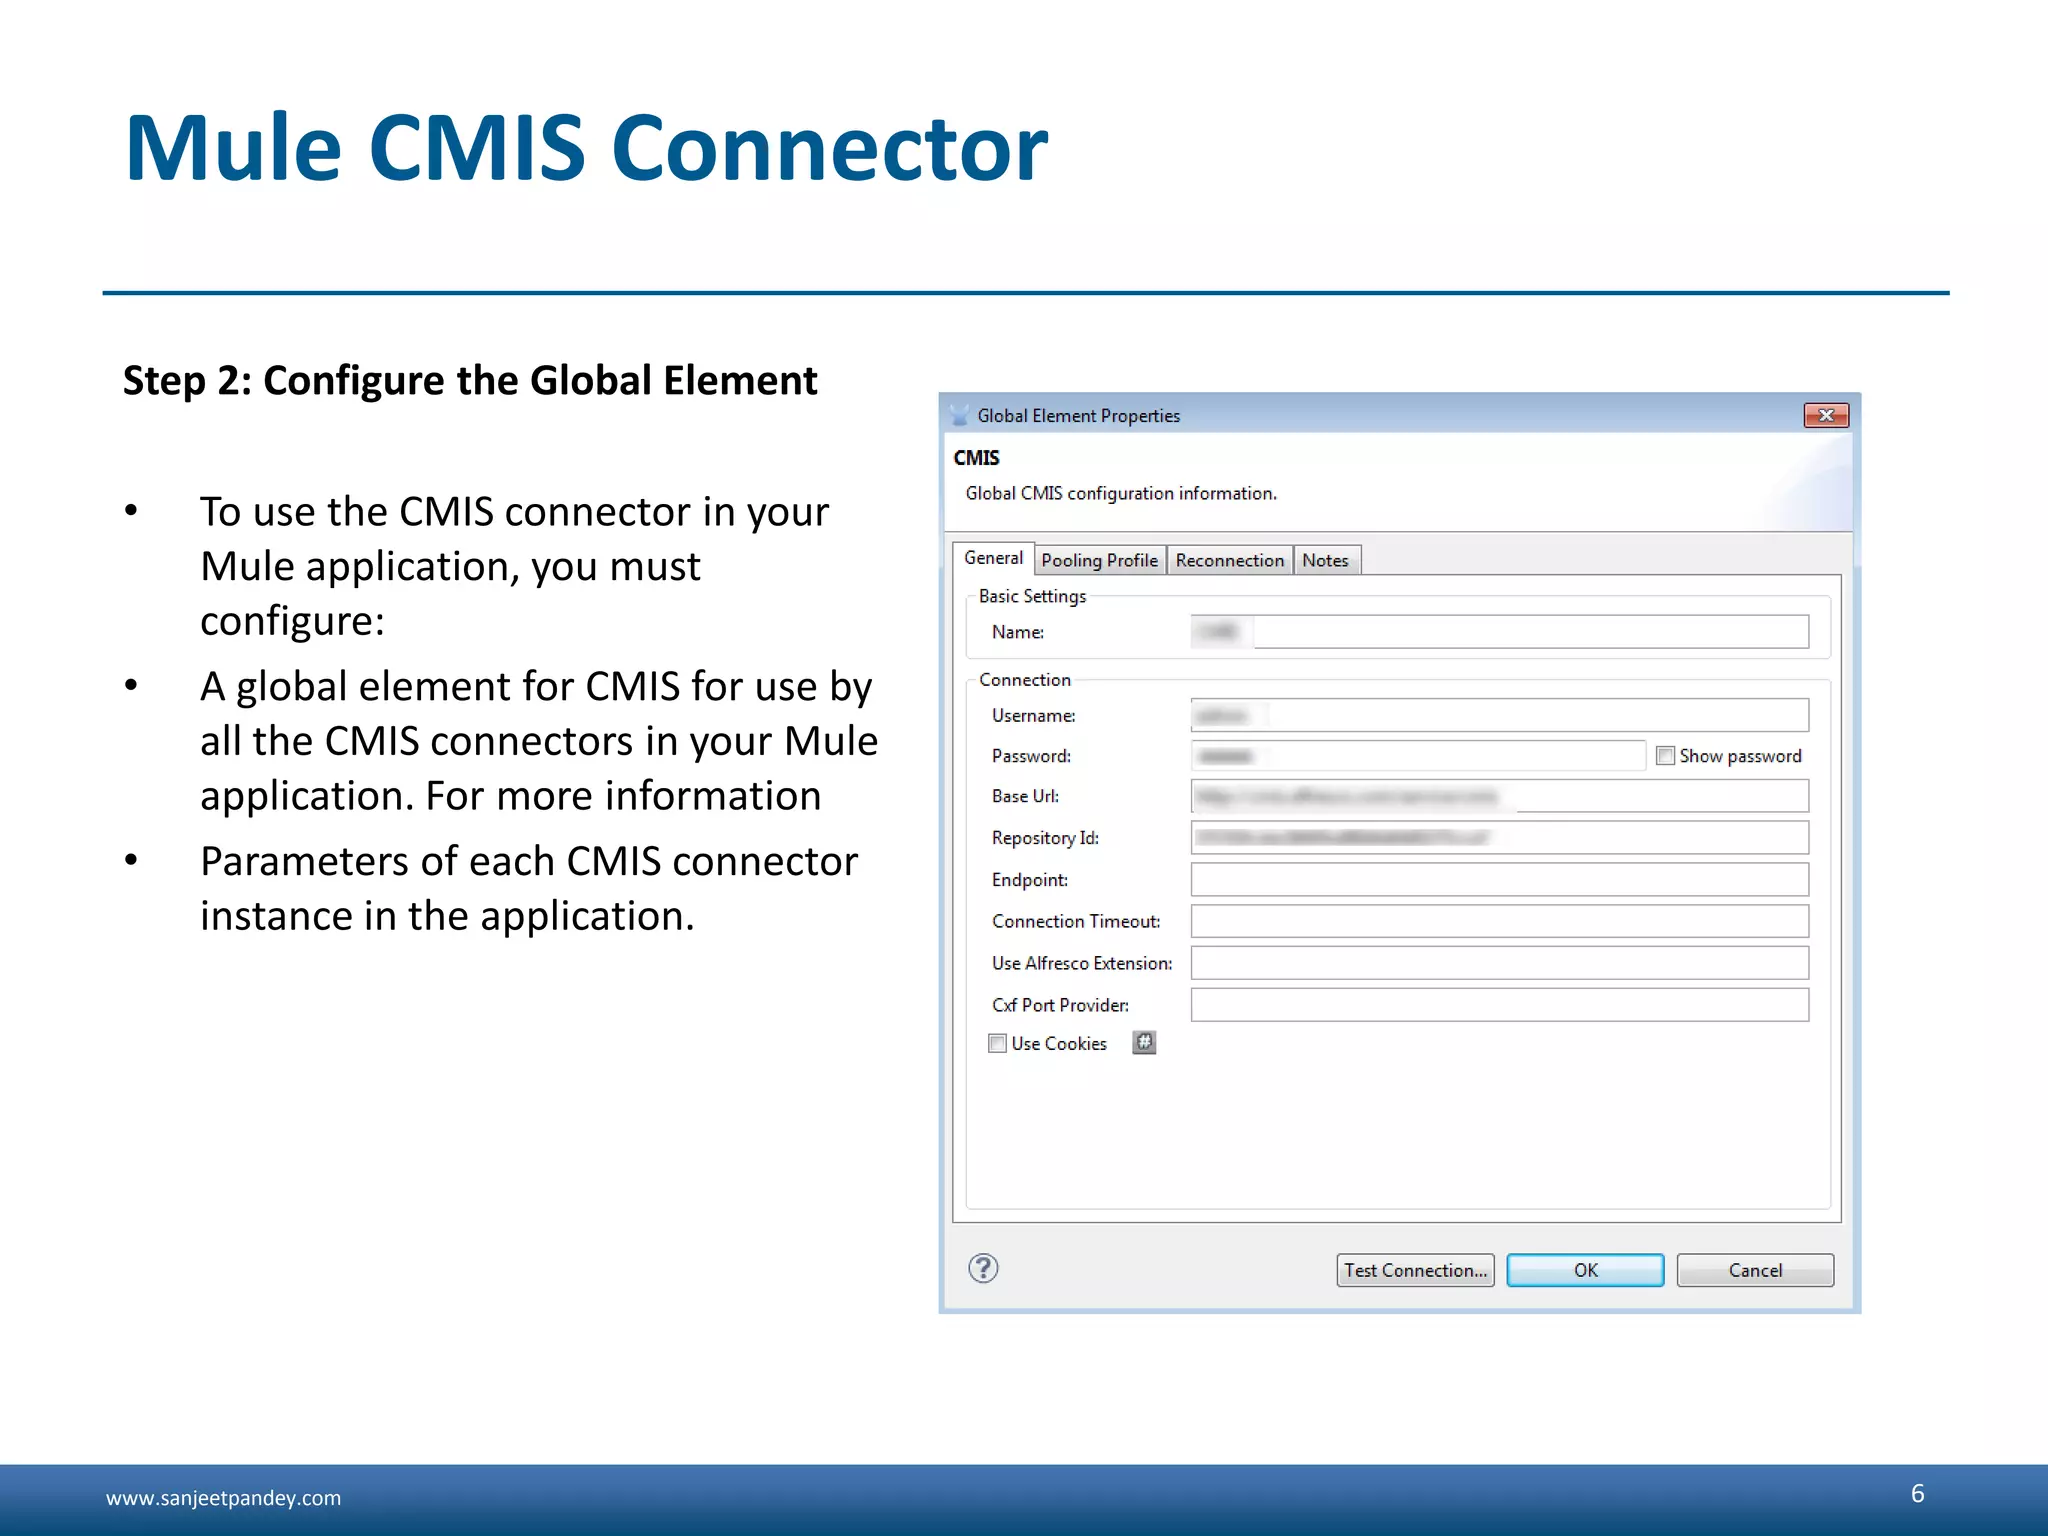
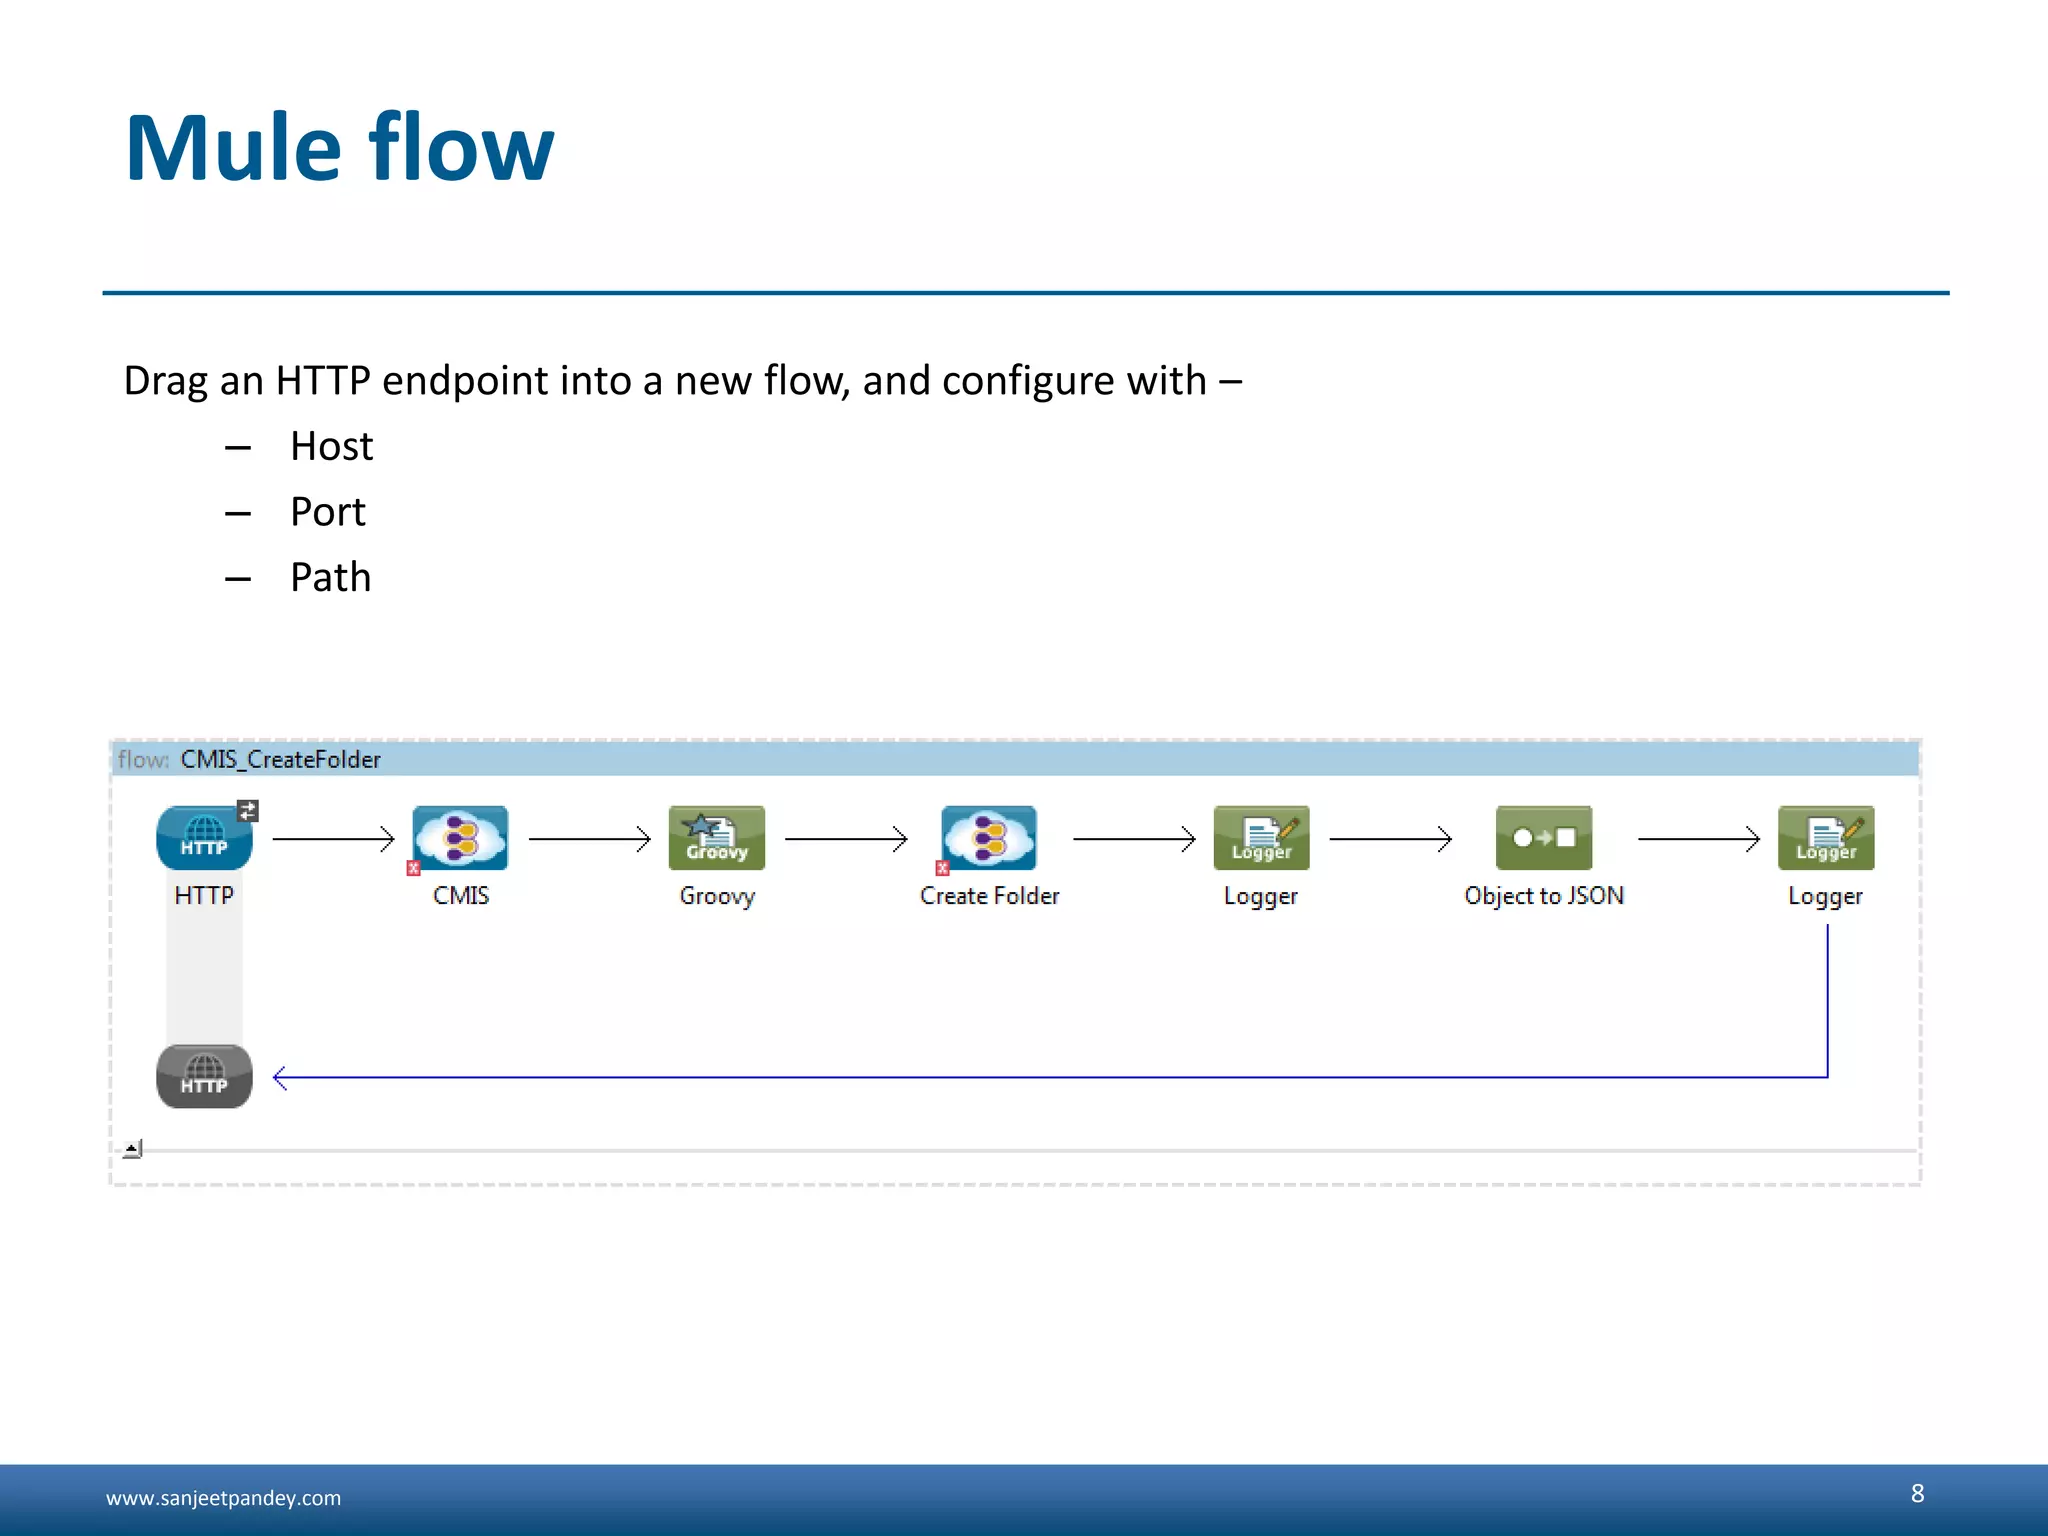
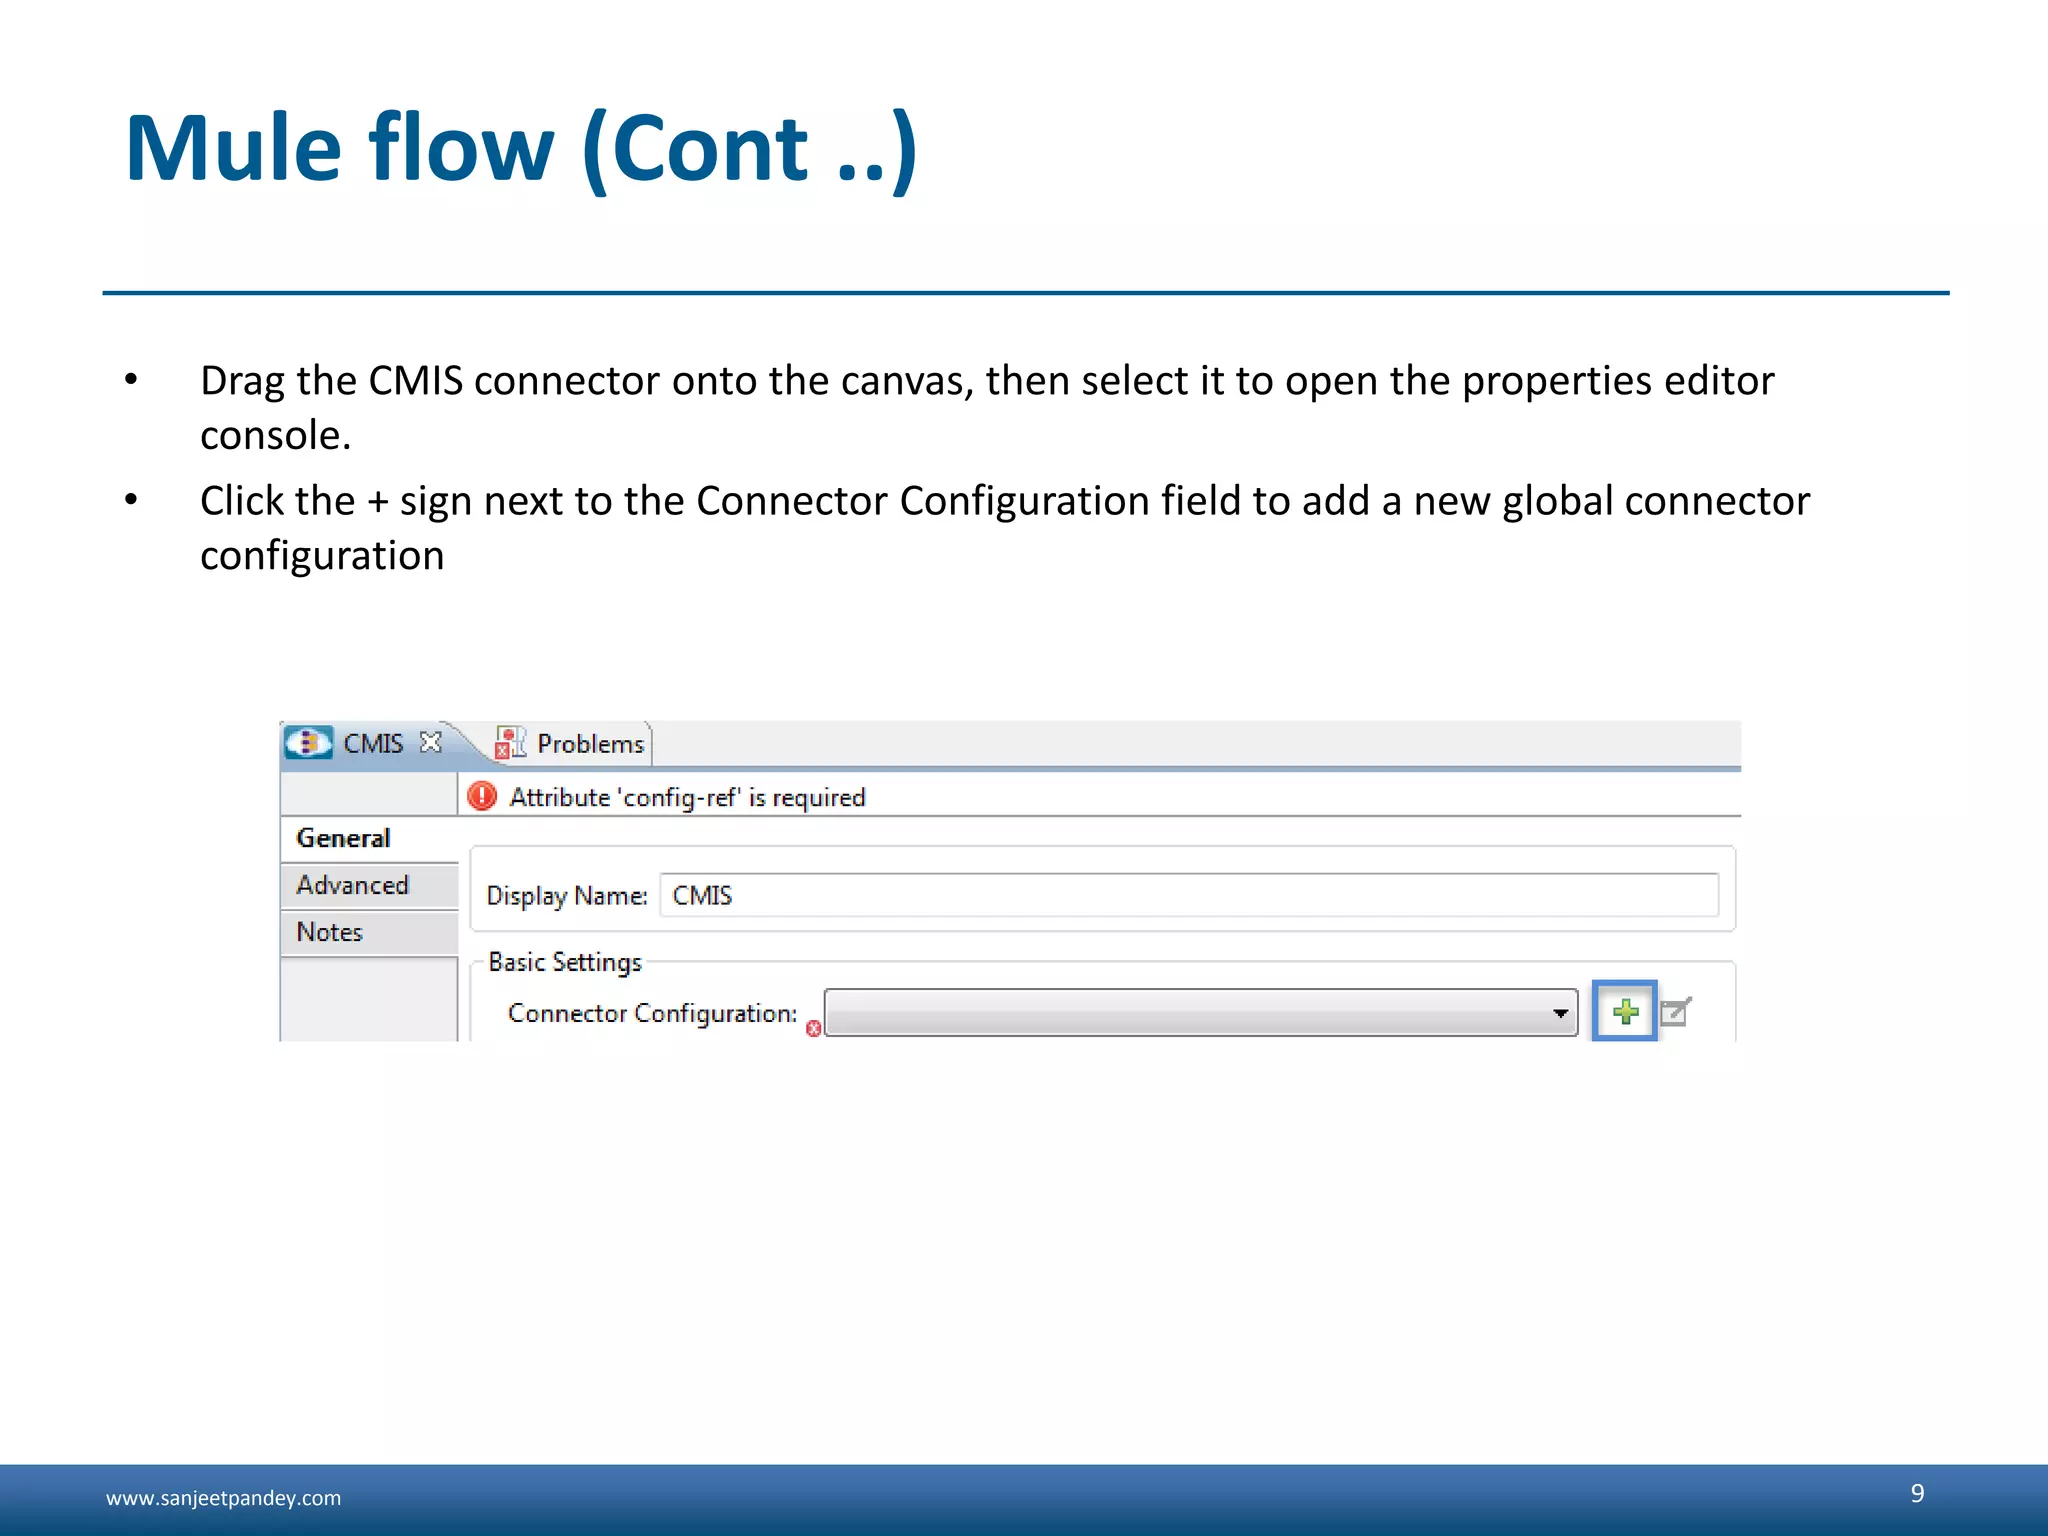
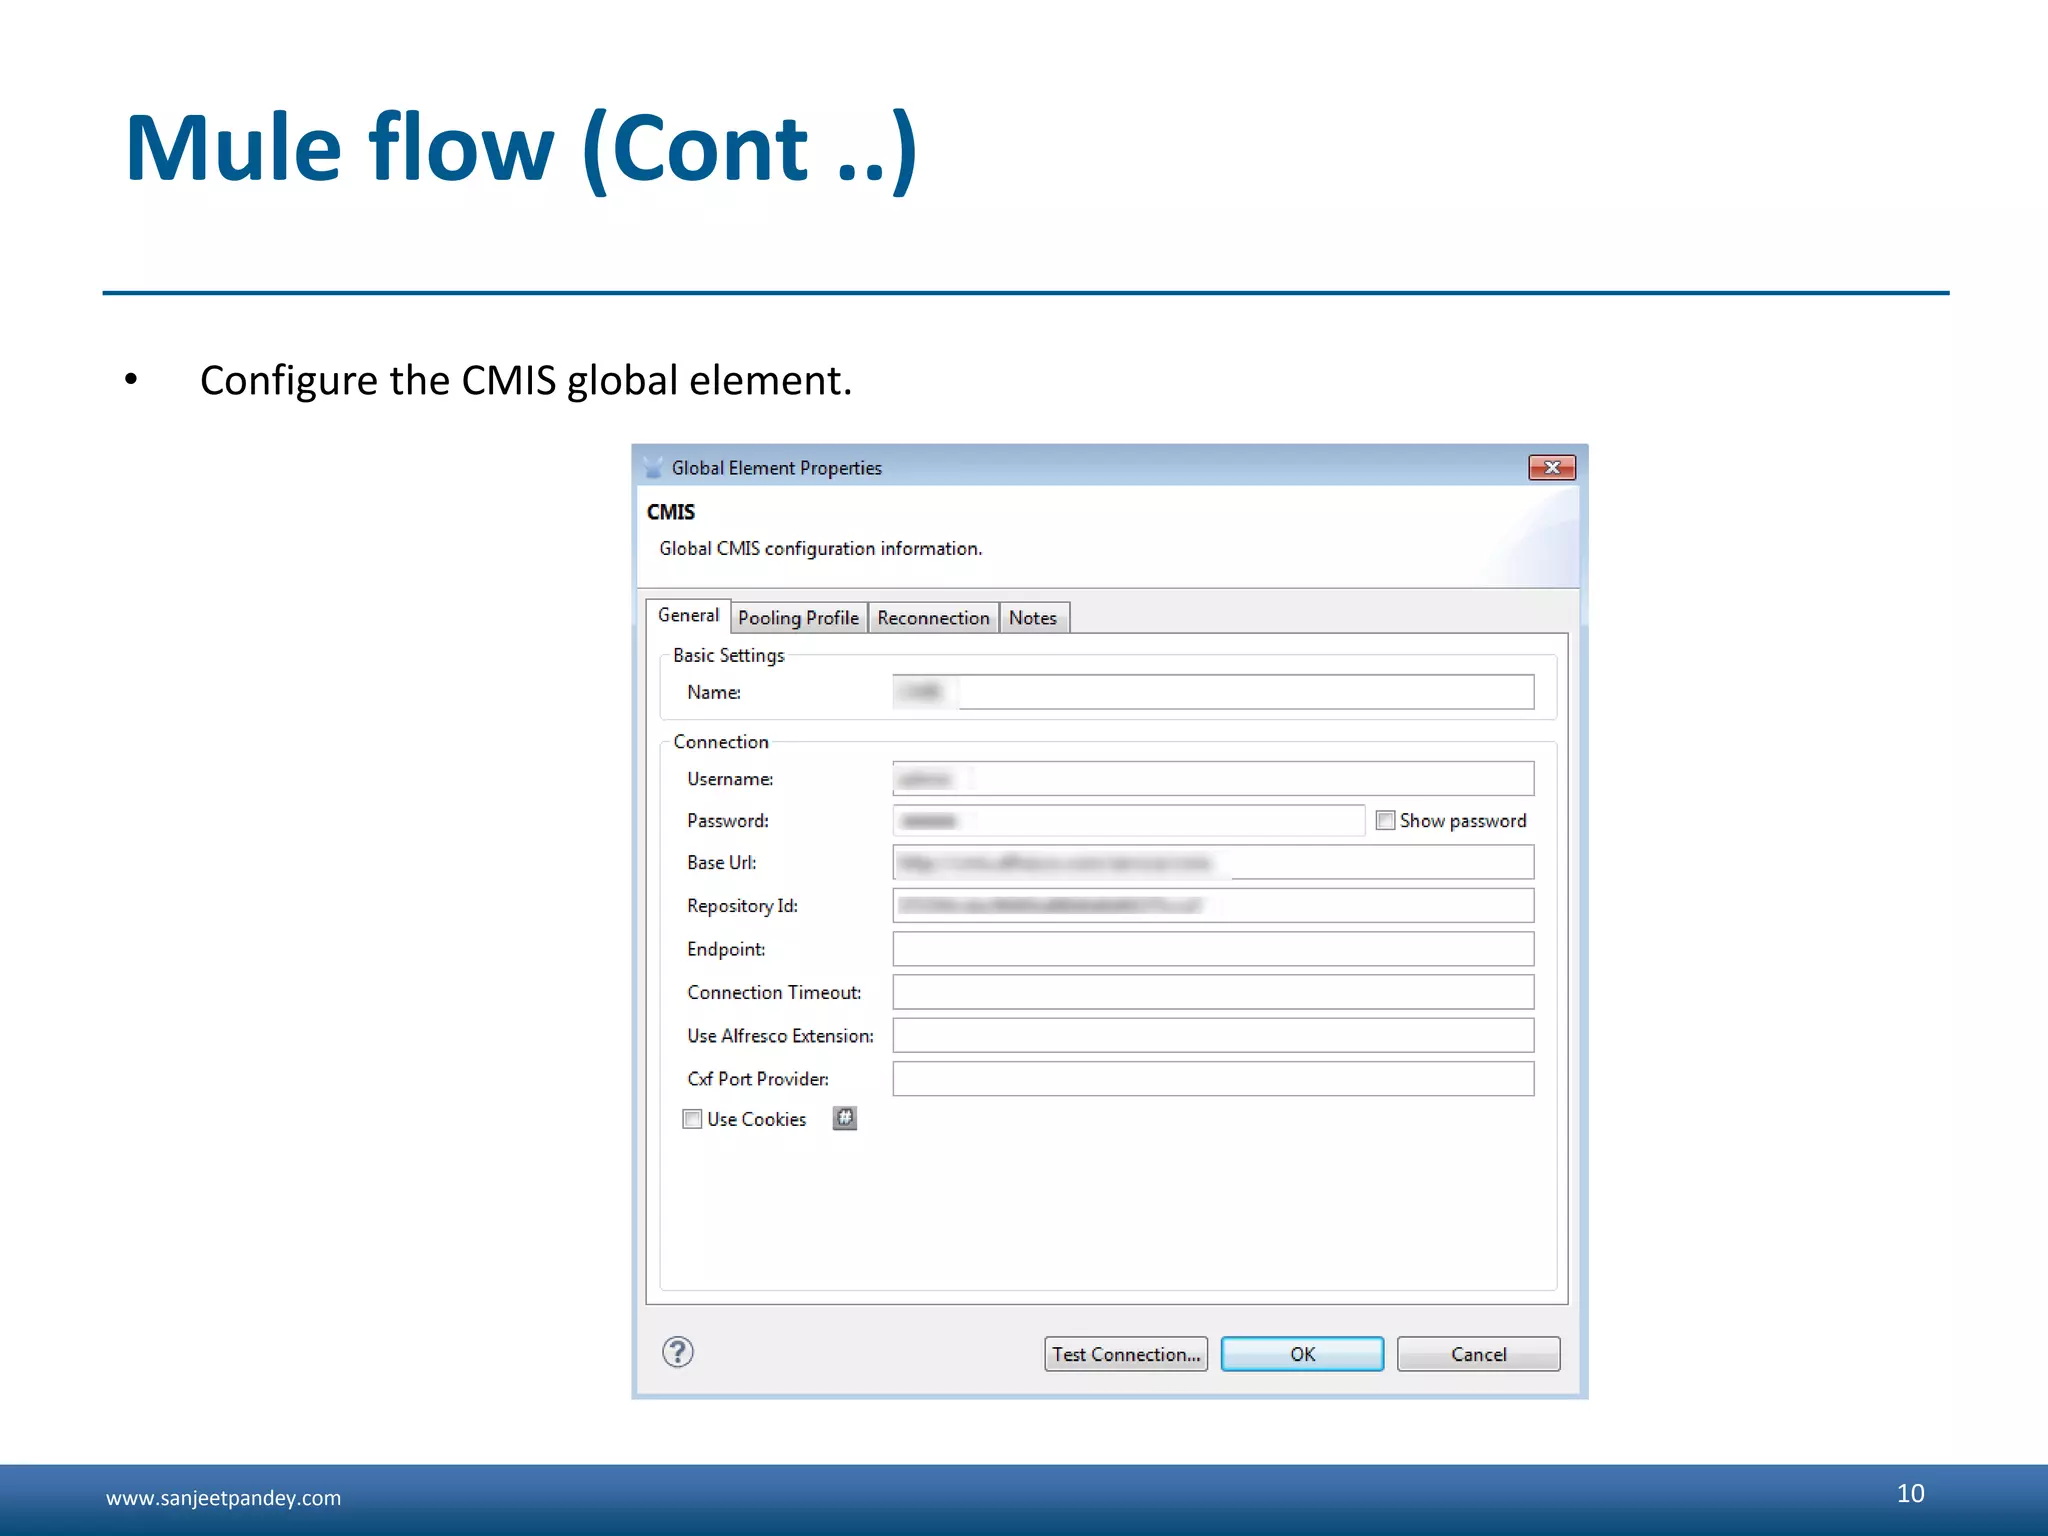
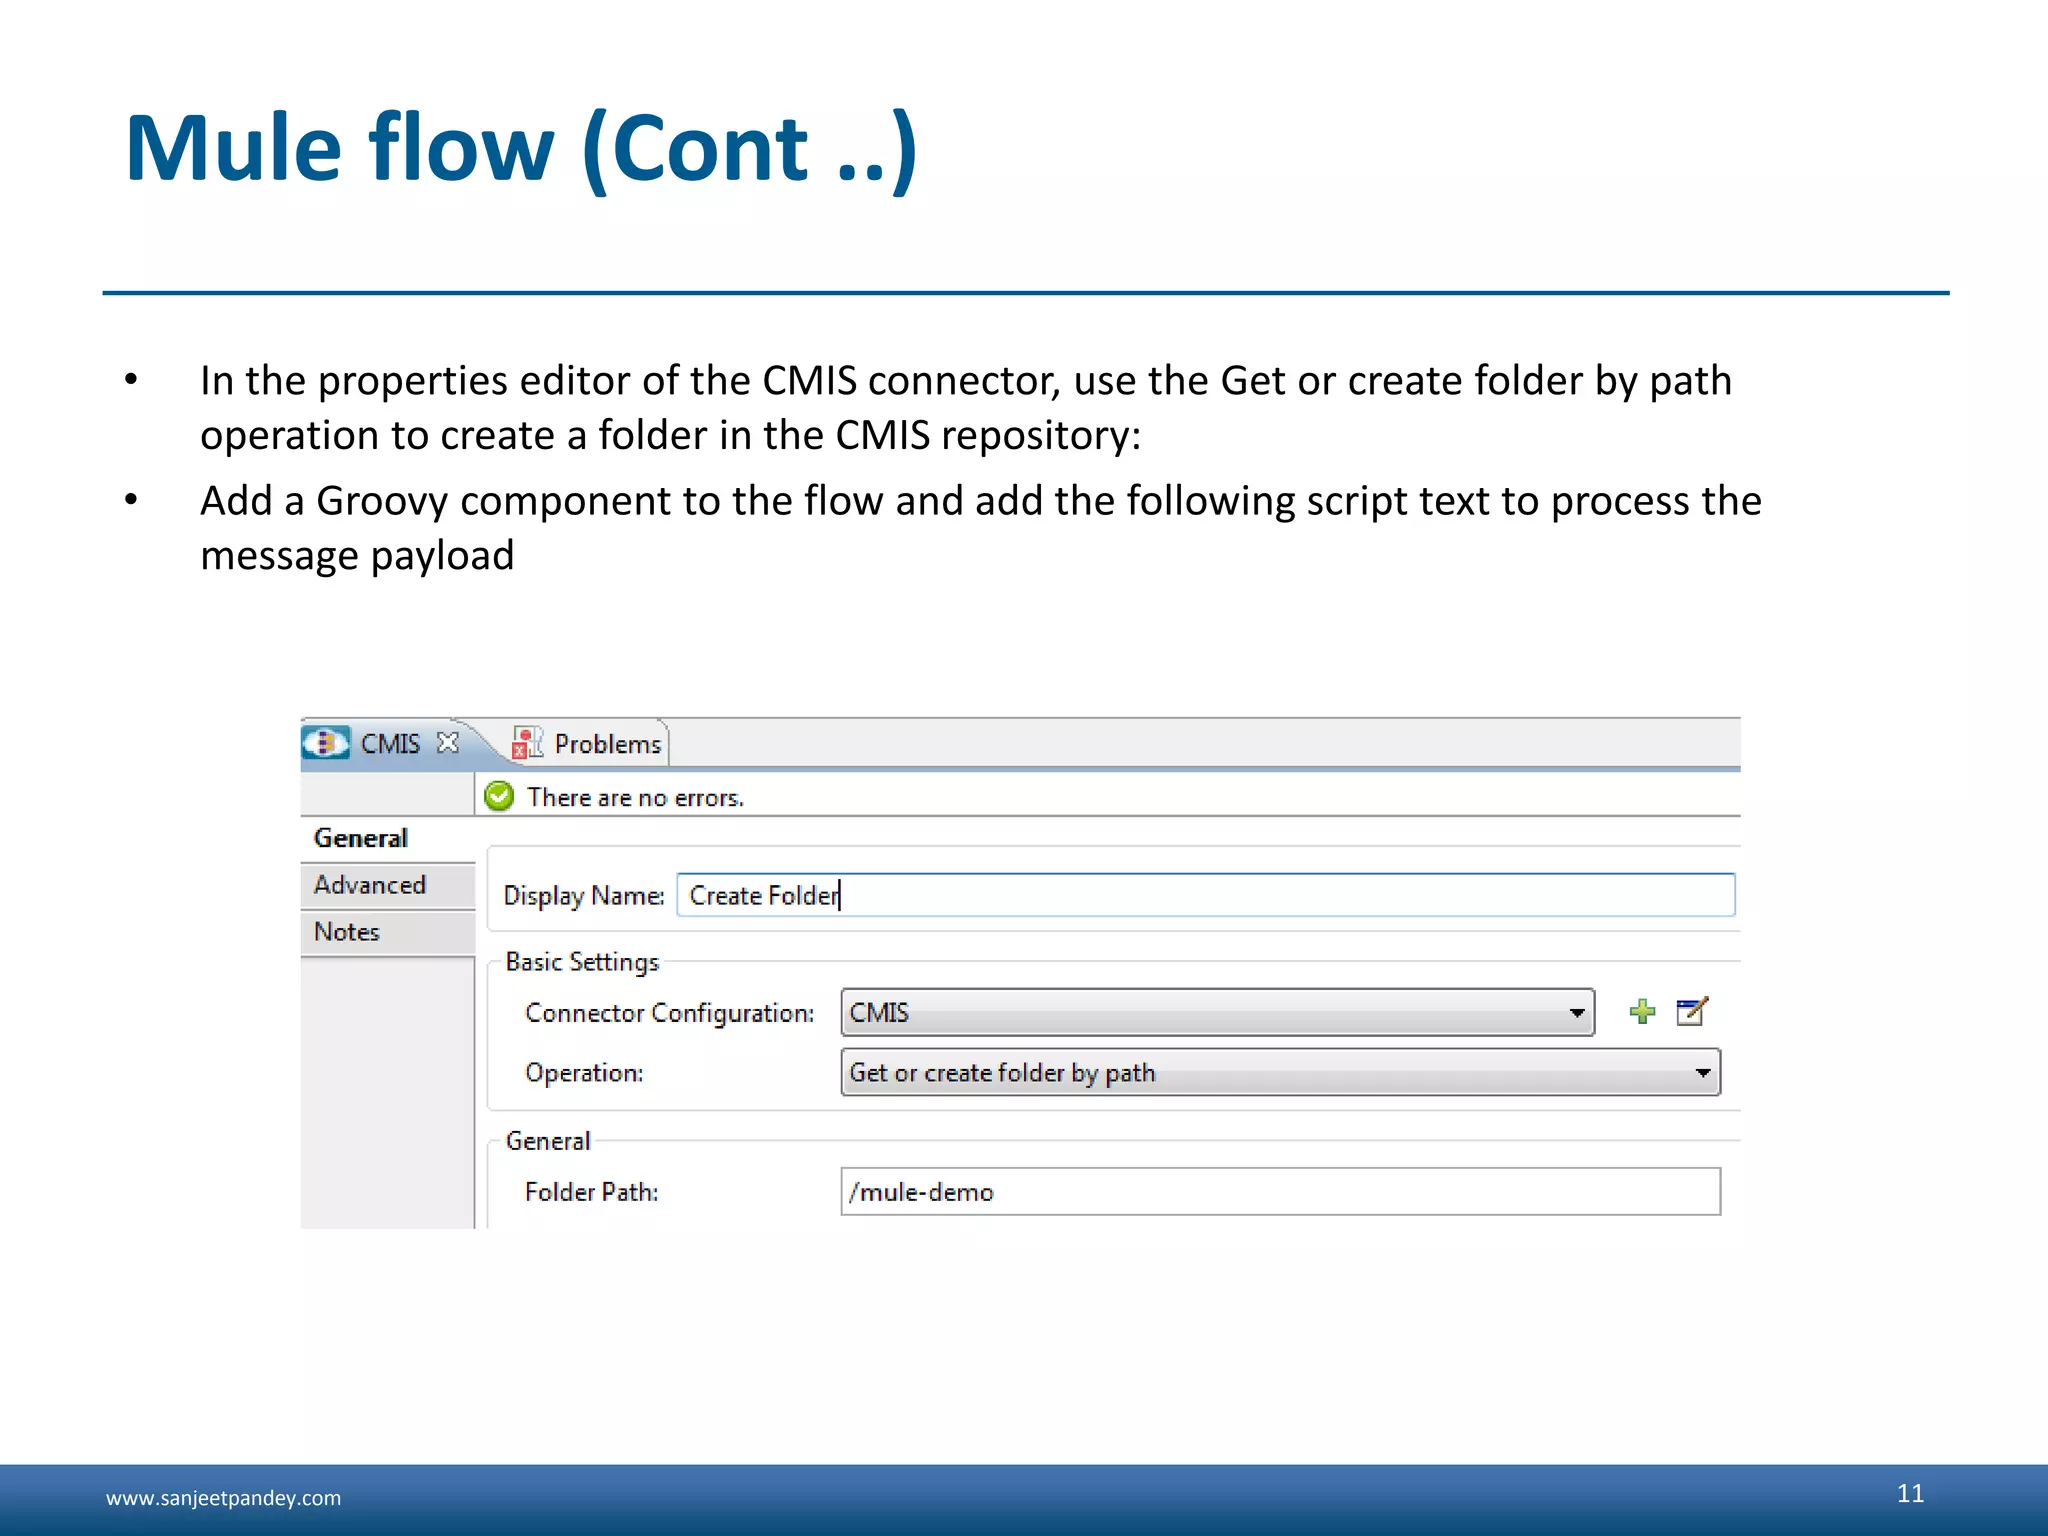
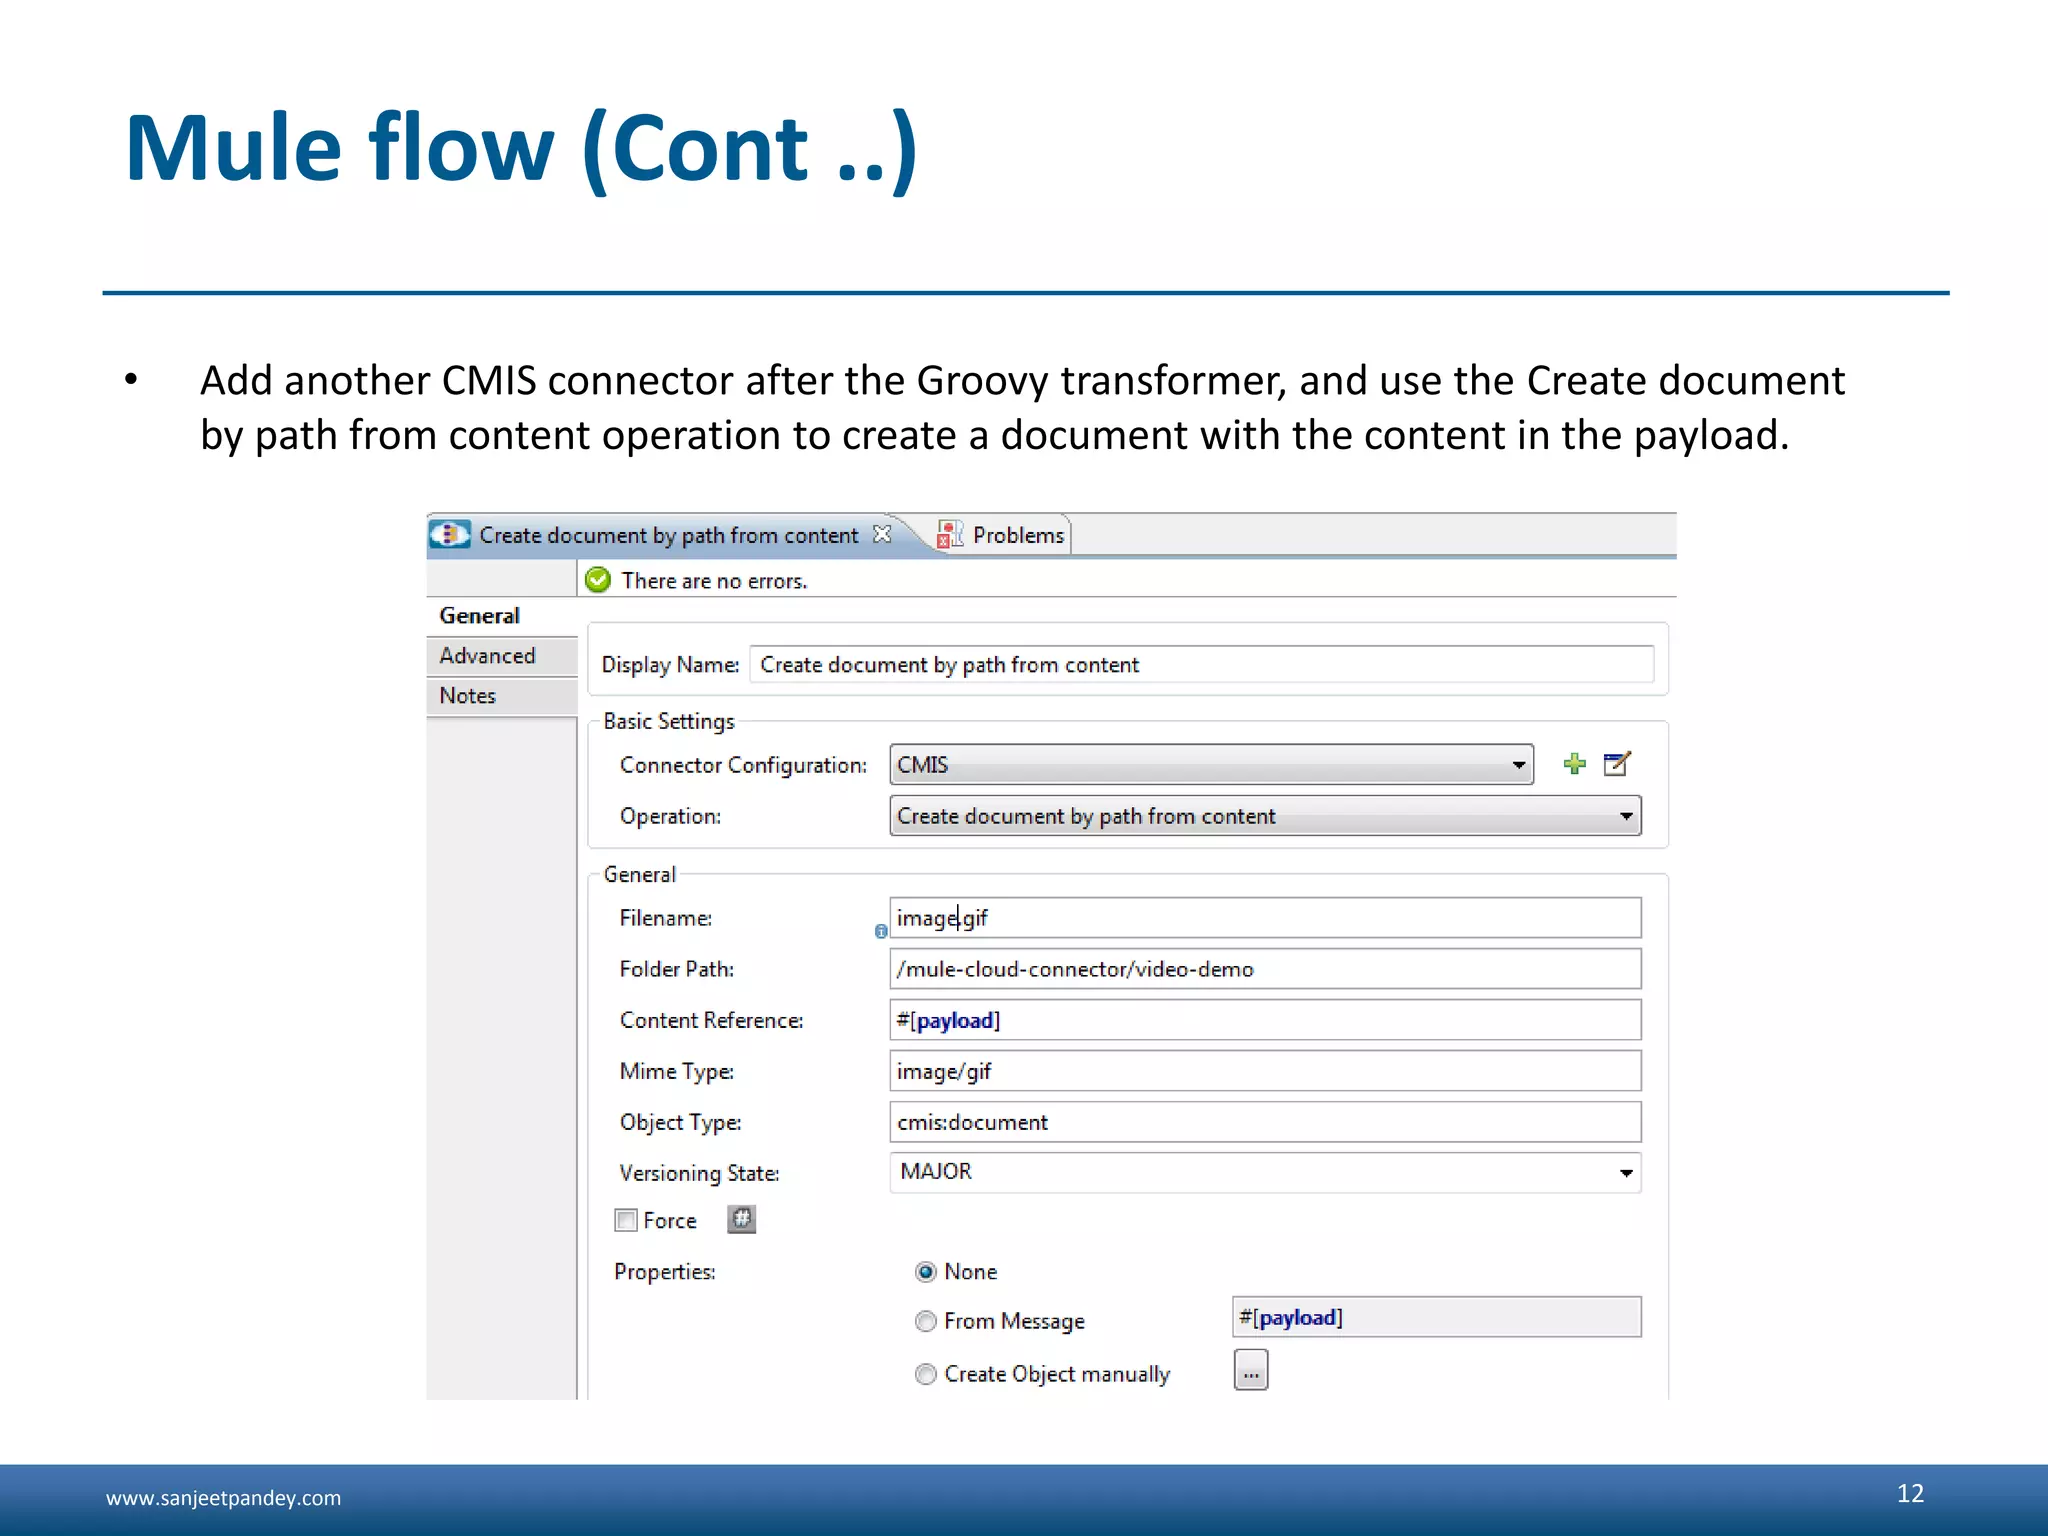
www.sanjeetpandey.com
Prepared by – Sanjeet Pandey
Integration with CMIS using Mule ESB
(Content Management Interoperability Services)
www.sanjeetpandey.com
Overview
- The Anypoint Connector for Content Management Interoperability Services (CMIS) provides
connectivity to CMIS repositories, such as Alfresco and SharePoint. It enables synchronizing
data and automating business processes across applications and systems.
Supported operations:
- Apply Policy
- Check in
- Check out
- Create Folder
- Create File
- Create Relationship
- Delete
- Query
- ...
2
www.sanjeetpandey.com
Prerequisites
For the CMIS connector to work properly in your Mule application, you need the following:
• Access to a CMIS repository
• A community edition of Anypoint Studio
3
www.sanjeetpandey.com
Installation
To install:
• Open Anypoint Studio, and under the Help menu, select Install New Software.
• In the Install menu, click Work with, and click the Anypoint Connectors Update Site.
• In the table below the Filter field, click the right arrow next to the Community folder, and
select the MuleSoft CMIS Connector Mule Studio Extension check box. Click Next.
• Review the details of the item you selected, then click Next.
• Select I accept the terms of license agreement, then click Finish.
• Click Restart Now to complete the installation.
4
www.sanjeetpandey.com
Mule CMIS Connector
Step 1: Create a New Mule Project
• To configure:
• In Anypoint Studio, click File > New > Mule Project.
• Specify a Project Name and click Finish.
5
www.sanjeetpandey.com
Mule CMIS Connector
Step 2: Configure the Global Element
• To use the CMIS connector in your
Mule application, you must
configure:
• A global element for CMIS for use by
all the CMIS connectors in your Mule
application. For more information
• Parameters of each CMIS connector
instance in the application.
6
www.sanjeetpandey.com
Mule CMIS Connector (Cont ...)
• Click the Global Elements tab at the base of the canvas, then click Create.
• In the Choose Global Type menu, use the filter to locate and select CMIS, then click OK.
• Configure the parameters according to the table below.
• Access the Pooling Profile tab to configure any settings relevant to managing multiple
connections using a connection pool.
• Access the Reconnection tab to configure any settings relevant to reconnection strategies
that Mule should execute if it loses its connection to CMIS.
• Click OK to save the global connector configurations.
• Return to the Message Flow tab in Studio.
7
www.sanjeetpandey.com
Mule flow
Drag an HTTP endpoint into a new flow, and configure with –
– Host
– Port
– Path
8
www.sanjeetpandey.com
Mule flow (Cont ..)
• Drag the CMIS connector onto the canvas, then select it to open the properties editor
console.
• Click the + sign next to the Connector Configuration field to add a new global connector
configuration
9
www.sanjeetpandey.com
Mule flow (Cont ..)
• Configure the CMIS global element.
10
www.sanjeetpandey.com
Mule flow (Cont ..)
• In the properties editor of the CMIS connector, use the Get or create folder by path
operation to create a folder in the CMIS repository:
• Add a Groovy component to the flow and add the following script text to process the
message payload
11
www.sanjeetpandey.com
Mule flow (Cont ..)
• Add another CMIS connector after the Groovy transformer, and use the Create document
by path from content operation to create a document with the content in the payload.
12
www.sanjeetpandey.com
Mule flow (Cont ..)
• Add a Object to Json transformer onto the flow to capture the response from the CMIS
connector and display it as a HTTP response.
13
www.sanjeetpandey.com
Running Mule Project
• Run the project as a Mule Application (right-click project name, then select Run As > Mule
Application).
• Navigate to http://localhost:8081/cmis to upload a file to your CMIS repository.
++++++++++++++++++++++++++++++++++++++++++++++++++++++++++++
+ Started app ' CMIS_CreateFolder' +
++++++++++++++++++++++++++++++++++++++++++++++++++++++++++++
• Open an Internet browser and visit http://localhost:8081/cmis
• The operation will create a folder in the CMIS System
14
www.sanjeetpandey.com 15

Integration with CMIS using Mule ESB

  • 1.
    www.sanjeetpandey.com www.sanjeetpandey.com Prepared by –Sanjeet Pandey Integration with CMIS using Mule ESB (Content Management Interoperability Services)
  • 2.
    www.sanjeetpandey.com Overview - The AnypointConnector for Content Management Interoperability Services (CMIS) provides connectivity to CMIS repositories, such as Alfresco and SharePoint. It enables synchronizing data and automating business processes across applications and systems. Supported operations: - Apply Policy - Check in - Check out - Create Folder - Create File - Create Relationship - Delete - Query - ... 2
  • 3.
    www.sanjeetpandey.com Prerequisites For the CMISconnector to work properly in your Mule application, you need the following: • Access to a CMIS repository • A community edition of Anypoint Studio 3
  • 4.
    www.sanjeetpandey.com Installation To install: • OpenAnypoint Studio, and under the Help menu, select Install New Software. • In the Install menu, click Work with, and click the Anypoint Connectors Update Site. • In the table below the Filter field, click the right arrow next to the Community folder, and select the MuleSoft CMIS Connector Mule Studio Extension check box. Click Next. • Review the details of the item you selected, then click Next. • Select I accept the terms of license agreement, then click Finish. • Click Restart Now to complete the installation. 4
  • 5.
    www.sanjeetpandey.com Mule CMIS Connector Step1: Create a New Mule Project • To configure: • In Anypoint Studio, click File > New > Mule Project. • Specify a Project Name and click Finish. 5
  • 6.
    www.sanjeetpandey.com Mule CMIS Connector Step2: Configure the Global Element • To use the CMIS connector in your Mule application, you must configure: • A global element for CMIS for use by all the CMIS connectors in your Mule application. For more information • Parameters of each CMIS connector instance in the application. 6
  • 7.
    www.sanjeetpandey.com Mule CMIS Connector(Cont ...) • Click the Global Elements tab at the base of the canvas, then click Create. • In the Choose Global Type menu, use the filter to locate and select CMIS, then click OK. • Configure the parameters according to the table below. • Access the Pooling Profile tab to configure any settings relevant to managing multiple connections using a connection pool. • Access the Reconnection tab to configure any settings relevant to reconnection strategies that Mule should execute if it loses its connection to CMIS. • Click OK to save the global connector configurations. • Return to the Message Flow tab in Studio. 7
  • 8.
    www.sanjeetpandey.com Mule flow Drag anHTTP endpoint into a new flow, and configure with – – Host – Port – Path 8
  • 9.
    www.sanjeetpandey.com Mule flow (Cont..) • Drag the CMIS connector onto the canvas, then select it to open the properties editor console. • Click the + sign next to the Connector Configuration field to add a new global connector configuration 9
  • 10.
    www.sanjeetpandey.com Mule flow (Cont..) • Configure the CMIS global element. 10
  • 11.
    www.sanjeetpandey.com Mule flow (Cont..) • In the properties editor of the CMIS connector, use the Get or create folder by path operation to create a folder in the CMIS repository: • Add a Groovy component to the flow and add the following script text to process the message payload 11
  • 12.
    www.sanjeetpandey.com Mule flow (Cont..) • Add another CMIS connector after the Groovy transformer, and use the Create document by path from content operation to create a document with the content in the payload. 12
  • 13.
    www.sanjeetpandey.com Mule flow (Cont..) • Add a Object to Json transformer onto the flow to capture the response from the CMIS connector and display it as a HTTP response. 13
  • 14.
    www.sanjeetpandey.com Running Mule Project •Run the project as a Mule Application (right-click project name, then select Run As > Mule Application). • Navigate to http://localhost:8081/cmis to upload a file to your CMIS repository. ++++++++++++++++++++++++++++++++++++++++++++++++++++++++++++ + Started app ' CMIS_CreateFolder' + ++++++++++++++++++++++++++++++++++++++++++++++++++++++++++++ • Open an Internet browser and visit http://localhost:8081/cmis • The operation will create a folder in the CMIS System 14
  • 15.

Editor's Notes

  • #4 Follow Do's and Do Not'sCommon Profile PicFollow Company and Geography:HydAdd followers from peers and WW, MuleSoftHave a Note about yourselfAsk Questions in live BrightTalk Webinars using #tweetsTweet/Retweet Articles on Mule. WW blog, G+ and Forum Links Follow WW and Mulesoft....