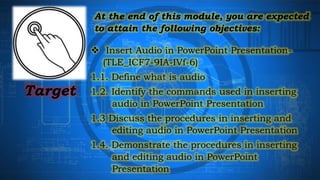
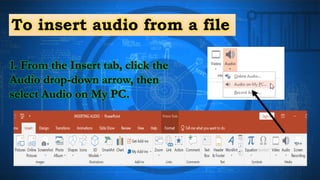
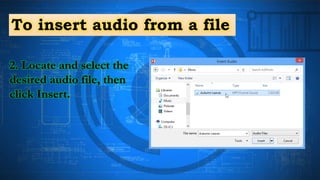
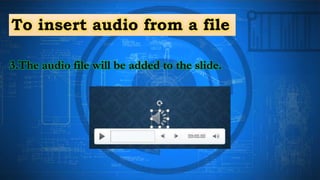
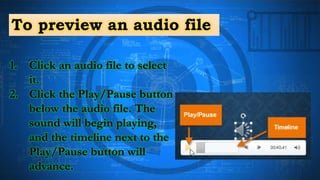
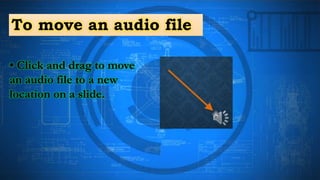
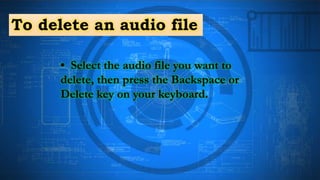
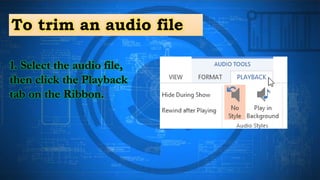
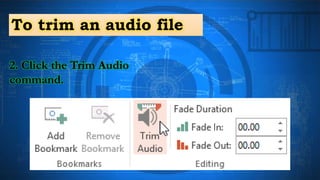
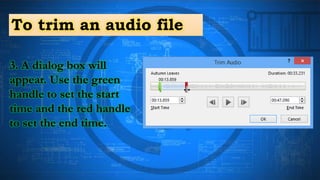
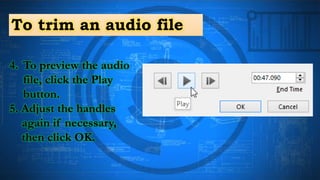
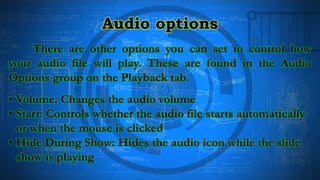
?
THINK
In what places, things, situation do
you think we hear audio?
How they are being
delivered/transmitted/said?
ING
Target
 Insert Audio in PowerPoint Presentation-
(TLE_ICF7-9IA-IVf-6)
1.1. Define what is audio
1.2. Identify the commands used in inserting
audio in PowerPoint Presentation
1.3 Discuss the procedures in inserting and
editing audio in PowerPoint Presentation
1.4. Demonstrate the procedures in inserting
and editing audio in PowerPoint
Presentation
At the end of this module, you are expected
to attain the following objectives:
Jumpstart
Guess who or where the
sound/audio came from
Discover
AUDIO?
What is…..
Audio
Audio is sound within the acoustic range
available to humans. An audio frequency (AF) is
an electrical alternating current within the 20 to
20,000 hertz (cycles per second) range that can
be used to produce acoustic sound. In
computers, audio is the sound system that
comes with or can be added to a computer.
Audio
PowerPoint allows you to add audio to your
presentation. For example, you could add
background music to one slide, a sound effect
to another, and even record your own narration
or commentary. You can then edit the audio to
customize it for your presentation.
Let’s Discuss the
Procedure
To insert audio from a file
1. From the Insert tab, click the
Audio drop-down arrow, then
select Audio on My PC.
To insert audio from a file
2. Locate and select the
desired audio file, then
click Insert.
To insert audio from a file
3.The audio file will be added to the slide.
Recording your own
audio
Sometimes you may want to record audio directly into
a presentation. For example, you might want the
presentation to include narration. Before you begin, make
sure you have a microphone that is compatible with your
computer; many computers have built-in microphones or
ones that can be plugged in to the computer.
To record audio
1. From the Insert tab, click
the Audio drop-down arrow,
then select Record Audio.
To record audio
2. Type a name for the
audio recording, if desired.
To record audio
3. Click the Record button
to start recording.
To record audio
4. When you're finished
recording, click the Stop button.
To record audio
5. To preview your recording,
click the Play button.
To record audio
6. When you're done, click
OK. The audio file will be
inserted into the slide.
Working with audio
To preview an audio file
1. Click an audio file to select
it.
2. Click the Play/Pause button
below the audio file. The
sound will begin playing,
and the timeline next to the
Play/Pause button will
advance.
To preview an audio file
3. To jump to a different part of
the file, click anywhere on the
timeline.
To move an audio file
• Click and drag to move
an audio file to a new
location on a slide.
To delete an audio file
• Select the audio file you want to
delete, then press the Backspace or
Delete key on your keyboard.
Editing audio
You can modify your audio files using the commands
on the Playback tab. For example, if you add a song to a
slide you can trim it to play only a brief section. You can
also add a fade in and fade out, and add bookmarks that
allow you to jump to specific points in the audio file.
To trim an audio file
1. Select the audio file,
then click the Playback
tab on the Ribbon.
To trim an audio file
2. Click the Trim Audio
command.
To trim an audio file
3. A dialog box will
appear. Use the green
handle to set the start
time and the red handle
to set the end time.
To trim an audio file
4. To preview the audio
file, click the Play
button.
5. Adjust the handles
again if necessary,
then click OK.
To trim an audio file
4. To preview the audio
file, click the Play
button.
5. Adjust the handles
again if necessary,
then click OK.
Audio options
There are other options you can set to control how
your audio file will play. These are found in the Audio
Options group on the Playback tab.
• Volume: Changes the audio volume
• Start: Controls whether the audio file starts automatically
or when the mouse is clicked
• Hide During Show: Hides the audio icon while the slide
show is playing
Audio options
• Play Across Slides: Continues playing the audio file
across multiple slides instead of just the current slide
• Loop until Stopped: Replays the audio file until stopped
• Rewind after Playing: Returns the audio file to the
beginning when it is finished playing
Explore
Directions: Arrange the steps to come up
with a correct procedure, write the letter
that corresponds to the correct order (A,
B, C, D……….)
Deepen
Challenge!
Challenge!
1. Open an existing PowerPoint presentation. If you want,
you can use our practice presentation.
2. Insert a sound from a file from your computer, if you
have one.
3. Preview the audio file.
4. Trim the audio file.
6. Experiment with the different Audio Options on the
Playback tab.
7. If your computer has a microphone, record some audio
for a slide.
Gauge
Carefully read each item. Use the
answer sheet provided for your answers.
Write the letter of the best answer for each
test item.
1. What is the process used to add sound in your presentation?
a. Insert Audio c. Insert Tab
b. Insert Picture d. Inset Video
2. What other term is used for the word customize?
a. Copy c. Delete
b. Cut d. Edit
3. What tab gives you access to the commands used in adding audio in
your presentation?
a. Design tab b. File tab c. Home tab d. Insert tab
4. Which of the following is sound within the acoustic range available to
humans?
a. Audio c. Shape
b. Picture d. Video
5. Which equipment is needed if you are going to record your own
audio?
a. Keyboard b. Microphone c. Mouse d. Internet
ASSIGNMENT
Make an advance study on the topics
under week 7 & 8

INSERTING AUDIO.pptx

  • 8.
  • 9.
    In what places,things, situation do you think we hear audio? How they are being delivered/transmitted/said?
  • 10.
  • 11.
    Target  Insert Audioin PowerPoint Presentation- (TLE_ICF7-9IA-IVf-6) 1.1. Define what is audio 1.2. Identify the commands used in inserting audio in PowerPoint Presentation 1.3 Discuss the procedures in inserting and editing audio in PowerPoint Presentation 1.4. Demonstrate the procedures in inserting and editing audio in PowerPoint Presentation At the end of this module, you are expected to attain the following objectives:
  • 12.
  • 13.
    Guess who orwhere the sound/audio came from
  • 22.
  • 23.
  • 24.
    Audio Audio is soundwithin the acoustic range available to humans. An audio frequency (AF) is an electrical alternating current within the 20 to 20,000 hertz (cycles per second) range that can be used to produce acoustic sound. In computers, audio is the sound system that comes with or can be added to a computer.
  • 25.
    Audio PowerPoint allows youto add audio to your presentation. For example, you could add background music to one slide, a sound effect to another, and even record your own narration or commentary. You can then edit the audio to customize it for your presentation.
  • 26.
  • 27.
    To insert audiofrom a file 1. From the Insert tab, click the Audio drop-down arrow, then select Audio on My PC.
  • 28.
    To insert audiofrom a file 2. Locate and select the desired audio file, then click Insert.
  • 29.
    To insert audiofrom a file 3.The audio file will be added to the slide.
  • 30.
    Recording your own audio Sometimesyou may want to record audio directly into a presentation. For example, you might want the presentation to include narration. Before you begin, make sure you have a microphone that is compatible with your computer; many computers have built-in microphones or ones that can be plugged in to the computer.
  • 31.
    To record audio 1.From the Insert tab, click the Audio drop-down arrow, then select Record Audio.
  • 32.
    To record audio 2.Type a name for the audio recording, if desired.
  • 33.
    To record audio 3.Click the Record button to start recording.
  • 34.
    To record audio 4.When you're finished recording, click the Stop button.
  • 35.
    To record audio 5.To preview your recording, click the Play button.
  • 36.
    To record audio 6.When you're done, click OK. The audio file will be inserted into the slide.
  • 37.
  • 38.
    To preview anaudio file 1. Click an audio file to select it. 2. Click the Play/Pause button below the audio file. The sound will begin playing, and the timeline next to the Play/Pause button will advance.
  • 39.
    To preview anaudio file 3. To jump to a different part of the file, click anywhere on the timeline.
  • 40.
    To move anaudio file • Click and drag to move an audio file to a new location on a slide.
  • 41.
    To delete anaudio file • Select the audio file you want to delete, then press the Backspace or Delete key on your keyboard.
  • 42.
    Editing audio You canmodify your audio files using the commands on the Playback tab. For example, if you add a song to a slide you can trim it to play only a brief section. You can also add a fade in and fade out, and add bookmarks that allow you to jump to specific points in the audio file.
  • 43.
    To trim anaudio file 1. Select the audio file, then click the Playback tab on the Ribbon.
  • 44.
    To trim anaudio file 2. Click the Trim Audio command.
  • 45.
    To trim anaudio file 3. A dialog box will appear. Use the green handle to set the start time and the red handle to set the end time.
  • 46.
    To trim anaudio file 4. To preview the audio file, click the Play button. 5. Adjust the handles again if necessary, then click OK.
  • 47.
    To trim anaudio file 4. To preview the audio file, click the Play button. 5. Adjust the handles again if necessary, then click OK.
  • 48.
    Audio options There areother options you can set to control how your audio file will play. These are found in the Audio Options group on the Playback tab. • Volume: Changes the audio volume • Start: Controls whether the audio file starts automatically or when the mouse is clicked • Hide During Show: Hides the audio icon while the slide show is playing
  • 49.
    Audio options • PlayAcross Slides: Continues playing the audio file across multiple slides instead of just the current slide • Loop until Stopped: Replays the audio file until stopped • Rewind after Playing: Returns the audio file to the beginning when it is finished playing
  • 50.
  • 51.
    Directions: Arrange thesteps to come up with a correct procedure, write the letter that corresponds to the correct order (A, B, C, D……….)
  • 52.
  • 53.
  • 54.
    Challenge! 1. Open anexisting PowerPoint presentation. If you want, you can use our practice presentation. 2. Insert a sound from a file from your computer, if you have one. 3. Preview the audio file. 4. Trim the audio file. 6. Experiment with the different Audio Options on the Playback tab. 7. If your computer has a microphone, record some audio for a slide.
  • 55.
  • 56.
    Carefully read eachitem. Use the answer sheet provided for your answers. Write the letter of the best answer for each test item.
  • 57.
    1. What isthe process used to add sound in your presentation? a. Insert Audio c. Insert Tab b. Insert Picture d. Inset Video 2. What other term is used for the word customize? a. Copy c. Delete b. Cut d. Edit 3. What tab gives you access to the commands used in adding audio in your presentation? a. Design tab b. File tab c. Home tab d. Insert tab
  • 58.
    4. Which ofthe following is sound within the acoustic range available to humans? a. Audio c. Shape b. Picture d. Video 5. Which equipment is needed if you are going to record your own audio? a. Keyboard b. Microphone c. Mouse d. Internet
  • 59.
    ASSIGNMENT Make an advancestudy on the topics under week 7 & 8