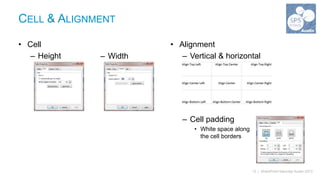
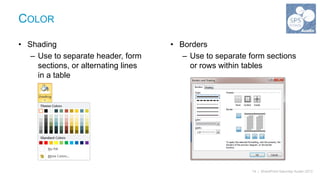
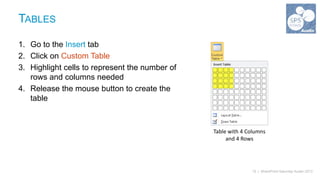
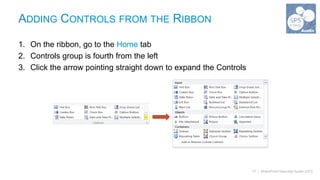
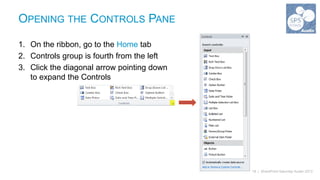
InfoPath in an Hour
  Building Electronic Forms for Use with SharePoint
  Workflows


                                                                     Theresa Eller
                                         Systems Analyst Sr., DynCorp International
THANK YOU FOR BEING A PART OF SHAREPOINT
SATURDAY AUSTIN!
• Please turn off all electronic devices or set them to vibrate
• If you must take a phone call, please do so in the hall
• Wi-Fi is available, you will need your Guest ID/password
  (at registration desk)
• Feel free to tweet and blog during sessions. Remember to follow @SPSATX
  and tag #SPSATX in your tweets!


                      SharePoint Saturday Austin is hosted by
                        the Austin SharePoint User Group
                                 (@AustinSPUG)


                                                                2 | SharePoint Saturday Austin 2013
THANKS TO OUR SPONSORS!


                          3 | SharePoint Saturday Austin 2013
WHO AM I?

• Theresa Eller
   – Systems Analyst Sr. at DynCorp International
      • SharePoint 2010 end/power user support and training; backup farm
        administrator
      • Production support for internally developed enterprise business
        applications, OnBase (document management system), etc.
   – Bachelor’s Degree: Public Relations, University of Louisiana at Lafayette
   – Master’s Degree: Teaching & Learning with Technology, Ashford University
• @SharePointMadam
• sharepointmadam@gmail.com


                                                                4 | SharePoint Saturday Austin 2013
GETTING STARTED
OPENING INFOPATH DESIGNER 2010

1. Start > All Programs > Microsoft   2. From Available Form Templates,
   Office > Microsoft InfoPath           select Blank Form
   Designer 2010


                                      3. In the Blank Form area (on right),
                                         click Design Form


                                                               6 | SharePoint Saturday Austin 2013
DOWNLOAD AN EXISTING FORM

1. Navigate to the Document Library in SharePoint
2. Under Library Tools, click Library
3. From the Settings group, click Library Settings
4. Under General Settings, click
   Advanced Settings
5. Under Template URL:, click Edit Template
6. Template opens in InfoPath Designer;
   click File > Save As
7. Select the location to save the file
8. Enter the File Name
9. Click Save
                                                     7 | SharePoint Saturday Austin 2013
EDIT AN EXISTING FORM

1. Right-click on the form icon
2. Select Design


                                  8 | SharePoint Saturday Austin 2013
FORM LAYOUT
ADDING CONTENT TO A BLANK FORM

• Two default sections
   1. Title area
   2. One cell
      ď‚§   Can be split into multiple columns
          and/or multiple rows


                                               10 | SharePoint Saturday Austin 2013
ROWS & COLUMNS

• Insert
   – With cursor at end of last row, press Tab
       — or —
   1. Position cursor where new cell/row/column
      should be added
   2. Go to Table Tools Layout tab and click
      Insert Below, Insert Above, Insert Left,
      or Insert Right
 • Delete
    1. Highlight cell/row/column to remove
    2. Click Delete and select from dropdown
       menu
                                                  11 | SharePoint Saturday Austin 2013
MERGE

• Merge Cells
   1. Highlight cells/rows/columns to merge
   2. Click Merge Cells
• Split Cells
   – Default: 2 columns and 1 row
   1. Highlight cells/rows/columns to split
   2. Click Split Cells


         Before Split / After Merge           After Split / Before Merge
                                                                      12 | SharePoint Saturday Austin 2013
CELL & ALIGNMENT

• Cell                  • Alignment
   – Height   – Width      – Vertical & horizontal


                           – Cell padding
                              • White space along
                                the cell borders


                                                    13 | SharePoint Saturday Austin 2013
COLOR

• Shading                             • Borders
   – Use to separate header, form        – Use to separate form sections
     sections, or alternating lines        or rows within tables
     in a table


                                                            14 | SharePoint Saturday Austin 2013
TABLES

1. Go to the Insert tab
2. Click on Custom Table
3. Highlight cells to represent the number of
   rows and columns needed
4. Release the mouse button to create the
   table


                                                Table with 4 Columns
                                                     and 4 Rows


                                                              15 | SharePoint Saturday Austin 2013
CONTROLS
ADDING CONTROLS FROM THE RIBBON

1. On the ribbon, go to the Home tab
2. Controls group is fourth from the left
3. Click the arrow pointing straight down to expand the Controls


                                                                   17 | SharePoint Saturday Austin 2013
OPENING THE CONTROLS PANE

1. On the ribbon, go to the Home tab
2. Controls group is fourth from the left
3. Click the diagonal arrow pointing down
   to expand the Controls


                                            18 | SharePoint Saturday Austin 2013
DEMO
RECOMMENDATIONS
INFOPATH WITH SHAREPOINT 2010 HOW-TO

               • Real Solutions for Using
                 InfoPath with SharePoint 2010
                  – by Steven Mann


                                                 21 | SharePoint Saturday Austin 2013
QUESTIONS?
PLEASE FILL OUT SESSION EVALUATIONS
               AND
     THANK YOU FOR ATTENDING!
THANKS TO OUR SPONSORS!


                          24 | SharePoint Saturday Austin 2013

InfoPath in an Hour - SPSATX

  • 1.
    InfoPath in anHour Building Electronic Forms for Use with SharePoint Workflows Theresa Eller Systems Analyst Sr., DynCorp International
  • 2.
    THANK YOU FORBEING A PART OF SHAREPOINT SATURDAY AUSTIN! • Please turn off all electronic devices or set them to vibrate • If you must take a phone call, please do so in the hall • Wi-Fi is available, you will need your Guest ID/password (at registration desk) • Feel free to tweet and blog during sessions. Remember to follow @SPSATX and tag #SPSATX in your tweets! SharePoint Saturday Austin is hosted by the Austin SharePoint User Group (@AustinSPUG) 2 | SharePoint Saturday Austin 2013
  • 3.
    THANKS TO OURSPONSORS! 3 | SharePoint Saturday Austin 2013
  • 4.
    WHO AM I? •Theresa Eller – Systems Analyst Sr. at DynCorp International • SharePoint 2010 end/power user support and training; backup farm administrator • Production support for internally developed enterprise business applications, OnBase (document management system), etc. – Bachelor’s Degree: Public Relations, University of Louisiana at Lafayette – Master’s Degree: Teaching & Learning with Technology, Ashford University • @SharePointMadam • sharepointmadam@gmail.com 4 | SharePoint Saturday Austin 2013
  • 5.
  • 6.
    OPENING INFOPATH DESIGNER2010 1. Start > All Programs > Microsoft 2. From Available Form Templates, Office > Microsoft InfoPath select Blank Form Designer 2010 3. In the Blank Form area (on right), click Design Form 6 | SharePoint Saturday Austin 2013
  • 7.
    DOWNLOAD AN EXISTINGFORM 1. Navigate to the Document Library in SharePoint 2. Under Library Tools, click Library 3. From the Settings group, click Library Settings 4. Under General Settings, click Advanced Settings 5. Under Template URL:, click Edit Template 6. Template opens in InfoPath Designer; click File > Save As 7. Select the location to save the file 8. Enter the File Name 9. Click Save 7 | SharePoint Saturday Austin 2013
  • 8.
    EDIT AN EXISTINGFORM 1. Right-click on the form icon 2. Select Design 8 | SharePoint Saturday Austin 2013
  • 9.
  • 10.
    ADDING CONTENT TOA BLANK FORM • Two default sections 1. Title area 2. One cell  Can be split into multiple columns and/or multiple rows 10 | SharePoint Saturday Austin 2013
  • 11.
    ROWS & COLUMNS •Insert – With cursor at end of last row, press Tab — or — 1. Position cursor where new cell/row/column should be added 2. Go to Table Tools Layout tab and click Insert Below, Insert Above, Insert Left, or Insert Right • Delete 1. Highlight cell/row/column to remove 2. Click Delete and select from dropdown menu 11 | SharePoint Saturday Austin 2013
  • 12.
    MERGE • Merge Cells 1. Highlight cells/rows/columns to merge 2. Click Merge Cells • Split Cells – Default: 2 columns and 1 row 1. Highlight cells/rows/columns to split 2. Click Split Cells Before Split / After Merge After Split / Before Merge 12 | SharePoint Saturday Austin 2013
  • 13.
    CELL & ALIGNMENT •Cell • Alignment – Height – Width – Vertical & horizontal – Cell padding • White space along the cell borders 13 | SharePoint Saturday Austin 2013
  • 14.
    COLOR • Shading • Borders – Use to separate header, form – Use to separate form sections sections, or alternating lines or rows within tables in a table 14 | SharePoint Saturday Austin 2013
  • 15.
    TABLES 1. Go tothe Insert tab 2. Click on Custom Table 3. Highlight cells to represent the number of rows and columns needed 4. Release the mouse button to create the table Table with 4 Columns and 4 Rows 15 | SharePoint Saturday Austin 2013
  • 16.
  • 17.
    ADDING CONTROLS FROMTHE RIBBON 1. On the ribbon, go to the Home tab 2. Controls group is fourth from the left 3. Click the arrow pointing straight down to expand the Controls 17 | SharePoint Saturday Austin 2013
  • 18.
    OPENING THE CONTROLSPANE 1. On the ribbon, go to the Home tab 2. Controls group is fourth from the left 3. Click the diagonal arrow pointing down to expand the Controls 18 | SharePoint Saturday Austin 2013
  • 19.
  • 20.
  • 21.
    INFOPATH WITH SHAREPOINT2010 HOW-TO • Real Solutions for Using InfoPath with SharePoint 2010 – by Steven Mann 21 | SharePoint Saturday Austin 2013
  • 22.
  • 23.
    PLEASE FILL OUTSESSION EVALUATIONS AND THANK YOU FOR ATTENDING!
  • 24.
    THANKS TO OURSPONSORS! 24 | SharePoint Saturday Austin 2013