This document discusses configuring and troubleshooting access control lists (ACLs) on Cisco routers. It covers the basics of numbered standard and extended IPv4 ACLs, including configuration examples that permit or deny traffic based on source IP addresses, protocols, and port numbers. Named ACLs and commands for verifying, monitoring, and troubleshooting ACLs are also examined. The document provides guidance on implementing ACLs to control network access and troubleshooting common ACL errors.

![© 2007 Cisco Systems, Inc. All rights reserved. ICND2 v1.0—6-3
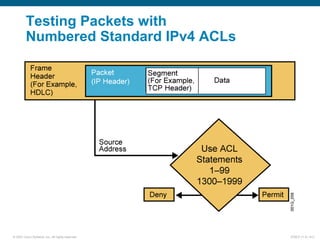
Activates the list on an interface.
Sets inbound or outbound testing.
no ip access-group access-list-number {in | out} removes the ACL from the interface.
ip access-group access-list-number {in | out}
Uses 1 to 99 for the access-list-number.
The first entry is assigned a sequence number of 10, and successive entries
are incremented by 10.
Default wildcard mask is 0.0.0.0 (only standard ACL).
no access-list access-list-number removes the entire ACL.
remark lets you add a description to the ACL.
access-list access-list-number
{permit | deny | remark} source [mask]
RouterX(config)#
RouterX(config-if)#
Numbered Standard IPv4 ACL
Configuration](https://image.slidesharecdn.com/icnd210s06l02-150412085445-conversion-gate01/85/Icnd210-s06l02-3-320.jpg)


![© 2007 Cisco Systems, Inc. All rights reserved. ICND2 v1.0—6-9
ip access-group access-list-number {in | out}
Activates the extended list on an interface
Sets parameters for this list entry
access-list access-list-number {permit | deny}
protocol source source-wildcard [operator port]
destination destination-wildcard [operator port]
[established] [log]
RouterX(config)#
RouterX(config-if)#
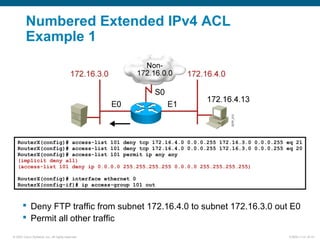
Numbered Extended IPv4 ACL
Configuration](https://image.slidesharecdn.com/icnd210s06l02-150412085445-conversion-gate01/85/Icnd210-s06l02-9-320.jpg)

![© 2007 Cisco Systems, Inc. All rights reserved. ICND2 v1.0—6-12
ip access-list {standard | extended} name
[sequence-number] {permit | deny} {ip access list test conditions}
{permit | deny} {ip access list test conditions}
ip access-group name {in | out}
Named IP ACL Configuration
Alphanumeric name string must be unique
If not configured, sequence numbers are generated automatically starting at 10 and
incrementing by 10
no sequence number removes the specific test from the named ACL
Activates the named IP ACL on an interface
RouterX(config {std- | ext-}nacl)#
RouterX(config-if)#
RouterX(config)#](https://image.slidesharecdn.com/icnd210s06l02-150412085445-conversion-gate01/85/Icnd210-s06l02-12-320.jpg)