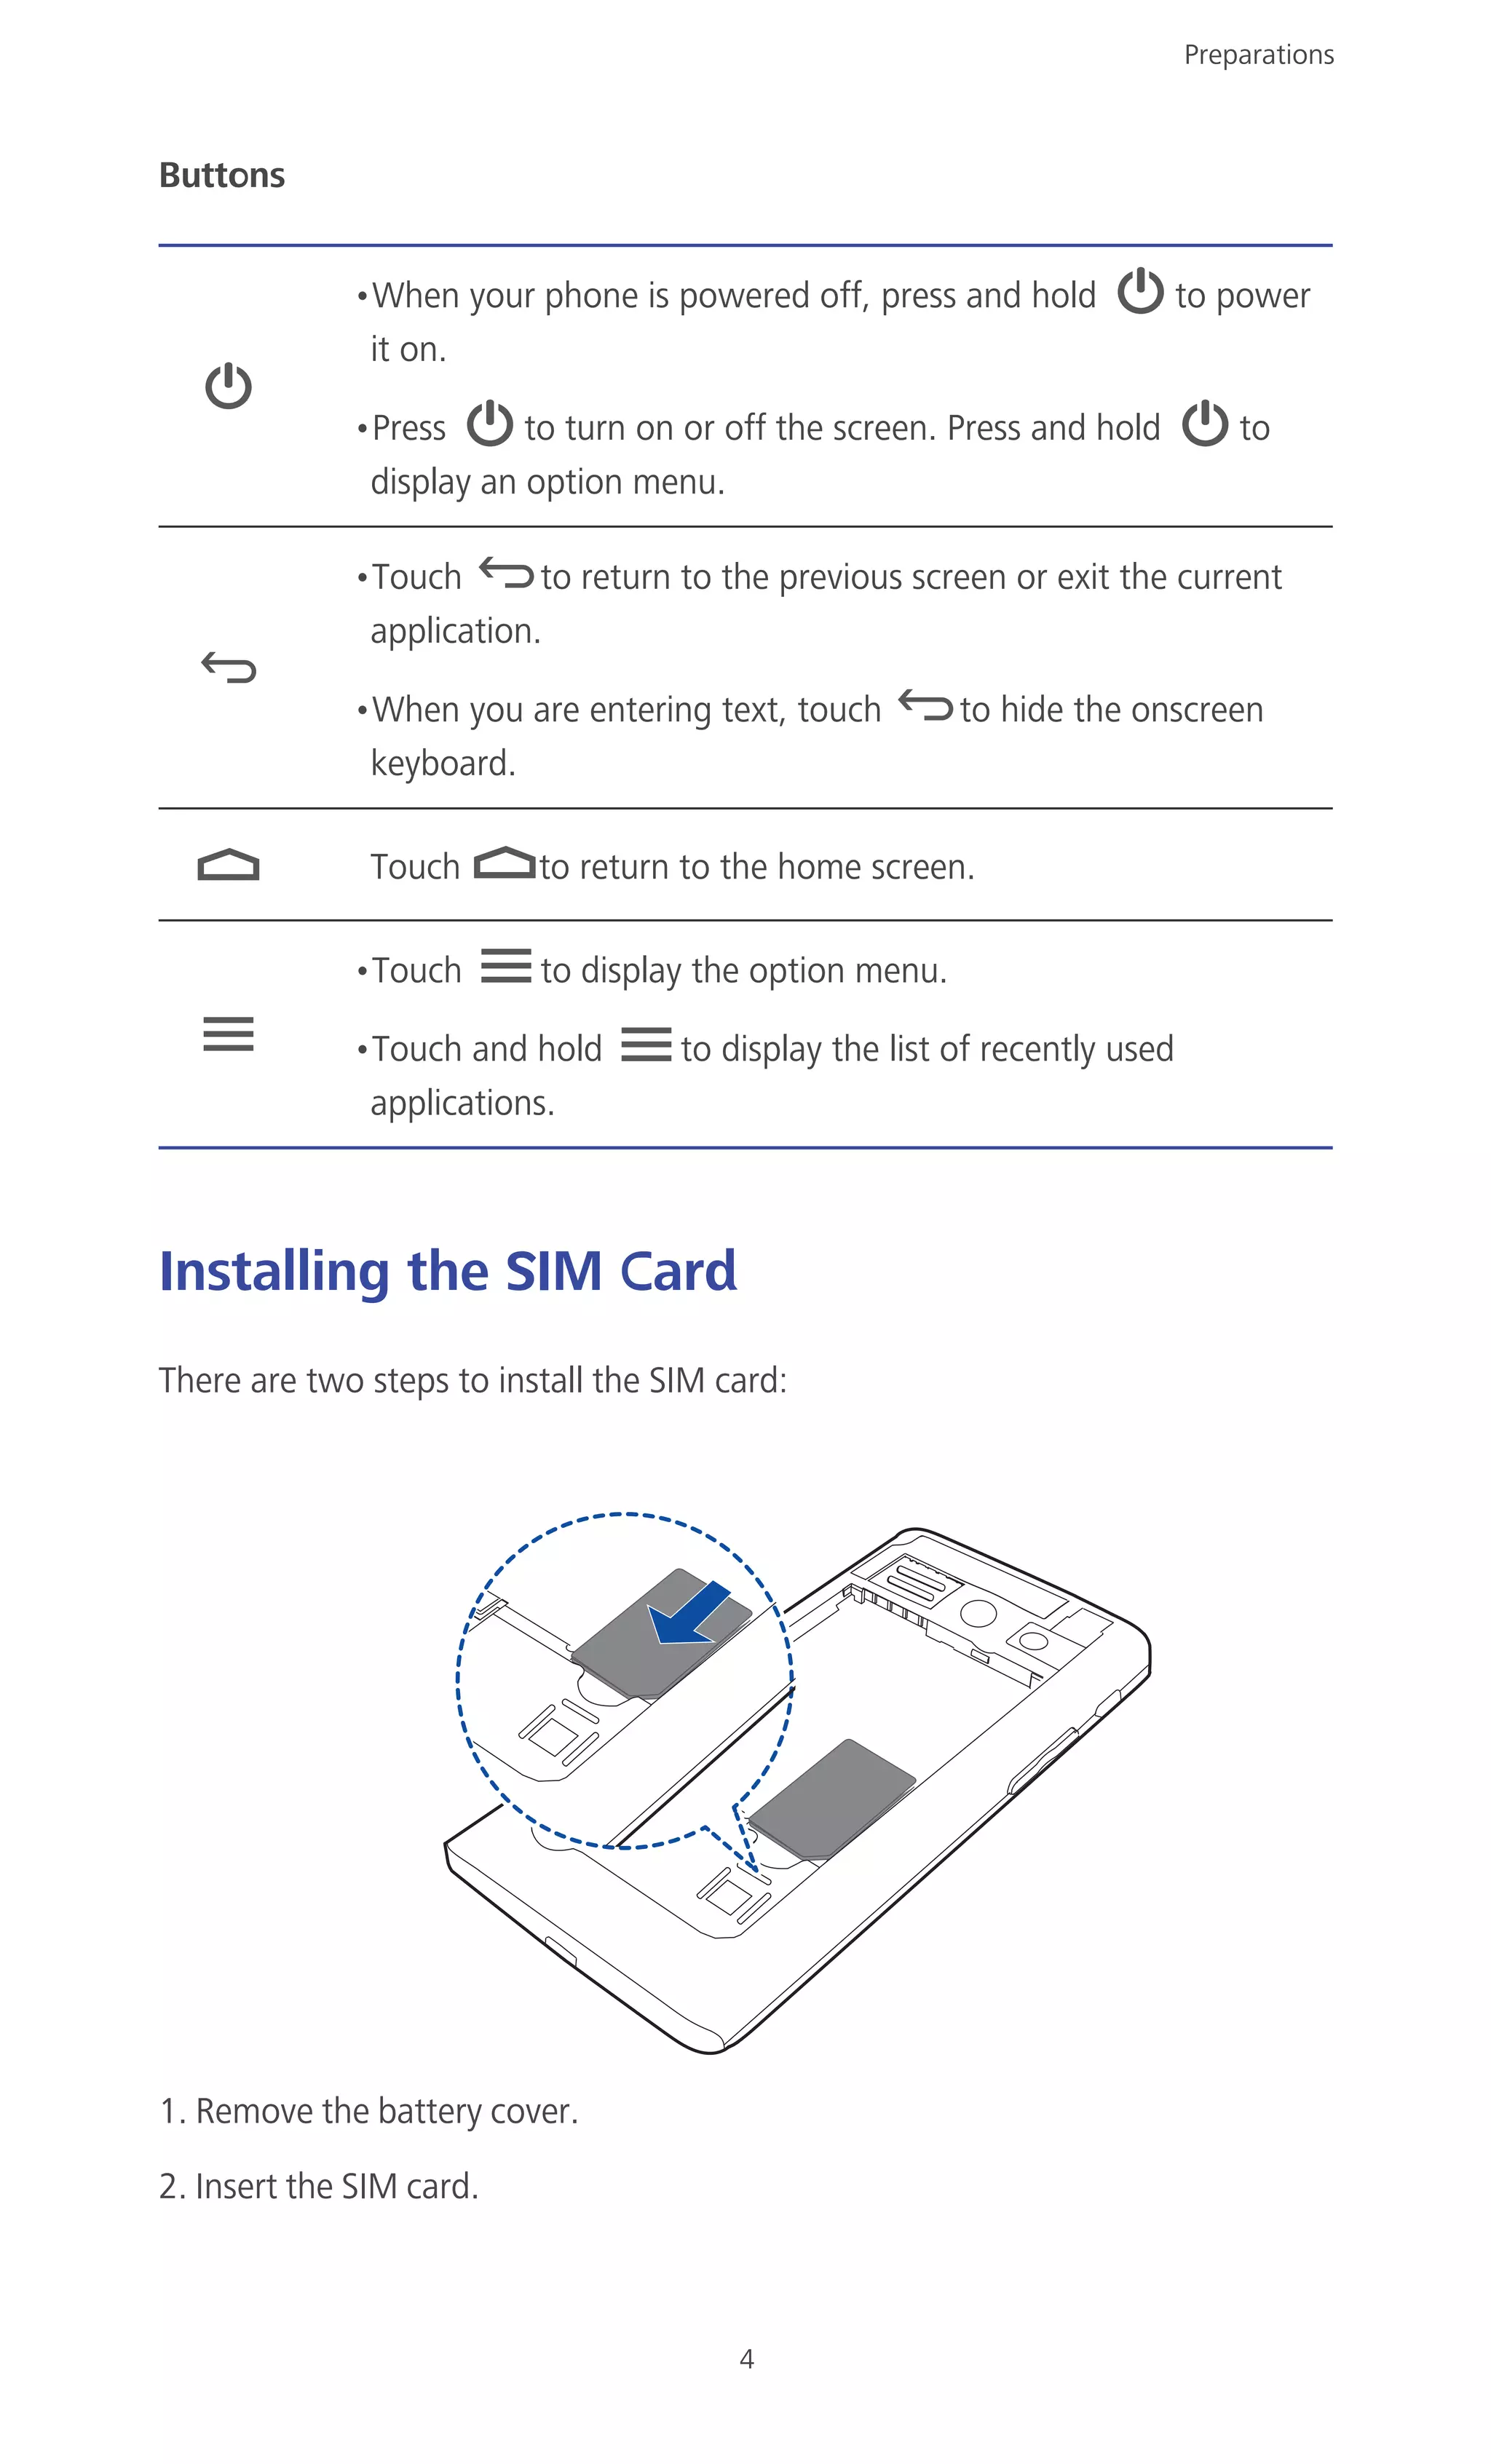
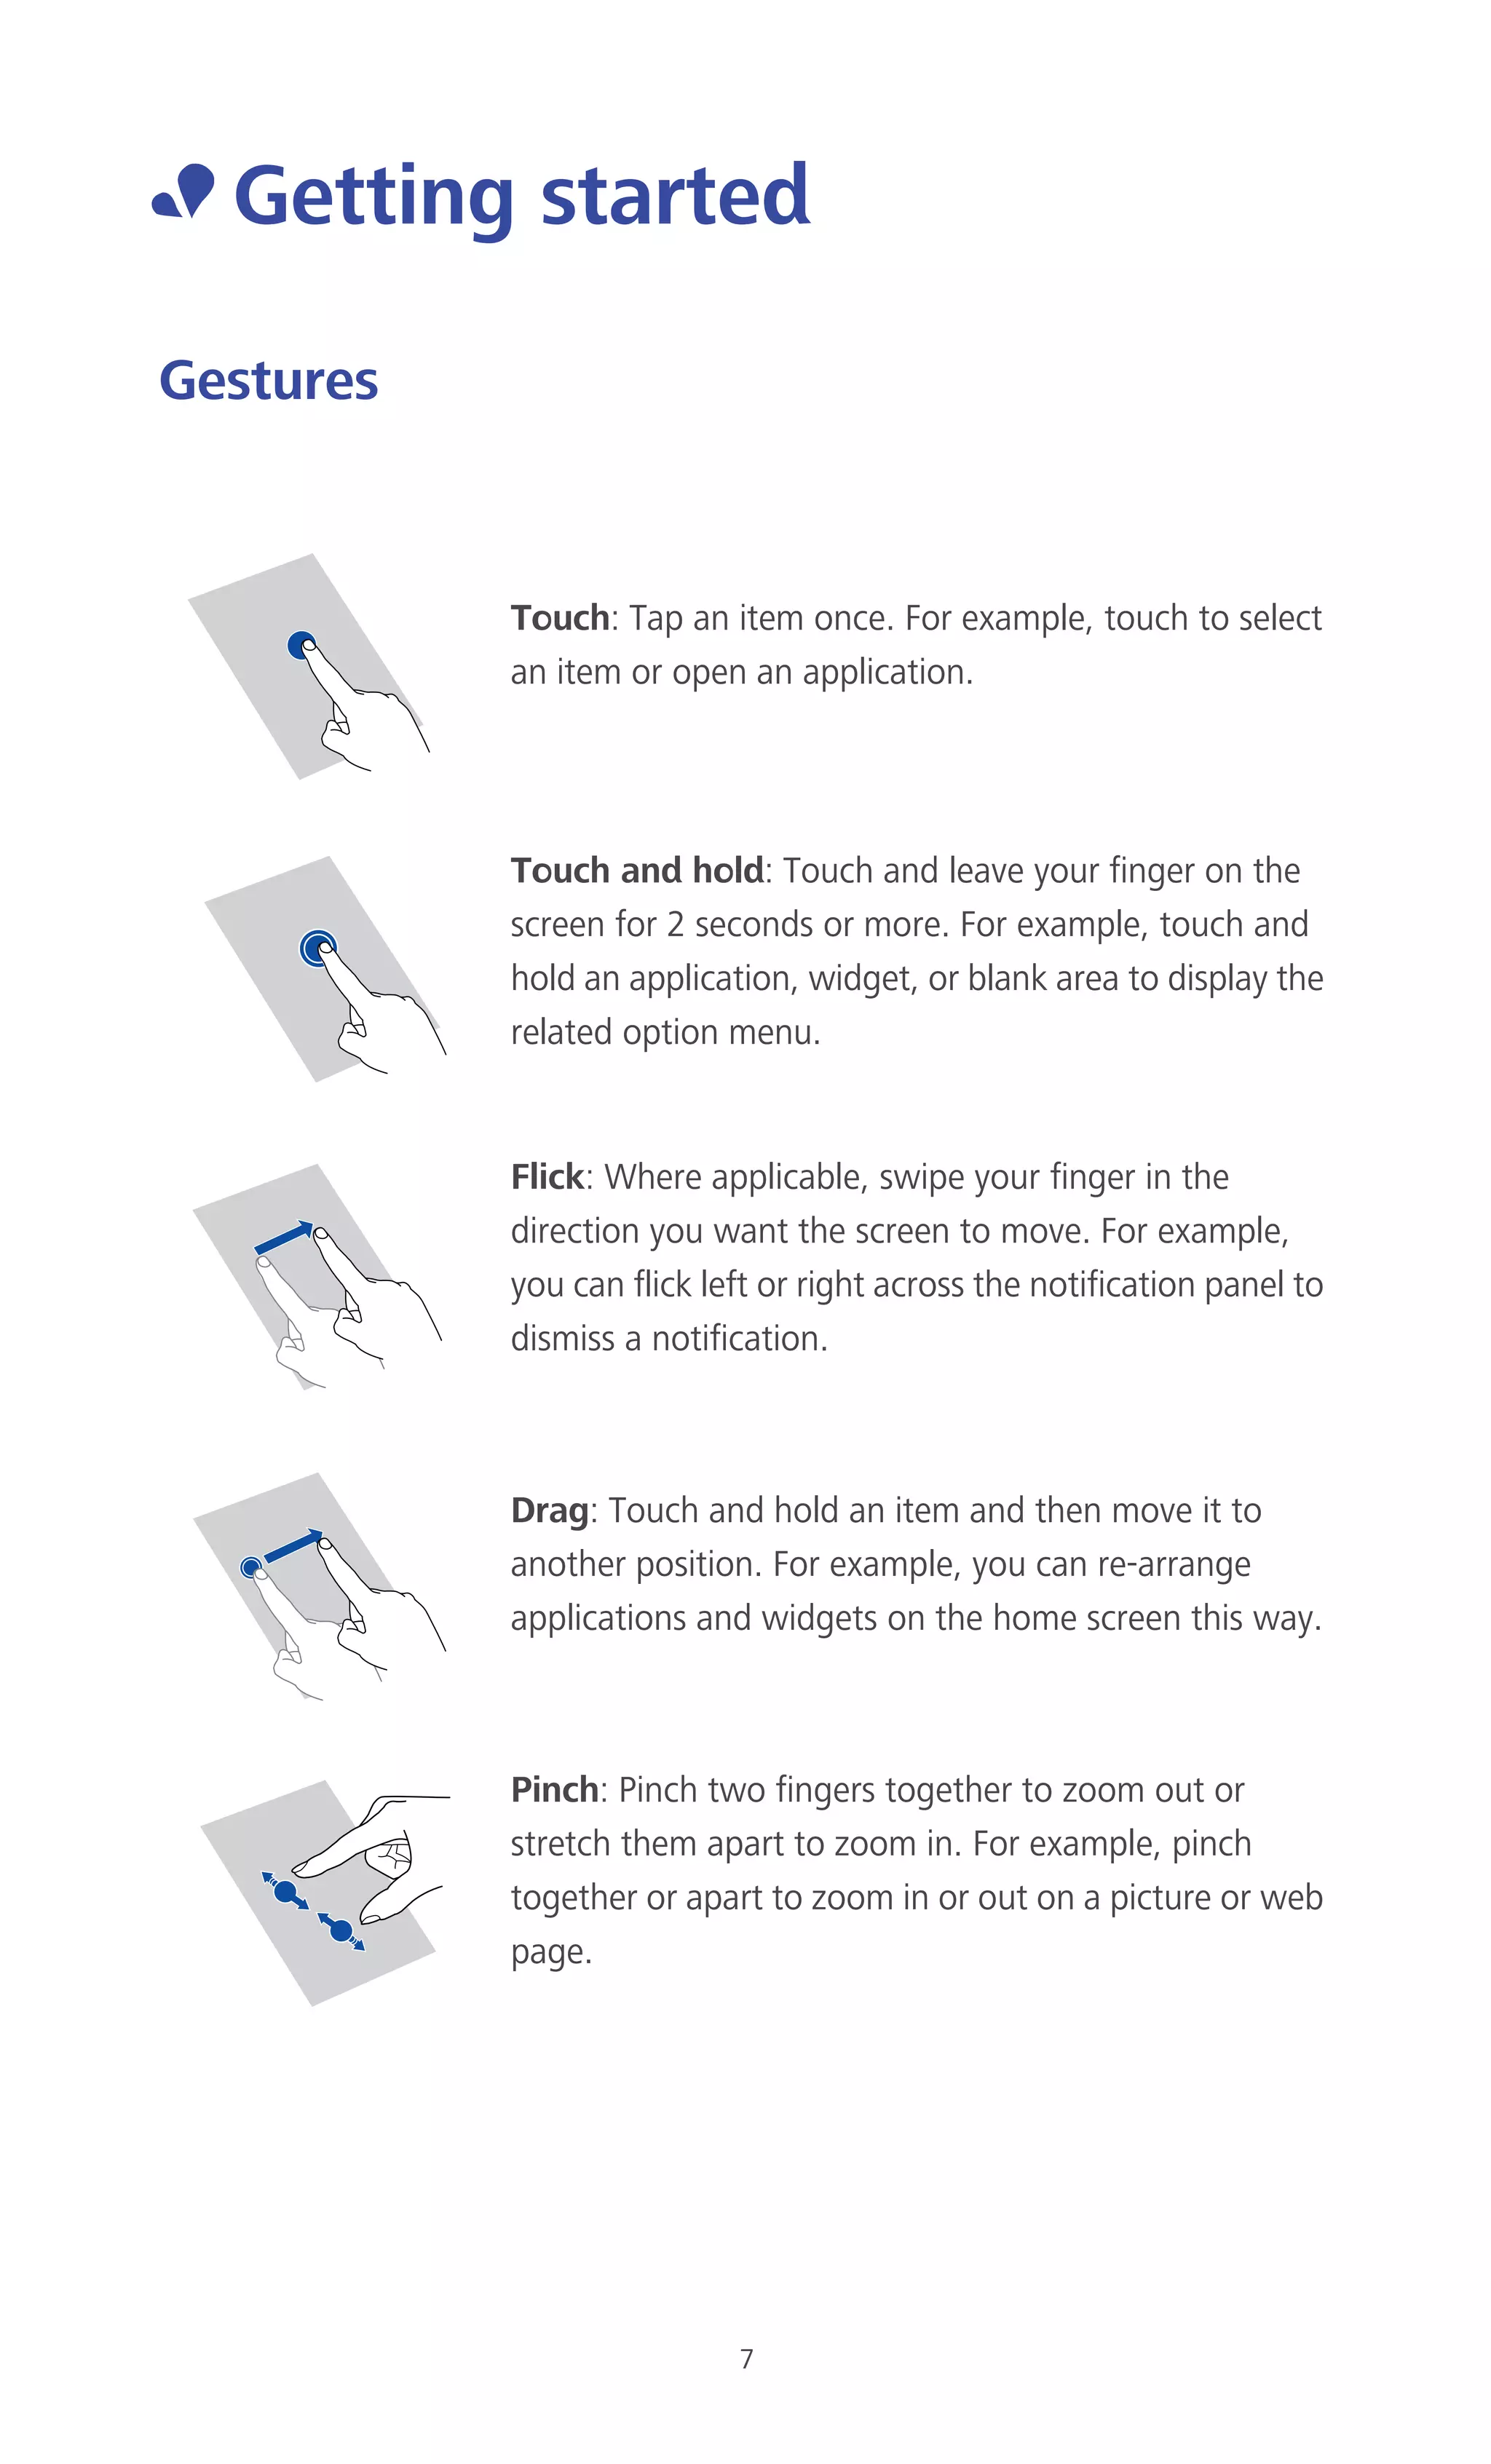
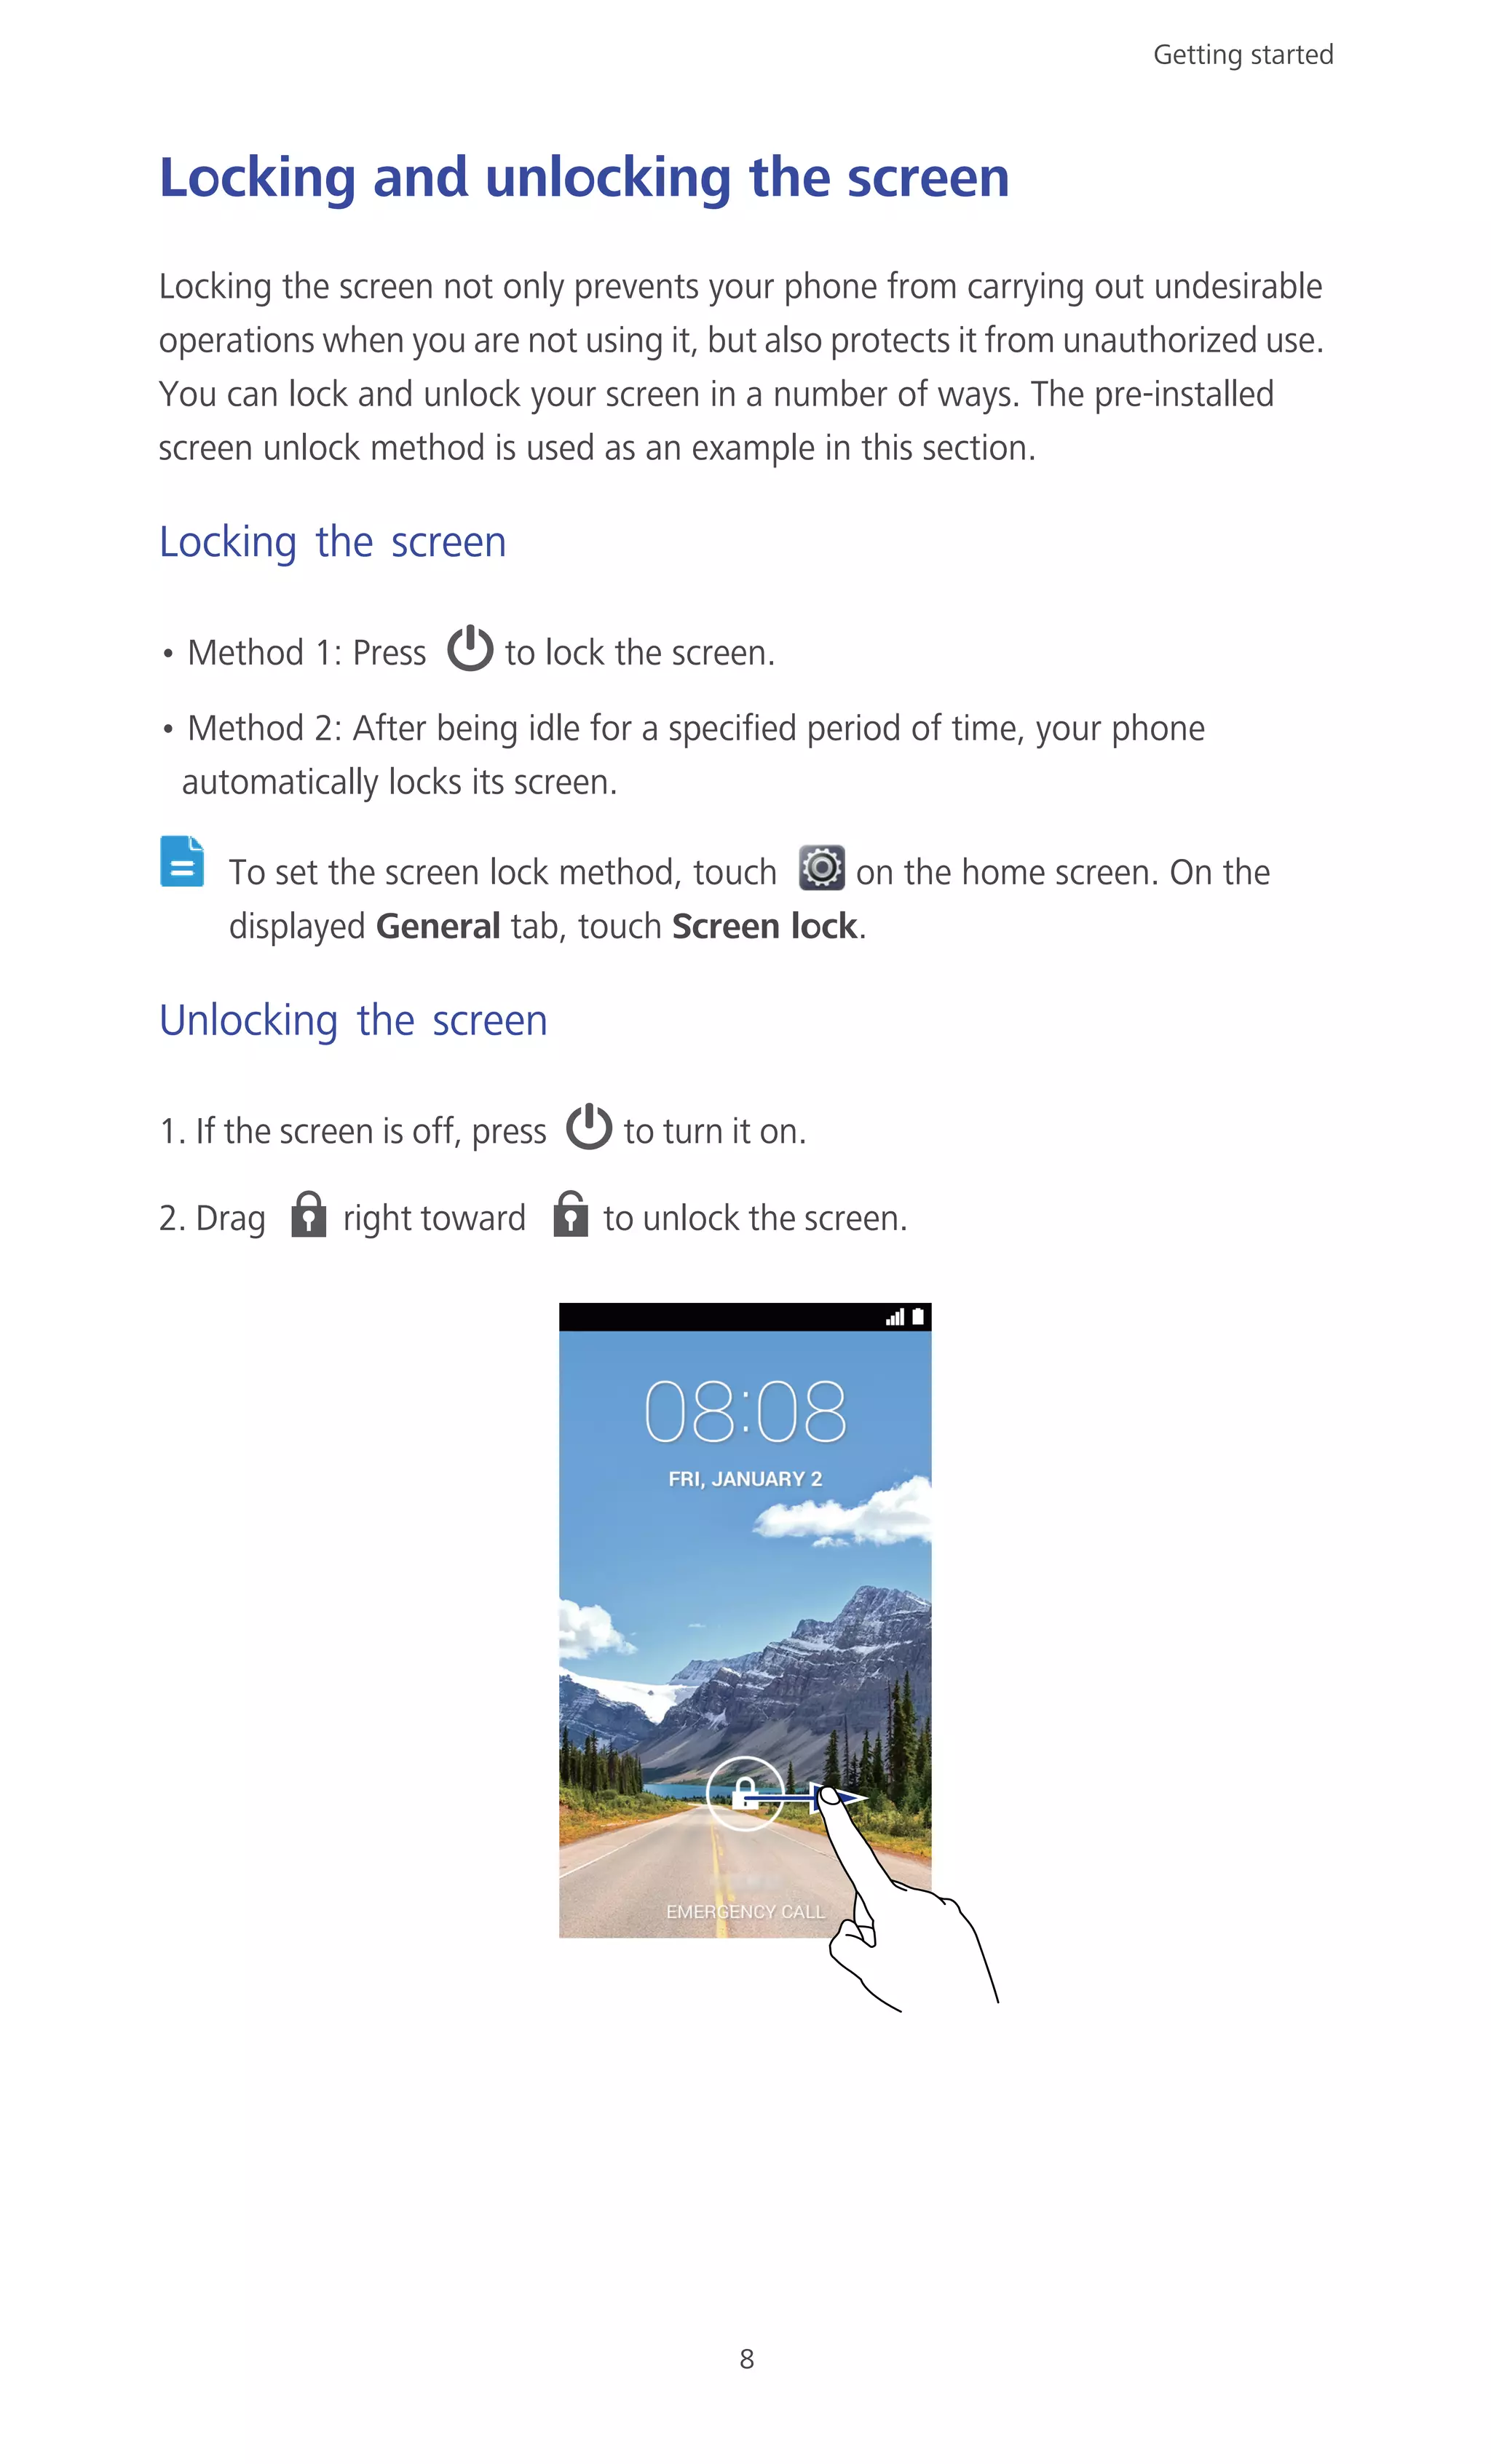
Y530HUAWEI
User Guide
i
• Contents
Foreword .................................................................................. 1
Safety precautions..................................................................... 2
Preparations.............................................................................. 3
Your phone at a glance...............................................................................3
Installing the SIM Card ................................................................................4
Inserting a microSD card .............................................................................5
Charging the battery ...................................................................................5
Important information about the battery.....................................................6
Powering your phone on and off.................................................................6
Getting started.......................................................................... 7
Gestures......................................................................................................7
Locking and unlocking the screen ...............................................................8
Getting to know your home screen .............................................................9
Using the notification panel ......................................................................12
Accessing applications...............................................................................13
Texting......................................................................................................13
Personalizing your phone ........................................................ 17
Changing the home screen style................................................................17
Changing the theme .................................................................................17
Change the wallpaper ...............................................................................17
Setting the home screen transition effect ..................................................17
Organizing home screen widgets and application icons.............................18
Organizing home screen icons using folders..............................................19
Customizing your home screens................................................................19
Setting tones.............................................................................................20
Changing the font size ..............................................................................21
Setting the screen unlock method.............................................................21
Adjusting the screen brightness.................................................................22
Calls........................................................................................ 24
Smart dialing.............................................................................................24
Answering or rejecting a call .....................................................................24
Viewing the call log...................................................................................25
What you can do during a call...................................................................25
Making a conference call ..........................................................................26
Answering a third-party call ......................................................................26
Contents
ii
Making emergency calls............................................................................26
Other call services .....................................................................................27
People..................................................................................... 29
Creating a contact.....................................................................................29
Searching for a contact .............................................................................29
Copying contacts ......................................................................................29
Importing or exporting contacts................................................................30
Adding a contact to your favorites ............................................................31
Deleting contacts ......................................................................................31
Sharing contacts .......................................................................................31
Contact groups .........................................................................................31
Messaging .............................................................................. 34
Sending a text message.............................................................................34
Sending a multimedia message .................................................................34
Replying to a message...............................................................................35
Searching for a message ...........................................................................35
Managing messages..................................................................................35
Modifying message settings ......................................................................36
Browser .................................................................................. 37
Browsing web pages.................................................................................37
Managing bookmarks ...............................................................................37
Setting the home page..............................................................................38
Clearing your browsing history..................................................................38
Modifying browser settings.......................................................................38
Email....................................................................................... 40
Adding a POP3 or IMAP email account......................................................40
Adding an Exchange account....................................................................40
Switching between email accounts............................................................41
Sending emails..........................................................................................41
Checking your emails ................................................................................41
Removing an email account ......................................................................42
Modifying email account settings..............................................................42
Multimedia.............................................................................. 43
Camera .....................................................................................................43
Gallery ......................................................................................................45
Music........................................................................................................47
Internet connection................................................................. 50
Contents
iii
Mobile data connection ............................................................................50
Setting up a Wi-Fi connection ...................................................................50
Sharing your phone's mobile data connection...........................................52
Controlling your data usage ......................................................................53
Sharing data ........................................................................... 55
Bluetooth..................................................................................................55
Connecting your phone to a computer......................................................56
File Manager........................................................................... 58
Creating a folder .......................................................................................58
Searching for a file ....................................................................................58
Copying, cutting, and pasting a file...........................................................58
Compressing or decompressing files..........................................................59
Renaming a file .........................................................................................59
Deleting a file............................................................................................59
Creating a shortcut for a file or folder .......................................................60
Checking the memory status .....................................................................60
Managing applications............................................................ 61
Downloading applications.........................................................................61
Installing an application.............................................................................61
Viewing applications .................................................................................61
Uninstalling an application ........................................................................62
Clearing the application cache...................................................................62
Google services....................................................................... 63
Gmail ........................................................................................................63
Maps.........................................................................................................64
YouTube ...................................................................................................65
Play Store..................................................................................................65
Basic utilities ........................................................................... 66
Calendar ...................................................................................................66
Clock.........................................................................................................67
Calculator..................................................................................................68
Notes........................................................................................................68
Weather....................................................................................................69
FM radio ...................................................................................................70
Accounts and sync .................................................................. 72
Adding an account....................................................................................72
Deleting an account ..................................................................................72
Contents
iv
Turning on data synchronization ...............................................................72
Modifying account synchronization settings..............................................73
Settings................................................................................... 74
Turning on or off airplane mode................................................................74
Tone settings ............................................................................................74
Display settings .........................................................................................75
Setting the date and time..........................................................................75
Changing the system language..................................................................76
Modifying location service settings............................................................76
Setting the PIN of your SIM card ...............................................................76
Restoring factory settings..........................................................................77
Online update ...........................................................................................77
Accessibility...............................................................................................78
FAQs....................................................................................... 79
Legal Notice............................................................................ 81
1
• Foreword
Thank you for choosing the HUAWEI Ascend Y530 smartphone.
This guide introduces you to the features and functions of your new phone and
safety precautions. Please read it carefully before you start using the phone.
All pictures and illustrations in this document are for your reference only. The
actual product may vary.
Symbols and definitions
The following symbols are used in this document.
Note Provides additional information.
Caution
Indicates potential problems that may arise
without the proper care and, if necessary, how to
handle these problems.
2
• Safety precautions
Please read these safety precautions carefully before operating your phone.
Do not crush, throw, or puncture your phone. Avoid dropping,
squeezing, or bending it also.
Your phone is not meant for use in a damp environment, such as the
bathroom. Do not submerge your phone in liquid of any sort and
avoid getting your phone wet.
Avoid using your mobile phone in areas where it may cause
interference or present a hazard. Follow local laws and regulations.
Avoid using your phone while driving. Your safety should always be
your top priority.
Follow any rules or regulations in hospitals and health care facilities.
Power off your phone near any medical apparatus.
Power off your phone in an aircraft. The phone may interfere with
the aircraft's control equipment and navigation system.
Power off your phone near high-precision electronic devices. The
phone may affect the performance of these devices.
Do not attempt to disassemble your phone or its accessories. Only
qualified personnel are allowed to service or repair the phone.
Do not place your phone or its accessories in containers with a
strong electromagnetic field.
Do not place magnetic storage media near your phone. Radio waves
from the phone may erase the information stored on them.
Do not expose your phone to extreme temperatures or use it at a
location with flammable materials, such as a gas station.
Keep your phone and its accessories away from children. Do not
allow young children to use your phone without adult supervision.
Use only approved batteries and chargers to avoid the risk of
explosions.
Observe any laws or regulations on the use of wireless devices.
Respect the privacy and legal rights of others when using your
phone.
To prevent damage to your phone or your computer, follow all
instructions pertaining to the USB cable.
3
• Preparations
Your phone at a glance
Headset jack Earpiece
Status indicator Power button
Volume button Back
Home Menu
Microphone Micro USB port
Flashlight Rear camera
Speaker Front camera
1
2
3
4
5
6 7 8
1314 12 11
9 10
1 2
3 4
5 6
7 8
9 10
11 12
13 14
Preparations
4
Buttons
Installing the SIM Card
There are two steps to install the SIM card:
1. Remove the battery cover.
2. Insert the SIM card.
•When your phone is powered off, press and hold to power
it on.
•Press to turn on or off the screen. Press and hold to
display an option menu.
•Touch to return to the previous screen or exit the current
application.
•When you are entering text, touch to hide the onscreen
keyboard.
Touch to return to the home screen.
•Touch to display the option menu.
•Touch and hold to display the list of recently used
applications.
Preparations
5
Inserting a microSD card
You can expand your phone's storage capacity with a microSD card. Follow the
operations in the figure below to install a microSD card.
To remove a microSD card:
1. On the home screen, touch then the All tab.
2. Under DEVICE, touch More... > Storage.
3. Touch Unmount SD card.
4. Carefully take out the microSD card.
Charging the battery
Use the provided USB cable and power adapter to connect your phone to a
power outlet, or use the USB cable itself to connect your phone to a computer.
Preparations
6
Important information about the battery
• If the battery power is depleted, you may not be able to power on your phone
immediately after you begin charging the battery. This is normal. Allow the
battery to charge for a few minutes before attempting to power on your
phone.
• Rechargeable batteries have a limited number of charge cycles and may
eventually need to be replaced. When the battery life becomes noticeably
shorter, replace the battery.
• The time required to fully charge the battery depends on the ambient
temperature and age of the battery.
• If your phone is very low on power, it plays an alert tone and displays a
message. If the battery level is extremely low, your phone automatically powers
off.
Powering your phone on and off
• To power on your phone, press and hold .
• To power off your phone, press and hold to display an option menu, and
then touch Power off.
7
• Getting started
Gestures
Touch: Tap an item once. For example, touch to select
an item or open an application.
Touch and hold: Touch and leave your finger on the
screen for 2 seconds or more. For example, touch and
hold an application, widget, or blank area to display the
related option menu.
Flick: Where applicable, swipe your finger in the
direction you want the screen to move. For example,
you can flick left or right across the notification panel to
dismiss a notification.
Drag: Touch and hold an item and then move it to
another position. For example, you can re-arrange
applications and widgets on the home screen this way.
Pinch: Pinch two fingers together to zoom out or
stretch them apart to zoom in. For example, pinch
together or apart to zoom in or out on a picture or web
page.
Getting started
8
Locking and unlocking the screen
Locking the screen not only prevents your phone from carrying out undesirable
operations when you are not using it, but also protects it from unauthorized use.
You can lock and unlock your screen in a number of ways. The pre-installed
screen unlock method is used as an example in this section.
Locking the screen
• Method 1: Press to lock the screen.
• Method 2: After being idle for a specified period of time, your phone
automatically locks its screen.
To set the screen lock method, touch on the home screen. On the
displayed General tab, touch Screen lock.
Unlocking the screen
1. If the screen is off, press to turn it on.
2. Drag right toward to unlock the screen.
Getting started
9
Getting to know your home screen
Your home screens are where you'll find your favorite widgets and all your
applications. We did away with the application list to give you a more convenient
and direct path to your applications. The default home screen is shown below.
Status icons
Status bar: displays notifications and icons. Flick down from the
status bar to open the notification panel.
Screen position indicator: shows the current screen's position.
Dock: displays your most common applications.
Signal strength No signal
GPRS network connected
Enhanced Data Rates for
GSM Evolution (EDGE)
network connected
3
1
2
1
2
3
GG EE
Getting started
10
3G network connected
High Speed Packet
Access (HSPA) network
connected
Roaming Airplane mode enabled
Bluetooth on
Receiving location data
from GPS
Vibration mode enabled Silence mode enabled
Alarms enabled Charging
Battery full Battery low
Call in progress Missed calls
New messages New emails
New voicemails Select input method
Wi-Fi network available
Connected to a Wi-Fi
network
Uploading data Downloading data
Phone memory full Upcoming events
No SIM card found
Sign-in or
synchronization problem
Synchronizing data Synchronization failed
Portable Wi-Fi hotspot
on
More notifications
Connected to a VPN Headset plugged in
3G3G HH
Getting started
11
Switching between home screens
Running out of space on the home screen? Not to worry. Your phone lets you
create more home screens for various application icons and widgets.
• Flick left and right across the screen to switch between the home screens.
• Pinch two fingers together to display the home screen thumbnails. Touch a
thumbnail to enter that particular home screen.
Taking a screenshot
Want to share an interesting scene in a movie or show off your new high score
in a game? Take a screenshot and share away.
Connected to a
computer
USB tethering on
Getting started
12
Press and the volume down button simultaneously to take a screenshot.
Then, open the notification panel and touch to share the screenshot.
Screenshots are saved to the Screenshots album in Gallery.
Auto-rotate screen
Your phone features a tilt sensor. If you rotate your phone when browsing a web
page or viewing a photo, the orientation of your screen will automatically
change to landscape or portrait view. You'll also be able to enjoy tilt sensor-
based applications, such as racing games.
To quickly turn the auto-rotate screen function on or off, flick down from the
status bar to open the notification panel and touch .
Using the notification panel
Flick down from the status bar to open the notification panel.
Touch to delete all notifications.
Touch to display the settings screen.
Touch the switch shortcuts on the notification panel to turn on or
off the functions.
1
2
3
4
1
2
3
Getting started
13
Accessing applications
Starting applications and switching between them
On the home screen, touch an application icon to open it.
To switch to another application, touch to return to the home screen, and
touch the icon of the application you want to open.
Viewing recently used applications
To display the list of recently used applications, touch and hold . You can
then:
• Touch an application to start it.
• Flick left or right across an application to dismiss it.
• Touch to clear the list.
Texting
Your phone comes with multiple text input methods. You can quickly enter text
using the onscreen keyboard.
• Touch a text box to bring up the onscreen keyboard.
• To hide the onscreen keyboard, touch .
Selecting an input method
1. On the text input screen, flick down from the status bar to open the
notification panel.
2. Touch to select an input method.
To change your phone's default input method, touch on the home
screen. Then touch the All tab. Under PERSONAL, touch Language &
input > Default to select an input method.
Touch an application to start it and flick left or right across a
notification to dismiss it.
4
Getting started
14
Huawei input method
Slide your finger left or right across the onscreen keyboard to switch between
the QWERTY and 9-key keyboards.
Touch to switch between lowercase letters, uppercase letters,
and caps lock.
Touch to enter numbers and symbols.
Touch to enter emoticons.
Touch to switch the input language.
When you are typing in English, touch to switch between
QWERTY and 9-key keyboards.
3
1
2
45
1
A
2 *#12
3
4
5
Getting started
15
Android Input Method
•Touch to switch between lowercase and uppercase letters.
•Touch and hold or quickly touch twice to turn on caps lock.
Touch to enter numbers.
•Touch to switch to voice input.
•Touch and hold to open the Input options menu.
•Touch to enter a space.
•Touch and hold to switch to another input method.
•Touch to enter a period.
•Touch and hold to enter symbols.
•Touch to delete the character to the left of the cursor.
•Touch and hold to delete all characters to the left of the cursor.
1
2 3 4 5
6
1
2 ?123
3
4
...
...
5
6
Getting started
16
Editing text
Learn how to select, cut, copy, and paste text on your phone.
• Select text: Touch and hold the text to bring up . Then drag and
to select more or less text, or touch Select all to select all text in a text
box.
• Cut text: Select text and touch Cut.
• Copy text: Select text and touch Copy.
• Paste text: Touch where you want to insert the text, drag to move the
insertion point, and touch Paste to paste the text you copied or cut.
Configuring an input method
1. On the home screen, touch then the All tab.
2. Under PERSONAL, touch Language & input.
3. Under KEYBOARD & INPUT METHODS, touch the input method you want
to configure.
17
• Personalizing your phone
Changing the home screen style
Your phone supports the standard and simple home screen styles.
1. On the home screen, touch .
2. Under All, touch Home screen style.
3. Choose Standard or Simple and touch APPLY.
Changing the theme
1. On the home screen, touch .
2. Select a theme and touch APPLY.
Change the wallpaper
1. On the home screen, touch and hold a blank area to display the Set home
screen dialog box.
2. Touch Wallpapers.
3. From the Wallpaper screen, you can set the following items:
• Lock screen wallpaper: Set the wallpaper displayed on the phone lock
screen.
• Home screen wallpaper: Set the home screen wallpaper.
• Shake to change: Change the home screen wallpaper by shaking your
phone.
• Random change: The home screen wallpaper changes randomly.
Setting the home screen transition effect
1. On the home screen, touch and hold a blank area to display the Set home
screen dialog box.
Personalizing your phone
18
2. Touch Transitions.
3. Select a home screen transition effect.
Organizing home screen widgets and
application icons
Adding a widget to the home screen
1. On the home screen, touch and hold a blank area to display the Set home
screen dialog box.
2. Touch Widgets.
3. Drag a widget from the screen's lower section to a screen thumbnail.
4. Touch to return to the home screen.
If the home screen doesn't have enough space, your phone will
automatically create a new home screen to the original's right and place the
widget on the new home screen.
Deleting an application icon or widget
On the home screen, touch and hold the application icon or widget you want to
delete until is displayed. Drag the unwanted application icon or widget to
to delete it.
Deleting an application icon uninstalls the application. When you delete an
application icon, your phone prompts you to confirm the action. Touch OK
to uninstall the application.
Moving an application icon or widget
You can re-arrange application icons and widgets to any fitting empty space on
the home screen.
Personalizing your phone
19
Organizing home screen icons using folders
Creating a folder on the home screen
1. On the home screen, drag an item onto another one to create a folder
containing both of them.
2. You can then:
• Touch the folder name to rename it.
• Touch and add more items to the folder.
Removing an item from a folder
1. On the home screen, touch a folder.
2. Drag an item out from the folder to remove the item.
A folder must contain at least two items; otherwise, the folder will automatically
disappear.
Customizing your home screens
Re-arranging home screens
1. On a home screen, touch and hold a blank area to display the Set home
screen dialog box.
2. Touch Thumbnails.
3. Touch and hold a home screen thumbnail until your phone vibrates, and drag
it to the new location.
Adding a home screen
1. On a home screen, touch and hold a blank area to display the Set home
screen dialog box.
2. Touch Thumbnails.
3. Touch to add a home screen.
Personalizing your phone
20
Deleting a home screen
Only blank home screens can be deleted.
1. On a home screen, touch and hold a blank area to display the Set home
screen dialog box.
2. Touch Thumbnails.
3. Touch to delete a home screen.
Setting tones
Setting the ringtone
1. On the home screen, touch then the All tab.
2. Under DEVICE, touch Sound.
3. Touch Phone ringtone and select either of the following options from the
displayed dialog box:
• Ringtone: choose from the default selection.
• Music: choose from the audio files you have saved to your phone.
4. Touch Apply.
Setting notification tones
1. On the home screen, touch then the All tab.
2. Under DEVICE, touch Sound.
3. Touch Notification tone.
4. Select a tone type.
You can configure the email notification tone only after you have set up an
email account.
5. Select a tone.
6. Touch Apply.
Personalizing your phone
21
Changing the font size
1. On the home screen, touch then the All tab.
2. Under DEVICE, touch Display.
3. Touch Font size and select a font size.
Setting the screen unlock method
Face unlock
1. On the home screen, touch then the All tab.
2. Under PERSONAL, touch Security.
3. Touch Screen lock > Face Unlock.
4. Follow the onscreen instructions to take a photo of your face.
Your phone will use face unlock as the primary unlock method.
5. Set a secondary unlock method.
If face unlock cannot recognize you (dim light, for example), follow the onscreen
instructions to unlock your phone using the secondary unlock method.
To turn off face unlock, use the secondary unlock method to enter the Screen
lock screen, and select another unlock method.
Unlocking the screen with a pattern
1. On the home screen, touch then the All tab.
2. Under PERSONAL, touch Security.
3. Touch Screen lock > Pattern.
4. Follow the onscreen instructions to set a screen unlock pattern.
If you draw incorrect patterns five consecutive times, the screen stops
responding to further unlock attempts for 30 seconds. You will still be able
to make emergency calls during this time.
Personalizing your phone
22
Unlocking the screen with a PIN
1. On the home screen, touch then the All tab.
2. Under PERSONAL, touch Security.
3. Touch Screen lock > PIN.
4. Follow the onscreen instructions to set a screen unlock PIN.
After a PIN is set, you will have to enter it every time you want to unlock the
phone screen.
If you enter incorrect PINs five consecutive times, the screen stops
responding to further unlock attempts for 30 seconds. You will still be able
to make emergency calls during this time.
Unlocking the screen with a password
1. On the home screen, touch then the All tab.
2. Under PERSONAL, touch Security.
3. Touch Screen lock > Password.
4. Follow the onscreen instructions to set a screen unlock password.
5. Repeat the password and touch OK.
After a password is set, you will have to enter it every time you want to unlock
the phone screen.
If you enter incorrect passwords five consecutive times, the screen stops
responding to further unlock attempts for 30 seconds. You will still be able
to make emergency calls during this time.
Adjusting the screen brightness
1. On the home screen, touch then the All tab.
2. Under DEVICE, touch Display.
3. Touch Brightness.
4. In the displayed dialog box, perform either of the following operations:
• Select the Automatic brightness check box to have your phone
automatically adjust its screen brightness based on the ambient light.
Personalizing your phone
23
• Drag the slider left to reduce the screen brightness or drag it right to increase
the screen brightness.
24
• Calls
Smart dialing
In addition to standard call procedures, smart dialing lets you quickly find
contacts by entering parts of their names or numbers.
1. On the home screen, touch .
2. Enter a phone number or the initials or first several letters of a contact name.
Matching contacts in your phone and phone numbers in your call log are then
displayed in a list.
3. From the list, select the contact you want to call.
4. To end the call, touch .
Answering or rejecting a call
When a call comes in, you can press the volume button to mute the
ringtone.
• Drag right to answer the call.
• Drag left to reject the call.
• Drag up to reject the call and send the caller a message.
On the dialer screen, touch > Call settings > Quick responses to edit
the message that will be sent.
Calls
25
Viewing the call log
1. On the home screen, touch to display your recent calls above the dialer.
2. Touch > Missed calls to view your missed calls.
What you can do during a call
Touch > to place the current call on hold, and touch
again to resume the call.
Touch > to start a three-way call. Before you use three-
way calling, make sure you have subscribed to this service. For
details, contact your service provider.
Touch to use the speakerphone.
Touch to mute or unmute the microphone.
Touch to end the call.
Touch to display the dialer.
2
3
5
64
1
7
8
1
2
3
4
5
6
Calls
26
To return to the call screen, flick down from the status bar to open the
notification panel, and touch Current call.
Making a conference call
Conference calling with your friends, family, and co-workers is easy. Make or
answer a call, and dial another number to add the second participant to your
conference call.
Before you make a conference call, make sure you have subscribed to the
service. For details, contact your service provider.
1. Call the first participant.
2. When the call is connected, touch > to call the second participant.
The first participant will be placed on hold.
3. When the second call is connected, touch to start a conference call.
4. To add more people to the call, repeat steps 2 and 3.
5. Touch to end the call.
Answering a third-party call
Before you answer a third-party call, make sure you have turned on call waiting.
1. If a call comes in when you are already in another call, drag right to
answer the new call and place the first call on hold.
2. To switch between the two calls, touch .
Making emergency calls
In the event of an emergency, you will still be able to make emergency calls
without the use of a SIM card. However, you must still be under the coverage
area.
Touch > to display a note.
Touch > to display the contact list.
7
8
Calls
27
1. On the home screen, touch .
2. Enter your local emergency number and touch .
Emergency calls are subject to cellular network quality, use environment,
service provider policies, and local laws and regulations. Never rely solely on
your phone for critical communications when emergencies occur.
Other call services
Your phone also supports other call functions, such as call forwarding, call
waiting, and voicemail. Before you use these functions, make sure you have
subscribed to these services. For details, contact your service provider.
Enabling call forwarding
Too busy to answer all your calls with one phone? Forward them to another
number and never miss an important call again!
1. On the home screen, touch then the All tab.
2. Under APPS, touch Call.
3. Touch Call forwarding.
4. Select a forwarding mode.
5. Enter the phone number to which you want to forward calls, and touch
Enable.
Enabling call waiting
The call waiting function lets you answer another incoming call when you are
already busy in a call and switch between the two calls.
1. On the home screen, touch then the All tab.
2. Under APPS, touch Call.
3. Touch Additional settings.
4. Touch Call waiting to enable call waiting.
Calls
28
Setting up your voicemail
Voicemail is your personal storage for missed calls, including the calls missed
when you are in another call or your phone is powered off.
Before you use voicemail, make sure you have subscribed to the voicemail
service and obtained your voicemail number. For details, contact your
service provider. You must also enable call forwarding and set all incoming
calls to be forwarded to your voicemail.
1. On the home screen, touch then the All tab.
2. Under APPS, touch Call.
3. Touch Voicemail > Voicemail settings > Voicemail number.
4. Enter your voicemail number, and touch OK.
To listen to your voicemail messages, touch and hold the 1 key on the dialer and
follow the voice instructions.
29
• People
Forget about lugging around business card holders. You can now easily store
and manage your contacts.
Creating a contact
1. On the home screen, touch then the Contacts tab.
2. Touch .
3. Select an account.
4. Enter the contact name, phone number, and other details. Touch Add
another field to enter more information.
5. Touch DONE to save the contact.
Searching for a contact
1. On the home screen, touch then the Contacts tab.
2. Touch the search box.
3. Enter the contact name or initials.
Matching results are displayed as you type.
For example, to search for John Doe, enter John Doe or JD.
Copying contacts
1. On the home screen, touch then the Contacts tab.
2. Touch > Manage contacts > Copy contacts.
3. From the displayed option menu, select the location where the contacts you
want to copy are saved.
4. Touch the contacts you want to copy or touch All to select all contacts.
5. Touch COPY and select the account to which you want to paste the contacts.
People
30
Importing or exporting contacts
Your phone supports contact files in .vcf format only. This is a standard format
for files storing contacts. Contact names, addresses, phone numbers, and other
information can be saved in .vcf files.
Importing contacts from a storage device
You can import contacts saved in a .vcf file from a storage device to your phone.
1. On the home screen, touch then the Contacts tab.
2. Touch > Manage contacts > Import from storage.
3. Select one or more .vcf files.
4. Touch OK.
Importing contacts from a Bluetooth device
You can import contacts saved in a .vcf file from a Bluetooth device to your
phone.
1. On the home screen, touch then the Contacts tab.
2. Touch > Manage contacts > Import via Bluetooth.
Your phone then enables Bluetooth and searches for available Bluetooth
devices.
3. Touch the Bluetooth device with which you want to pair your phone.
When the two devices are paired, your phone automatically imports contacts
from the other device.
Exporting contacts
Back up your contacts to an external storage device to avoid losing them during
a system upgrade or by mistake.
1. On the home screen, touch then the Contacts tab.
2. Touch > Manage contacts > Export to storage.
A dialog box is then displayed, showing the exported .vcf file name and its
save location.
3. Touch OK.
People
31
To view the .vcf file you just exported, open File Manager. The file is displayed
in the root directory of your phone's internal storage.
Adding a contact to your favorites
1. On the home screen, touch then the Favorites tab.
2. Touch .
3. Touch the contact you want to add to favorites or touch All to select all
contacts.
4. Touch ADD.
Deleting contacts
1. On the home screen, touch then the Contacts tab.
2. Touch > Delete contacts.
3. Touch the contacts you want to delete or touch All to select all contacts.
4. Touch DELETE.
5. Touch OK.
Sharing contacts
You can share contacts in .vcf format in many ways.
1. On the home screen, touch then the Contacts tab.
2. Touch > Share contacts.
3. Touch the contacts you want to share or touch All to select all contacts.
4. Touch SHARE and choose a sharing method from the displayed option menu.
Contact groups
You can create a contact group and send a message or email to all group
members simultaneously.
People
32
Creating a contact group
1. On the home screen, touch then the Groups tab.
2. Touch .
3. Name the contact group.
4. Touch Add members.
5. Select one or more contacts.
6. Touch ADD MEMBERS.
7. Touch DONE.
Editing a contact group
1. On the home screen, touch then the Groups tab.
2. Touch and hold the contact group you want to edit.
3. From the displayed option menu, choose Edit.
4. Rename the group or manage group members.
5. Touch DONE.
Sending messages or emails to a contact group
1. On the home screen, touch then the Groups tab.
2. Touch and hold the contact group you want to send a message or email to.
3. From the displayed option menu, choose Send message or Send email.
You can also open the contact group and touch to send a message or
to send an email.
Deleting a contact group
1. On the home screen, touch then the Groups tab.
2. Touch and hold the contact group you want to delete.
3. From the displayed option menu, choose Delete.
@
People
33
Deleting a contact group will not remove the contacts in the group from
your phone.
34
• Messaging
Sending a text message
1. On the home screen, touch .
2. In the list of message threads, touch .
3. Touch the recipient text box and enter the contact name or phone number.
Touch to select more contacts.
4. Write your message.
5. Touch Send.
Sending a multimedia message
Make sure your data service is on before trying to send multimedia messages.
1. On the home screen, touch .
2. In the list of message threads, touch .
3. Touch the recipient text box and enter the contact name or phone number.
Touch to select more contacts.
4. Touch > Add subject and enter the message subject.
5. Write your message.
6. Touch , select the attachment type, and attach a file.
To attach more than one files to the message, touch Slideshow.
7. Touch Send.
Messaging
35
Replying to a message
1. On the home screen, touch .
2. In the list of message threads, touch a contact name or phone number to view
the conversation thread.
3. Touch the text field to write your reply.
4. Touch Send.
Searching for a message
1. On the home screen, touch .
2. In the list of message threads, touch > Search.
3. Enter the message or contact, or parts of them.
Your phone then displays matching results.
Managing messages
Copying a message
1. On the home screen, touch .
2. In the list of message threads, touch a contact name or phone number to view
the conversation thread.
3. Touch and hold the message you want to copy.
4. From the displayed option menu, choose Copy text.
5. Touch and hold the area you want to paste the message and choose Paste
from the displayed option menu.
Forwarding a message
1. On the home screen, touch .
2. In the list of message threads, touch a contact name or phone number to view
the conversation thread.
3. Touch and hold the message you want to forward.
Messaging
36
4. From the displayed option menu, choose Forward.
5. Touch the recipient text box and enter the contact name or phone number.
Touch to select more contacts.
6. Touch Send.
Deleting a message
1. On the home screen, touch .
2. In the list of message threads, touch a contact name or phone number to view
the conversation thread.
3. Touch and hold the message you want to delete and touch Delete.
Deleting a thread
1. On the home screen, touch .
2. In the list of message threads, touch and hold the thread you want to delete.
3. From the displayed option menu, choose Delete messages.
Modifying message settings
1. On the home screen, touch .
2. In the list of message threads, touch .
3. Touch Settings.
4. Change the message tone, manage SIM card messages, and more.
37
• Browser
Your phone's browser lets you surf the web and stay on the ball with up-to-date
news and information. Staying connected has never been easier.
Browsing web pages
1. On the home screen, touch .
2. Enter a website address in the address box.
Your phone displays matching websites as you type.
3. Touch the website you want to visit.
Managing bookmarks
Bookmarks let you keep track of your favorite websites.
Adding a bookmark
1. On the home screen, touch .
2. On the Browser screen, open the web page you want to add as a bookmark.
3. Touch > Save to bookmarks.
4. Name the bookmark or use the default name. Then, touch OK.
Accessing a bookmark
1. On the home screen, touch .
2. On the Browser screen, touch .
3. Touch Bookmarks.
4. Under Local, touch a bookmark.
Editing a bookmark
1. On the home screen, touch .
Browser
38
2. On the Browser screen, touch .
3. Touch Bookmarks.
4. Touch and hold the bookmark you want to edit.
5. From the displayed option menu, choose Edit bookmark.
6. Edit the bookmark.
7. Touch OK.
Setting the home page
Set your favorite web page as your browser's home page to make life a little
easier.
1. On the home screen, touch .
2. On the Browser screen, touch .
3. Touch Settings > General > Set homepage.
4. From the displayed option menu, choose the web page you want to set as the
home page.
Clearing your browsing history
To better protect your privacy, clear your browsing history from time to time.
1. On the home screen, touch .
2. On the Browser screen, touch .
3. Touch Settings > Privacy & security > Clear history.
4. Touch OK.
Modifying browser settings
1. On the home screen, touch .
2. On the Browser screen, touch .
3. Touch Settings.
Browser
39
4. Customize your browser settings to better fit your needs.
40
• Email
Don't want to miss important emails from your friends or clients during your
business trip? Use your phone to read and reply to emails when you are on the
go.
Adding a POP3 or IMAP email account
Certain parameters must be set when you add a POP3 or IMAP email account.
For details, contact your email service provider.
1. On the home screen, touch .
2. Select an email account type.
3. Enter your Email address and Password, and touch Next.
4. Follow the onscreen instructions to configure the email settings.
When the email account is set up, the Inbox screen is displayed.
To add more email accounts, touch > Settings > Add account.
Adding an Exchange account
Exchange is an email system developed by Microsoft to implement
communication inside an enterprise. Some email service providers also provide
Exchange accounts for individuals and families.
Certain parameters must be set when you add an Exchange account. For details,
contact your email service provider.
1. On the home screen, touch .
2. Touch Exchange.
3. Enter your Email address, Domain, Username, and Password. Then, touch
Next.
4. Follow the onscreen instructions to configure the email settings.
When the Exchange account is set up, the Inbox screen is displayed.
Email
41
Switching between email accounts
1. On the home screen, touch .
2. Touch the email address on the top to display your email account list.
3. Touch an email account you want to use.
Sending emails
1. On the home screen, touch .
2. Open an email account.
3. On the Inbox screen, touch .
4. Enter the recipient and subject and write your message. Upload any
attachments.
5. When you are done, touch to send the email.
Checking your emails
1. On the home screen, touch .
2. Open an email account.
3. On the Inbox screen, touch the email you want to read.
4. When reading an email, you can:
• Touch to reply to it.
• Touch to forward it.
• Touch to delete it.
• Touch to go back to the previous email.
• Touch to skip to the next email.
Mail retrieval may be slightly delayed, depending on the network condition.
Touch in the lower right corner to refresh the inbox.
Email
42
Removing an email account
After you remove an email account, your phone will no longer send or receive
emails using that account.
1. On the home screen, touch .
2. On the Inbox screen, touch .
3. Touch Settings.
4. Select the account you want to remove.
5. Under REMOVE ACCOUNT, touch Remove account.
6. Touch OK.
Modifying email account settings
1. On the home screen, touch .
2. On the Inbox screen, touch .
3. Touch Settings > General.
4. Set the font size, display options, and other settings.
43
• Multimedia
Camera
As time flies by, there must be some memories you want to keep forever. Camera
is a great tool for this. It supports a variety of capture modes, such as beauty and
smile.
Viewfinder
•Drag the slider to to switch to photo mode.
•Drag the slider to to switch to video mode.
•Touch to take a photo.
•Touch and hold to take burst shots.
Touch the thumbnail to view your photos.
•Touch an object on the viewfinder to focus the camera on it.
•Spread two fingers to zoom in or pinch to zoom out.
1
2
3
4
5
6
7
1
2
3
4
Multimedia
44
Taking a photo
1. On the home screen, touch .
2. Frame the scene you want to capture. The camera automatically focuses itself.
When the viewfinder frame turns green, the camera is focused.
3. Touch .
Shooting a video
1. On the home screen, touch .
2. Frame the scene you want to record.
3. Touch to start recording.
4. Touch to stop recording.
Taking a panoramic photo
Are you still upset that your camera's view angle isn't wide enough to capture an
incredible scene? Panorama mode is exactly the solution you need. You'll be able
to piece together several photos and combine them into one seamless shot.
1. On the home screen, touch .
2. In photo mode, touch > to switch to panoramic mode.
Touch to open the option menu, where you can:
•Touch to switch to normal mode.
•Touch to switch to panoramic mode.
•Touch to switch to special effects mode.
•Touch to enable or disable Touch to capture, Voice activated
shooting, GPS tag, and other functions, as well as set the photo
resolution, timer, and other parameters.
Touch to set the flashlight mode.
Touch to switch between the rear and front cameras.
5
6
7
Multimedia
45
3. Frame the scene you want to capture.
4. Touch .
5. Move your phone slowly in the direction indicated by the arrow to capture
multiple photos.
If the viewfinder screen turns red, the view will not be captured. This may
happen when you have moved your phone too fast or the viewfinder scope
has gone beyond the limits of the panoramic view.
6. Your phone stops shooting when it has taken enough photos for a panoramic
photo. You can also touch to stop shooting.
The camera automatically stitches the photos together to create one
panoramic photograph.
Gallery
Gallery is your personal treasure box of sweet memories.
Viewing photos or videos
In your Gallery, photos and videos are stored in separate albums.
1. On the home screen, touch .
2. Touch the album you want to view.
3. Touch the photo or video to view it in full screen mode.
When viewing a photo, pinch two fingers together to zoom out or spread
them apart to zoom in.
Playing a slideshow
1. On the home screen, touch .
2. Touch an album.
3. Touch > Slideshow to play a slideshow of the photos in the album.
4. Touch the screen to stop the slideshow.
Multimedia
46
Editing a photo
You can remove red eye, crop a photo, or apply a number of effects to make your
photos even more stunning.
1. On the home screen, touch .
2. Touch the photo you want to edit.
3. Touch > Edit and then you can:
• Touch to select a filter.
• Touch to rotate or crop the photo.
• Touch to lighten or shadow the photo.
• Touch to add a frame to the photo.
4. Touch .
Rotating a photo
1. On the home screen, touch .
2. Touch the photo you want to rotate.
3. Touch > Rotate Left or Rotate Right.
You can also enable the auto-rotate screen function to have your phone
automatically adjust the display orientation when you rotate your phone.
Cropping a photo
1. On the home screen, touch .
2. Touch the photo you want to crop.
3. Touch > Edit.
4. Touch > Crop and then you can:
• Drag the grid to reposition it.
• Drag the frames of the grid to resize it.
5. Touch .
Multimedia
47
Deleting a photo
1. On the home screen, touch .
2. Touch the photo you want to delete.
3. Touch .
4. Touch Delete.
Sharing a photo or video
Want to share your best shots or an amusing trick your dog just did? Simply share
the photos and videos using email, Bluetooth, and more.
1. On the home screen, touch .
2. Touch the photo or video you want to share.
3. Touch .
4. Choose a sharing method and follow the onscreen instructions.
Setting a photo as the wallpaper
1. On the home screen, touch .
2. Choose the photo you want to set as the wallpaper.
3. Touch > Set as > Wallpaper.
4. Drag the frames of the grid to resize it.
5. Touch .
Music
In the mood for music? Your phone provides you with a supreme audio
experience.
Adding songs
You can copy songs to your phone and immerse yourself in a world of
extraordinary sound anytime. Add songs to your phone by:
• Copying songs from your computer using a USB cable.
Multimedia
48
• Downloading songs from the web.
• Copying songs from Bluetooth devices.
Listening to music
1. On the home screen, touch .
2. Choose a category.
3. Touch the song you want to play.
Touch to enter the music library.
• Touch to play and touch to pause.
• Touch to go back to the previous song.
• Touch to skip to the next song.
Drag the slider to control the playback.
Touch to display the option menu from which you can perform
additional operations.
1 4
3
2
1
2
3
4
Multimedia
49
When a song is playing, touch to exit the playback screen without
stopping the song. To return to the music playback screen, open the
notification panel and touch the playing song.
50
• Internet connection
Mobile data connection
After you insert a SIM card into your phone and power it on for the first time,
your phone automatically registers with your service provider's data service.
Checking the network connection
1. On the home screen, touch then the All tab.
2. Under WIRELESS & NETWORKS, touch Mobile networks.
3. Touch Access Point Names or Network operators to check network
connection settings.
Your phone automatically reads access point settings from your SIM card.
Do not change the access point settings; otherwise, you may not be able to
access the network.
Enabling the data service
1. On the home screen, flick down from the status bar to open the notification
panel.
2. Touch to enable your phone's data service.
When you don't need to access the Internet, disable the data service to save
battery power and reduce data usage.
Setting up a Wi-Fi connection
When you use your phone at home, you can connect to the Wi-Fi hotspot
created from your router. Some public locations, such as airports and libraries,
may also have Wi-Fi networks available for use.
Connecting to a Wi-Fi network
1. On the home screen, touch then the All tab.
2. Under WIRELESS & NETWORKS, touch the Wi-Fi switch to turn on Wi-Fi.
Internet connection
51
3. Under WIRELESS & NETWORKS, touch Wi-Fi.
You phone then scans for available Wi-Fi networks and displays them.
4. Choose the Wi-Fi network you want to connect to and touch Connect.
For an encrypted Wi-Fi network, enter the password when prompted.
If Wi-Fi and mobile data are both enabled, your phone connects to the Wi-
Fi network preferentially. When Wi-Fi becomes unavailable, your phone
automatically switches to the mobile data connection.
Connecting to a Wi-Fi network using WPS
Wi-Fi protected setup (WPS) lets you quickly connect to a Wi-Fi network. A safe
connection is set up by pressing the WPS button or entering the PIN.
To use the WPS function and set up a Wi-Fi connection between your phone
and a Wi-Fi hotspot, make sure the Wi-Fi hotspot also supports the WPS.
Using the WPS button
1. On the home screen, touch then the All tab.
2. Under WIRELESS & NETWORKS, touch the Wi-Fi switch to turn on Wi-Fi.
3. On the Wi-Fi network list, touch .
4. On the Wi-Fi hotspot device, press the WPS button.
Using the WPS PIN
1. On the home screen, touch then the All tab.
2. Under WIRELESS & NETWORKS, touch the Wi-Fi switch to turn on Wi-Fi.
3. On the Wi-Fi network list, touch .
4. Touch Input WPS PIN.
Your phone generates a PIN.
5. On the Wi-Fi hotspot device, enter the PIN.
Internet connection
52
Sharing your phone's mobile data connection
Want to access the Internet from multiple devices when you are on the go? Use
USB tethering or set your phone as a Wi-Fi hotspot to share its data connection
with other devices.
USB tethering
You can share your phone's data connection with a computer using a USB cable.
To use USB tethering, you may need to install your phone's driver on the
computer or establish a network connection, depending on your computer's
operating system. If your computer runs Windows 7, Windows Vista, or a latest
Linux operating system (such as Ubuntu 10.4), you can use your phone's USB
tethering function without configuring any settings on the computer. If you are
running an earlier version of Windows or another OS, your PC will identify and
install a driver automatically.
1. Use a USB cable to connect your phone to the computer.
2. On the home screen, touch then the All tab.
3. Under WIRELESS & NETWORKS, touch More….
4. Touch Tethering & portable hotspot.
5. Select the USB tethering check box to share your phone's data connection.
You cannot use your phone's USB tethering function when the phone is in
USB storage mode.
Wi-Fi hotspot
Your phone can also function as a Wi-Fi hotspot for other devices, sharing its
mobile data connection.
1. On the home screen, touch then the All tab.
2. Under WIRELESS & NETWORKS, touch More….
3. Touch Tethering & portable hotspot > Configure Wi-Fi hotspot.
4. Name the Wi-Fi hotspot.
5. Select an encryption mode.
It is recommended that you set the encryption mode to WPA2PSK to better
Internet connection
53
secure the Wi-Fi network.
6. Set the key to the Wi-Fi hotspot.
When other devices want to access your phone's network, this key must be
entered.
7. Select the Portable Wi-Fi hotspot check box.
8. On the device you want to use, search for and connect to your phone's Wi-Fi
network.
Controlling your data usage
Your phone's data usage control function lets you check and control your data
usage.
Set a data usage cycle and a mobile data limit for this period and you will be
notified when data usage reaches this limit. You can also query the data usage
within a certain period of time or data traffic consumed by an application.
1. On the home screen, touch then the All tab.
2. Under WIRELESS & NETWORKS, touch More….
3. Touch Data usage.
Turn the mobile data connection on or off. To configure data control
and query data usage, the mobile data connection must be turned
on.
4
5
6
1
2
3
1
Internet connection
54
On the Data usage screen, touch to open an option menu, from which you
can:
• Turn data roaming on or off.
• Prevent background mobile data traffic.
• Turn automatic data synchronization on or off.
• Select the Show Wi-Fi usage check box. The Wi-Fi tab will be displayed.
Touch this tab to view Wi-Fi data usage.
• Touch Mobile hotspots and select the Wi-Fi networks that are mobile
hotspots to prevent applications from accessing these networks in the
background. If an application is downloading a large file using these networks,
you will be notified.
Turn the mobile data usage limit on or off.
Set the data usage cycle.
Touch Data usage cycle then Change cycle… to set the data
usage cycle.
Set the data usage limits. The yellow line indicates the warning limit,
and the red line indicates the data usage limit.
Drag the red and yellow lines to adjust the values or touch the lines
to set specific values.
When your data usage reaches the yellow line, you will receive a
warning notification. When your data usage reaches the red line,
your phone's mobile data connection will be disabled.
Time axis.
Drag the time axes to set a data usage cycle.
Display the data usage of each application.
2
3
4
5
6
55
• Sharing data
Bluetooth
Your phone is Bluetooth-capable, allowing you to connect to other Bluetooth-
enabled devices for wireless data transmission. When using Bluetooth, stay
within 10 meters (33 feet) of other Bluetooth devices.
Turning on Bluetooth
1. On the home screen, touch then the All tab.
2. Under WIRELESS & NETWORKS, touch Bluetooth.
When Bluetooth is turned on, your phone's name is displayed at the top of the
Bluetooth screen. Touch the name to set your phone's visibility.
To rename your phone, touch > Rename phone. When you are done,
touch Rename to save the changes.
Pairing with other Bluetooth devices
To exchange data with another Bluetooth device, enable Bluetooth on both
devices and pair them with each other.
1. On the home screen, touch then the ALL tab.
2. Under WIRELESS & NETWORKS, touch Bluetooth.
3. From the list of detected Bluetooth devices, touch a device and follow the
onscreen instructions to pair with it.
To disconnect from a paired Bluetooth device, under PAIRED DEVICES, touch
> Unpair.
If a Bluetooth connection cannot be set up between your phone and
another device, they may be incompatible.
Sharing data
56
Sharing files using Bluetooth
Bluetooth enables you to conveniently send photos, videos, and other files to
your family and friends. You can share files with Bluetooth-enabled devices
without an Internet connection.
1. On the home screen, touch .
2. Touch and hold the file you want to send.
3. From the displayed option menu, choose Share > Bluetooth.
4. From the detected Bluetooth device list, select a device.
Receiving files using Bluetooth
1. When your phone receives a file transfer request, open the notification panel.
2. Touch Bluetooth share: Incoming file to display a file reception dialog box.
3. Touch Accept to start receiving the file.
When the file is received, you will receive a notification of a successful transfer.
Open the notification panel to read the notification. By default, received files are
saved to the bluetooth folder in File Manager.
Connecting your phone to a computer
When you connect your phone to a computer using a USB cable, your phone will
display a notification prompting you to select a connection type.
MTP mode
The Media Transfer Protocol (MTP) is used to transfer media files, such as
pictures, songs, and videos, between your phone and a computer. The MTP
mode is only compatible with Windows Media Player 10 or later.
1. Use a USB cable to connect your phone to the computer.
2. On the USB computer connection screen, choose Media device (MTP).
The phone driver is then automatically installed on the computer.
3. After the driver is installed, follow the onscreen instructions on the computer
to view or transfer files.
Sharing data
57
PTP mode
The Picture Transfer Protocol (PTP) is another method to transfer pictures and
videos to your computer.
1. Use a USB cable to connect your phone to the computer.
2. On the USB computer connection screen, choose Camera (PTP).
The phone driver is then automatically installed on the computer.
3. After the driver is installed, follow the onscreen instructions on the computer
to view or transfer files.
Mass storage mode
In mass storage mode, you can use your phone as a USB mass storage device and
transfer files between your phone and a computer.
1. Use a USB cable to connect your phone to the computer.
2. On the USB computer connection screen, choose USB storage device.
The phone driver is then automatically installed on the computer.
3. The computer will identify your phone as a USB mass storage device. You can
then transfer files between your phone and the computer.
After file transmission, safely remove the device from the computer and
disconnect it from the USB cable to prevent your data from being lost or
corrupted.
58
• File Manager
File Manager helps you manage files and applications in your phone's internal
storage and microSD card. You'll be able to view, create, edit, delete, move,
archive, compress, and decompress files.
Creating a folder
You can create folders to better manage the files and applications stored in your
phone's internal storage or microSD card.
1. On the home screen, touch .
2. Touch Internal or SD card.
3. Touch > New folder.
4. In the displayed dialog box, name the new folder.
5. Touch Save.
Searching for a file
Too many files stressing you out? The search function helps you find what you
need in no time.
1. On the home screen, touch .
2. Touch Internal or SD card.
3. Touch > Search.
4. Enter part or all of the file name.
Matching results will be displayed.
Copying, cutting, and pasting a file
1. On the home screen, touch .
2. Touch and hold the file you want to copy or cut.
3. From the displayed option menu, choose Copy or Cut.
File Manager
59
4. Select where you want to paste the file.
5. Touch PASTE.
Compressing or decompressing files
You can compress files into .zip files to save space or decompress .zip and .rar
files.
1. On the home screen, touch .
2. Touch and hold the file or folder you want to compress.
3. From the displayed option menu, choose Compress.
4. Choose the save path of the compressed file and name it.
5. Touch OK.
To decompress a file, touch and hold it and choose Extract from the displayed
option menu.
Renaming a file
1. On the home screen, touch .
2. Touch and hold the file you want to rename.
3. From the displayed option menu, choose Rename.
4. In the displayed dialog box, enter a new name for the file.
5. Touch OK.
Deleting a file
1. On the home screen, touch .
2. Touch and hold the file you want to delete.
3. From the displayed option menu, choose Delete.
4. Touch OK.
File Manager
60
Creating a shortcut for a file or folder
1. On the home screen, touch .
2. Touch the file or folder you want to create a shortcut for.
3. From the displayed option menu, choose Desktop shortcuts.
Checking the memory status
Before you save large files to your phone's internal storage or microSD card,
make sure there is enough space first.
1. On the home screen, touch .
2. Touch > Storage.
3. On the Storage settings screen, view the total and available space on your
phone's internal storage or microSD card.
61
• Managing applications
Downloading applications
A rich selection of applications is available through Google's Play Store. You can
also connect your phone to a computer and transfer applications over that way.
Installing an application
It is recommended that you use Play Store as your primary download
source. Certain third-party applications from other sources may not be
compatible with your phone.
1. On the home screen, touch Mgmt. > .
2. Select the application you want to install.
3. Touch Install.
4. Touch Done.
During the installation, an Install blocked message may be displayed. Read
the message carefully. If you want to continue with the installation, touch
then All > Security, and select the Unknown sources check box to
allow installation of third-party applications. Then touch to proceed.
Viewing applications
You can view detailed information about all applications installed on your phone.
1. On the home screen, touch then the All tab.
2. Under APPS, touch Manage apps.
3. Flick to All.
4. Select the application you want to view.
Managing applications
62
Uninstalling an application
You can remove unwanted applications to increase your phone's available
storage.
1. On the home screen, touch then the All tab.
2. Under APPS, touch Manage apps.
3. Flick to All.
4. Select the application you want to uninstall.
5. Touch Uninstall > OK.
Some pre-installed applications cannot be uninstalled.
Clearing the application cache
You can clear the application cache to free up the phone memory.
1. On the home screen, touch then the All tab.
2. Under APPS, touch Manage apps.
3. Flick to All.
4. Touch Clear cache.
63
• Google services
To use Google services, sign in with a Google account. If you don't have one,
open a Google application and follow the onscreen instructions to create your
Google account.
Google applications, services, and functions vary with country and service
provider. Please follow local laws and regulations when you use Google
services.
Gmail
Gmail is Google's official email service. When you first use Gmail, emails on your
web account will be synchronized to your phone.
Sending emails
1. On the home screen, touch to open your mailbox. If you have added
more than one Gmail accounts, select the one you want to use.
2. Touch .
3. Enter the recipient and subject and compose your message.
4. Touch .
Checking your emails
1. On the home screen, touch to open your mailbox. If you have added
more than one Gmail accounts, select the one you want to use.
2. From the email list, select the email you want to read.
• Touch to reply to it.
• Touch > Reply all to reply to all.
• Touch > Forward to forward the email.
Google services
64
Maps
Maps helps you find out where you are, shows you how to get to a destination,
and displays real-time traffic. Satellite view is also available.
Turning on location services
Before you use Maps to search for a location, turn on your location services.
1. On the home screen, touch then the All tab.
2. Touch Location access.
3. Select the GPS satellites and Wireless networks check boxes.
Searching for places of interest
1. On the home screen, touch Google apps > .
2. Touch .
3. Enter the location you want to search for.
4. Touch in the lower right corner of the keyboard.
The search results are marked on the map by letters.
5. Touch a mark to see how to get there and view more details about the
location.
Getting somewhere
1. On the home screen, touch Google apps > .
2. Touch .
3. Choose a transportation method.
4. Follow the onscreen instructions to enter your starting point and destination.
5. Touch in the lower right corner of the keyboard to display the routes.
6. Touch a route to view its details on the map.
Touch to clear the search results.
Google services
65
YouTube
YouTube is Google's online video-sharing website, where you can search for,
watch, and upload videos.
Searching for a video
1. On the home screen, touch Google apps > .
2. Touch .
3. Enter the keywords for the video you want to find.
4. Touch in the lower right corner of the keyboard.
5. From the search results, touch a video to watch it.
Sharing a video
From the video list, select the video you want to share. Then, touch and
select a sharing method.
Play Store
Play Store is an application market provided by Google, where you can
download applications and games.
Installing an application
1. On the home screen, touch .
2. Find the desired application.
3. Follow the onscreen instructions to download and install it.
Uninstalling an application
1. On the home screen, touch .
2. Touch > My apps.
3. From the application list, touch the application you want to uninstall.
4. Touch UNINSTALL > OK to uninstall the application.
66
• Basic utilities
Your phone comes with a variety of useful tools, such as Calendar, Clock, and
Calculator, helping you keep yourself organized.
Calendar
Calendar is your personal assistant that helps you manage, arrange, and keep
track of all important events.
Creating an event
1. On the home screen, touch .
2. Touch .
3. Enter event details, such as the event name, time, and location.
4. Touch SAVE.
Viewing events
1. On the home screen, touch .
2. Touch the date in the upper left corner to switch between the year, month,
week, day, and agenda views. The agenda view displays all your calendar
events.
Sharing an event
You can share an event with your family and friends in a number ways, such as
Bluetooth.
1. On the home screen, touch .
2. Open an event you want to share.
3. Touch > Send event.
4. Select a sharing method and follow the onscreen instructions.
Basic utilities
67
Synchronizing and viewing events
Calendar events in your accounts (such as an email account) can be synchronized
to and viewed on Calendar.
1. On the home screen, touch .
2. Touch > Calendars to display.
3. Select the account whose calendar you want to display.
4. Touch > Calendars to sync.
5. Select the account from which you want to synchronize calendar events.
6. Touch OK.
Modifying calendar settings
1. On the home screen, touch .
2. Touch > Settings.
3. Follow the onscreen instructions to configure the calendar settings.
Clock
Clock lets you view the time around the world, use stopwatch or timer to keep
track of time, or set alarms to wake you up in the morning.
Adding an alarm
1. On the home screen, touch then the Alarm tab.
2. From the alarm list, touch .
3. Set the alarm time, ringtone, how often it repeats, and more.
4. Touch DONE.
Alarms will go off even when your phone is powered off.
Deleting an alarm
1. On the home screen, touch then the Alarm tab.
Basic utilities
68
2. From the alarm list, touch and hold the alarm you want to delete.
3. From the displayed option menu, choose Delete alarm.
4. Touch OK.
Configuring alarm settings
1. On the home screen, touch then the Alarm tab.
2. From the alarm list, touch > Settings.
3. On the alarm settings screen, set the ring mode, snooze duration, and the
volume button's function when an alarm sounds.
Calculator
Calculator lets you perform basic arithmetic operations.
1. On the home screen, touch Tools > .
2. On the Calculator screen, flick left or right to switch between the basic and
scientific calculators.
Notes
Notes is a handy application that lets you record quick thoughts or important
information.
1. On the home screen, touch Tools > .
2. Touch Add note.
3. Enter what you want to record.
4. When you are done, touch .
On the Notes screen, you can touch and select one or more notes you
want to delete, or select All to delete all notes.
Basic utilities
69
Weather
Weather provides you with the latest weather information for any city around
the world. You can share weather information with your family and friends.
Before you use Weather, turn on your phone's GPS and data service.
Adding a city
Add cities of your concern to Weather to check their real-time weather
information.
1. On the home screen, touch Tools > .
2. Touch > .
In addition to your current city, you can add up to nine cities.
3. Enter a city name.
Matching cities are then displayed.
4. Select the city you want to add.
Setting the default city
1. On the home screen, touch Tools > .
2. Touch .
3. Touch the icon next to the city you want to set as the default city.
Deleting cities
1. On the home screen, touch Tools > .
2. Touch > .
3. Select the cities you want to delete, and touch DELETE.
Updating weather
1. On the home screen, touch Tools > .
2. Flick left or right to find the city whose weather you want to update.
Basic utilities
70
3. Touch to update the weather.
You can also set Weather to automatic update mode. Touch > ,
select Auto update, and set Update interval. Your phone will then update
the weather at the interval you set.
Sharing weather information
Your phone lets you send weather information as a text message to remind your
family and friends of weather changes.
1. On the home screen, touch Tools > .
2. Flick left or right to find the city whose weather you want to share.
3. Touch to display the messaging screen.
4. You can then:
• Enter a phone number.
• Touch to select a contact.
5. Touch Send to send the weather information to the recipient.
FM radio
Want to listen to your favorite broadcast programs? Open FM Radio anytime
anywhere you like.
Connect a headset to the phone. FM Radio utilizes the headset as an
antenna.
Searching for stations
1. On the home screen, touch Tools > .
2. Touch > to search for and save available stations.
Your phone will automatically search for and save stations the first time you
open the FM radio.
Basic utilities
71
Listening to FM radio
From the FM Radio screen, you can:
Touch to view the station list.
Touch to enable or disable the speaker.
Touch to go to the next station.
Touch to turn the FM radio on or off.
Touch to add the current station to your favorites.
Touch to return to the previous station.
1
2
3
4
5
6
1
2
3
4
5
6
72
• Accounts and sync
You can synchronize data on your phone, such as contacts, emails, and events,
to and from the Internet.
Adding an account
1. On the home screen, touch then the All tab.
2. Under ACCOUNTS, touch Add account.
3. Select an account type.
4. Follow the onscreen instructions and enter your account information.
5. Configure the account and set the type of data you want to synchronize.
When an account is set up, it will be shown in the ACCOUNTS section.
The types of data you can synchronize to your phone vary with account
type.
Deleting an account
1. On the home screen, touch then the All tab.
2. Under ACCOUNTS, select an account type.
3. Select the account you want to delete.
4. Touch > Remove account.
5. In the displayed dialog box, touch Remove account.
Turning on data synchronization
1. On the home screen, touch then the All tab.
2. Under ACCOUNTS, select an account type.
3. Select the account you want to synchronize from.
Accounts and sync
73
4. Touch the data you want to synchronize.
You can touch > Sync now to have the data synchronization run in
the background.
Modifying account synchronization settings
1. On the home screen, touch then the All tab.
2. Under ACCOUNTS, select an account type.
3. Select the account whose synchronization settings you want to modify.
4. Under Sync settings, select the data you want to synchronize.
74
• Settings
Turning on or off airplane mode
Always comply with all airline rules and regulations. If allowed by the aircraft
operator, you may switch on your phone and enable airplane mode in flight.
In airplane mode, your phone's wireless features are disabled, but you can still
listen to music or play games.
Use either of the following methods to turn on or off Airplane mode:
• Press and hold the power button. From the displayed option menu, choose
Airplane mode.
• On the home screen, touch then the All tab. Under WIRELESS &
NETWORKS, touch Airplane mode.
When airplane mode is on, appears in the status bar.
Tone settings
1. On the home screen, touch then the All tab.
2. Under DEVICE, touch Sound.
3. From the settings screen, you can:
• Touch Volume and drag the sliders to set the volume of music, ringtones,
message tones, and more.
• Touch Vibration to set whether your phone vibrates when you have an
incoming call, message, email, event, and more.
• Touch Silent mode to turn on or off silent mode.
• Touch Phone ringtone to select a ringtone.
• Touch Notification tone to select a tone for messages, emails, events, and
more.
• Touch SYSTEM to turn the notification tone or vibration on or off when you
touch or lock the screen, take a screenshot, dial a number, and more.
You can adjust the volume from the home screen or most applications, such
as call, music, and video.
Settings
75
Display settings
1. On the home screen, touch then the All tab.
2. Under DEVICE, touch Display.
3. On the settings screen, you can:
• Touch Brightness to set the screen brightness. To manually adjust the
brightness, clear the Automatic brightness check box.
• Touch Wallpaper to set the lock screen and home screen wallpapers.
• Touch Auto-rotate screen to turn on or off the screen auto-rotate
function. If this function is turned on, your screen's orientation will
automatically change with the way you hold your phone when you perform
certain operations, such as browsing a web page, viewing a picture, or
writing a message.
• Touch Sleep to set a screen timeout period. If idle for the specified period,
your phone automatically locks its screen to save battery power.
• Touch Touch key light to turn on or off the smart backlight function. If this
function is turned on, your phone automatically adjusts the screen
brightness based on the content displayed on it.
• Touch Font size to change the display font size.
Setting the date and time
By default, your phone relies on the network-based date and time. You can also
manually set the date and time.
1. On the home screen, touch then the All tab.
2. Under SYSTEM, touch Date & time.
3. From the settings screen, you can:
• Clear the Automatic date & time check box to stop your phone from
automatically obtaining the network date and time.
• Clear the Automatic time zone check box to stop your phone from
automatically obtaining the network time zone.
• Touch Set date and flick up and down to set your phone's date.
• Touch Set time and flick up and down to set your phone's time.
Settings
76
• Touch Select time zone and select the time zone from the list. Scroll up or
down to view more time zones.
• Select or clear the Use 24-hour format check box to switch between the
12-hour and 24-hour formats.
• Touch Select date format to select how you want the date to be displayed.
Changing the system language
1. On the home screen, touch then the All tab.
2. Under PERSONAL, touch Language & input.
3. Touch Language.
4. From the list, choose a language.
Modifying location service settings
You can modify your phone's location service settings for more convenient
positioning and navigation services.
1. On the home screen, touch then the All tab.
2. Under PERSONAL, touch Location access.
3. From the settings screen, you can:
• Touch Access my location to enable your phone to use your location
information.
• Touch GPS satellites to have your phone obtain your location information
from GPS satellites.
• Touch Wireless networks to have your phone obtain your location
information from a Wi-Fi network or mobile data connection.
Setting the PIN of your SIM card
The personal identification number (PIN) is delivered with your SIM card. If you
enable the PIN protection function for your SIM card, you will need to enter the
PIN each time you power your phone on.
Before you perform the following operations, make sure you have obtained your
SIM card's PIN from your service provider.
Settings
77
1. On the home screen, touch then the All tab.
2. Under PERSONAL, touch Security.
3. Touch Set up SIM/USIM card lock.
4. Select the Lock SIM card check box.
5. Enter the PIN.
6. Touch OK.
If you incorrectly enter the PIN a specified number of consecutive times, the
PIN is blocked and the phone prompts you to enter the PIN unblocking key
(PUK). If you incorrectly enter the PUK a specified number of consecutive
times, the SIM card will be disabled permanently. For details about the
maximum retry attempts for the PIN and PUK, contact your service provider.
Restoring factory settings
Restoring your phone to its factory settings erases all your personal data from the
phone, including your email accounts, system and application settings, and
installed applications.
Back up important data on your phone before you restore factory settings.
1. On the home screen, touch then the All tab.
2. Under PERSONAL, touch Backup & reset.
3. Touch Factory data reset > Reset phone > Reset phone.
The phone will restore its factory settings and restart.
Online update
Once in a while, new updates for your phone will be available online. You will
receive a notification when updates are available. Before updating, make sure
your phone has enough storage space for the update package.
To update your phone manually, go to the home screen, touch > About
phone > System updates > Online updates to check for updates, and follow
the onscreen instructions to update your phone online.
All your personal data may be erased during a system update. It is
recommended that you back up important data before updating your
Settings
78
phone.
Accessibility
You can turn on or off preset or installed accessibility features.
1. On the home screen, touch then the All tab.
2. Under SYSTEM, touch Accessibility.
3. Select the features you want to turn on or off.
79
• FAQs
What are some ways I can save battery power?
• When you do not need Internet access, open the notification panel and touch
to turn off your mobile data connection.
• When you do not need wireless data services, such as GPS, Bluetooth, or Wi-Fi,
open the notification panel, and touch , , or to turn off these
services.
• Touch > All > Display to reduce the screen brightness and screen
timeout period. Press to turn off the screen when your phone is not in
use.
• Close applications that are not in use.
• Decrease the volume.
How can I free up additional phone memory?
• Move files and email attachments to a microSD card.
• Open the browser and delete locally cached content.
• Clear the application cache.
• Uninstall applications you no longer use.
How do I use a microSD card to import contacts from another phone?
Your phone supports contact files in .vcf format only.
1. Save the contacts you want to import as a .vcf file and save the file to a
microSD card.
2. Insert the microSD card into your phone, and touch File Manager then SD
card to find the .vcf file.
3. Touch the .vcf file. Your phone then displays a message asking whether you
want to import the contacts.
4. Touch OK to import the contacts.
Compatibility problems may occur with .vcf files created by other phones,
and certain contact information may be lost when contacts are imported.
FAQs
80
How do I disable the Auto-rotate screen function?
On the home screen, touch then All > Display, and clear Auto-rotate
screen.
How do I set a screen unlock pattern?
On the home screen, touch then Security > Screen lock > Pattern, and
follow the onscreen instructions to set a screen unlock pattern.
How do I switch the text input method?
When you write text, open the notification panel and touch Choose input
method to select an input method.
How do I stop the song playing in the background?
Open the notification panel, touch the playing song to display the music
playback screen, and stop the playback.
How do I return to the call screen?
To return from another screen during a call, open the notification panel and
touch the ongoing call.
How do I move an application icon on the home screen?
Touch and hold the application icon you want to move and drag it to a new
location.
How do I hide the onscreen keyboard?
Touch to hide the keyboard.
How do I forward a message?
Touch and hold the message you want to forward, and choose Forward from
the displayed option menu.
How do I restart my phone?
Press and hold , and touch Restart > OK to restart your phone.
81
• Legal Notice
Copyright © Huawei Technologies Co., Ltd. 2014. All rights reserved.
No part of this manual may be reproduced or transmitted in any form or by any
means without prior written consent of Huawei Technologies Co., Ltd. and its
affiliates ("Huawei").
The product described in this manual may include copyrighted software of
Huawei and possible licensors. Customers shall not in any manner reproduce,
distribute, modify, decompile, disassemble, decrypt, extract, reverse engineer,
lease, assign, or sublicense the said software, unless such restrictions are
prohibited by applicable laws or such actions are approved by respective
copyright holders.
Trademarks and Permissions
, , and are trademarks or registered trademarks of Huawei
Technologies Co., Ltd.
Android™ is a trademark of Google Inc.
The Bluetooth® word mark and logos are registered trademarks owned by
Bluetooth SIG, Inc. and any use of such marks by Huawei Technologies Co., Ltd.
is under license.
Other trademarks, product, service and company names mentioned may be the
property of their respective owners.
Notice
Some features of the product and its accessories described herein rely on the
software installed, capacities and settings of local network, and therefore may
not be activated or may be limited by local network operators or network service
providers.
Thus, the descriptions herein may not exactly match the product or its
accessories which you purchase.
Huawei reserves the right to change or modify any information or specifications
contained in this manual without prior notice and without any liability.
Third-Party Software Statement
Huawei does not own the intellectual property of the third-party software and
applications that are delivered with this product. Therefore, Huawei will not
Legal Notice
82
provide any warranty of any kind for third party software and applications.
Neither will Huawei provide support to customers who use third-party software
and applications, nor be responsible or liable for the functions or performance of
third-party software and applications.
Third-party software and applications services may be interrupted or terminated
at any time, and Huawei does not guarantee the availability of any content or
service. Third-party service providers provide content and services through
network or transmission tools outside of the control of Huawei. To the greatest
extent permitted by applicable law, it is explicitly stated that Huawei shall not
compensate or be liable for services provided by third-party service providers, or
the interruption or termination of third-party contents or services.
Huawei shall not be responsible for the legality, quality, or any other aspects of
any software installed on this product, or for any uploaded or downloaded third-
party works in any form, including but not limited to texts, images, videos, or
software etc. Customers shall bear the risk for any and all effects, including
incompatibility between the software and this product, which result from
installing software or uploading or downloading the third-party works.
This product is based on the open-source Android™ platform. Huawei has made
necessary changes to the platform. Therefore, this product may not support all
the functions that are supported by the standard Android platform or may be
incompatible with third-party software. Huawei does not provide any warranty
or representation in connect with any such compatibility and expressly excludes
all liability in connection with such matters.
DISCLAIMER
ALL CONTENTS OF THIS MANUAL ARE PROVIDED “AS IS”. EXCEPT AS REQUIRED
BY APPLICABLE LAWS, NO WARRANTIES OF ANY KIND, EITHER EXPRESS OR
IMPLIED, INCLUDING BUT NOT LIMITED TO, THE IMPLIED WARRANTIES OF
MERCHANTABILITY AND FITNESS FOR A PARTICULAR PURPOSE, ARE MADE IN
RELATION TO THE ACCURACY, RELIABILITY OR CONTENTS OF THIS MANUAL.
TO THE MAXIMUM EXTENT PERMITTED BY APPLICABLE LAW, IN NO EVENT
SHALL HUAWEI BE LIABLE FOR ANY SPECIAL, INCIDENTAL, INDIRECT, OR
CONSEQUENTIAL DAMAGES, OR LOSS OF PROFITS, BUSINESS, REVENUE, DATA,
GOODWILL SAVINGS OR ANTICIPATED SAVINGS REGARDLESS OF WHETHER
SUCH LOSSES ARE FORSEEABLE OR NOT.
THE MAXIMUM LIABILITY (THIS LIMITATION SHALL NOT APPLY TO LIABILITY
FOR PERSONAL INJURY TO THE EXTENT APPLICABLE LAW PROHIBITS SUCH A
LIMITATION) OF HUAWEI ARISING FROM THE USE OF THE PRODUCT DESCRIBED
Legal Notice
83
IN THIS MANUAL SHALL BE LIMITED TO THE AMOUNT PAID BY CUSTOMERS
FOR THE PURCHASE OF THIS PRODUCT.
Import and Export Regulations
Customers shall comply with all applicable export or import laws and regulations
and be responsible to obtain all necessary governmental permits and licenses in
order to export, re-export or import the product mentioned in this manual
including the software and technical data therein.
Privacy Policy
To better understand how we protect your personal information, please see the
privacy policy at http://consumer.huawei.com/privacy-policy.
Please visit http://consumer.huawei.com/en/support/hotline for recently updated
hotline and email address in your country or region.
V100R001_01
This guide is for reference only. The actual product, including but not limited
to the color, size, and screen layout, may vary. All statements, information,
and recommendations in this guide do not constitute a warranty of any kind,
express or implied.

Huawei Ascend Y530 Manual / User Guide

  • 1.
  • 2.
    i • Contents Foreword ..................................................................................1 Safety precautions..................................................................... 2 Preparations.............................................................................. 3 Your phone at a glance...............................................................................3 Installing the SIM Card ................................................................................4 Inserting a microSD card .............................................................................5 Charging the battery ...................................................................................5 Important information about the battery.....................................................6 Powering your phone on and off.................................................................6 Getting started.......................................................................... 7 Gestures......................................................................................................7 Locking and unlocking the screen ...............................................................8 Getting to know your home screen .............................................................9 Using the notification panel ......................................................................12 Accessing applications...............................................................................13 Texting......................................................................................................13 Personalizing your phone ........................................................ 17 Changing the home screen style................................................................17 Changing the theme .................................................................................17 Change the wallpaper ...............................................................................17 Setting the home screen transition effect ..................................................17 Organizing home screen widgets and application icons.............................18 Organizing home screen icons using folders..............................................19 Customizing your home screens................................................................19 Setting tones.............................................................................................20 Changing the font size ..............................................................................21 Setting the screen unlock method.............................................................21 Adjusting the screen brightness.................................................................22 Calls........................................................................................ 24 Smart dialing.............................................................................................24 Answering or rejecting a call .....................................................................24 Viewing the call log...................................................................................25 What you can do during a call...................................................................25 Making a conference call ..........................................................................26 Answering a third-party call ......................................................................26
  • 3.
    Contents ii Making emergency calls............................................................................26 Othercall services .....................................................................................27 People..................................................................................... 29 Creating a contact.....................................................................................29 Searching for a contact .............................................................................29 Copying contacts ......................................................................................29 Importing or exporting contacts................................................................30 Adding a contact to your favorites ............................................................31 Deleting contacts ......................................................................................31 Sharing contacts .......................................................................................31 Contact groups .........................................................................................31 Messaging .............................................................................. 34 Sending a text message.............................................................................34 Sending a multimedia message .................................................................34 Replying to a message...............................................................................35 Searching for a message ...........................................................................35 Managing messages..................................................................................35 Modifying message settings ......................................................................36 Browser .................................................................................. 37 Browsing web pages.................................................................................37 Managing bookmarks ...............................................................................37 Setting the home page..............................................................................38 Clearing your browsing history..................................................................38 Modifying browser settings.......................................................................38 Email....................................................................................... 40 Adding a POP3 or IMAP email account......................................................40 Adding an Exchange account....................................................................40 Switching between email accounts............................................................41 Sending emails..........................................................................................41 Checking your emails ................................................................................41 Removing an email account ......................................................................42 Modifying email account settings..............................................................42 Multimedia.............................................................................. 43 Camera .....................................................................................................43 Gallery ......................................................................................................45 Music........................................................................................................47 Internet connection................................................................. 50
  • 4.
    Contents iii Mobile data connection............................................................................50 Setting up a Wi-Fi connection ...................................................................50 Sharing your phone's mobile data connection...........................................52 Controlling your data usage ......................................................................53 Sharing data ........................................................................... 55 Bluetooth..................................................................................................55 Connecting your phone to a computer......................................................56 File Manager........................................................................... 58 Creating a folder .......................................................................................58 Searching for a file ....................................................................................58 Copying, cutting, and pasting a file...........................................................58 Compressing or decompressing files..........................................................59 Renaming a file .........................................................................................59 Deleting a file............................................................................................59 Creating a shortcut for a file or folder .......................................................60 Checking the memory status .....................................................................60 Managing applications............................................................ 61 Downloading applications.........................................................................61 Installing an application.............................................................................61 Viewing applications .................................................................................61 Uninstalling an application ........................................................................62 Clearing the application cache...................................................................62 Google services....................................................................... 63 Gmail ........................................................................................................63 Maps.........................................................................................................64 YouTube ...................................................................................................65 Play Store..................................................................................................65 Basic utilities ........................................................................... 66 Calendar ...................................................................................................66 Clock.........................................................................................................67 Calculator..................................................................................................68 Notes........................................................................................................68 Weather....................................................................................................69 FM radio ...................................................................................................70 Accounts and sync .................................................................. 72 Adding an account....................................................................................72 Deleting an account ..................................................................................72
  • 5.
    Contents iv Turning on datasynchronization ...............................................................72 Modifying account synchronization settings..............................................73 Settings................................................................................... 74 Turning on or off airplane mode................................................................74 Tone settings ............................................................................................74 Display settings .........................................................................................75 Setting the date and time..........................................................................75 Changing the system language..................................................................76 Modifying location service settings............................................................76 Setting the PIN of your SIM card ...............................................................76 Restoring factory settings..........................................................................77 Online update ...........................................................................................77 Accessibility...............................................................................................78 FAQs....................................................................................... 79 Legal Notice............................................................................ 81
  • 6.
    1 • Foreword Thank youfor choosing the HUAWEI Ascend Y530 smartphone. This guide introduces you to the features and functions of your new phone and safety precautions. Please read it carefully before you start using the phone. All pictures and illustrations in this document are for your reference only. The actual product may vary. Symbols and definitions The following symbols are used in this document. Note Provides additional information. Caution Indicates potential problems that may arise without the proper care and, if necessary, how to handle these problems.
  • 7.
    2 • Safety precautions Pleaseread these safety precautions carefully before operating your phone. Do not crush, throw, or puncture your phone. Avoid dropping, squeezing, or bending it also. Your phone is not meant for use in a damp environment, such as the bathroom. Do not submerge your phone in liquid of any sort and avoid getting your phone wet. Avoid using your mobile phone in areas where it may cause interference or present a hazard. Follow local laws and regulations. Avoid using your phone while driving. Your safety should always be your top priority. Follow any rules or regulations in hospitals and health care facilities. Power off your phone near any medical apparatus. Power off your phone in an aircraft. The phone may interfere with the aircraft's control equipment and navigation system. Power off your phone near high-precision electronic devices. The phone may affect the performance of these devices. Do not attempt to disassemble your phone or its accessories. Only qualified personnel are allowed to service or repair the phone. Do not place your phone or its accessories in containers with a strong electromagnetic field. Do not place magnetic storage media near your phone. Radio waves from the phone may erase the information stored on them. Do not expose your phone to extreme temperatures or use it at a location with flammable materials, such as a gas station. Keep your phone and its accessories away from children. Do not allow young children to use your phone without adult supervision. Use only approved batteries and chargers to avoid the risk of explosions. Observe any laws or regulations on the use of wireless devices. Respect the privacy and legal rights of others when using your phone. To prevent damage to your phone or your computer, follow all instructions pertaining to the USB cable.
  • 8.
    3 • Preparations Your phoneat a glance Headset jack Earpiece Status indicator Power button Volume button Back Home Menu Microphone Micro USB port Flashlight Rear camera Speaker Front camera 1 2 3 4 5 6 7 8 1314 12 11 9 10 1 2 3 4 5 6 7 8 9 10 11 12 13 14
  • 9.
    Preparations 4 Buttons Installing the SIMCard There are two steps to install the SIM card: 1. Remove the battery cover. 2. Insert the SIM card. •When your phone is powered off, press and hold to power it on. •Press to turn on or off the screen. Press and hold to display an option menu. •Touch to return to the previous screen or exit the current application. •When you are entering text, touch to hide the onscreen keyboard. Touch to return to the home screen. •Touch to display the option menu. •Touch and hold to display the list of recently used applications.
  • 10.
    Preparations 5 Inserting a microSDcard You can expand your phone's storage capacity with a microSD card. Follow the operations in the figure below to install a microSD card. To remove a microSD card: 1. On the home screen, touch then the All tab. 2. Under DEVICE, touch More... > Storage. 3. Touch Unmount SD card. 4. Carefully take out the microSD card. Charging the battery Use the provided USB cable and power adapter to connect your phone to a power outlet, or use the USB cable itself to connect your phone to a computer.
  • 11.
    Preparations 6 Important information aboutthe battery • If the battery power is depleted, you may not be able to power on your phone immediately after you begin charging the battery. This is normal. Allow the battery to charge for a few minutes before attempting to power on your phone. • Rechargeable batteries have a limited number of charge cycles and may eventually need to be replaced. When the battery life becomes noticeably shorter, replace the battery. • The time required to fully charge the battery depends on the ambient temperature and age of the battery. • If your phone is very low on power, it plays an alert tone and displays a message. If the battery level is extremely low, your phone automatically powers off. Powering your phone on and off • To power on your phone, press and hold . • To power off your phone, press and hold to display an option menu, and then touch Power off.
  • 12.
    7 • Getting started Gestures Touch:Tap an item once. For example, touch to select an item or open an application. Touch and hold: Touch and leave your finger on the screen for 2 seconds or more. For example, touch and hold an application, widget, or blank area to display the related option menu. Flick: Where applicable, swipe your finger in the direction you want the screen to move. For example, you can flick left or right across the notification panel to dismiss a notification. Drag: Touch and hold an item and then move it to another position. For example, you can re-arrange applications and widgets on the home screen this way. Pinch: Pinch two fingers together to zoom out or stretch them apart to zoom in. For example, pinch together or apart to zoom in or out on a picture or web page.
  • 13.
    Getting started 8 Locking andunlocking the screen Locking the screen not only prevents your phone from carrying out undesirable operations when you are not using it, but also protects it from unauthorized use. You can lock and unlock your screen in a number of ways. The pre-installed screen unlock method is used as an example in this section. Locking the screen • Method 1: Press to lock the screen. • Method 2: After being idle for a specified period of time, your phone automatically locks its screen. To set the screen lock method, touch on the home screen. On the displayed General tab, touch Screen lock. Unlocking the screen 1. If the screen is off, press to turn it on. 2. Drag right toward to unlock the screen.
  • 14.
    Getting started 9 Getting toknow your home screen Your home screens are where you'll find your favorite widgets and all your applications. We did away with the application list to give you a more convenient and direct path to your applications. The default home screen is shown below. Status icons Status bar: displays notifications and icons. Flick down from the status bar to open the notification panel. Screen position indicator: shows the current screen's position. Dock: displays your most common applications. Signal strength No signal GPRS network connected Enhanced Data Rates for GSM Evolution (EDGE) network connected 3 1 2 1 2 3 GG EE
  • 15.
    Getting started 10 3G networkconnected High Speed Packet Access (HSPA) network connected Roaming Airplane mode enabled Bluetooth on Receiving location data from GPS Vibration mode enabled Silence mode enabled Alarms enabled Charging Battery full Battery low Call in progress Missed calls New messages New emails New voicemails Select input method Wi-Fi network available Connected to a Wi-Fi network Uploading data Downloading data Phone memory full Upcoming events No SIM card found Sign-in or synchronization problem Synchronizing data Synchronization failed Portable Wi-Fi hotspot on More notifications Connected to a VPN Headset plugged in 3G3G HH
  • 16.
    Getting started 11 Switching betweenhome screens Running out of space on the home screen? Not to worry. Your phone lets you create more home screens for various application icons and widgets. • Flick left and right across the screen to switch between the home screens. • Pinch two fingers together to display the home screen thumbnails. Touch a thumbnail to enter that particular home screen. Taking a screenshot Want to share an interesting scene in a movie or show off your new high score in a game? Take a screenshot and share away. Connected to a computer USB tethering on
  • 17.
    Getting started 12 Press andthe volume down button simultaneously to take a screenshot. Then, open the notification panel and touch to share the screenshot. Screenshots are saved to the Screenshots album in Gallery. Auto-rotate screen Your phone features a tilt sensor. If you rotate your phone when browsing a web page or viewing a photo, the orientation of your screen will automatically change to landscape or portrait view. You'll also be able to enjoy tilt sensor- based applications, such as racing games. To quickly turn the auto-rotate screen function on or off, flick down from the status bar to open the notification panel and touch . Using the notification panel Flick down from the status bar to open the notification panel. Touch to delete all notifications. Touch to display the settings screen. Touch the switch shortcuts on the notification panel to turn on or off the functions. 1 2 3 4 1 2 3
  • 18.
    Getting started 13 Accessing applications Startingapplications and switching between them On the home screen, touch an application icon to open it. To switch to another application, touch to return to the home screen, and touch the icon of the application you want to open. Viewing recently used applications To display the list of recently used applications, touch and hold . You can then: • Touch an application to start it. • Flick left or right across an application to dismiss it. • Touch to clear the list. Texting Your phone comes with multiple text input methods. You can quickly enter text using the onscreen keyboard. • Touch a text box to bring up the onscreen keyboard. • To hide the onscreen keyboard, touch . Selecting an input method 1. On the text input screen, flick down from the status bar to open the notification panel. 2. Touch to select an input method. To change your phone's default input method, touch on the home screen. Then touch the All tab. Under PERSONAL, touch Language & input > Default to select an input method. Touch an application to start it and flick left or right across a notification to dismiss it. 4
  • 19.
    Getting started 14 Huawei inputmethod Slide your finger left or right across the onscreen keyboard to switch between the QWERTY and 9-key keyboards. Touch to switch between lowercase letters, uppercase letters, and caps lock. Touch to enter numbers and symbols. Touch to enter emoticons. Touch to switch the input language. When you are typing in English, touch to switch between QWERTY and 9-key keyboards. 3 1 2 45 1 A 2 *#12 3 4 5
  • 20.
    Getting started 15 Android InputMethod •Touch to switch between lowercase and uppercase letters. •Touch and hold or quickly touch twice to turn on caps lock. Touch to enter numbers. •Touch to switch to voice input. •Touch and hold to open the Input options menu. •Touch to enter a space. •Touch and hold to switch to another input method. •Touch to enter a period. •Touch and hold to enter symbols. •Touch to delete the character to the left of the cursor. •Touch and hold to delete all characters to the left of the cursor. 1 2 3 4 5 6 1 2 ?123 3 4 ... ... 5 6
  • 21.
    Getting started 16 Editing text Learnhow to select, cut, copy, and paste text on your phone. • Select text: Touch and hold the text to bring up . Then drag and to select more or less text, or touch Select all to select all text in a text box. • Cut text: Select text and touch Cut. • Copy text: Select text and touch Copy. • Paste text: Touch where you want to insert the text, drag to move the insertion point, and touch Paste to paste the text you copied or cut. Configuring an input method 1. On the home screen, touch then the All tab. 2. Under PERSONAL, touch Language & input. 3. Under KEYBOARD & INPUT METHODS, touch the input method you want to configure.
  • 22.
    17 • Personalizing yourphone Changing the home screen style Your phone supports the standard and simple home screen styles. 1. On the home screen, touch . 2. Under All, touch Home screen style. 3. Choose Standard or Simple and touch APPLY. Changing the theme 1. On the home screen, touch . 2. Select a theme and touch APPLY. Change the wallpaper 1. On the home screen, touch and hold a blank area to display the Set home screen dialog box. 2. Touch Wallpapers. 3. From the Wallpaper screen, you can set the following items: • Lock screen wallpaper: Set the wallpaper displayed on the phone lock screen. • Home screen wallpaper: Set the home screen wallpaper. • Shake to change: Change the home screen wallpaper by shaking your phone. • Random change: The home screen wallpaper changes randomly. Setting the home screen transition effect 1. On the home screen, touch and hold a blank area to display the Set home screen dialog box.
  • 23.
    Personalizing your phone 18 2.Touch Transitions. 3. Select a home screen transition effect. Organizing home screen widgets and application icons Adding a widget to the home screen 1. On the home screen, touch and hold a blank area to display the Set home screen dialog box. 2. Touch Widgets. 3. Drag a widget from the screen's lower section to a screen thumbnail. 4. Touch to return to the home screen. If the home screen doesn't have enough space, your phone will automatically create a new home screen to the original's right and place the widget on the new home screen. Deleting an application icon or widget On the home screen, touch and hold the application icon or widget you want to delete until is displayed. Drag the unwanted application icon or widget to to delete it. Deleting an application icon uninstalls the application. When you delete an application icon, your phone prompts you to confirm the action. Touch OK to uninstall the application. Moving an application icon or widget You can re-arrange application icons and widgets to any fitting empty space on the home screen.
  • 24.
    Personalizing your phone 19 Organizinghome screen icons using folders Creating a folder on the home screen 1. On the home screen, drag an item onto another one to create a folder containing both of them. 2. You can then: • Touch the folder name to rename it. • Touch and add more items to the folder. Removing an item from a folder 1. On the home screen, touch a folder. 2. Drag an item out from the folder to remove the item. A folder must contain at least two items; otherwise, the folder will automatically disappear. Customizing your home screens Re-arranging home screens 1. On a home screen, touch and hold a blank area to display the Set home screen dialog box. 2. Touch Thumbnails. 3. Touch and hold a home screen thumbnail until your phone vibrates, and drag it to the new location. Adding a home screen 1. On a home screen, touch and hold a blank area to display the Set home screen dialog box. 2. Touch Thumbnails. 3. Touch to add a home screen.
  • 25.
    Personalizing your phone 20 Deletinga home screen Only blank home screens can be deleted. 1. On a home screen, touch and hold a blank area to display the Set home screen dialog box. 2. Touch Thumbnails. 3. Touch to delete a home screen. Setting tones Setting the ringtone 1. On the home screen, touch then the All tab. 2. Under DEVICE, touch Sound. 3. Touch Phone ringtone and select either of the following options from the displayed dialog box: • Ringtone: choose from the default selection. • Music: choose from the audio files you have saved to your phone. 4. Touch Apply. Setting notification tones 1. On the home screen, touch then the All tab. 2. Under DEVICE, touch Sound. 3. Touch Notification tone. 4. Select a tone type. You can configure the email notification tone only after you have set up an email account. 5. Select a tone. 6. Touch Apply.
  • 26.
    Personalizing your phone 21 Changingthe font size 1. On the home screen, touch then the All tab. 2. Under DEVICE, touch Display. 3. Touch Font size and select a font size. Setting the screen unlock method Face unlock 1. On the home screen, touch then the All tab. 2. Under PERSONAL, touch Security. 3. Touch Screen lock > Face Unlock. 4. Follow the onscreen instructions to take a photo of your face. Your phone will use face unlock as the primary unlock method. 5. Set a secondary unlock method. If face unlock cannot recognize you (dim light, for example), follow the onscreen instructions to unlock your phone using the secondary unlock method. To turn off face unlock, use the secondary unlock method to enter the Screen lock screen, and select another unlock method. Unlocking the screen with a pattern 1. On the home screen, touch then the All tab. 2. Under PERSONAL, touch Security. 3. Touch Screen lock > Pattern. 4. Follow the onscreen instructions to set a screen unlock pattern. If you draw incorrect patterns five consecutive times, the screen stops responding to further unlock attempts for 30 seconds. You will still be able to make emergency calls during this time.
  • 27.
    Personalizing your phone 22 Unlockingthe screen with a PIN 1. On the home screen, touch then the All tab. 2. Under PERSONAL, touch Security. 3. Touch Screen lock > PIN. 4. Follow the onscreen instructions to set a screen unlock PIN. After a PIN is set, you will have to enter it every time you want to unlock the phone screen. If you enter incorrect PINs five consecutive times, the screen stops responding to further unlock attempts for 30 seconds. You will still be able to make emergency calls during this time. Unlocking the screen with a password 1. On the home screen, touch then the All tab. 2. Under PERSONAL, touch Security. 3. Touch Screen lock > Password. 4. Follow the onscreen instructions to set a screen unlock password. 5. Repeat the password and touch OK. After a password is set, you will have to enter it every time you want to unlock the phone screen. If you enter incorrect passwords five consecutive times, the screen stops responding to further unlock attempts for 30 seconds. You will still be able to make emergency calls during this time. Adjusting the screen brightness 1. On the home screen, touch then the All tab. 2. Under DEVICE, touch Display. 3. Touch Brightness. 4. In the displayed dialog box, perform either of the following operations: • Select the Automatic brightness check box to have your phone automatically adjust its screen brightness based on the ambient light.
  • 28.
    Personalizing your phone 23 •Drag the slider left to reduce the screen brightness or drag it right to increase the screen brightness.
  • 29.
    24 • Calls Smart dialing Inaddition to standard call procedures, smart dialing lets you quickly find contacts by entering parts of their names or numbers. 1. On the home screen, touch . 2. Enter a phone number or the initials or first several letters of a contact name. Matching contacts in your phone and phone numbers in your call log are then displayed in a list. 3. From the list, select the contact you want to call. 4. To end the call, touch . Answering or rejecting a call When a call comes in, you can press the volume button to mute the ringtone. • Drag right to answer the call. • Drag left to reject the call. • Drag up to reject the call and send the caller a message. On the dialer screen, touch > Call settings > Quick responses to edit the message that will be sent.
  • 30.
    Calls 25 Viewing the calllog 1. On the home screen, touch to display your recent calls above the dialer. 2. Touch > Missed calls to view your missed calls. What you can do during a call Touch > to place the current call on hold, and touch again to resume the call. Touch > to start a three-way call. Before you use three- way calling, make sure you have subscribed to this service. For details, contact your service provider. Touch to use the speakerphone. Touch to mute or unmute the microphone. Touch to end the call. Touch to display the dialer. 2 3 5 64 1 7 8 1 2 3 4 5 6
  • 31.
    Calls 26 To return tothe call screen, flick down from the status bar to open the notification panel, and touch Current call. Making a conference call Conference calling with your friends, family, and co-workers is easy. Make or answer a call, and dial another number to add the second participant to your conference call. Before you make a conference call, make sure you have subscribed to the service. For details, contact your service provider. 1. Call the first participant. 2. When the call is connected, touch > to call the second participant. The first participant will be placed on hold. 3. When the second call is connected, touch to start a conference call. 4. To add more people to the call, repeat steps 2 and 3. 5. Touch to end the call. Answering a third-party call Before you answer a third-party call, make sure you have turned on call waiting. 1. If a call comes in when you are already in another call, drag right to answer the new call and place the first call on hold. 2. To switch between the two calls, touch . Making emergency calls In the event of an emergency, you will still be able to make emergency calls without the use of a SIM card. However, you must still be under the coverage area. Touch > to display a note. Touch > to display the contact list. 7 8
  • 32.
    Calls 27 1. On thehome screen, touch . 2. Enter your local emergency number and touch . Emergency calls are subject to cellular network quality, use environment, service provider policies, and local laws and regulations. Never rely solely on your phone for critical communications when emergencies occur. Other call services Your phone also supports other call functions, such as call forwarding, call waiting, and voicemail. Before you use these functions, make sure you have subscribed to these services. For details, contact your service provider. Enabling call forwarding Too busy to answer all your calls with one phone? Forward them to another number and never miss an important call again! 1. On the home screen, touch then the All tab. 2. Under APPS, touch Call. 3. Touch Call forwarding. 4. Select a forwarding mode. 5. Enter the phone number to which you want to forward calls, and touch Enable. Enabling call waiting The call waiting function lets you answer another incoming call when you are already busy in a call and switch between the two calls. 1. On the home screen, touch then the All tab. 2. Under APPS, touch Call. 3. Touch Additional settings. 4. Touch Call waiting to enable call waiting.
  • 33.
    Calls 28 Setting up yourvoicemail Voicemail is your personal storage for missed calls, including the calls missed when you are in another call or your phone is powered off. Before you use voicemail, make sure you have subscribed to the voicemail service and obtained your voicemail number. For details, contact your service provider. You must also enable call forwarding and set all incoming calls to be forwarded to your voicemail. 1. On the home screen, touch then the All tab. 2. Under APPS, touch Call. 3. Touch Voicemail > Voicemail settings > Voicemail number. 4. Enter your voicemail number, and touch OK. To listen to your voicemail messages, touch and hold the 1 key on the dialer and follow the voice instructions.
  • 34.
    29 • People Forget aboutlugging around business card holders. You can now easily store and manage your contacts. Creating a contact 1. On the home screen, touch then the Contacts tab. 2. Touch . 3. Select an account. 4. Enter the contact name, phone number, and other details. Touch Add another field to enter more information. 5. Touch DONE to save the contact. Searching for a contact 1. On the home screen, touch then the Contacts tab. 2. Touch the search box. 3. Enter the contact name or initials. Matching results are displayed as you type. For example, to search for John Doe, enter John Doe or JD. Copying contacts 1. On the home screen, touch then the Contacts tab. 2. Touch > Manage contacts > Copy contacts. 3. From the displayed option menu, select the location where the contacts you want to copy are saved. 4. Touch the contacts you want to copy or touch All to select all contacts. 5. Touch COPY and select the account to which you want to paste the contacts.
  • 35.
    People 30 Importing or exportingcontacts Your phone supports contact files in .vcf format only. This is a standard format for files storing contacts. Contact names, addresses, phone numbers, and other information can be saved in .vcf files. Importing contacts from a storage device You can import contacts saved in a .vcf file from a storage device to your phone. 1. On the home screen, touch then the Contacts tab. 2. Touch > Manage contacts > Import from storage. 3. Select one or more .vcf files. 4. Touch OK. Importing contacts from a Bluetooth device You can import contacts saved in a .vcf file from a Bluetooth device to your phone. 1. On the home screen, touch then the Contacts tab. 2. Touch > Manage contacts > Import via Bluetooth. Your phone then enables Bluetooth and searches for available Bluetooth devices. 3. Touch the Bluetooth device with which you want to pair your phone. When the two devices are paired, your phone automatically imports contacts from the other device. Exporting contacts Back up your contacts to an external storage device to avoid losing them during a system upgrade or by mistake. 1. On the home screen, touch then the Contacts tab. 2. Touch > Manage contacts > Export to storage. A dialog box is then displayed, showing the exported .vcf file name and its save location. 3. Touch OK.
  • 36.
    People 31 To view the.vcf file you just exported, open File Manager. The file is displayed in the root directory of your phone's internal storage. Adding a contact to your favorites 1. On the home screen, touch then the Favorites tab. 2. Touch . 3. Touch the contact you want to add to favorites or touch All to select all contacts. 4. Touch ADD. Deleting contacts 1. On the home screen, touch then the Contacts tab. 2. Touch > Delete contacts. 3. Touch the contacts you want to delete or touch All to select all contacts. 4. Touch DELETE. 5. Touch OK. Sharing contacts You can share contacts in .vcf format in many ways. 1. On the home screen, touch then the Contacts tab. 2. Touch > Share contacts. 3. Touch the contacts you want to share or touch All to select all contacts. 4. Touch SHARE and choose a sharing method from the displayed option menu. Contact groups You can create a contact group and send a message or email to all group members simultaneously.
  • 37.
    People 32 Creating a contactgroup 1. On the home screen, touch then the Groups tab. 2. Touch . 3. Name the contact group. 4. Touch Add members. 5. Select one or more contacts. 6. Touch ADD MEMBERS. 7. Touch DONE. Editing a contact group 1. On the home screen, touch then the Groups tab. 2. Touch and hold the contact group you want to edit. 3. From the displayed option menu, choose Edit. 4. Rename the group or manage group members. 5. Touch DONE. Sending messages or emails to a contact group 1. On the home screen, touch then the Groups tab. 2. Touch and hold the contact group you want to send a message or email to. 3. From the displayed option menu, choose Send message or Send email. You can also open the contact group and touch to send a message or to send an email. Deleting a contact group 1. On the home screen, touch then the Groups tab. 2. Touch and hold the contact group you want to delete. 3. From the displayed option menu, choose Delete. @
  • 38.
    People 33 Deleting a contactgroup will not remove the contacts in the group from your phone.
  • 39.
    34 • Messaging Sending atext message 1. On the home screen, touch . 2. In the list of message threads, touch . 3. Touch the recipient text box and enter the contact name or phone number. Touch to select more contacts. 4. Write your message. 5. Touch Send. Sending a multimedia message Make sure your data service is on before trying to send multimedia messages. 1. On the home screen, touch . 2. In the list of message threads, touch . 3. Touch the recipient text box and enter the contact name or phone number. Touch to select more contacts. 4. Touch > Add subject and enter the message subject. 5. Write your message. 6. Touch , select the attachment type, and attach a file. To attach more than one files to the message, touch Slideshow. 7. Touch Send.
  • 40.
    Messaging 35 Replying to amessage 1. On the home screen, touch . 2. In the list of message threads, touch a contact name or phone number to view the conversation thread. 3. Touch the text field to write your reply. 4. Touch Send. Searching for a message 1. On the home screen, touch . 2. In the list of message threads, touch > Search. 3. Enter the message or contact, or parts of them. Your phone then displays matching results. Managing messages Copying a message 1. On the home screen, touch . 2. In the list of message threads, touch a contact name or phone number to view the conversation thread. 3. Touch and hold the message you want to copy. 4. From the displayed option menu, choose Copy text. 5. Touch and hold the area you want to paste the message and choose Paste from the displayed option menu. Forwarding a message 1. On the home screen, touch . 2. In the list of message threads, touch a contact name or phone number to view the conversation thread. 3. Touch and hold the message you want to forward.
  • 41.
    Messaging 36 4. From thedisplayed option menu, choose Forward. 5. Touch the recipient text box and enter the contact name or phone number. Touch to select more contacts. 6. Touch Send. Deleting a message 1. On the home screen, touch . 2. In the list of message threads, touch a contact name or phone number to view the conversation thread. 3. Touch and hold the message you want to delete and touch Delete. Deleting a thread 1. On the home screen, touch . 2. In the list of message threads, touch and hold the thread you want to delete. 3. From the displayed option menu, choose Delete messages. Modifying message settings 1. On the home screen, touch . 2. In the list of message threads, touch . 3. Touch Settings. 4. Change the message tone, manage SIM card messages, and more.
  • 42.
    37 • Browser Your phone'sbrowser lets you surf the web and stay on the ball with up-to-date news and information. Staying connected has never been easier. Browsing web pages 1. On the home screen, touch . 2. Enter a website address in the address box. Your phone displays matching websites as you type. 3. Touch the website you want to visit. Managing bookmarks Bookmarks let you keep track of your favorite websites. Adding a bookmark 1. On the home screen, touch . 2. On the Browser screen, open the web page you want to add as a bookmark. 3. Touch > Save to bookmarks. 4. Name the bookmark or use the default name. Then, touch OK. Accessing a bookmark 1. On the home screen, touch . 2. On the Browser screen, touch . 3. Touch Bookmarks. 4. Under Local, touch a bookmark. Editing a bookmark 1. On the home screen, touch .
  • 43.
    Browser 38 2. On theBrowser screen, touch . 3. Touch Bookmarks. 4. Touch and hold the bookmark you want to edit. 5. From the displayed option menu, choose Edit bookmark. 6. Edit the bookmark. 7. Touch OK. Setting the home page Set your favorite web page as your browser's home page to make life a little easier. 1. On the home screen, touch . 2. On the Browser screen, touch . 3. Touch Settings > General > Set homepage. 4. From the displayed option menu, choose the web page you want to set as the home page. Clearing your browsing history To better protect your privacy, clear your browsing history from time to time. 1. On the home screen, touch . 2. On the Browser screen, touch . 3. Touch Settings > Privacy & security > Clear history. 4. Touch OK. Modifying browser settings 1. On the home screen, touch . 2. On the Browser screen, touch . 3. Touch Settings.
  • 44.
    Browser 39 4. Customize yourbrowser settings to better fit your needs.
  • 45.
    40 • Email Don't wantto miss important emails from your friends or clients during your business trip? Use your phone to read and reply to emails when you are on the go. Adding a POP3 or IMAP email account Certain parameters must be set when you add a POP3 or IMAP email account. For details, contact your email service provider. 1. On the home screen, touch . 2. Select an email account type. 3. Enter your Email address and Password, and touch Next. 4. Follow the onscreen instructions to configure the email settings. When the email account is set up, the Inbox screen is displayed. To add more email accounts, touch > Settings > Add account. Adding an Exchange account Exchange is an email system developed by Microsoft to implement communication inside an enterprise. Some email service providers also provide Exchange accounts for individuals and families. Certain parameters must be set when you add an Exchange account. For details, contact your email service provider. 1. On the home screen, touch . 2. Touch Exchange. 3. Enter your Email address, Domain, Username, and Password. Then, touch Next. 4. Follow the onscreen instructions to configure the email settings. When the Exchange account is set up, the Inbox screen is displayed.
  • 46.
    Email 41 Switching between emailaccounts 1. On the home screen, touch . 2. Touch the email address on the top to display your email account list. 3. Touch an email account you want to use. Sending emails 1. On the home screen, touch . 2. Open an email account. 3. On the Inbox screen, touch . 4. Enter the recipient and subject and write your message. Upload any attachments. 5. When you are done, touch to send the email. Checking your emails 1. On the home screen, touch . 2. Open an email account. 3. On the Inbox screen, touch the email you want to read. 4. When reading an email, you can: • Touch to reply to it. • Touch to forward it. • Touch to delete it. • Touch to go back to the previous email. • Touch to skip to the next email. Mail retrieval may be slightly delayed, depending on the network condition. Touch in the lower right corner to refresh the inbox.
  • 47.
    Email 42 Removing an emailaccount After you remove an email account, your phone will no longer send or receive emails using that account. 1. On the home screen, touch . 2. On the Inbox screen, touch . 3. Touch Settings. 4. Select the account you want to remove. 5. Under REMOVE ACCOUNT, touch Remove account. 6. Touch OK. Modifying email account settings 1. On the home screen, touch . 2. On the Inbox screen, touch . 3. Touch Settings > General. 4. Set the font size, display options, and other settings.
  • 48.
    43 • Multimedia Camera As timeflies by, there must be some memories you want to keep forever. Camera is a great tool for this. It supports a variety of capture modes, such as beauty and smile. Viewfinder •Drag the slider to to switch to photo mode. •Drag the slider to to switch to video mode. •Touch to take a photo. •Touch and hold to take burst shots. Touch the thumbnail to view your photos. •Touch an object on the viewfinder to focus the camera on it. •Spread two fingers to zoom in or pinch to zoom out. 1 2 3 4 5 6 7 1 2 3 4
  • 49.
    Multimedia 44 Taking a photo 1.On the home screen, touch . 2. Frame the scene you want to capture. The camera automatically focuses itself. When the viewfinder frame turns green, the camera is focused. 3. Touch . Shooting a video 1. On the home screen, touch . 2. Frame the scene you want to record. 3. Touch to start recording. 4. Touch to stop recording. Taking a panoramic photo Are you still upset that your camera's view angle isn't wide enough to capture an incredible scene? Panorama mode is exactly the solution you need. You'll be able to piece together several photos and combine them into one seamless shot. 1. On the home screen, touch . 2. In photo mode, touch > to switch to panoramic mode. Touch to open the option menu, where you can: •Touch to switch to normal mode. •Touch to switch to panoramic mode. •Touch to switch to special effects mode. •Touch to enable or disable Touch to capture, Voice activated shooting, GPS tag, and other functions, as well as set the photo resolution, timer, and other parameters. Touch to set the flashlight mode. Touch to switch between the rear and front cameras. 5 6 7
  • 50.
    Multimedia 45 3. Frame thescene you want to capture. 4. Touch . 5. Move your phone slowly in the direction indicated by the arrow to capture multiple photos. If the viewfinder screen turns red, the view will not be captured. This may happen when you have moved your phone too fast or the viewfinder scope has gone beyond the limits of the panoramic view. 6. Your phone stops shooting when it has taken enough photos for a panoramic photo. You can also touch to stop shooting. The camera automatically stitches the photos together to create one panoramic photograph. Gallery Gallery is your personal treasure box of sweet memories. Viewing photos or videos In your Gallery, photos and videos are stored in separate albums. 1. On the home screen, touch . 2. Touch the album you want to view. 3. Touch the photo or video to view it in full screen mode. When viewing a photo, pinch two fingers together to zoom out or spread them apart to zoom in. Playing a slideshow 1. On the home screen, touch . 2. Touch an album. 3. Touch > Slideshow to play a slideshow of the photos in the album. 4. Touch the screen to stop the slideshow.
  • 51.
    Multimedia 46 Editing a photo Youcan remove red eye, crop a photo, or apply a number of effects to make your photos even more stunning. 1. On the home screen, touch . 2. Touch the photo you want to edit. 3. Touch > Edit and then you can: • Touch to select a filter. • Touch to rotate or crop the photo. • Touch to lighten or shadow the photo. • Touch to add a frame to the photo. 4. Touch . Rotating a photo 1. On the home screen, touch . 2. Touch the photo you want to rotate. 3. Touch > Rotate Left or Rotate Right. You can also enable the auto-rotate screen function to have your phone automatically adjust the display orientation when you rotate your phone. Cropping a photo 1. On the home screen, touch . 2. Touch the photo you want to crop. 3. Touch > Edit. 4. Touch > Crop and then you can: • Drag the grid to reposition it. • Drag the frames of the grid to resize it. 5. Touch .
  • 52.
    Multimedia 47 Deleting a photo 1.On the home screen, touch . 2. Touch the photo you want to delete. 3. Touch . 4. Touch Delete. Sharing a photo or video Want to share your best shots or an amusing trick your dog just did? Simply share the photos and videos using email, Bluetooth, and more. 1. On the home screen, touch . 2. Touch the photo or video you want to share. 3. Touch . 4. Choose a sharing method and follow the onscreen instructions. Setting a photo as the wallpaper 1. On the home screen, touch . 2. Choose the photo you want to set as the wallpaper. 3. Touch > Set as > Wallpaper. 4. Drag the frames of the grid to resize it. 5. Touch . Music In the mood for music? Your phone provides you with a supreme audio experience. Adding songs You can copy songs to your phone and immerse yourself in a world of extraordinary sound anytime. Add songs to your phone by: • Copying songs from your computer using a USB cable.
  • 53.
    Multimedia 48 • Downloading songsfrom the web. • Copying songs from Bluetooth devices. Listening to music 1. On the home screen, touch . 2. Choose a category. 3. Touch the song you want to play. Touch to enter the music library. • Touch to play and touch to pause. • Touch to go back to the previous song. • Touch to skip to the next song. Drag the slider to control the playback. Touch to display the option menu from which you can perform additional operations. 1 4 3 2 1 2 3 4
  • 54.
    Multimedia 49 When a songis playing, touch to exit the playback screen without stopping the song. To return to the music playback screen, open the notification panel and touch the playing song.
  • 55.
    50 • Internet connection Mobiledata connection After you insert a SIM card into your phone and power it on for the first time, your phone automatically registers with your service provider's data service. Checking the network connection 1. On the home screen, touch then the All tab. 2. Under WIRELESS & NETWORKS, touch Mobile networks. 3. Touch Access Point Names or Network operators to check network connection settings. Your phone automatically reads access point settings from your SIM card. Do not change the access point settings; otherwise, you may not be able to access the network. Enabling the data service 1. On the home screen, flick down from the status bar to open the notification panel. 2. Touch to enable your phone's data service. When you don't need to access the Internet, disable the data service to save battery power and reduce data usage. Setting up a Wi-Fi connection When you use your phone at home, you can connect to the Wi-Fi hotspot created from your router. Some public locations, such as airports and libraries, may also have Wi-Fi networks available for use. Connecting to a Wi-Fi network 1. On the home screen, touch then the All tab. 2. Under WIRELESS & NETWORKS, touch the Wi-Fi switch to turn on Wi-Fi.
  • 56.
    Internet connection 51 3. UnderWIRELESS & NETWORKS, touch Wi-Fi. You phone then scans for available Wi-Fi networks and displays them. 4. Choose the Wi-Fi network you want to connect to and touch Connect. For an encrypted Wi-Fi network, enter the password when prompted. If Wi-Fi and mobile data are both enabled, your phone connects to the Wi- Fi network preferentially. When Wi-Fi becomes unavailable, your phone automatically switches to the mobile data connection. Connecting to a Wi-Fi network using WPS Wi-Fi protected setup (WPS) lets you quickly connect to a Wi-Fi network. A safe connection is set up by pressing the WPS button or entering the PIN. To use the WPS function and set up a Wi-Fi connection between your phone and a Wi-Fi hotspot, make sure the Wi-Fi hotspot also supports the WPS. Using the WPS button 1. On the home screen, touch then the All tab. 2. Under WIRELESS & NETWORKS, touch the Wi-Fi switch to turn on Wi-Fi. 3. On the Wi-Fi network list, touch . 4. On the Wi-Fi hotspot device, press the WPS button. Using the WPS PIN 1. On the home screen, touch then the All tab. 2. Under WIRELESS & NETWORKS, touch the Wi-Fi switch to turn on Wi-Fi. 3. On the Wi-Fi network list, touch . 4. Touch Input WPS PIN. Your phone generates a PIN. 5. On the Wi-Fi hotspot device, enter the PIN.
  • 57.
    Internet connection 52 Sharing yourphone's mobile data connection Want to access the Internet from multiple devices when you are on the go? Use USB tethering or set your phone as a Wi-Fi hotspot to share its data connection with other devices. USB tethering You can share your phone's data connection with a computer using a USB cable. To use USB tethering, you may need to install your phone's driver on the computer or establish a network connection, depending on your computer's operating system. If your computer runs Windows 7, Windows Vista, or a latest Linux operating system (such as Ubuntu 10.4), you can use your phone's USB tethering function without configuring any settings on the computer. If you are running an earlier version of Windows or another OS, your PC will identify and install a driver automatically. 1. Use a USB cable to connect your phone to the computer. 2. On the home screen, touch then the All tab. 3. Under WIRELESS & NETWORKS, touch More…. 4. Touch Tethering & portable hotspot. 5. Select the USB tethering check box to share your phone's data connection. You cannot use your phone's USB tethering function when the phone is in USB storage mode. Wi-Fi hotspot Your phone can also function as a Wi-Fi hotspot for other devices, sharing its mobile data connection. 1. On the home screen, touch then the All tab. 2. Under WIRELESS & NETWORKS, touch More…. 3. Touch Tethering & portable hotspot > Configure Wi-Fi hotspot. 4. Name the Wi-Fi hotspot. 5. Select an encryption mode. It is recommended that you set the encryption mode to WPA2PSK to better
  • 58.
    Internet connection 53 secure theWi-Fi network. 6. Set the key to the Wi-Fi hotspot. When other devices want to access your phone's network, this key must be entered. 7. Select the Portable Wi-Fi hotspot check box. 8. On the device you want to use, search for and connect to your phone's Wi-Fi network. Controlling your data usage Your phone's data usage control function lets you check and control your data usage. Set a data usage cycle and a mobile data limit for this period and you will be notified when data usage reaches this limit. You can also query the data usage within a certain period of time or data traffic consumed by an application. 1. On the home screen, touch then the All tab. 2. Under WIRELESS & NETWORKS, touch More…. 3. Touch Data usage. Turn the mobile data connection on or off. To configure data control and query data usage, the mobile data connection must be turned on. 4 5 6 1 2 3 1
  • 59.
    Internet connection 54 On theData usage screen, touch to open an option menu, from which you can: • Turn data roaming on or off. • Prevent background mobile data traffic. • Turn automatic data synchronization on or off. • Select the Show Wi-Fi usage check box. The Wi-Fi tab will be displayed. Touch this tab to view Wi-Fi data usage. • Touch Mobile hotspots and select the Wi-Fi networks that are mobile hotspots to prevent applications from accessing these networks in the background. If an application is downloading a large file using these networks, you will be notified. Turn the mobile data usage limit on or off. Set the data usage cycle. Touch Data usage cycle then Change cycle… to set the data usage cycle. Set the data usage limits. The yellow line indicates the warning limit, and the red line indicates the data usage limit. Drag the red and yellow lines to adjust the values or touch the lines to set specific values. When your data usage reaches the yellow line, you will receive a warning notification. When your data usage reaches the red line, your phone's mobile data connection will be disabled. Time axis. Drag the time axes to set a data usage cycle. Display the data usage of each application. 2 3 4 5 6
  • 60.
    55 • Sharing data Bluetooth Yourphone is Bluetooth-capable, allowing you to connect to other Bluetooth- enabled devices for wireless data transmission. When using Bluetooth, stay within 10 meters (33 feet) of other Bluetooth devices. Turning on Bluetooth 1. On the home screen, touch then the All tab. 2. Under WIRELESS & NETWORKS, touch Bluetooth. When Bluetooth is turned on, your phone's name is displayed at the top of the Bluetooth screen. Touch the name to set your phone's visibility. To rename your phone, touch > Rename phone. When you are done, touch Rename to save the changes. Pairing with other Bluetooth devices To exchange data with another Bluetooth device, enable Bluetooth on both devices and pair them with each other. 1. On the home screen, touch then the ALL tab. 2. Under WIRELESS & NETWORKS, touch Bluetooth. 3. From the list of detected Bluetooth devices, touch a device and follow the onscreen instructions to pair with it. To disconnect from a paired Bluetooth device, under PAIRED DEVICES, touch > Unpair. If a Bluetooth connection cannot be set up between your phone and another device, they may be incompatible.
  • 61.
    Sharing data 56 Sharing filesusing Bluetooth Bluetooth enables you to conveniently send photos, videos, and other files to your family and friends. You can share files with Bluetooth-enabled devices without an Internet connection. 1. On the home screen, touch . 2. Touch and hold the file you want to send. 3. From the displayed option menu, choose Share > Bluetooth. 4. From the detected Bluetooth device list, select a device. Receiving files using Bluetooth 1. When your phone receives a file transfer request, open the notification panel. 2. Touch Bluetooth share: Incoming file to display a file reception dialog box. 3. Touch Accept to start receiving the file. When the file is received, you will receive a notification of a successful transfer. Open the notification panel to read the notification. By default, received files are saved to the bluetooth folder in File Manager. Connecting your phone to a computer When you connect your phone to a computer using a USB cable, your phone will display a notification prompting you to select a connection type. MTP mode The Media Transfer Protocol (MTP) is used to transfer media files, such as pictures, songs, and videos, between your phone and a computer. The MTP mode is only compatible with Windows Media Player 10 or later. 1. Use a USB cable to connect your phone to the computer. 2. On the USB computer connection screen, choose Media device (MTP). The phone driver is then automatically installed on the computer. 3. After the driver is installed, follow the onscreen instructions on the computer to view or transfer files.
  • 62.
    Sharing data 57 PTP mode ThePicture Transfer Protocol (PTP) is another method to transfer pictures and videos to your computer. 1. Use a USB cable to connect your phone to the computer. 2. On the USB computer connection screen, choose Camera (PTP). The phone driver is then automatically installed on the computer. 3. After the driver is installed, follow the onscreen instructions on the computer to view or transfer files. Mass storage mode In mass storage mode, you can use your phone as a USB mass storage device and transfer files between your phone and a computer. 1. Use a USB cable to connect your phone to the computer. 2. On the USB computer connection screen, choose USB storage device. The phone driver is then automatically installed on the computer. 3. The computer will identify your phone as a USB mass storage device. You can then transfer files between your phone and the computer. After file transmission, safely remove the device from the computer and disconnect it from the USB cable to prevent your data from being lost or corrupted.
  • 63.
    58 • File Manager FileManager helps you manage files and applications in your phone's internal storage and microSD card. You'll be able to view, create, edit, delete, move, archive, compress, and decompress files. Creating a folder You can create folders to better manage the files and applications stored in your phone's internal storage or microSD card. 1. On the home screen, touch . 2. Touch Internal or SD card. 3. Touch > New folder. 4. In the displayed dialog box, name the new folder. 5. Touch Save. Searching for a file Too many files stressing you out? The search function helps you find what you need in no time. 1. On the home screen, touch . 2. Touch Internal or SD card. 3. Touch > Search. 4. Enter part or all of the file name. Matching results will be displayed. Copying, cutting, and pasting a file 1. On the home screen, touch . 2. Touch and hold the file you want to copy or cut. 3. From the displayed option menu, choose Copy or Cut.
  • 64.
    File Manager 59 4. Selectwhere you want to paste the file. 5. Touch PASTE. Compressing or decompressing files You can compress files into .zip files to save space or decompress .zip and .rar files. 1. On the home screen, touch . 2. Touch and hold the file or folder you want to compress. 3. From the displayed option menu, choose Compress. 4. Choose the save path of the compressed file and name it. 5. Touch OK. To decompress a file, touch and hold it and choose Extract from the displayed option menu. Renaming a file 1. On the home screen, touch . 2. Touch and hold the file you want to rename. 3. From the displayed option menu, choose Rename. 4. In the displayed dialog box, enter a new name for the file. 5. Touch OK. Deleting a file 1. On the home screen, touch . 2. Touch and hold the file you want to delete. 3. From the displayed option menu, choose Delete. 4. Touch OK.
  • 65.
    File Manager 60 Creating ashortcut for a file or folder 1. On the home screen, touch . 2. Touch the file or folder you want to create a shortcut for. 3. From the displayed option menu, choose Desktop shortcuts. Checking the memory status Before you save large files to your phone's internal storage or microSD card, make sure there is enough space first. 1. On the home screen, touch . 2. Touch > Storage. 3. On the Storage settings screen, view the total and available space on your phone's internal storage or microSD card.
  • 66.
    61 • Managing applications Downloadingapplications A rich selection of applications is available through Google's Play Store. You can also connect your phone to a computer and transfer applications over that way. Installing an application It is recommended that you use Play Store as your primary download source. Certain third-party applications from other sources may not be compatible with your phone. 1. On the home screen, touch Mgmt. > . 2. Select the application you want to install. 3. Touch Install. 4. Touch Done. During the installation, an Install blocked message may be displayed. Read the message carefully. If you want to continue with the installation, touch then All > Security, and select the Unknown sources check box to allow installation of third-party applications. Then touch to proceed. Viewing applications You can view detailed information about all applications installed on your phone. 1. On the home screen, touch then the All tab. 2. Under APPS, touch Manage apps. 3. Flick to All. 4. Select the application you want to view.
  • 67.
    Managing applications 62 Uninstalling anapplication You can remove unwanted applications to increase your phone's available storage. 1. On the home screen, touch then the All tab. 2. Under APPS, touch Manage apps. 3. Flick to All. 4. Select the application you want to uninstall. 5. Touch Uninstall > OK. Some pre-installed applications cannot be uninstalled. Clearing the application cache You can clear the application cache to free up the phone memory. 1. On the home screen, touch then the All tab. 2. Under APPS, touch Manage apps. 3. Flick to All. 4. Touch Clear cache.
  • 68.
    63 • Google services Touse Google services, sign in with a Google account. If you don't have one, open a Google application and follow the onscreen instructions to create your Google account. Google applications, services, and functions vary with country and service provider. Please follow local laws and regulations when you use Google services. Gmail Gmail is Google's official email service. When you first use Gmail, emails on your web account will be synchronized to your phone. Sending emails 1. On the home screen, touch to open your mailbox. If you have added more than one Gmail accounts, select the one you want to use. 2. Touch . 3. Enter the recipient and subject and compose your message. 4. Touch . Checking your emails 1. On the home screen, touch to open your mailbox. If you have added more than one Gmail accounts, select the one you want to use. 2. From the email list, select the email you want to read. • Touch to reply to it. • Touch > Reply all to reply to all. • Touch > Forward to forward the email.
  • 69.
    Google services 64 Maps Maps helpsyou find out where you are, shows you how to get to a destination, and displays real-time traffic. Satellite view is also available. Turning on location services Before you use Maps to search for a location, turn on your location services. 1. On the home screen, touch then the All tab. 2. Touch Location access. 3. Select the GPS satellites and Wireless networks check boxes. Searching for places of interest 1. On the home screen, touch Google apps > . 2. Touch . 3. Enter the location you want to search for. 4. Touch in the lower right corner of the keyboard. The search results are marked on the map by letters. 5. Touch a mark to see how to get there and view more details about the location. Getting somewhere 1. On the home screen, touch Google apps > . 2. Touch . 3. Choose a transportation method. 4. Follow the onscreen instructions to enter your starting point and destination. 5. Touch in the lower right corner of the keyboard to display the routes. 6. Touch a route to view its details on the map. Touch to clear the search results.
  • 70.
    Google services 65 YouTube YouTube isGoogle's online video-sharing website, where you can search for, watch, and upload videos. Searching for a video 1. On the home screen, touch Google apps > . 2. Touch . 3. Enter the keywords for the video you want to find. 4. Touch in the lower right corner of the keyboard. 5. From the search results, touch a video to watch it. Sharing a video From the video list, select the video you want to share. Then, touch and select a sharing method. Play Store Play Store is an application market provided by Google, where you can download applications and games. Installing an application 1. On the home screen, touch . 2. Find the desired application. 3. Follow the onscreen instructions to download and install it. Uninstalling an application 1. On the home screen, touch . 2. Touch > My apps. 3. From the application list, touch the application you want to uninstall. 4. Touch UNINSTALL > OK to uninstall the application.
  • 71.
    66 • Basic utilities Yourphone comes with a variety of useful tools, such as Calendar, Clock, and Calculator, helping you keep yourself organized. Calendar Calendar is your personal assistant that helps you manage, arrange, and keep track of all important events. Creating an event 1. On the home screen, touch . 2. Touch . 3. Enter event details, such as the event name, time, and location. 4. Touch SAVE. Viewing events 1. On the home screen, touch . 2. Touch the date in the upper left corner to switch between the year, month, week, day, and agenda views. The agenda view displays all your calendar events. Sharing an event You can share an event with your family and friends in a number ways, such as Bluetooth. 1. On the home screen, touch . 2. Open an event you want to share. 3. Touch > Send event. 4. Select a sharing method and follow the onscreen instructions.
  • 72.
    Basic utilities 67 Synchronizing andviewing events Calendar events in your accounts (such as an email account) can be synchronized to and viewed on Calendar. 1. On the home screen, touch . 2. Touch > Calendars to display. 3. Select the account whose calendar you want to display. 4. Touch > Calendars to sync. 5. Select the account from which you want to synchronize calendar events. 6. Touch OK. Modifying calendar settings 1. On the home screen, touch . 2. Touch > Settings. 3. Follow the onscreen instructions to configure the calendar settings. Clock Clock lets you view the time around the world, use stopwatch or timer to keep track of time, or set alarms to wake you up in the morning. Adding an alarm 1. On the home screen, touch then the Alarm tab. 2. From the alarm list, touch . 3. Set the alarm time, ringtone, how often it repeats, and more. 4. Touch DONE. Alarms will go off even when your phone is powered off. Deleting an alarm 1. On the home screen, touch then the Alarm tab.
  • 73.
    Basic utilities 68 2. Fromthe alarm list, touch and hold the alarm you want to delete. 3. From the displayed option menu, choose Delete alarm. 4. Touch OK. Configuring alarm settings 1. On the home screen, touch then the Alarm tab. 2. From the alarm list, touch > Settings. 3. On the alarm settings screen, set the ring mode, snooze duration, and the volume button's function when an alarm sounds. Calculator Calculator lets you perform basic arithmetic operations. 1. On the home screen, touch Tools > . 2. On the Calculator screen, flick left or right to switch between the basic and scientific calculators. Notes Notes is a handy application that lets you record quick thoughts or important information. 1. On the home screen, touch Tools > . 2. Touch Add note. 3. Enter what you want to record. 4. When you are done, touch . On the Notes screen, you can touch and select one or more notes you want to delete, or select All to delete all notes.
  • 74.
    Basic utilities 69 Weather Weather providesyou with the latest weather information for any city around the world. You can share weather information with your family and friends. Before you use Weather, turn on your phone's GPS and data service. Adding a city Add cities of your concern to Weather to check their real-time weather information. 1. On the home screen, touch Tools > . 2. Touch > . In addition to your current city, you can add up to nine cities. 3. Enter a city name. Matching cities are then displayed. 4. Select the city you want to add. Setting the default city 1. On the home screen, touch Tools > . 2. Touch . 3. Touch the icon next to the city you want to set as the default city. Deleting cities 1. On the home screen, touch Tools > . 2. Touch > . 3. Select the cities you want to delete, and touch DELETE. Updating weather 1. On the home screen, touch Tools > . 2. Flick left or right to find the city whose weather you want to update.
  • 75.
    Basic utilities 70 3. Touchto update the weather. You can also set Weather to automatic update mode. Touch > , select Auto update, and set Update interval. Your phone will then update the weather at the interval you set. Sharing weather information Your phone lets you send weather information as a text message to remind your family and friends of weather changes. 1. On the home screen, touch Tools > . 2. Flick left or right to find the city whose weather you want to share. 3. Touch to display the messaging screen. 4. You can then: • Enter a phone number. • Touch to select a contact. 5. Touch Send to send the weather information to the recipient. FM radio Want to listen to your favorite broadcast programs? Open FM Radio anytime anywhere you like. Connect a headset to the phone. FM Radio utilizes the headset as an antenna. Searching for stations 1. On the home screen, touch Tools > . 2. Touch > to search for and save available stations. Your phone will automatically search for and save stations the first time you open the FM radio.
  • 76.
    Basic utilities 71 Listening toFM radio From the FM Radio screen, you can: Touch to view the station list. Touch to enable or disable the speaker. Touch to go to the next station. Touch to turn the FM radio on or off. Touch to add the current station to your favorites. Touch to return to the previous station. 1 2 3 4 5 6 1 2 3 4 5 6
  • 77.
    72 • Accounts andsync You can synchronize data on your phone, such as contacts, emails, and events, to and from the Internet. Adding an account 1. On the home screen, touch then the All tab. 2. Under ACCOUNTS, touch Add account. 3. Select an account type. 4. Follow the onscreen instructions and enter your account information. 5. Configure the account and set the type of data you want to synchronize. When an account is set up, it will be shown in the ACCOUNTS section. The types of data you can synchronize to your phone vary with account type. Deleting an account 1. On the home screen, touch then the All tab. 2. Under ACCOUNTS, select an account type. 3. Select the account you want to delete. 4. Touch > Remove account. 5. In the displayed dialog box, touch Remove account. Turning on data synchronization 1. On the home screen, touch then the All tab. 2. Under ACCOUNTS, select an account type. 3. Select the account you want to synchronize from.
  • 78.
    Accounts and sync 73 4.Touch the data you want to synchronize. You can touch > Sync now to have the data synchronization run in the background. Modifying account synchronization settings 1. On the home screen, touch then the All tab. 2. Under ACCOUNTS, select an account type. 3. Select the account whose synchronization settings you want to modify. 4. Under Sync settings, select the data you want to synchronize.
  • 79.
    74 • Settings Turning onor off airplane mode Always comply with all airline rules and regulations. If allowed by the aircraft operator, you may switch on your phone and enable airplane mode in flight. In airplane mode, your phone's wireless features are disabled, but you can still listen to music or play games. Use either of the following methods to turn on or off Airplane mode: • Press and hold the power button. From the displayed option menu, choose Airplane mode. • On the home screen, touch then the All tab. Under WIRELESS & NETWORKS, touch Airplane mode. When airplane mode is on, appears in the status bar. Tone settings 1. On the home screen, touch then the All tab. 2. Under DEVICE, touch Sound. 3. From the settings screen, you can: • Touch Volume and drag the sliders to set the volume of music, ringtones, message tones, and more. • Touch Vibration to set whether your phone vibrates when you have an incoming call, message, email, event, and more. • Touch Silent mode to turn on or off silent mode. • Touch Phone ringtone to select a ringtone. • Touch Notification tone to select a tone for messages, emails, events, and more. • Touch SYSTEM to turn the notification tone or vibration on or off when you touch or lock the screen, take a screenshot, dial a number, and more. You can adjust the volume from the home screen or most applications, such as call, music, and video.
  • 80.
    Settings 75 Display settings 1. Onthe home screen, touch then the All tab. 2. Under DEVICE, touch Display. 3. On the settings screen, you can: • Touch Brightness to set the screen brightness. To manually adjust the brightness, clear the Automatic brightness check box. • Touch Wallpaper to set the lock screen and home screen wallpapers. • Touch Auto-rotate screen to turn on or off the screen auto-rotate function. If this function is turned on, your screen's orientation will automatically change with the way you hold your phone when you perform certain operations, such as browsing a web page, viewing a picture, or writing a message. • Touch Sleep to set a screen timeout period. If idle for the specified period, your phone automatically locks its screen to save battery power. • Touch Touch key light to turn on or off the smart backlight function. If this function is turned on, your phone automatically adjusts the screen brightness based on the content displayed on it. • Touch Font size to change the display font size. Setting the date and time By default, your phone relies on the network-based date and time. You can also manually set the date and time. 1. On the home screen, touch then the All tab. 2. Under SYSTEM, touch Date & time. 3. From the settings screen, you can: • Clear the Automatic date & time check box to stop your phone from automatically obtaining the network date and time. • Clear the Automatic time zone check box to stop your phone from automatically obtaining the network time zone. • Touch Set date and flick up and down to set your phone's date. • Touch Set time and flick up and down to set your phone's time.
  • 81.
    Settings 76 • Touch Selecttime zone and select the time zone from the list. Scroll up or down to view more time zones. • Select or clear the Use 24-hour format check box to switch between the 12-hour and 24-hour formats. • Touch Select date format to select how you want the date to be displayed. Changing the system language 1. On the home screen, touch then the All tab. 2. Under PERSONAL, touch Language & input. 3. Touch Language. 4. From the list, choose a language. Modifying location service settings You can modify your phone's location service settings for more convenient positioning and navigation services. 1. On the home screen, touch then the All tab. 2. Under PERSONAL, touch Location access. 3. From the settings screen, you can: • Touch Access my location to enable your phone to use your location information. • Touch GPS satellites to have your phone obtain your location information from GPS satellites. • Touch Wireless networks to have your phone obtain your location information from a Wi-Fi network or mobile data connection. Setting the PIN of your SIM card The personal identification number (PIN) is delivered with your SIM card. If you enable the PIN protection function for your SIM card, you will need to enter the PIN each time you power your phone on. Before you perform the following operations, make sure you have obtained your SIM card's PIN from your service provider.
  • 82.
    Settings 77 1. On thehome screen, touch then the All tab. 2. Under PERSONAL, touch Security. 3. Touch Set up SIM/USIM card lock. 4. Select the Lock SIM card check box. 5. Enter the PIN. 6. Touch OK. If you incorrectly enter the PIN a specified number of consecutive times, the PIN is blocked and the phone prompts you to enter the PIN unblocking key (PUK). If you incorrectly enter the PUK a specified number of consecutive times, the SIM card will be disabled permanently. For details about the maximum retry attempts for the PIN and PUK, contact your service provider. Restoring factory settings Restoring your phone to its factory settings erases all your personal data from the phone, including your email accounts, system and application settings, and installed applications. Back up important data on your phone before you restore factory settings. 1. On the home screen, touch then the All tab. 2. Under PERSONAL, touch Backup & reset. 3. Touch Factory data reset > Reset phone > Reset phone. The phone will restore its factory settings and restart. Online update Once in a while, new updates for your phone will be available online. You will receive a notification when updates are available. Before updating, make sure your phone has enough storage space for the update package. To update your phone manually, go to the home screen, touch > About phone > System updates > Online updates to check for updates, and follow the onscreen instructions to update your phone online. All your personal data may be erased during a system update. It is recommended that you back up important data before updating your
  • 83.
    Settings 78 phone. Accessibility You can turnon or off preset or installed accessibility features. 1. On the home screen, touch then the All tab. 2. Under SYSTEM, touch Accessibility. 3. Select the features you want to turn on or off.
  • 84.
    79 • FAQs What aresome ways I can save battery power? • When you do not need Internet access, open the notification panel and touch to turn off your mobile data connection. • When you do not need wireless data services, such as GPS, Bluetooth, or Wi-Fi, open the notification panel, and touch , , or to turn off these services. • Touch > All > Display to reduce the screen brightness and screen timeout period. Press to turn off the screen when your phone is not in use. • Close applications that are not in use. • Decrease the volume. How can I free up additional phone memory? • Move files and email attachments to a microSD card. • Open the browser and delete locally cached content. • Clear the application cache. • Uninstall applications you no longer use. How do I use a microSD card to import contacts from another phone? Your phone supports contact files in .vcf format only. 1. Save the contacts you want to import as a .vcf file and save the file to a microSD card. 2. Insert the microSD card into your phone, and touch File Manager then SD card to find the .vcf file. 3. Touch the .vcf file. Your phone then displays a message asking whether you want to import the contacts. 4. Touch OK to import the contacts. Compatibility problems may occur with .vcf files created by other phones, and certain contact information may be lost when contacts are imported.
  • 85.
    FAQs 80 How do Idisable the Auto-rotate screen function? On the home screen, touch then All > Display, and clear Auto-rotate screen. How do I set a screen unlock pattern? On the home screen, touch then Security > Screen lock > Pattern, and follow the onscreen instructions to set a screen unlock pattern. How do I switch the text input method? When you write text, open the notification panel and touch Choose input method to select an input method. How do I stop the song playing in the background? Open the notification panel, touch the playing song to display the music playback screen, and stop the playback. How do I return to the call screen? To return from another screen during a call, open the notification panel and touch the ongoing call. How do I move an application icon on the home screen? Touch and hold the application icon you want to move and drag it to a new location. How do I hide the onscreen keyboard? Touch to hide the keyboard. How do I forward a message? Touch and hold the message you want to forward, and choose Forward from the displayed option menu. How do I restart my phone? Press and hold , and touch Restart > OK to restart your phone.
  • 86.
    81 • Legal Notice Copyright© Huawei Technologies Co., Ltd. 2014. All rights reserved. No part of this manual may be reproduced or transmitted in any form or by any means without prior written consent of Huawei Technologies Co., Ltd. and its affiliates ("Huawei"). The product described in this manual may include copyrighted software of Huawei and possible licensors. Customers shall not in any manner reproduce, distribute, modify, decompile, disassemble, decrypt, extract, reverse engineer, lease, assign, or sublicense the said software, unless such restrictions are prohibited by applicable laws or such actions are approved by respective copyright holders. Trademarks and Permissions , , and are trademarks or registered trademarks of Huawei Technologies Co., Ltd. Android™ is a trademark of Google Inc. The Bluetooth® word mark and logos are registered trademarks owned by Bluetooth SIG, Inc. and any use of such marks by Huawei Technologies Co., Ltd. is under license. Other trademarks, product, service and company names mentioned may be the property of their respective owners. Notice Some features of the product and its accessories described herein rely on the software installed, capacities and settings of local network, and therefore may not be activated or may be limited by local network operators or network service providers. Thus, the descriptions herein may not exactly match the product or its accessories which you purchase. Huawei reserves the right to change or modify any information or specifications contained in this manual without prior notice and without any liability. Third-Party Software Statement Huawei does not own the intellectual property of the third-party software and applications that are delivered with this product. Therefore, Huawei will not
  • 87.
    Legal Notice 82 provide anywarranty of any kind for third party software and applications. Neither will Huawei provide support to customers who use third-party software and applications, nor be responsible or liable for the functions or performance of third-party software and applications. Third-party software and applications services may be interrupted or terminated at any time, and Huawei does not guarantee the availability of any content or service. Third-party service providers provide content and services through network or transmission tools outside of the control of Huawei. To the greatest extent permitted by applicable law, it is explicitly stated that Huawei shall not compensate or be liable for services provided by third-party service providers, or the interruption or termination of third-party contents or services. Huawei shall not be responsible for the legality, quality, or any other aspects of any software installed on this product, or for any uploaded or downloaded third- party works in any form, including but not limited to texts, images, videos, or software etc. Customers shall bear the risk for any and all effects, including incompatibility between the software and this product, which result from installing software or uploading or downloading the third-party works. This product is based on the open-source Android™ platform. Huawei has made necessary changes to the platform. Therefore, this product may not support all the functions that are supported by the standard Android platform or may be incompatible with third-party software. Huawei does not provide any warranty or representation in connect with any such compatibility and expressly excludes all liability in connection with such matters. DISCLAIMER ALL CONTENTS OF THIS MANUAL ARE PROVIDED “AS IS”. EXCEPT AS REQUIRED BY APPLICABLE LAWS, NO WARRANTIES OF ANY KIND, EITHER EXPRESS OR IMPLIED, INCLUDING BUT NOT LIMITED TO, THE IMPLIED WARRANTIES OF MERCHANTABILITY AND FITNESS FOR A PARTICULAR PURPOSE, ARE MADE IN RELATION TO THE ACCURACY, RELIABILITY OR CONTENTS OF THIS MANUAL. TO THE MAXIMUM EXTENT PERMITTED BY APPLICABLE LAW, IN NO EVENT SHALL HUAWEI BE LIABLE FOR ANY SPECIAL, INCIDENTAL, INDIRECT, OR CONSEQUENTIAL DAMAGES, OR LOSS OF PROFITS, BUSINESS, REVENUE, DATA, GOODWILL SAVINGS OR ANTICIPATED SAVINGS REGARDLESS OF WHETHER SUCH LOSSES ARE FORSEEABLE OR NOT. THE MAXIMUM LIABILITY (THIS LIMITATION SHALL NOT APPLY TO LIABILITY FOR PERSONAL INJURY TO THE EXTENT APPLICABLE LAW PROHIBITS SUCH A LIMITATION) OF HUAWEI ARISING FROM THE USE OF THE PRODUCT DESCRIBED
  • 88.
    Legal Notice 83 IN THISMANUAL SHALL BE LIMITED TO THE AMOUNT PAID BY CUSTOMERS FOR THE PURCHASE OF THIS PRODUCT. Import and Export Regulations Customers shall comply with all applicable export or import laws and regulations and be responsible to obtain all necessary governmental permits and licenses in order to export, re-export or import the product mentioned in this manual including the software and technical data therein. Privacy Policy To better understand how we protect your personal information, please see the privacy policy at http://consumer.huawei.com/privacy-policy.
  • 89.
    Please visit http://consumer.huawei.com/en/support/hotlinefor recently updated hotline and email address in your country or region. V100R001_01 This guide is for reference only. The actual product, including but not limited to the color, size, and screen layout, may vary. All statements, information, and recommendations in this guide do not constitute a warranty of any kind, express or implied.