This user manual summarizes information about setting up and using a Samsung smartphone. It includes instructions on assembling the device, setting up accounts, understanding the home screen and notifications, using apps like calling, texting, the camera, and more. The manual also outlines legal disclaimers regarding warranties, software use, and other policies.

![ii
IF YOUR CARRIER PROHIBITS THIS, IF YOU
ATTEMPT TO DOWNLOAD SOFTWARE ONTO THE
DEVICE WITHOUT AUTHORIZATION, YOU WILL BE
NOTIFIED ON THE SCREEN THAT UNAUTHORIZED
SOFTWARE HAS BEEN DETECTED. YOU SHOULD
THEN POWER DOWN THE DEVICE AND CONTACT
YOUR CARRIER TO RESTORE THE DEVICE TO THE
CARRIER AUTHORIZED SETTINGS.
Diagnostic Software
This device is equipped with diagnostic software
reporting usage and performance information used
solely to deliver improved network quality and
overall device experience to AT&T customers. Please
refer to your AT&T Wireless Customer Agreement
and/or the AT&T Privacy Policy (att.com/privacy) for
more information.
Notice from AT&T
This device is intended for use exclusively on
AT&T’s system. You agree that you won’t make any
modifications to the Equipment or programming
to enable the Equipment to operate on any other
system. A voice plan is required on all voice-capable
devices, unless specifically noted otherwise in the
terms governing your agreement. Some devices or
plans may require you to subscribe to a data plan.
Your device is designed to make it easy for you
to access a wide variety of content. For your
protection, AT&T wants you to be aware that some
applications that you enable may involve the location
of your device being shared. For applications
available through AT&T, AT&T offers privacy controls
that let you decide how an application may use the
location of your device and other devices on your
account. However, AT&T’s privacy tools do not apply
to applications available outside of AT&T. Please
review the terms and conditions and the associated
privacy policy for each location-based service to
learn how location information will be used and
protected.
Your device may be used to access the Internet and
to download, and/or purchase goods, applications,
and services from AT&T or elsewhere from third
parties. AT&T provides tools for you to control
access to the Internet and certain Internet content.
These controls may not be available for certain
devices which bypass AT&T controls.
AT&T may collect certain types of information from
your device when you use AT&T services to provide
customer support and to improve its services.
For more information on AT&T’s Privacy Policy, visit
att.com/privacy [013016]
Samsung KNOX
Samsung KNOX™
is Samsung’s security platform
and is a mark for a Samsung device tested for
security with enterprise use in mind. Additional
licensing fee may be required. For more information
about KNOX, please refer to: samsung.com/us/knox
[041516]
Samsung Electronics America
(SEA), Inc.
Address:
85 Challenger Road
Ridgefield Park,
New Jersey 07660
Phone:
1-800-SAMSUNG (726-7864)
Internet Address:
samsung.com
©2016 Samsung Electronics America, Inc.
Samsung, Samsung Galaxy, Multi Window,
S Health, and S Voice are all trademarks of
Samsung Electronics Co., Ltd.
Other marks are the property of their respective
owners.
Note: Screen images are simulated. Appearance of
device may vary.
Do you have questions about your
Samsung Mobile Device?
For 24 hour information and assistance, we offer
a new FAQ/ARS System (Automated Response
System) at: samsung.com/us/support](https://image.slidesharecdn.com/samsunggalaxyalphaatt-170116040138/75/Samsung-Galaxy-Alpha-Manual-User-Guide-3-2048.jpg)


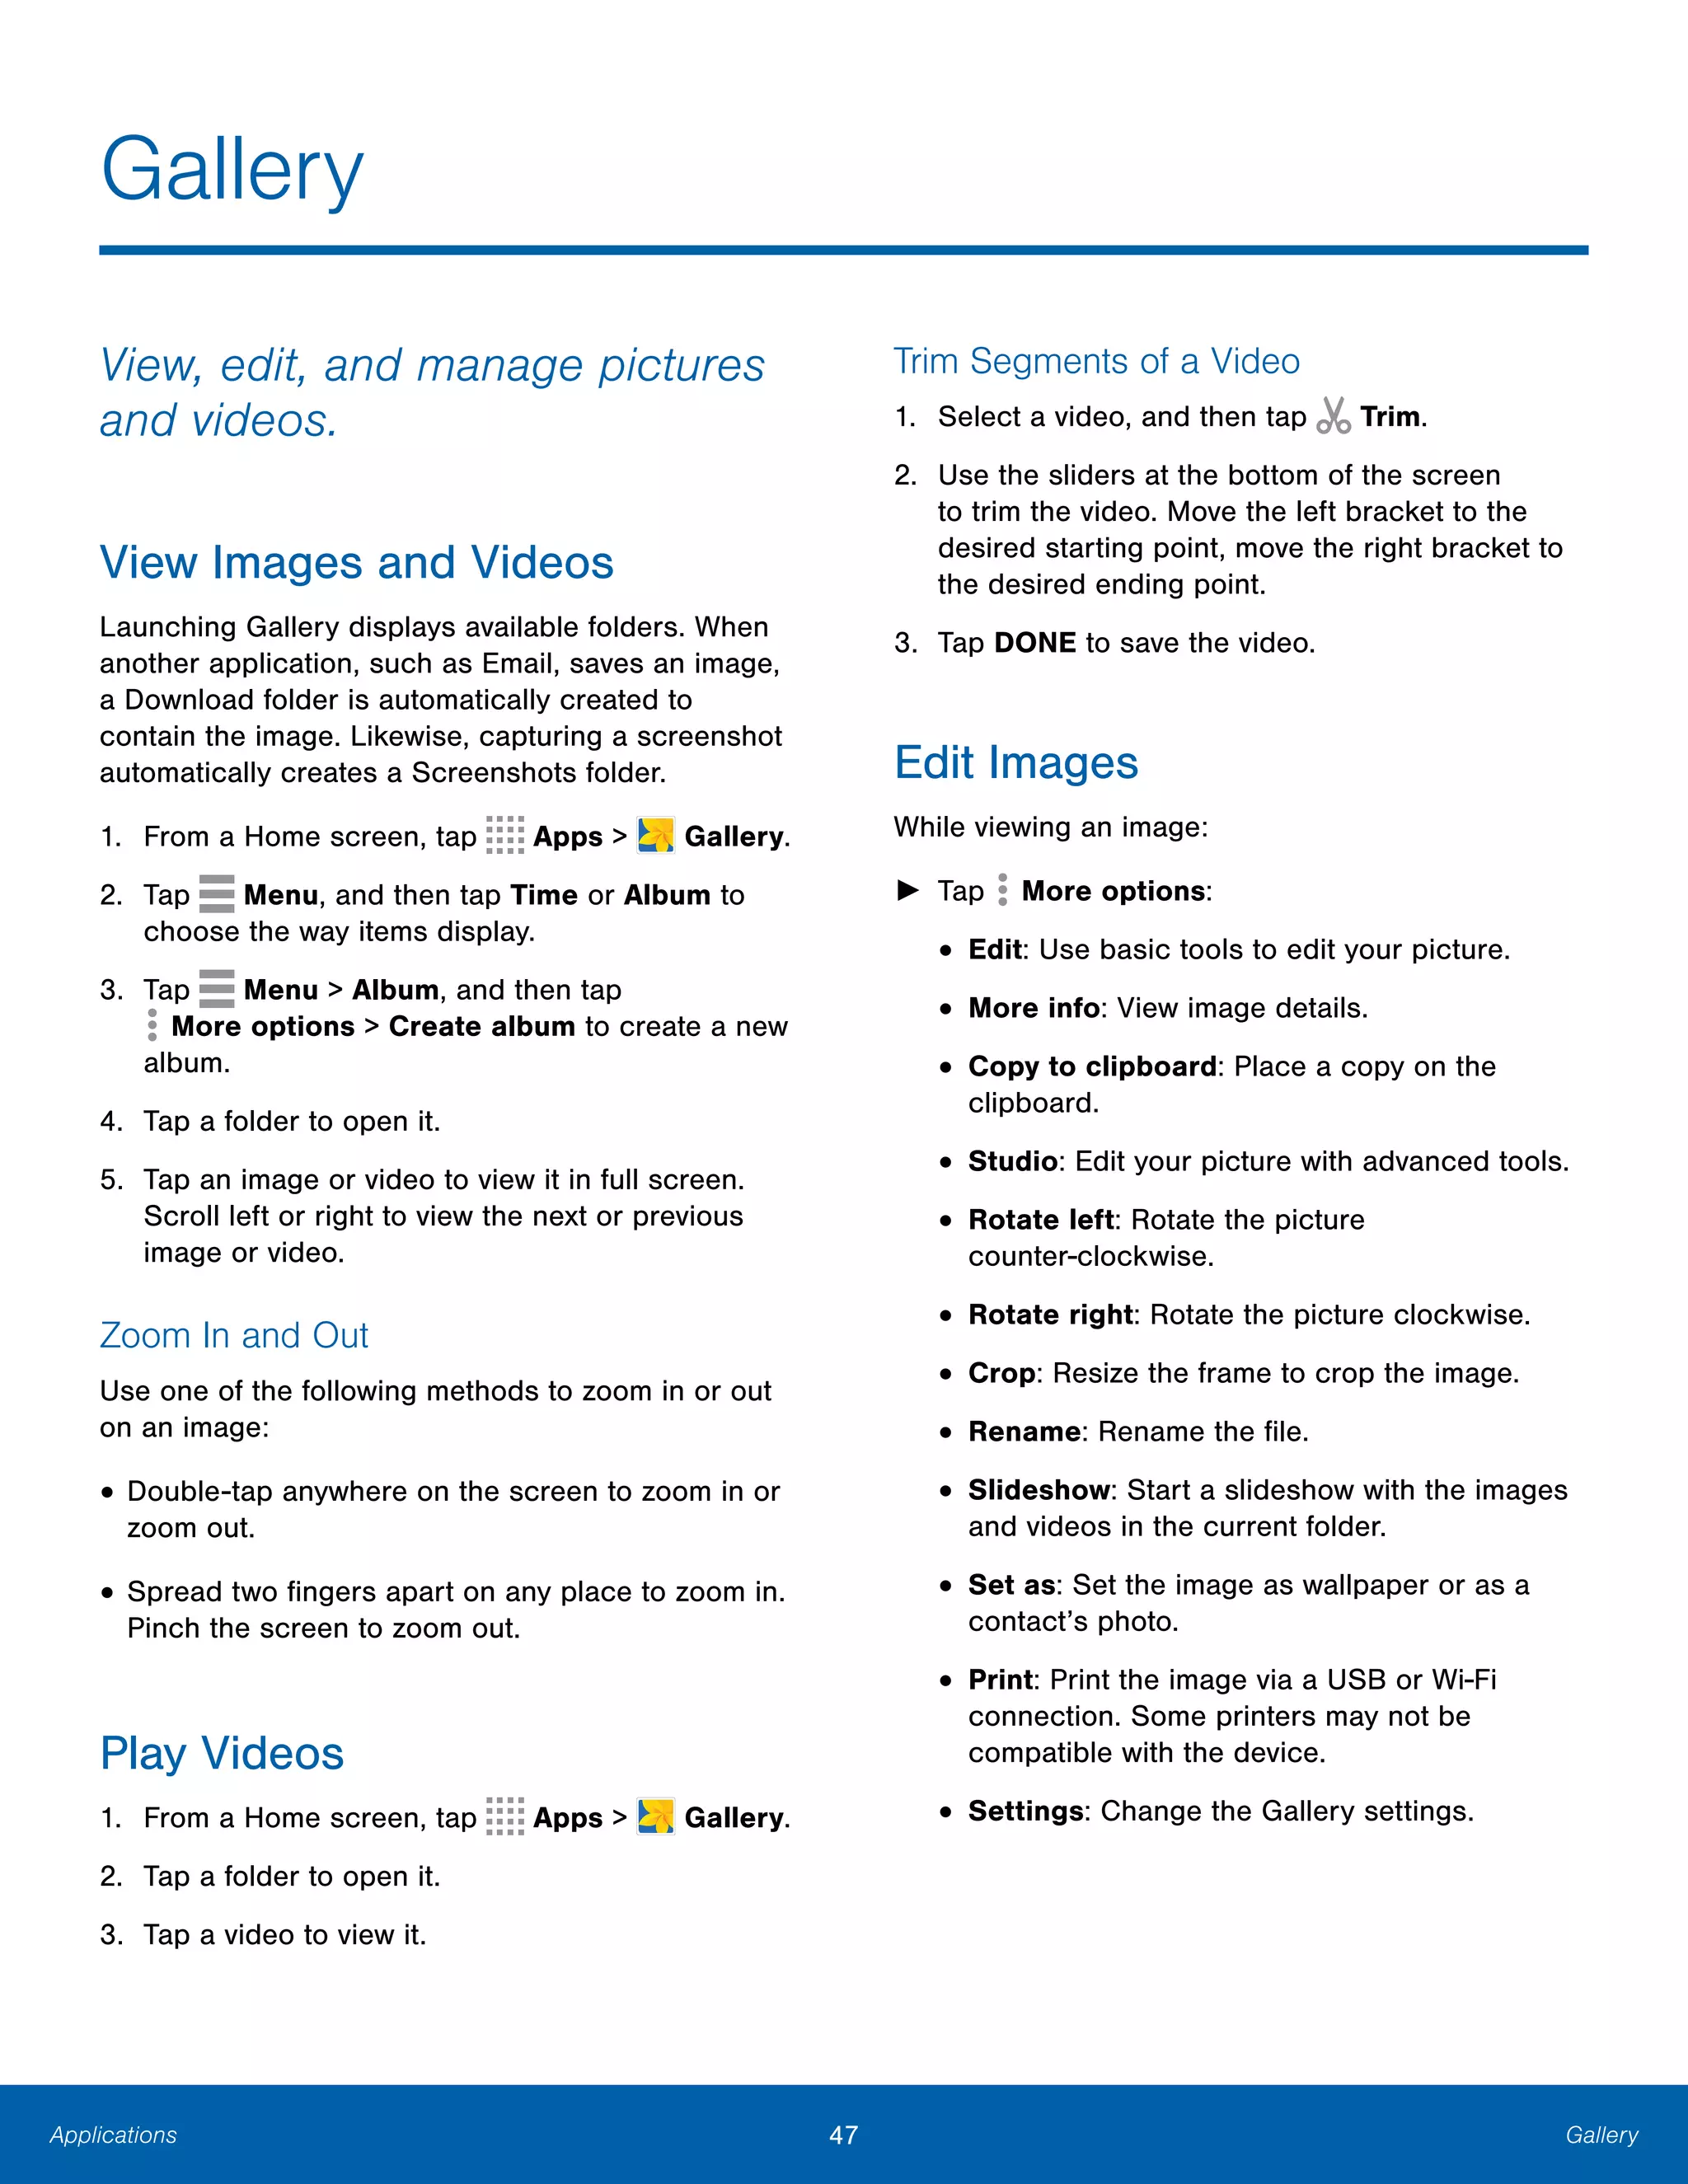
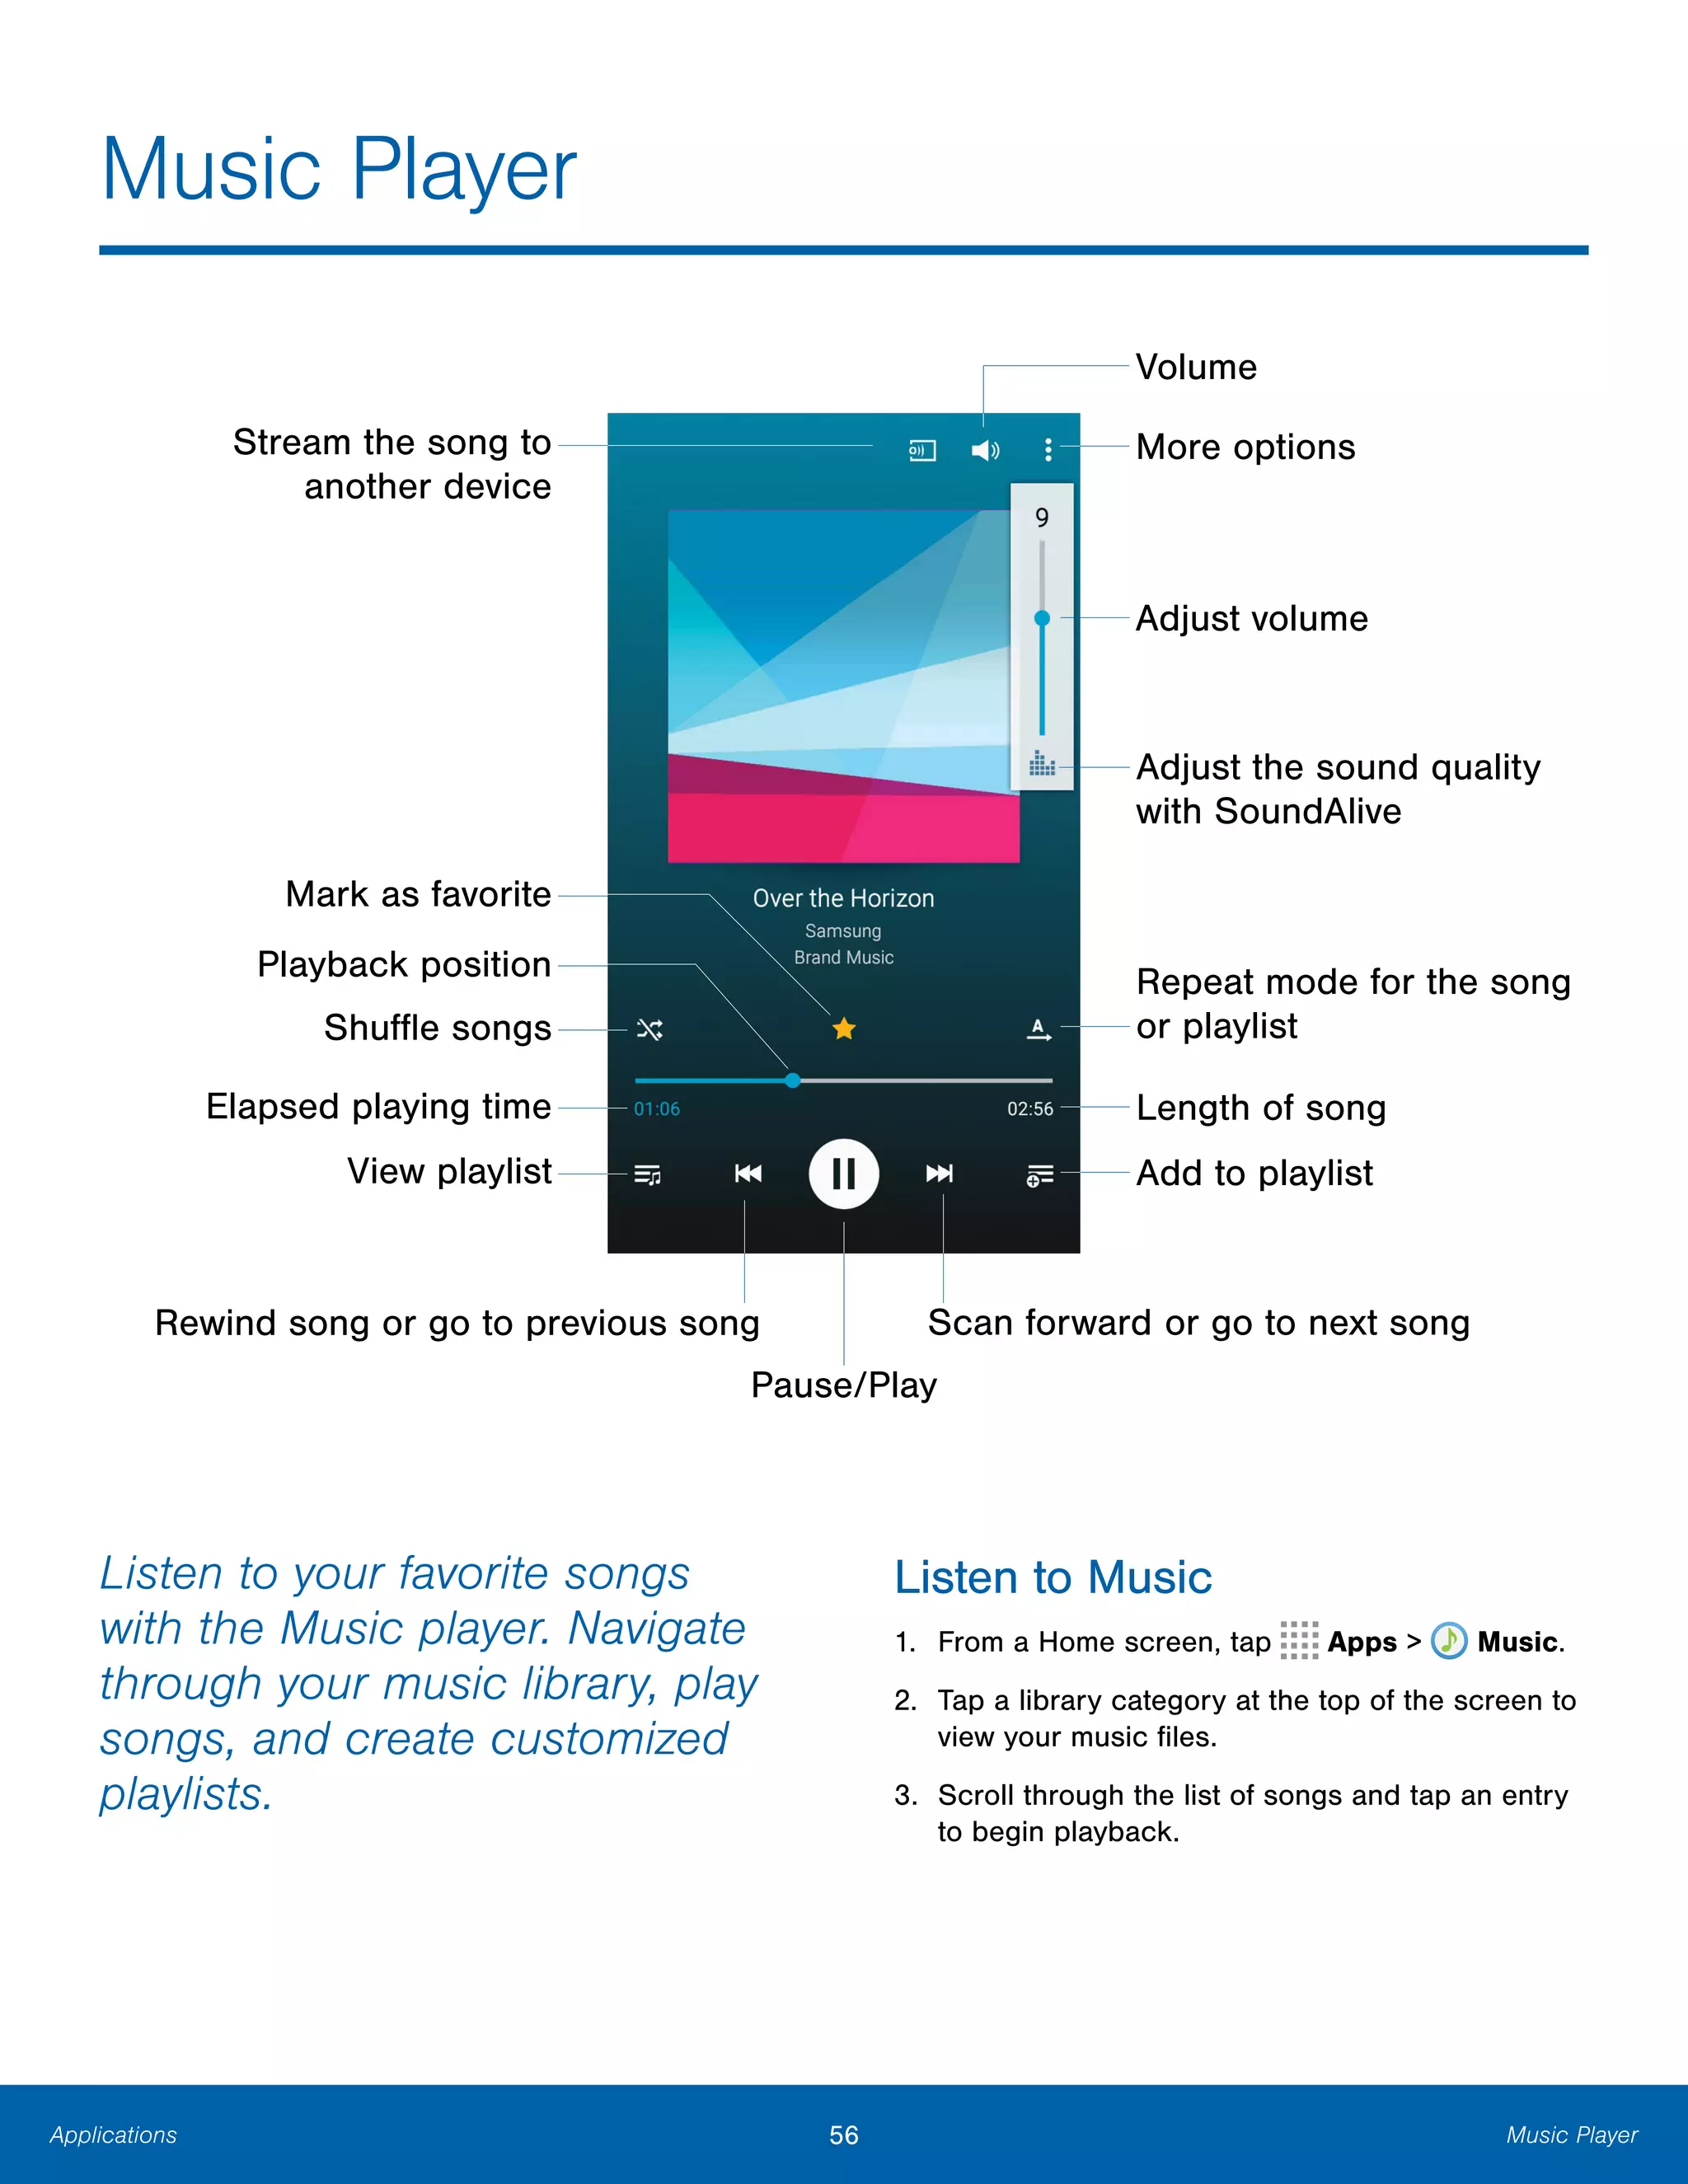
![23 Make and Answer CallsCalling
Options During a Call
Your phone provides a number of functions that you
can use during a call.
Adjust the Call Volume
► Press the Volume Key to increase or decrease
the volume.
– or –
Quickly add more volume to the incoming audio
by tapping More options > Extra volume.
Listen with the Speaker or
Bluetooth Headset
Listen to the call using the speaker or through a
Bluetooth headset (not included).
► Tap Speaker to hear the caller using the
speaker.
– or –
Tap Bluetooth to use a Bluetooth headset
(not included).
Personalize the Call Sound Setting
Adjust the sound by using an audio equalizer.
► From the currently active call, tap
More options > Personalize call sound.
Place a New Call While on a Call
If your service plan supports this feature, you can
make another call while a call is in progress.
1. From the active call, tap Add call to dial the
second call. The first call is displayed as a
thumbnail.
2. Dial the new number and tap Dial.
• Tap Swap to switch between the two calls.
• Tap Merge to hear both callers at once
(multi conferencing).
Call Waiting
If your service plan supports this feature, you can
answer an incoming call while you have a call in
progress. You are notified of an incoming call by a
call waiting tone.
To answer a new call while you have a call in
progress:
1. Slide Answer in any direction to answer the
new call.
2. Tap an option:
• Put [caller] on hold to place the previous
caller on hold while you answer the new
incoming call.
• End call with [caller] to end the previous call
and answer the new call.
3. Tap the previous On hold number entry and
select Swap to switch between the two calls.
This places the new caller on hold and activates
the previous call.](https://image.slidesharecdn.com/samsunggalaxyalphaatt-170116040138/75/Samsung-Galaxy-Alpha-Manual-User-Guide-29-2048.jpg)


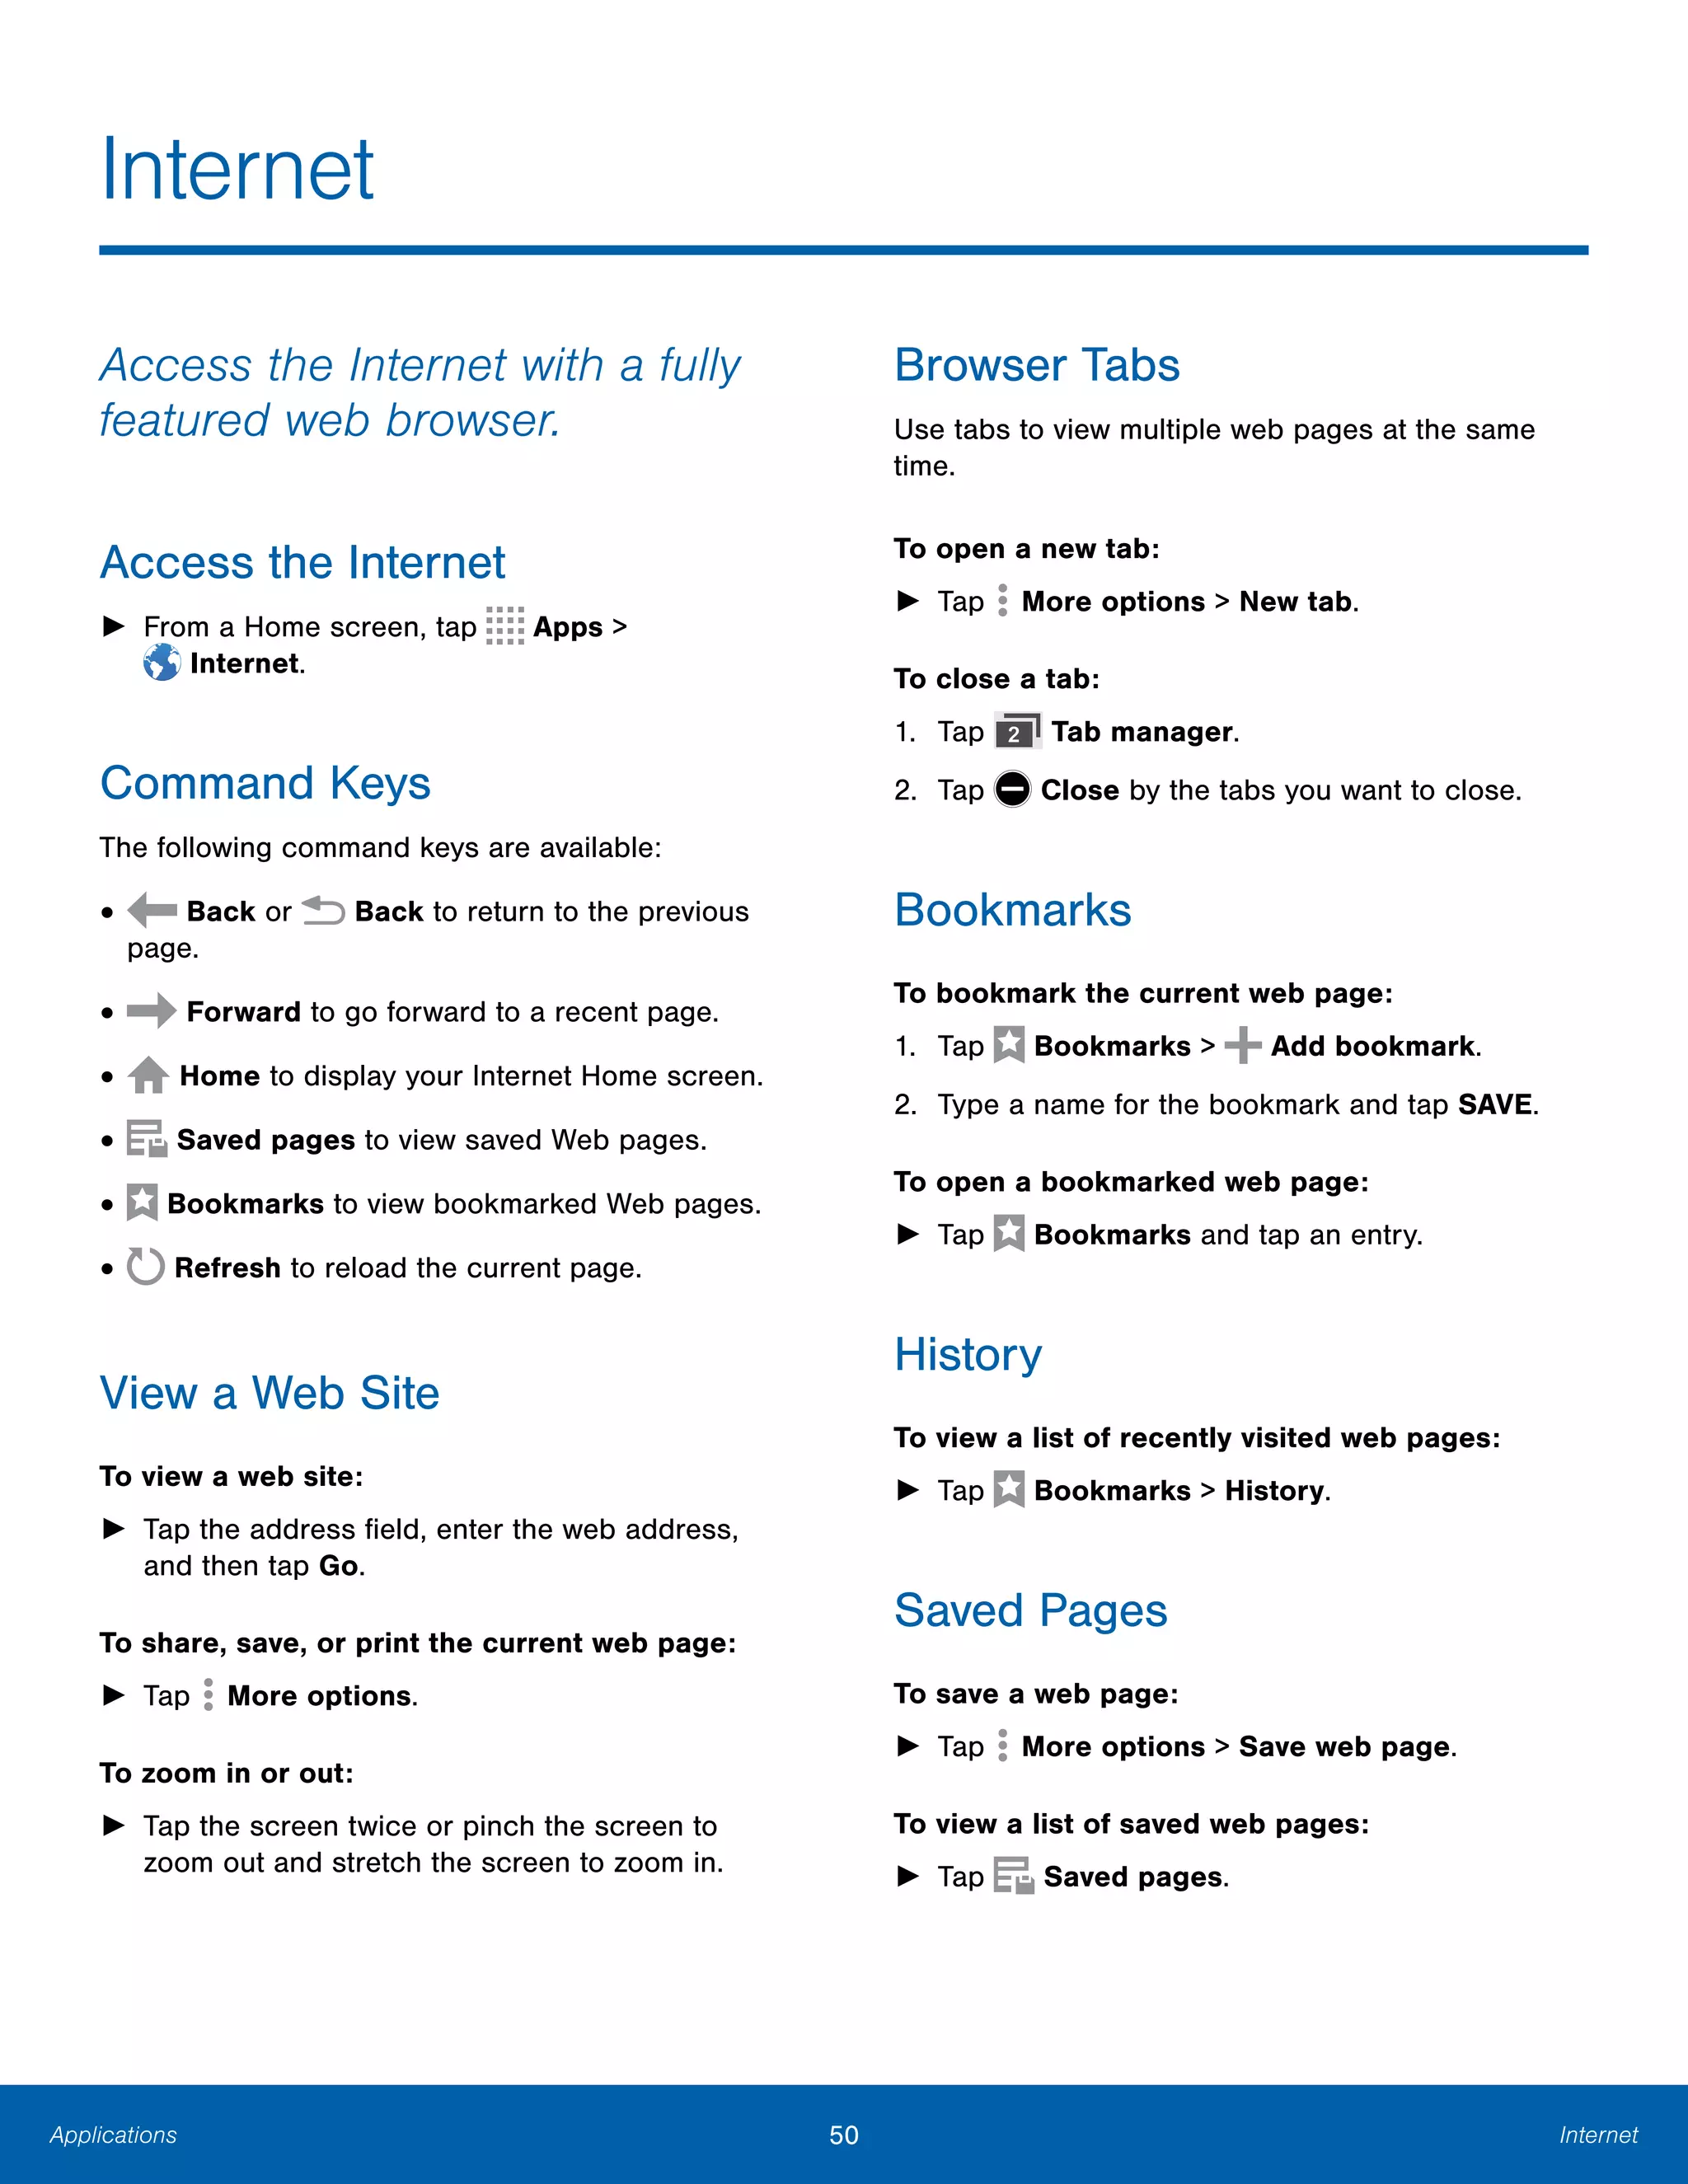
![42 ContactsApplications
Create a Shortcut to a Favorite
You can create a shortcut to a favorite on the home
screen, to access their information directly from the
home screen.
1. From a Home screen, tap Apps >
Contacts.
2. Tap the Favorites tab, and then touch and hold a
contact to select it.
3. Tap More options > Add shortcut to
Home screen. The new shortcut displays in an
empty area of the home screen.
Groups
You can use groups to organize your contacts. Your
device comes with preloaded groups, and you can
create your own. You might create a group for your
family, for coworkers, or a team. Groups make it
easy to find contacts, and you can send messages
to the members of a group.
Create a Group
1. From a Home screen, tap Apps >
Contacts.
2. Tap Groups, and then tap Create group.
3. Tap fields to enter information about the group:
• Tap Create group in [location] to choose
where to save the group. You can save it to a
specific account, to the device memory, or to
all accounts.
• Tap Group name to enter a name for the new
group.
• Tap Group ringtone, Group message tone,
and Group vibration pattern to select
identifying notifications for this group.
4. Tap Add member and select contacts to add to
the new group, and then tap DONE.
5. Tap SAVE to save the new group.
Rename a Group
1. From a Home screen, tap Apps >
Contacts.
2. Tap Groups, and then tap a group.
3. Tap More options > Edit group and enter a
new name.
4. Tap SAVE.
Add Contacts to a Group
1. From a Home screen, tap Apps >
Contacts.
2. Tap Groups, and then tap a group.
3. Tap Add member, and then tap the contacts
you want to add.
4. Tap DONE.
Send a Message or an Email to a Group
You can send a message or an email to members of
a group.
1. From a Home screen, tap Apps >
Contacts.
2. Tap Groups, and then tap a group.
3. Tap More options > Send message or email.
4. Tap either Message or Email.
5. Tap contacts to select them, or tap the selected
checkbox at the top of the screen to select
all, and then tap DONE. Only group members
that have phone numbers (Message) or email
addresses (Email) in their records are shown.
6. Choose an account to use (for Email) and follow
the prompts.](https://image.slidesharecdn.com/samsunggalaxyalphaatt-170116040138/75/Samsung-Galaxy-Alpha-Manual-User-Guide-48-2048.jpg)

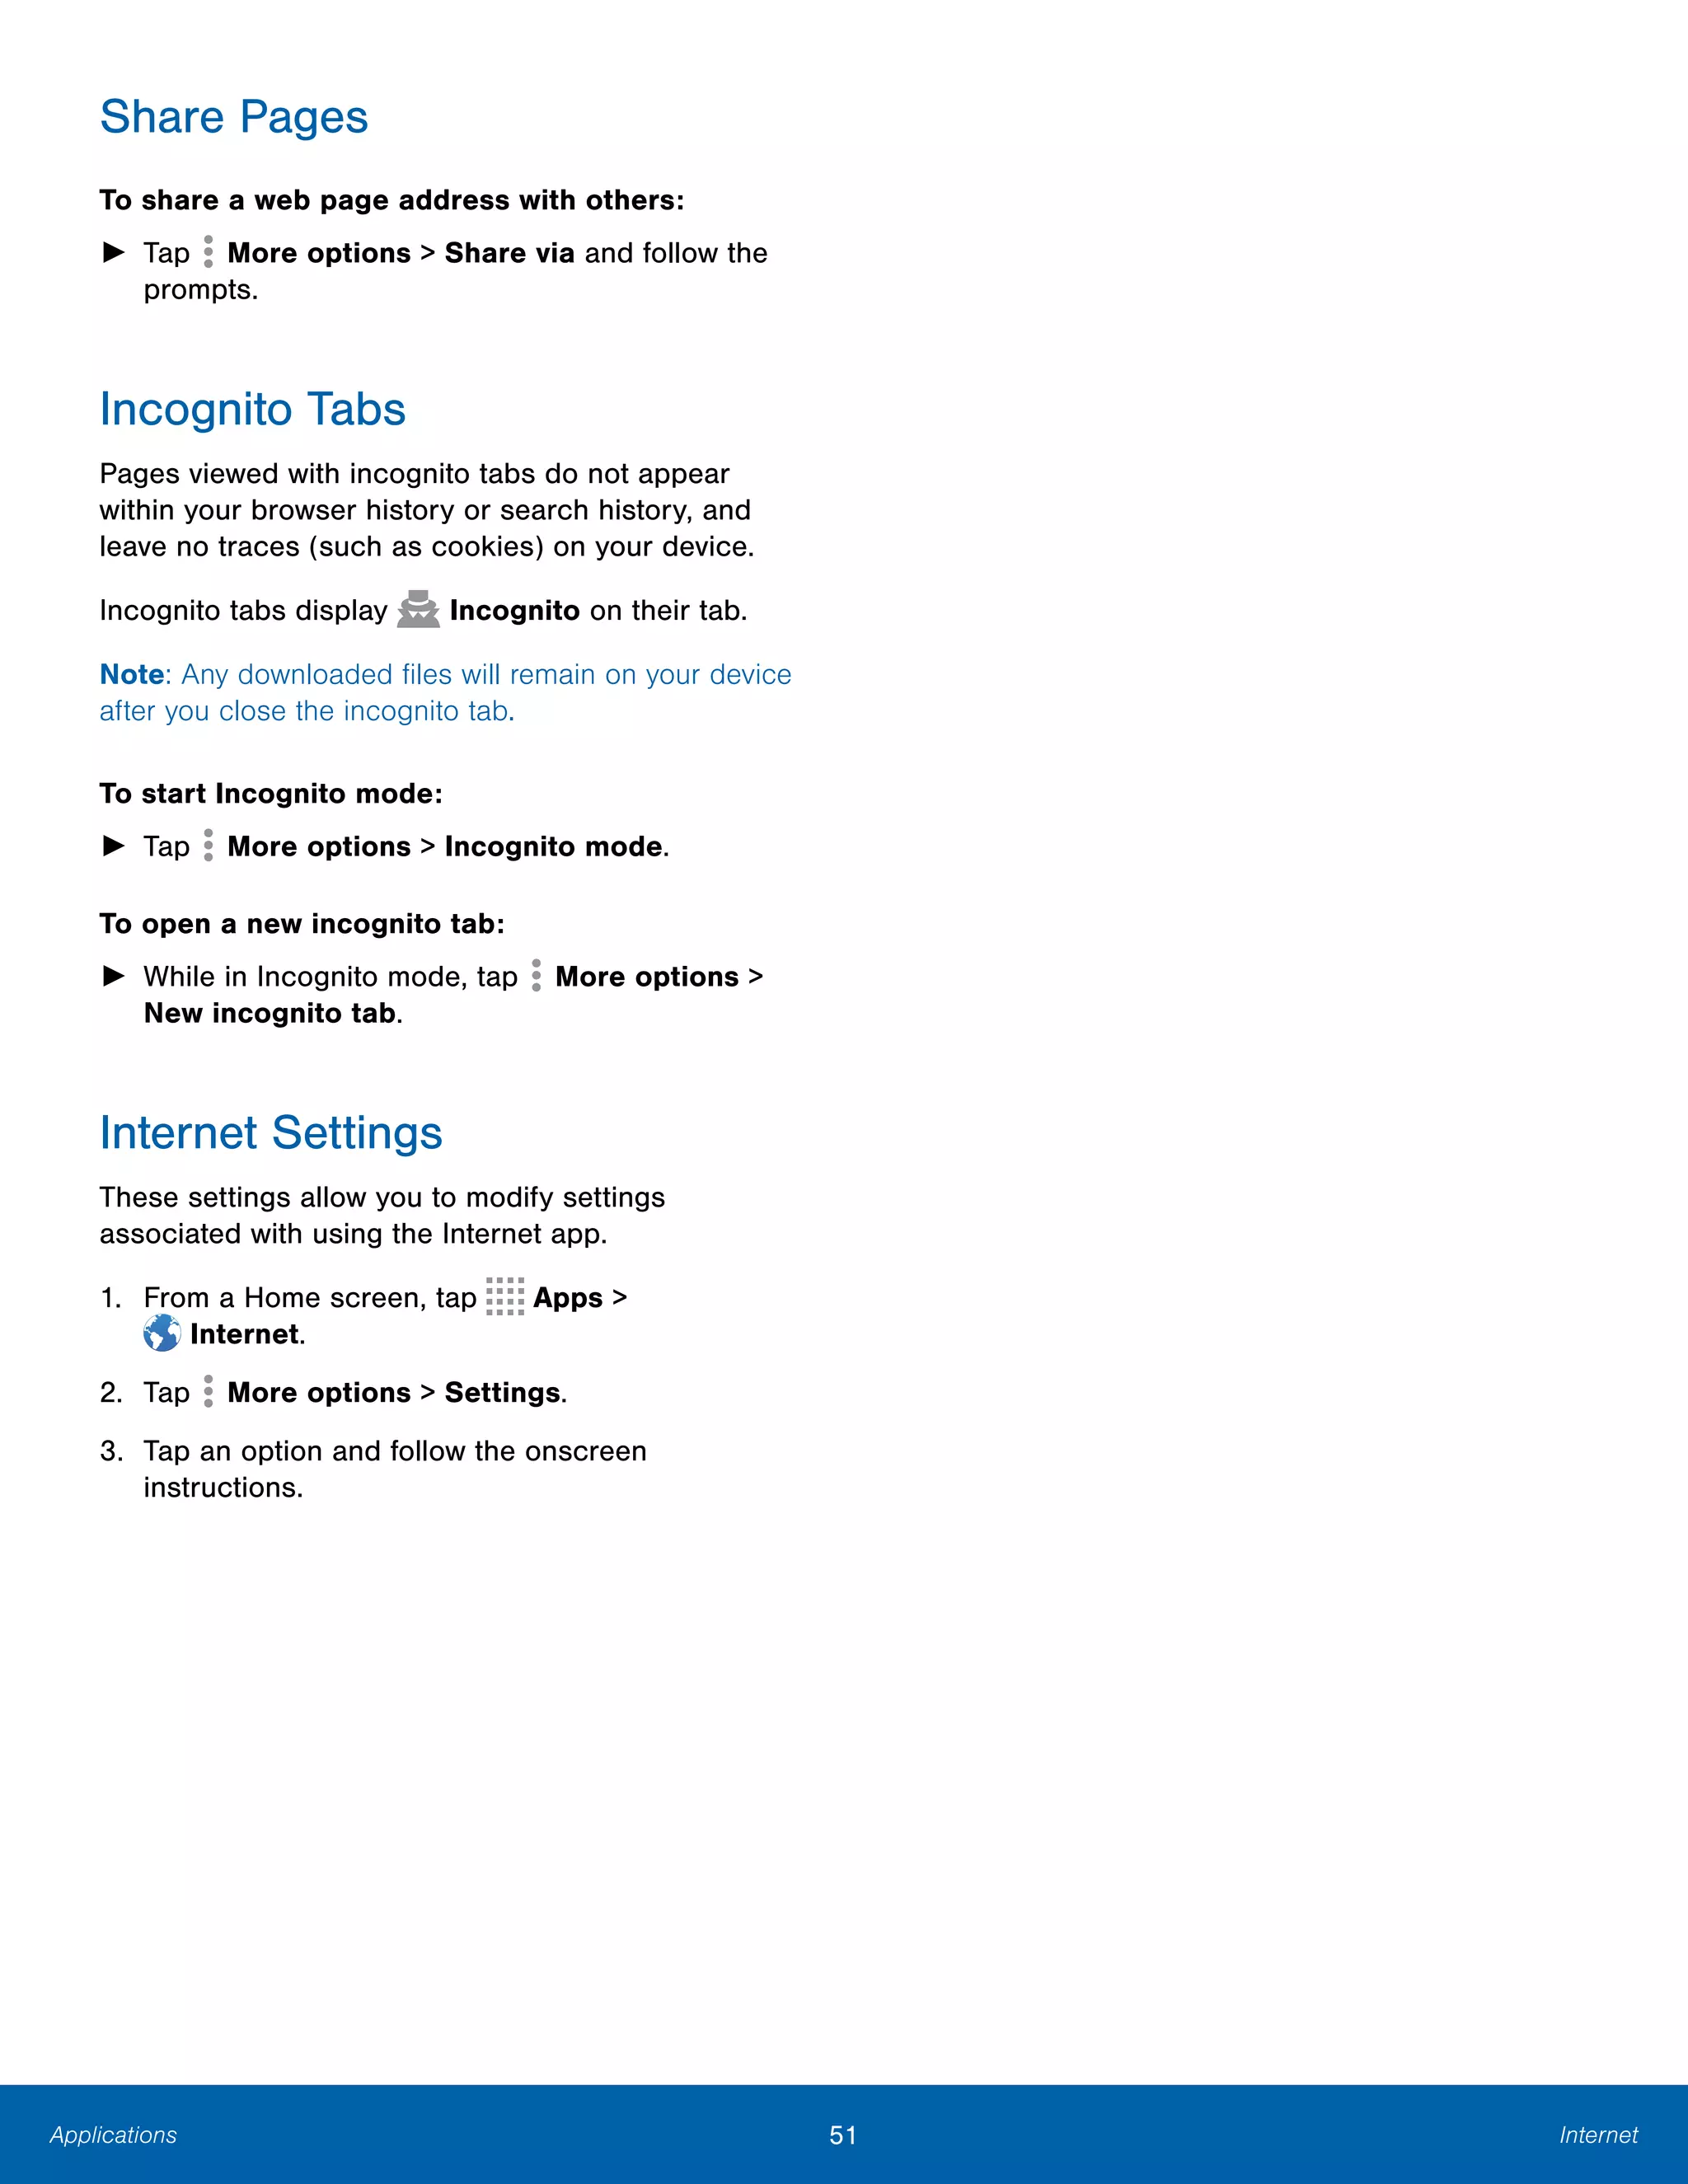
![Applications
From a Home screen, tap Apps > Email.
Email
Use the Email app to view and
manage all your email accounts
in one application.
To access Email:
►
Configure Email Accounts
You can configure Email for most accounts in just a
few steps.
1. From a Home screen, tap Apps > Email.
2. Follow the onscreen instructions to set up your
email account.
To add another email account:
1. From a Home screen, tap Apps > Email.
2. Tap More options > Settings >
Manage accounts.
3. Tap Add account.
The device communicates with the appropriate
server to set up your account and synchronize your
email. When complete, your email appears in the
Inbox for the account.
Note: To configure email account settings at any
time, tap More options > Settings. Tap Manage
accounts and then tap the account to display
Account settings.
Refresh Your Email Account
Refresh your account to update your email
accounts.
1. From a Home screen, tap Apps > Email.
2. Tap Refresh.
Manage Your Email Accounts
You can view email you receive for all accounts on
the Combined view screen or you can view email
accounts individually.
1. From a Home screen, tap Apps > Email.
2. Tap Menu at the top left of the screen to
select:
• Combined inbox: View all email in a combined
inbox.
• [Account Name]: View email for only this
account.
Delete Email Accounts
To delete an Email account:
1. From a Home screen, tap Apps > Email.
2. Tap Menu > MANAGE ACCOUNTS.
3. Touch and hold the account you want to delete,
and then tap Delete.
44 Email](https://image.slidesharecdn.com/samsunggalaxyalphaatt-170116040138/75/Samsung-Galaxy-Alpha-Manual-User-Guide-50-2048.jpg)