Downloaded 23 times


![Table of Contents
Chapter 11: Mapping Windows Installer
Installing with Elevated Privileges..................................................................................246
Caching Transforms in Secure Location........................................................................247
Locking Down Windows Installer...................................................................................247
Removing Windows Installer Data.......................................................................................248
Msizap.exe.....................................................................................................................248
Msicuu.exe.....................................................................................................................249
Inventorying Applications.....................................................................................................250
Chapter 12: Deploying with Answer Files...................................................................................253
Overview..............................................................................................................................253
Creating Distribution Folders...............................................................................................253
Customizing Answer Files ....................................................................................................255
Setup Manager..............................................................................................................258
.
Notepad and Other Text Editors....................................................................................260
Adding Settings to Unattend.txt...........................................................................................262
[GuiRunOnce]................................................................................................................262
Cmdlines.txt...................................................................................................................263
Logging On Automatically After Installation.........................................................................264
Chapter 13: Cloning Disks with Sysprep .....................................................................................266
Overview..............................................................................................................................266
Cloning Windows XP...........................................................................................................266
Windows XP Tools.........................................................................................................268
Sysprep Limitations ........................................................................................................268
Building a Disk Image..........................................................................................................269
Customizing Mini−Setup................................................................................................270
Preparing for Duplication ................................................................................................272
Cloning the Disk Image..................................................................................................272
Reducing Image Count........................................................................................................275
Filling SysprepMassStorage Manually...........................................................................275
Filling SysprepMassStorage Automatically....................................................................276
Cleaning Up After Sysprep .............................................................................................276
Mapping Sysprep Settings...................................................................................................277
Keeping Perspective............................................................................................................278
Chapter 14: Microsoft Office XP User Settings ...........................................................................280
Overview..............................................................................................................................280
Profile Wizard .......................................................................................................................280
Customizing the Wizard.................................................................................................281
Capturing Settings ..........................................................................................................288
Deploying Settings.........................................................................................................289
Custom Installation Wizard..................................................................................................290
Add/Remove Registry Entries........................................................................................291
Customize Default Application Settings.........................................................................292
Change Office User Settings ..........................................................................................293
Add Installations and Run Programs ..............................................................................294
Custom Maintenance Wizard...............................................................................................295
Group and System Policy....................................................................................................295
vii](https://image.slidesharecdn.com/4525391/85/Windows-XP-Registry-Guide-8-320.jpg)
![Table of Contents
Chapter 15: Working Around IT Problems..................................................................................298
Controlling Just−in−Time Setup...........................................................................................298
Outlook Express .............................................................................................................299
Windows Media Player..................................................................................................300
.
Desktop Themes............................................................................................................300
Other Shortcuts..............................................................................................................301
Removing Components.......................................................................................................302
Answer File [Components] Section................................................................................302
Extending Windows Components Wizard......................................................................304
Removing Components After Installation .......................................................................305
Hiding Non−Removable Components ............................................................................306
Removing Policy Tattoos.....................................................................................................307
Elevating Processes' Privileges...........................................................................................309
Group Policy ...................................................................................................................309
Secondary Logon...........................................................................................................310
Scheduled Tasks ............................................................................................................310
AutoLogon ......................................................................................................................311
Severing File Associations...................................................................................................313
Deploying Office XP Trusted Sources.................................................................................314
Enabling Remote Desktop Remotely...................................................................................314
Customizing the Windows XP Logon...................................................................................315
Part IV: Appendices .......................................................................................................................316
Appendix List.......................................................................................................................316
Part Overview .................................................................................................................316
Appendix A: File Associations.....................................................................................................317
Overview..............................................................................................................................317
Merge Algorithm ...................................................................................................................317
File Extension Keys.............................................................................................................317
OpenWithList.................................................................................................................318
.
PerceivedType...............................................................................................................319
ShellNew........................................................................................................................319
Program Class Keys............................................................................................................319
DefaultIcon.....................................................................................................................321
EditFlags........................................................................................................................321
Shell...............................................................................................................................322
Specialized Keys ..................................................................................................................323
Applications ....................................................................................................................324
SystemFileAssociations.................................................................................................324
Unknown........................................................................................................................324
COM Class Keys ..................................................................................................................324
Appendix B: Per−User Settings...................................................................................................327
Overview..............................................................................................................................327
AppEvents ............................................................................................................................327
Console................................................................................................................................328
Control Panel.......................................................................................................................329
Desktop..........................................................................................................................330
DesktopWindow Metrics ................................................................................................333
viii](https://image.slidesharecdn.com/4525391/85/Windows-XP-Registry-Guide-9-320.jpg)


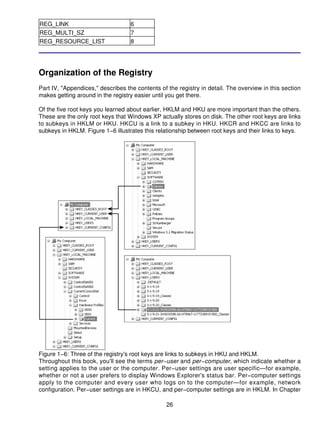


![1. Click the key at the top of the branch you want to export.
2. On the File menu, click Export to display the Export Registry File dialog box, shown in Figure
2−5.
Figure 2−5: Make sure you choose which file format you want to use, regardless of the file
extension you type in the File Name box.
3. In the File Name box, enter a name for the file you're creating.
4. Select the option for the export range you want:
♦ To back up the entire registry, select the All option.
♦ To back up the selected branch, select the Selected Branch option.
5. In the Save As Type list, click the type of file you want to create: Registration Files (*.reg),
Registry Hive Files (*.*), Text Files (*.txt), or Win9x/NT4 Registration Files (*.reg).
6. Click Save.
Importing a file into the registry is similar to opening a file. Click File, Import; in the Files Of Type list,
click the type of file that you're importing; then, in the File Name box, type the path and name of the
file you're importing. The following sections describe each of the file types that you see in the Save
As Type and Files Of Type lists. Each type is a different file format and thus suited to different
purposes than the other types.
Registration Files
Registration files are version 5 REG files—plain text files that look similar to INI flies. Each section
name represents a key, and each item in a section represents a value. The following listing is a
sample of a version 5 REG file:
Listing 2−2: Sample Version 5 REG File
Windows Registry Editor Version 5.00
[HKEY_CURRENT_USERSample]
"String"="Jerry Honeycutt"
"Binary"=hex:01,02,03,04,05,06,07,08
48](https://image.slidesharecdn.com/4525391/85/Windows-XP-Registry-Guide-59-320.jpg)
!["DWORD"=dword:00004377
"Expandable String"=hex(2):25,00,55,00,53,00,45,00,52,00,00,00
"MultiString"=hex(7):48,00,65,00,6c,00,6c,00,6f,00,00,00,00
[HKEY_CURRENT_USERSampleSubkey]
The most important thing to know about version 5 REG files is that they are Unicode, and some
programs can't handle Unicode REG files properly. And because these files are Unicode, each
character in REG_EXPAND_SZ and REG_MULTI_SZ values is two bytes wide. In the listing just
shown, you'll notice this in the values called Expandable String and MultiString. For example, the
letter A is 0x0041, not 0x41. For more information about Unicode−encoded text, see Chapter 1,
"Learning the Basics." Windows 2000 and Windows XP are the only Microsoft operating systems
that support version 5 REG files.
In the previous section, you learned how to import REG files using Regedit. You can also
double−click a REG file to merge it into the registry. Regedit will prompt to merge the settings that
the file contains into the registry and, after you click Yes, it will tell you when it's finished. If you're
deploying a REG file to users, however, you don't want them to see the message or answer the
prompt, so you'll use Regedit's /s command−line option to run it quietly. For example:
regedit settings.reg /s
Use this command line from batch files, scripts, answer files, or even from the Office XP Resource
Kit's Custom Installation Wizard. For more information about creating and deploying REG files, see
the following chapters:
• Chapter 9, "Scripting Registry Changes," describes the format of each value type in REG
files and shows you how to build them manually.
• Chapter 12, "Deploying with Answer Files," describes how to deploy REG files as part of
your Windows XP answer file—a great way to deploy user settings.
• Chapter 14, "Deploying Office XP Settings," describes how to deploy REG files as part of
your Office XP customizations.
Caution Don't import a REG file that you create in one version of Windows into another
version—at least not without thinking about it carefully. For example, exporting
hardware settings from the Windows NT 4.0 registry and importing them into the
Windows XP registry will likely wreak havoc with Windows XP. Some settings are
fine to share across Windows versions, however, such as file associations in
HKCR and some programs' settings. Use common sense.
Win9x/NT4 Registration Files
Win9x/NT4 registration files are version 4 REG files, which Windows 95, Windows 98, Windows Me,
and Windows NT 4.0 support. The following sample is a version 4 ANSI REG file. The settings are
the same as the version 5 Unicode REG file you saw in the previous section:
Listing 2−3: Sample Version 4 REG File
REGEDIT4
[HKEY_CURRENT_USERSample]
"String"="Jerry Honeycutt"
"Binary"=hex:01,02,03,04,05,06,07,08
"DWORD"=dword:00004377
49](https://image.slidesharecdn.com/4525391/85/Windows-XP-Registry-Guide-60-320.jpg)
!["Expandable String"=hex(2):25,55,53,45,52,00
"MultiString"=hex(7):48,65,6c,6c,6f,00,00
[HKEY_CURRENT_USERSampleSubkey]
Instead of Unicode text, version 4 files are ANSI text files. That means that each character is a
single byte wide. The letter A is 0x41. You notice the difference between this and the earlier
Unicode REG file in the Expandable String and MultiString values. Characters in
REG_EXPAND_SZ and REG_MULTI_SZ values are single bytes, which is more natural for most
folks. This is the file format that's compatible with programs expecting ANSI REG files, and it has
the added benefit of being compatible with earlier versions of Regedit.
Choosing Between REG and Hive Files
Registry Editor exports branches to four different file formats. Each format has strengths and
weaknesses that make it appropriate for some tasks and useless for others. This section should
help you choose the right format each time.
Exporting to hive files is my choice most of the time. The reason I like hive files so much is because
they're much more accurate than either type of REG file. They are the same format as the Windows
XP working hive files, so they represent settings exactly the same way. Also, when you import a
hive file, Registry Editor deletes the branch it's replacing before importing the settings. In other
words, the editor removes any settings that exist in the working registry but not in the hive file you're
importing. When restoring keys from a backup after an unsuccessful registry edit, this is exactly the
behavior you want. Hive files have one more strength that make them my choice most of the time:
You can load them as new hives and view their contents without affecting other parts of the registry.
Their only drawback is you can't view them in Notepad.
Although hive files are my choice most of the time, there are a few scenarios that require me to use
REG files. First is when I'm working with programs that don't understand hive files. For example, the
Office XP Resource Kit's Custom Installation Wizard can read REG files but not hive files. Second is
when I'm exporting settings to different versions of Windows. Windows 98 doesn't provide a way to
load hive files. Last, and important in my view, is when I'm trying to track down a setting in the
registry by comparing snapshots. Comparing two hive files isn't feasible, but comparing two REG
files is easy using Microsoft Word 2002.
Hive Files
Hive files are binary files that contain portions of the registry. As you recall from Chapter 1,
"Learning the Basics," Windows XP stores different parts of the registry in different hive files.
Regedit displays all these hives together in one logical unit. Hive files are useful tools, though. You
can export branches to hive files that can then be imported to another computer or by another user.
They're great backups.
Exported hive files have purposes similar to REG files. Hive files have most of the advantages of
REG files, except that you can't view and edit them in a text editor. The advantage that hive files
have over REG files is that you can load and edit them in Regedit without actually replacing your
own settings. The section "Working with Hive Files," on the facing page, describes how to load hive
files.
50](https://image.slidesharecdn.com/4525391/85/Windows-XP-Registry-Guide-61-320.jpg)


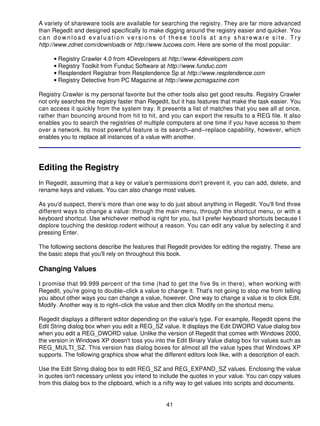
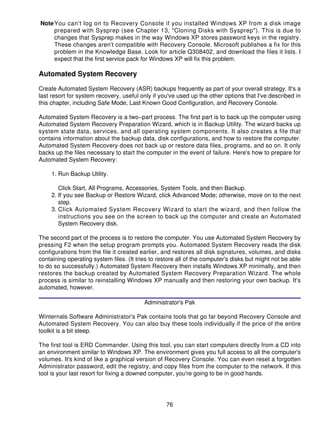
![Figure 3−2: The key Backup Desktop Settings is a hive containing a backup copy of HKCUControl
PanelDesktop that I've loaded into the registry.
Now that I hopefully have you sold on using hive files to back up settings before changing them, I'm
going to introduce you to the ultimate way to back up registry settings: Console Registry Tool for
Windows (Reg.exe). This command−line tool comes with Windows XP and provides most of
Regedit's features plus some. You learn its full use in Chapter 9, "Scripting Registry Changes." You
can use it to save keys to hive files. You can also use it to restore, load, and unload hive files. With
Reg.exe, saving a hive file is the same as exporting, and restoring a hive file is the same as
importing. The best part is one of the tool's unique features: the ability to copy one key to another
key, creating a quick backup copy of a key right there in the registry. So for example, I can copy
HKCUControl Panel Desktop to HKCUControl PanelJH_Backup with a single command. Table
3−2 on the next page describes the Reg.exe command lines for each of these features. See
Chapter 9 for a full explanation of all the different options.
Table 3−2: Backing Up the Registry with Reg.exe
Command Line Description
REG SAVE keyname Save the branch starting with the key keyname to the hive file called
filename filename. Keyname begins with one of the root key abbreviations, HKCR,
HKLM, HKCU, HKU, or HKCC.
REG RESTORE Restore the hive file filename to the key keyname, replacing all of its
keyname filename contents. Keyname begins with one of the root key abbreviations, HKCR,
HKLM, HKCU, HKU, or HKCC.
REG LOAD keyname Load the hive file filename to a new temporary branch beginning with the
filename key keyname. Keyname begins with one of the root key abbreviations,
HKCR, HKLM, HKCU, HKU, or HKCC.
REG UNLOAD keyname Unload the hive file in the temporary branch beginning with the key
keyname. Keyname begins with one of the root key abbreviations,
HKCR, HKLM, HKCU, HKU, or HKCC.
REG COPY keyname1 Copy the values in the key keyname1 to the key keyname2, creating it if
keyname2 [/s] it doesn't already exist. Keyname1 and keyname2 begin with one of the
root key abbreviations, HKCR, HKLM, HKCU, HKU, or HKCC. The
option /s copies the entire branch, not just the values in keyname1.
Fixing Corrupt Settings
Even if you've followed my advice to this point, you're going to run into problems. Sometimes a
simple change to the registry has ripple effects that restoring a backup copy of a value won't fix.
Windows XP and most applications are incredibly resilient, though, so fixing a problem is a simple
matter of telling it to heal thyself.
The quickest route is to remove the offending value and allow the program to re−create it using a
default. Windows XP and most programs re−create missing settings, which is what makes this work
in most cases. This is tantamount to uninstalling and reinstalling an application. The difficult part is
figuring out which value contains the troublesome setting. Chapter 8, "Finding Registry Values,"
helps you track down settings. For example, if your mouse pointer bounces around the screen in
convulsive fits, remove the key HKCUControl PanelMouse. When you log off and back on to
Windows XP, the mouse settings are re−created. The operating system won't re−create everything
you delete, though, particularly file associations in HKCR. So back up any setting you delete before
you try this troubleshooting technique.
57](https://image.slidesharecdn.com/4525391/85/Windows-XP-Registry-Guide-68-320.jpg)


![Figure 3−3: TechSmith SnagIt is the best screen capture tool, and it works well with Windows XP.
Well−designed applications re−create settings that they're missing. To reset the program's per−user
settings, remove HKCUSoftwareCompanyProgram. You typically don't want to remove the
program's per−computer settings because doing so is likely to adversely affect most applications.
You can hide the program's per−computer settings to test the scenario first, just to be on the safe
side.
Windows Installer−based applications are easier to reset because Windows Installer has repair
functionality built right into it. Microsoft Office XP is an example of a Windows Installer−based
application. To learn more about Windows Installer−based applications, see Chapter 11, "Mapping
Windows Installer." For now, I will describe the three different ways you can have Windows Installer
restore an application's original settings:
• On the application's Help menu, click Detect And Repair.
• Click Start, Control Panel, and then click Add Or Remove Programs. Click the application
you want to repair, and then click Change. Follow the instructions you see on the screen to
repair the application.
• In the Run dialog box, type msiexec /f[u][m] package, where package is the path and file
name of the application's package file, which has the .msi file extension. Use /fu to repair
per−user settings and /fmto repair per−computer settings. IT professionals like this
command because it's the best way to repair settings without visiting the user's desk.
The last repair method for Windows Installer−based applications, particularly for Office XP, is Profile
Wizard. Chapter 14, "Deploying Office XP Settings," describes how to use this tool to deploy
settings with Office XP. Basically, you install and configure Office XP on a sample computer,
60](https://image.slidesharecdn.com/4525391/85/Windows-XP-Registry-Guide-71-320.jpg)


![My Pictures %USERPROFILE%My DocumentsMy Pictures
NetHood %USERPROFILE%NetHood
Personal %USERPROFILE%My Documents
PrintHood %USERPROFILE%PrintHood
Programs %USERPROFILE%Start MenuPrograms
Recent %USERPROFILE%Recent
SendTo %USERPROFILE%SendTo
Start Menu %USERPROFILE%Start Menu
Startup %USERPROFILE%Start MenuProgramsStartup
Templates %USERPROFILE%Templates
Users might want to redirect special folders for a variety of reasons, but two come to mind. The first
is to redirect the My Documents folder to a different volume. For example, users might redirect My
Documents to drive D so they can reinstall Windows XP on drive C without losing their documents.
The second scenario is when users have a network and want to access their documents from more
than one computer. In that case, they can redirect both their My Documents and Favorites folders to
a network location so they have access to them from anywhere. IT professionals frequently want to
redirect My Documents to a network location, too, which makes backing up users' documents
easier. This can be done with the IntelliMirror feature Redirected Folders. IT professionals can't use
IntelliMirror features without Active Directory, but they can simulate Redirected Folders. Chapter 15,
"Working Around IT Problems," shows how to use this hack in that scenario.
HKCUSoftwareMicrosoftWindowsCurrentVersionExplorerUser Shell Folders is the key where
Windows XP stores the location of per−user special folders. Each value in this key is a special
folder as shown in Table 4−1. These are REG_EXPAND_SZ values, so you can use environment
variables in them. Use %USERPROFILE% in a path to direct the folder somewhere inside users'
profile folders or %USERNAME% in a path to include users' names. To redirect users' Favorites
folders to the network, set the value Favorites, which you looked up in Table 4−1, to Server
Share %USERNAME%Favorites, where Server Share is the server and share containing the
folders. The next time the user logs on, Windows XP updates a second key,
HKCUSoftwareMicrosoftWindowsCurrentVersion ExplorerShell Folders, with the paths from
User Shell Folders, so you don't have to update it. In fact, Microsoft's documentation says Windows
XP doesn't use Shell Folders.
The following listing shows you how to redirect special folders automatically. Save this listing to the
text file Redirect.inf and replace the string PERSONAL with the location where you want to redirect
the My Documents folder. (Use environment variables so the script works for all users.) Do the
same for the strings FAVORITES, PICTURES, and APPDATA. To configure these settings,
right−click Redirect.inf, and then click Install. Chapter 9, "Scripting Registry Changes," shows you
other ways to deploy these settings. You can uninstall this script using Add Or Remove Programs.
Listing 4−1: Redirect.inf
[ Version]
Signature=$CHICAGO$
[DefaultInstall]
AddReg=Reg.Settings
AddReg=Reg.Uninstall
CopyFiles=Inf.Copy
[DefaultUninstall]
79](https://image.slidesharecdn.com/4525391/85/Windows-XP-Registry-Guide-90-320.jpg)
![DelReg=Reg.Settings
DelReg=Reg.Uninstall
DelFiles=Inf.Copy
[Reg.Settings]
HKCU,SoftwareMicrosoftWindowsCurrentVersionExplorer
User Shell Folders,AppData,0x20000,"%APPDATA%"
HKCU,SoftwareMicrosoftWindowsCurrentVersionExplorer
User Shell Folders,Personal,0x20000,"%PERSONAL%"
HKCU,SoftwareMicrosoftWindowsCurrentVersionExplorer
User Shell Folders,My Pictures,0x20000,"%PICTURES%"
HKCU,SoftwareMicrosoftWindowsCurrentVersionExplorerUser Shell
Folders,favorites,0x20000,"%FAVORITES%"
[Reg.Uninstall]
HKCU,SoftwareMicrosoftWindowsCurrentVersionUninstall%NAME%
HKCU,SoftwareMicrosoftWindowsCurrentVersionUninstall
%NAME%,DisplayName,,"%NAME%"
HKCU,SoftwareMicrosoftWindowsCurrentVersionUninstall%NAME%,UninstallString
,,"Rundll32.exe setupapi.dll,InstallHinfSection DefaultUninstall 132"
"%53%Application DataCustomRedirect.inf"
[Inf.Copy]
Redirect.inf
[DestinationDirs]
Inf.Copy=53,Application DataCustom
[SourceDisksNames]
55=%DISKNAME%
[SourceDisksFiles]
Redirect.inf=55
[Strings]
NAME = "Jerry's Redirect Folders"
APPDATA = "ServerFolders%USERNAME%Application Data"
PERSONAL = "ServerFolders%USERNAME%My Documents"
PICTURES = "ServerFolders%USERNAME%My DocumentsMy Pictures"
FAVORITES = "ServerFolders%USERNAME%Favorites"
DISKNAME = "Setup Files"
Note The special folders in this section are per−user and exist within users' profile folders. Windows
XP also lists per−computer special folders in HKLM. Examples of per−computer folders
include Common AppData, Common Desktop, and Common Documents. It's not as useful to
customize per−computer folders, however. Regardless, the same rules apply. Change the
location of the folder in User Shell folders; Windows XP automatically updates Shell Folders.
Customizing Shell Folders
Some folders you see in Windows Explorer, Control Panel, or on the desktop don't actually exist on
the file system. They're objects based on classes registered in the key HKCRCLSID. Some folders
and files that do exist on the file system have special capabilities (the History and Briefcase folders
for example), and those capabilities also come from objects based on classes registered in
HKCRCLSID. A class is essentially a template for creating something real, like an object in the user
interface, and CLSID is where those classes register themselves so Windows XP knows about
them.
80](https://image.slidesharecdn.com/4525391/85/Windows-XP-Registry-Guide-91-320.jpg)


![To add commands to My Computer's shortcut menu, edit its class registration, which is in
HKCRCLSID{20D04FE0−3AEA−1069−A2D8−08002B30309D}. Add the command to this key's
shell subkey. For example, after installing Microsoft Tweak UI, which you learn about in Chapter 5,
"Mapping Tweak UI," I like to add a command to My Computer's shortcut menu that opens Tweak
UI. So I add the branch tweakcommand to My Computer's class registration. I set the default value
of tweak to Tweak UI, the menu item text, and the default value of command to
C:WindowsSystem32Tweakui.exe, the path and file name of Tweak UI. After customizing the
class registration for My Computer, starting Tweak UI is fast: Right−click My Computer, and then
click Tweak UI.
The following INF file automates this setting. First install Tweak UI. Then save this script to the file
Tweakui.inf, right−click the file, and then click Install. (Again, you can download these sample
scripts from http://www.honeycutt.com.) See Chapter 9, "Scripting Registry Changes," for other
ways to script this hack. You can uninstall these settings in Add Or Remove Programs.
Listing 4−2: Tweakui.inf
[Version]
Signature=$CHICAGO$
[DefaultInstall]
AddReg=Reg.Settings
AddReg=Reg.Uninstall
CopyFiles=Inf.Copy
[DefaultUninstall]
DelReg=Reg.Settings
DelReg=Reg.Uninstall
DelFiles=Inf.Copy
[Reg.Settings]
HKCR,CLSID{20D04FE0−3AEA−1069−A2D8−08002B30309D}shelltweak
HKCR,CLSID{20D04FE0−3AEA−1069−A2D8−08002B30309D}shelltweak,,,"%MENUITEM%"
HKCR,CLSID{20D04FE0−3AEA−1069−A2D8−08002B30309D}shelltweakcommand
,,0x20000,"%SYSTEMROOT%System32Tweakui.exe"
[Reg.Uninstall]
HKLM,SoftwareMicrosoftWindowsCurrentVersionUninstall%NAME%
HKLM,SoftwareMicrosoftWindowsCurrentVersionUninstall%NAME%,DisplayName
,,"%NAME%"
HKLM,SoftwareMicrosoftWindowsCurrentVersionUninstall%NAME%,UninstallString
,,"Rundll32.exe setupapi.dll,InstallHinfSection DefaultUninstall 132"
"%17%Tweakui.inf"
[Inf.Copy]
Tweakui.inf
[DestinationDirs]
Inf.Copy=17
[SourceDisksNames]
55=%DISKNAME%
[SourceDisksFiles]
Tweakui.inf=55
[Strings]
NAME = "Jerry's Tweak UI Shortcut"
MENUITEM = "Tweak UI"
DISKNAME = "Setup Files"
87](https://image.slidesharecdn.com/4525391/85/Windows-XP-Registry-Guide-98-320.jpg)
![You can add any command to any shortcut menu, and that command doesn't have to edit, print, or
do anything at all with the menu's target. My Computer is a good place to park system−oriented
commands like Tweak UI, but you could also put them on another object's shortcut menu, such as
Recycle Bin, if you don't display the My Computer icon on the desktop.
Open Command Prompts at Folders
Another favorite customization, and the one I probably use the most, enables me to quickly open an
MS−DOS command prompt with the targeted folder set as the current working directory. I add the
command C:WINDOWSSystem32cmd.exe /k cd "%1" to the Directory and Drive program classes.
Then I right−click a folder and click CMD Prompt Here to open a command prompt with that folder
set as the current working directory. This is a real time saver. Here are the settings to add to
HKCRDirectory (repeat these settings in HKCRDrive):
• In HKCRDirectoryshell, create the subkey cmdhere.
• In HKCRDirectoryshellcmdhere, set the default value to CMD Prompt Here. This is the text
you'll see on the shortcut menu.
• In HKCRDirectoryshellcmdhere, create the subkey command.
• In HKCRDirectoryshellcmdherecommand, set the default value to
C:WindowsSystem32cmd.exe /k cd "%1".
The following script automatically adds this command to the Directory and Drive program classes.
Save it to the text file Cmdhere.inf, right−click it, and then click Install. To understand how this script
works, see Chapter 9, "Scripting Registry Changes." Remove these settings using Add Or Remove
Programs.
Listing 4−3: Cmdhere.inf
[Version]
Signature=$CHICAGO$
[DefaultInstall]
AddReg=Reg.Settings
AddReg=Reg.Uninstall
CopyFiles=Inf.Copy
[DefaultUninstall]
DelReg=Reg.Settings
DelReg=Reg.Uninstall
DelFiles=Inf.Copy
[Reg.Settings]
HKCR,DirectoryShellCmdhere
HKCR,DirectoryShellCmdhere,,,"%MENUITEM%"
HKCR,DirectoryShellCmdherecommand,,,"%11%cmd.exe /k cd ""%1"""
HKCR,DriveShellCmdhere
HKCR,DriveShellCmdhere,,,"%MENUITEM%"
HKCR,DriveShellCmdherecommand,,,"%11%cmd.exe /k cd ""%1"""
[Reg.Uninstall]
HKLM,SoftwareMicrosoftWindowsCurrentVersionUninstall%NAME%
HKLM,SoftwareMicrosoftWindowsCurrentVersionUninstall%NAME%,DisplayName
,,"%NAME%"
HKLM,SoftwareMicrosoftWindowsCurrentVersionUninstall%NAME%,UninstallString
,,"Rundll32.exe setupapi.dll,InstallHinfSection DefaultUninstall 132"
"%17%Cmdhere.inf"
88](https://image.slidesharecdn.com/4525391/85/Windows-XP-Registry-Guide-99-320.jpg)
![[Inf.Copy]
Cmdhere.inf
[DestinationDirs]
Inf.Copy=17
[SourceDisksNames]
55=%DISKNAME%
[SourceDisksFiles]
Cmdhere.inf=55
[Strings]
NAME = "Jerry's CMD Prompt Here"
MENUITEM = "CMD &Prompt Here"
DISKNAME = "Setup Files"
Rooting Windows Explorer at a Folder
The idea behind this customization is to open Windows Explorer without all the usual clutter so you
can focus on a single folder. Add the command explorer.exe /e,/root,/idlist,%I to the Folder program
class's shell subkey. Then right−click any folder, choose the command you added, and another
Windows Explorer window opens with that folder rooted at the top of the left pane.
Here are the settings you add to the Folder program class:
• In HKCRFoldershell, create the subkey fromhere.
• In HKCRFoldershellfromhere, set the default value to Explore from Here. This is the text
you'll see on the shortcut menu.
• In HKCRFoldershellfromhere, create the subkey command.
• In HKCRFoldershellfromherecommand, set the default value to explorer.exe
/e,/root,/idlist,%I.
The following script automatically adds this command to the Folder program class. Save it to the
text file Fromhere.inf, right−click it, and then click Install. To understand how this script works, see
Chapter 9, "Scripting Registry Changes." Remove these settings using Add Or Remove Programs.
Listing 4−4: Fromhere.inf
[Version]
Signature=$CHICAGO$
[DefaultInstall]
AddReg=Reg.Settings
AddReg=Reg.Uninstall
CopyFiles=Inf.Copy
[DefaultUninstall]
DelReg=Reg.Settings
DelReg=Reg.Uninstall
DelFiles=Inf.Copy
[Reg.Settings]
HKCR,Foldershellfromhere
HKCR,Foldershellfromhere,,,"%MENUITEM%"
HKCR,Foldershellfromherecommand,,,"explorer.exe /e,/root,/idlist,%I"
89](https://image.slidesharecdn.com/4525391/85/Windows-XP-Registry-Guide-100-320.jpg)
![[Reg.Uninstall]
HKLM,SoftwareMicrosoftWindowsCurrentVersionUninstall%NAME%
HKLM,SoftwareMicrosoftWindowsCurrentVersionUninstall%NAME%
,DisplayName,,"%NAME%"
HKLM,SoftwareMicrosoftWindowsCurrentVersionUninstall%NAME%
,UninstallString,,"Rundll32.exe setupapi.dll,InstallHinfSection DefaultUninstall 132"
"%17%Fromhere.inf"
[Inf.Copy]
Fromhere.inf
[DestinationDirs]
Inf.Copy=17
[SourceDisksNames]
55=%DISKNAME%
[SourceDisksFiles]
Fromhere.inf=55
[Strings]
NAME = "Jerry's Explore from Here"
MENUITEM = "Explore from &Here"
DISKNAME = "Setup Files"
Adding InfoTips to Program Classes
I like InfoTips; you might not. Position the mouse pointer over an object in the user interface, and
Windows XP displays the InfoTip associated with it in a small yellow box. For documents, the
InfoTip typically includes the type of document, the date of its last modification, its size, and so on.
You can further customize InfoTips, though.
Windows XP uses the REG_SZ value InfoTip to display InfoTips. The operating system uses this
value it finds in the class registration or program class to which the object belongs. For example, if
you position the mouse pointer over a file with the .doc file extension, Windows XP looks in the
associated program class Wordpad.Document.1 for the value InfoTip. If it doesn't find the value
there, it uses the value InfoTip that it finds in HKCR*. The default value of that is
prop:Type;DocAuthor;DocTitle;DocSubject;DocComments; Write;Size.
Thus, you can customize individual classes or create an InfoTip that applies to all classes. If you're
after a specific object or file type, add the REG_SZ value InfoTip to that specific class registration or
program class. Otherwise, customize the value InfoTip in HKCR* to see that tip for all file classes.
So what does all that mean? The notation prop: name indicates to Windows XP that it should use
the document property name in the InfoTip. Thus, the value you just saw means that Windows XP
should display the document properties Type, DocAuthor, DocTitle, DocSubject, DocComments,
Write, and Size in the InfoTip. You can also set InfoTip to an exact string that you want Windows XP
to display when users position the mouse pointer over objects of that particular class. For example,
you can set InfoTip for the txtfile program class to This is a text file, and that's what Windows XP
displays when users position the mouse pointer over text files. Windows XP ignores any property in
the InfoTip that the document doesn't define, and InfoTips can be up to six lines long. The following
list shows just some of the document properties that you can add to an InfoTip (available properties
depend on each individual program class):
90](https://image.slidesharecdn.com/4525391/85/Windows-XP-Registry-Guide-101-320.jpg)

![value IconIndex is the index number of the icon, starting with 0, which is the first icon in the file. If
you use an icon file instead of a DLL or EXE file, put the path of the file in IconFile and set
IconIndex to 0. InfoTip is the text that I want Windows Explorer to display when I position the mouse
pointer over the folder.
[.ShellClassInfo]
IconFile=C:WindowsRegedit.exe
IconIndex=0
InfoTip="Manuscripts for my latest registry book."
Set the Desktop.ini file's Hidden And System attribute by typing the command attrib +s +h filename
in the Run dialog box. You also set the folder's System attribute by typing the command attrib +s
foldername in the Run dialog box. Figure 4−5 shows what the folder Registry Book looks like after
creating this Desktop.ini file in it and setting the file and folder's attributes. Now whenever I position
the mouse pointer over the folder, I am reminded of the important task at hand.
Figure 4−5: When I hold the mouse pointer over the Registry Book folder, I see the text Manuscripts
for my latest registry book.
Adding File Templates
I'm sure you know about the New menu. Right−click within any folder, click New, and choose one of
the templates available to create a new, empty file; then double−click the new file to edit it. By
default, Windows XP provides the following templates: Briefcase, Bitmap Image, Wordpad
Document, Rich Text Document, Text Document, Wave Sound, and Compressed (Zipped Folder).
You can add templates, though, making the chore of starting new files quicker and easier.
Adding new templates is a two−step process:
1. In the file extension key HKCR.ext, create the ShellNew subkey.
2. Add one of the following four values to the ShellNew subkey to define how Windows XP
creates new files of this type:
92](https://image.slidesharecdn.com/4525391/85/Windows-XP-Registry-Guide-103-320.jpg)


![[Version]
Signature=$CHICAGO$
[DefaultInstall]
DelReg=Reg.Settings
[Reg.Settings]
HKCU,SoftwareMicrosoftWindowsCurrentVersionExplorerMenuOrder
Tip You sorted the Start menu just the way you wanted it—wouldn't it be dandy if you could transfer
that sort order to another computer? You're in luck. Export the key MenuOrder to a REG file,
and then import that REG file to the computer on which you want to use that sort order.
Customizing Internet Explorer
Windows XP comes with Internet Explorer 6. IT professionals can customize Internet Explorer in a
number of ways using the Internet Explorer Administration Kit. This tool is available at
http://www.microsoft.com/downloads, and it also comes with the Office XP Resource Kit. You can
do the following with the kit:
• Tailor Internet Explorer and other Internet components to fit the needs of your enterprise or
users. For example, you can customize the Links bar and Favorites menu to promote your
intranet or provide helpful information.
• Configure and deploy settings without ever touching desktops.
• Customize the setup program so that it requires little or no user interaction.
• Control which settings users can change so that IT professionals can ensure that security,
connection, and important settings stick to corporate standards.
For more information about the Internet Explorer Administration Kit, see
http://www.microsoft.com/windows/ieak/default.asp. The following sections describe a few of my
favorite customizations for Internet Explorer, including extending its shortcut menus, changing the
toolbar's background, and adding search URLs to it.
Extending the Shortcut Menus
Right−click a Web page, and Internet Explorer displays a shortcut menu. You can customize this
shortcut menu by adding commands to it that you link to scripts in an HTML file. For example, you
can add a command to the shortcut menu that opens the current Web page in a new window or
highlights the selected text on it.
HKCUSoftwareMicrosoftInternet ExplorerMenuExt is where Internet Explorer looks for
extensions. Add this key if it doesn't exist, and then add a subkey for each command that you want
to add. Then set that subkey's default value to the path and name of the HTML file containing the
script that carries out the command. For example, to add the command Magnify to the shortcut
menu that runs the script in the HTML file C:Windows WebMagnify.htm, add the subkey Magnify
and set its default value to C:WindowsWebMagnify.htm. When you choose this command on
Internet Explorer's shortcut menu, it executes the script that the file contains. Then you need to
create Magnify.htm. The following listing is the contents of Magnify.htm. external.menuArguments is
a property that contains the window object in which you executed the command. Because you have
access to the window object, you can do almost anything you like in that window, such as
reformatting its contents, and so on.
Listing 4−6: Magnify.htm
98](https://image.slidesharecdn.com/4525391/85/Windows-XP-Registry-Guide-109-320.jpg)

![the %s with any text you type to the right of the prefix. Continue the example, and set it to
http://groups.google.com/groups?q=%s&hl=en.
Add the REG_SZ values shown in Table 4−6 to the prefix key you created. The purpose of these
values is to describe what to substitute for special characters in your search string, including a
space, percent sign (%), ampersand (&), and plus sign (+). These characters have special meaning
when submitting forms to Web sites, so you must substitute a plus sign for a space, for example, or
%26 for an ampersand. Thus, the browser translates the string Ben & Jerry to Ben+%26+Jerry.
Table 4−6: Values in Search URLs
Name Data
<space> +
% %25
& %26
+ %2B
Deriving the URL that you must use is easy. Open the search engine that you want to add to
Internet Explorer's search URLs, and then search for something. When the browser displays the
results, copy the URL from the address bar, replacing your search word with a %s. For example,
after searching Google Groups for sample, the resulting URL is
http://groups.google.com/groups?q=sample&hl=en. Replace the word sample with %s to get
http://groups.google.com/groups?q=%s&hl=en.
This hack is so useful that I have a script that automatically creates search URLs for the search
engines I use most often. Copy the following listing to the file Search.inf, right−click it, and then click
Install. You can remove this script and all its settings using Add Or Remove Programs. This script
creates search URLs for the five search engines that I use most often. The search URL news
searches Google Groups; msn searches MSN; ms searches Microsoft's Web site; msdn searches
MSDN; and technet searches TechNet.
Listing 4−7: Search.inf
[Version]
Signature=$CHICAGO$
[DefaultInstall]
AddReg=Reg.Settings
AddReg=Reg.Uninstall
CopyFiles=Inf.Copy
[DefaultUninstall]
DelReg=Reg.Settings
DelReg=Reg.Uninstall
DelFiles=Inf.Copy
[Reg.Settings]
HKCU,SoftwareMicrosoftInternet ExplorerSearchURL
HKCU,SoftwareMicrosoftInternet ExplorerSearchURLnews,,0,"%GOOGLE%"
HKCU,SoftwareMicrosoftInternet ExplorerSearchURLnews," ",0,"+"
HKCU,SoftwareMicrosoftInternet ExplorerSearchURLnews,"%",0,"%25"
HKCU,SoftwareMicrosoftInternet ExplorerSearchURLnews,"&",0,"%26"
HKCU,SoftwareMicrosoftInternet ExplorerSearchURLnews,"+",0,"%2B"
100](https://image.slidesharecdn.com/4525391/85/Windows-XP-Registry-Guide-111-320.jpg)
![HKCU,SoftwareMicrosoftInternet ExplorerSearchURLmsn,,0,"%MSN%"
HKCU,SoftwareMicrosoftInternet ExplorerSearchURLmsn," ",0,"+"
HKCU,SoftwareMicrosoftInternet ExplorerSearchURLmsn,"%",0,"%25"
HKCU,SoftwareMicrosoftInternet ExplorerSearchURLmsn,"&",0,"%26"
HKCU,SoftwareMicrosoftInternet ExplorerSearchURLmsn,"+",0,"%2B"
HKCU,SoftwareMicrosoftInternet ExplorerSearchURLms,,0,"%MICROSOFT%"
HKCU,SoftwareMicrosoftInternet ExplorerSearchURLms," ",0,"+"
HKCU,SoftwareMicrosoftInternet ExplorerSearchURLms,"%",0,"%25"
HKCU,SoftwareMicrosoftInternet ExplorerSearchURLms,"&",0,"%26"
HKCU,SoftwareMicrosoftInternet ExplorerSearchURLms,"+",0,"%2B"
HKCU,SoftwareMicrosoftInternet ExplorerSearchURLmsdn,,0,"%MSDN%"
HKCU,SoftwareMicrosoftInternet ExplorerSearchURLmsdn," ",0,"+"
HKCU,SoftwareMicrosoftInternet ExplorerSearchURLmsdn,"%",0,"%25"
HKCU,SoftwareMicrosoftInternet ExplorerSearchURLmsdn,"&",0,"%26"
HKCU,SoftwareMicrosoftInternet ExplorerSearchURLmsdn,"+",0,"%2B"
HKCU,SoftwareMicrosoftInternet ExplorerSearchURLtechnet,,0,"%TECHNET%"
HKCU,SoftwareMicrosoftInternet ExplorerSearchURLtechnet," ",0,"+"
HKCU,SoftwareMicrosoftInternet ExplorerSearchURLtechnet,"%",0,"%25"
HKCU,SoftwareMicrosoftInternet ExplorerSearchURLtechnet,"&",0,"%26"
HKCU,SoftwareMicrosoftInternet ExplorerSearchURLtechnet,"+",0,"%2B"
[Reg.Uninstall]
HKCU,SoftwareMicrosoftWindowsCurrentVersionUninstall%NAME%
HKCU,SoftwareMicrosoftWindowsCurrentVersionUninstall%NAME%,DisplayName
,,"%NAME%"
HKCU,SoftwareMicrosoftWindowsCurrentVersionUninstall%NAME%,UninstallString
,,"Rundll32.exe setupapi.dll,InstallHinfSection DefaultUninstall 132"
"%53%Application DataCustomSearch.inf"
[Inf.Copy]
Search.inf
[DestinationDirs]
Inf.Copy=53,Application DataCustom
[SourceDisksNames]
55=%DISKNAME%
[SourceDisksFiles]
Search.inf=55
[Strings]
NAME = "Jerry's IE Search URLs"
DISKNAME = "Setup Files"
; Search URLs
GOOGLE = "http://groups.google.com/groups?q=%s&hl=en"
MSN = "http://search.msn.com/results.asp?RS=CHECKED&FORM=MSNH&v=1&q=%s"
MICROSOFT = "http://search.microsoft.com/default.asp?so=RECCNT&siteid=us&p=1&"
"nq=NEW&qu=%s&IntlSearch=&boolean=ALL&ig=1&ig=3&ig=5&ig=7&ig=9&ig=2&ig=4&ig=6&"
"ig=8&ig=10&i=00&i=02&i=04&i=06&i=08&i=01&i=03&i=05&i=07&i=09"
MSDN = "http://search.microsoft.com/default.asp?qu=%s&boolean=ALL&nq=NEW&"
"so=RECCNT&p=1&ig=01&i=00&i=01&i=02&i=03&i=04&i=05&i=06&i=07&i=08&i=09&i=10&"
"i=11&i=12&i=13&i=14&i=15&i=16&i=17&i=18&i=19&i=20&i=21&i=22&i=23&i=24&i=25&"
"i=26&i=27&i=28&i=29&i=30&i=31&i=32&i=33&i=34&i=35&i=36&i=37&i=38&i=39&i=40&"
"i=41&i=42&i=43&i=44&i=45&i=46&i=47&i=48&i=49&i=50&i=51&siteid=us/dev"
TECHNET = "http://search.microsoft.com/default.asp?qu=%s&boolean=ALL&nq=NEW&"
"so=RECCNT&p=1&ig=01&ig=02&ig=03&ig=04&i=00&i=01&i=02&i=03&i=04&i=05&i=06&i=07&"
"i=08&i=09&i=10&i=11&i=12&i=13&i=14&i=15&i=16&i=17&i=18&i=19&i=20&i=21&i=22&"
101](https://image.slidesharecdn.com/4525391/85/Windows-XP-Registry-Guide-112-320.jpg)


![string variables makes it easier to maintain template files that use the same strings more than once.
More importantly, it makes localization of template files far easier and much less error prone.
Define strings at the end of your template file in the [strings] section. The format of each string is
name="string". You must enclose the string in double quotation marks. To use string variables in
your template file, use the format !!name. Each time the Group Policy editor sees !! name, it
substitutes the string for the name. Incidentally, the !! makes searching template files for strings
easy—just search the file for the double exclamation marks. The following listing is an example of
how strings and string variables are used in template file:
Listing 6−3: example.adm
POLICY !!Sample // Defined in [strings] section
SUPPORTED "At least Microsoft Windows XP" // Hard−coded string
EXPLAIN !!Sample_Explain // Defined in [strings] section
...
[strings]
Sample="Sample Policy"
Sample_Explain="This sample policy doesn't do much of anything."
Note In this chapter, I tend not to use string variables for clarity. Avoiding string variables prevents
you from having to look up each string as you're wading through the listings. Keep in mind
that you'll want to use string variables if you plan on localizing your files.
CLASS
The first entry in a template file is the keyword CLASS. It defines whether the policies following it
are per−user or per−computer, that is, it specifies where in the Group Policy editor you see the
policy: User Configuration or Computer Configuration. You can use multiple CLASS keywords in a
template file. When the Windows XP client−side extensions process the file, it merges the settings
defined in the CLASS USER sections and does the same for the settings defined in all the CLASS
MACHINE sections. Then it loads the settings defined in the CLASS USER sections in HKCU and
the settings defined in the CLASS MACHINE sections in HKLM.
Syntax
CLASS Name
Name This must be MACHINE or USER.MACHINE specifies that the policies following the CLASS
keyword are per−computer policies, and USER specifies that the policies following the
keyword are per−user policies. This keyword persists until you change it using additional
CLASS keywords.
Example
Listing 6−4: example.adm
CLASS MACHINE
// Policies here are per−computer policies
CLASS USER
// Policies here are per−user policies
138](https://image.slidesharecdn.com/4525391/85/Windows-XP-Registry-Guide-149-320.jpg)

![Keywords
The valid keywords you can use within a CATEGORY section are the following:
• CATEGORY
• END
• KEYNAME
• POLICY
KEYNAME
Use the KEYNAME keyword within a category to define which subkey of HKCU or HKLM
(depending on the CLASS keyword) contains the value you're changing. Do not include a root key in
the path because the CLASS keyword defines it. If the name contains spaces, you must enclose the
string in double quotation marks. The example in the previous section, "CATEGORY" shows how to
use the KEYNAME keyword.
POLICY
Use the POLICY keyword to define a policy that the administrator can change. The policy editor
displays the policy and its controls in a dialog box that the administrator uses to change the policies
state and settings. You can include multiple POLICY keywords in a single category, but you don't
need to include the KEYNAME keyword before each POLICY keyword. The most recent KEYNAME
keyword applies for each policy. You end a policy with END POLICY.
Each policy contains a VALUENAME keyword to associate a registry value with it. By default, the
policy editor assumes it's a REG_DWORD value and stores 0x01 in it when you enable the policy.
The policy editor also removes the value when you disable the policy. You must use the VALUEON
and VALUEOFF keywords if you don't want the policy editor to remove the value when you disable
the policy. You don't have to use any keywords other than VALUENAME to get this behavior. You
can include optional PART keywords that specify additional options, however, such as drop−down
list boxes, check boxes, text boxes, and so on. You see these controls in the bottom part of the
policy's dialog box (see Figure 6−3).
Syntax
POLICY Name
[KEYNAME Subkey]
EXPLAIN Help
VALUENAME Value
[Parts]
END POLICY
Name This is the name of the policy as you want to see it in the Group Policy editor. Use a
descriptive but short name.
Subkey This is an optional subkey of HKLM or HKCU to use for the category. Do not include either
root key in the path, though, because the preceding CLASS keyword specifies which of
these root keys to use. If you specify a subkey, all subcategories, policies, and parts use it
unless they specifically provide a subkey of their own. Enclose names that contain spaces
in double quotes.
140](https://image.slidesharecdn.com/4525391/85/Windows-XP-Registry-Guide-151-320.jpg)
![Help This is the string that the Group Policy editor displays on the Explain tab and on the
Extended tab of the policy's dialog box.
Value This is the registry value to modify. Enabling the policy sets the REG_DWORD value to
0x01. Select the Not Configured option or disable the policy, and the policy editor removes
the value from the registry. To specify values other than the default 0x01, use the
VALUEON and VALUEOFF keywords directly following the VALUENAME keyword:
VALUEON [NUMERIC] Enabled
VALUEOFF [NUMERIC] Disabled
When you use these keywords, the policy editor sets the registry value to Enabled when
you enable the policy and sets the value to Disabled when you disable the policy. The
default value type is REG_SZ, but you can change it to REG_DWORD by prefixing the
value with the keyword NUMERIC. Regardless, setting the policy to Not Configured
removes the value altogether.
Example
Listing 6−6: example.adm
CLASS MACHINE
CATEGORY "Disk Quotas"
KEYNAME "SoftwarePoliciesMSDiskQuota"
POLICY "Enable disk quotas"
EXPLAIN "Enables and disables disk quotas management."
VALUENAME "Enable"
VALUEON NUMERIC 1
VALUEOFF NUMERIC 0
END POLICY
END CATEGORY
Keywords
The valid keywords within a POLICY section include the following:
• ACTIONLISTOFF
• ACTIONLISTON
• END
• KEYNAME
• PART
• VALUENAME
• VALUEOFF
• VALUEON
• HELP
• POLICY
Note Additional keywords are available for policies, but they are for developers creating policy
141](https://image.slidesharecdn.com/4525391/85/Windows-XP-Registry-Guide-152-320.jpg)
![extensions. For example, CLIENTEXT associates a client−side extension with a policy via the
extension's GUID. I'm not covering these because they don't fit our purposes here.
EXPLAIN
The EXPLAIN keyword provides help text for a specific policy. In Windows 2000 and Windows XP,
each policy's dialog box includes an Explain tab, which provides details about the policy settings.
You also see this help text on the Extended tab of the editor's right pane in Windows XP. Each
policy you create for Windows 2000 and Windows XP should contain one EXPLAIN keyword
followed by a full description of the policy and its settings. Although I don't show this in my examples
(trying to keep them simple), you should enclose this keyword between #if version >=3 and #endif to
prevent earlier versions of the policy editor from choking on these keywords:
Listing 6−7: example.adm
#if version >= 3
EXPLAIN "Enables and disables disk quotas management."
#endif
VALUENAME
The VALUENAME keyword identifies the registry value that the policy editor modifies when you
enable or disable the policy. The syntax is VALUENAME Name. You saw an example of this
keyword in the section "POLICY." Unless you set the VALUEON and VALUEOFF keywords,
described in the next section, the policy editor creates the policy as a REG_DWORD value:
• Enabled. Sets the value to 0x01
• Disabled. Removes the value
• Not Configured. Removes the value
VALUENAME, VALUEON, and VALUEOFF describe the value that enables and disables the policy.
If you want to define additional settings that enable you to collect additional values to refine the
policy, you must use the PART keyword. Settings in a PART section are in the bottom part of the
policy's dialog box.
VALUEON and VALUEOFF
You can use the VALUEON and VALUEOFF keywords to write specific values based on the state of
the policy. The section "POLICY" contains an example of how these keywords are used. The
syntaxes are VALUEON [NUMERIC] Enabled and VALUEOFF [NUMERIC] Disabled. By default,
the policy editor creates the value as a REG_SZ value; if you want it to create the value as a
REG_DWORD value, prefix it with the NUMERIC keyword. For example:
VALUEON 0 // Created as a REG_SZ value containing "0"
VALUEOFF NUMERIC 1 // Created as a REG_DWORD value containing 0x01
ACTIONLIST
The ACTIONLIST keyword enables you to group settings together. Think of it as a list of values you
want the policy editor to change when you change a policy. The following two variants of the
ACTIONLIST keyword are the most commonly used:
142](https://image.slidesharecdn.com/4525391/85/Windows-XP-Registry-Guide-153-320.jpg)
![• ACTIONLISTON. A list of values to change when the policy is enabled
• ACTIONLISTOFF. A list of values to change when the policy is disabled
Syntax
ACTIONLIST
[KEYNAME Subkey]
VALUENAME Value
VALUE Data
END ACTIONLIST
Subkey This is an optional subkey of HKLM or HKCU to use for the category. Do not
include either root key in the path, though, because the preceding CLASS keyword
specifies which of these root keys to use. If you specify a subkey, all subcategories,
policies, and parts use it unless they specifically provide a subkey of their own.
Enclose names that contain spaces in double quotes.
Value This is the registry value to modify. Enabling the policy sets the REG_DWORD
value to 0x01. Select the Not Configured option, and the policy editor removes the
value from the registry. To specify values other than the default 0x00 and 0x01, use
the VALUE keyword.
Data This is the data to which you want to set the value. The default value type is
REG_SZ, but you can change it to REG_DWORD by prefixing the value with the
keyword NUMERIC. If you follow the keyword VALUE with the keyword DELETE
(VALUE DELETE), policy editor removes the value from the registry. Regardless,
setting the policy to Not Configured removes the value altogether.
Example
Listing 6−8: example.adm
POLICY "Sample Action List"
EXPLAIN "This illustrates action lists"
ACTIONLISTON
VALUENAME Sample1 VALUE 1
VALUENAME Sample2 VALUE 1
END ACTIONLISTON
ACTIONLISTOFF
VALUENAME Sample1 VALUE 0
VALUENAME Sample2 VALUE 0
END ACTIONLISTOFF
END POLICY
PART
The PART keyword enables you to specify various options, including drop−down lists, text boxes,
and check boxes, in the lower part of a policy's dialog box. Figure 6−5 shows an example of the
settings that you want to collect in addition to enabling or disabling the policy. For simple policies
that you only need to enable or disable, you won't need to use this keyword. In fact, only a relative
handful of the policies in Windows XP use the PART keyword at all.
143](https://image.slidesharecdn.com/4525391/85/Windows-XP-Registry-Guide-154-320.jpg)
![Figure 6−5: Use the PART keyword to collect additional data that further refines the policy.
You begin a part with the PART keyword and end it with END PART. The syntax of the PART
keyword is PART Name Type. Name is the name of the part, and Type is the type of part. Each
policy can contain multiple PART keywords, and the policy editor displays them in the dialog box
using the order that it found them in the administrative template. This section gives you the overall
syntax of the PART keyword, and the sections following this one describe how to create the
different types of parts.
Syntax
PART Name Type
Keywords
[KEYNAME Subkey]
[DEFAULT Default]
VALUENAME Name
END PART
Name This specifies the name of the setting as you want to see it in the policy's dialog box.
Enclose the name in double quotes if it contains spaces. This is the setting's prompt.
Type This can be one of the following types:
• CHECKBOX. Displays a check box. The REG_DWORD value is 0x01 if you
select the check box or 0x00 if you clear it.
• COMBOBOX. Displays a combo box.
• DROPDOWNLIST. Displays a combo box with a drop−down list. The user can
choose only one of the entries supplied.
• EDITTEXT. Displays a text box that accepts alphanumeric input. The value is
either REG_SZ or REG_EXPAND_SZ.
• LISTBOX. Displays a list box with Add and Remove buttons. This is the only type
144](https://image.slidesharecdn.com/4525391/85/Windows-XP-Registry-Guide-155-320.jpg)

![• Checked. Writes 1 to the REG_SZ value
• Cleared. Writes 0 to the REG_SZ value
Include the keyword DEFCHECKED within the part if you want the check box selected by default.
Otherwise, the check box is cleared by default.
Syntax
PART Name CHECKBOX
DEFCHECKED
VALUENAME Value
END PART
Name This specifies the name of the setting as you want to see it in the policy's dialog box.
Enclose the name in double quotes if it contains spaces. You see the name next to the
check box.
Value This is the registry value to modify. Enabling the policy sets the REG_SZ value to 1. Set the
Not Configured option, and the policy editor removes the value from the registry. To specify
values other than the default 0 and 1, use the VALUEON and VALUEOFF keywords
following the VALUENAME keyword:
VALUEON [NUMERIC] Enabled
VALUEOFF [NUMERIC] Disabled
When you use these keywords, the policy editor sets the registry value to Enabled when you
enable the policy and sets the value to Disabled when you disable the policy. The default
value type is REG_SZ, but you can change it to REG_DWORD by prefixing the value with
the keyword NUMERIC. Regardless, setting the policy to Not Configured removes the value
altogether. You can also use the ACTIONLISTON and ACTIONLISTOFF keywords to
associate multiple values with a check box.
Example
Listing 6−10: example.adm
CLASS USER
CATEGORY "Sample Policies"
EXPLAIN "These are sample policies that illustrate parts."
POLICY "Sample Policy"
SUPPORTED "At least Microsoft Windows XP Professional"
EXPLAIN "This is a sample policy that illustrates a part."
KEYNAME "SoftwarePolicies"
PART Sample1 CHECKBOX
VALUENAME Sample1
END PART
PART Sample2 CHECKBOX
DEFCHECKED
VALUENAME Sample2
146](https://image.slidesharecdn.com/4525391/85/Windows-XP-Registry-Guide-157-320.jpg)
![VALUEON NUMERIC 11
VALUEOFF NUMERIC 12
END PART
END POLICY
END CATEGORY
Keywords
The valid keywords within a CHECKBOX section include the following:
• ACTIONLISTOFF
• ACTIONLISTON
• DEFCHECKED
• END
• KEYNAME
• VALUENAME
• VALUEOFF
• VALUEON
COMBOBOX
The COMBOBOX keyword adds a combo box to the policy's dialog box. It has one additional
keyword you must use, SUGGESTIONS. This creates a list of suggestions that the policy editor
places in the drop−down list. Separate the items in this list with white space and enclose items
containing spaces within double quotation marks. End the list with the END SUGGESTIONS.
A few keywords modify the behavior of the combo box:
• DEFAULT. Specifies the default value of the combo box
• EXPANDABLETEXT. Creates the value as a REG_EXPAND_SZ value
• MAXLENGTH. Specifies the maximum length of the value
• NOSORT. Prevents the policy editor from sorting the list
• REQUIRED. Specifies that a value is required
Syntax
PART Name COMBOBOX
SUGGESTIONS
Suggestions
END SUGGESTIONS
[DEFAULT Default]
[EXPANDABLETEXT]
[MAXLENGTH Max]
[NOSORT]
[REQUIRED]
VALUENAME Value
END PART
Name This specifies the name of the setting as you want to see it in the policy's dialog box.
Enclose the name in double quotes if it contains spaces. You see the name next to
the combo box.
Suggestions
147](https://image.slidesharecdn.com/4525391/85/Windows-XP-Registry-Guide-158-320.jpg)

![editor places in the drop−down list. Define each item within the ITEMLIST section using the syntax
NAME Name VALUE Value. Enclose items containing spaces within double quotation marks. End
the list with the END ITEMLIST.
A few keywords modify the behavior of the drop−down list:
• DEFAULT. Specifies the default value of the drop−down list
• EXPANDABLETEXT. Creates the value as a REG_EXPAND_SZ value
• NOSORT. Prevents the policy editor from sorting the list
• REQUIRED. Specifies that a value is required
Syntax
PART Name DROPDOWNLIST
ITEMLIST
NAME Item VALUE Data
END ITEMLIST
[DEFAULT Default]
[EXPANDABLETEXT]
[NOSORT]
[REQUIRED]
VALUENAME Value
END PART
Name This specifies the name of the setting as you want to see it in the policy's dialog box.
Enclose the name in double quotes if it contains spaces. You see the name next to
the drop−down list.
Item This is the name of each item in the list. This is the text that you'll see in the
drop−down list. This isn't the value that the policy editor stores in the registry, though.
Data This is the data you want the policy editor to store in the value when you select the
associated item.
Default This is the default value for the part. When you enable the policy, the policy editor fills
the control with the default value. Use an item defined in ITEMLIST.
Value This is the registry value to modify. The policy editor creates this in the registry as a
REG_SZ value and fills it with the value of Data associated with the selected item.
Example
Listing 6−12: example.adm
CLASS USER
CATEGORY "Sample Policies"
EXPLAIN "These are sample policies that illustrate parts."
POLICY "Sample Policy"
SUPPORTED "At least Microsoft Windows XP Professional"
EXPLAIN "This is a sample policy that illustrates creating a part."
KEYNAME "SoftwarePolicies"
PART Sample DROPDOWNLIST
ITEMLIST
NAME Sample1 VALUE 0
NAME Sample2 VALUE 1
NAME "Another Sample" VALUE 2
END ITEMLIST
149](https://image.slidesharecdn.com/4525391/85/Windows-XP-Registry-Guide-160-320.jpg)
![VALUENAME Sample
END PART
END POLICY
END CATEGORY
Keywords
The valid keywords within a DROPDOWNLIST section are the following:
• DEFAULT
• END
• EXPANDABLETEXT
• KEYNAME
• NOSORT
• REQUIRED
• ITEMLIST
• VALUENAME
EDITTEXT
The EDITTEXT keyword enables you to input alphanumeric text in a text box. Policy editor stores
the text in a REG_SZ value. A few keywords modify the behavior of the text box:
• DEFAULT. Specifies the default value of the text box
• EXPANDABLETEXT. Creates the value as a REG_EXPAND_SZ value
• MAXLENGTH. Specifies the maximum length of the value
• REQUIRED. Specifies that a value is required
Syntax
PART Name EDITTEXT
[DEFAULT Default]
[EXPANDABLETEXT]
[MAXLENGTH Max]
[REQUIRED]
VALUENAME Value
END PART
Name This specifies the name of the setting as you want to see it in the policy's dialog box.
Enclose the name in double quotes if it contains spaces. You see the name next to the text
box.
Default This is the default value for the part. When you enable the policy, the policy editor fills the
control with the default value. Use a default value that's appropriate for the part's type.
Max This is the maximum length of the value's data.
Value This is the registry value to modify. The policy editor creates this in the registry as a
REG_SZ value and fills it with any text that you typed.
Example
Listing 6−13: example.adm
CLASS USER
150](https://image.slidesharecdn.com/4525391/85/Windows-XP-Registry-Guide-161-320.jpg)

![Syntax
PART Name LISTBOX
[EXPANDABLETEXT]
[NOSORT]
[ADDITIVE]
[EXPLICITVALUE | VALUEPREFIX Prefix]
END PART
Name This specifies the name of the setting as you want to see it in the policy's dialog box.
Enclose the name in double quotes if it contains spaces.
Prefix This is the prefix to use for incremental names. If you specify a prefix, the policy editor
adds an incremental number to it. For example, a prefix of Sample generates the
value names Sample1, Sample2, and so on. The prefix can be empty (""), causing the
value names to be 1, 2, and so on.
Example
Listing 6−14: example.adm
CLASS USER
CATEGORY "Sample Policies"
EXPLAIN "These are sample policies that illustrate parts."
POLICY "Sample Policy"
SUPPORTED "At least Microsoft Windows XP Professional"
EXPLAIN "This is a sample policy that illustrates creating a part."
KEYNAME "SoftwarePolicies"
PART Sample LISTBOX
EXPLICITVALUE
END PART
END POLICY
END CATEGORY
Keywords
The valid keywords within a LISTBOX section are the following:
• ADDITIVE
• END
• EXPANDABLETEXT
• EXPLICITVALUE
• KEYNAME
• NOSORT
• VALUEPREFIX
NUMERIC
The NUMERIC keyword enables you to input alphanumeric text using a spinner control that adjusts
the number up and down. Policy editor stores the number in a REG_DWORD value, but you can
change the value's type to REG_SZ using the TXTCONVERT keyword. A few other keywords
152](https://image.slidesharecdn.com/4525391/85/Windows-XP-Registry-Guide-163-320.jpg)
![modify the behavior of the text box:
• DEFAULT. Specifies the initial value of the text box
• MAX. Specifies the maximum value. The default is 9999
• MIN. Specifies the minimum value. The default is 0.
• REQUIRED. Specifies that a value is required
• SPIN. Specifies the increment to use for the spinner control. The default value is 1, and
using 0 removes the spinner control.
• TXTCONVERT. Writes values as REG_SZ values rather than REG_DWORD
Syntax
PART Name NUMERIC
[DEFAULT Default]
[MAX Max]
[MIN Min]
[REQUIRED]
[SPIN]
[TXTCONVERT]
VALUENAME Value
END PART
Name This specifies the name of the setting as you want to see it in the policy's dialog box.
Enclose the name in double quotes if it contains spaces. You see the name next to the text
box.
Default This is the default value for the part. When you enable the policy, the policy editor fills the
control with the default value. Use a default value that's appropriate for the part's type.
Max This is the maximum value. The default is 9999.
Min This is the minimum value. The default is 0.
Value This is the registry value to modify. The policy editor creates this in the registry as a
REG_DWORD value, setting it to the value that you specify in the dialog box. To change
the value's type to REG_SZ, use the TXTCONVERT keyword.
Example
Listing 6−15: example.adm
CLASS USER
CATEGORY "Sample Policies"
EXPLAIN "These are sample policies that illustrate parts."
POLICY "Sample Policy"
SUPPORTED "At least Microsoft Windows XP Professional"
EXPLAIN "This is a sample policy that illustrates creating a part."
KEYNAME "SoftwarePolicies"
PART Sample NUMERIC
DEFAULT 11
MIN 10
MAX 20
VALUENAME Sample
END PART
END POLICY
153](https://image.slidesharecdn.com/4525391/85/Windows-XP-Registry-Guide-164-320.jpg)


![Syntax
gpresult [/s Computer [/u DomainUser /p Password]] [/user TargetUserName [/
scope {user|computer}] [/v] [/z]
/s Computer This specifies the name or IP address of a remote computer (don't use
backslashes). It defaults to the local computer.
/u DomainUser This runs the command with the account permissions of the user specified by
User or Domain User. The default is the permissions of the current console
user.
/p Password This specifies the password of the user account that the /u option specifies.
/user This specifies the user name of the user for whom you want to display RSoP.
TargetUserName
/scope This displays either user or computer results. Valid values for the /scope option
{user|computer} are user or computer. If you omit the /scope option, Gpresult.exe displays both
user and computer settings.
/v This specifies that the output display verbose policy information.
/z This specifies that the output display all available information about Group
Policy. Because this option produces more information than the /v option,
redirect output to a text file when you use this parameter: gpresult /z
>policy.txt.
/? This displays help.
Examples
gpresult /user jerry /scope computer
gpresult /s camelot /u honeycuttadministrator /p password /user jerry
gpresult /s camelot /u honeycuttadministrator /p password /user jerry /z
>policy.txt
Gpupdate
Group Policy Update Tool (Gpupdate.exe) refreshes local and network policy settings, including
registry−based settings. As I mentioned, this command replaces the obsolete command secedit
/refreshpolicy.
Syntax
gpupdate [/target:{computer|user}] [/force] [/wait:value] [/logoff] [/boot]
/target:{computer|user} This processes only the computer settings or the current user settings. By
default, both the computer and user settings are processed.
/force This ignores all processing optimizations and reapplies all settings.
/wait:value This is the number of seconds that policy processing waits to finish. The
default is 600 seconds. 0 means don't wait, and −1 means wait forever.
/logoff This logs the user off after the refresh has completed. This is required for
those Group Policy client−side extensions that do not process on a
background refresh cycle but that do process when the user logs on, such
as user Software Installation and Folder Redirection. This option has no
effect if there are no extensions called that require the user to log off.
/boot This restarts the computer after the refresh is finished. This is required for
those Group Policy client−side extensions that do not process on a
160](https://image.slidesharecdn.com/4525391/85/Windows-XP-Registry-Guide-171-320.jpg)


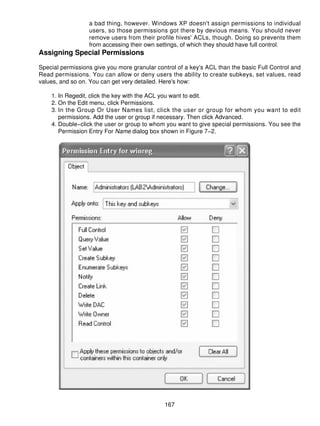

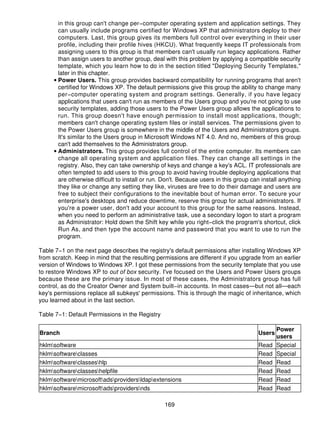


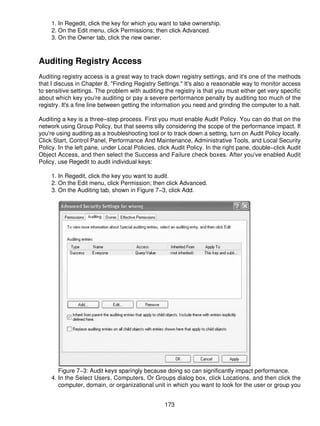


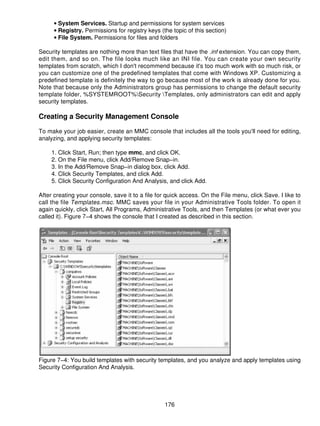


![Add keys/values Yes Yes Yes Yes Yes
Delete keys/values Yes Keys only Yes Yes Yes
Querying values No No Yes Yes No
Support for value types High Medium Medium Low Medium
Bitwise support Yes No No Yes No
Nine times out of ten, my preference is to write an INF file. You'll notice that most of the scripts in
this book are INF files. I chose this method because I'm familiar with INF files, they're easy to
create, and they're easy to read. I use scripts only when I have to query values from the registry.
INF files' strong suit is that they offer the flexibility to do anything I want in the registry without
requiring me to put on a programmer hat for the weekend. Choose whatever methods best suit you,
but give more weight to INF files and scripts. You won't end up using just one of these techniques,
though. In fact, you'll find that you'll use a combination of these methods, depending on the
scenario. After you start using the script methods I describe in this chapter, you'll master them in no
time.
Now I'll describe the differences. As the table shows, using REG files is the easiest method, scripts
and Windows Installer package files are the most difficult, and the rest fall somewhere in between.
No matter which method you choose, they all become rather easy after you learn how to use them.
Access to the operating system is important only if you're trying to do more than just edit the
registry. For example, if you want to read values from the registry and then dump them to a text file,
you're going to need access to the operating system. The most important difference is that only INF
files and scripts provide high support for the many different types of values you can store in the
registry. The remaining methods support the basic value types, though, and that's often all you
need. If you need to edit more esoteric types, though, you're better off writing an INF file or a script.
Likewise, INF files and scripts are the only two methods you can use to set and clear bits in values.
For example, the bits in the value UserPreferencesMask indicate different user interface settings,
and you enable or disable them by setting or clearing the corresponding bit. If this is your
requirement, you're left with INF files or scripts as your method of choice.
Installing INF Files
Setup Information files have the .inf extension; I call them INF files. The Windows XP setup API
(Application Programming Interface) uses INF files to script installations. Most people associate INF
files with device−driver installation, but applications often use them, too. Most actions that you
associate with installing device drivers and applications are available through INF files. You can
copy, remove, and rename files. You can add, change, and delete registry values. You can install
and start services. You can install most anything using INF files. For example, you can use them to
customize registry settings—obviously. You can also create INF files that users can uninstall using
Add Or Remove Programs.
INF files look similar to INI and REG files. They're text files that contain sections that look like
[Section]. Each section contains items, sometimes called properties, that look like Name = Value.
Windows XP happens to come with the perfect INF−file editor: Notepad. When you create a new
INF file using Notepad, make sure that you enclose the file name in quotation marks or choose All
Files in the Save As Type list in the Save As dialog box. That way, your file will have the .inf
extension instead of the .txt extension. Installing an INF file is straightforward: Right−click the INF
file, and then click Install. To deploy an INF file and prevent users from having to install it manually,
use the following command, replacing Filename with the name of your INF file. (This is the
command line that Windows XP associates with the .inf file extension in the registry.)
194](https://image.slidesharecdn.com/4525391/85/Windows-XP-Registry-Guide-205-320.jpg)
![rundll32.exe setupapi,InstallHinfSection DefaultInstall 132 Filename.inf
Listing 9−1 shows a simple INF file. The first section, [Version], is required. The name of the second
section is arbitrary but usually [DefaultInstall] so that users can right−click the file to install it. The
linkage to this section is through the command line you saw just before this paragraph. The
command is rundll32.exe, which executes the API in Setupapi.dll called InstallHinfSection. The next
item on the command line, DefaultInstall, is the name of the section to install. The 132 you see
before the file name tells the setup API to prompt the user before rebooting the computer, if
necessary. The last item on the command line is the name of the INF file to install. Like I mentioned,
because this is the command that Windows XP associates with the .inf file extension, you should
usually name this section [DefaultInstall]. Within this section you see two directives, AddReg and
DelReg. The directive AddReg=Add.Settings adds the settings contained in the section
[Add.Settings].
Listing 9−1: Example.inf
[Version]
Signature=$CHICAGO$
[DefaultInstall]
AddReg=Add.Settings
DelReg=Del.Settings
[Add.Settings]
HKCR,regfileshell,,0,"edit"
[Del.Settings]
HKCU,SoftwareMicrosoftWindowsCurrentVersionAppletsRegedit
The directive DelReg=Del.Settings deletes the settings listed in the section [Del.Settings]. The
names of these sections are arbitrary; you should adopt names that make sense to you and stick
with them so you don't confuse yourself down the road.
Now you've had my two−dollar tour of an INF file. The sections that follow describe how to write the
different parts of an INF file. I'm focusing on using INF files to edit the registry, but you can do much
more with them. The ultimate resource for writing INF files is
http://msdn.microsoft.com/library/en−us/install/hh/install/inf−format_7soi.asp on Microsoft's Web
site. This is the INF File Sections and Directives section of the Windows Driver Development Kit
(DDK). Don't let the fact that this information is in the DDK scare you; it's really straightforward and
useful for much more than installing device drivers.
Starting with a Template
I never start INF files from scratch. I can't be bothered to remember the format of the sections and
directives, so I use a template. I'm lazy enough (or efficient enough) that I add the template you see
in Listing 9−2 to the Templates folder in my user profile so that I can right−click in a folder, and then
click New, Setup Information File. The easiest way is to first create the file Setup Information File.inf
with the contents of Listing 9−2. Then use Tweak UI, which you learn about in Chapter 5, "Mapping
Tweak UI," to add the template. It's a real timesaver.
Listing 9−2: Setup Information File.inf
[Version]
Signature=$CHICAGO$
195](https://image.slidesharecdn.com/4525391/85/Windows-XP-Registry-Guide-206-320.jpg)
![[DefaultInstall]
BitReg=Bits.Set
AddReg=Reg.Settings
AddReg=Reg.Uninstall
CopyFiles=Inf.Copy
[DefaultUninstall]
BitReg=Bits.Clear
DelReg=Reg.Settings
DelReg=Reg.Uninstall
DelFiles=Inf.Copy
[Reg.Settings]
; ROOT,SUBKEY[,NAME[,FLAG[,DATA]]]
;
; FLAG:
;
; 0x00000 − REG_SZ
; 0x00001 − REG_BINARY
; 0x10000 − REG_MULTI_SZ
; 0x20000 − REG_EXPAND_SZ
; 0x10001 − REG_DWORD
; 0x20001 − REG_NONE
[Bits.Set]
; ROOT,SUBKEY,NAME,FLAG,MASK,BYTE
;
; FLAG:
;
; 0x00000 − Clear bits in mask
; 0x00001 − Set bits in mask
[Bits.Clear]
; ROOT,SUBKEY,NAME,FLAG,MASK,BYTE
;
; FLAG:
;
; 0x00000 − Clear bits in mask
; 0x00001 − Set bits in mask
[Reg.Uninstall]
HKCU,SoftwareMicrosoftWindowsCurrentVersionUninstall%NAME%
HKCU,SoftwareMicrosoftWindowsCurrentVersionUninstall%NAME%,DisplayName
,,"%NAME%"
HKCU,SoftwareMicrosoftWindowsCurrentVersionUninstall%NAME%,UninstallString
,,"Rundll32.exe setupapi.dll,InstallHinfSection DefaultUninstall 132"
" %53%Application DataCustomFILENAME"
; ROOT:
;
; HKCU
; HKLM
[Inf.Copy]
FILENAME
[DestinationDirs]
Inf.Copy=53,Application DataCustom
196](https://image.slidesharecdn.com/4525391/85/Windows-XP-Registry-Guide-207-320.jpg)
![; DIRID:
;
; 10 − %SystemRoot%
; 11 − %SystemRoot%System32
; 17 − %SystemRoot%Inf
; 53 − %UserProfile%
; 54 − %SystemDrive%
; −1 − Absolute path
[SourceDisksNames]
55=%DISKNAME%
[SourceDisksFiles]
FILENAME=55
[Strings]
NAME = "Jerry's NAME"
DISKNAME = "Setup Files"
The reason this template makes creating INF files so easy is because I've added comments to it.
Comments begin with the semicolon (;) and add descriptive information to the file. In this case, for
each section, I described the format of the different directives. In the [Reg.Settings] section, for
example, you see the syntax for adding values to the registry. In the [Bits.Set] section, you see the
format for setting individual bits in a number. I often write INF files that users can uninstall using Add
Or Remove Programs; the template in Listing 9−2 shows you how to do that. If you don't want users
to uninstall the file and its settings, remove the [DefaultUninstall], [Reg.Uninstall],
[Inf.Copy],[DestinationDirs], [SourceDisksNames], and [SourceDisksFiles] sections and any
linkages to those sections. In this template, all−capitalized words are placeholders that I replace
when I create an INF file. For example, I replace FILENAME with the INF file's actual name.
The first two lines in Listing 9−2 are the only ones required. The [Version] section and the Signature
property identify the file as a valid INF file. You must include these two lines at the top of all your
INF files. Incidentally, Chicago was Microsoft's code name for Microsoft Windows 95, and so
version=$CHICAGO$ identifies the file as a Windows 95 INF file. These days, $CHICAGO$
indicates an INF file that's compatible with all versions of Windows. Use $Windows 95$ if you want
to indicate that your INF file is compatible with 16−bit versions of Windows only. Use $Windows
NT$ to indicate that your INF file is compatible with 32−bit versions of Windows only. Generally, I
leave Signature set to $CHICAGO$.
Linking Sections Together
After the [Version] section is usually the [DefaultInstall] section. As I said earlier, the name of this
section is arbitrary, but you should use [DefaultInstall] if you want users to be able to install your INF
file by right−clicking it. The command associated with the .inf file extension references this section
by name. This is the section that links together your INF file. You fill it with directives that tell the
Setup API which sections in the INF file to process and what to do with them.
You saw this section in Listing 9−2. Each line in this section is a directive. The Setup API supports a
number of different directives, but the ones we care about in this book are AddReg, DelReg, and
BitReg. In the listing, you see a line that says AddReg=Reg.Settings. This adds the settings listed in
the [Reg.Settings] section. The line BitReg=Bits.Set sets the bit masks listed in the section
[Bits.Set]. As well, you can list more than one section for each directive. You can duplicate a
directive on multiple lines, for example, or you can assign multiple sections to it: AddReg=
Section1,Section2,SectionN. For an example, see Listing 9−3.
197](https://image.slidesharecdn.com/4525391/85/Windows-XP-Registry-Guide-208-320.jpg)
![Listing 9−3: Example.inf
[Version]
Signature=$CHICAGO$
[DefaultInstall]
AddReg=Reg.Settings1,Reg.Settings2,Reg.Settings3
AddReg=Reg.Settings4
AddReg=Reg.Settings5
DelReg=Reg.Settings6
[Reg.Settings1]
; Registry settings to add or change
[Reg.Settings2]
; Registry settings to add or change
[Reg.Settings3]
; Registry settings to add or change
[Reg.Settings4]
; Registry settings to add or change
[Reg.Settings5]
; Registry settings to add or change
[Reg.Settings6]
; Registry keys and values to remove
Note The order of the AddReg and DelReg directives doesn't matter. The Setup API processes all
DelReg directives first, followed by the AddReg sections.
Adding Keys and Values
As you just saw, the AddReg directive in [DefaultInstall] indicates the names of sections that contain
settings you want to add to the registry. These are [add−registry−section] sections. You can add
new keys, set default values, create new values, or modify existing values using an
[add−registry−section] section. And each section can contain multiple entries. Each
[add−registry−section] name must be unique in the INF file.
Syntax
[add−registry−section]
rootkey, [subkey], [value], [flags], [data]
rootkey This is the root key containing the key or value you're modifying. Use the
abbreviations HKCR, HKCU, HKLM, or HKU.
subkey This is the subkey to create or the subkey in which to add or change a value.
This is optional. If missing, all operations are on the root key.
value This is the name of the value to create or modify if it exists. This value is optional.
If value is omitted and the flags and data parameters are given, operations are
on the key's default value. If value, flags, and data are omitted, you're adding a
subkey.
flags
• 0x00000000. Value is REG_SZ. This is the default if you omit flags.
• 0x00000001. Value is REG_BINARY.
198](https://image.slidesharecdn.com/4525391/85/Windows-XP-Registry-Guide-209-320.jpg)
![• 0x00010000. Value is REG_MULTI_SZ.
• 0x00020000. Value is REG_EXPAND_SZ.
• 0x00010001. Value is REG_DWORD.
• 0x00020001. Value is REG_NONE.
• 0x00000002. Don't overwrite existing keys and values. Combine this flag
with others by ORing them together.
• 0x00000004. Delete subkey from the registry, or delete value from
subkey. Combine this flag with others by ORing them together.
• 0x00000008. Append data to value. This flag is valid only if value is
REG_MULTI_SZ. The string data is not appended if it already exists.
Combine this flag with 0x00010000 by ORing them together.
• 0x00000010. Create subkey, but ignore value and data if specified.
Combine this flag with others by ORing them together.
• 0x00000020. Set value only if it already exists. Combine this flag with
others by ORing them together.
• 0x00001000. Make the specified change in the 64−bit registry. If not
specified, the change is made to the native registry. Combine this flag
with others by ORing them together.
• 0x00004000. Make the specified change in the 32−bit registry. If not
specified, the change is made to the native registry. Combine this flag
with others by ORing them together.
data This is the data to write to value. If the value doesn't exist, the Setup API creates
it; if the value exists, the API overwrites it; if the value is REG_MULTI_SZ and
you set the 0x00010008 flag, the API adds the value to the existing string list. If
you omit data, the Setup API creates the value without setting it. See the
following example to learn how to format each type of value.
Example
[Version]
Signature=$CHICAGO$
[DefaultInstall]
AddReg=Reg.Settings
[Reg.Settings]
; Sets the default value of HKCUSoftwareSample
HKCU,SoftwareSample,,,"Default"
; Creates a REG_SZ value called Sample
HKCU,SoftwareSample,String,0x00000,"String"
; Creates a REG_BINARY value called Binary
HKCU,SoftwareSample,Binary,0x00001,00,01,30,05
; Creates a REG_MULTI_SZ value called Multisz
HKCU,SoftwareSample,Multisz,0x10000,"String list"
; Creates a REG_DWORD value called Dword
HKCU,SoftwareSample,Dword,0x10001,0x01010102
; Creates a REG_SZ value called Hello
HKLM,SOFTWARESample,Hello,,"World"
; Creates a REG_DWORD value and sets it to 0x0000
HKLM,SOFTWARESample,Nothing,0x10001
199](https://image.slidesharecdn.com/4525391/85/Windows-XP-Registry-Guide-210-320.jpg)
![Deleting Keys and Values
The [DefaultInstall] section's DelReg directive specifies sections containing registry keys and values
to delete. These are [del−registry−section] sections. They are much simpler than the
[add−registry−section] sections but have similar rules: Each section can contain multiple entries,
and the name of each section must be unique.
Syntax
[del−registry−section]
rootkey, [subkey], [value], [flags], [data]
rootkey This is the root key containing the key or value you're deleting. Use the abbreviations
HKCR, HKCU, HKLM, or HKU.
subkey This is the subkey to delete or subkey from which to delete a value. This is optional. If
missing, all operations are on the root key.
value This is the name of the value to delete. This value is optional. If value is omitted, you're
deleting subkey.
flags
• 0x00002000. Delete the entire subkey.
• 0x00004000. Make the specified change in the 32−bit registry. If not specified, the
change is made to the native registry. Combine this flag with others by ORing them
together.
• 0x00018002. If value is REG_MULTI_SZ, remove all strings matching the string
indicated by data.
data This is used only when flags is 0x00018002. This specifies the string to remove from a
REG_MULTI_SZ value.
Example
[Version]
Signature=$CHICAGO$
[DefaultInstall]
DelReg=Reg.Settings
[Reg.Settings]
; Removes the key HKCUSoftwareSample
HKCU,SoftwareSample
; Removes the value Hello from HKCUSoftwareSample
HKCU,SoftwareSample,Hello
; Removes the string "World" from the REG_MULTI_SZ value Hello
HKCU,SoftwareSample,Hello,0x00018002,"World"
Setting and Clearing Bits
The BitReg directive is similar to the AddReg directive. You add it to the [DefaultInstall] section to
indicate the names of sections that contain bits you want to set and clear. These are
[bit−registry−section] sections. Use the BitReg directive when you want to work with bit masks in the
registry. For example, if you want to enable certain user−interface features in the value
UserPreferencesMask, use this directive. Like the other directives you learned about, each section
can contain multiple entries, and the name of each section must be unique.
200](https://image.slidesharecdn.com/4525391/85/Windows-XP-Registry-Guide-211-320.jpg)
![In the following description of the syntax, notice the differences between the [bit−registry−section]
and [add−registry−section] sections. The parameter value is not optional. Also, the parameters
mask and byte replace the value data. The parameter mask is 8 bits long and indicates which bit
you want to enable or disable. The parameter byte indicates which byte in the binary value you want
to modify. This indicates bytes left to right starting from 0. This is straightforward when working with
REG_BINARY values but less so when working with REG_DWORD values. As discussed in
Chapter 1, "Learning the Basics," Windows XP stores REG_DWORD values in the registry in
reverse−byte order (little−endian architecture). To be sure, test your INF files carefully to make sure
you're masking the bits you think you're masking. Figure 9−1 shows the relationship between value,
mask, and byte. The value to which I'm applying the mask is a REG_DWORD value stored in the
registry in reverse−byte notation: 0x0180C000. Set the mask in byte 0, and the result is
0x0180C080. Clear the mask in byte 1, and the result is 0x0140C080.
Figure 9−1: The parameter byte indicates to which of a number's bytes you want to apply mask.
Syntax
[bit−registry−section]
rootkey, [subkey], value, [flags], mask, byte
rootkey This is the root key containing the value you're modifying. Use the abbreviations HKCR,
HKCU, HKLM, or HKU.
subkey This is the subkey in which to change a value. This is optional. If missing, all operations are
on the root key.
value This is the name of the value to modify. This value is not optional and should be a
REG_DWORD or REG_BINARY value.
flags
• 0x00000000. Clear the bits specified by mask.
• 0x00000001. Set the bits specified by mask.
• 0x00040000. Make the specified change in the 32−bit registry. If not specified, the
change is made to the native registry. Combine this flag with others by ORing them
together.
mask
201](https://image.slidesharecdn.com/4525391/85/Windows-XP-Registry-Guide-212-320.jpg)
![This is the byte−sized mask specifying the bits to set or clear in the specified byte of value.
Specify this value in hexadecimal notation. Bits that are 1 will be set or cleared, depending
on flags, and bits that are 0 will be ignored.
byte This specifies the byte in value to which you want to apply mask. The left−most byte is 0,
the next is 1, and so on. Keep in mind that Windows XP stores REG_DWORD values in
reverse−byte order when specifying which byte on which to apply mask. Thus, in
REG_DWORD values, the right−most byte is stored first in memory.
Example
[Version]
Signature=$CHICAGO$
[DefaultInstall]
BitReg=Bit.Settings
[Bit.Settings]
; Changes 50,00,10,00 to 31,00,10,00
HKCU,SoftwareSample,Mask,0x0001,0x01,0
; Changes 50,00,F0,00 to 30,00,70,00
HKU,SoftwareSample,Mask,0x0000,0x80,2
Using Strings in INF Files
You can make your INF files far easier to read if you use the [Strings] section. Each line in this
section is a string in the format name ="string". Then you can use that string elsewhere in the INF
file by referencing it as %name%. This makes INF files easier to read in numerous ways (see
Listing 9−4, which is also a good example of using the BitReg directive):
• The [Strings] section collects strings at the bottom of your INF file so that you can see them
in one place.
• The [Strings] section enables you to type a string one time and then use that string in
numerous places. The string is consistent throughout your INF file.
• The [Strings] section makes translating INF files easier because localizable strings are at the
bottom of the file.
Listing 9−4: Strings.inf
[Version]
Signature=$CHICAGO$
[DefaultInstall]
BitReg=Bits.Set
AddReg=Add.Settings
DelReg=Del.Settings
[Add.Settings]
HKCU,%HK_DESKTOP%,ActiveWndTrkTimeout,0x10001,1000
HKLM,%HK_SETUP%,RegisteredOwner,,%OWNER%
[Del.Settings]
HKCU,%HK_EXPLORER%MenuOrder
HKCU,%HK_EXPLORER%RunMRU
HKCU,%HK_EXPLORER%RecentDocs
HKCU,%HK_EXPLORER%ComDlg32LastVisitedMRU
HKCU,%HK_SEARCH%ACMru
HKCU,%HK_INTERNET%TypedURLs
202](https://image.slidesharecdn.com/4525391/85/Windows-XP-Registry-Guide-213-320.jpg)
![[Bits.Set]
HKCU,%HK_DESKTOP%,UserPreferencesMask,1,0x01,0
HKCU,%HK_DESKTOP%,UserPreferencesMask,1,0x40,0
[Strings]
HK_DESKTOP="Control PanelDesktop"
HK_EXPLORER="SoftwareMicrosoftWindowsCurrentVersionExplorer"
HK_SEARCH="SoftwareMicrosoftSearch Assistant"
HK_INTERNET="SoftwareMicrosoftInternet Explorer"
HK_SETUP="SOFTWAREMicrosoftWindows NTCurrentVersion"
OWNER=" Fuzzy Wuzzy Was a Bear"
Note Here's the truth−in−advertising bit: I seldom use strings because I don't often localize INF
files. I use strings only when doing so really does make the INF file easier to read. In
particular, when a line becomes so long that it wraps, I use a string to shorten it. Alternatively,
you can use the line−continuation character, a backslash (), to split lines. I also use strings
for values that change frequently, particularly in template INF files. Strings make using
templates easier.
Setting Values with REG Files
You learned how to create REG files using Regedit in Chapter 2, "Using the Registry Editor." REG
files are the classic method for adding and changing values in the registry, but as I said in the
section "Choosing a Technique," they're not as powerful as the other methods you learn about in
this chapter. Their big weakness is that you can't remove values using a REG file; you can only add
or modify values, or remove keys.
After you've created a REG file, which has the .reg file extension, you import it into the registry by
double−clicking the file. This is great if you want users to import the file themselves, but you need
the following command if you want to import a REG file using your software management
infrastructure or some method such as providing a link to it on the intranet: regedit /s filename.reg.
Replace filename .reg with the path and name of your REG file. The /s command−line option
imports the file into the registry without prompting the user, which is what you want to do most of the
time. To edit a REG file, right−click it, and then click Edit. Don't accidentally double−click a REG file
thinking that you're going to open it in Notepad because double−clicking a REG file imports it into
the registry.
Remember that Regedit supports two different file formats for REG files. Version 4 REG files are
ANSI. ANSI character encoding uses one byte to represent each character. Also, Regedit writes
REG_EXPAND_SZ and REG_MULTI_SZ strings to REG files using ANSI character encoding, so
each character is a single byte. Unicode character encoding uses two bytes for each character, and
when you create a Unicode REG file, Regedit writes REG_EXPAND_SZ and REG_MULTI_SZ
strings to the file using the two−byte Unicode encoding scheme. Chapter 1, "Learning the Basics,"
tells you more about the differences between the two encoding standards. Chapter 2, "Using
Registry Editor," describes the differences between the two different types of REG files. What you
need to know is that choosing to create a version 4 REG file means that the file and the values in
the file use ANSI; likewise, creating a version 5 REG file means that the file and the values in the
file use Unicode. I tend to use version 4, ANSI REG files, except when I know the registry data
contains localized text that requires Unicode to represent it. If in doubt, always create version 5,
Unicode files.
Listing 9−5 shows a sample REG file. The first line in this file is the header, which identifies the file's
version. The header Windows Registry Editor Version 5.00 indicates a version 5, Unicode REG file.
203](https://image.slidesharecdn.com/4525391/85/Windows-XP-Registry-Guide-214-320.jpg)
![The header REGEDIT4 indicates a version 4, ANSI REG file. A blank line usually follows the
header, but the file works fine without it. Notice how similar the remainder of this file looks to INF
and INI files. Each section contains the fully qualified name of a key. They use the full names of root
keys, not the abbreviations. Listing 9−5 is importing settings into three keys: HKCUControl
PanelDesktop, HKCUControl Panel DesktopWindowMetrics, and HKCUControl PanelMouse.
The lines below each section are values that Regedit will add to that key when Regedit imports the
file in to the registry. The format is "name"=value. The value named @ represents the key's default
value. Some of the values in Listing 9−5 contain dword and hex, whereas others are enclosed in
quotation marks. Values enclosed in quotation marks are strings. Values in the form dword:value
are REG_DWORD values. Values in the form hex: values are REG_BINARY values. This gets more
complicated when you add subtypes, such as hex(type): value, and I'll talk about those a bit later.
Listing 9−5: Example.reg
Windows Registry Editor Version 5.00
[HKEY_CURRENT_USERControl PanelDesktop]
"ActiveWndTrkTimeout"=dword:00000000
"ForegroundFlashCount"=dword:00000003
"ForegroundLockTimeout"=dword:00030d40
"MenuShowDelay"="400"
"PaintDesktopVersion"=dword:00000000
"UserPreferencesMask"=hex:9e,3e,07,80
[HKEY_CURRENT_USERControl PanelDesktopWindowMetrics]
"Shell Icon BPP"="16"
"Shell Icon Size"="32"
"MinAnimate"="1"
[HKEY_CURRENT_USERControl PanelMouse]
@=" Rodent"
"ActiveWindowTracking"=dword:00000000
"DoubleClickHeight"="4"
"DoubleClickSpeed"="500"
"DoubleClickWidth"="4"
"MouseSensitivity"="10"
"MouseSpeed"="1"
"MouseThreshold1"="6"
"MouseThreshold2"="10"
"SnapToDefaultButton"="0"
"SwapMouseButtons"="0"
Exporting Settings to REG Files
The easiest way to create a REG file is by using Regedit to export keys to REG files. Follow these
steps to export branches of the registry to files:
1. Click the key at the top of the branch you want to export.
2. On the File menu, click Export.
The Export Registry File dialog box appears, shown in Figure 9−2 on the next page.
204](https://image.slidesharecdn.com/4525391/85/Windows-XP-Registry-Guide-215-320.jpg)

![♦ Add Windows Registry Editor Version 5.00 at the top of the file to create a version 5
REG file.
3. For each key into which you want to import values, add a section to the file in the format
[key], where key is the fully qualified name of the key. Don't use the root−key abbreviations;
use their full names: HKEY_CURRENT_USER.
4. For each value that you want to import into the registry, add the value in the format
"name"=value to the key's section. Use @ for a key's default value. See Table 9−2 for
information about how to format the different types of values in a REG file. You can continue
an entry from one line to the next using the line−continuation character, a backslash ().
Table 9−2: Value Formats in REG files
Type Version 4 Version 5
REG_SZ "String" "String"
REG_DWORD dword:00007734 dword:00007734
REG_BINARY hex:00,00,01,03 hex:00,00,01,03
REG_EXPAND_SZ hex(2):25,53,59,53,54,45,4d,52, hex(2):25,00,53,00,59,00,53,00,
4f,4f,54,25,00 54,00,45,00,4d,00,52,00,4f,00,
4f,00,54,00,25,00,00,00
REG_MULTI_SZ hex(7):48,65,6c,6c,6f,20,57,6f, hex(7):48,00,65,00,6c,00,6c,00,
72,6c,64,00,4a,65,72,72,79,20, 6f,00,20,00,57,00,6f,00,72,00,
77,61,73,20,68,65,72,65,00,00 6c,00,64,00,00,00,4a,00,65,00,
72,00,72,00,79,00,20,00,77,00,
61,00,73,00,20,00,68,00,65,00,
72,00,65,00,00,00,00,00
5. Click File, Save As, type the name of the file in File Name, including the extension .reg
(enclose the file name in quotation marks so that Notepad doesn't use the .txt extension), do
one of the following, and then click Save:
♦ In the Encoding list, choose ANSI to create a version 4 REG file.
♦ In the Encoding list, choose Unicode to create a version 5 REG file.
Encoding Special Characters
Within REG files, certain characters have special meaning. Quotation marks begin and end strings.
The backslash character is a line−continuation character. So how do you include these characters
in your values? You use escaping, which is an ages−old method for prefixing special characters
with a backslash. For example, the string n represents a newline character and the string "
represents a quotation mark. Table 9−3 describes the special characters you can use and shows
you examples.
Table 9−3: Special Characters in REG Files
Escape Expanded Example
C:Documents and SettingsJerry
" " A "quoted" string
n newline This is on n two lines
r return This is on r two lines
206](https://image.slidesharecdn.com/4525391/85/Windows-XP-Registry-Guide-217-320.jpg)
![Deleting Keys Using a REG File
You can't use a REG file to remove individual values, but you can certainly use one to delete entire
keys. This is an undocumented feature of REG files: Just prefix a key's name with a minus (−) sign:
[−key]. Here's a brief example that removes the key HKCUSoftware Honeycutt when you import
the REG file in to the registry:
Windows Registry Editor Version 5.00
[−HKEY_CURRENT_USERSoftwareHoneycutt]
Rather than manually create a REG file to remove keys, I prefer to export a key to a REG file and
then edit it. After exporting the key to a REG file, remove all the values and keys that you don't want
to delete. Then add the minus sign to the names of the keys that you want to delete. Then you can
remove those keys quickly and easily by double−clicking the REG file or using the command regedit
/s filename .reg.
Editing from the Command Prompt
Windows XP comes with Console Registry Tool for Windows (Reg.exe). This tool is nothing short of
marvelous. You use it to edit the registry from the MS−DOS command prompt. You can do with
Reg.exe just about anything you can do with Regedit, and more. The best part of Reg.exe is that
you can use it to write simple scripts in the form of batch files that change the registry. And unlike in
earlier versions of Windows, you don't have to install Reg.exe. It's installed by default and combines
the numerous registry tools that came with the resource kits for earlier versions of Windows.
This tool is so cool I can just start with an example. Listing 9−6 is a simple batch file that installs
Microsoft Office XP the first time the batch file runs (think logon script). After installing Office XP, the
batch file calls Reg.exe to add the REG_DWORD value Flag to HKCU SoftwareExample. The
batch file checks for this value's presence each time the file runs and skips the installation if it
exists. Thus, the batch file installs the application only one time. This is a method you can use to
deploy software through users' logon scripts. Instead of checking for a value that you add, as Listing
9−6 does, you can check for a value that the application stores in the registry. For example, the
second line in the batch file could just as easily been Reg QUERY
HKCUSoftwareMicrosoftOffice10.0 >nul, which checks to see if Office XP is installed for the user.
Listing 9−6: Login.bat
@Echo Off
Reg QUERY HKCUSoftwareExample /v Flag >nul
goto %ERRORLEVEL%
:1
Echo Installing software the first time this runs
CamelotOfficeSetup.exe /settings setup.ini
Reg ADD HKCUSoftwareExample /v Flag /t REG_DWORD /d "1"
goto CONTINUE
:0
207](https://image.slidesharecdn.com/4525391/85/Windows-XP-Registry-Guide-218-320.jpg)
![Echo Software is already installed, skipping this section
:CONTINUE
Set HKMS=HKCUSoftwareMicrosoft
Set HKCV=HKCUSoftwareMicrosoftWindowsCurrentVersion
REM Clear the history lists
Reg DELETE %HKCV%ExplorerMenuOrder /f
Reg DELETE %HKCV%ExplorerRunMRU /f
Reg DELETE %HKCV%ExplorerRecentDocs /f
Reg DELETE %HKCV%ExplorerComDlg32LastVisitedMRU /f
Reg DELETE "%HKMS%Search AssistantACMru" /f
Reg DELETE "%HKMS%Internet ExplorerTypedURLs" /f
The syntax of the Reg.exe command line is straightforward: reg command options. Command is
one of the many commands that Reg.exe supports, including ADD, QUERY, and DELETE. Options
is the options that the command requires. Options usually include the name of a key, and
sometimes a value's name and data. If any key or value name contains spaces, you must enclose
the name in quotation marks. It gets more complicated for each of the different commands you can
use with it, however, and I cover each of those in the sections following this one. If you're without
this book and need a quick refresh, just type reg /? at the MS−DOS command prompt to see a list
of commands that Regexe supports.
Adding Keys and Values
Use the ADD command to add keys and values to the registry.
Syntax
REG ADD [ computer ]key [/v value | /ve] [/t type] [/s separator] [/d data]
[/f]
If omitted, Reg.exe connects to the local computer; otherwise, Reg.exe connects to the
computer remote computer.
key This is the key's path, beginning with the root key. Use the root−key abbreviations
HKCR, HKCU, HKLM, and HKU. Only HKLM and HKU are available when connecting
to remote computers.
/v value This will add or change value.
/ve This will change the key's default value.
/t type This is the value's type: REG_BINARY, REG_DWORD,
REG_DWORD_LITTLE_ENDIAN, REG_DWORD_BIG_ENDIAN, REG_EXPAND_SZ,
REG_MULTI_SZ, or REG_SZ. The default is REG_SZ.
/s This specifies the character used to separate strings when creating REG_MULTI_SZ
separator values. the default is 0, or null.
/d data This is the data to assign to new or existing values.
/f This forces Reg.exe to overwrite existing values with prompting.
208](https://image.slidesharecdn.com/4525391/85/Windows-XP-Registry-Guide-219-320.jpg)
![Example
REG ADD JERRY1HKLMSoftwareHoneycutt
REG ADD HKLMSoftwareHoneycutt /v Data /t REG_BINARY /d CCFEF0BC
REG ADD HKLMSoftwareHoneycutt /v List /t REG_MULTI_SZ /d Hello0World
REG ADD HKLMSoftwareHoneycutt /v Path /t REG_EXPAND_SZ /d %%SYSTEMROOT%%
Note The percent sign (%) has a special purpose on the MS−DOS command prompt and
within batch files. You enclose environment variables in percent signs to expand
them in place. Thus, to use them on the Reg.exe command line, and elsewhere for
that matter, you must use double percent signs (%%). In the previous example, if you
had used single percent signs, the command prompt would have expanded the
environment variable before running the command. Using double percent signs
prevents the command prompt from expanding the environment variable.
Querying Values
The QUERY command works three ways. First it can display the data in a specific value. Second it
can display all of a key's values. Third it can list all the subkeys and values in a key by adding the /s
command−line option. How it works depends on the options you use.
Syntax
REG QUERY [computer]key [/v value | /ve] [/s]
computer If omitted, Reg.exe connects to the local computer; otherwise, Reg.exe connects
to the remote computer.
key This is the key's path, beginning with the root key. Use the root−key
abbreviations HKCR, HKCU, HKLM, and HKU. Only HKLM and HKU are
available when connecting to remote computers.
/v value This will query value in key. If you omit /v, Reg.exe queries all values in the key.
/ve This will query the key's default value.
/s This will query all the key's subkeys and values.
Example
REG QUERY HKLMSOFTWAREMicrosoftWindowsCurrentVersion /s
REG QUERY HKLMSOFTWAREMicrosoftWindows NTCurrentVersion /v CurrentVersion
Note Reg.exe sets ERRORLEVEL to 0 if the command succeeds and 1 if it
doesn't. Thus, you can test ERRORLEVEL in a batch file to determine if a
value exists or not. You saw an example of this in Listing 9−6. Although
you can use the If statement to test ERRORLEVEL, I prefer creating labels
in my batch file, one for each level, as shown in Listing 9−6 earlier in this
chapter. Then I can just write statements that look like Goto
%ERRORLEVEL% or Goto QUERY%ERRORLEVEL%, which branches to
the label QUERY1 if ERRORLEVEL is 1.
Deleting Keys and Values
Use the DELETE command to remove keys and values from the registry.
209](https://image.slidesharecdn.com/4525391/85/Windows-XP-Registry-Guide-220-320.jpg)
![Syntax
REG DELETE [ computer ]key [/v value | /ve | /va] [/f]
computer If omitted, Reg.exe connects to the local computer; otherwise, Reg.exe connects
to the remote computer.
key This is the key's path, beginning with the root key. Use the root−key
abbreviations HKCR, HKCU, HKLM, and HKU. Only HKLM and HKU are
available when connecting to remote computers.
/v value This will delete value from key.
/ve This will delete the key's default value.
/va This will delete all values from key.
/f This will force Reg.exe to delete values with prompting.
Example
REG DELETE JERRY1HKLMSoftwareHoneycutt
REG DELETE HKLMSoftwareHoneycutt /v Data /f
REG DELETE HKLMSoftwareHoneycutt /va
Comparing Keys and Values
Use the COMPARE command to compare two registry keys. Those keys can be on the same
computer or different computers, making this a useful troubleshooting tool.
The /on command−line option seems odd at first. Why would you compare keys or values and not
show the differences? Reg.exe sets ERRORLEVEL depending on the comparison's result, and you
can use that in your batch files to execute different code depending on whether the two are the
same or different—without displaying any results. Here's the meaning of ERRORLEVEL:
• 0. The command was successful and the keys or values are identical.
• 1. The command failed.
• 2. The command was successful and the keys or values are different.
REG COMPARE [ computer1 ]key1 [computer2 ]key2 [/v value | /ve]
[/oa|/od|/os|/on] [/s]
computer1 If omitted, Reg.exe connects to the local computer; otherwise, Reg.exe
connects to the remote computer.
computer2 If omitted, Reg.exe connects to the local computer; otherwise, Reg.exe
connects to the remote computer.
key1 This is the key's path, beginning with the root key. Use the root−key
abbreviations HKCR, HKCU, HKLM, and HKU. Only HKLM and HKU are
available when connecting to remote computers.
key2 This is the key's path, beginning with the root key. Use the root−key
abbreviations HKCR, HKCU, HKLM, and HKU. Only HKLM and HKU are
available when connecting to remote computers.
/v value This compares value.
/ve This compares the key's default value.
/oa This shows all differences and matches.
/od This shows only differences.
210](https://image.slidesharecdn.com/4525391/85/Windows-XP-Registry-Guide-221-320.jpg)
![/os This shows only matches.
/on This shows nothing.
/s This compares all the key's subkeys and values.
Example
REG COMPARE HKCRtxtfile HKRdocfile /ve
REG COMPARE JERRY1HKCR JERRY2HKCR /od /s
REG COMPARE HKCUSoftware JERRY2HKCUSoftware /s
Copying Keys and Values
The COPY command copies a subkey to another key. This command is useful to back up subkeys,
as you learned in Chapter 3, "Backing Up the Registry."
REG COPY [ computer1 ]key1 [computer2 ]key2 [/s] [/f]
computer1 If omitted, Reg.exe connects to the local computer; otherwise, Reg.exe
connects to the remote computer.
computer2 If omitted, Reg.exe connects to the local computer; otherwise, Reg.exe
connects to the remote computer.
key1 This is the key's path, beginning with the root key. Use the root−key
abbreviations HKCR, HKCU, HKLM, and HKU. Only HKLM and HKU are
available when connecting to remote computers.
key2 The key's path, beginning with the root key. Use the root−key abbreviations
HKCR, HKCU, HKLM, and HKU. Only HKLM and HKU are available when
connecting to remote computers.
/s This copies all the key's subkeys and values.
/f This forces Reg.exe to copy with prompting.
Example
REG COPY HKCUSoftwareMicrosoftOffice HKCUBackupOffice /s
REG COPY HKCRregfile HKCUBackupregfile /s /f
Exporting Keys to REG Files
Use the EXPORT command to export all or part of the registry to REG files. This command has a
few limitations, though. First it works only with the local computer. You can't create a REG file from
a remote computer's registry. Second it creates only version 5, Unicode REG files. There's no
option available to create ANSI REG files. The EXPORT command is the same as clicking File,
Export in Regedit.
REG EXPORT key filename
key This is the key's path, beginning with the root key. Use the root−key abbreviations HKCR,
HKCU, HKLM, and HKU. This is the key you want to export to a REG file.
filename This is the path and name of the REG file to create.
Example
REG EXPORT "HKCUControl Panel" Preferences.reg
211](https://image.slidesharecdn.com/4525391/85/Windows-XP-Registry-Guide-222-320.jpg)


![processor, and more. This script and many more like it are available on Microsoft's Script Center,
which is a large library of scripts that you can download, modify, and use. All these scripts are at
http://www.microsoft.com/technet/scriptcenter.
strComputer = "."
Set objWMIService = GetObject("winmgmts:" _
& "{impersonationLevel=impersonate}!" & strComputer & "rootcimv2")
Set colSettings = objWMIService.ExecQuery _
("Select * from Win32_OperatingSystem")
For Each objOperatingSystem in colSettings
Wscript.Echo "OS Name: " & objOperatingSystem.Name
Wscript.Echo "Version: " & objOperatingSystem.Version
Wscript.Echo "Service Pack: " & _
objOperatingSystem.ServicePackMajorVersion _
& "." & objOperatingSystem.ServicePackMinorVersion
Wscript.Echo "OS Manufacturer: " & objOperatingSystem.Manufacturer
Wscript.Echo "Windows Directory: " & _
objOperatingSystem.WindowsDirectory
Wscript.Echo "Locale: " & objOperatingSystem.Locale
Wscript.Echo "Available Physical Memory: " & _
objOperatingSystem.FreePhysicalMemory
Wscript.Echo "Total Virtual Memory: " & _
objOperatingSystem.TotalVirtualMemorySize
Wscript.Echo "Available Virtual Memory: " & _
objOperatingSystem.FreeVirtualMemory
Wscript.Echo "OS Name: " & objOperatingSystem.SizeStoredInPagingFiles
Next
Set colSettings = objWMIService.ExecQuery _
("Select * from Win32_ComputerSystem")
For Each objComputer in colSettings
Wscript.Echo "System Name: " & objComputer.Name
Wscript.Echo "System Manufacturer: " & objComputer.Manufacturer
Wscript.Echo "System Model: " & objComputer.Model
Wscript.Echo "Time Zone: " & objComputer.CurrentTimeZone
Wscript.Echo "Total Physical Memory: " & _
objComputer.TotalPhysicalMemory
Next
Set colSettings = objWMIService.ExecQuery _
("Select * from Win32_Processor")
For Each objProcessor in colSettings
Wscript.Echo "System Type: " & objProcessor.Architecture
Wscript.Echo "Processor: " & objProcessor.Description
Next
Set colSettings = objWMIService.ExecQuery _
("Select * from Win32_BIOS")
For Each objBIOS in colSettings
Wscript.Echo "BIOS Version: " & objBIOS.Version
Next
Running Script Files
Windows XP provides two scripting hosts. The Windows−based version runs scripts when you
double−click a script file. The script engine is Wscript.exe. You can also use the command−line
version, which is handy when the script outputs data similar to how most command−line programs
do. The example given in the sidebar "Why write scripts when INF files are easier?" in Listing 9−7 is
one script that's better from the command−line. The command−line scripting engine is Cscript.exe:
cscript script [//B|//I] [//D] [//E: engine] [//H:cscript|//H:wscript] [//
215](https://image.slidesharecdn.com/4525391/85/Windows-XP-Registry-Guide-226-320.jpg)
![Job:name] [//Logo|//Nologo] [//S] [//T:time] [//X] [//?]
//B This specifies batch mode, which does not display alerts, scripting errors, or input
prompts.
//I This specifies interactive mode, which displays alerts, scripting errors, and input
prompts. This is the default and the opposite of //B.
//D This turns on the debugger.
//E: engine Specifies the scripting language that is used to run the script.
//H:cscript | This registers either Cscript.exe or Wscript.exe as the default script host for
//H:wscript running scripts. If neither is specified, the default is Wscript.exe.
//Job: name This runs the job identified by name in a .wsf script file.
//Logo This specifies that the Windows Script Host banner is displayed in the console
window before the script runs. This is the default and the opposite of //Nologo.
//Nologo This specifies that the Windows Script Host banner is not displayed before the
script runs.
//S This saves the current command−line options for the current user.
//T: time This specifies the maximum time the script can run (in seconds). You can specify
up to 32,767 seconds. The default is no time limit.
//X This starts the script in the debugger.
//? This displays available command parameters and provides help for using them.
(This is the same as typing Cscript.exe with no parameters and no script.)
You can specify some of the same options when using the Windows−based scripting host.
Right−click the script file, and then click Properties. You'll see the dialog box shown in Figure 9−3
on the next page. You can set the amount of time that the script is allowed to run and whether or not
the host displays a log. The result is a file with the .wsh extension that contains these settings. It
looks like your average INI file. You then execute the script by double−clicking the WSH file.
216](https://image.slidesharecdn.com/4525391/85/Windows-XP-Registry-Guide-227-320.jpg)

![Object VBScript JScript
Value "HKLMSubkeyValue" "HKLMSubkeyValue"
Key "HKLMSubkey" "HKLMSubkey"
Adding and Updating Values
The Shell object's RegWrite method adds keys and values or changes existing values. If you want
to change a key's default value, set strName to the name of the key, including the trailing backslash,
and then assign a value to it.
Tip One of the RegWrite method's biggest weaknesses is that it writes only four bytes of
REG_BINARY values. It can't handle larger binary values. If you want to change longer binary
values or change types of values that this method doesn't support, use the Shell object's Run
method to import a REG file. For example, you can put your settings in a REG file called
Settings.reg. Then import that REG file using the statement WshShell.Run("Settings.reg").
object.RegWrite( strName, anyValue [,strType] )
object This is the Shell object.
strName This is the string indicating the name of the key or value. You can add keys. You can add
or change values. strName must be a fully−qualified path to a key or value and begin with
one of the root keys: HKCR, HKCU, HKLM, or HKU.
anyValue This is the data to assign to new or existing values. Use the format appropriate for the
value's type.
strType This is the type of value to create: REG_SZ, REG_EXPAND_SZ, REG_DWORD, or
REG_BINARY. The RegWrite method doesn't support the REG_MULTI_SZ value type.
Also, this method writes only four byte REG_BINARY values.
Example (VBScript)
Set WshShell = WScript.CreateObject("WScript.Shell")
WshShell.RegWrite "HKCUSoftwareSample", 1, "REG_BINARY"
WshShell.RegWrite "HKCUSoftwareSampleHowdy", "World!", "REG_SZ"
Example (JScript)
var WshShell = WScript.CreateObject( "WScript.Shell" );
WshShell.RegWrite("HKCUSoftwareSample", 1, "REG_BINARY");
WshShell.RegWrite("HKCUSoftwareSampleHowdy", "World!", "REG_SZ");
Removing Keys and Values
The Shell object's RegDelete method removes keys and values from the registry. Be careful,
however, because removing an entire branch is easy; there's no confirmation. To remove a key, end
strName with a backslash; otherwise, you're removing a value.
object.RegDelete( strName )
object This is the shell object.
strName This is the string indicating the name of the key or value to delete. strName must be a fully
qualified path to a key or value and begin with one of the root keys: HKCR, HKCU, HKLM,
218](https://image.slidesharecdn.com/4525391/85/Windows-XP-Registry-Guide-229-320.jpg)


![Figure 10−1: The subkeys of ProfileList contain a wealth of information about the user profiles that
Windows XP has created, including their paths on the file system.
NoteIn enterprises that use Windows NT 4.0, IT professionals sometimes move profiles to
%SYSTEMROOT%Profiles when deploying Windows XP because managing the profiles is
often easier if they are in the same location regardless of the platform. Windows XP answer
files offer a setting that enables you to do that. The setting is ProfilesDir, and it's in the
[GuiUnattended] section. Set ProfilesDir to the path of the folder in which you want to store
profiles. You should begin the path with either %SYSTEMROOT% or %SYSTEMDRIVE%;
otherwise, the setup program ignores it.
Advantages of User Profiles
The primary goal of user profiles is to keep each user's settings and data distinct from that of other
users as well as from the computer's settings. This has several advantages for enterprise
environments and makes Windows XP more convenient to use at home, too. User profiles enable
statelesscomputing. A company can configure Windows XP to store key user settings and data
separately from the computer. This makes backing up and replacing computers much easier
because users' data is tucked safely away on the network and maintained separately from the
computer's configuration. The first time users log on to a replacement computer, the operating
system copies their settings from the network. They get back to work more quickly.
User profiles also allow users' settings to follow them from computer to computer. They don't have
to reconfigure settings at each computer. When they log on to a network that supports roaming user
profiles, the operating system downloads their settings from the network. When they log off of the
computer, the operating system copies users' settings back to the network. Roaming user profiles
makes sharing computers more feasible because each user has his or her personalized
configuration. Roaming user profiles are a must−have in environments such as call centers, where
users aren't guaranteed to sit down at the same computer twice. You learn about roaming user
profiles in the section "Using Roaming User Profiles," later in this chapter.
223](https://image.slidesharecdn.com/4525391/85/Windows-XP-Registry-Guide-234-320.jpg)

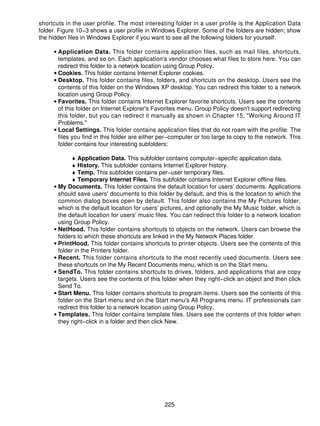


![Deploying Default User Folders
After completing the steps in the last section, you have a default user profile that's ready to deploy.
You have two choices. If you're deploying Windows XP using disk−imaging techniques, you can
include the default user profile on the disk image. Replace %SYSTEMDRIVE%Documents and
SettingsDefault User with your own Default User folder. After replacing the Default User folder with
your own, clone and deploy the disk image. When new users log on to the computer, they'll receive
your default user profile and thus your settings.
I don't like customizing the local Default User folder as my sole means of deploying default settings,
though. I prefer to separate settings from configurations. What if I need to update a setting down the
line? I don't want to update the Default User folder on each computer in the organization.
The alternative is to copy the customized Default User folder to the NETLOGON share of the
server. As you learned earlier in the chapter, Windows XP looks first for the network version of the
Default User folder and then the local version. The first time users log on to a computer, Windows
XP gets my default user profile from the network. Of course, the benefit is that I can always update
it later. The primary problem with this method is that if users log on to their computers locally, they
still get the local default user profile. That's the reason that I prefer doing both at the same time. I
replace the Default User folder on disk images and also copy the same folder to the NETLOGON
share of the server.
NoteAn alternative to copying a default user profile to the NETLOGON share is keeping a user
profile handy on the network and then copying it to users' network profile folders when you
create new accounts. For example, stash away a default user profile somewhere on your
server. Assuming that you're using roaming user profiles, copy the default user profile into
new accounts' profile folders. The first time those users log on to Windows XP, the operating
system downloads their roaming user profile, which you've already preconfigured. This is
useful in one−off scenarios when you want users to have a profile other than the default. It's
also useful in a heterogeneous environment, which often requires different user profiles for
different versions of Windows.
Coexisting with Earlier Versions of Windows
Coexistence is an issue that affects roaming user profiles only. If you're not using roaming user
profiles on your network, coexistence isn't an issue because you won't be deploying user profiles to
different versions of Windows. In general, though, roaming user profiles are compatible between
Windows 2000 and Windows XP. Here are a few precautions you can take to minimize problems:
• Try to make sure that users with roaming user profiles are logging on to the same version of
Windows on each computer. That means you should choose your rollout units so that you're
picking up all the computers that users can access.
• At the very least, make sure the same application versions are on each computer and that
you've installed applications to the same path on each computer.
• If you're using roaming user profiles with Windows 2000 and Windows XP, make sure your
%SYSTEMDRIVE% and %SYSTEMROOT% are the same. Also, make sure that profiles are
stored in the same path. If you're using roaming user profiles with Windows NT 4.0 and
Windows XP, you should move the location of user profiles that Windows XP uses by setting
the ProfilesDir property in the [GuiUnattended] section of your answer file.
240](https://image.slidesharecdn.com/4525391/85/Windows-XP-Registry-Guide-251-320.jpg)


![Some applications don't provide a user interface for repairing them, so you must use the command
line. The syntax of the command you use to repair an application follows this paragraph. The
variable package is the path and name of the package file from which you installed the application.
To repair user settings, type msiexec /fu package. To repair computer settings, type msiexec /fm
package. The command msiexec /fmu package gets them both at the same time. These
commands work rather well, which you can witness for yourself. Install Office XP. Remove its
settings from the registry, which are in HKCU SoftwareMicrosoftOffice, and then repair user
settings. Windows Installer rebuilds the missing settings.
msiexec /f[p|o|e|d|c|a|u|m|v|s] package
p Reinstall missing files but don't check version
o Reinstall missing files or files that are from an earlier version
e Reinstall missing files or files that are from the same or earlier version
d Reinstall missing files or files that aren't from the same version
c Reinstall missing files or files that are corrupt. This option repairs only files that have a checksum
in the package file.
a Reinstall all files regardless of their versions or checksums
u Rewrite the essential registry values described in the package file. This includes values in the
per−user branches HKU and HKCU.
m Rewrite essential registry values described in the package file. This includes values in the
per−computer branches HKLM and HKCR.
s Reinstall all shortcuts and overwrite existing icons.
v Recache the source package locally.
Note Repairing an application using Windows Installer is a bit extreme considering that
you have System Restore at your disposal. Chapter 3, "Backing Up the Registry,"
describes how to use this awesome feature to protect configurations. If users'
settings get out of whack, going back to an earlier restore point will likely fix the
problem. IT professionals can easily script this operation, too, which enables the
helpdesk to automatically go back to the most recent restore point.
Managing Windows Installer with Policies
Windows Installer provides a number of policies for managing how it installs applications and
interacts with users. Some policies are more important and more useful than others; I'll get to that in
just a bit. First here's the lineup (the parentheses contain the policies' registry values):
• User ConfigurationAdministrative TemplatesWindows Components Windows Installer
(HKCUSoftwarePoliciesMicrosoftWindowsInstaller)
♦ Always install with elevated privileges (AlwaysInstallElevated). Directs Windows
Installer to use system permissions when it installs any program on the system. You
must also set the per−computer version of this policy for it to work.
♦ Search order (SearchOrder). Specifies the order in which Windows Installer
searches for installation files. In other words, you can specify the order in which it
looks at network, local media, and Web locations for installation files.
♦ Prohibit rollback (DisableRollback). Prohibits Windows Installer from generating
and saving the files it needs to reverse an interrupted or unsuccessful installation.
This is useful when you know that the disks won't have enough space to hold the
rollback files. However, it's dangerous because Windows Installer won't be able to
restore the computer if the installation fails.
244](https://image.slidesharecdn.com/4525391/85/Windows-XP-Registry-Guide-255-320.jpg)


![registry, you'll still have plenty of cleaning to do. You'll want to get rid of the application's files and
other settings that it might have stored in the registry. For example, you'll still see the application's
shortcut on the Start menu, but when you click it, you'll see an error message telling you that the
application isn't installed. Chapter 3, "Backing Up the Registry," describes how to manually remove
a program after you've got it to this step.
msizap T[A!] productcode
msizap T[A!] packagefile
msizap *[A!] ALLPRODUCTS
msizap PSA?!
* Remove all Windows Installer folders and registry keys, adjusting shared DLL counts and
stopping the service
T Remove all Windows Installer information for a product
P Remove the in−progress key
S Remove rollback information
A Give administrators full control to targeted folders and keys instead of removing them
W Apply changes for all users instead of just the current user
G Remove cached Windows Installer files that are orphaned
! Automatically respond Yes to all prompts
? Display help
TipI'm not comfortable with manually removing a program's files and registry settings after using
Msizap. Most large applications store settings in the registry beyond the typical
HKUSoftwareVendorProductVersion keys. For example, they register components in HKCR,
and you might not get rid of them all. My solution seems odd, but it works well. Zapping a
program's Windows Installer data from the registry should enable me to reinstall it. So I reinstall
the application and then use Add Or Remove Programs to remove it. Windows Installer is likely
to do a much cleaner job of removing the application than I am.
Msicuu.exe
Windows Installer Clean Up (Msicuu.exe in the Windows XP Support Tools) puts a graphical user
interface on Msizap.exe. If you're sitting at the computer, use this tool instead of using Msizap at the
command prompt. It's less error−prone:
1. In the Run dialog box, type Msicuu, and click OK.
2. In the Windows Installer Clean Up dialog box, shown in Figure 11−1, click the application for
which you want to remove Windows Installer data from the registry, and then click Remove.
249](https://image.slidesharecdn.com/4525391/85/Windows-XP-Registry-Guide-260-320.jpg)


![Figure 12−1: In addition to creating this folder structure, you must set OEMPreinstall=Yes in your
Windows XP answer file.
Here's a description of each folder shown in Figure 12−1:
• i386 folder. This is the i386 folder from the Windows XP CD, including all of its subfolders
and files.
• $OEM$. This is the OEM distribution folder that contains additional files you want to deploy
and are required to install Windows XP. If you use the OemFilesPath setting in the
[Unattended] section of the answer file, you can create the $OEM$ folder outside the i386
folder. I often create multiple $OEM$ folders (one for each different configuration) and
deploy each along with a single i386 folder. To do that, I create an answer file for each
configuration that points to a unique $OEM$ folder. You must include OemPreinstall=Yes in
the [Unattended] section of the answer file if you are using the $OEM$ folder to add files to
the system or if you are using Cmdlines.txt to run other programs during installation.
• Cmdlines.txt. This file contains the commands that the setup program runs during
installation. The file format is similar to an INI file. You create this file in the $OEM$ folder,
adding each command in the [Commands] section. For more information about using
Cmdlines.txt, particularly to deploy user settings with Windows XP, see "Cmdlines.txt," later
in this chapter.
• $$Rename.txt. This is an optional file that setup uses during installations you start from
MS−DOS to convert short file names to long file names. You can create a $$Rename.txt file
for each folder containing short file names you want to rename, or you can use one
$$Rename.txt file for an entire folder tree. I often use this file when deploying third−party
device drivers that use long file names.
• $OEM$Textmode. This folder contains hardware−dependent files that Setup Loader and
the text−mode setup program install on the target computer during text−mode setup. These
files include OEM HALs (hardware abstraction layers), mass storage device drivers, and the
Txtsetup.oem file, which describes how to load and install these components. List these files
in the [OEMBootFiles] section of your answer file. This folder isn't as necessary as it was
when hardware configurations varied more wildly.
• $OEM$$$. This is the folder into which you add files and subfolders that you want the setup
program to copy to the target computer's %SYSTEMROOT% folder. This is how to
customize Windows XP Professional system folders. To add a file called Sample.dll to
%SYSTEMROOT%System32, add it to $OEM$$$System32. The setup program creates
subfolders that don't exist on the target computer. Therefore, you can create a new subfolder
in %SYSTEMROOT% called Drivers to deploy third−party device drivers with Windows XP.
OemPnPDriversPath must indicate the location of the third−party device drivers on the target
computer; in this case, OemPnPDriversPath=%SYSTEMROOT%Drivers.
• $OEM$$1. This folder enables you to add files and folders to %SYSTEMDRIVE% on the
target computer. It works in a similar way as $OEM$$$, except that you use $OEM$$1 to
add files to the root of the drive on which you're installing Windows XP. A typical example is
creating a folder on %SYSTEMDRIVE% called $OEM$$1Sysprep, which automatically
adds the Sysprep folder and files necessary to prepare the target computer's drive for
254](https://image.slidesharecdn.com/4525391/85/Windows-XP-Registry-Guide-265-320.jpg)

![Listing 12−1 shows a sample answer file (most tend not to be this complicated and so
well−documented with comments).
Listing 12−1: Unattend.txt
[Unattended]
UnattendMode = FullUnattended
TargetPath = Windows
FileSystem = LeaveAlone
OemPreinstall = Yes
OemSkipEula = Yes
[GuiUnattended]
; Set the TimeZone. For example, to set the TimeZone for the
; Pacific Northwest, use a value of "004." Be sure to use the
; numeric value that represents your own time zone. To look up
; a numeric value, see the Deploy.chm file on the Windows XP Professional CD.
; The Deploy.cab file is in the SupportTools folder.
TimeZone = "YourTimeZone"
OemSkipWelcome = 1
; The OemSkipRegional key allows Unattended Installation to skip
; RegionalSettings when the final location of the computer is unknown.
OemSkipRegional = 1
[UserData]
; Tip: Avoid using spaces in the ComputerName value.
ComputerName = "YourComputerName"
; To ensure a fully unattended installation, you must provide a value
; for the ProductKey key.
ProductKey = "Your product key"[LicenseFilePrintData]
; This section is used for server installs.
AutoMode = "PerServer"AutoUsers = "50"[Display]
BitsPerPel = 16
XResolution = 800
YResolution = 600
VRefresh = 60
[Components]
; This section contains keys for installing the components of
; Windows XP Professional. A value of On installs the component, and a
; value of Off prevents the component from being installed.
iis_common = On
iis_inetmgr = Off
iis_www = Off
iis_ftp = Off
iis_doc = Off
iis_smtp = On
; The Fp_extensions key installs Front Page Server Extensions.
Fp_extensions = On
; If you set the TSEnabled key to On, Terminal Services is installed on
; a current version of Windows Server.
TSEnabled = On
; If you set the TSClients key to On, the files required to create
; Terminal Services client disks are installed. If you set this key
; to On, you must also set the TSEnabled key to On.
TSClients = On
Indexsrv_system = On
Accessopt = On
Calc = On
Charmap = On
Chat = Off
Clipbook = On
256](https://image.slidesharecdn.com/4525391/85/Windows-XP-Registry-Guide-267-320.jpg)
![Deskpaper = On
Dialer = On
Freecell = Off
Hypertrm = On
Media_clips = On
Media_utopia = On
Minesweeper = Off
Mousepoint = Off
Mplay = On
Mswordpad = On
Paint = On
Pinball = Off
Rec = On
Solitaire = Off
Templates = On
Vol = On
[TapiLocation]
CountryCode = "1"
Dialing = Pulse
; Indicates the area code for your telephone. This value must
; be a 3−digit number.
AreaCode = "Your telephone area code"
LongDistanceAccess = 9
[Networking]
[Identification]
JoinDomain = YourCorpNet
DomainAdmin = YourCorpAdmin
DomainAdminPassword = YourAdminPassword
[NetOptionalComponents]
; Section contains a list of optional network components to install.
Snmp = Off
Lpdsvc = Off
Simptcp = Off
[Branding]
; This section brands Microsoft® Internet Explorer with custom
; properties from the Unattended answer file.
BrandIEUsingUnattended = Yes
[URL]
; This section contains custom URL settings for Microsoft
; Internet Explorer. If these settings are not present, the
; default settings are used. Specifies the URL for the
; browser's default home page. For example, you might use the
; following: Home_Page = www.microsoft.com.
Home_Page = YourHomePageURL
; Specifies the URL for the default search page. For example, you might
; use the following: Search Page = www.msn.com
Search_Page = YourSearchPageURL
; Specifies a shortcut name in the link folder of Favorites.
; For example, you might use the following: Quick_Link_1_Name =
; "Microsoft Product Support Services"
Quick_Link_1_Name = "Your Quick Link Name"
; Specifies a shortcut URL in the link folder of Favorites. For example,
; you might use this: Quick_Link_1 = http://support.microsoft.com/.
Quick_Link_1 = YourQuickLinkURL
[Proxy]
; This section contains custom proxy settings for Microsoft
257](https://image.slidesharecdn.com/4525391/85/Windows-XP-Registry-Guide-268-320.jpg)

![Providing the Product Key Use this page to specify a product key, which is required for a
fully automated installation.
Computer Names Use this page to tell Setup Manager to generate a Uniqueness
Database File (UDF) that the setup program will use to give each
computer a unique name. If you import names from a text file,
Setup Manager converts them into a UDF file. You can also set
an option to generate unique computer names.
Administrator Password Use this page to tell Setup Manager to encrypt the local
administrator password in the answer file so that users can't gain
unauthorized access to the local administrator account. You can
also configure the answer file to prompt users for the local
administrator password during installation. If the Administrator
Password box is blank, you can use the AutoLogon feature to
automatically log on to the client computer as an administrator.
For more information about using the AutoLogon feature with
[GuiRunOnce] to deploy user settings with Windows XP, see
"[GuiRunOnce]," later in this chapter.
Networking Components Use this page to configure any network setting in Setup Manager
that you can configure on the desktop. The interface for setting
network settings in Setup Manager is the same as you see in
Windows XP.
Workgroup or Domain Use this page to join computers to a domain or workgroup. You
can also automatically create accounts in the domain.
Telephony Use this page to set telephony properties, such as area codes
and dialing rules.
Regional Settings Use this page to set regional options, such as date, time, and
currency formats.
Languages Use this page to add support for other language groups.
Browser and Shell Settings Use this page to configure Internet connections, including proxy
server settings. If you need to customize the browser, you can
use Setup Manager to access the Internet Explorer Administration
Kit (IEAK), available from http://www.microsoft.com, and the
Office XP Resource Kit toolbox at
http://www.microsoft.com/office/ork.
Installation Folder Use this page to specify the default Windows folder, generate a
unique folder during setup, or install Windows XP in a custom
folder. For example, if you plan to keep Microsoft Windows 2000
in parts of your company or are upgrading to Windows XP from
Windows 2000, you can move Windows XP from the Windows
folder to the Winnt folder so that you have a consistent folder
structure throughout the organization.
Install Printers Use this page to install printers as part of the installation process.
Run Once Use this page to add commands that run automatically the first
time a user logs on to the computer. Setup Manager adds these
commands to the answer file's [GuiRunOnce] section. For
example, you can fire off Microsoft Office XP's setup program
from here. For more information about using this feature to deploy
user settings, see "GuiRunOnce," later in this chapter.
Additional Commands Use this page to add commands that run at the end of the setup
process and before users log on to the system, such as starting a
259](https://image.slidesharecdn.com/4525391/85/Windows-XP-Registry-Guide-270-320.jpg)
![setup program or adding user settings. For more information, see
"Cmdlines.txt," later in this chapter.
Figure 12−2: Windows XP's Setup Manager is greatly improved over Windows 2000's version. Most
of the changes are in its user interface, but encrypting the local administrator password is a new
feature.
Notepad and Other Text Editors
Even with all of Setup Manager's features, I prefer to create answer files manually. Now, before you
think I'm silly and just making work for myself, let me add that I have a library of answer−file
templates that I call on when required. After you've created your first answer file and you've got it
just right, you can reuse it over and over again because little changes from job to job. I've got
another surprise for you that I'm holding onto until you get to the end of this section.
You can use a text editor, Notepad for example, to create answer files. They look just like INI files;
both have sections and their sections contain settings. You don't have to use all the sections or
values available in the answer file if you don't need them. In fact, a typical answer file for a computer
that you're joining to a Microsoft−based network is only about 20 lines long. If you add errors to an
answer file, the setup program reports the line number containing the syntax error.
The answer file in Listing 12−2 is one that I use frequently. Notice that I've commented out the
AdminPassword and FullName values by preceding them with a semicolon (;), so the setup
program prompts the user for both values. You must provide your own product key for this sample
(wink). Also notice that I don't use the [Display] section in this answer file, but Windows XP
automatically optimizes the display settings when the user logs on to the computer. Last, I've
commented out the DomainAdmin and DomainAdminPassword values in this answer file so the
setup program will prompt the user for the credentials necessary to join the domain. I do this to
avoid putting my domain administrator's credentials in an answer file. This isn't a problem, though,
because I delegate ownership of each computer object to users so they can use their own account
to join their own computers to the domain.
Listing 12−2: Unattend.txt
[Unattended]
FileSystem=ConvertNTFS
OemPreinstall=Yes
260](https://image.slidesharecdn.com/4525391/85/Windows-XP-Registry-Guide-271-320.jpg)
![OemSkipEula=Yes
TargetPath=Windows
UnattendMode=ReadOnly
[GuiUnattended]
; AdminPassword=
OEMSkipRegional=1
OEMSkipWelcome=1
ProfilesDir=%SYSTEMDRIVE%Profiles
TimeZone=020
[UserData]
ComputerName=*
; FullName=
OrgName="Jerry Honeycutt"
ProductID="Your Product ID"
[TapiLocation]
AreaCode=972
CountryCode=1
Dialing=Tone
[Identification]
; DomainAdmin=
; DomainAdminPassword=
JoinDomain=HONEYCUTT
[Networking]
InstallDefaultComponents=Yes
;end
This answer file is just one example. I built this answer file to do a clean installation of Windows XP
from MS−DOS. I also have answer files that upgrade Windows 2000 to Windows XP. I have answer
files that build disk images for deployment. I have still other answer files for deploying Windows XP
through Remote Installation Services, building lab computers, installing Windows XP on mobile
computers, installing Windows XP on Novell networks, and so on.
Jerry's Answer File Editor
Here's the surprise I promised. I don't use Notepad to edit answer files. I use Microsoft Word 2002.
Here's why:
• Word includes built−in version control, enabling me to manage the different versions of an
answer file over time. I can refer back to an earlier version of an answer file to see what I've
changed.
• Word includes revision tracking, which enables me to see the changes I've made to the
current version of my answer file. This is a great feature for documenting answer files as well
as sending answer files out for review.
• Word enables reviewers to comment on answer files without actually changing them. This is
another great feature for sending answer files out for review.
• Word enables me to build custom dictionaries. I build custom dictionaries that include
answer file section and value names, which ensures that I don't add errors to answer files
with something as silly as a typo.
I'm willing to bet that these four features are enough to convince you to start using Word to edit
answer files. Doing so will make you many times more productive as an IT professional. The
261](https://image.slidesharecdn.com/4525391/85/Windows-XP-Registry-Guide-272-320.jpg)
![process requires one bit of explanation, though. I edit and review answer files as document files
(DOC files). Only when I'm ready to build a distribution share do I export the answer file from Word
to a text file. Enjoy!
Adding Settings to Unattend.txt
Now you know how to build answer files and how to use them. It's time to get to the heart of the
matter, which is how to deploy user settings with your answer file. To deploy settings with Windows
XP, you need a mechanism for running a program during the setup process. Windows XP's setup
program provides two different mechanisms, but first, think of all the different ways to add settings
to the registry (and this is only a partial list):
• REG files. For more information about creating REG files, see Chapter 2, "Using the
Registry Editor," and Chapter 9, "Scripting Registry Changes." You import a REG file using
the command regedit filename.reg /s.
• INF files. For more information about building and installing INF files, see Chapter 9,
"Scripting Registry Changes." You install an INF file by running the command rundll32.exe
setupapi,InstallHinfSection DefaultInstall 132 filename.inf.
• Scripts. For more information about writing scripts for Windows Scripting Host, see Chapter
9, "Scripting Registry Changes." You run a script using the command wscriptfilename.ext,
where ext is either vbs or js.
• OPS files. For more information about creating and installing OPS files, see Chapter 14,
"Deploying Office XP Settings." You import an OPS file into the user's profile using the
command proflwiz /r filename.ops /q.
• Console Registry Tool for Windows (Reg). For more information about using Reg to edit
the registry, see Chapter 2, "Using the Registry Editor," and Chapter 9, "Scripting Registry
Changes." Reg has a robust command−line interface that enables you to edit the registry
using batch files.
• Windows Installer package files (MSI files). For more information about package files, see
Chapter 11, "Mapping Windows Installer." To learn how to build MSI files that install registry
settings, see Chapter 9, "Scripting Registry Changes."
Now that I've reminded you of the many tools and commands that I describe in this book for
installing registry settings, see the following two sections, "[GuiRunOnce]" and "Cmdlines.txt," to
learn how to deploy those commands with Windows XP.
[GuiRunOnce]
The [GuiRunOnce] section contains a list of commands that run the first time a user logs on to the
computer after the Windows XP setup program runs. Enclose each command in quotation marks.
The commands in the [GuiRunOnce] section run in the context of the console user, so you must
ensure that the user has the privileges necessary to run each command. You can use this feature to
install a REG file when a user logs on to the computer. For example, add the following lines to your
answer file to import Settings.reg into the registry the first time a user logs on to the computer:
[GuiRunOnce]
"regedit %SYSTEMROOT%Settings.reg /s"
You must provide any programs and data files that you want to use, though, and you do that by
deploying them through the $OEM$ distribution folders that you learned about in "Creating
262](https://image.slidesharecdn.com/4525391/85/Windows-XP-Registry-Guide-273-320.jpg)
![Distribution Folders," earlier in this chapter. In the previous example of a [GuiRunOnce] section, I'd
put Settings.reg in i386$OEM$$$ to make sure that the setup program copied it to
%SYSTEMROOT% on the target computer. Also, you want to make sure that a program you run
from [GuiRunOnce] has a command−line option to run quietly; you don't want to display a user
interface while installing registry settings. All the commands I listed in the section "Adding Settings
to Unattend.txt" include the command−line option to run without displaying a user interface.
Another method of deploying settings is running Profile Wizard from the Office XP Resource Kit.
Add the following lines to your answer file. You must also make sure that the Windows XP setup
program copies Proflwiz.exe and Settings.ops to the target computer. In this case, I put both files in
i386$OEM$$$:
[GuiRunOnce]
"%SYSTEMROOT%Proflwiz.exe /r %SYSTEMROOT%Settings.ops /q"
Here are three things you should consider when using [GuiRunOnce]:
• From [GuiRunOnce] you can't run programs that force Windows XP to restart. That's
because Windows XP loses any entries remaining in [GuiRunOnce] when it restarts, and
those command will not run. If you can't prevent the program from restarting the computer,
try repackaging it as a Windows Installer package file or add it as the last command in
[GuiRunOnce]. This isn't an issue for any of the commands I've given you that add registry
settings.
• Any program that relies on Windows Explorer will not work properly because Windows
Explorer is not running when the commands in the [GuiRunOnce] section are. Again, you
can consider repackaging these applications.
• If you're trying to install Windows Installer package files from [GuiRunOnce], you must use
the /wait command−line option to ensure that two packages don't try to install at the same
time. Otherwise, both packages fail. This is an issue only when installing Windows Installer
packages using Setup.exe, however, because Setup.exe launches Windows Installer and
then returns, allowing the next package to begin installing immediately. If you install
Windows Installer packages using Msiexec (the Windows Installer command−line interface)
instead, this problem isn't an issue.
Tip The commands in the [GuiRunOnce] section run asynchronously, which
means that they could potentially all run at the same time. If you'd rather
run commands synchronously—one at a time—create a batch file that
runs the program using the Start command's /wait command−line option.
The syntax is Start /wait program, where program is the path and name of
the program file. The /wait command−line option prevents the Start
program from returning control to the batch file until program finishes.
Then run this batch file from [GuiRunOnce].
Cmdlines.txt
The file Cmdlines.txt contains commands that the GUI−mode portion of the setup program runs
when installing optional components, including applications the setup program must install
immediately after installing Windows XP. The commands in Cmdlines.txt run as a system service,
so they run with elevated privileges. You put Cmdlines.txt in the $OEM$ subfolder of the Windows
XP distribution folder. You put the same kinds of commands in Cmdlines.txt that you'd put in
[GuiRunOnce]. You also have to use the $OEM$ folder to copy data files, such as REG files, INF
files, and scripts, to the target computer.
263](https://image.slidesharecdn.com/4525391/85/Windows-XP-Registry-Guide-274-320.jpg)
![The format of Cmdlines.txt is simple. It has a single section called [Commands], followed by zero or
more commands. Enclosing each command in quotation marks is a good idea if the command
contains spaces. Here's a sample that imports a REG file called Settings.reg and installs an INF file
called Config.inf, assuming that I added both files to $OEM$$$ in the distribution folder:
[Commands]
"regedit.exe %SYSTEMROOT%Settings.reg /s"
"rundll32.exe setupapi,InstallHinfSection DefaultInstall 132"
"%SYSTEMROOT%Config.inf"
Using Cmdlines.txt is different than [GuiRunOnce] in some important aspects, though:
• You must create the $OEM$ distribution folders, and you must set OEMPreinstall=Yes in
your answer file.
• When the setup program runs the command in Cmdlines.txt, no user is logged on to
Windows XP, and for that matter, no network connection is guaranteed. As a result,
Windows XP stores settings in the default user hive file so all users receive the same
settings.
• You can't install Windows Installer packages using Cmdlines.txt.
Logging On Automatically After Installation
If you're using the [GuiRunOnce] section to deploy settings or run programs after installing Windows
XP, you'll want to automatically log on to the operating system immediately after installation is
finished. On top of that, you'll likely want to log on as local Administrator to install applications that
require elevated privileges or change settings in HKLM that restricted users can't change. For that,
use the AutoLogon setting in the [GuiUnattended] section of your answer file. Set AutoLogon=Yes.
T h i s s e t s t h e v a l u e A u t o A d m i n L o g o n i n t h e k e y
HKLMSoftwareMicrosoftWindowsCurrentVersionWinLogon, which you learn about in Chapter
15, "Working Around IT Problems."
You must also set AutoLogonCount in the [GuiUnattended] section. This setting specifies the
number of times you want to automatically log on to Windows XP as local Administrator. This sets
t h e v a l u e A u t o L o g o n C o u n t i n t h e k e y
HKLMSoftwareMicrosoftWindowsCurrentVersionWinLogon. Normally, you'd log on to Windows
XP only one time by setting AutoLogonCount=1. However, you can log on to the operating system
as many times as necessary, such as when a setup programs restarts the computer in the middle of
the installation process. The following lines show you the settings necessary to use this feature:
[GuiUnattended]
AutoLogon=Yes
AutoLogonCount=1
[GuiRunOnce]
"regedit %SYSTEMROOT%Settings.reg /s"
When you set a password using the AdminPassword setting in the [GuiUnattended] section,
Windows XP uses that password to log the local Administrator on to it. However, if you encrypt the
password and set EncryptedAdminPassword=Yes, Windows XP disables this feature. It's a trade off
between security and deployment convenience. Don't panic, though; when Windows XP finishes
installing, it removes the password from any local copies of the answer file, such as
%SYSTEMROOT%System32$winnt$.sif.
264](https://image.slidesharecdn.com/4525391/85/Windows-XP-Registry-Guide-275-320.jpg)


![• InstallFilesPath tells Mini−Setup Wizard where to find additional installation files, including
the $OEM$ folder, which contains a Cmdlines.txt file (more on that later).
• OemPnPDriversPath tells Mini−Setup Wizard where to find third−party device drivers that
I've included in the disk image (helps reduce image count).
• ComputerName and Username are missing from this Sysprep.inf file, so Mini−Setup Wizard
prompts users for both values.
• DomainAdmin and DomainAdminPassword are absent from this Sysprep.inf file, so
Mini−Setup Wizard prompts users for the credentials necessary to join the computer to the
domain.
• [Sysprep] and [SysprepMassStorage] help to reduce the number of disk images you must
maintain. I discuss both these sections in "Reducing Image Count," later in this chapter.
Listing 13−1: Sysprep.inf
[Unattended]
ExtendOemPartition=1
InstallFilesPath=Sysprepi386
OemPnPDriversPath=WindowsDrivers
OemPreinstall=Yes
OemSkipEula=Yes
[GuiUnattended]
OemSkipRegional=1
OemSkipWelcome=1
TimeZone=020
[UserData]
OrgName="Jerry Honeycutt"
ProductID=#####−#####−#####−#####−#####
[TapiLocation]
AreaCode=972
CountryCode=1
Dialing=Tone
[Identification]
JoinDomain=HONEYCUTT
[Networking]
InstallDefaultComponents=Yes
[Sysprep]
BuildMassStorageSection=Yes
[SysprepMassStorage]
;end
The easiest way to build your own Sysprep.inf file is to use a template and then edit it in Notepad.
You can use the previous listing with very little modification. If you prefer, you can use Setup
Manager. Chapter 12, "Deploying with Answer Files," introduced Setup Manager to you. There are
a few more settings available to you in Setup Manager that this listing doesn't show, such as
installing printers; thus, you might build a Sysprep.inf file using Setup Manager and then use that as
your template for future jobs.
Note Chapter 12, "Deploying with Answer Files," describes how to deploy settings in an answer file.
It shows how to use REG files, INF files, and so on from an answer file. You can use those
271](https://image.slidesharecdn.com/4525391/85/Windows-XP-Registry-Guide-282-320.jpg)
![same methods in the Sysprep.inf file, too. Just like in any normal answer file, you can run a
command in the [GuiRunOnce] section or run a command from the Cmdlines.txt file that edits
the registry. Because Chapter 12 covers these topics thoroughly, I won't duplicate them here.
Preparing for Duplication
You're almost done; now you must prepare the sample computer's hard disk for duplication. On the
surface, this is the easy part but, as I sometimes do, I'm going to throw a curveball. To prepare for
duplication, create %SYSTEMDRIVE%Sysprep and copy Sysprep.exe, Setupcl.exe, and the
Sysprep.inf file you created to it.
That's it—now for the curveball: Fully automated disk image production is the ideal. It enables
regression testing. If you can swing it (and you can with a good bit of work), you'll want to modify
your Windows XP answer file so that it runs Sysprep after it installs all the applications. Here's how:
1. Create a Sysprep folder in the Windows XP distribution folder under $OEM$$1 so that the
setup program creates %SYSTEMDRIVE%Sysprep for you during installation. This
prevents you from having to interact with the disk image at all.
2. Add the following to the answer file you're using to build the disk image. This installs each
application. The placeholders setup1 and setup2 are the commands necessary to install the
applications you want to include on the disk image. If you prefer, you can run a batch file
from the [GuiRunOnce] section, and install all the applications from that batch file. Running
each setup program with no user interaction is preferable. This script quietly runs Sysprep
configured to use Mini−Setup Wizard, which prepares the disk for duplication:
[GuiRunOnce]
"setup1"
"setup2"
"%SYSTEMDRIVE%SysprepSysprep.exe −mini −quiet −reseal −forceshutdown"
3. Add the following to the answer file you're using to build the disk image. This automatically
logs the local Administrator on to Windows XP to run the programs in [GuiRunOnce] (set
AutoLogonCount to the number of times you need to log on to Windows XP to complete the
installation process in [GuiRunOnce]):
[GuiUnattended]
AutoLogon=Yes
AutoLogonCount=1
4. In the answer file you're using to install Windows XP on the sample computer, leave the
local Administrator password null: AdminPassword=*. Doing so ensures that you can change
the local Administrator password in Sysprep.inf.
Cloning the Disk Image
The last step is to run Sysprep and clone the disk to an image file. If you're fully automating disk
image production, this occurs automatically. Otherwise, run Sysprep manually. The following steps
describe how to run Sysprep so that it prepares the disk for duplication and configures it to
automate Mini−Setup Wizard:
1. Run %SYSTEMDRIVE%Sysprep.exe.
You see the Sysprep window shown in Figure 13−2.
272](https://image.slidesharecdn.com/4525391/85/Windows-XP-Registry-Guide-283-320.jpg)
![Figure 13−2: Earlier versions of Sysprep had no user interface, so this look and feel is truly
new.
2. Select the MiniSetup check box.
This causes Sysprep to use Mini−Setup Wizard as the first−run experience instead of
Windows Welcome, which is the default. Mini−Setup Wizard is the first−run experience that
you customize with Sysprep.inf.
3. Optionally, select the PnP check box.
Do this only if you want Mini−Setup Wizard to detect legacy devices during hardware
detection, which adds about 10 minutes to the installation process.
4. Click Reseal to prepare the disk for duplication, and shut down the computer.
I'm not a fan of graphical user interfaces when there is a perfectly good command I can type at the
MS−DOS command prompt. As a result, I almost always use Sysprep's command−line options
instead:
sysprep {[−clean] | [−activated] [−audit] [−factory] [−forceshutdown] [−mini]
[−noreboot] [−nosidgen] [−pnp] [−quiet] [−reboot] [−reseal]}
−activated Does not reset the grace period for Windows Product Activation. Use this option
only if you have activated Windows XP in Factory mode. The product key you use
to activate Windows XP must match the product key located on the COA sticker
attached to that particular computer.
−audit Reboots the computer into Factory mode without generating new SIDs or
processing any items in the [OEMRunOnce] section of Winbom.ini. Use this
command−line option only if the computer is already in Factory mode.
−clean Clears the critical devices database used by the [SysprepMassStorage] section in
Sysprep.inf. You learn about this setting in the section titled, "Reducing Image
Count," later in this chapter.
−factory Restarts in a network−enabled state without displaying Windows Welcome or
Mini−Setup Wizard. This option is useful for updating drivers, running Plug and
Play enumeration, installing applications, testing, configuring the computer with
273](https://image.slidesharecdn.com/4525391/85/Windows-XP-Registry-Guide-284-320.jpg)
![Reducing Image Count
I'm getting to the meat in this section: how to reduce the number of images that you manage, and
how the registry fits into that process. To reduce image count, you have to make sure that Windows
XP starts on each hardware configuration because Windows XP must start before Mini−Setup
Wizard can. Without additional effort on your part, this isn't always possible. Windows XP only
knows about the devices installed on the sample computer, and if the target computer has different
boot hardware (mass−storage controllers and system devices), it won't start.
The secret is to tell Windows XP about the other boot hardware you expect it to encounter when
you deploy the operating system. I'll show you the hard way first, which is to manually customize the
Sysprep.inf file's [SysprepMassStorage] section, and then I'll show you the easy way, which is to
allow Sysprep to build this section for you automatically. The manual method is what you used for
Windows 2000, and you must use it with Windows XP if the operating system doesn't include native
support for all the boot hardware in your organization. In either case, customizing
[SysprepMassStorage] allows for the following combinations:
• IDE to IDE. The sample computer uses a different IDE controller than the target computers.
• IDE to SCSI. The sample computer uses an IDE controller, and the target computers use
SCSI controllers.
• SCSI to SCSI. The sample computer uses a different SCSI controller than the target
computers.
• SCSI to IDE. The sample computer uses a SCSI controller, and the target computers use
IDE controllers.
Note When deploying disk images to computers that use SCSI controllers, the target computers'
hard disks must support the extended INT13 BIOS functions. They must be able to start using
a Boot.ini file that uses the multi() syntax in lieu of the scsi() or signature() syntax. To ensure
the use of the multi() syntax, add AddBiosToBoot to your answer file.
Filling SysprepMassStorage Manually
To fill the [SysprepMassStorage] section, you need to dig up the Plug and Play ID for each boot
device on the target computers. There's a few ways to get this ID. One is to look for it in the INF files
that come with Windows XP. Search %SYSTEMROOT%Inf for the name of the device, look in the
INF file that you find, and record the device's ID as well as the name of the INF file in which you
found it. For example, if I'm deploying a disk image to computers that have the Intel 82801BA Bus
Master IDE Controller, I'd look in Mshdc.inf to get its Plug and Play ID, which is
PCIVEN_8086&DEV_244A. All your hits will be in Machine.inf, Scsi.inf, Pnpscsi.inf, and Mshdc.inf.
After you've identified boot devices, add them to your Sysprep.inf file in the [SysprepMassStorage]
section. The following listing shows the format. PNPID is the device's Plug and Play ID, and INF is
the path and file name of the INF file that contains the Plug and Play ID of the device.
[SysprepMassStorage]
PNPID = INF
Here's an excerpt from a Sysprep.inf file that I used recently:
[SysprepMassStorage]
Primary_IDE_Channel=%SYSTEMROOT%InfMshdc.inf
Secondary_IDE_Channel=%SYSTEMROOT%InfMshdc.inf
PCIVEN_8086&DEV_1222=%SYSTEMROOT%InfMshdc.inf
PCIVEN_8086&DEV_1230=%SYSTEMROOT%InfMshdc.inf
275](https://image.slidesharecdn.com/4525391/85/Windows-XP-Registry-Guide-286-320.jpg)
![PCIVEN_8086&DEV_7010=%SYSTEMROOT%InfMshdc.inf
PCIVEN_8086&DEV_7111=%SYSTEMROOT%InfMshdc.inf
PCIVEN_8086&DEV_2411=%SYSTEMROOT%InfMshdc.inf
PCIVEN_8086&DEV_2421=%SYSTEMROOT%InfMshdc.inf
PCIVEN_8086&DEV_2441=%SYSTEMROOT%InfMshdc.inf
PCIVEN_8086&DEV_244A=%SYSTEMROOT%InfMshdc.inf
If Windows XP doesn't provide native support for a boot device, you use a different format. First
copy the device driver's files to a folder on the disk image. The easiest way is to add them to the
Windows XP distribution folder $OEM$$$Drivers so that the setup program automatically copies
them to %SYSTEMROOT%Drivers on the sample computer. Then add lines to the
[SysprepMassStorage] section that look like the following listing. PNPID is the Plug and Play ID of
the device. INF is the path and file name of the INF file that contains the Plug and Play ID, such as
%SYSTEMROOT%Drivers Filename.inf. DIR is the name of the directory on the floppy disk that
contains the device driver. DESC is a description of the disk as specified in the Txtsetup.oem file,
and TAG is the disk tag as specified in the Txtsetup.oem file. The last three items are optional.
PNPID = INF[, DIR[, DESC[, TAG]]]
Filling SysprepMassStorage Automatically
New for Windows XP is the ability to automatically build the Sysprep.inf file's [SysprepMassStorage]
section. By adding the lines that you see in the following listing to your Sysprep.inf file, Sysprep
extracts all the Plug and Play IDs from Machine.inf, Scsi.inf, Pnpscsi.inf, and Mshdc.inf and adds
the appropriate entries. Make sure that you leave the [SysprepMassStorage] section empty, and
double−check your spelling of BuildMassStorageSection. (I've spent hours troubleshooting a file in
which I misspelled the name of this setting.)
[Sysprep]
BuildMassStorageSection=Yes
[SysprepMassStorage]
Note When you build the [SysprepMassStorage] section automatically, Sysprep
takes much longer to run. Rather than shutting down the computer after a few
seconds, which is Sysprep's typical behavior, Sysprep grinds away for about
15 minutes while it builds this section. Be patient as long as you see hard disk
activity and a spinning hourglass. Reducing image count is worth the wait.
Cleaning Up After Sysprep
You're not finished yet. Sysprep adds the devices in the [SysprepMassStorage] section to Windows
XP's critical device's database. This database is in the registry at
HKLMSYSTEMCurrentControlSetControlCriticalDeviceDatabase. Each subkey corresponds to a
device you added to [SysprepMassStorage] and contains a link to the actual device driver in the
registry. Windows XP tries to start each device in the database every time it boots. The problem is
that this increases boot time significantly—something you don't want to inflict on users.
Don't I always have a solution? On each target computer, run sysprep.exe −clean − quiet. This
command disables all the devices that Windows XP didn't find when it started. The next time the
operating system starts, it doesn't try to start device drivers for those devices that it didn't find. The
trick is when to run this command. You don't do it when you build the image. Instead, you run the
command during Mini−Setup Wizard. Add the command to the Cmdlines.txt file that you create in
%SYSTEMDRIVE%Sysprepi386$OEM$. The file looks like this (make sure that InstallFilesPath
points to the folder containing the $OEM$ folder, which is usually
276](https://image.slidesharecdn.com/4525391/85/Windows-XP-Registry-Guide-287-320.jpg)
![%SYSTEMDRIVE%Sysprepi386, and you set OemPreinstall=Yes):
[Commands]
"%SYSTEMDRIVE%SysprepSysprep.exe −clean −quiet"
Mapping Sysprep Settings
When you run Sysprep, it modifies hundreds if not thousands of registry settings to prepare the
computer's hard disk for duplication. Table 13−1 on the next page describes the settings that relate
directly to Sysprep. These are settings that prepare Mini−Setup Wizard to run the next time
Windows XP starts. I tracked these down by comparing snapshots of the registry before and after
running Sysprep. I divided this table into sections, with each key in a different section.
Table 13−1: Sysprep Registry Settings
Value Type Description
HKLMSOFTWAREMicrosoftSysprep
SidsGenerated REG_DWORD Sysprep sets this value to 0x01, indicating that it
removed the computer's SID and Setupcl.exe will
regenerate it.
CriticalDevicesInstalled REG_DWORD Sysprep sets this value to 0x01, indicating that it created
the critical devices database.
HKLMSOFTWAREMicrosoftWindowsCurrentVersionSetup
SourcePath REG_DWORD Sysprep sets this to the value of InstallFilesPath in
Sysprep.inf, which indicates to the setup program where
to find installation files.
HKLMSOFTWAREMicrosoftWindowsCurrentVersionSetupOOBE
RunWelcomeProcess REG_DWORD Sysprep sets this value to 0x00, which disables the
Windows Welcome out−of−box experience.
HKLMSYSTEMCurrentControlSetControlLsaKerberosSidCache
MachineSid REG_BINARY Sysprep deletes this value to remove the computer's
SID.
HKLMSYSTEMCurrentControlSetControlSession Manager
SetupExecute REG_MULTI_SZ Setup adds Setupcl.exe to this value. This runs
Setupcl.exe when Windows XP restarts so that
Setupcl.exe can regenerate the computer's SID and run
Mini−Setup Wizard.
HKLMSYSTEMSetup
BootDiskSig REG_DWORD Sysprep stores the signature of the boot disk in this
value.
CloneTag REG_MULTI_SZ Sysprep stores the date and time that you ran the
prepared disk in this value.
Cmdline REG_SZ Sysprep stores the setup command line setup
−newsetup −mini in this value. This is the command that
runs Mini−Setup Wizard.
MiniSetupInProgress REG_DWORD Sysprep sets this value to 0x01, indicating that
Mini−Setup Wizard is in the process of running.
277](https://image.slidesharecdn.com/4525391/85/Windows-XP-Registry-Guide-288-320.jpg)
![SetupType REG_DWORD Sysprep sets this value to 0x01.
SystemSetupInProgress REG_DWORD Sysprep Sets this value to 0x01.
Sysprep changes other settings that I don't describe in Table 13−1. The settings that it changes
depend on the computer's configuration. For example, it disables Remote Desktop and Remote
Assistance. It configures System Restore to create an initial system checkpoint the next time
Windows XP starts. It also resets the computer's digital ID and resets the Windows Product
Activation timer. Last, if you're using [SysprepMassStorage], Sysprep fills the critical devices
database and configures the device drivers for each device. The changes that Sysprep makes to
the registry are numerous, but the following list summarizes some of the most significant that I
found while sniffing out the changes that it makes:
•Sysprep resets the event system. These settings are in
HKLMSOFTWAREMicrosoftEventSystem.
• Sysprep removes certificate templates and certificates from the keys
H K L M S O F T W A R E M i c r o s o f t C r y p t o g r a p h y a n d
HKLMSOFTWAREMicrosoftEnterpriseCertificates.
•Sysprep resets the configuration of Group Policy in the key
HKLMSOFTWAREMicrosoftWindowsCurrentVersionGroup Policy.
• Sysprep removes the computer from the domain, if it's a domain member, by deleting the
appropriate values from the keys HKLMSOFTWAREMicrosoftWindows
NTCurrentVersionWinlogon,HKLMSOFTWAREMicrosoftWindows
NTCurrentVersionWinlogonDomainCache, and elsewhere.
• Sysprep removes policies from the key HKLMSOFTWAREPolicies.
•Sysprep removes networking components from the keys
HKLMSYSTEMCurrentControlSetControl,HKLMSYSTEMCurrentControlSetEnum, and
HKLMSYSTEMCurrentControlSetServices.
•S y s p r e p r e s e t s t h e a p p l i c a t i o n c o m p a t i b i l i t y d a t a i n
HKLMSYSTEMCurrentControlSetControlSession ManagerAppCompatibility.
•S y s p r e p r e s e t s p o w e r m a n a g e m e n t s e t t i n g s i n t h e k e y
HKLMSYSTEMControlSet001ControlSession ManagerPower.
• Sysprep configures the Netlogon service to load on demand instead of automatically in
HKLMSYSTEMCurrentControlSetServicesNetlogon.
• Sysprep adds the devices specified in [SysprepMassStorage] to the critical devices
d a t a b a s e . T h i s d a t a b a s e i s i n t h e k e y
HKLMSYSTEMCurrentControlSetControlCriticalDeviceDatabase.
• Sysprep installs and configures device drivers for the devices listed in the
[SysprepMassStorage] section. It configures these device drivers in the key
HKLMSYSTEMCurrentControlSetServices.
Keeping Perspective
In this chapter, I've given you enough information to start testing Sysprep in your lab straightaway.
Sysprep is even a great tool for those power users who install Windows XP over and over again.
But I haven't told you enough about Sysprep for you to build an image and start blasting it at an
enterprise's desktops.
There's much more to Sysprep than just writing a few answer files and running Sysprep.exe.
Considerations include everything from defining preferred configurations to licensing to whether
you've configured your routers for multicast. Disk imaging is a part of an overall deployment plan,
278](https://image.slidesharecdn.com/4525391/85/Windows-XP-Registry-Guide-289-320.jpg)


![applications other than Office XP.
The sections following this one describe how to capture settings, apply settings, and customize
settings with Profile Wizard. The following list describes Profile Wizard's command−line options:
proflwiz.exe [/a] [/u] [/q] [/e] [/p] [/f] [/i filename.ini] /s filename.ops |
/r filename.ops
z/a Starts the wizard in administrator mode (Profile Wizard). Uses the OPW10adm.ini file
by default. This is the default setting if neither /a nor /u is on the command line.
/u Starts the wizard in user mode (Save My Settings Wizard). Proflwiz.exe uses the
OPW10usr.ini file if /u is present on the command line. OPW10usr.ini is available only
with Office XP and not the Office XP Resource Kit.
/q Runs the wizard in quiet mode. Runs the wizard quietly and displays no progress
indicators or error messages. Use this option with either the /s or /r option but not the /p
or /e option. You do not need to specify a mode of operation (/a or /u) when using the
quiet mode option.
/e Displays error messages. Displays only error messages and no progress indicators
while the wizard is running. Use this option with either the /s or /r option but not with the
/q option.
/p Displays progress indicators. Displays only progress indicators and no error messages
while the wizard is running. Use this option with either the /s or / r option, but not with
the /q option.
/f Displays a completion message at the end of the restore or save process. Use this
option with either the /s or /r option but not with the /q option. The options /e, /p, and /f
are additive. Including /e and /f in the command line displays only error messages and
finish messages.
/i Specifies the INI file to use. Instructs Profile Wizard not to use the default INI file
filename.ini (OPW10adm.ini or OPW10usr.ini). Instead, it uses the INI file filename.ini to determine
which settings and files to store in the OPS file.
/s Saves user configuration settings from the current computer to the OPS file
filename.ops filename.ops. The wizard displays progress indicators and error messages while it is
running.
/r Restores the application settings from the specified OPS file filename.ops to the
filename.ops computer. The wizard displays progress indicators and error messages while it is
running.
Note Save My Settings Wizard in Office XP is based on Profile Wizard. It uses an INI file that saves
and restores users' settings. That INI file is OPW10usr.ini. The OPS file that it creates
includes personal settings and information, though, which makes it inappropriate for
deployment to other users.
Customizing the Wizard
You do not need to edit Profile Wizard's INI file to include or exclude entire Office XP applications in
your OPS file. On the wizard's Save Or Restore Settings page, select the check boxes next to the
applications for which you want to save settings. If a setting in Office XP (or another program) that
you want to capture isn't in OPW10adm.ini, you must customize OPW10adm.ini or build a new INI
file to capture it in an OPS file.
Edit OPW10adm.ini in Notepad or another text editor, and then add or delete references to settings
and files that you want to include or exclude. You can also run Profile Wizard from the command
line with no loss in functionality. Every option available in the wizard has a corresponding
281](https://image.slidesharecdn.com/4525391/85/Windows-XP-Registry-Guide-292-320.jpg)
![command−line switch. Listing 14−1 on page 337 shows the default OPW10adm.ini file. You'll notice
that it contains thorough instructions on how to customize the file. If you're capturing settings for
Office XP, start with this file. If you're capturing user settings for Windows XP or another application,
consider starting a new INI file using OPW10adm.ini as a reference. Make sure that your new INI
file contains the [Header] section shown in listing 14−1; otherwise, Profile Wizard won't let you save
the settings defined in your INI file to an OPS file. Here's an overview of what each section contains:
• [IncludeFolderTrees]. List the folder trees you want to include in the OPS file. Profile
Wizard captures all the subfolders and files in each tree. All entries in this section must
begin with one of the following tokens, which represent a subfolder in the user's profile
folder: <AppData>, <Desktop>,<Favorites>, <NetHood>,<Personal>, <PrintHood>,
<ProgramsMenu>, <RecentFiles>, <SendTo>,<StartMenu>, <StartupMenu>, <UserProfile>.
• [IncludeIndividualFolders]. List individual folders you want to include in the OPS file; the
format is the same as [IncludeFolderTrees].
• [IncludeIndividualFiles]. List individual files you want to include in the OPS file. The format
is the same as [IncludeFolderTrees].
• [ExcludeFiles]. List files you don't want to include in the OPS file. The format is the same as
[IncludeFolderTrees] except that you can use wildcards to specify all files of a certain type.
• FolderTreesToRemoveToResetToDefaults]. List the folder trees you want Profile Wizard
to remove prior to restoring the settings in the OPS file. This essentially resets the
application. The format is the same as [IncludeFolderTrees].
• [IndividualFilesToRemoveToResetToDefaults]. List individual files you want Profile
Wizard to remove prior to restoring the settings in the OPS file. The format is the same as
[IncludeFolderTrees].
• [ExcludeFilesToRemoveToResetToDefaults]. List the individual files you don't want
Profile Wizard to remove, regardless of where they exist in the profile folder. This enables
you to keep certain files within folders that you're removing through
[FolderTreesToRemoveToResetToDefaults]. You can use wildcards only as the first
character of the file name, and you cannot specify a path: *.doc.
• [IncludeRegistryTrees]. List the registry branches you want to include in the OPS file.
Profile Wizard captures all the subkeys and values in each branch. Include one branch per
line.
• [IncludeIndividualRegistryKeys]. List individual registry keys you want to include in the
OPS file.
• [IncludeIndividualRegistryValues]. List individual registry values you want to include in the
OPS files. For the default value, use a trailing backslash: HKCUSoftware. Otherwise,
include the value name in each line: HKCUSoftwareValue.
• [ExcludeRegistryTrees]. List the registry branches you want to exclude from the OPS file.
• [ExcludeIndividualRegistryKeys]. List the individual registry keys you want to exclude
from the OPS file.
• [ExcludeIndividualRegistryValues]. List the individual values you want to exclude from the
OPS file. The format is the same as [IncludeIndividualRegistryValues].
• [RegistryTreesToRemoveToResetToDefaults]. List the registry branches you want Profile
Wizard to remove prior to applying the OPS file.
• [IndividualRegistryValuesToRemoveToResetToDefaults]. List individual values you want
Profile Wizard to remove prior to applying the OPS file. The format is the same as
[IncludeIndividualRegistryValues].
• [RegistryTreesToExcludeToResetToDefaults]. List the individual registry branches you
don't want Profile Wizard to remove when applying an OPS file. You cannot use this section
if you're embedding the OPS file in a MST file. This overrides
[RegistryTreesToRemoveToResetToDefaults].
• [RegistryKeysToExcludeToResetToDefaults]. List the individual registry keys you don't
282](https://image.slidesharecdn.com/4525391/85/Windows-XP-Registry-Guide-293-320.jpg)
![want Profile Wizard to remove when applying the OPS file. You cannot use this section if
you're embedding the OPS file in a MST file. This overrides
[RegistryTreesToRemoveToResetToDefaults].
• [RegistryValuesToExcludeToResetToDefaults]. List the individual values you don't want
Profile Wizard to remove when applying the OPS file. You cannot use this section if you're
embedding the OPS file in a MST file. This overrides
[RegistryTreesToRemoveToResetToDefaults].
Listing 14−1: OPW10adm.ini
# Microsoft Office Save My Settings/Profile Wizard INI file
# Edit this file to change which files and registry keys are included into
# the OPS file, and/or to change what gets deleted when using the
# 'Reset to defaults before restoring settings' option.
# Syntax is documented in each section.
# All include and exclude strings are case insensitive.
# Comments are denoted with # at the beginning of the line.
# At the end of a line is a '#' followed by one or more of the following
# possible terminal symbols:
# word, xl, access, ppt, ol, pub, fp, designer, common, all
# Terminal symbols indicate which applications the line of settings belongs to.
# "all" indicates settings to be saved for any application.
# "common" indicates settings that are common among all applications.
[Header]
Version = 10.0
Product = Microsoft Office 10.0
# ************************** File/Folder Sections *****************************
[IncludeFolderTrees]
# List folder trees to be included into the OPS file.
# Syntax is one folder per line; no trailing backslash.
# Includes all subfolders in specified tree.
# Wildcards are not supported.
# Entries must begin with one of the following Folder tokens:
# <AppData>, <Desktop>, <Favorites>, <NetHood>, <Personal>,
# <PrintHood>, <ProgramsMenu>, <RecentFiles>, <SendTo>,
# <StartMenu>, <StartupMenu>, <UserProfile>.
# Subfolder tokens of format <SubFolder_$$$$> can be embedded in lines
# and are replaced at SAVE time by the registry data found in the $$$$
# value of HKCUSoftwareMicrosoftOffice10.0CommonGeneral.
<AppData>Microsoft<SubFolder_AddIns> # xl word
<AppData>MicrosoftClipGallery # ppt
<AppData>MicrosoftExcel # xl
<AppData>MicrosoftFrontPage # fp
<AppData>MicrosoftGraph # all
<AppData>MicrosoftOffice # common
<AppData>MicrosoftOutlook # ol
<AppData>MicrosoftPowerPoint # ppt
<AppData>Microsoft<SubFolder_Proof> # common all
<AppData>Microsoft<SubFolder_Queries> # xl access
<AppData>Microsoft<SubFolder_Signatures> # ol
<AppData>Microsoft<SubFolder_Stationery> # ol
<AppData>Microsoft<SubFolder_Templates> # word ppt xl
<AppData>Microsoft<SubFolder_Themes> # ppt
283](https://image.slidesharecdn.com/4525391/85/Windows-XP-Registry-Guide-294-320.jpg)
![<AppData>MicrosoftWord # word
# Use the following two lines for Outlook 98:
# <AppData>MicrosoftShared<SubFolder_Signatures> # ol
# <AppData>MicrosoftShared<SubFolder_Stationery> # ol
# Use the following line for Web Server Locations:
# <NetHood> # fp
[IncludeIndividualFolders]
# List individual folders to be included into the OPS file.
# Syntax same as [IncludeFolderTrees] but does not include subfolders.
# Wildcards are not supported.
[IncludeIndividualFiles]
# List individual files to be included into the OPS file.
# Syntax is one pathfilename per line.
# Entries must begin with one of the Folder tokens listed under
# [IncludeFolderTrees].
# Wildcards are not supported.
#
# Example for including Normal.dot:
# <AppData>Microsoft<SubFolder_Templates>Normal.dot # word
[ExcludeFiles]
# List files to not include into the OPS file.
# Syntax is one filename or pathfilename per line.
# Folder−token (e.g. <AppData>) is optional.
# Path relative to folder−token is optional.
# Wildcards are supported in the filename.
# Wildcards are not supported in the path.
#
# Examples for excluding Normal.dot:
# Normal.dot
# Normal.*
# Norm??.dot
# <AppData>Microsoft<SubFolder_Templates>Normal.dot
*.OST
*.PAB
*.PST
*.TMP
*.RWZ
*.NICK
EXTEND.DAT
OutlPrnt
<AppData>MicrosoftOutlook*.FAV
<AppData>MicrosoftWord*.ASD
<AppData>MicrosoftWord*.WBK
[FolderTreesToRemoveToResetToDefaults]
# List folder trees to be deleted prior to restoring data from OPS file.
# Syntax is same as [IncludeFolderTrees].
# Wildcards are not supported.
# Every file in the folder and all subfolders will be deleted.
# Use this section with caution; it might delete more than you intend.
# Terminal Symbols are ignored and treated as "all".
<AppData>MicrosoftOfficeShortcut Bar
<AppData>MicrosoftFrontPage
[IndividualFilesToRemoveToResetToDefaults]
284](https://image.slidesharecdn.com/4525391/85/Windows-XP-Registry-Guide-295-320.jpg)
![# List files to be deleted prior to restoring data from OPS file.
# Syntax is one pathfilename per line.
# Specify all subfolders explicitly.
# Entries must begin with one of the Folder tokens listed under
# [IncludeFolderTrees].
# Wildcards are supported in the filename.
# Wildcards are not supported in the path.
# Terminal Symbols are ignored and treated as "all".
<AppData>Microsoft<SubFolder_AddIns>*.*
<AppData>MicrosoftClipGallery*.*
<AppData>MicrosoftExcel*.*
<AppData>MicrosoftExcel<SubFolder_Xlstart>*.*
<AppData>MicrosoftGraph*.*
<AppData>MicrosoftOffice*.*
<AppData>MicrosoftOffice<SubFolder_Actors>*.*
# <AppData>MicrosoftOffice<SubFolder_RecentFiles>*.*
<AppData>MicrosoftPowerPoint*.*
<AppData>Microsoft<SubFolder_Proof>*.*
<AppData>Microsoft<SubFolder_Queries>*.*
<AppData>Microsoft<SubFolder_Signatures>*.*
<AppData>Microsoft<SubFolder_Stationery>*.*
<AppData>Microsoft<SubFolder_Templates>*.*
<AppData>Microsoft<SubFolder_Themes>*.*
<AppData>MicrosoftWord*.*
<AppData>MicrosoftWord<SubFolder_Startup>*.*
[ExcludeFilesToRemoveToResetToDefaults]
# List of files NOT to be removed regardless of where they live when
# resetting to defaults prior to restoring data from OPS file.
#
# Syntax is one filename per line; no preceeding path.
# Wildcards "*" and "?" are supported as the first character only.
# The following are allowed:*.DIC
#NORMAL.DOC
#?FOO.FIL
#*FILE.FOO
#*.DIC
# Terminal Symbols are ignored and treated as "all".
# Your files must not be preceeded by a path.
*.PST
*.DIC
*.OST
# ***************************** Registry Sections *****************************
[SubstituteEnvironmentVariables]
# List environment variables to substitute in registry values
# that take the data type REG_EXPAND_SZ.
# Syntax is one environment variable per line.
# Wildcards are not supported.
%USERPROFILE%
%USERNAME%
[IncludeRegistryTrees]
# List registry trees to include.
# All values and subkeys within the specified tree are included.
# Syntax is one key per line.
# Wildcards are not supported.
HKCUSoftwareMicrosoftOffice10.0Access # access
HKCUSoftwareMicrosoftOffice10.0Common # common
285](https://image.slidesharecdn.com/4525391/85/Windows-XP-Registry-Guide-296-320.jpg)
![HKCUSoftwareMicrosoftOffice10.0Excel # xl
HKCUSoftwareMicrosoftOffice10.0Graph # all
HKCUSoftwareMicrosoftOffice10.0NetFolder # common
HKCUSoftwareMicrosoftOffice10.0Osa # common
HKCUSoftwareMicrosoftOffice10.0Outlook # ol
HKCUSoftwareMicrosoftOffice10.0PowerPoint # ppt
HKCUSoftwareMicrosoftOffice10.0Shortcut Bar # common
HKCUSoftwareMicrosoftOffice10.0Web Server # fp
HKCUSoftwareMicrosoftOffice10.0Word # word
HKCUSoftwareMicrosoftOffice10.0Publisher # pub
HKCUSoftwareMicrosoftOffice10.0ClipGallery # common
HKCUSoftwareMicrosoftOfficeAccess # access
HKCUSoftwareMicrosoftOfficeCommon # common
HKCUSoftwareMicrosoftOfficeExcel # xl
HKCUSoftwareMicrosoftOfficeOutlook # ol
HKCUSoftwareMicrosoftOfficePowerPoint # ppt
HKCUSoftwareMicrosoftOfficeWord # word
HKCUSoftwareMicrosoftFrontPage # fp
HKCUSoftwareMicrosoftShared ToolsFont Mapping # all
HKCUSoftwareMicrosoftShared ToolsProofing Tools # all
HKCUSoftwareMicrosoftShared ToolsOutlookJournaling # ol
HKCUSoftwareMicrosoftVBAOffice # all
HKCUControlPanelInternationalNumShape # common
HKCUControlPanelInternationalCalendarsTwoDigitYearMax # common
HKCUAppEventsSchemesAppsOffice97 # ol
[IncludeIndividualRegistryKeys]
# List individual registry keys to include.
# Syntax is same as [IncludeRegistryTrees] but includes only values
# in the specified key, not subkeys.
# Wildcards are not supported.
HKCUSoftwareMicrosoftExchangeClientOptions # ol
HKCUSoftwareMicrosoftOffice10.0CommonLanguageResources # common
HKCUSoftwareMicrosoftVBATrusted # common
[IncludeIndividualRegistryValues]
# List individual registry values to include.
# Same as [IncludeIndividualRegistryKeys] but includes only specific named
# value, not subkeys.
# Syntax is keyvaluename.
# Wildcards are not supported.
# Name can be blank to denote the default value (use a trailing backslash).
[ExcludeRegistryTrees]
# List registry trees to exclude.
# All values and subkeys within the specified tree are excluded.
# Syntax is one key per line.
# Wildcards are not supported.
HKCUSoftwareMicrosoftOffice10.0CommonMigration # all
[ExcludeIndividualRegistryKeys]
# List individual registry keys to exclude.
# Syntax is same as [ExcludeRegistryTrees] but excludes only values
# in the specified key, not subkeys.
# Wildcards are not supported.
HKCUSoftwareMicrosoftOffice10.0PowerPointTips # all
HKCUSoftwareMicrosoftOffice10.0CommonUserInfo # all
HKCUSoftwareMicrosoftOffice10.0ExcelRecent Files # all
HKCUSoftwareMicrosoftOffice10.0PowerPointRecent File List # all
286](https://image.slidesharecdn.com/4525391/85/Windows-XP-Registry-Guide-297-320.jpg)
![HKCUSoftwareMicrosoftOfficeOutlookOMI Account ManagerAccounts # all
HKCUSoftwareMicrosoftFrontPageExplorerFrontPage ExplorerRecent File List
# all
HKCUSoftwareMicrosoftFrontPageExplorerFrontPage ExplorerRecent Page List
# all
HKCUSoftwareMicrosoftFrontPageExplorerFrontPage ExplorerRecent Web List
# all
HKCUSoftwareMicrosoftOffice10.0PhotoDrawRecent File List # all
[ExcludeIndividualRegistryValues]
# List individual registry values to exclude.
# Same as [ExcludeIndividualRegistryKeys] but excludes only specific named
# value, not subkeys.
# Syntax is keyvaluename.
# Wildcards are not supported.
# Name can be blank to denote the default value (use a trailing backslash).
HKCUSoftwareMicrosoftOffice10.0AccessMRU1
HKCUSoftwareMicrosoftOffice10.0AccessMRUFlags1
HKCUSoftwareMicrosoftOffice10.0AccessMRU2
HKCUSoftwareMicrosoftOffice10.0AccessMRUFlags2
HKCUSoftwareMicrosoftOffice10.0AccessMRU3
HKCUSoftwareMicrosoftOffice10.0AccessMRUFlags3
HKCUSoftwareMicrosoftOffice10.0AccessMRU4
HKCUSoftwareMicrosoftOffice10.0AccessMRUFlags4
HKCUSoftwareMicrosoftOffice10.0AccessMRU5
HKCUSoftwareMicrosoftOffice10.0AccessMRUFlags5
HKCUSoftwareMicrosoftOffice10.0AccessMRU6
HKCUSoftwareMicrosoftOffice10.0AccessMRUFlags6
HKCUSoftwareMicrosoftOffice10.0AccessMRU7
HKCUSoftwareMicrosoftOffice10.0AccessMRUFlags7
HKCUSoftwareMicrosoftOffice10.0AccessMRU8
HKCUSoftwareMicrosoftOffice10.0AccessMRUFlags8
HKCUSoftwareMicrosoftOffice10.0AccessMRU9
HKCUSoftwareMicrosoftOffice10.0AccessMRUFlags9
HKCUSoftwareMicrosoftOffice10.0AccessSettingsPrefs Migrated
HKCUSoftwareMicrosoftOffice10.0AccessUserData
HKCUSoftwareMicrosoftOffice10.0CommonGeneralFirstRun
HKCUSoftwareMicrosoftOffice10.0CommonUserData
HKCUSoftwareMicrosoftOffice10.0ExcelOptionsFirstRun
HKCUSoftwareMicrosoftOffice10.0ExcelOptionsTipShown
HKCUSoftwareMicrosoftOffice10.0ExcelUserData
HKCUSoftwareMicrosoftOffice10.0OutlookSetupFirst−Run
HKCUSoftwareMicrosoftOffice10.0OutlookSetupMailSupport
HKCUSoftwareMicrosoftOffice10.0OutlookUserData
HKCUSoftwareMicrosoftoffice10.0OutlookJournalItem Log File
HKCUSoftwareMicrosoftoffice10.0OutlookJournalOutlook Item Log File
HKCUSoftwareMicrosoftOffice10.0PowerPointFirst RunFirstRun
HKCUSoftwareMicrosoftOffice10.0PowerPointUserData
HKCUSoftwareMicrosoftOffice10.0WordOptionsFirstRun
HKCUSoftwareMicrosoftOffice10.0WordOptionsReplyMessageComment
HKCUSoftwareMicrosoftOffice10.0WordUserData
HKCUSoftwareMicrosoftOffice10.0OutlookPreferencesAnnotationText
HKCUSoftwareMicrosoftOffice10.0Shortcut BarLocalPath
HKCUSoftwareMicrosoftoffice10.0WordOptionsPROGRAMDIR
HKCUSoftwareMicrosoftOfficeCommonAssistantAsstFile
HKCUSoftwareMicrosoftOfficeCommonAssistantCurrAsstFile
[RegistryTreesToRemoveToResetToDefaults]
# List registry trees to be removed prior to writing custom values.
# All values and subkeys within the specified tree will be removed.
# Wildcards are not supported.
287](https://image.slidesharecdn.com/4525391/85/Windows-XP-Registry-Guide-298-320.jpg)
![# Terminal Symbols are ignored and treated as "all".
HKCUSoftwareMicrosoftOffice10.0
HKCUSoftwareMicrosoftOfficeAccess
HKCUSoftwareMicrosoftOfficeCommon
HKCUSoftwareMicrosoftOfficeExcel
HKCUSoftwareMicrosoftOfficeOutlook
HKCUSoftwareMicrosoftOfficePowerPoint
HKCUSoftwareMicrosoftOfficeWord
HKCUSoftwareMicrosoftFrontPage
HKCUSoftwareMicrosoftShared ToolsProofing Tools
HKCUSoftwareMicrosoftVBAOffice
# HKCUSoftwareMicrosoftWindows NTCurrentVersionWindows Messaging
# SubsystemProfiles
HKCUSoftwareMicrosoftVBATrusted
[IndividualRegistryValuesToRemoveToResetToDefaults]
# List individual registry values to be removed prior to writing custom values.
# Syntax is keyvaluename.
# Wildcards are not supported.
# Valuename can be blank to denote the default value (use a trailing backslash).
# Terminal Symbols are ignored and treated as "all".
[RegistryTreesToExcludeToResetToDefaults]
# List individual registry trees that will not be removed when resetting to
# defaults.
# All values and subkeys within the specified tree will be ignored.
# Wildcards are not supported.
# Terminal symbols are ignored and treated as "all".
# This section cannot be used if the OPS file is used for custom setup in a
# transform.
[RegistryKeysToExcludeToResetToDefaults]
# List individual registry keys that will not be removed when resetting to
# defaults.
# All values within the specified tree will be ignored.
# Wildcards are not supported.
# Terminal symbols are ignored and treated as "all".
# This section cannot be used if the OPS file is used for custom setup in a
# transform.
[RegistryValuesToExcludeToResetToDefaults]
# List individual registry values that will not be removed when resetting to
# defaults.
# Wildcards are not supported.
# Only excludes only specific values, not subkeys.
# Terminal symbols are ignored and treated as "all".
# Syntax is keyvaluename.
# Name can be blank to denote the default value (use a trailing backslash).
# This section cannot be used if the OPS file is used for custom setup in a
# transform.
Capturing Settings
Before creating an OPS file, you must start each Office XP program on a sample computer and set
all the options you want to capture in the file. The most interesting settings are on each program's
Tools menu. To customize toolbars and menus, click Customize on the Tools menu. To configure
288](https://image.slidesharecdn.com/4525391/85/Windows-XP-Registry-Guide-299-320.jpg)


![Components. The next several sections describe how to use this hack to control different
components. You should include changes to Installed Components on disk images. Chapter 13,
"Cloning Disks with Sysprep," describes how to deploy settings on your disk images.
NoteWhy care if Outlook Express has an icon on the Quick Launch toolbar? It's distracting and
keeps users from their work. Specifically, your enterprise isn't likely to use Outlook Express as
its mail client; you probably deployed a full−featured client like Outlook 2002 or similar. If you
advertise Outlook Express on the desktop, users are going to have two mail clients. If that
doesn't confuse them and cause problems, it'll certainly tease them into playing with Outlook
Express. This goes for many of the other programs that come with Windows XP, including
Windows Media Player, NetMeeting, and so on.
Outlook Express
When Windows XP creates a new user profile, it executes the command in the REG_EXPAND_SZ
value HKLMSOFTWAREMicrosoftActive SetupInstalled Components{44BBA840−CC51−
11CF−AAFA−00AA00B6015C}StubPath to create the Outlook Express icon in the Start menu and
on the Quick Launch toolbar. This command is "%ProgramFiles%Outlook Express setup50.exe"
/APP:OE /CALLER:WINNT /user /install. To prevent this command from running, remove the
StubPath value or, alternatively, change its name to HideStubPath, as shown in Figure 15−1.
Figure 15−1: Prevent Windows XP from creating Outlook Express shortcuts by hiding StubPath.
This customization is common on disk images, so I'm providing you with a script to do it. Save the
script shown in Listing 15−1 to a text file with the .inf extension. Right−click it, and then click Install.
Keep this script handy as a disk−image customization tool.
Listing 15−1: Outlook.inf
[Version]
Signature=$CHICAGO$
[DefaultInstall]
DelReg=Reg.Settings
[Reg.Settings]
HKLM,SOFTWAREMicrosoftActive SetupInstalled Components{44BBA840−
CC51−11CF−AAFA−00AA00B6015C},StubPath
TipAn alternative to hiding the Outlook Express icon is making Outlook Express a newsreader
client only. Add the option /outnews to the target of each icon (put this commandline option
outside of the quotation marks). When users choose the shortcut, Outlook Express opens with
all its news−client features working, but its mail−client features don't work. This is useful in
scenarios when you must provide newsgroup access to users, like developers, who usually
require access to Microsoft and developer newsgroups. To easily deploy this customized
Outlook Express shortcut, add it to the default user profile. Alternatively, because this hack
299](https://image.slidesharecdn.com/4525391/85/Windows-XP-Registry-Guide-310-320.jpg)


![Be wary of preventing Windows XP from configuring the Windows Desktop Update. This
component is necessary to provide resiliency for Windows Installer−based applications.
For example, when a user opens the shortcut of a Windows Installer−based application,
the Windows Desktop Update passes it on to Windows Installer so that Windows Installer
can check and repair the application if necessary. If you prevent the operating system from
configuring the Windows Desktop Update, you remove Windows Installer from the process.
Even though this prevents Windows Installer from repairing broken shortcuts, it doesn't
prevent Windows Installer from repairing components within an application.
Removing Components
Whereas the previous section showed you how to prevent Windows XP from configuring
components when it creates a user profile, this section shows you how to prevent Windows XP from
installing certain components altogether. Be careful when you prevent the operating system from
installing components, though, because doing so could cripple some features and applications. For
example, Office XP requires Internet Explorer, Outlook Express, and NetMeeting for a lot of its
features, particularly its collaboration features. The moral is to test your configurations in a lab
before deploying them to unsuspecting users.
The Windows XP setup program doesn't provide a user interface for removing components during
installation. You can use an answer file to remove components, however; Chapter 12, "Deploying
with Answer Files," shows you what the [Components] section looks like in an answer file, and I
summarize that information in this chapter. The operating system does allow users to add or
remove components using Windows Components Wizard, though: click Start, Control Panel, Add Or
Remove Programs, Add/Remove Windows Components. Still, the wizard and answer files do not
allow you to remove and disable some of the features that enterprises would rather not install.
There's no option to remove Movie Maker, for example, nor is there an option to remove Windows
Messenger.
This section shows you some alternative ways to get rid of components, if possible, or to hide them.
The most common requests that I get are to get rid of Tour Windows XP, Movie Maker, Outlook
Express, and Files And Settings Transfer Wizard. Strangely, I'm not often asked about removing the
games, but you can do that easily enough through your Windows XP answer file.
Answer File [Components] Section
Chapter 12, "Deploying with Answer Files," describes how to build an answer file. If you're an IT
professional deploying Windows XP, you're probably already familiar with answer files. The
[Components] section of answer files enables you to prevent the operating system from installing
certain components. Listing 15−2 on the next page shows what this section looks like, and the
listing contains all the components that Windows XP answer files support (I omitted server−specific
components). The names of each component are self−explanatory. To install a component, set it to
On. To prevent its installation, set it to Off. In the listing, I've set each component to its default
installation value.
Listing 15−2: Unattend.txt
[Components]
accessopt=On; Accessibility wizard
calc=On; Calculator
charmap=On; Character Map
chat=Off; Chat
302](https://image.slidesharecdn.com/4525391/85/Windows-XP-Registry-Guide-313-320.jpg)
![deskpaper=On; Desktop backgrounds
dialer=On; Phone Dialer
fax=Off; Fax
fp_extensions=Off; FrontPage server extensions
fp_vdir_deploy=Off; Visual InterDev RAD Remote Deployment Support
freecell=On; Freecell
hearts=On; Hearts
hypertrm=On; HyperTerminal
IEAccess=On; Visible entry points to Internet Explorer
iis_common=Off; Internet Information Services (IIS) common
iis_ftp=Off; FTP service
iis_htmla=Off; HTML−based administration for IIS
iis_inetmgr=Off; MMC−based administration for IIS
iis_pwmgr=Off; Personal Web Manager
iis_smtp=Off; SMTP service for IIS
iis_smtp_docs=Off; SMTP service documentation
iis_www=Off; WWW service for IIS
iis_www_vdir_printers=Off; Web printing components for IIS
iisdbg=Off; Microsoft Script Debugger
indexsrv_system=Off; Indexing Service
media_clips=On; Sample sound clips
media_utopia=Off; Utopia Sound Scheme
minesweeper=On; Minesweeper
mousepoint=On; Mouse pointers
mplay=On; Windows Media Player
msmq_ADIntegrated=Off; Integrates Message Queuing (MSMQ) with AD
msmq_Core=Off; MSMQ core files
msmq_HTTPSupport=Off; MSMQ support for HTTP
msmq_LocalStorage=Off; MSMQ support for local storage
msmq_MQDSService=Off; MSMQ support for down−level clients
msmq_RoutingSupport=Off; MSMQ support for efficient routing
msmq_TriggersService=Off; MSMQ support for Component Object Model
msmsgs=On; Windows Messenger
msnexplr=On; MSN Explorer
mswordpad=On; WordPad
Netcis=Off; COM Internet Services
netoc=On; Optional networking components
objectpkg=On; Object Packager
paint=On; Paint
pinball=On; Pinball
rec=On; Sound Recorder
solitaire=On; Solitaire
spider=On; Spider
templates=On; Document templates
Vol=On; Volume Control
zonegames=On; Gaming Zone Internet games
Microsoft doesn't document a way to prevent the setup program from installing Windows
Messenger—a common request. I've added the component msmsgs to Listing 15−2, however,
which prevents the setup program from installing it. The file Sysoc.inf, which you learn about in the
next section, hides this component in Windows Components Wizard. You can edit that file to show
Windows Messenger in the wizard, but doing so relies on users to remove Windows Messenger.
Instead, you can add the component to the [Components] section of your answer file to prevent the
setup program from installing it.
This is a great technique for preventing the operating system from installing things such as the
games, but it doesn't prevent the installation of components such as Movie Maker, because the
[Components] section doesn't include settings for those components. You can use it to prevent the
installation of Windows Media Player and Windows Messenger, though, which strikes two
303](https://image.slidesharecdn.com/4525391/85/Windows-XP-Registry-Guide-314-320.jpg)
![components off of my checklist.
Extending Windows Components Wizard
Just because you don't see a component in Windows Components Wizard doesn't mean that
Windows XP isn't prepared to remove it. The file Sysoc.inf controls which components appear in the
wizard. This file is in %SYSTEMROOT%Inf, and Listing 15−3 shows its default contents. You must
display super−hidden files to see the Inf folder: In Windows Explorer, click Tools, Folder Options.
On the View tab, select the Show Hidden Files And Folders check box.
Listing 15−3: Sysoc.inf
[Version]
Signature = "$Windows NT$"
DriverVer=07/01/2001,5.1.2600.0
[Components]
NtComponents=ntoc.dll,NtOcSetupProc,,4
WBEM=ocgen.dll,OcEntry,wbemoc.inf,hide,7
Display=desk.cpl,DisplayOcSetupProc,,7
Fax=fxsocm.dll,FaxOcmSetupProc,fxsocm.inf,,7
NetOC=netoc.dll,NetOcSetupProc,netoc.inf,,7
iis=iis.dll,OcEntry,iis.inf,,7
com=comsetup.dll,OcEntry,comnt5.inf,hide,7
dtc=msdtcstp.dll,OcEntry,dtcnt5.inf,hide,7
IndexSrv_System = setupqry.dll,IndexSrv,setupqry.inf,,7
TerminalServer=TsOc.dll, HydraOc, TsOc.inf,hide,2
msmq=msmqocm.dll,MsmqOcm,msmqocm.inf,,6
ims=imsinsnt.dll,OcEntry,ims.inf,,7
fp_extensions=fp40ext.dll,FrontPage4Extensions,fp40ext.inf,,7
AutoUpdate=ocgen.dll,OcEntry,au.inf,hide,7
msmsgs=msgrocm.dll,OcEntry,msmsgs.inf,hide,7
RootAutoUpdate=ocgen.dll,OcEntry,rootau.inf,,7
IEAccess=ocgen.dll,OcEntry,ieaccess.inf,,7
Games=ocgen.dll,OcEntry,games.inf,,7
AccessUtil=ocgen.dll,OcEntry,accessor.inf,,7
CommApps=ocgen.dll,OcEntry,communic.inf,HIDE,7
MultiM=ocgen.dll,OcEntry,multimed.inf,HIDE,7
AccessOpt=ocgen.dll,OcEntry,optional.inf,HIDE,7
Pinball=ocgen.dll,OcEntry,pinball.inf,HIDE,7
MSWordPad=ocgen.dll,OcEntry,wordpad.inf,HIDE,7
ZoneGames=zoneoc.dll,ZoneSetupProc,igames.inf,,7
[Global]
WindowTitle=%WindowTitle%
WindowTitle.StandAlone="*"
[Components]
msnexplr=ocmsn.dll,OcEntry,msnmsn.inf,,7
[Strings]
WindowTitle="Windows Professional Setup"
WindowTitle_Standalone="Windows Components Wizard"
The important section in this file is [Components]. Each line in this section is either a specific
component or a category of components. If you see the word hide, Windows XP doesn't display the
304](https://image.slidesharecdn.com/4525391/85/Windows-XP-Registry-Guide-315-320.jpg)
![component or category in Windows Components Wizard. To allow users to remove the component,
or the components in the category, remove the word hide. For example, to allow users to remove
Windows Messenger, change the line msmsgs=msgrocm.dll,OcEntry,msmsgs.inf,hide,7to
msmsgs=msgrocm.dll,OcEntry,msmsgs.inf,,7.
Removing Components After Installation
The first option I gave you enables you to prevent the Windows XP setup program from installing
components during installation. The second option enables you to expose additional components in
Windows Components Wizard. This last option is for scenarios in which you want to remove a
component without exposing it in Windows Components Wizard. This is also useful when you want
to script the removal so that you don't have to visit the desktop.
The first step is to find the component's INF file in %SYSTEMROOT%Inf. Remember that this is a
super−hidden folder, and I gave you instructions for showing it earlier in this chapter. The easiest
way to find the component's INF file is to use Search Assistant. Look for all files with the .inf
extension that contain the name of the component. For example, to find the INF file for Windows
Messenger, search for all files with the .inf extension in %SYSTEMROOT%Inf that contain
Windows Messenger. You should come up with the file Msmsgs.inf as shown in Figure 15−3. Then
look in the file for a section with the words remove or uninstall in it. In this case, the section is called
[BLC.Remove]. Then execute the following command, whether in a script or in the Run dialog box,
where Filename.inf is the name of the INF file and Section is the name of the uninstall section:
rundll32 advpack.dll,LaunchINFSection %systemroot%InfFilename.inf,Section
Figure 15−3: Search the %SYSTEMROOT%Inf folder for all files with the .inf extension that contain
the name of the component you want to remove.
Thus, to remove Windows Messenger, run the command:
rundll32 advpack.dll,LaunchINFSection %systemroot%InfMsmsgs.inf,BLC.Remove.
305](https://image.slidesharecdn.com/4525391/85/Windows-XP-Registry-Guide-316-320.jpg)


![Tattoos become more problematic when you upgrade to Windows XP from an earlier version of
Windows. It's also a problem when you deploy Windows XP on a network that doesn't have Active
Directory but uses System Policy, and then deploy Active Directory down the line. The upgrade
process doesn't remove System Policy settings from the registry during an upgrade, so those
settings remain. The shotgun approach is to remove the following keys from each computer's
registry and each user's profile hive before upgrading to Windows XP; the surgical approach is to
remove individual policies, but that's too tedious:
• HKLMSOFTWAREPolicies
• HKLMSOFTWAREMicrosoftWindowsCurrentVersionPolicies
• HKCUSoftwarePolicies
• HKCUSoftwareMicrosoftWindowsCurrentVersionPolicies
How you remove these keys during the upgrade is the question. This isn't an issue for disk images
because the problem occurs only during an upgrade. If technicians are visiting desktops during the
upgrade, and I hope they aren't doing that, they can remove these keys manually. Otherwise, run
the Windows XP setup program from a batch file or script. Then you can precede the command that
starts the setup program with the commands that remove these keys. Listing 15−4 is an example of
an INF file that removes them. To run this INF file from a batch file, save it in a file called Tattos.inf;
then add the command %SystemRoot% System32rundll32.exe setupapi,InstallHinfSection
DefaultInstall 132 Tattoos.inf to the batch file that starts the Windows XP installation. You can also
script this edit using Windows Script Host, which Chapter 9, "Scripting Registry Changes,"
describes how to do.
Listing 15−4: Tattoos.inf
[Version]
Signature=$CHICAGO$
[DefaultInstall]
DelReg=Reg.Settings
[Reg.Settings]
HKLM,SOFTWAREPolicies
HKLM,SOFTWAREMicrosoftWindowsCurrentVersionPolicies
There a few major issues with this script, however. The first is that the user must be an
administrator to remove the policy branches from the registry. You can use the techniques
described in the next section, "Elevating Processes' Privileges," to take care of this issue or rely on
your software management infrastructure. The second issue is that it removes only the
per−computer policies. It doesn't remove policies from users' profile hives. You won't be able to use
a script like this from a logon script or allow the user to run it because they don't have the privileges
required to remove the policy branches from the registry. This is true unless you've dumped all
users in to the local Administrators group, which I hope you haven't done. The only reasonable
solution is to load each user's profile hive in Registry Editor (Regedit), and then remove the two
policy branches from it. You can more or less automate this process by writing a script that
connects to a remote computer, loads each profile hive file that exists in
HKLMSOFTWAREMicrosoftWindows NTCurrentVersion ProfileList, removes the policy
branches, and then unloads the hive file.
308](https://image.slidesharecdn.com/4525391/85/Windows-XP-Registry-Guide-319-320.jpg)

![Secondary Logon
Secondary Logon, also called Run As, enables users to run programs in the context of accounts
other than their own. For example, if I'm logged on to the computer using the account Jerry, which is
in the Power Users group, but I need to run a program as an administrator, I hold down the Shift
key, right−click the program's shortcut icon, click Run As, and then type the Administrator account's
name and password. The program runs under the Administrator account. Because Secondary
Logon relies on users knowing the credentials (which they won't know), it's not a really useful tool
for software deployment. I include it here to answer the inevitable question about whether you can
use it for that purpose.
You can use Secondary Logon from the command prompt, too. The following shows you the syntax
for this command:
RUNAS [ [/noprofile | /profile] [/env] [/netonly] ] /user:Username Program
RUNAS [ [/noprofile | /profile] [/env] [/netonly] ] /smartcard [/user:Username]
Program
/noprofile Specifies that Runas should not load the user profile. Programs load faster
but often don't work properly.
/profile Specifies that Runas should load the user profile.
/env Uses the current environment instead of the user's.
/netonly Specifies that the credentials are for remote access only.
/savecred Uses the credentials previously saved by the user.
/smartcard Specifies that the credentials are provided by a smartcard.
/user Username Specifies the account name to use. This should be in the form of
user@domain or domain user.
Program Specifies the command to execute.
Scheduled Tasks
One thing I like about Scheduled Tasks is that you have remote access to the Scheduled Tasks
folder on each computer. Also, you can include an account name and password in each task. You're
not relying on users to provide the credentials necessary to run a job, such as installing software.
For this reason, Scheduled Tasks beats Secondary Logon. In My Network Places, find the computer
on which you want to add a task. Open the computer's Scheduled Tasks folder, right−click the
folder, point to New, click Scheduled Task, and then rename the task. Configure the task as follows
(shown in Figure 15−5).
• In the Task tab's Run box, type the command you want to execute. Remember to keep the
command's path relative to the computer on which you're running it.
• In the Task tab's Run As box, type the account in which you want to run the task, and then
click Set Password to set the matching password. As shown in Figure 15−5, type the
account in the form domainusername.
• On the Schedule tab, configure the task's schedule. In the scenarios that I've described
(deploying software and settings), you'd want to schedule the task to run once.
• On the Settings tab, configure Windows XP to remove the task from the Scheduled Tasks
folder after it runs. No reason to leave behind artifacts.
310](https://image.slidesharecdn.com/4525391/85/Windows-XP-Registry-Guide-321-320.jpg)

![must add the account to one of the local groups in order to log on to Windows XP using that
account. The domain administrator is already a member of the local Administrators group, but I don't
recommend using the domain administrator account with this technique. Instead, you can use the
local Administrator account, which is always available. The last value you set is the REG_DWORD
value AutoLogonCount. Set this value to the number of times you want to automatically log on to
Windows XP.
Table 15−2: Configuring Autologon
Setting Name Type Data
HKLMSOFTWAREMicrosoftWindows NTCurrentVersionWinlogon
Enable Autologon AutoAdminLogon REG_SZ 0|1
User name DefaultUserName REG_SZ Name
User domain DefaultDomainName REG_SZ Domain
User password DefaultPassword REG_SZ Password
Number of times to log on to Windows XP AutoLogonCount REG_DWORD N
HKLMSOFTWAREMicrosoftWindowsCurrentVersionRunOnce
Program to run Name REG_SZ Command
Here's how it works. If the AutoAdminLogon value is 1 and the AutoLogonCount value is not 0,
Windows XP automatically logs on to the computer using the credentials provided in the values
DefaultUserName, DefaultDomainName, and DefaultPassword. The operating system then
decrements the value in AutoLogonCount. When AutoLogonCount reaches zero, Windows XP
removes the values AutoLogonCount and DefaultPassword from the registry and no longer logs the
user on to it automatically.
The last step is to put the command you want to run in HKLMSOFTWAREMicrosoft
WindowsCurrentVersionRunOnce. Because you're putting this command in the RunOnce key,
Windows XP runs this command one time and then removes the value from the registry. Each value
in RunOnce is a command. The name of each REG_SZ value doesn't matter, but you store the
command line you want to execute in it.
An example will tie everything together for you. I want to deploy an application to a computer but the
users in my organization are restricted and can't install it. I'd configure the values described in Table
15−2 so that when the current user logs off or when Windows XP restarts, the operating system
automatically logs the domain Administrator on to the computer. I know that the application reboots
the computer one time during the installation process, so I have to set AutoLogonCount to 2. The
first time Windows XP logs the user on to it starts the setup program, and the second continues the
setup program. The script shown in Listing 15−5 shows a way to automatically configure Windows
XP for this scenario.
Listing 15−5: Install.inf
[Version]
Signature=$CHICAGO$
[DefaultInstall]
AddReg=Reg.Settings
[Reg.Settings]
HKLM,SOFTWAREMicrosoftWindows NTCurrentVersionWinlogon,AutoAdminLogon,0,"1"
HKLM,SOFTWAREMicrosoftWindows NTCurrentVersionWinlogon,DefaultUserName,0
312](https://image.slidesharecdn.com/4525391/85/Windows-XP-Registry-Guide-323-320.jpg)


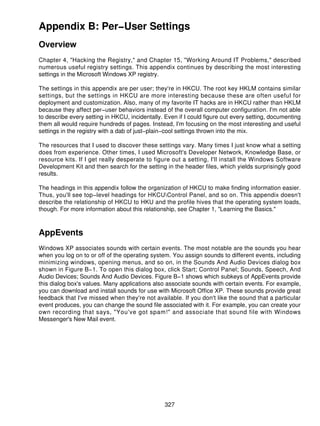


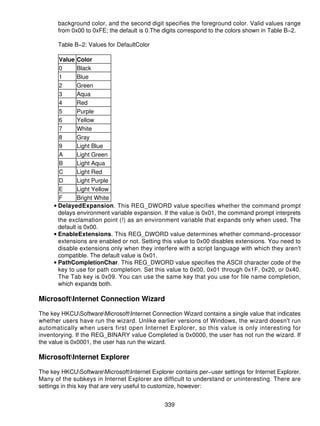


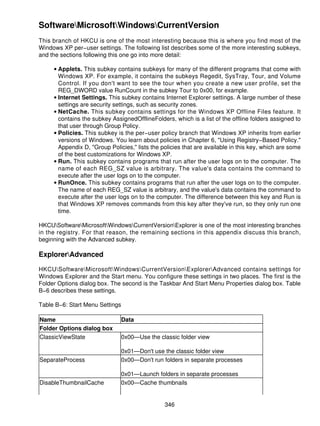


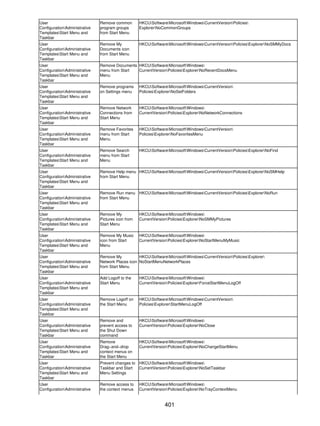


This document provides an overview of the Microsoft Windows XP Registry and how it can be used and managed. It discusses the structure and organization of the registry, tools for editing and managing the registry like Registry Editor, backing up the registry, customizing Windows XP settings by modifying the registry, deploying registry-based group policies, managing registry security, finding registry settings, scripting registry changes, deploying user profiles, using Windows Installer and answer files to deploy applications, cloning disks using Sysprep, deploying Microsoft Office user settings, and working around common IT problems. The document is divided into multiple parts covering registry overview, management, deployment, and appendices. It provides technical details and step-by-step instructions for advanced registry