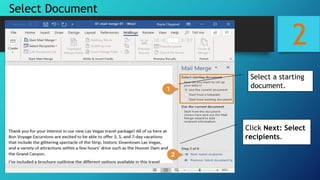
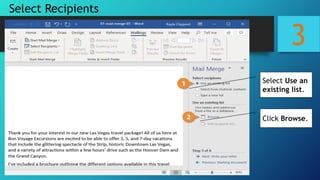
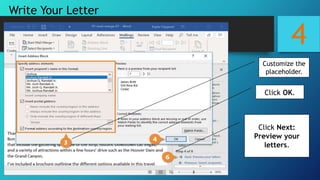
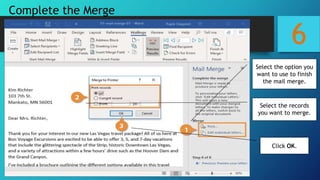
EMPOWERMENT
TECHNOLOGIES
GROUP 1
APPLIED PRODUCTIVITY
TOOLS WITH ADVANCED
APPLICATION TECHNIQUES
APPLIED PRODUCTIVITY TOOLS WITH
ADVANCED APPLICATION TECHNIQUES
Take Note:
Productivity tools are used to organize,
manipulate, shape and present ideas in a creative
and efficient way.
What are the applied
productivity tools in
empowerment technology?
Is Microsoft Word a productivity tool?
Yes
From notes to newsletters, Word has
always been the right tool for the job.
With live editing, sharing, and cloud-
based document storage, Word has
become an even better version.
Is Microsoft Excel a productivity tool?
Yes
Microsoft has introduced artificial
intelligence to Excel, giving users
unparalleled insight into data
analytics that helps collect and
inform users to help better plan for
the future.
Is Microsoft Word a productivity tool?
Yes
Microsoft PowerPoint provides the
tools that you need to create
beautiful, informative slides to
inform, entertain, and share with
your audience.
Examples of Productivity Tools
1. Word Processors
2. Databases
3. Spreadsheets
4. Multimedia Tools
ADVANCED TOOLS AND TECHNIQUES
1.Mail merge and label generation
2.Custom animations and timing
3.Hyperlinking in presentations
4.Integrating images and external material in
word processors
5.Embedded files and data
EMAIL MERGE AND
LABEL GENERATION
APPLIED PRODUCTIVITY TOOLS WITH
ADVANCED APPLICATION TECHNIQUES
1. Mail merge and label generation
Use Case: Mass email or printer letters
1
Set up and Choose Document Type
Click
the Mailings tab.
Click the Start Mail
Merge button.
Select Step-by-Step
Mail Merge Wizard.
Select a type of
document to create.
Click Next: Starting
document.
2
Select Document
Select a starting
document.
Click Next: Select
recipients.
3
Select Recipients
Select Use an
existing list.
Click Browse.
3
Select Recipients
Select your
data file.
Click Open.
3
Select Recipients
Make sure the right
recipients are
selected and
click OK.
Click Next: Write
your letter.
4
Write Your Letter
Click where you want
the information.
Select one of the
placeholder options.
4
Write Your Letter
Customize the
placeholder.
Click OK.
Click Next:
Preview your
letters.
5
Preview Your Mail Merge
Use
the arrow buttons in
the Mail Merge pane
to preview each
merged document.
Click Next: Complete
the merge.
6
Complete the Merge
Select the option you
want to use to finish
the mail merge.
Select the records
you want to merge.
Click OK.
CUSTOM ANIMATIONS
AND TIMING
APPLIED PRODUCTIVITY TOOLS WITH
ADVANCED APPLICATION TECHNIQUES
2. Custom Animations and Timing
Use Case: Adds a visual aspect to your
presentation and can create focus on specific
terms.
1
Display the animations plane
(Optional) If some of the
animations are grouped
together, click the Expand
Contents button to view them
all.
Click the Animation
Pane button.
Click
the Animations tab.
2
Reorder Animations
Select the animation you
want to reorder.
Click Move Earlier or Move
Later in the Timing group.
Click Preview.
3
Change How an Animation Starts
With the object and animation
selected, click the Start list
arrow in the Timing group.
Select how you want
the animation to start.
4
Change the Duration and Delay of an Animation
Select the animation
you want to modify.
Click the Up and Down arrows
in the Duration and Delay fields
to adjust the timing.
Click Preview
.
HYPERLINKING IN
PRESENTATIONS
APPLIED PRODUCTIVITY TOOLS WITH
ADVANCED APPLICATION TECHNIQUES
3. Hyperlinking in presentations
Use Case: Optimizes use of related content and
references. Applies to Word/Write documents too.
1. Select the text or graphic you
want to hyperlink.
2. Click the Insert tab.
3. Click Hyperlink.
Shortcut – Ctrl + K
1
Insert a Hyperlink
1
4. Select a linking option at the left.
 Existing File or Web Page:
Creates a link that takes you to
another file, a file created in
another program like a PowerPoint
presentation, or to a web page.
This is the most common type of
hyperlink.
 Place in This Document: Jumps
to a spot in the current
spreadsheet.
 Create New Document: Creates a
new Microsoft Excel spreadsheet
and then inserts a hyperlink to the
new file.
 E-mail Address: Creates a
clickable email address.
5. Fill in the necessary
informational fields.
6. Click OK.
Insert a Hyperlink
INTEGRATING IMAGES
AND EXTERNAL
MATERIAL IN WORD
PROCESSORS
APPLIED PRODUCTIVITY TOOLS WITH
ADVANCED APPLICATION TECHNIQUES
3. Integrating images and external material in
word processors
Use Case: Enriches textual content. Also useful in
presentation slides and sometimes in spreadsheets
1
1. Click where you want to
insert the SmartArt.
2. Click the Insert tab.
3. Click the SmartArt button in
the Illustrations group.
A dialog box opens, displaying
categories of SmartArt on the left,
styles of SmartArt graphics in the
middle, and a preview and
description of the selected SmartArt
on the right.
Insert SmartArt Diagrams
1
4. Select a category.
5. Select a graphic.
6. Click OK.
The selected SmartArt graphic is
inserted.
Each part of the graphic
contains placeholder text, ready
for you to fill it in.
Insert SmartArt Diagrams
2
1.Click the arrow on the SmartArt
graphic’s left border.
 The text pane opens, where you can
enter the text for the SmartArt
graphic.
 You can also open the text pane by
clicking the Text Pane button on the
Design tab in the SmartArt Tools
ribbon group.
2. Enter text for each bullet in the
text pane.
3. Click the text pane’s Close button
when you’re done.
3
1. Click the SmartArt shape you
want to format.
2. Click the Format tab under
SmartArt Tools.
3. Use the options in the Shape
Styles group to format each
shape.
Format SmartArt
EMBEDDED FILES
AND DATA
APPLIED PRODUCTIVITY TOOLS WITH
ADVANCED APPLICATION TECHNIQUES
5. Embedded files and data
Use Case: Seamlessly integrates related files
1
1. Click in your document where
you want to insert your picture.
2. Click the Insert tab.
3. Click Pictures button.
A file browser window
opens.
Insert a Picture
1
4. Navigate to the picture you
want to insert and select it.
Tip - To insert more than one
file at a time, press and hold
down Ctrl as you select them.
5. Click Insert button.
The selected picture is
inserted.
Insert a Picture
2
1. Click where you want to insert
your online picture.
2. Click the Online
Pictures button on the Insert tab.
From here, you can search
for pictures using Bing
Image Search, or browse
your OneDrive account for
something to use.
Insert an Online Picture
2
3. Enter keyword text into the search
field and press Enter.
You can click the Filter button below
the search field to refine your
search.
Size: Choose how big you want
the image to be, from a small
thumbnail to an extra-large
image.
Type: You can search for a
photograph, clipart, line
drawings, animations, or images
with transparent backgrounds.
Color: Select a color to show
images that primarily feature
that color.
Layout: Search for square, wide,
or tall images.
4. Select the picture you wish to use.
5. Click the Insert button.
Insert an Online Picture
3
1.Select the picture.
2.Click the Format tab in the
Picture Tools ribbon group.
3.Click the Crop button.
Crop handles appear on the sides
and corners of the image.
4.Click and drag the crop handles
where you want to crop.
Tip- crop all four sides of a picture
or graphic at once while
maintaining the graphic’s
proportions, press and hold
down Ctrl as you drag the handles.
5.Click the Crop button again
when you’re finished setting the
crop area.
Crop a Picture
4
1. Click the Quick
Styles button on the
Format tab.
2. Select a style.
Use Picture Styles
5
1.With the picture selected, click
the Artistic Effects list arrow on
the Format tab in the Picture Tools
ribbon group.
Thumbnails for the available
artistic effects appear, with
emulated pencil sketch styles,
paint styles, and texture effects.
2. Select an effect from the list.
Use Artistic Effects
THAT WILL BE FOR
TODAY. THANK YOU!

GROUP 1.pptx

  • 1.
  • 2.
    APPLIED PRODUCTIVITY TOOLS WITHADVANCED APPLICATION TECHNIQUES
  • 3.
    APPLIED PRODUCTIVITY TOOLSWITH ADVANCED APPLICATION TECHNIQUES Take Note: Productivity tools are used to organize, manipulate, shape and present ideas in a creative and efficient way.
  • 4.
    What are theapplied productivity tools in empowerment technology?
  • 5.
    Is Microsoft Worda productivity tool? Yes From notes to newsletters, Word has always been the right tool for the job. With live editing, sharing, and cloud- based document storage, Word has become an even better version.
  • 6.
    Is Microsoft Excela productivity tool? Yes Microsoft has introduced artificial intelligence to Excel, giving users unparalleled insight into data analytics that helps collect and inform users to help better plan for the future.
  • 7.
    Is Microsoft Worda productivity tool? Yes Microsoft PowerPoint provides the tools that you need to create beautiful, informative slides to inform, entertain, and share with your audience.
  • 8.
    Examples of ProductivityTools 1. Word Processors 2. Databases 3. Spreadsheets 4. Multimedia Tools
  • 9.
    ADVANCED TOOLS ANDTECHNIQUES 1.Mail merge and label generation 2.Custom animations and timing 3.Hyperlinking in presentations 4.Integrating images and external material in word processors 5.Embedded files and data
  • 10.
  • 11.
    APPLIED PRODUCTIVITY TOOLSWITH ADVANCED APPLICATION TECHNIQUES 1. Mail merge and label generation Use Case: Mass email or printer letters
  • 12.
    1 Set up andChoose Document Type Click the Mailings tab. Click the Start Mail Merge button. Select Step-by-Step Mail Merge Wizard. Select a type of document to create. Click Next: Starting document.
  • 13.
    2 Select Document Select astarting document. Click Next: Select recipients.
  • 14.
    3 Select Recipients Select Usean existing list. Click Browse.
  • 15.
  • 16.
    3 Select Recipients Make surethe right recipients are selected and click OK. Click Next: Write your letter.
  • 17.
    4 Write Your Letter Clickwhere you want the information. Select one of the placeholder options.
  • 18.
    4 Write Your Letter Customizethe placeholder. Click OK. Click Next: Preview your letters.
  • 19.
    5 Preview Your MailMerge Use the arrow buttons in the Mail Merge pane to preview each merged document. Click Next: Complete the merge.
  • 20.
    6 Complete the Merge Selectthe option you want to use to finish the mail merge. Select the records you want to merge. Click OK.
  • 21.
  • 22.
    APPLIED PRODUCTIVITY TOOLSWITH ADVANCED APPLICATION TECHNIQUES 2. Custom Animations and Timing Use Case: Adds a visual aspect to your presentation and can create focus on specific terms.
  • 23.
    1 Display the animationsplane (Optional) If some of the animations are grouped together, click the Expand Contents button to view them all. Click the Animation Pane button. Click the Animations tab.
  • 24.
    2 Reorder Animations Select theanimation you want to reorder. Click Move Earlier or Move Later in the Timing group. Click Preview.
  • 25.
    3 Change How anAnimation Starts With the object and animation selected, click the Start list arrow in the Timing group. Select how you want the animation to start.
  • 26.
    4 Change the Durationand Delay of an Animation Select the animation you want to modify. Click the Up and Down arrows in the Duration and Delay fields to adjust the timing. Click Preview .
  • 27.
  • 28.
    APPLIED PRODUCTIVITY TOOLSWITH ADVANCED APPLICATION TECHNIQUES 3. Hyperlinking in presentations Use Case: Optimizes use of related content and references. Applies to Word/Write documents too.
  • 29.
    1. Select thetext or graphic you want to hyperlink. 2. Click the Insert tab. 3. Click Hyperlink. Shortcut – Ctrl + K 1 Insert a Hyperlink
  • 30.
    1 4. Select alinking option at the left.  Existing File or Web Page: Creates a link that takes you to another file, a file created in another program like a PowerPoint presentation, or to a web page. This is the most common type of hyperlink.  Place in This Document: Jumps to a spot in the current spreadsheet.  Create New Document: Creates a new Microsoft Excel spreadsheet and then inserts a hyperlink to the new file.  E-mail Address: Creates a clickable email address. 5. Fill in the necessary informational fields. 6. Click OK. Insert a Hyperlink
  • 31.
  • 32.
    APPLIED PRODUCTIVITY TOOLSWITH ADVANCED APPLICATION TECHNIQUES 3. Integrating images and external material in word processors Use Case: Enriches textual content. Also useful in presentation slides and sometimes in spreadsheets
  • 33.
    1 1. Click whereyou want to insert the SmartArt. 2. Click the Insert tab. 3. Click the SmartArt button in the Illustrations group. A dialog box opens, displaying categories of SmartArt on the left, styles of SmartArt graphics in the middle, and a preview and description of the selected SmartArt on the right. Insert SmartArt Diagrams
  • 34.
    1 4. Select acategory. 5. Select a graphic. 6. Click OK. The selected SmartArt graphic is inserted. Each part of the graphic contains placeholder text, ready for you to fill it in. Insert SmartArt Diagrams
  • 35.
    2 1.Click the arrowon the SmartArt graphic’s left border.  The text pane opens, where you can enter the text for the SmartArt graphic.  You can also open the text pane by clicking the Text Pane button on the Design tab in the SmartArt Tools ribbon group. 2. Enter text for each bullet in the text pane. 3. Click the text pane’s Close button when you’re done.
  • 36.
    3 1. Click theSmartArt shape you want to format. 2. Click the Format tab under SmartArt Tools. 3. Use the options in the Shape Styles group to format each shape. Format SmartArt
  • 37.
  • 38.
    APPLIED PRODUCTIVITY TOOLSWITH ADVANCED APPLICATION TECHNIQUES 5. Embedded files and data Use Case: Seamlessly integrates related files
  • 39.
    1 1. Click inyour document where you want to insert your picture. 2. Click the Insert tab. 3. Click Pictures button. A file browser window opens. Insert a Picture
  • 40.
    1 4. Navigate tothe picture you want to insert and select it. Tip - To insert more than one file at a time, press and hold down Ctrl as you select them. 5. Click Insert button. The selected picture is inserted. Insert a Picture
  • 41.
    2 1. Click whereyou want to insert your online picture. 2. Click the Online Pictures button on the Insert tab. From here, you can search for pictures using Bing Image Search, or browse your OneDrive account for something to use. Insert an Online Picture
  • 42.
    2 3. Enter keywordtext into the search field and press Enter. You can click the Filter button below the search field to refine your search. Size: Choose how big you want the image to be, from a small thumbnail to an extra-large image. Type: You can search for a photograph, clipart, line drawings, animations, or images with transparent backgrounds. Color: Select a color to show images that primarily feature that color. Layout: Search for square, wide, or tall images. 4. Select the picture you wish to use. 5. Click the Insert button. Insert an Online Picture
  • 43.
    3 1.Select the picture. 2.Clickthe Format tab in the Picture Tools ribbon group. 3.Click the Crop button. Crop handles appear on the sides and corners of the image. 4.Click and drag the crop handles where you want to crop. Tip- crop all four sides of a picture or graphic at once while maintaining the graphic’s proportions, press and hold down Ctrl as you drag the handles. 5.Click the Crop button again when you’re finished setting the crop area. Crop a Picture
  • 44.
    4 1. Click theQuick Styles button on the Format tab. 2. Select a style. Use Picture Styles
  • 45.
    5 1.With the pictureselected, click the Artistic Effects list arrow on the Format tab in the Picture Tools ribbon group. Thumbnails for the available artistic effects appear, with emulated pencil sketch styles, paint styles, and texture effects. 2. Select an effect from the list. Use Artistic Effects
  • 46.
    THAT WILL BEFOR TODAY. THANK YOU!