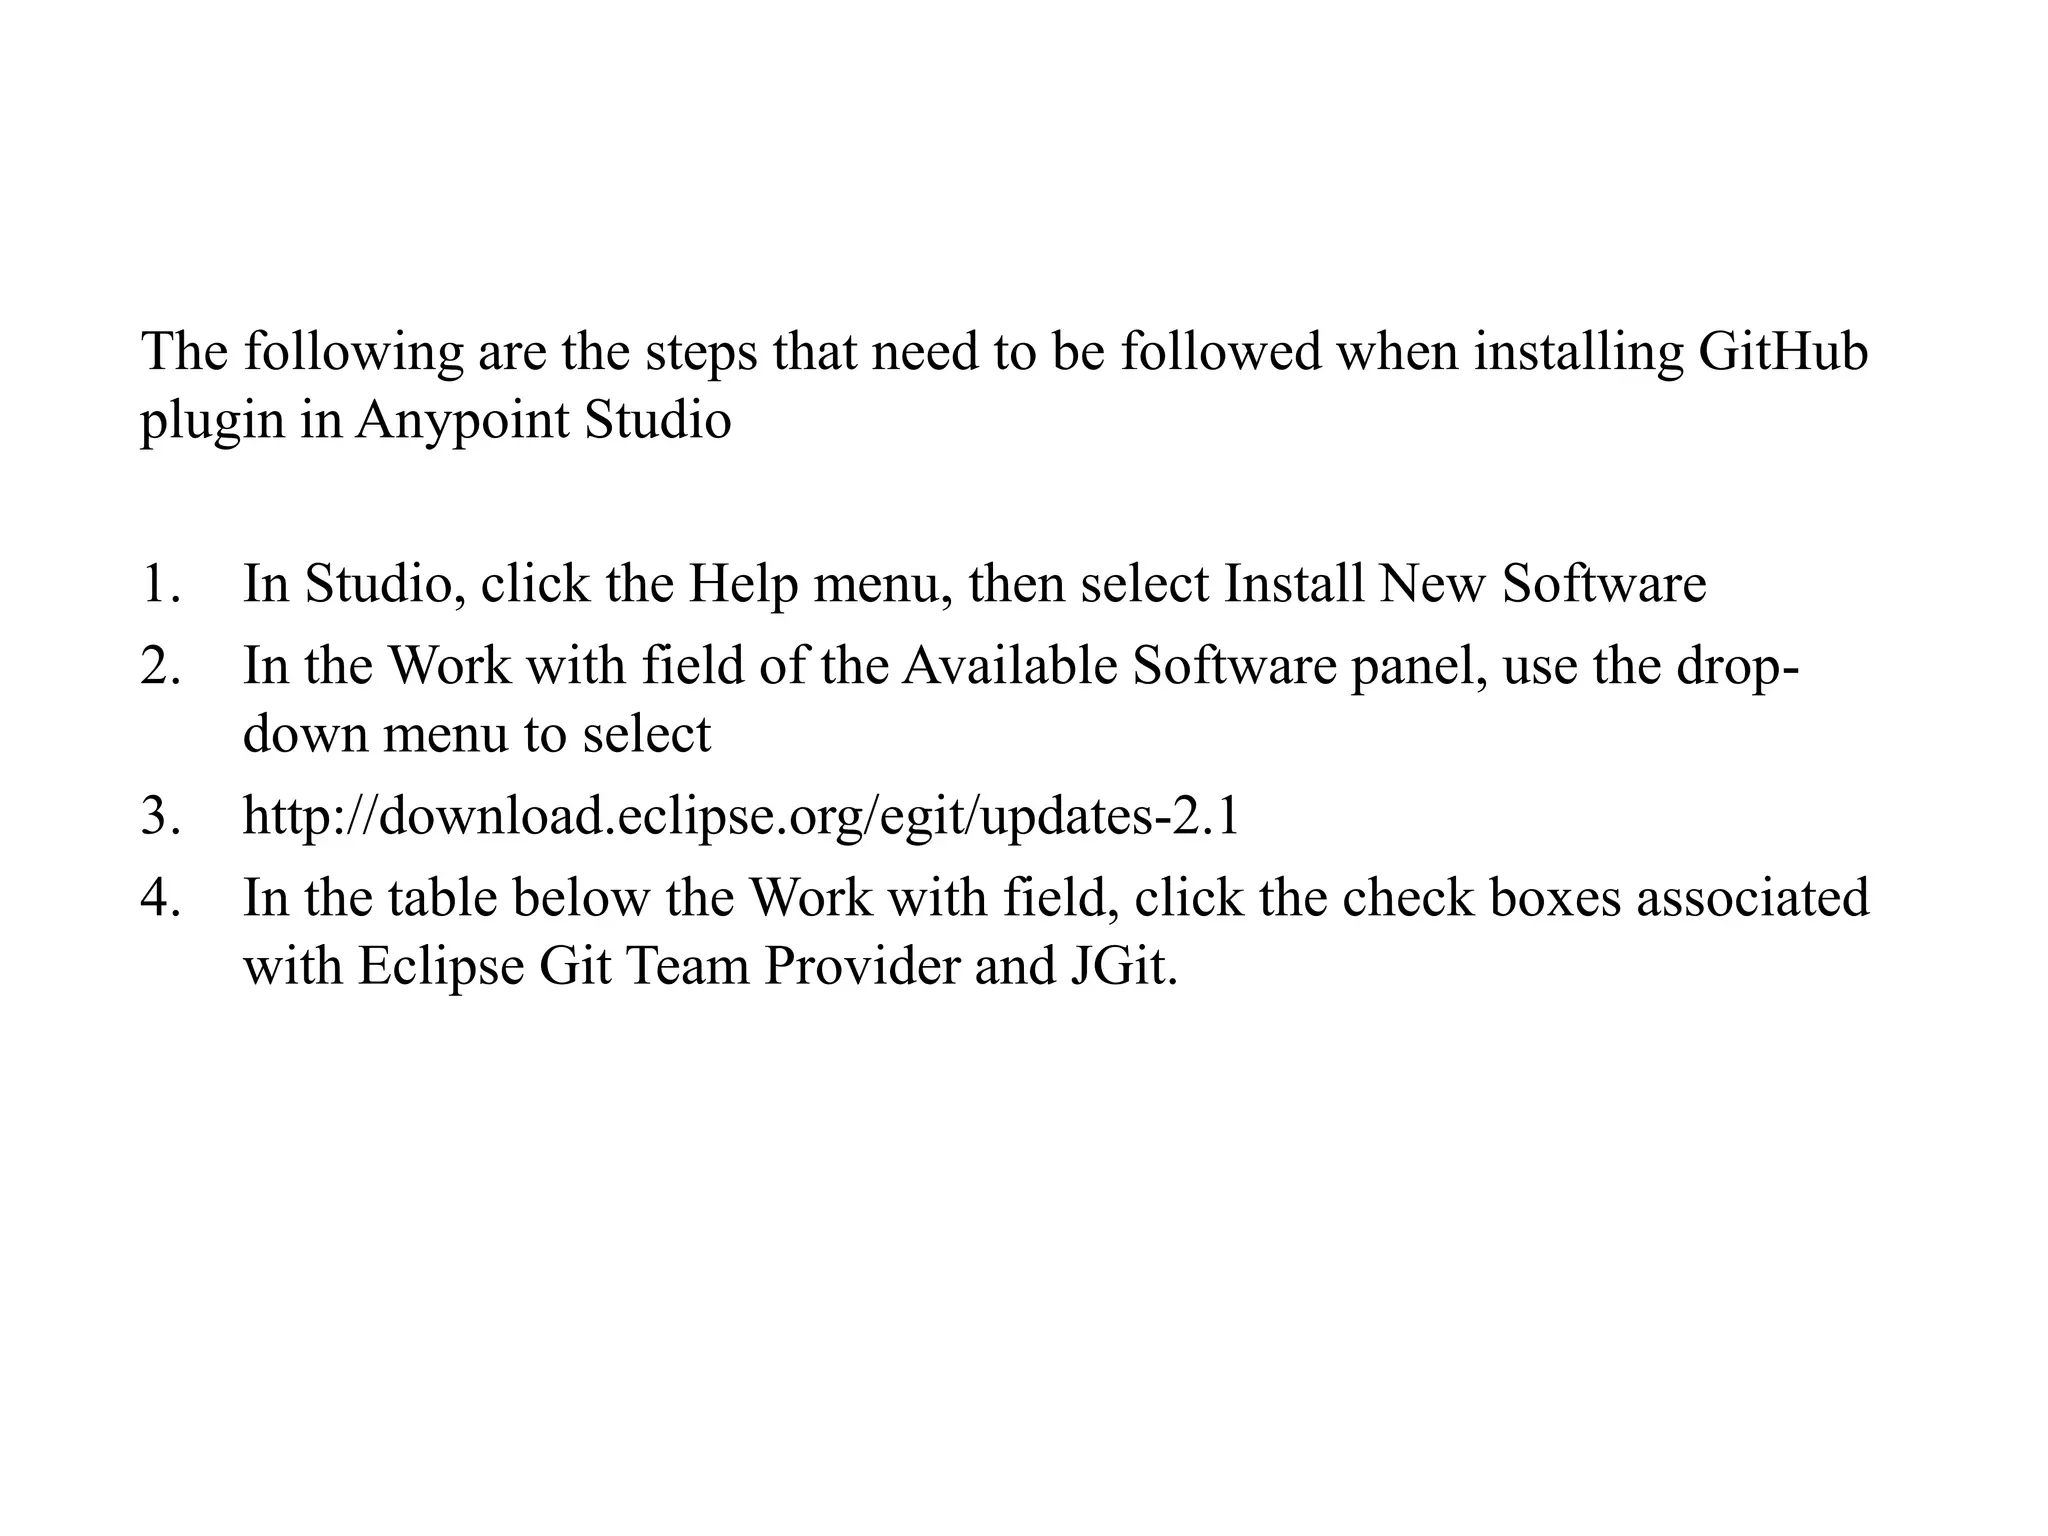
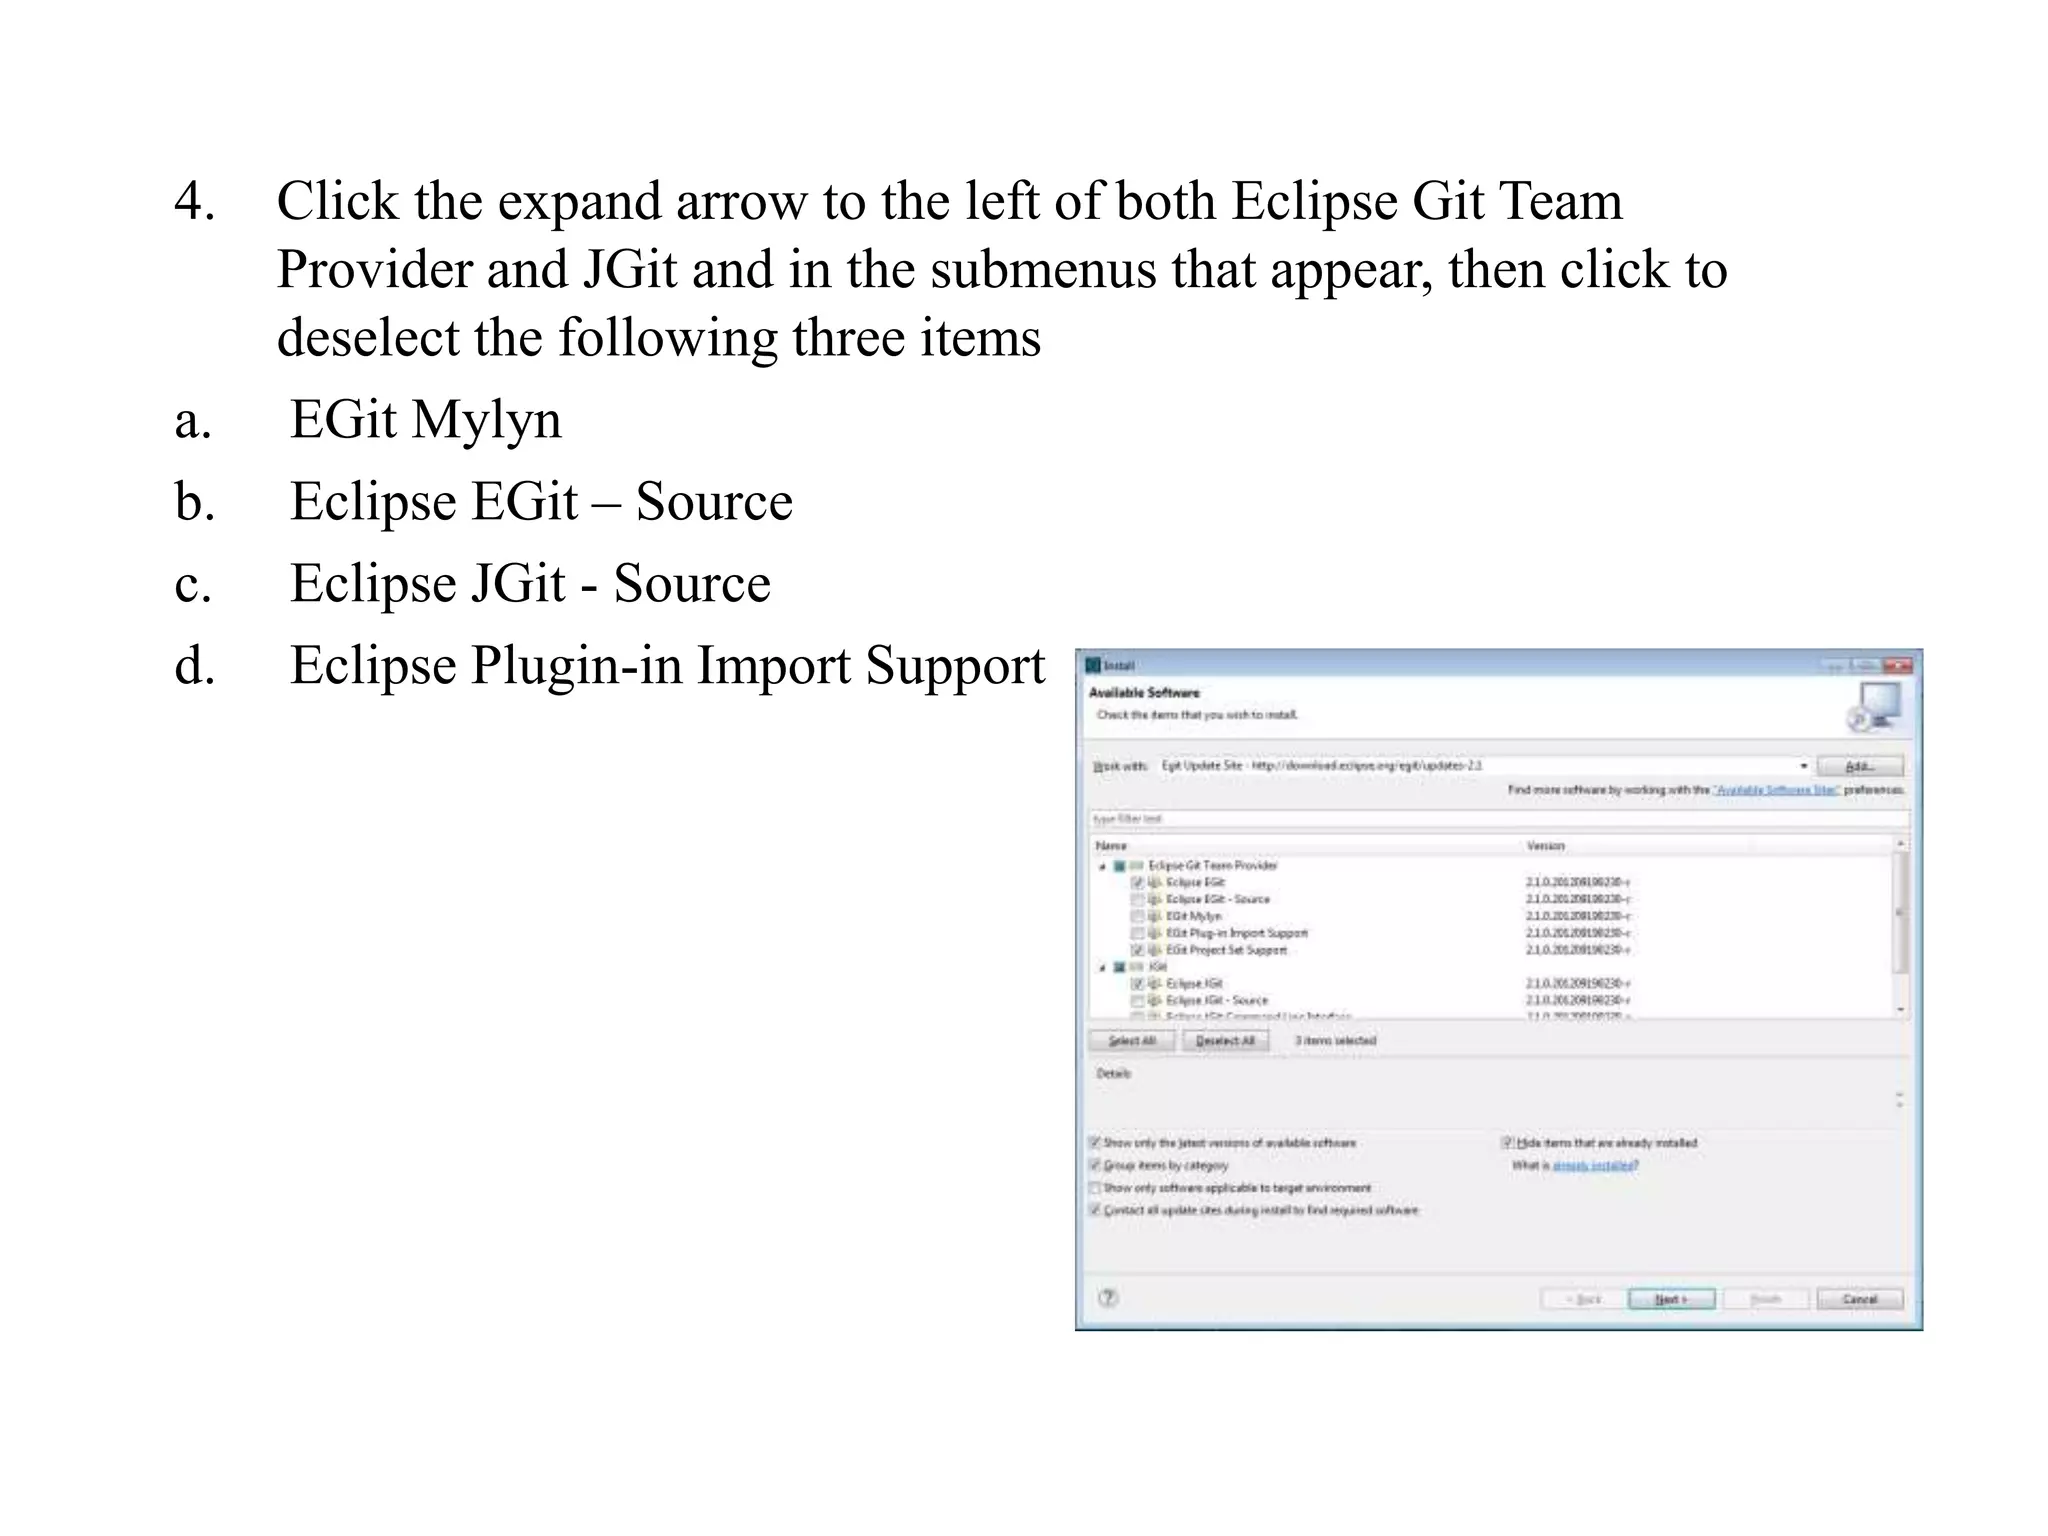
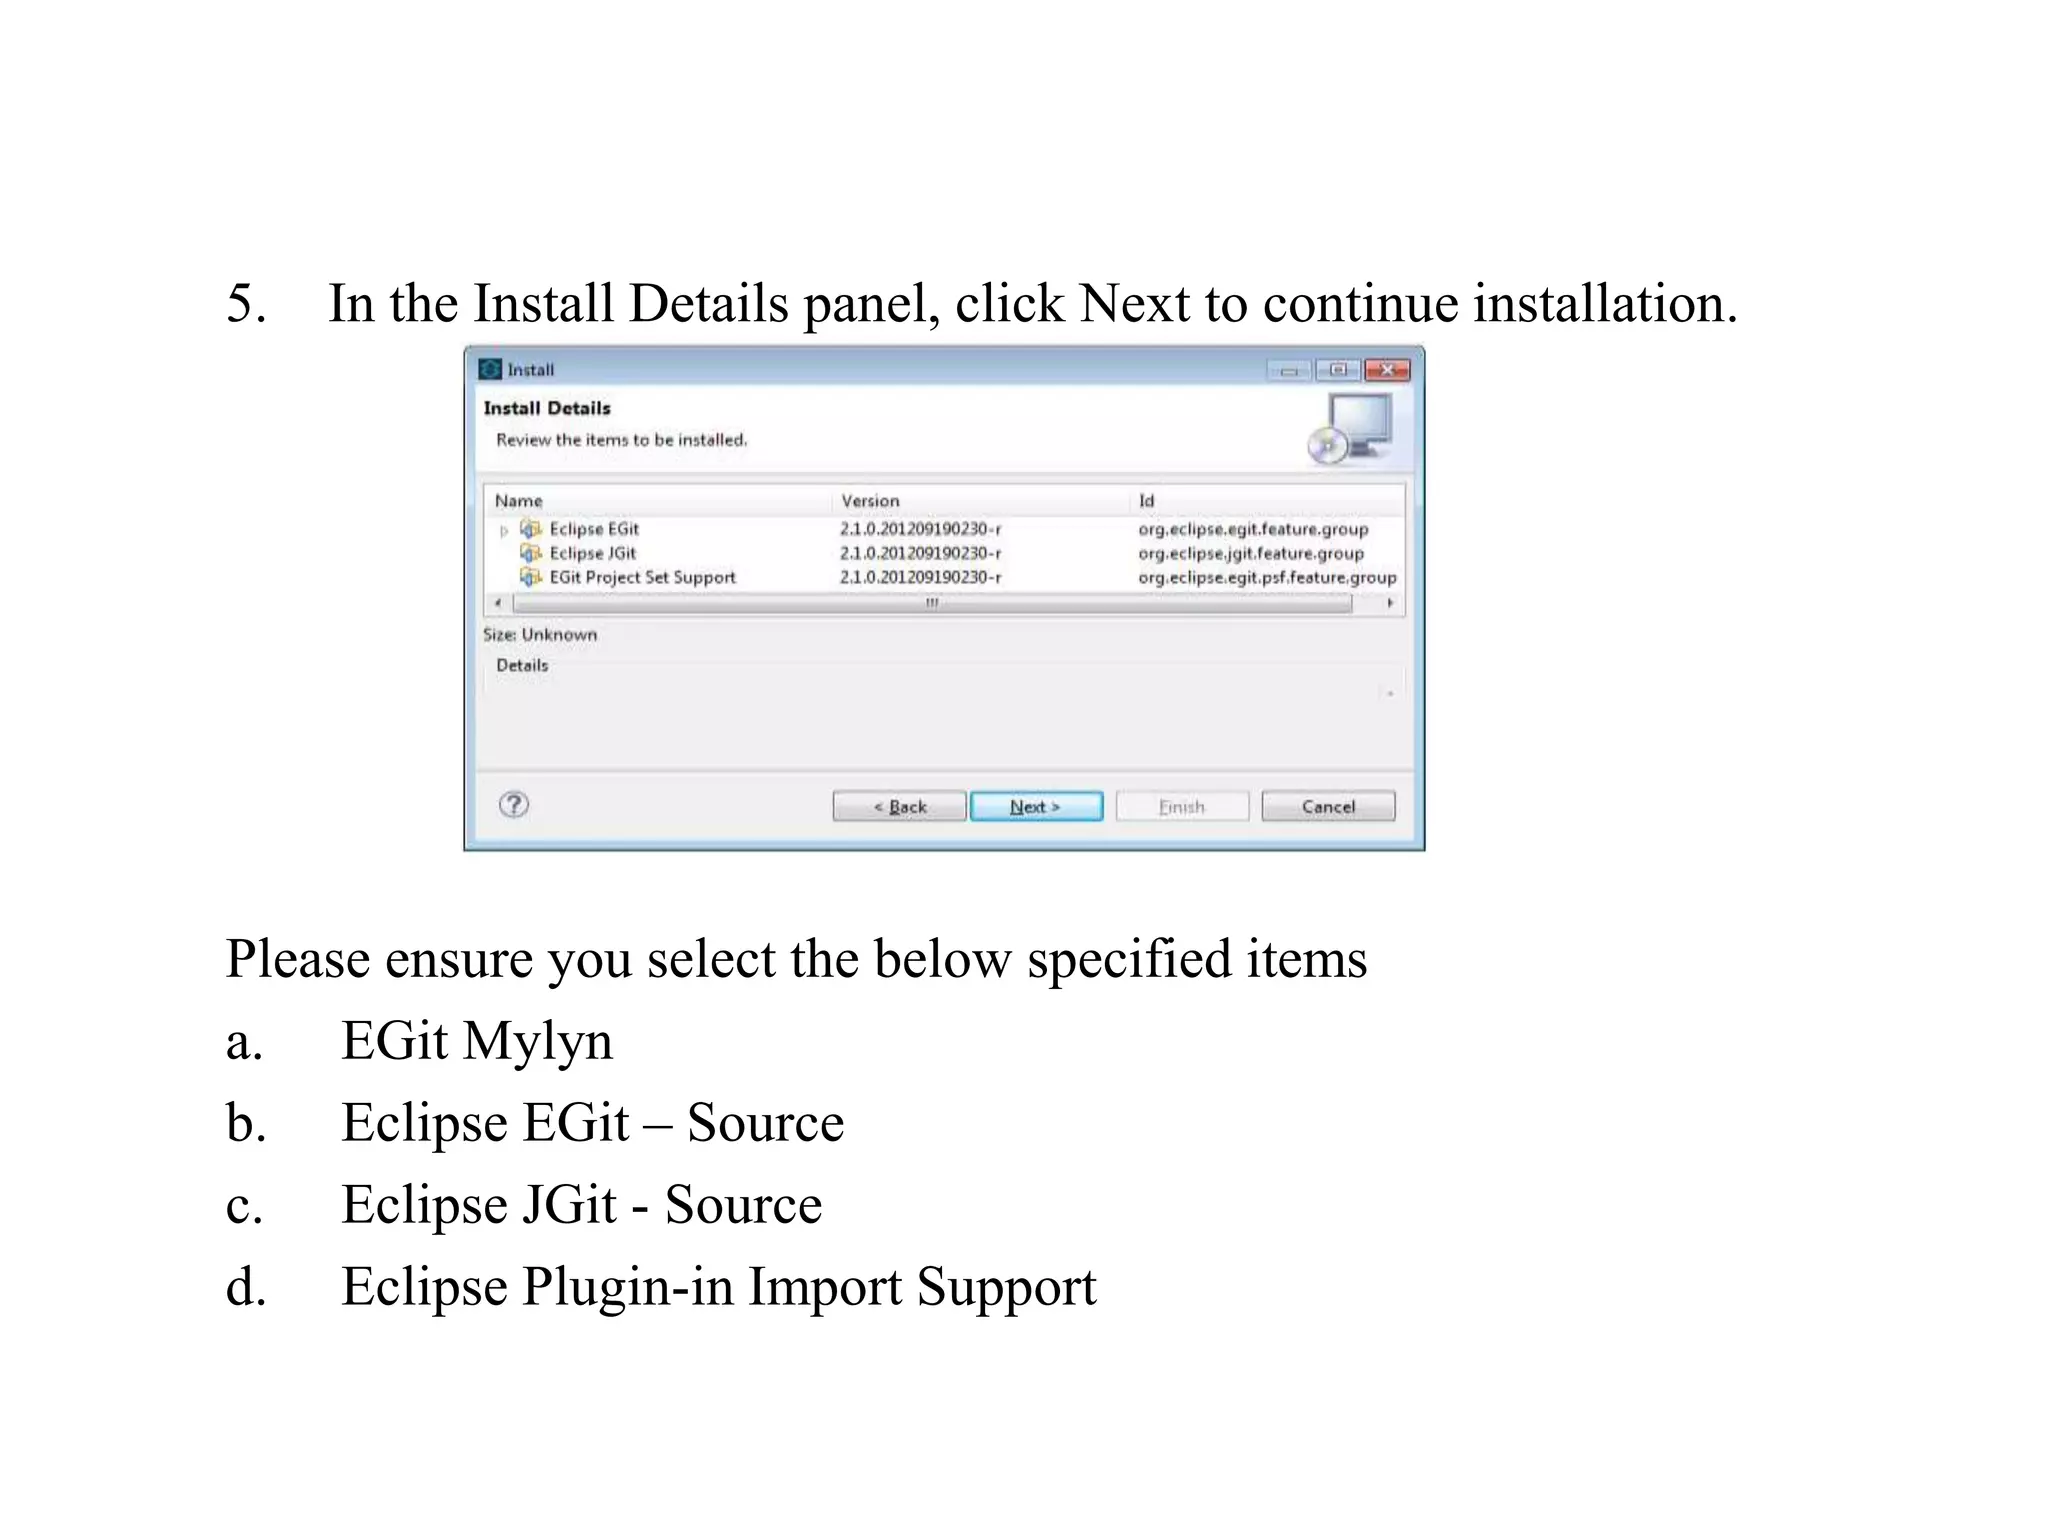
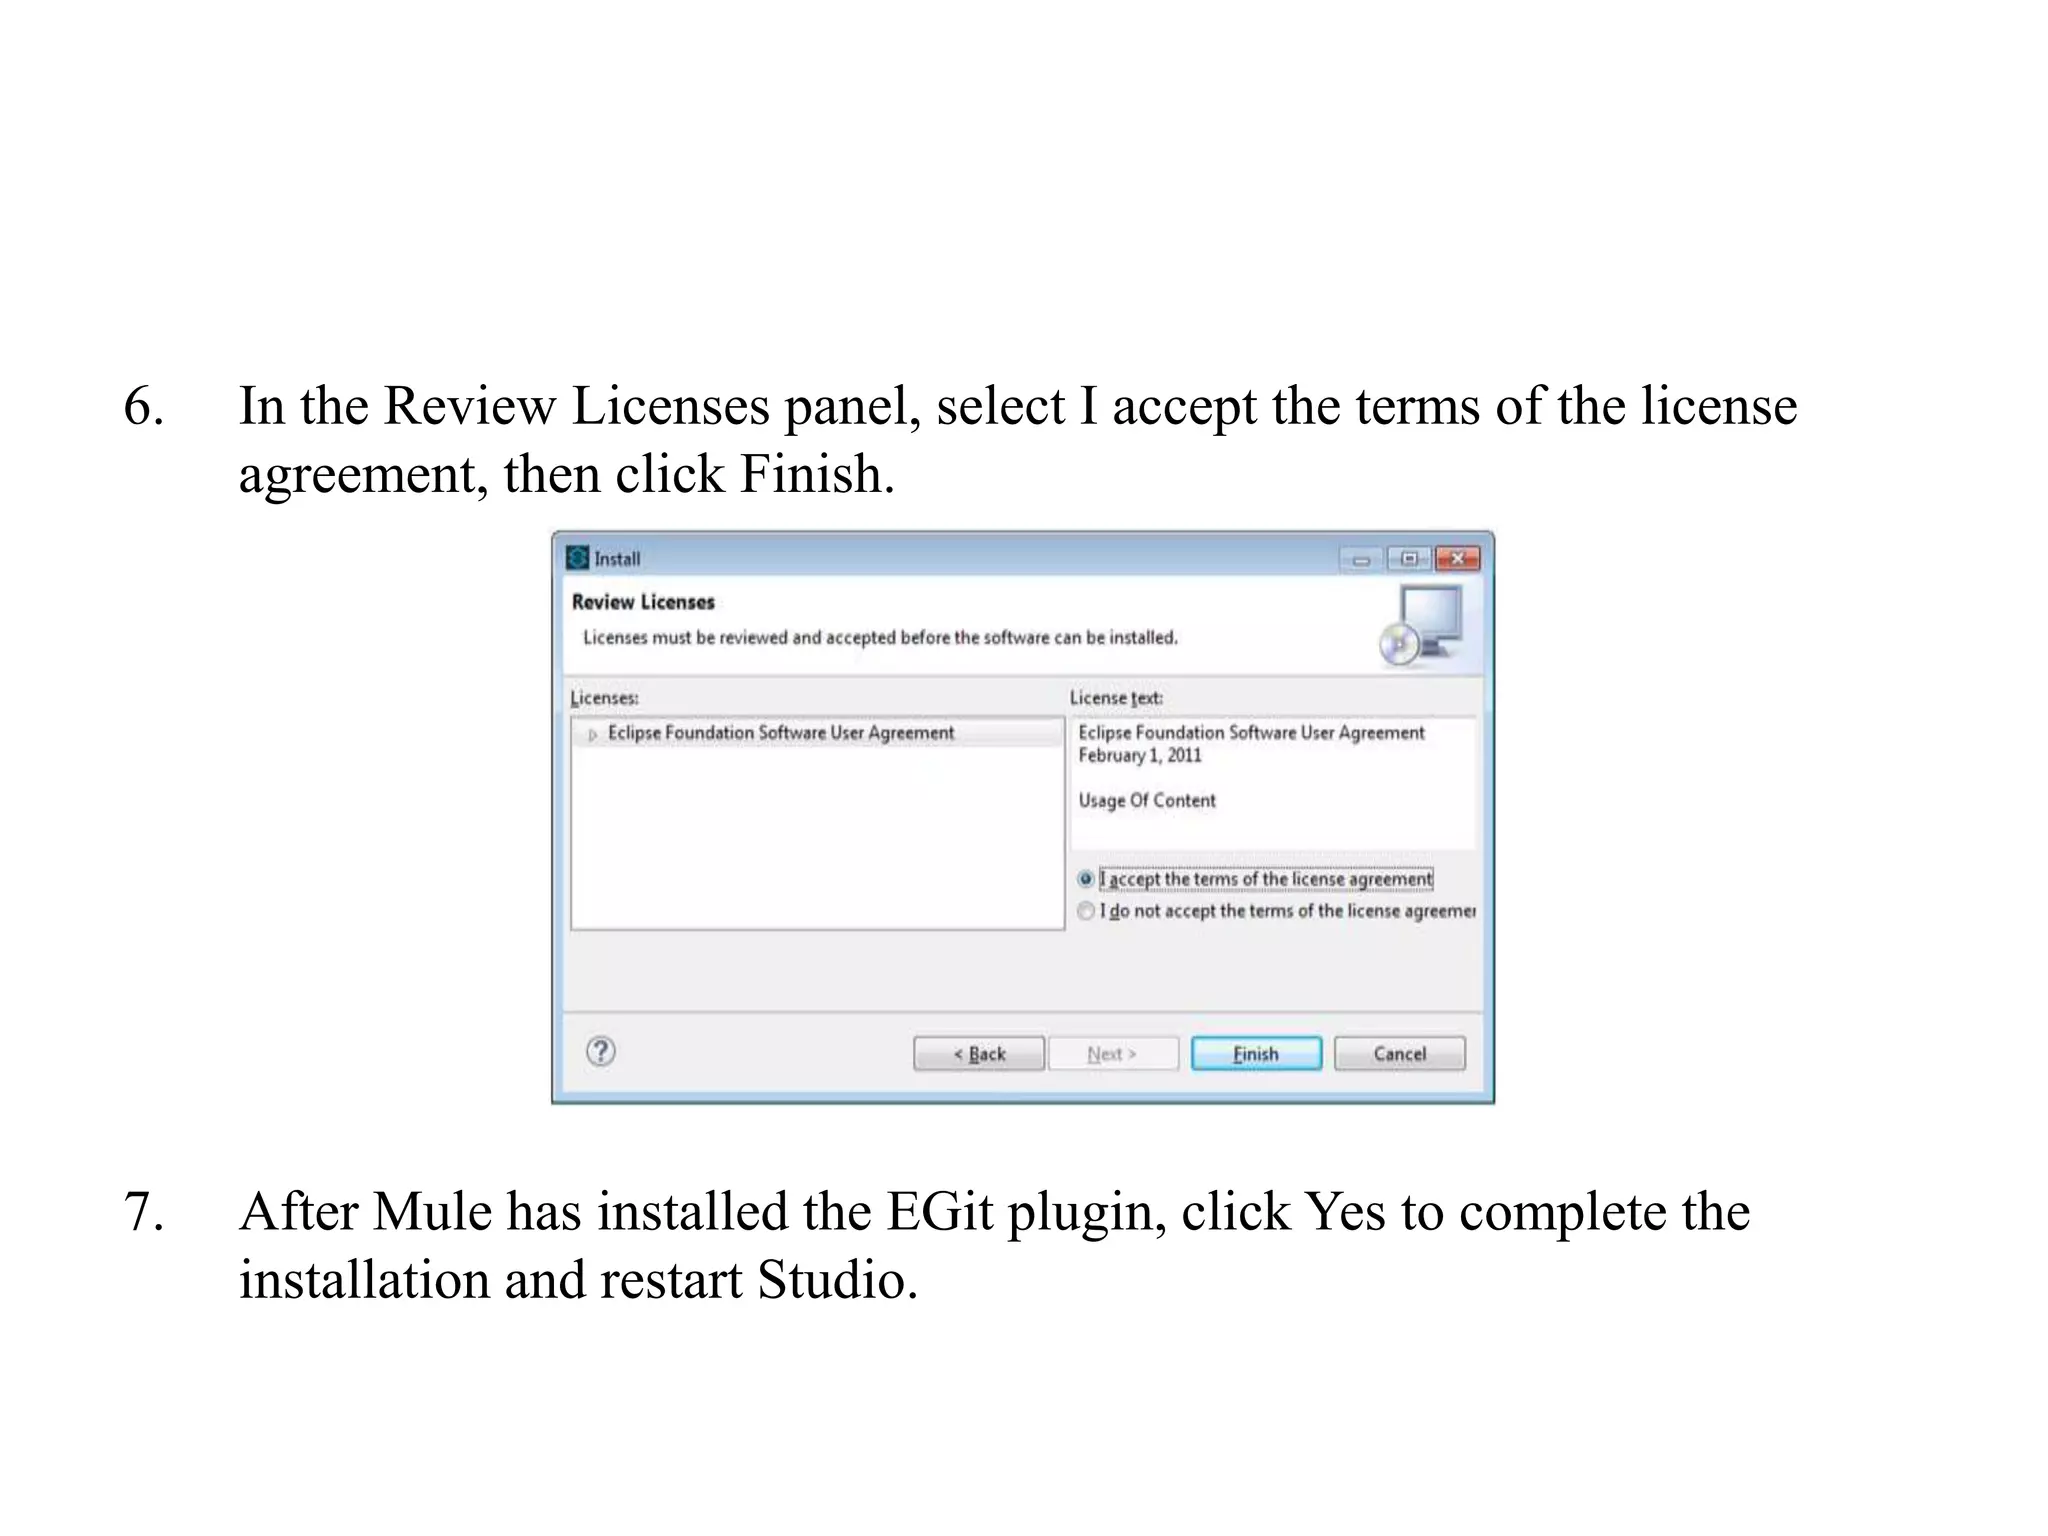
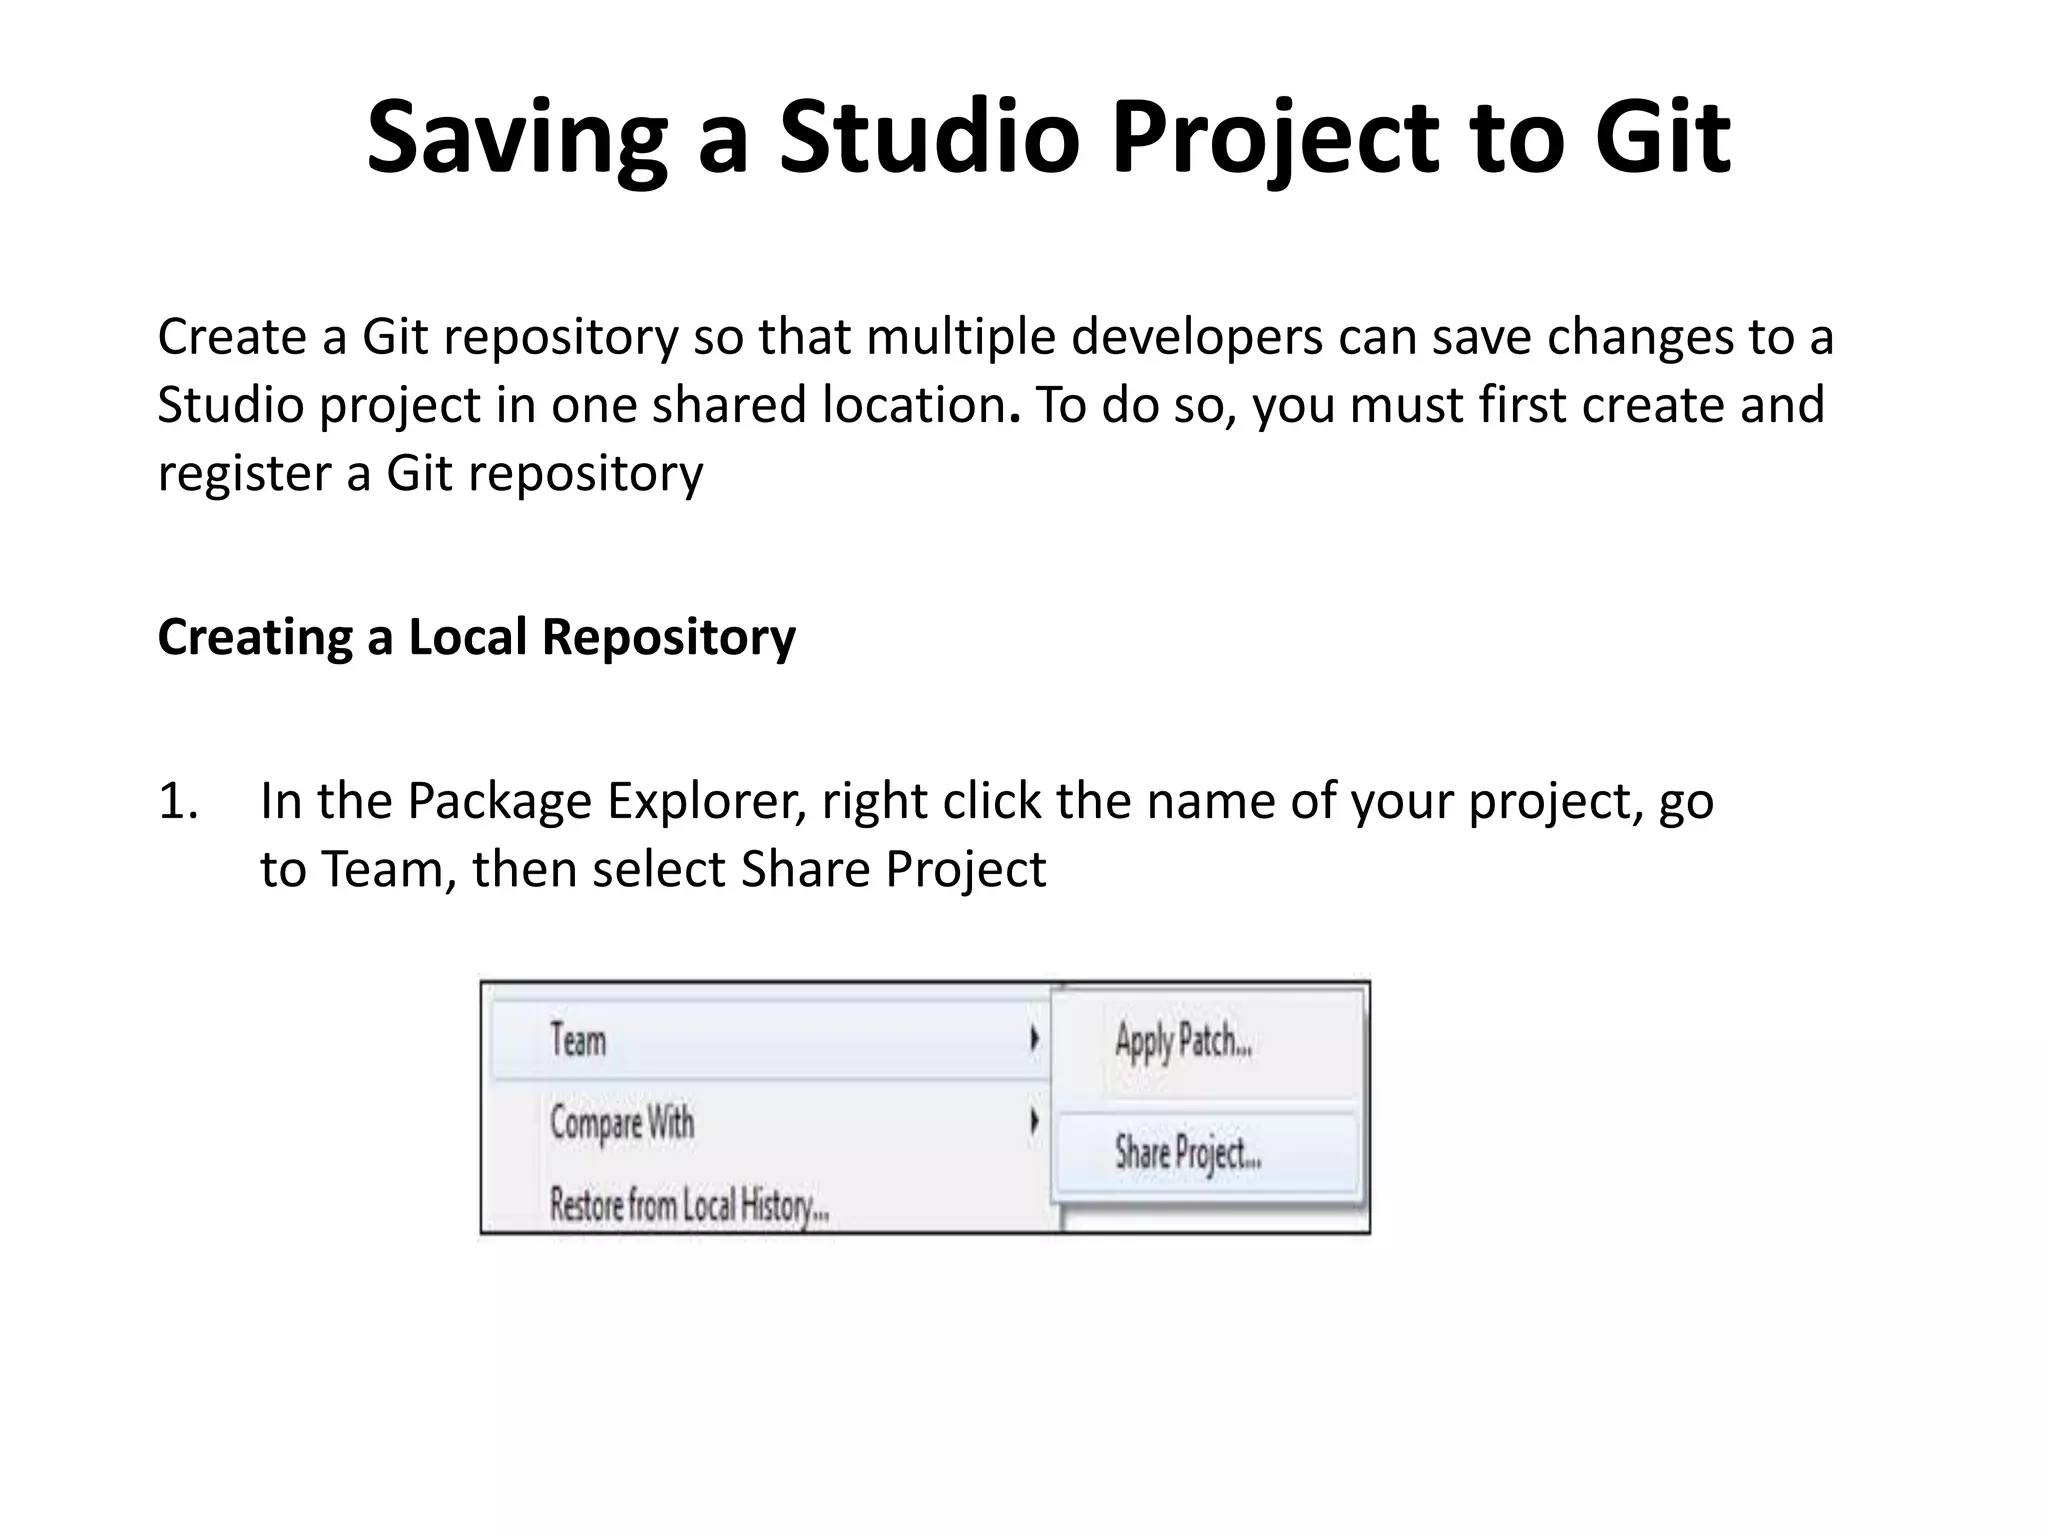
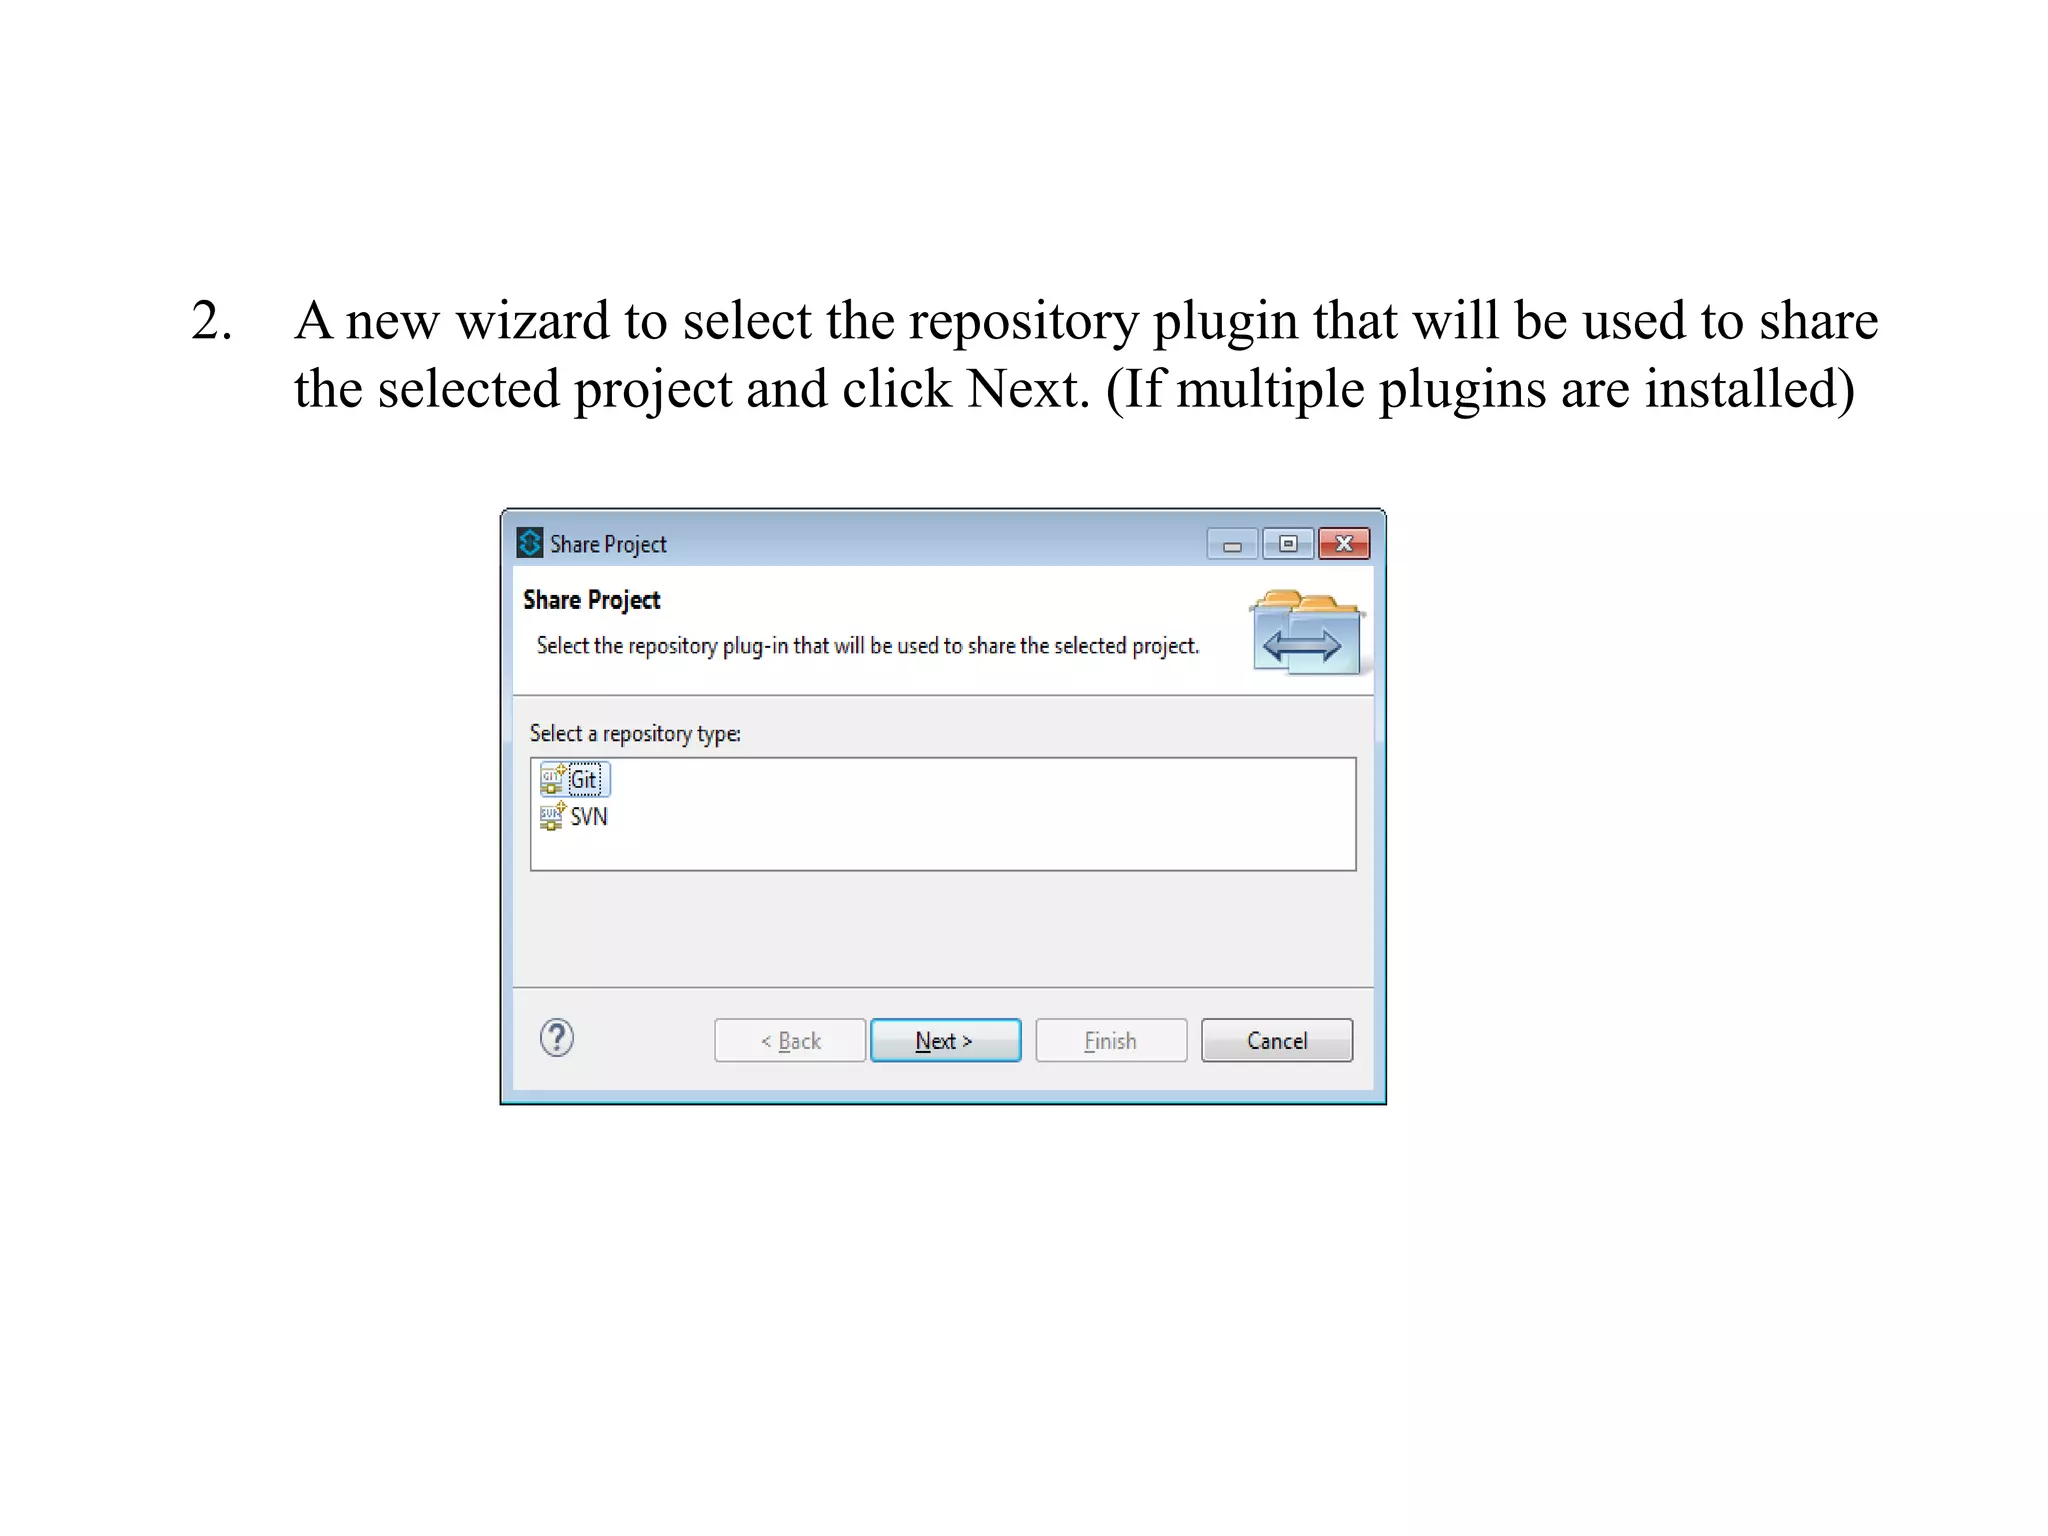
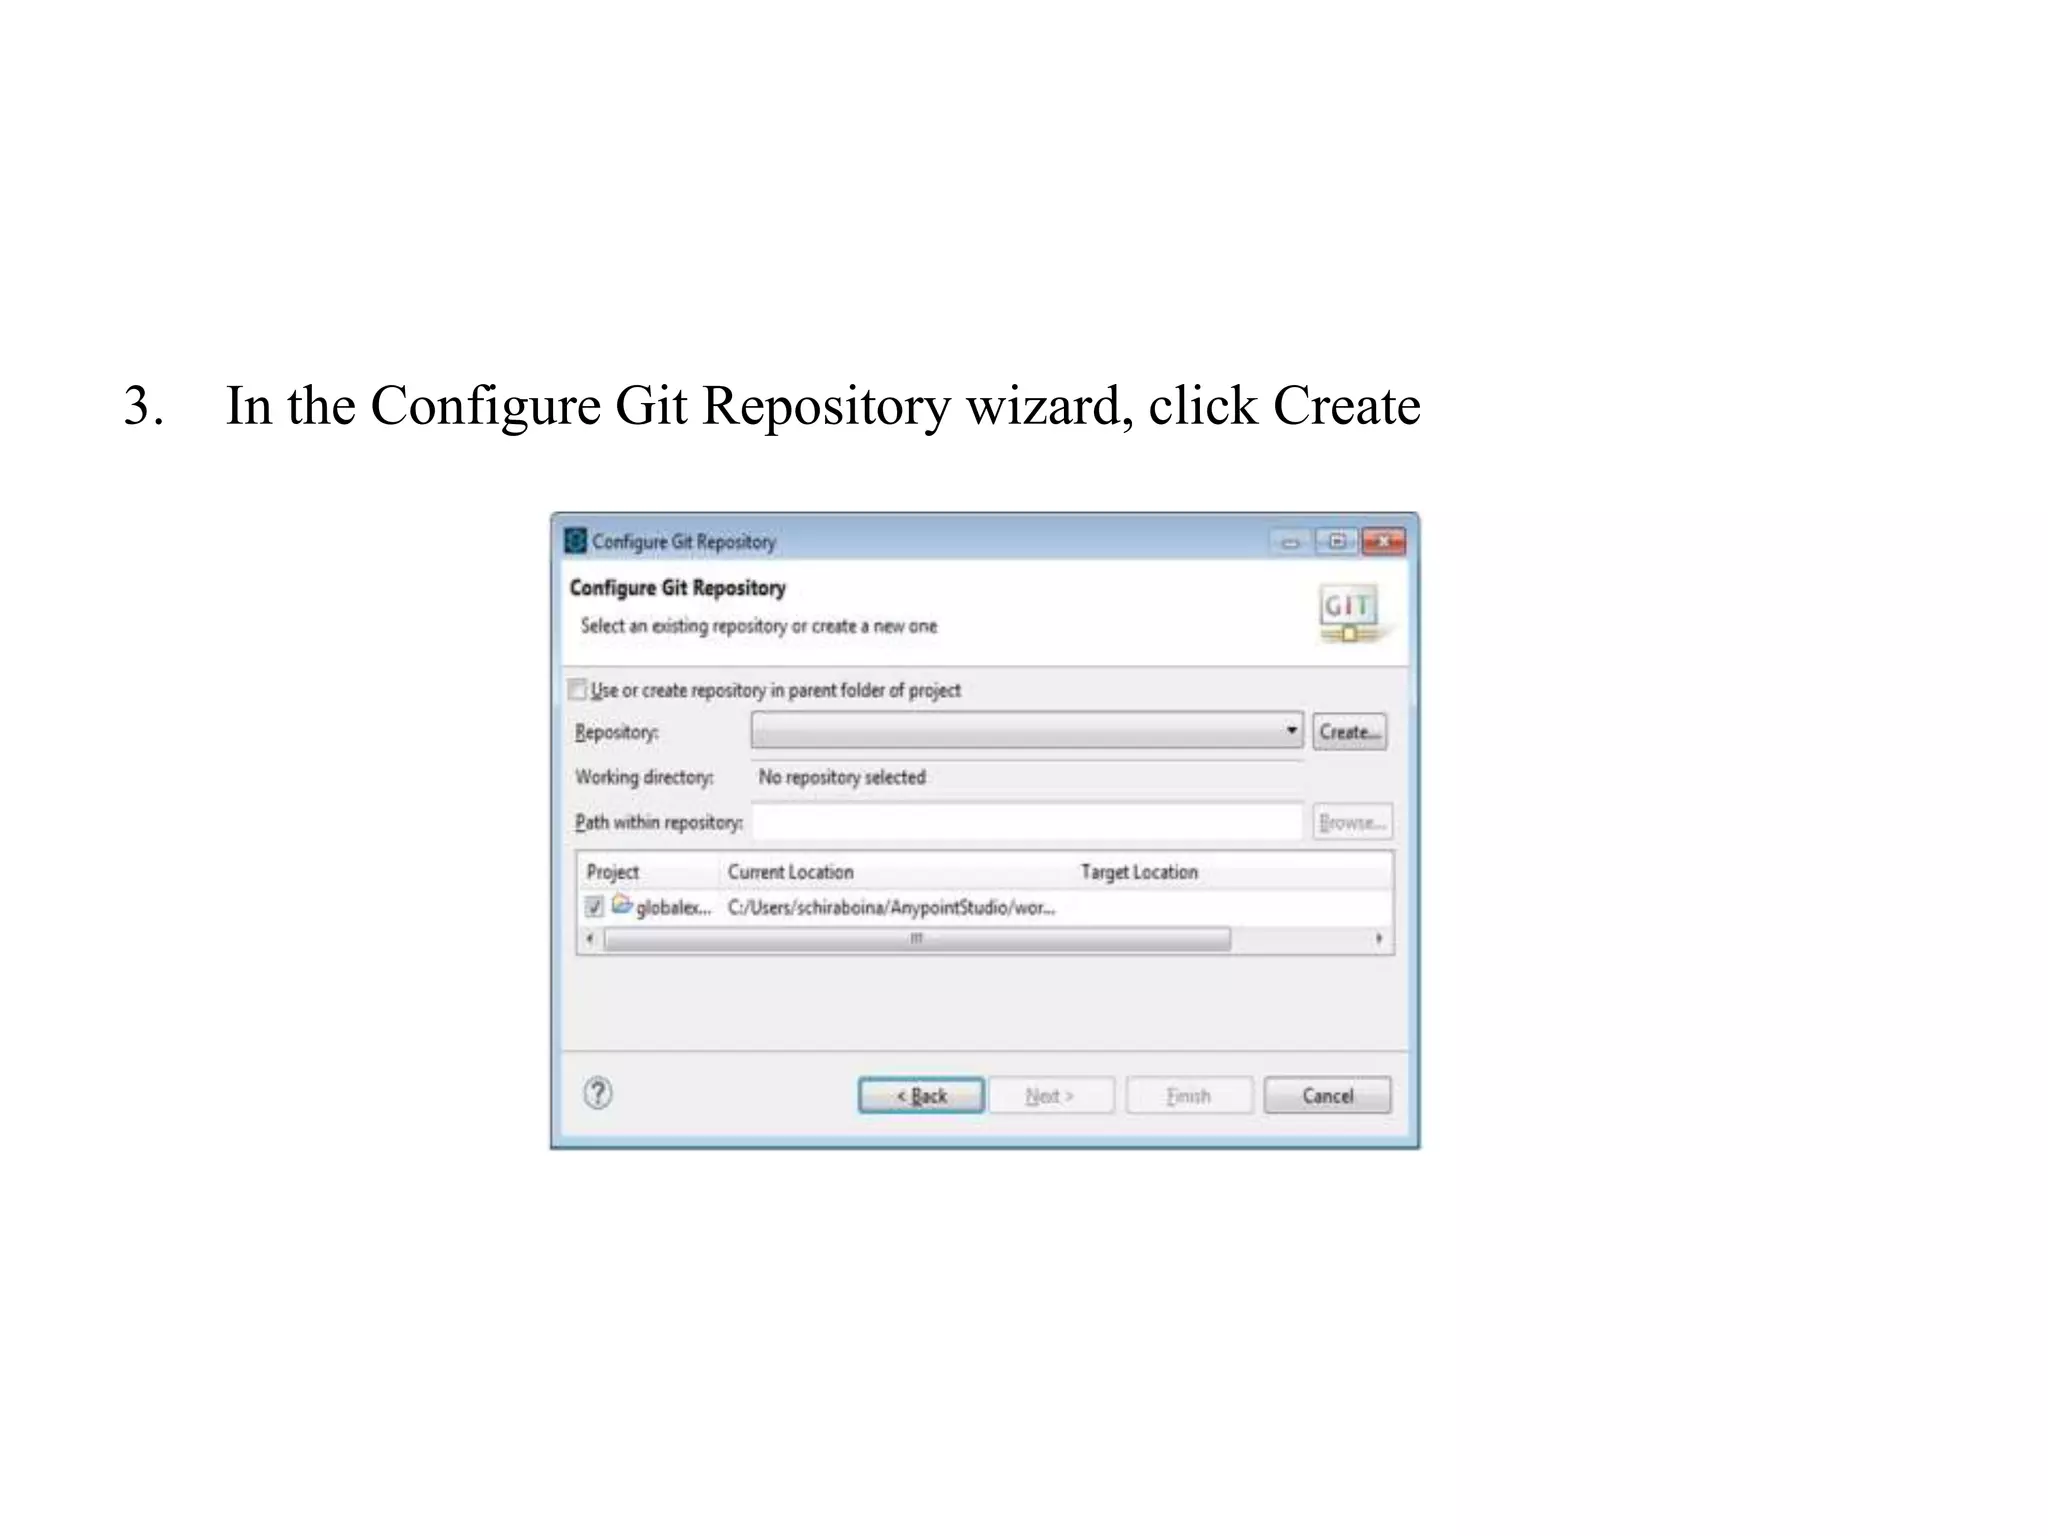
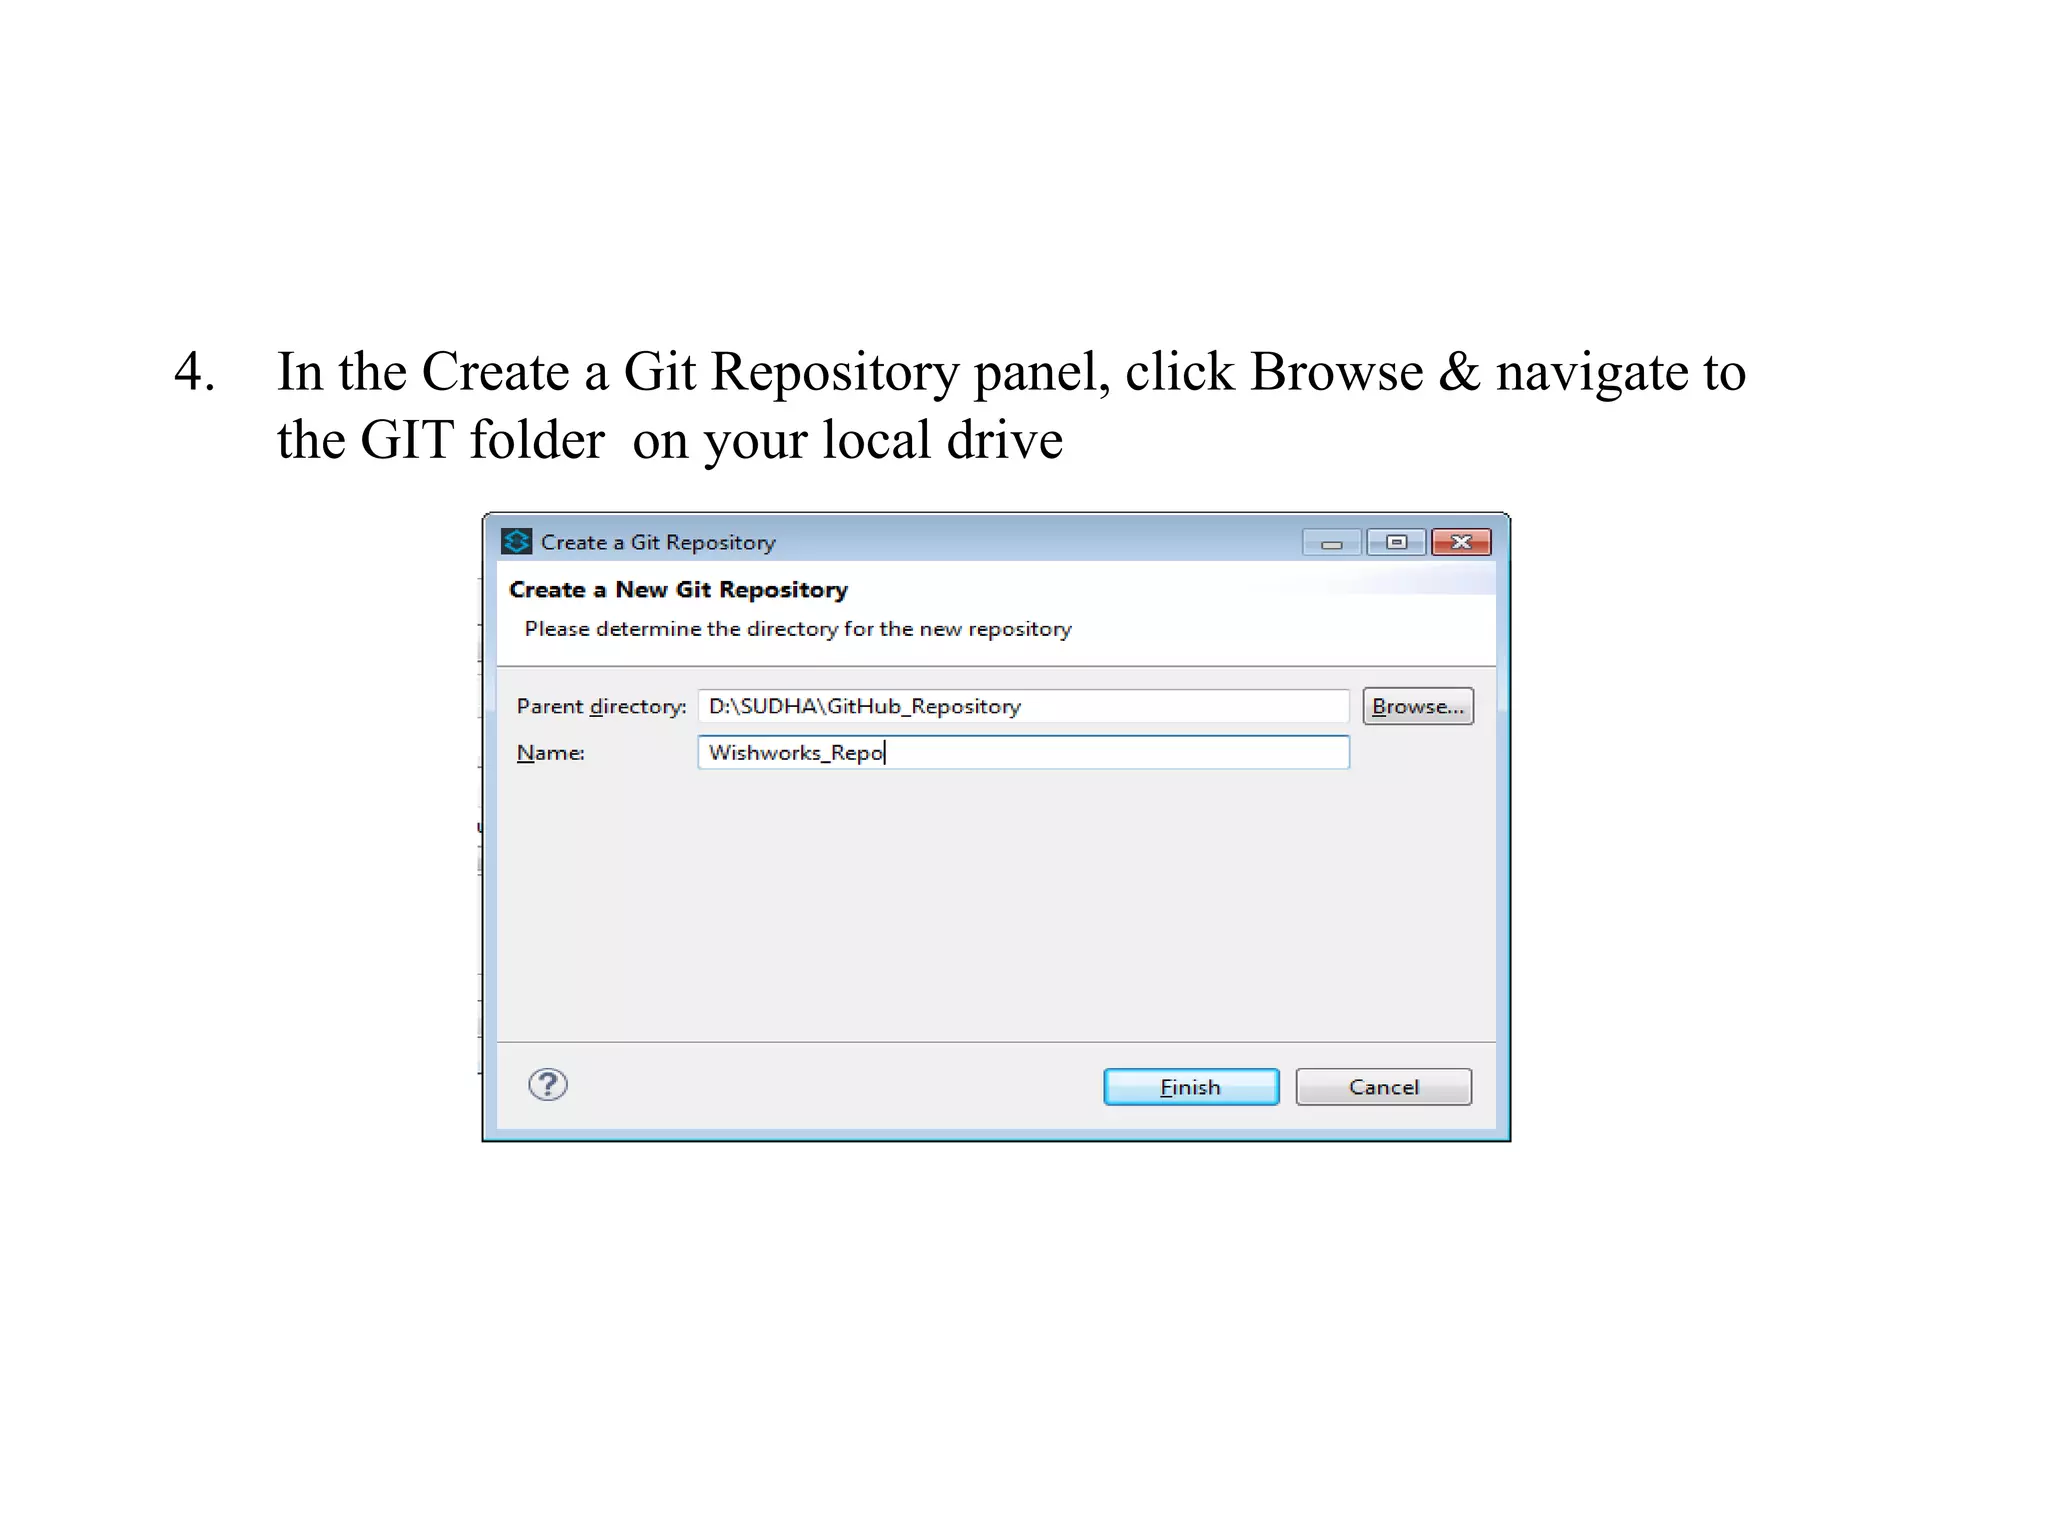
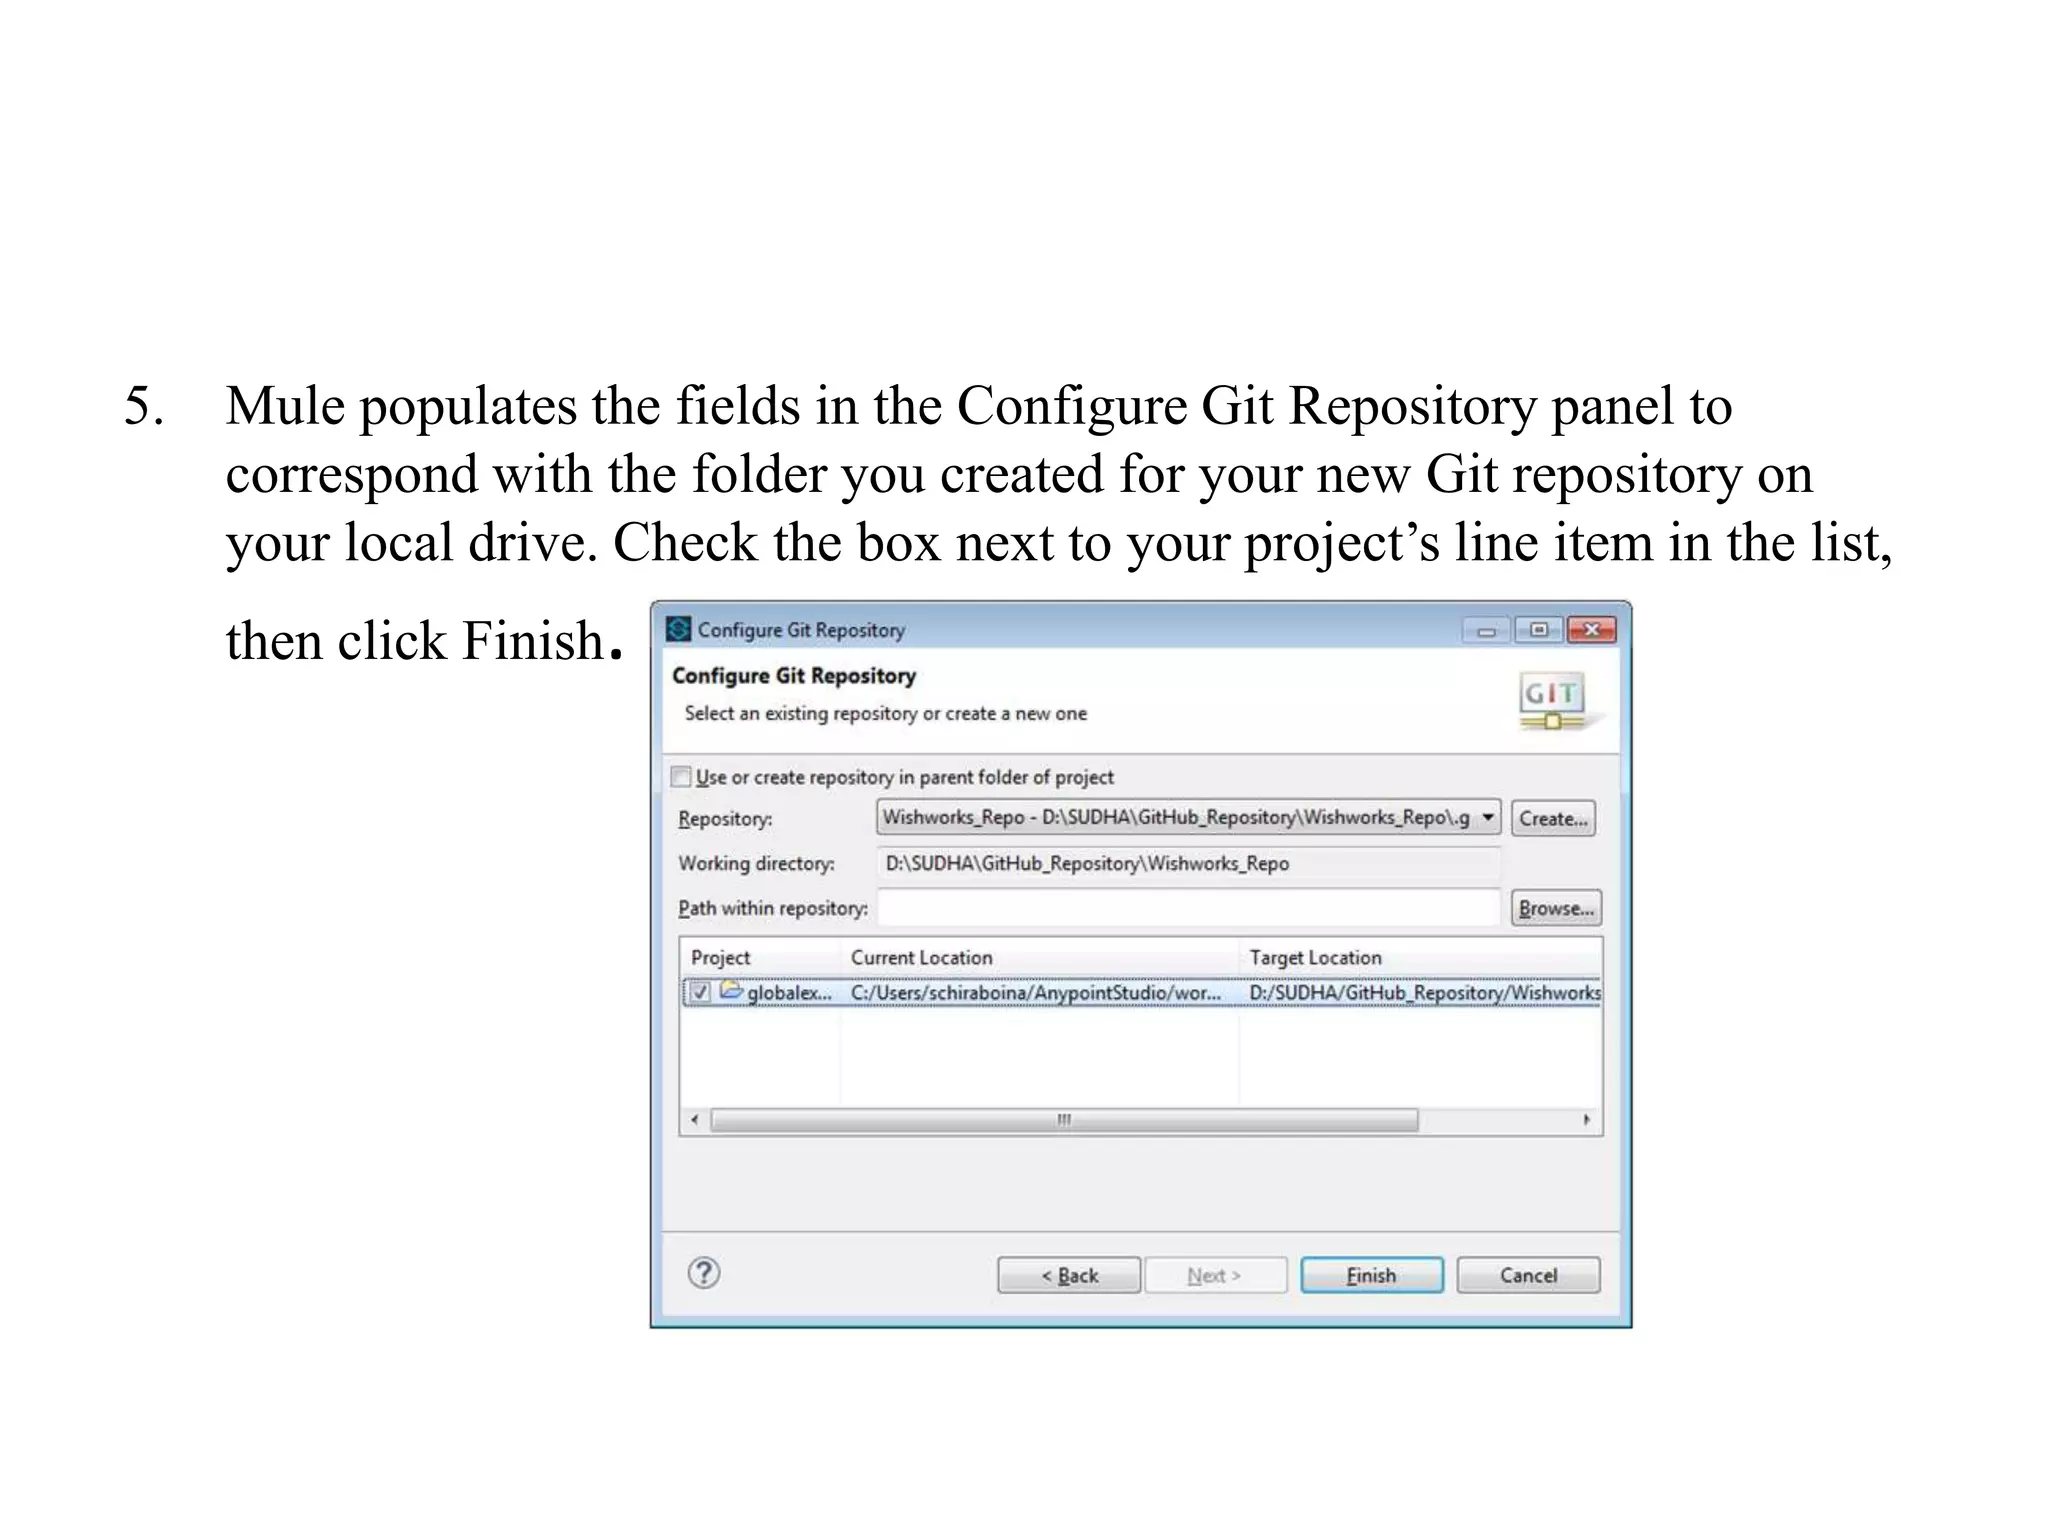
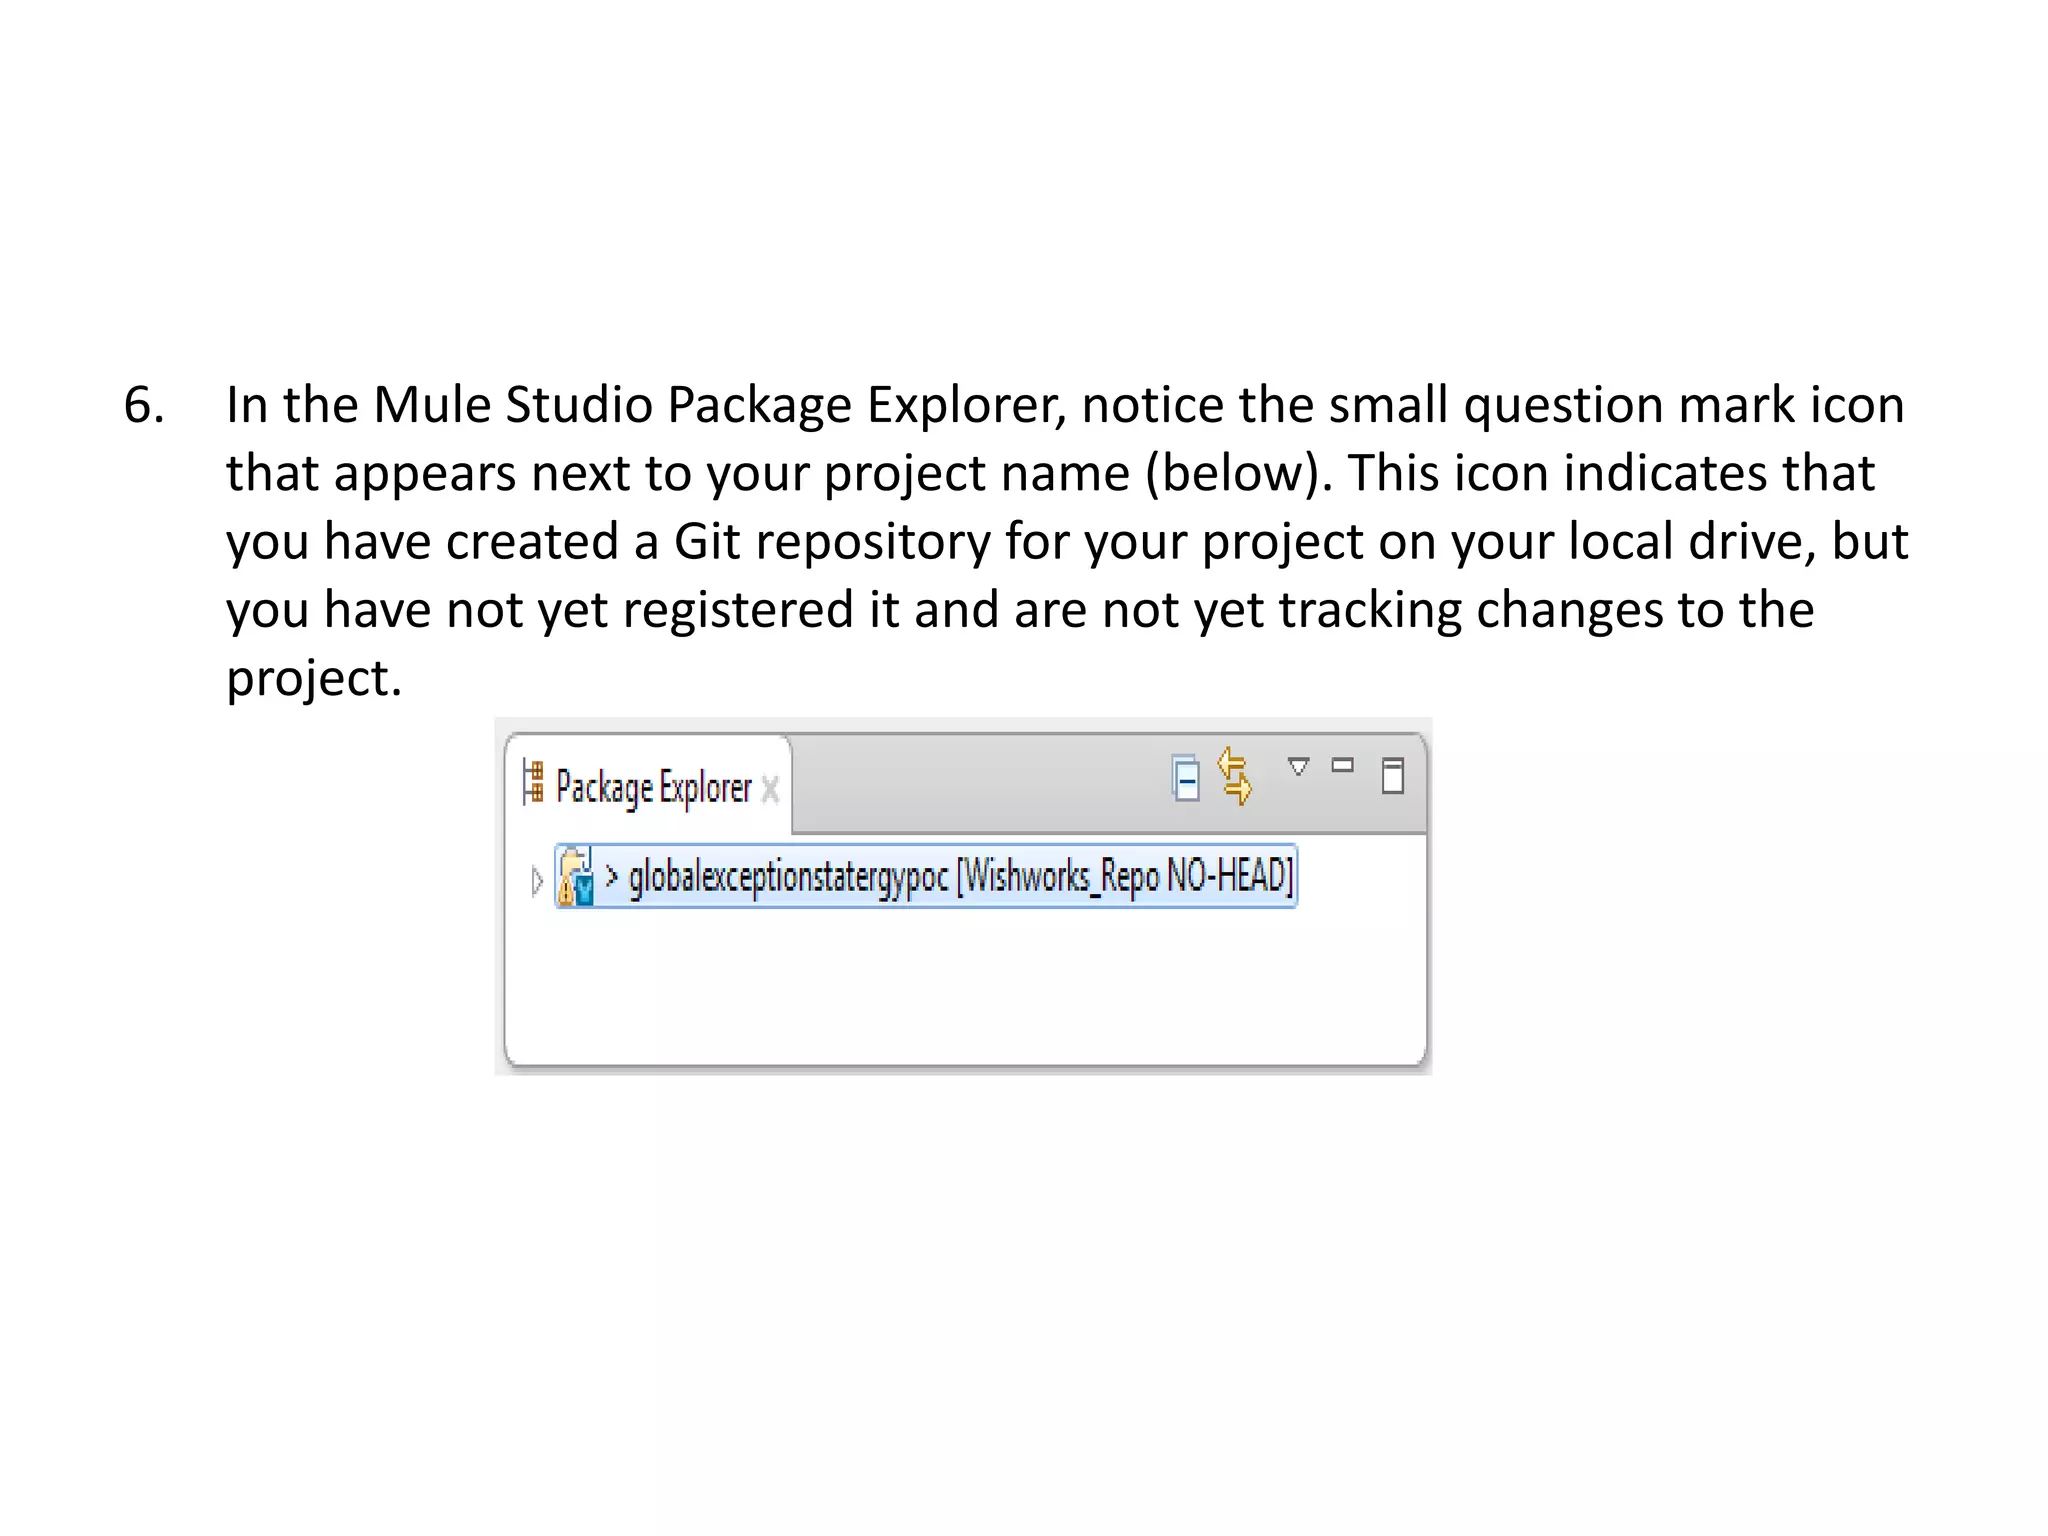
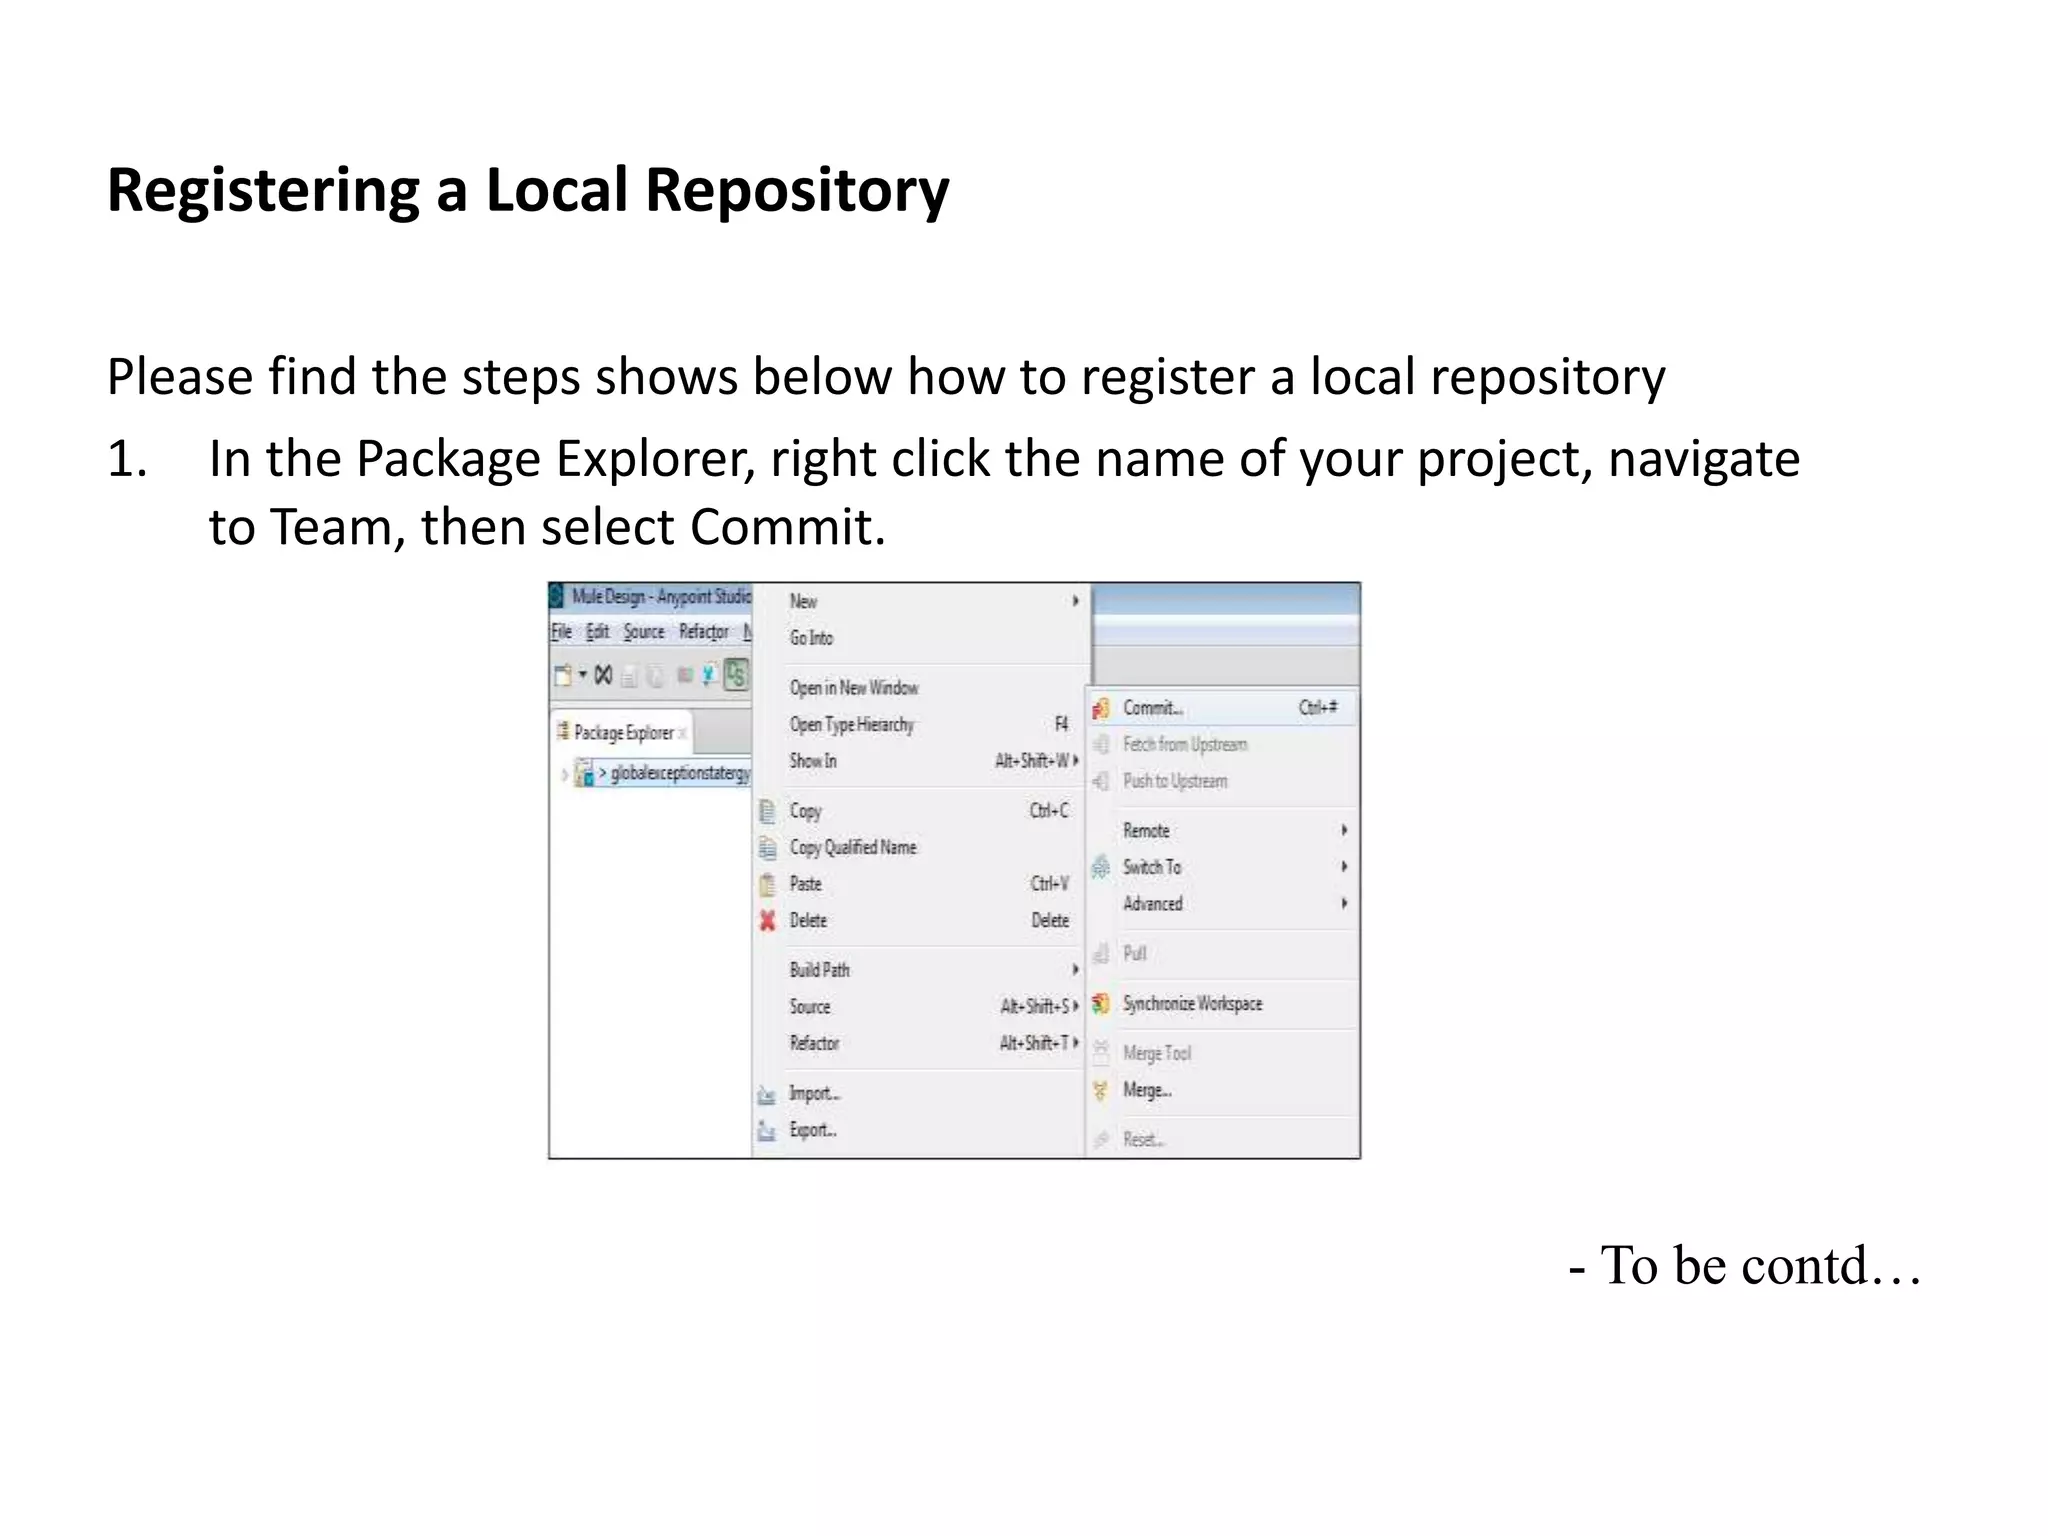
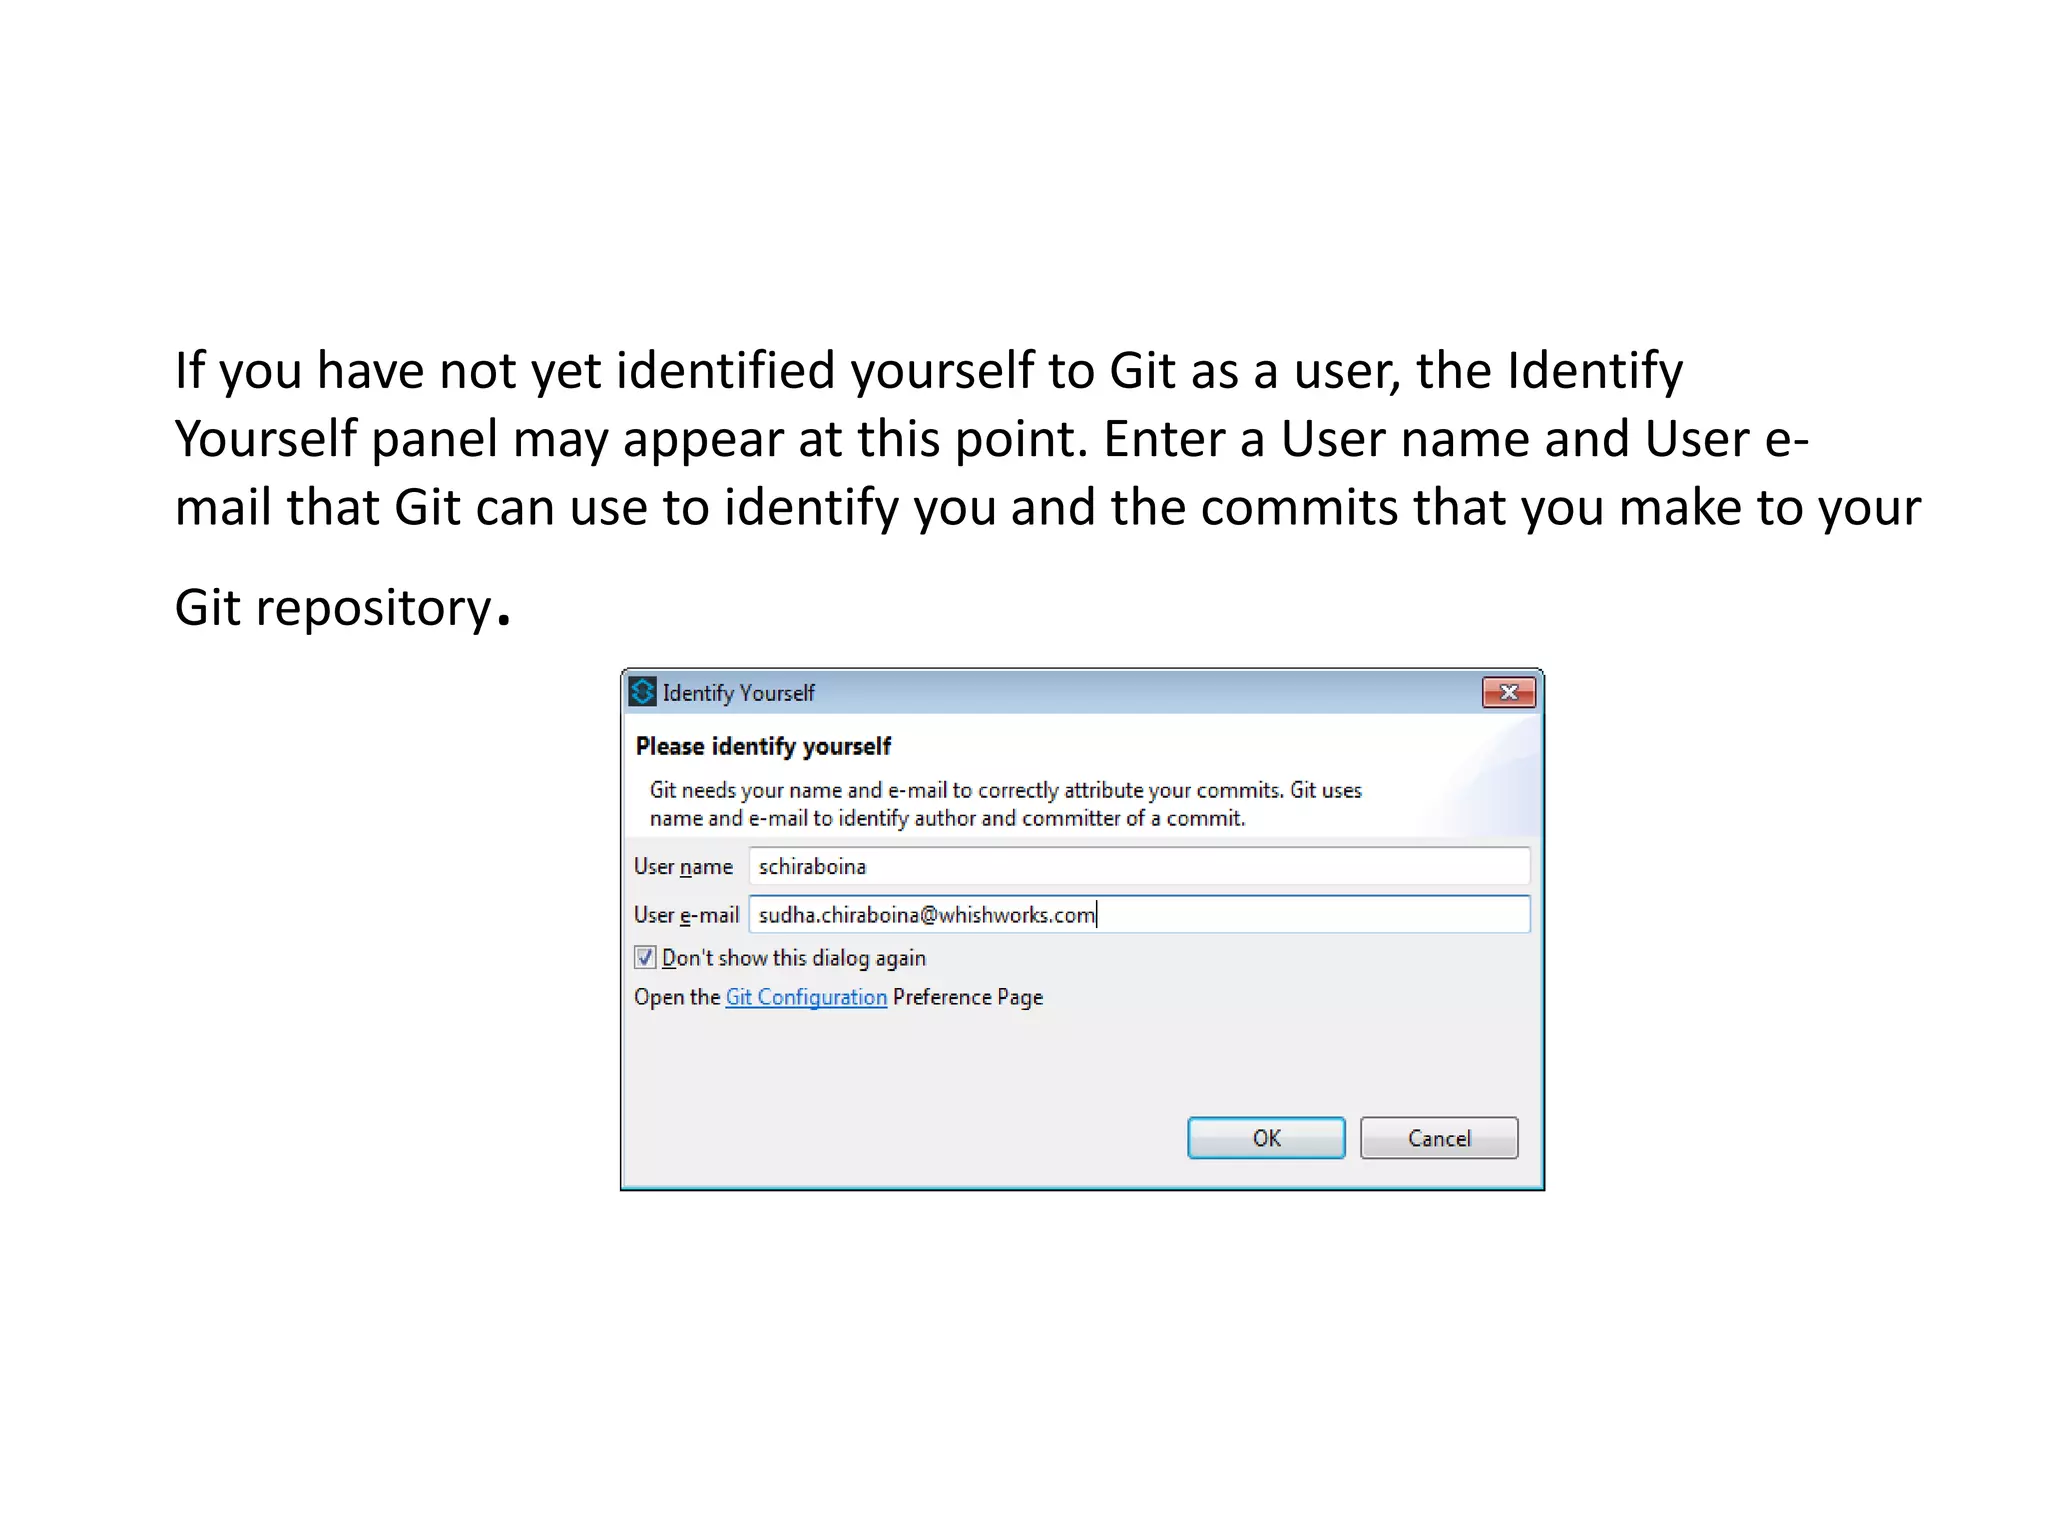
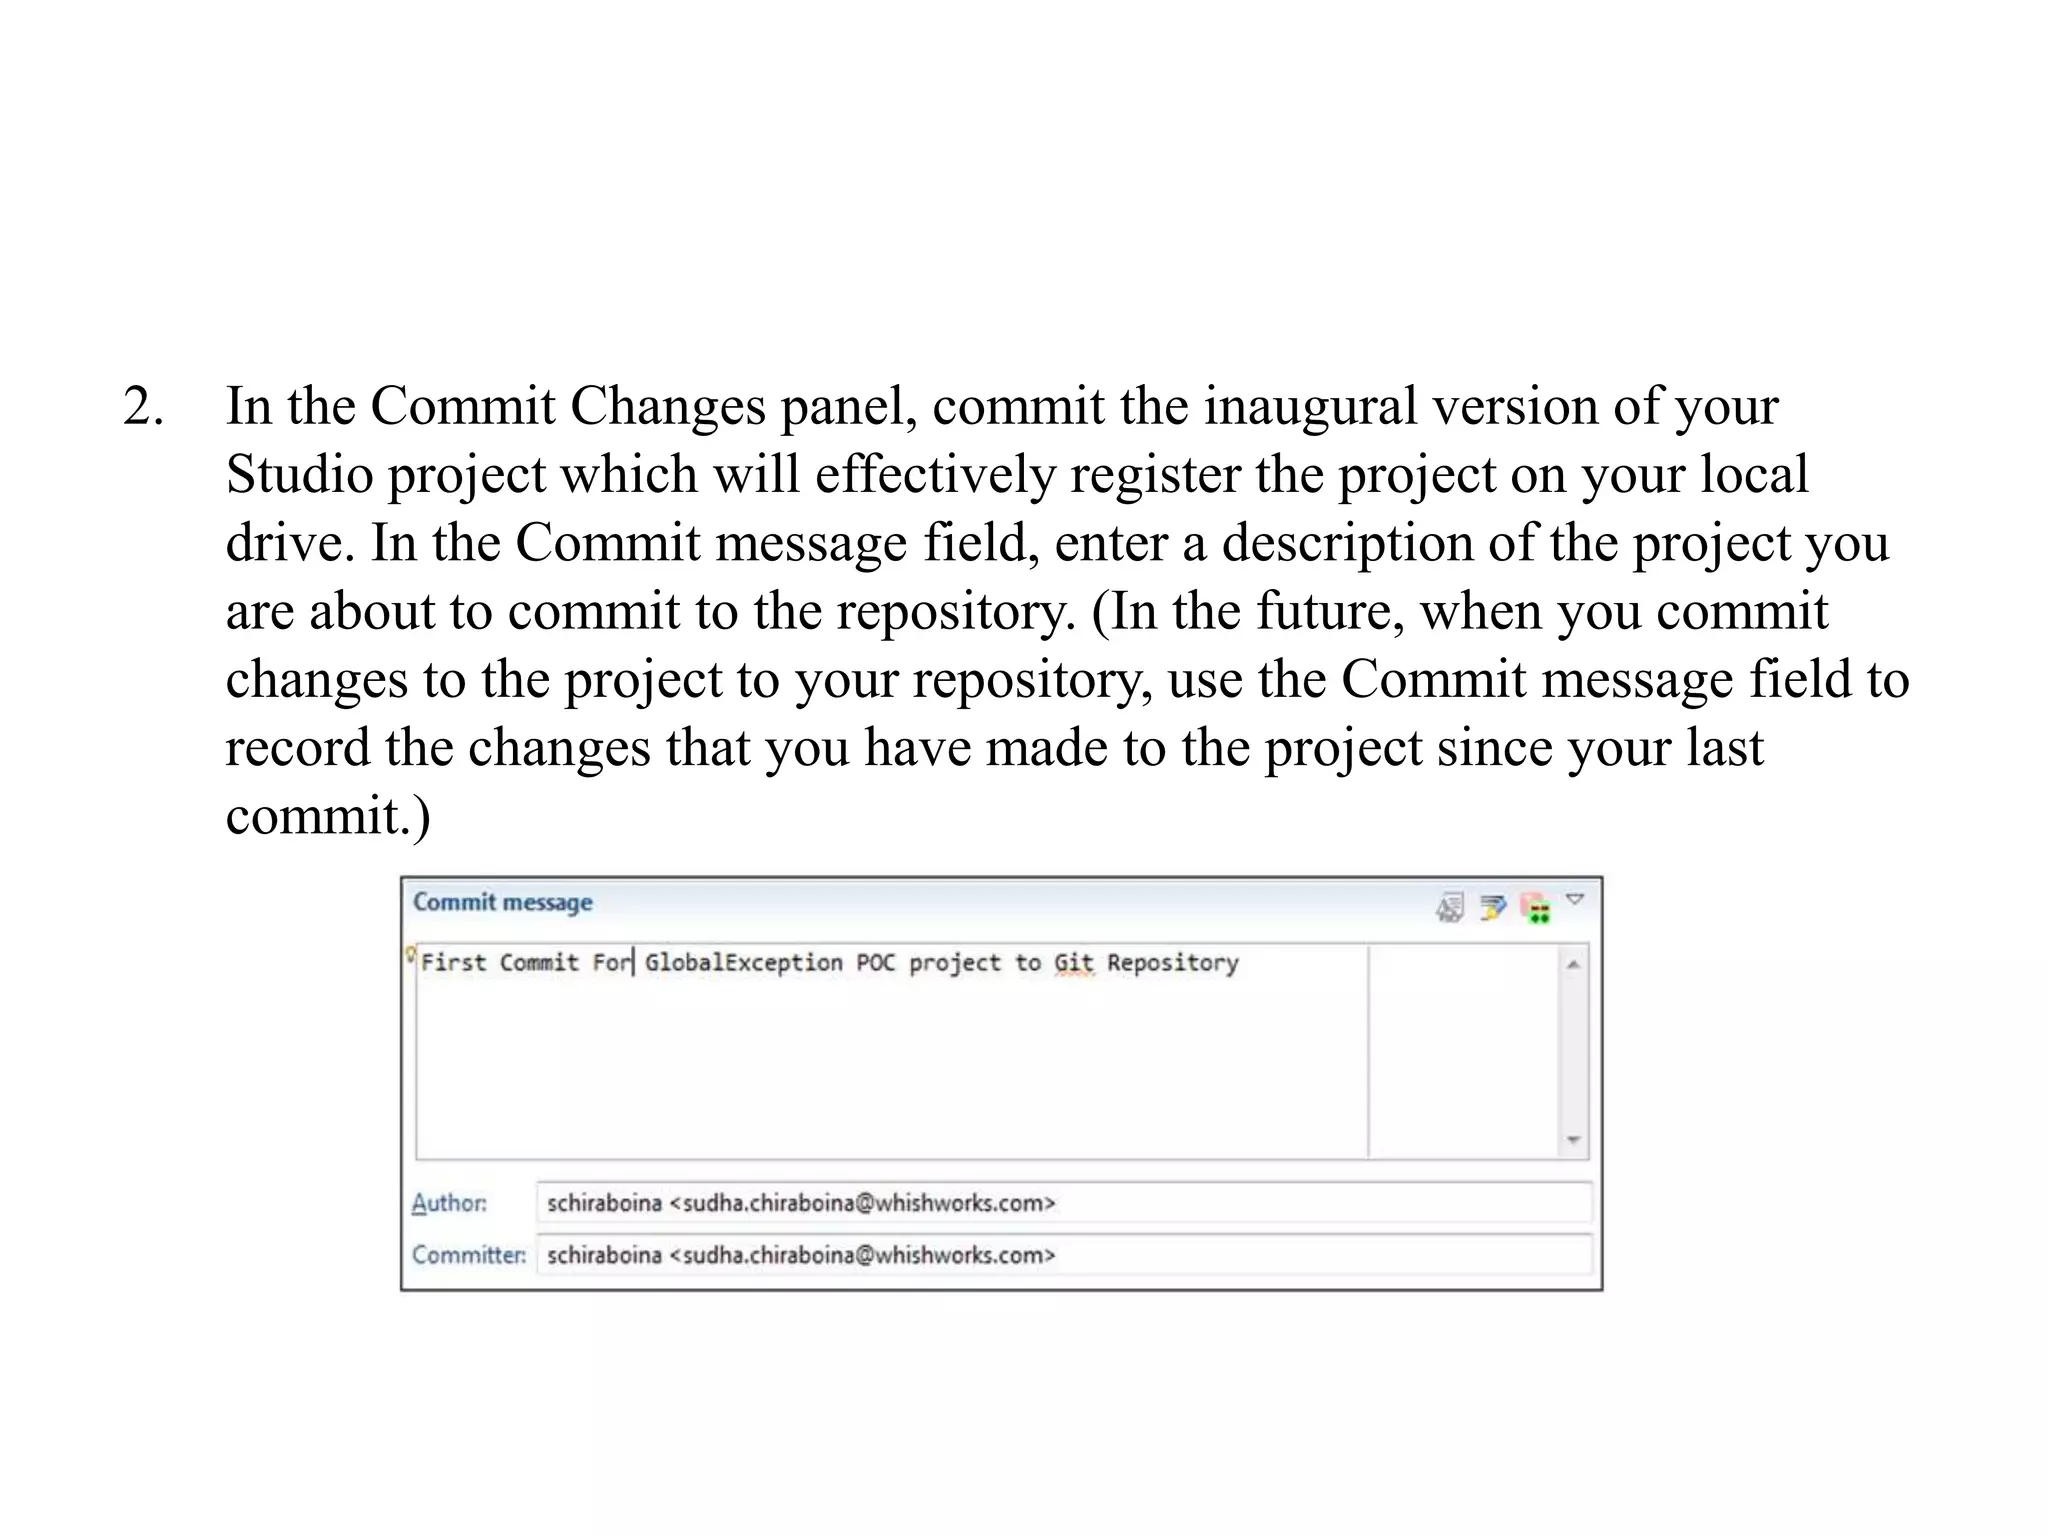
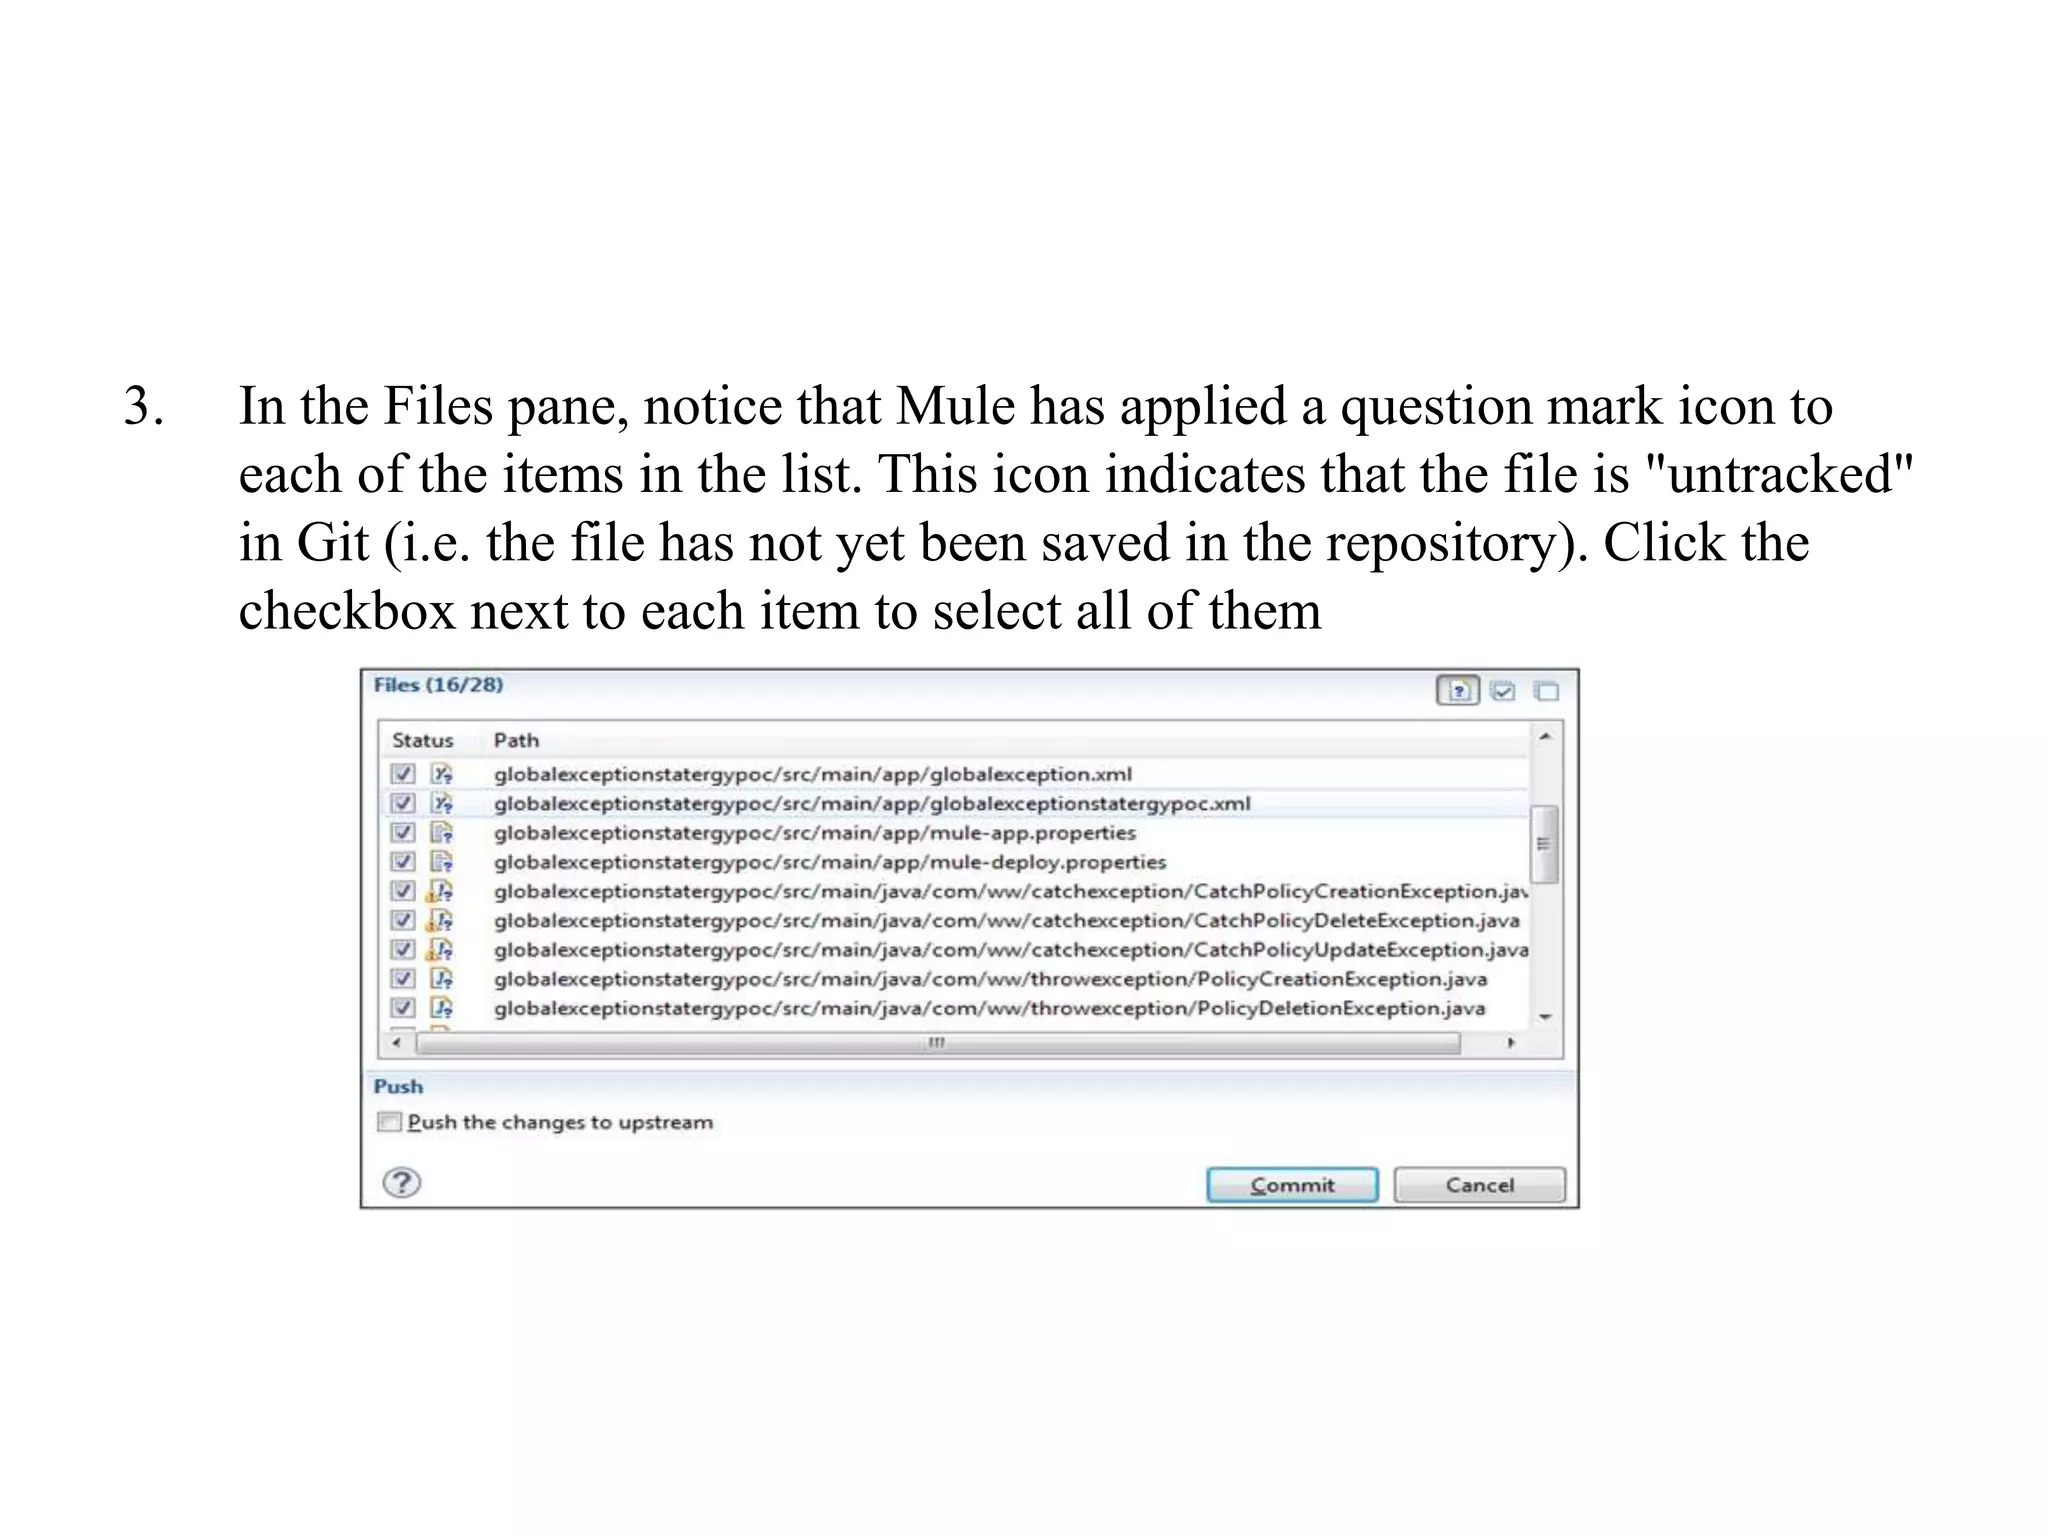
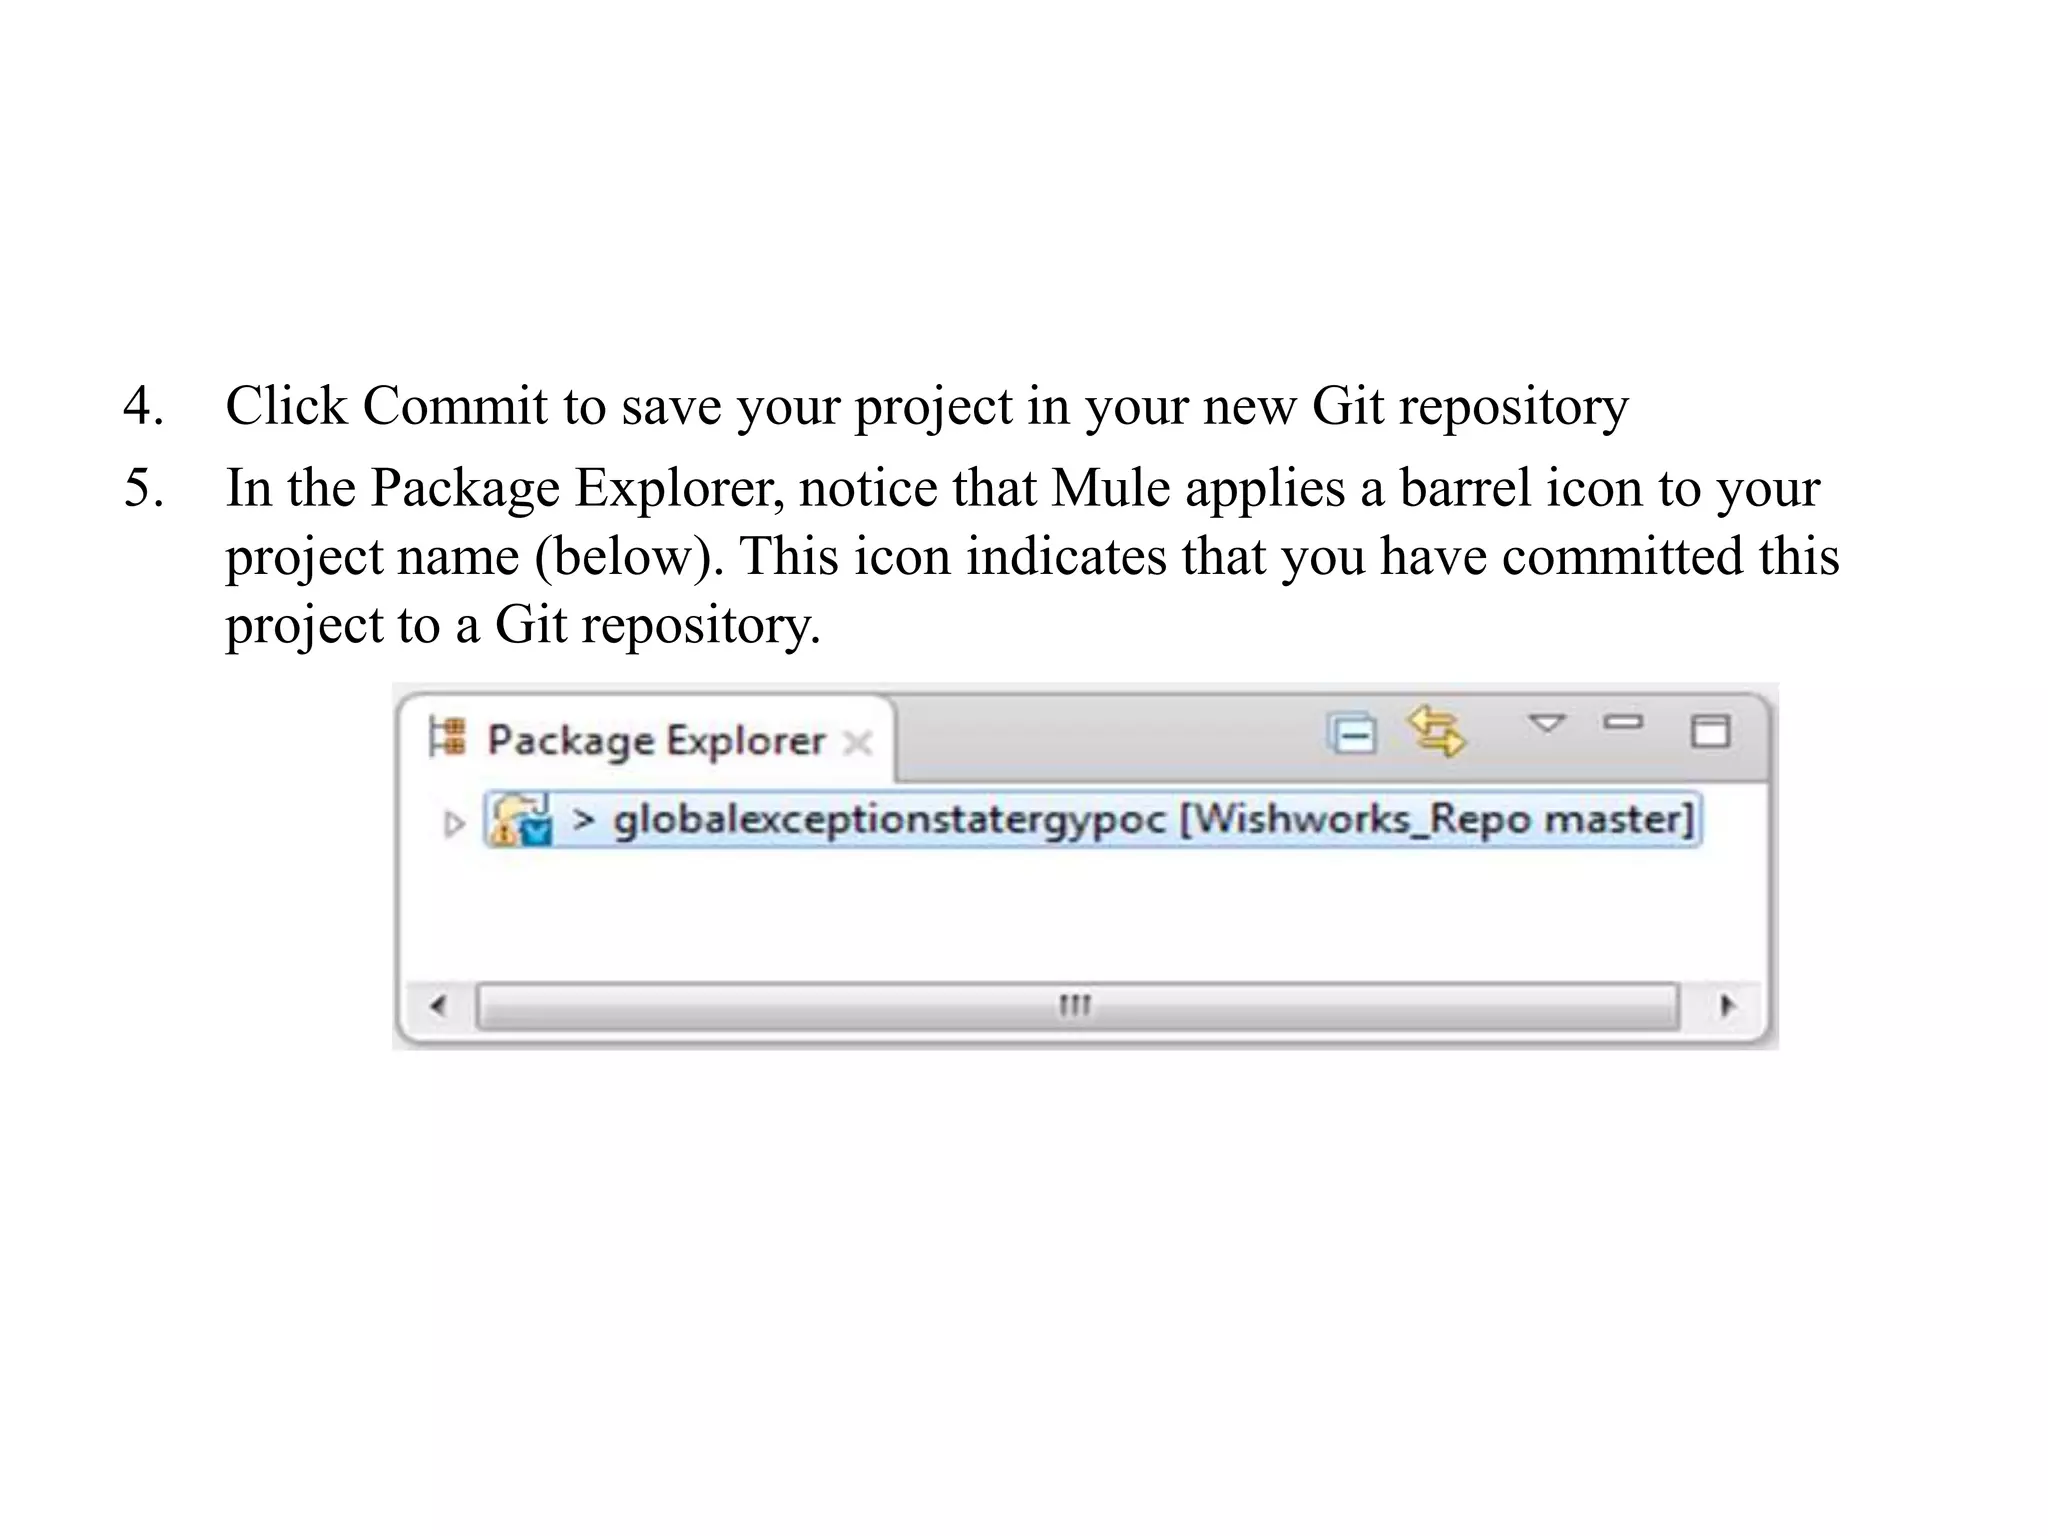
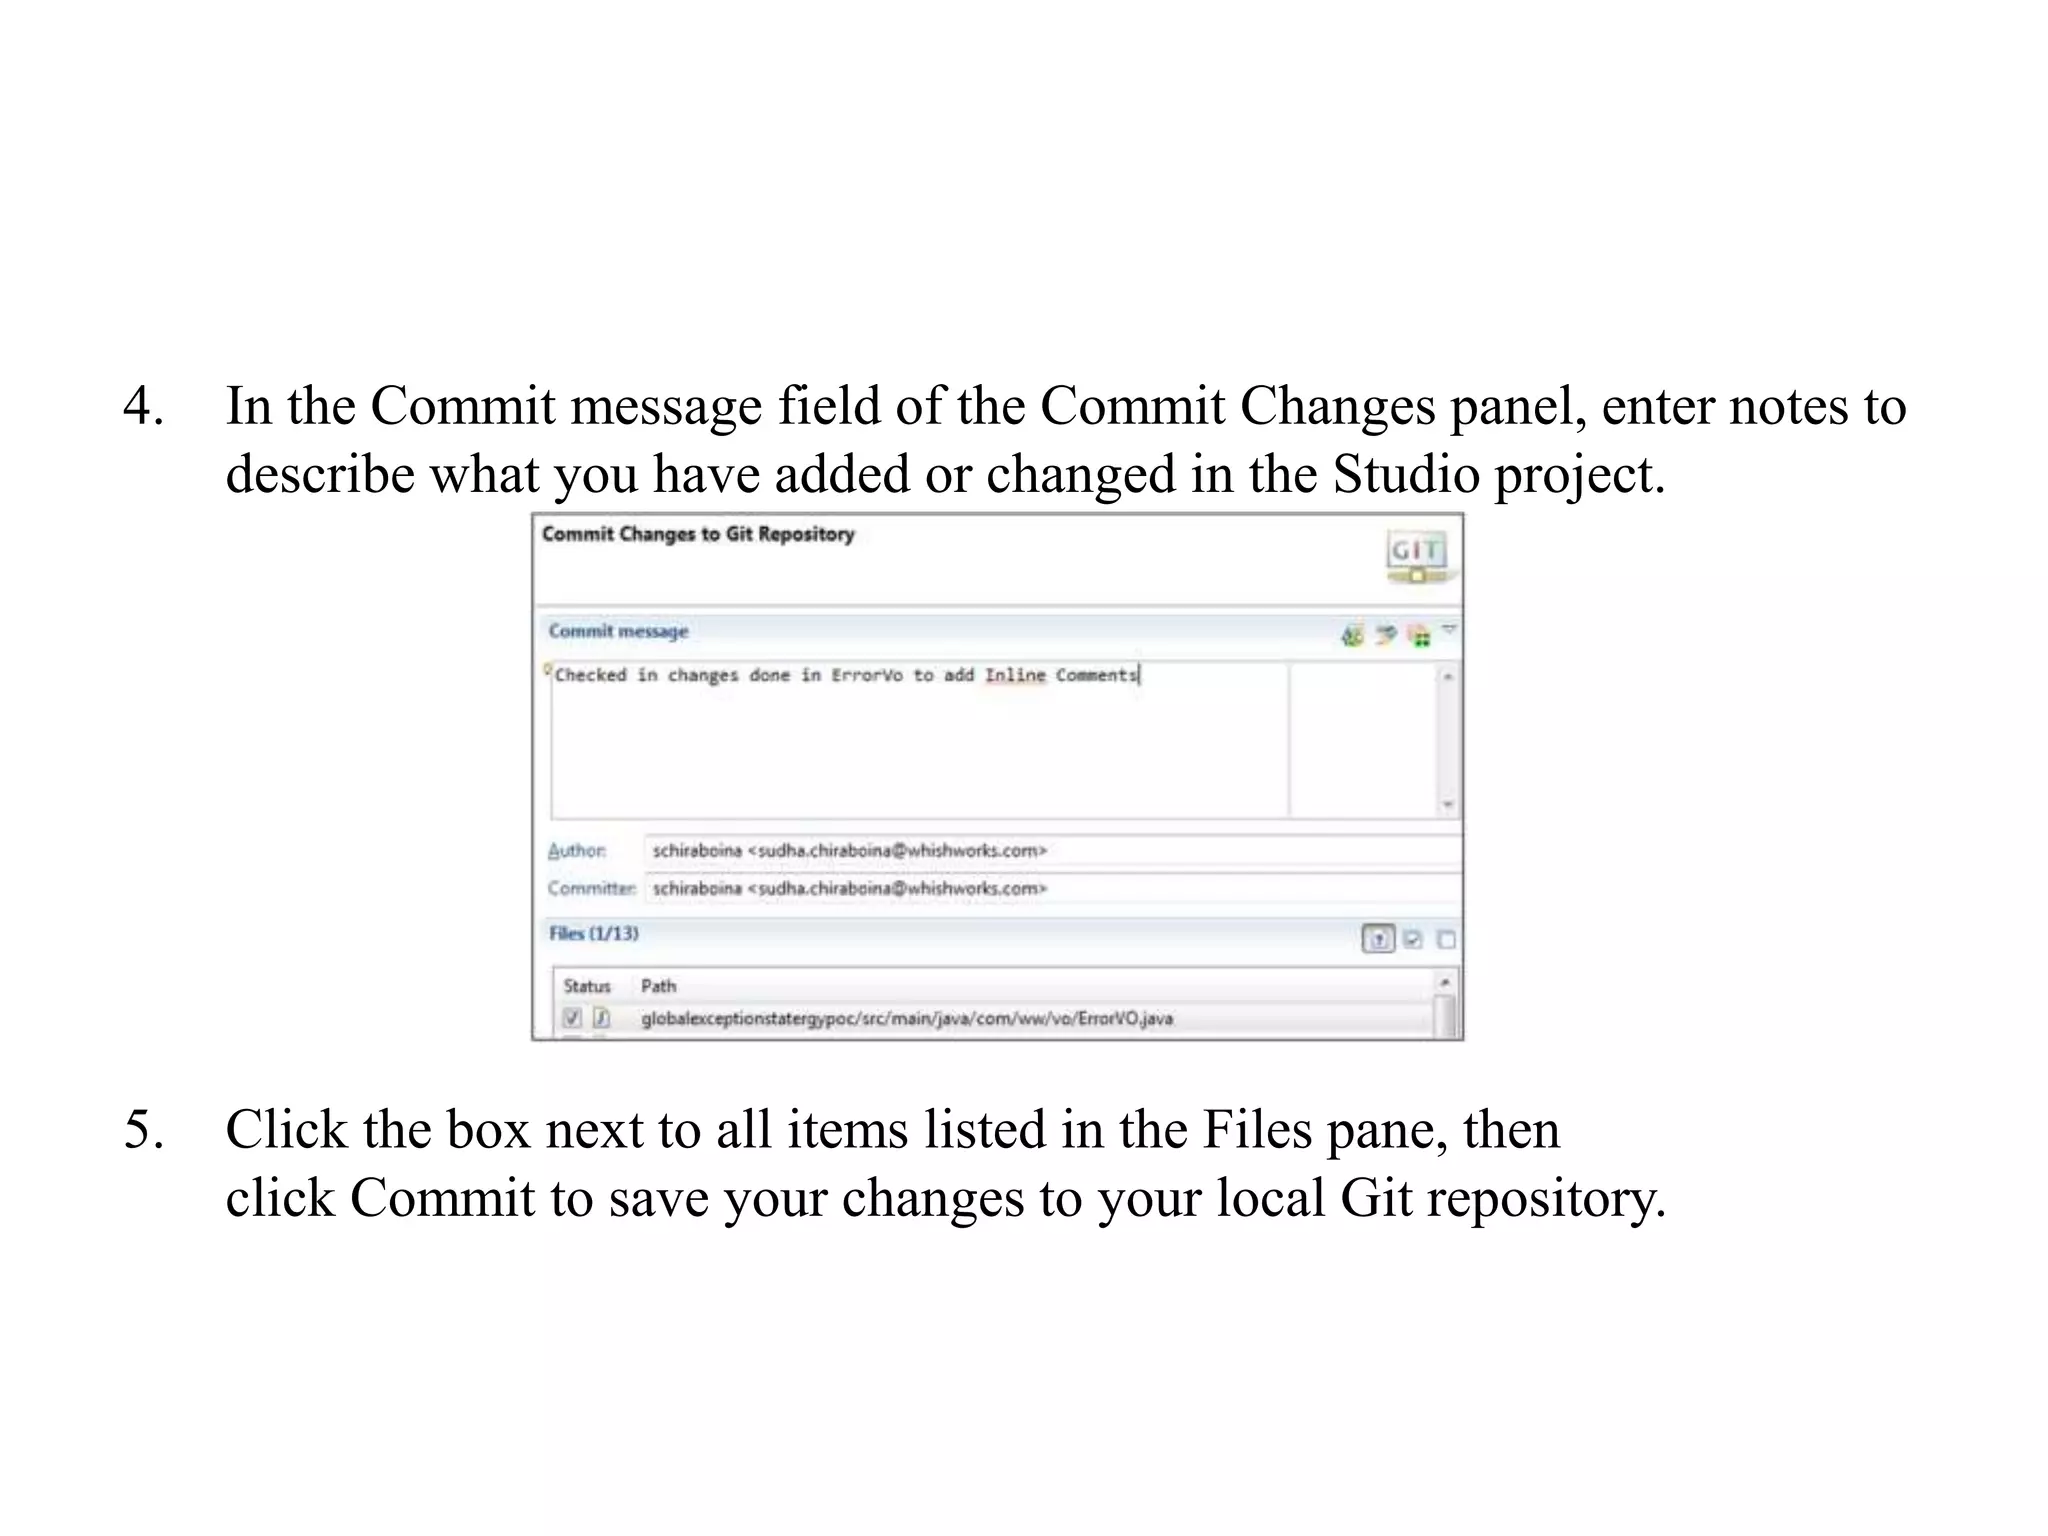
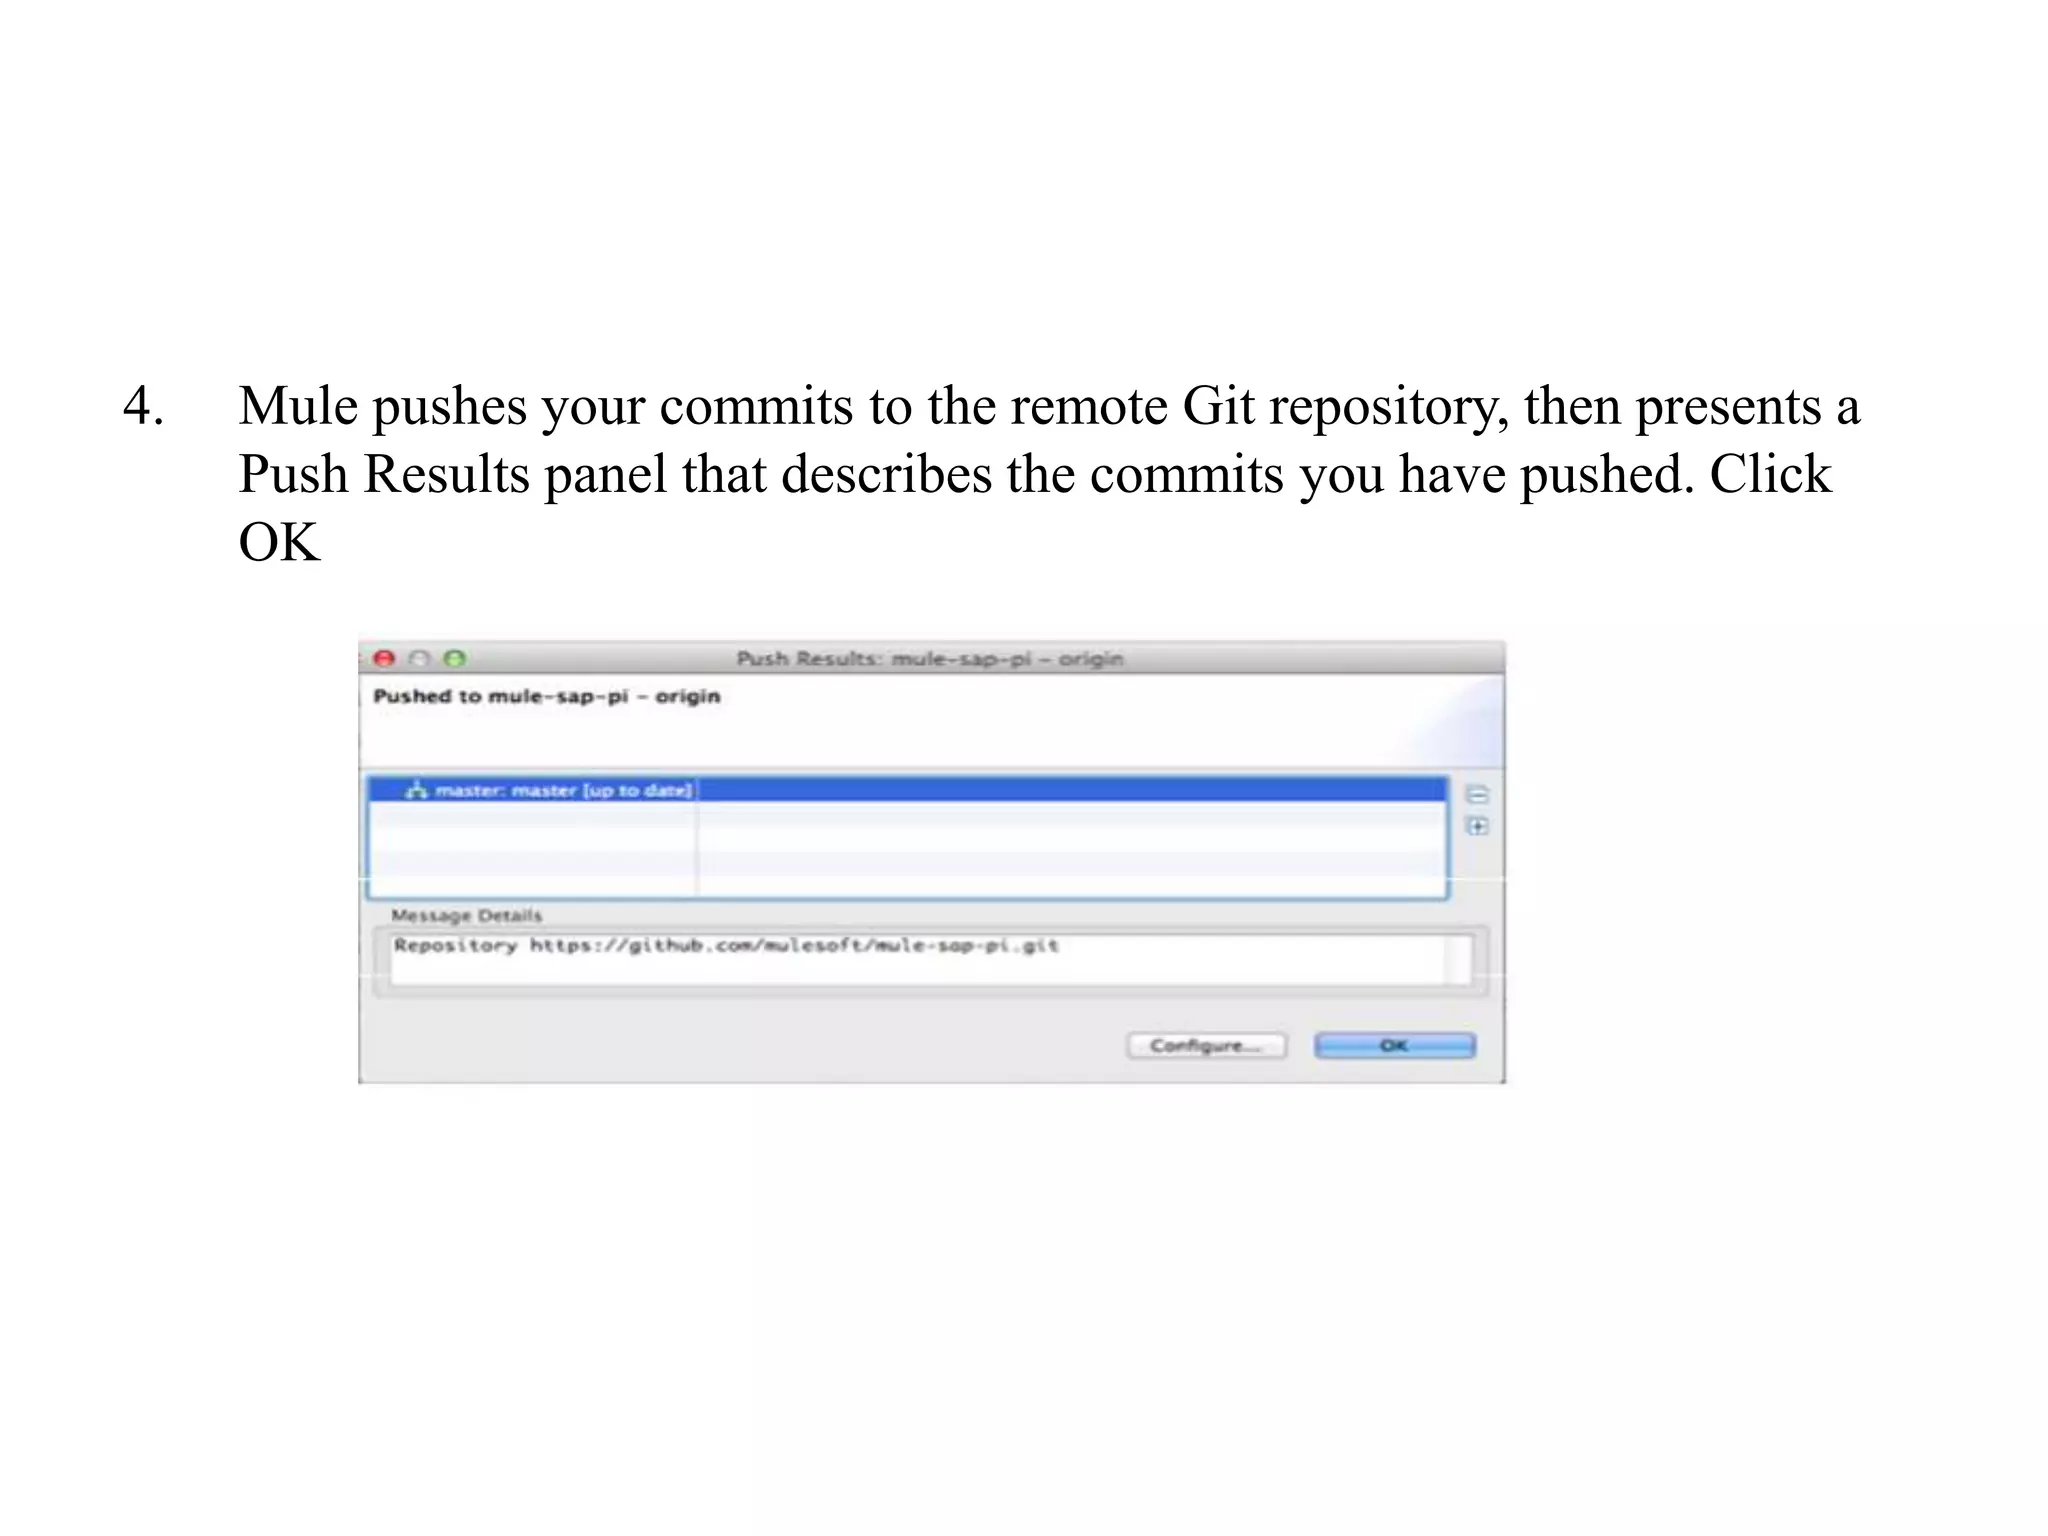
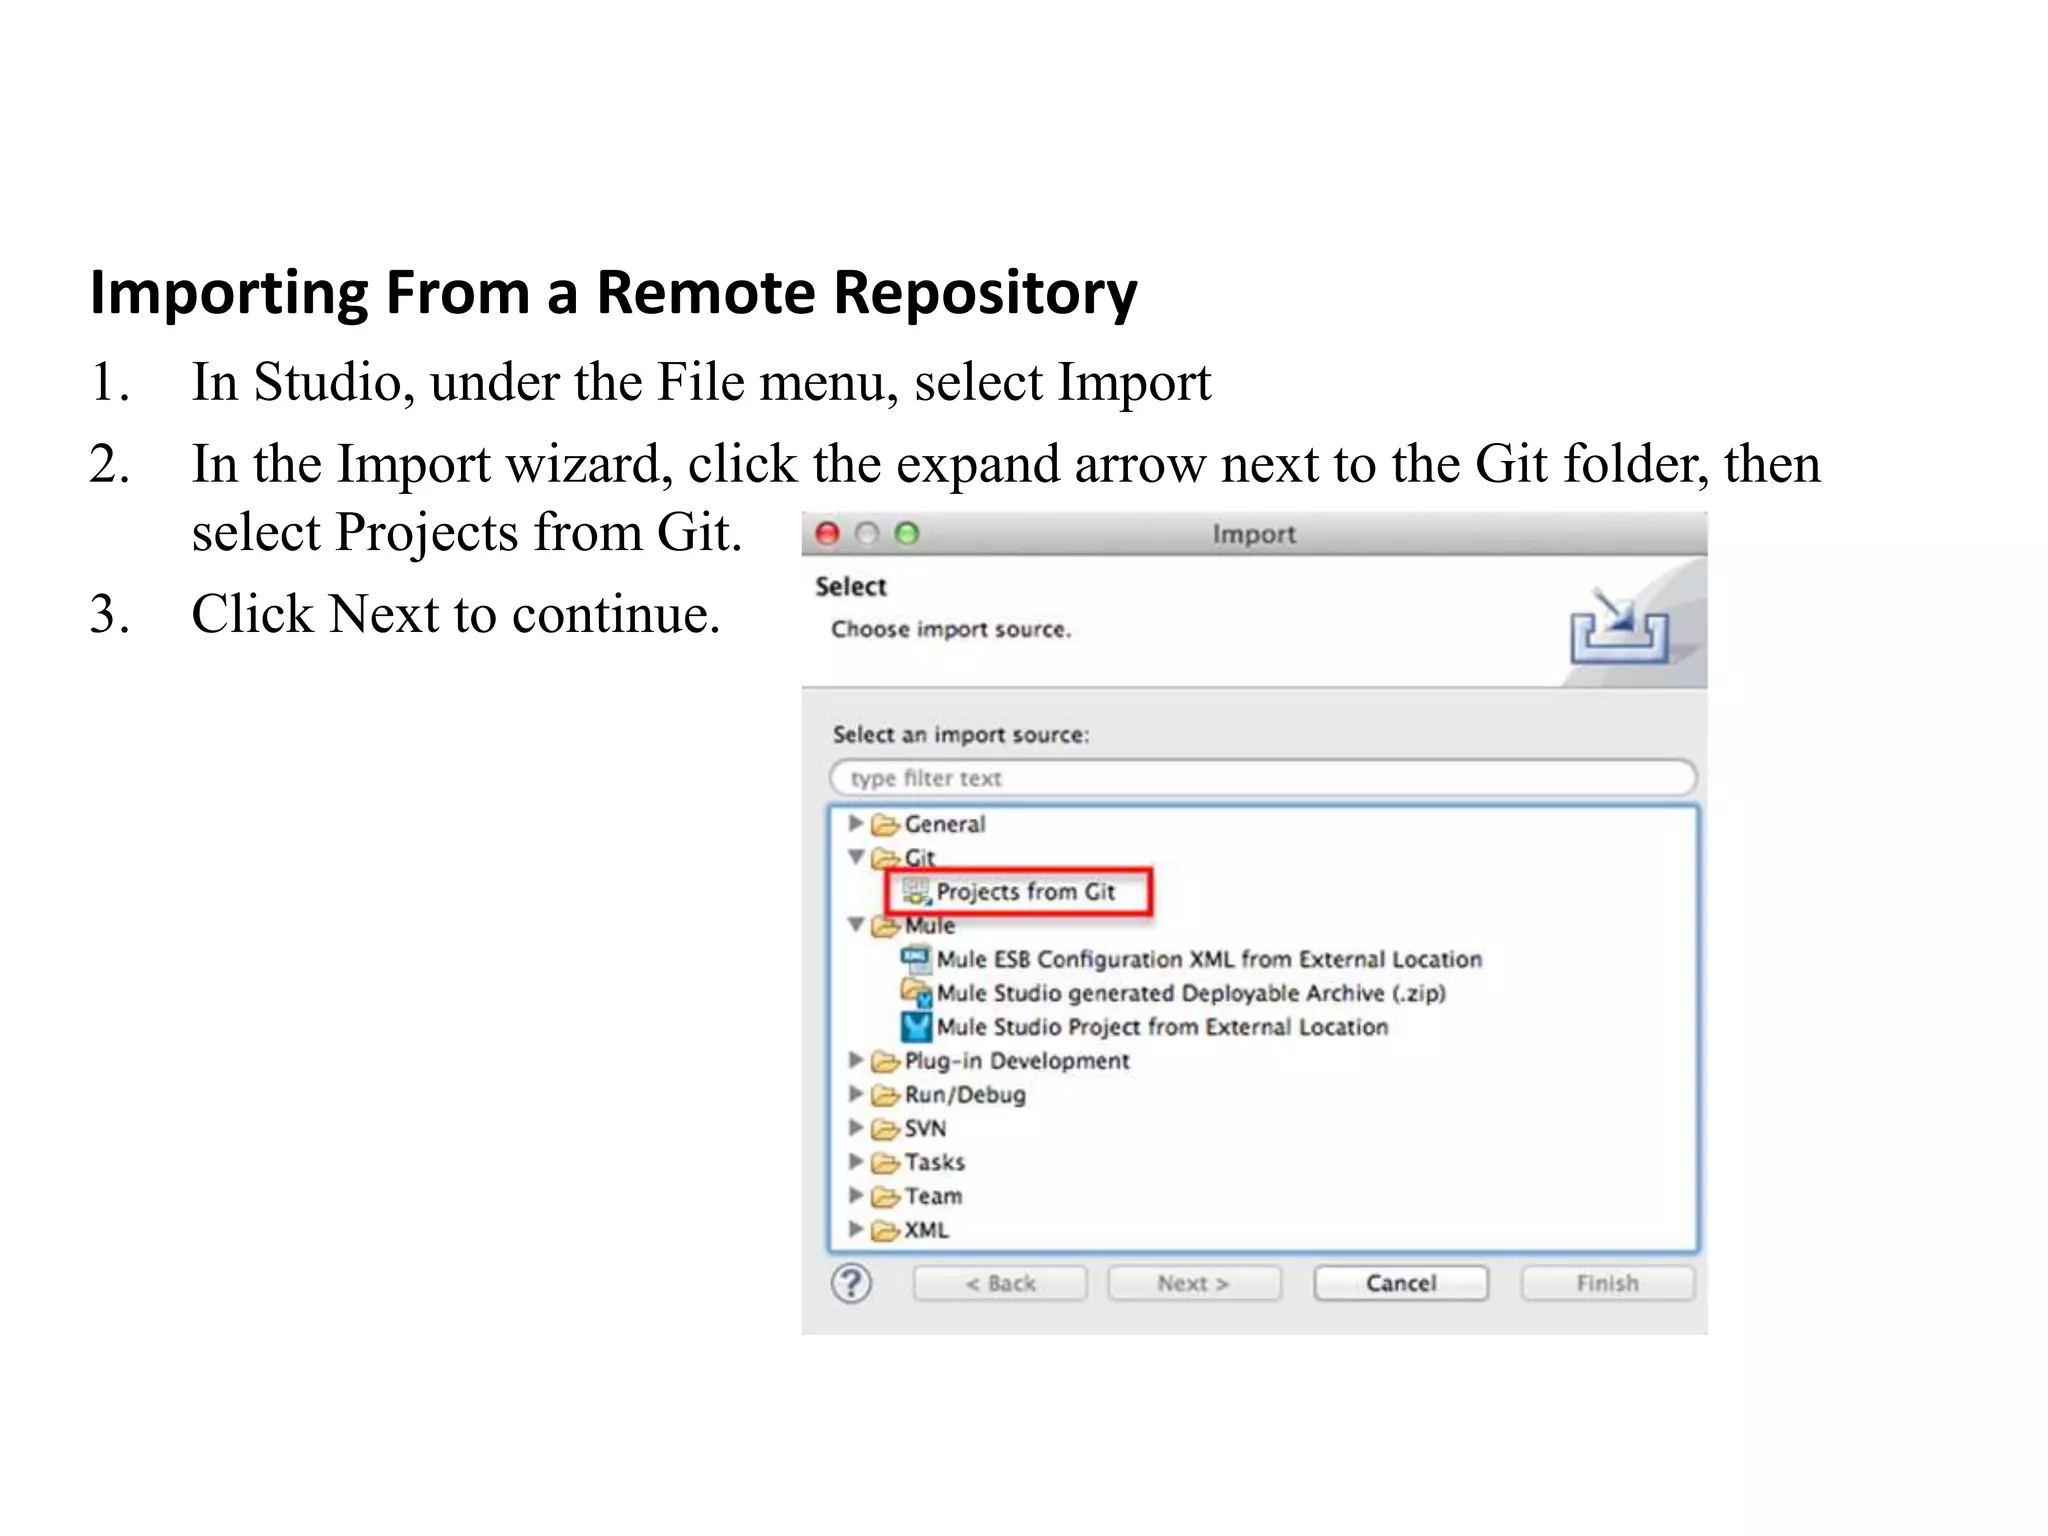
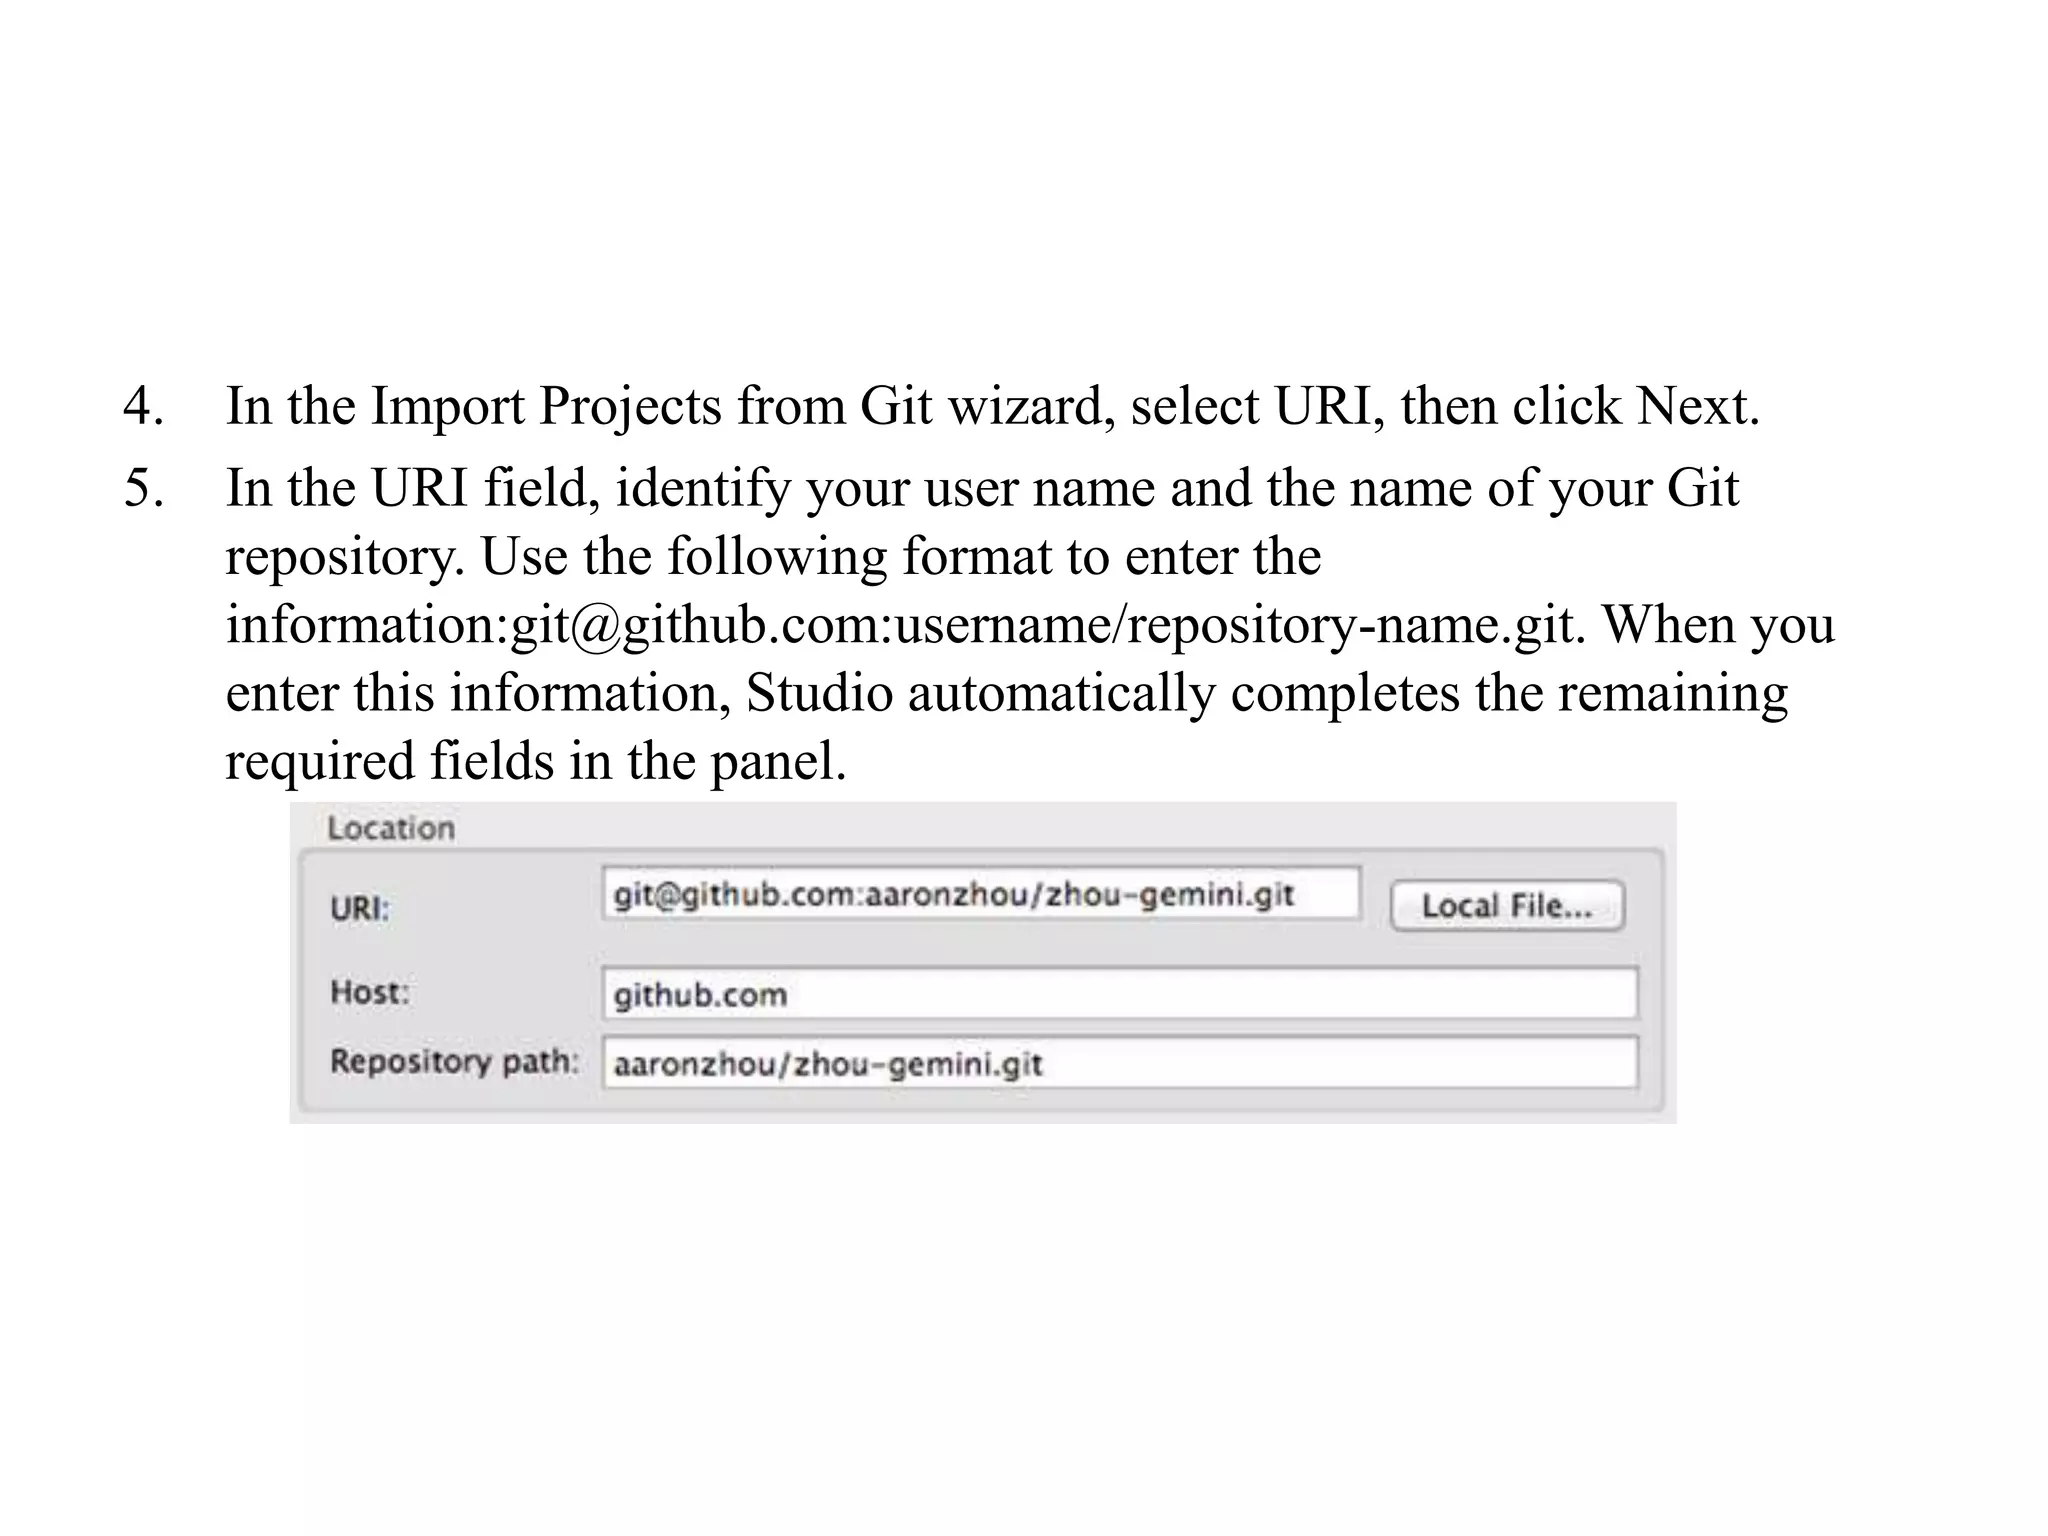
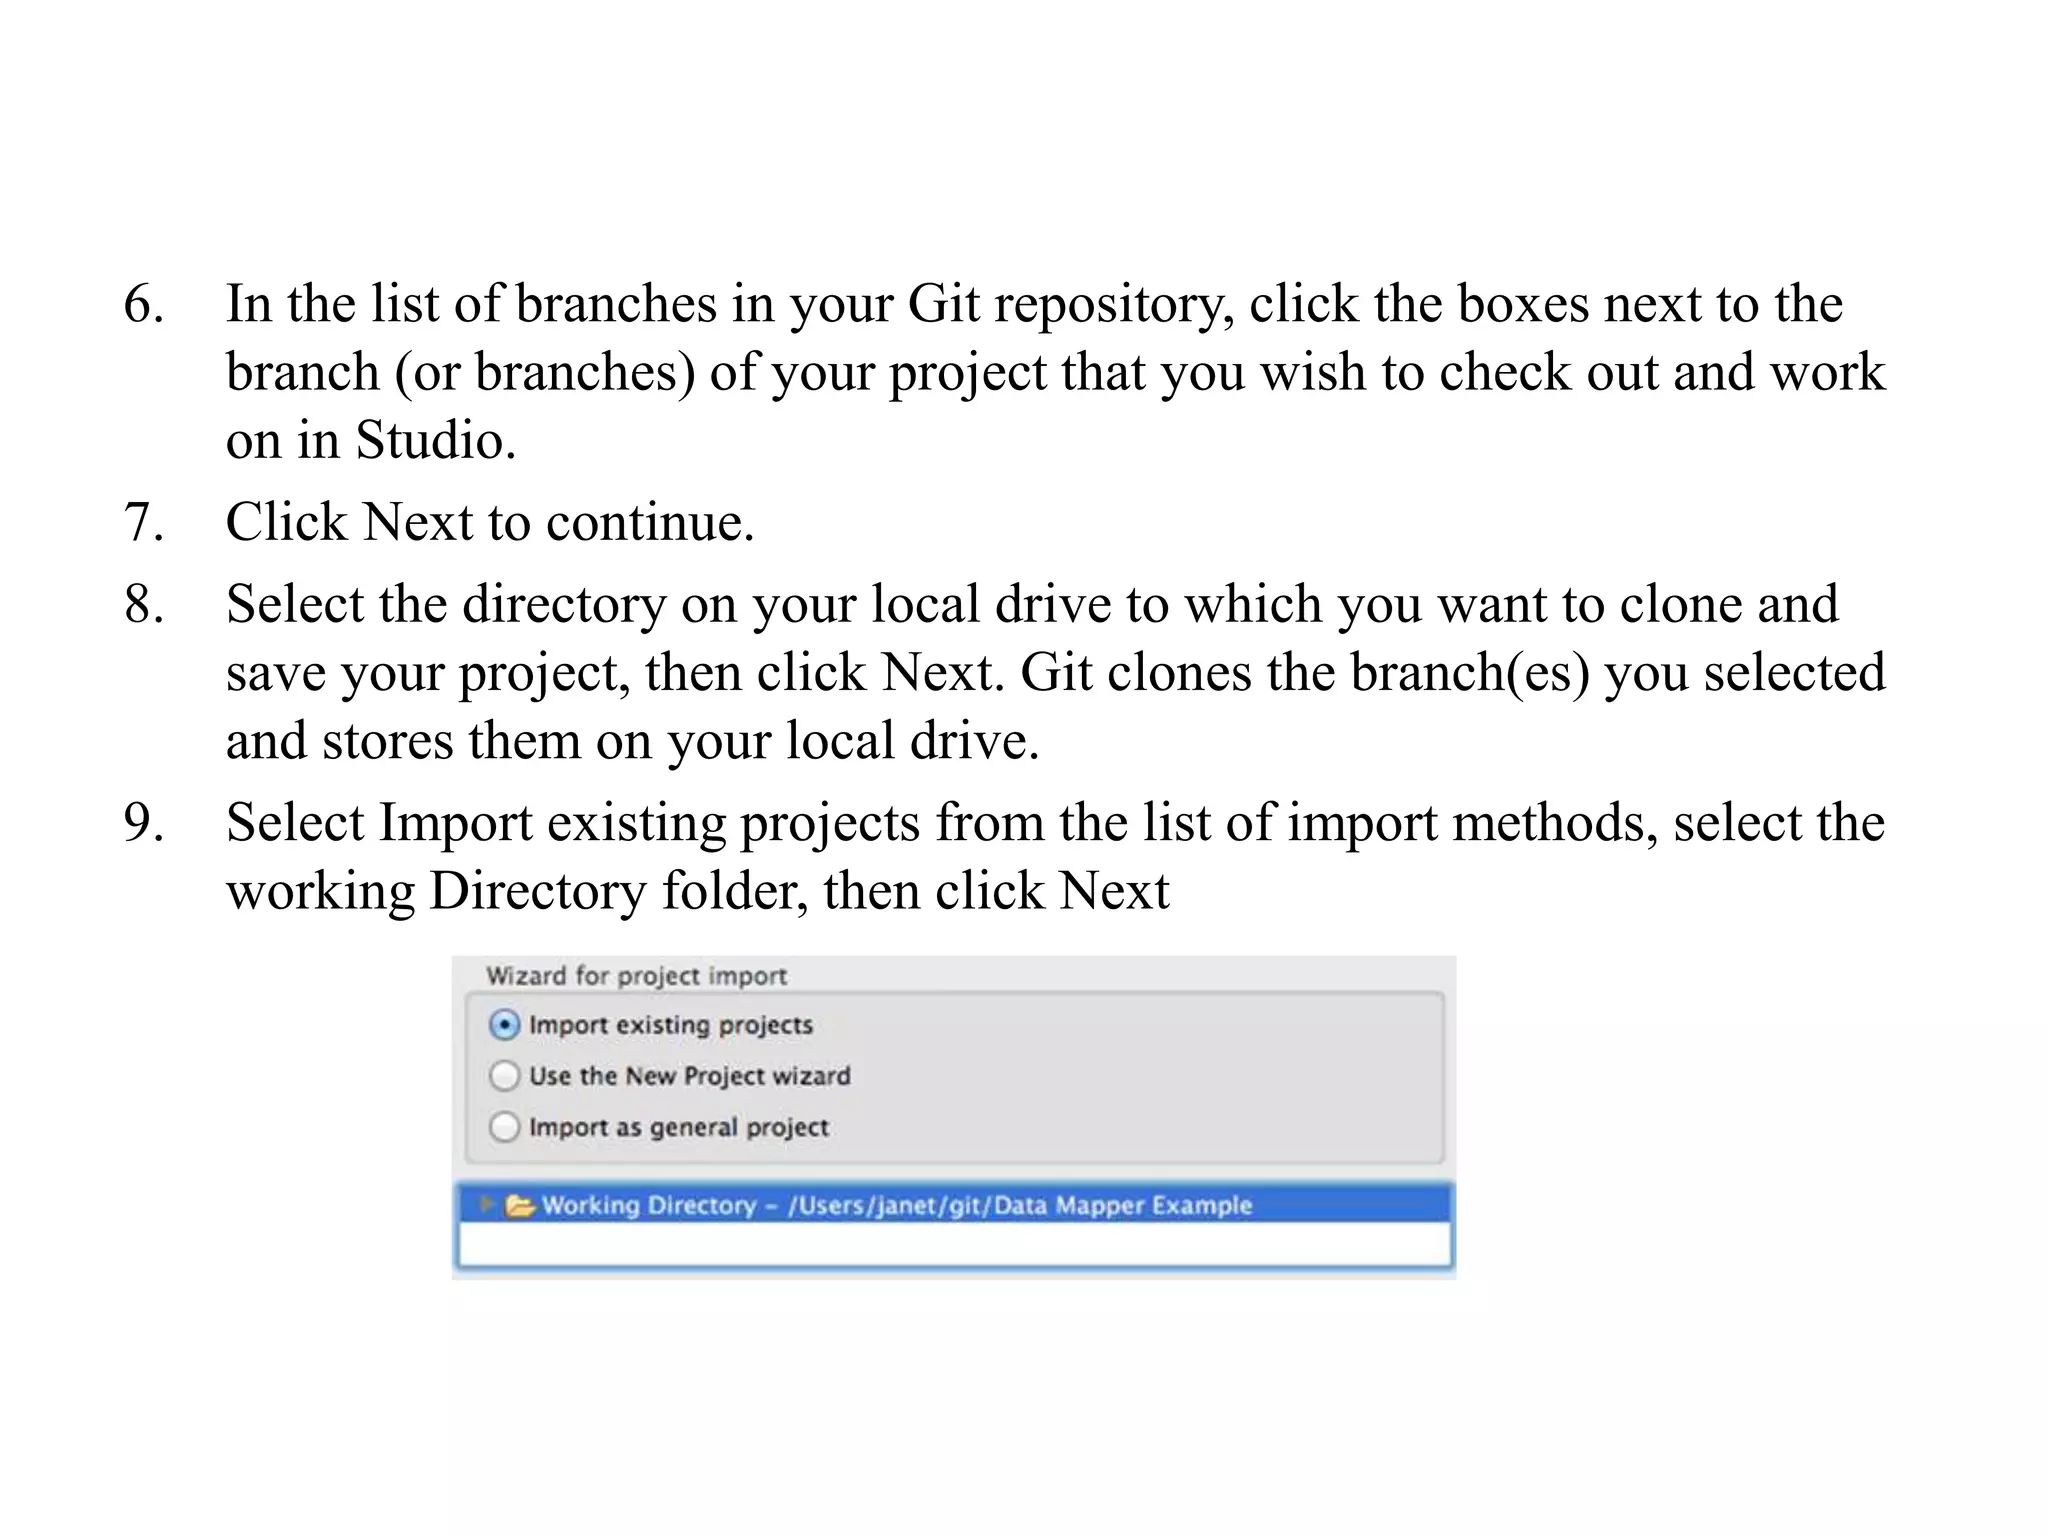
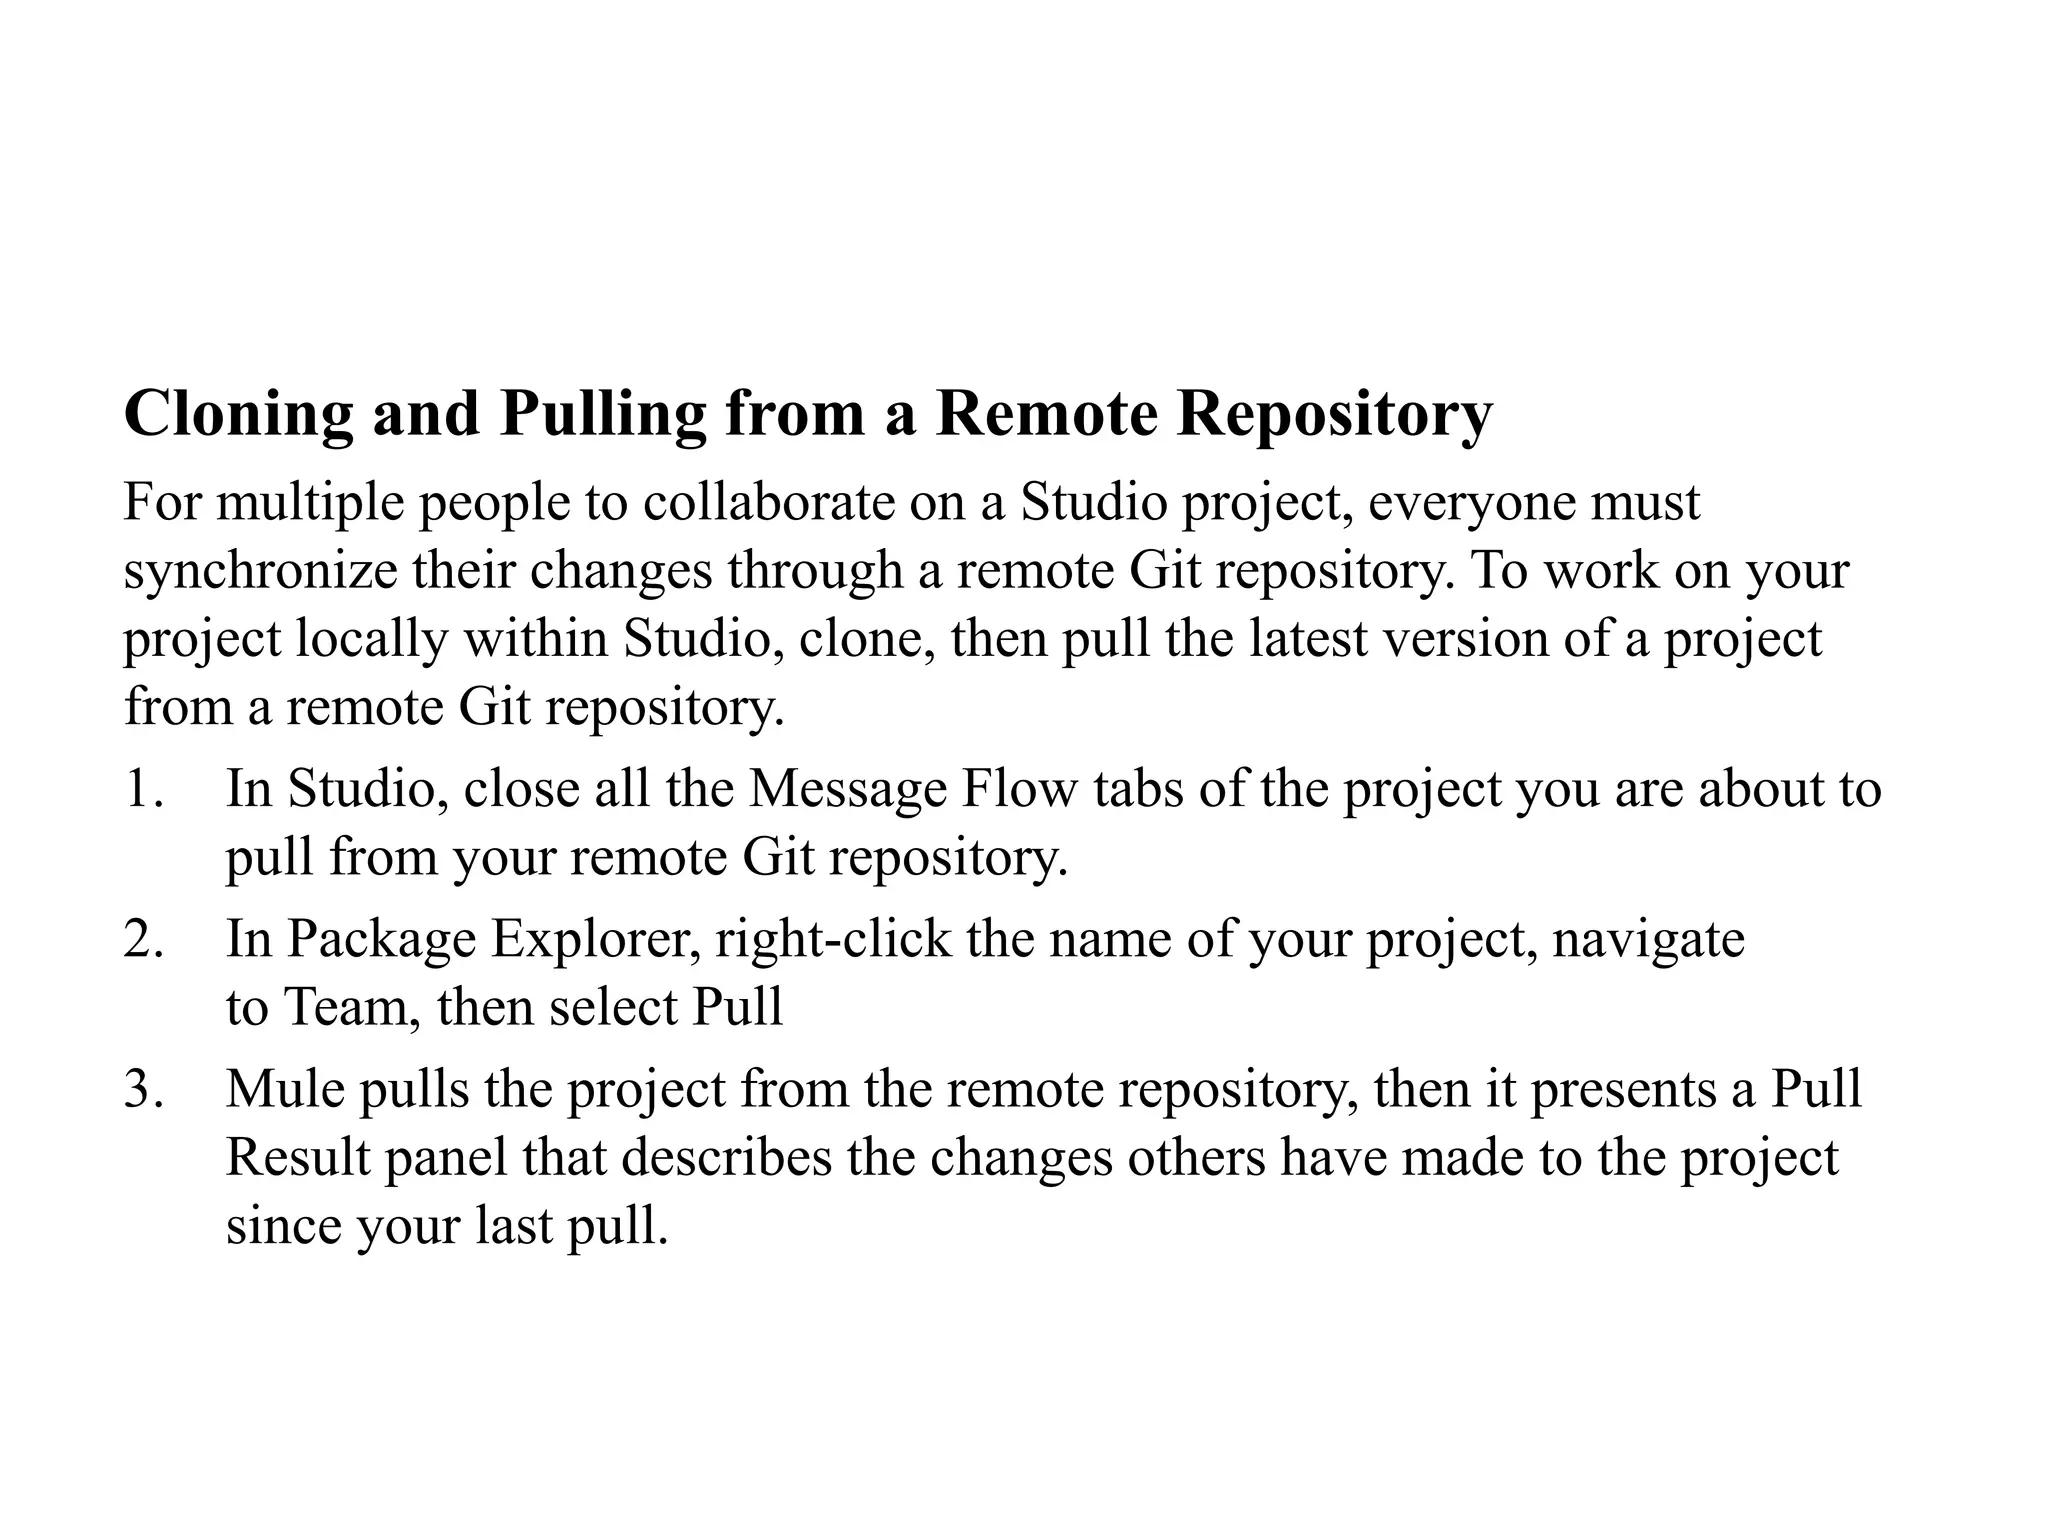
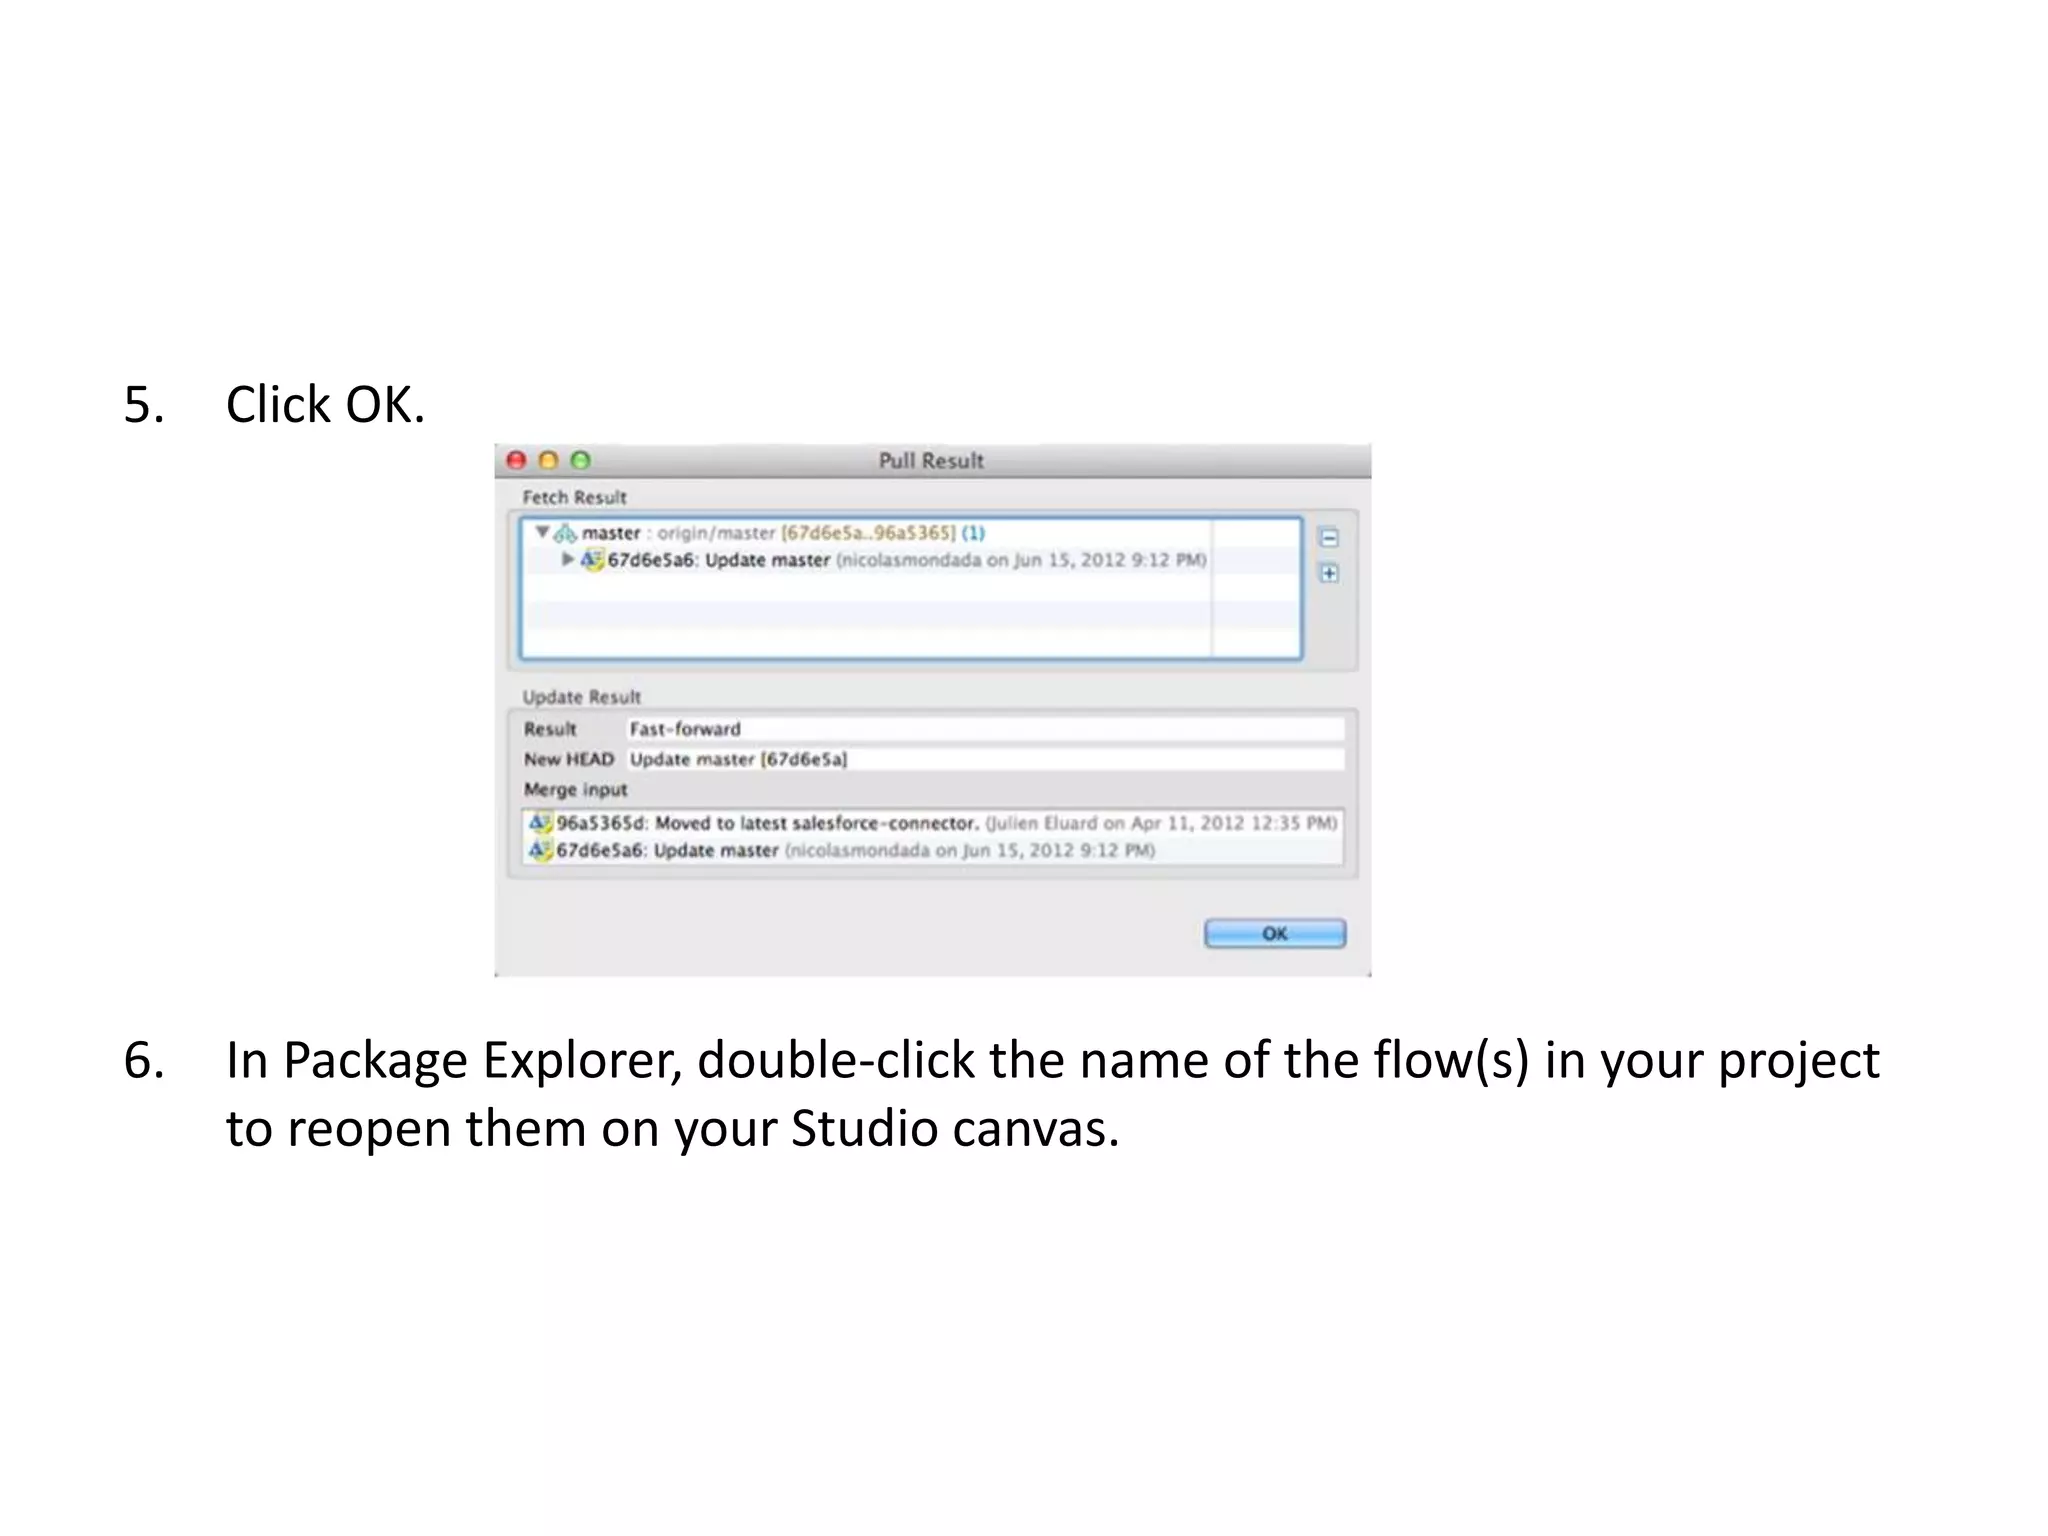
The document provides steps for setting up GitHub integration in Anypoint Studio, including installing the GitHub plugin, saving a project to a Git repository for version control, committing and pushing changes to a remote repository, and importing or cloning projects from Git repositories.
Mule tcat server - deploying applicationsShanky Gupta
A Deployment is the mechanism that enables you to deploy one or more applications to multiple Tomcat instances or groups, and to undeploy them just as easily. This page describes the various tasks related to deployment.
Feeling adventurous? Ready to try something new?
Explore the swamps with our iSwamp Application for iPhone!
We provide a large number of swamp maps with detailed information on the safety, places of interest, photos and advice from our unique swamp specialists.
Feel yourself at home. Anywhere.
This is a series in DevOps where we can go through the DevOps practices(Version Control-CI-CD-Agile-IaaC-monitoring-microservices-...etc) with Microsoft technologies and the edge technologies
Its presentation about Version Control from software engineering subject, also in this presentation I have discussed Git and Github its usage and configuration of Github in Dreamweaver, Android Studio, and visual studio and at the last part there is some commands of git and summary,
This blog is for an Intermediate developer who is planning to do Salesforce backup and code management using Git. Unlike Java Salesforce does not have a code versioning system. I am going to demonstrate how we can use Git and Eclipse(Local code base) to have this code management in place.
UiPath Test Automation using UiPath Test Suite series, part 3DianaGray10
Welcome to UiPath Test Automation using UiPath Test Suite series part 3. In this session, we will cover desktop automation along with UI automation.
Topics covered:
UI automation Introduction,
UI automation Sample
Desktop automation flow
Pradeep Chinnala, Senior Consultant Automation Developer @WonderBotz and UiPath MVP
Deepak Rai, Automation Practice Lead, Boundaryless Group and UiPath MVP
Kubernetes & AI - Beauty and the Beast !?! @KCD Istanbul 2024Tobias Schneck
As AI technology is pushing into IT I was wondering myself, as an “infrastructure container kubernetes guy”, how get this fancy AI technology get managed from an infrastructure operational view? Is it possible to apply our lovely cloud native principals as well? What benefit’s both technologies could bring to each other?
Let me take this questions and provide you a short journey through existing deployment models and use cases for AI software. On practical examples, we discuss what cloud/on-premise strategy we may need for applying it to our own infrastructure to get it to work from an enterprise perspective. I want to give an overview about infrastructure requirements and technologies, what could be beneficial or limiting your AI use cases in an enterprise environment. An interactive Demo will give you some insides, what approaches I got already working for real.
UiPath Test Automation using UiPath Test Suite series, part 4DianaGray10
Welcome to UiPath Test Automation using UiPath Test Suite series part 4. In this session, we will cover Test Manager overview along with SAP heatmap.
The UiPath Test Manager overview with SAP heatmap webinar offers a concise yet comprehensive exploration of the role of a Test Manager within SAP environments, coupled with the utilization of heatmaps for effective testing strategies.
Participants will gain insights into the responsibilities, challenges, and best practices associated with test management in SAP projects. Additionally, the webinar delves into the significance of heatmaps as a visual aid for identifying testing priorities, areas of risk, and resource allocation within SAP landscapes. Through this session, attendees can expect to enhance their understanding of test management principles while learning practical approaches to optimize testing processes in SAP environments using heatmap visualization techniques
What will you get from this session?
1. Insights into SAP testing best practices
2. Heatmap utilization for testing
3. Optimization of testing processes
4. Demo
Topics covered:
Execution from the test manager
Orchestrator execution result
Defect reporting
SAP heatmap example with demo
Speaker:
Deepak Rai, Automation Practice Lead, Boundaryless Group and UiPath MVP
Dev Dives: Train smarter, not harder – active learning and UiPath LLMs for do...UiPathCommunity
💥 Speed, accuracy, and scaling – discover the superpowers of GenAI in action with UiPath Document Understanding and Communications Mining™:
See how to accelerate model training and optimize model performance with active learning
Learn about the latest enhancements to out-of-the-box document processing – with little to no training required
Get an exclusive demo of the new family of UiPath LLMs – GenAI models specialized for processing different types of documents and messages
This is a hands-on session specifically designed for automation developers and AI enthusiasts seeking to enhance their knowledge in leveraging the latest intelligent document processing capabilities offered by UiPath.
Speakers:
👨🏫 Andras Palfi, Senior Product Manager, UiPath
👩🏫 Lenka Dulovicova, Product Program Manager, UiPath
Elevating Tactical DDD Patterns Through Object CalisthenicsDorra BARTAGUIZ
After immersing yourself in the blue book and its red counterpart, attending DDD-focused conferences, and applying tactical patterns, you're left with a crucial question: How do I ensure my design is effective? Tactical patterns within Domain-Driven Design (DDD) serve as guiding principles for creating clear and manageable domain models. However, achieving success with these patterns requires additional guidance. Interestingly, we've observed that a set of constraints initially designed for training purposes remarkably aligns with effective pattern implementation, offering a more ‘mechanical’ approach. Let's explore together how Object Calisthenics can elevate the design of your tactical DDD patterns, offering concrete help for those venturing into DDD for the first time!
Encryption in Microsoft 365 - ExpertsLive Netherlands 2024Albert Hoitingh
In this session I delve into the encryption technology used in Microsoft 365 and Microsoft Purview. Including the concepts of Customer Key and Double Key Encryption.
DevOps and Testing slides at DASA ConnectKari Kakkonen
My and Rik Marselis slides at 30.5.2024 DASA Connect conference. We discuss about what is testing, then what is agile testing and finally what is Testing in DevOps. Finally we had lovely workshop with the participants trying to find out different ways to think about quality and testing in different parts of the DevOps infinity loop.
State of ICS and IoT Cyber Threat Landscape Report 2024 previewPrayukth K V
The IoT and OT threat landscape report has been prepared by the Threat Research Team at Sectrio using data from Sectrio, cyber threat intelligence farming facilities spread across over 85 cities around the world. In addition, Sectrio also runs AI-based advanced threat and payload engagement facilities that serve as sinks to attract and engage sophisticated threat actors, and newer malware including new variants and latent threats that are at an earlier stage of development.
The latest edition of the OT/ICS and IoT security Threat Landscape Report 2024 also covers:
State of global ICS asset and network exposure
Sectoral targets and attacks as well as the cost of ransom
Global APT activity, AI usage, actor and tactic profiles, and implications
Rise in volumes of AI-powered cyberattacks
Major cyber events in 2024
Malware and malicious payload trends
Cyberattack types and targets
Vulnerability exploit attempts on CVEs
Attacks on counties – USA
Expansion of bot farms – how, where, and why
In-depth analysis of the cyber threat landscape across North America, South America, Europe, APAC, and the Middle East
Why are attacks on smart factories rising?
Cyber risk predictions
Axis of attacks – Europe
Systemic attacks in the Middle East
Download the full report from here:
https://sectrio.com/resources/ot-threat-landscape-reports/sectrio-releases-ot-ics-and-iot-security-threat-landscape-report-2024/
Builder.ai Founder Sachin Dev Duggal's Strategic Approach to Create an Innova...Ramesh Iyer
In today's fast-changing business world, Companies that adapt and embrace new ideas often need help to keep up with the competition. However, fostering a culture of innovation takes much work. It takes vision, leadership and willingness to take risks in the right proportion. Sachin Dev Duggal, co-founder of Builder.ai, has perfected the art of this balance, creating a company culture where creativity and growth are nurtured at each stage.
Essentials of Automations: Optimizing FME Workflows with ParametersSafe Software
Are you looking to streamline your workflows and boost your projects’ efficiency? Do you find yourself searching for ways to add flexibility and control over your FME workflows? If so, you’re in the right place.
Join us for an insightful dive into the world of FME parameters, a critical element in optimizing workflow efficiency. This webinar marks the beginning of our three-part “Essentials of Automation” series. This first webinar is designed to equip you with the knowledge and skills to utilize parameters effectively: enhancing the flexibility, maintainability, and user control of your FME projects.
Here’s what you’ll gain:
- Essentials of FME Parameters: Understand the pivotal role of parameters, including Reader/Writer, Transformer, User, and FME Flow categories. Discover how they are the key to unlocking automation and optimization within your workflows.
- Practical Applications in FME Form: Delve into key user parameter types including choice, connections, and file URLs. Allow users to control how a workflow runs, making your workflows more reusable. Learn to import values and deliver the best user experience for your workflows while enhancing accuracy.
- Optimization Strategies in FME Flow: Explore the creation and strategic deployment of parameters in FME Flow, including the use of deployment and geometry parameters, to maximize workflow efficiency.
- Pro Tips for Success: Gain insights on parameterizing connections and leveraging new features like Conditional Visibility for clarity and simplicity.
We’ll wrap up with a glimpse into future webinars, followed by a Q&A session to address your specific questions surrounding this topic.
Don’t miss this opportunity to elevate your FME expertise and drive your projects to new heights of efficiency.
Accelerate your Kubernetes clusters with Varnish CachingThijs Feryn
A presentation about the usage and availability of Varnish on Kubernetes. This talk explores the capabilities of Varnish caching and shows how to use the Varnish Helm chart to deploy it to Kubernetes.
This presentation was delivered at K8SUG Singapore. See https://feryn.eu/presentations/accelerate-your-kubernetes-clusters-with-varnish-caching-k8sug-singapore-28-2024 for more details.
2. The following are the steps that need to be followed when installing GitHub
plugin in Anypoint Studio
1. In Studio, click the Help menu, then select Install New Software
2. In the Work with field of the Available Software panel, use the drop-
down menu to select
3. http://download.eclipse.org/egit/updates-2.1
4. In the table below the Work with field, click the check boxes associated
with Eclipse Git Team Provider and JGit.
3. 4. Click the expand arrow to the left of both Eclipse Git Team
Provider and JGit and in the submenus that appear, then click to
deselect the following three items
a. EGit Mylyn
b. Eclipse EGit – Source
c. Eclipse JGit - Source
d. Eclipse Plugin-in Import Support
4. 5. In the Install Details panel, click Next to continue installation.
Please ensure you select the below specified items
a. EGit Mylyn
b. Eclipse EGit – Source
c. Eclipse JGit - Source
d. Eclipse Plugin-in Import Support
5. 6. In the Review Licenses panel, select I accept the terms of the license
agreement, then click Finish.
7. After Mule has installed the EGit plugin, click Yes to complete the
installation and restart Studio.
6. Saving a Studio Project to Git
Create a Git repository so that multiple developers can save changes to a
Studio project in one shared location. To do so, you must first create and
register a Git repository
Creating a Local Repository
1. In the Package Explorer, right click the name of your project, go
to Team, then select Share Project
7. 2. A new wizard to select the repository plugin that will be used to share
the selected project and click Next. (If multiple plugins are installed)
8. 3. In the Configure Git Repository wizard, click Create
9. 4. In the Create a Git Repository panel, click Browse & navigate to
the GIT folder on your local drive
10. 5. Mule populates the fields in the Configure Git Repository panel to
correspond with the folder you created for your new Git repository on
your local drive. Check the box next to your project’s line item in the list,
then click Finish.
11. 6. In the Mule Studio Package Explorer, notice the small question mark icon
that appears next to your project name (below). This icon indicates that
you have created a Git repository for your project on your local drive, but
you have not yet registered it and are not yet tracking changes to the
project.
12. Registering a Local Repository
Please find the steps shows below how to register a local repository
1. In the Package Explorer, right click the name of your project, navigate
to Team, then select Commit.
- To be contd…
13. If you have not yet identified yourself to Git as a user, the Identify
Yourself panel may appear at this point. Enter a User name and User e-
mail that Git can use to identify you and the commits that you make to your
Git repository.
14. 2. In the Commit Changes panel, commit the inaugural version of your
Studio project which will effectively register the project on your local
drive. In the Commit message field, enter a description of the project you
are about to commit to the repository. (In the future, when you commit
changes to the project to your repository, use the Commit message field to
record the changes that you have made to the project since your last
commit.)
15. 3. In the Files pane, notice that Mule has applied a question mark icon to
each of the items in the list. This icon indicates that the file is "untracked"
in Git (i.e. the file has not yet been saved in the repository). Click the
checkbox next to each item to select all of them
16. 4. Click Commit to save your project in your new Git repository
5. In the Package Explorer, notice that Mule applies a barrel icon to your
project name (below). This icon indicates that you have committed this
project to a Git repository.
17. Committing Changes to the Local Repository
After making changes to your Studio project and saving in Mule, you can
commit changes to the project in your local Git repository.
1. First, save the changes you have made to your Studio project in Mule
(File > Save).
2. In the Package Explorer, notice that Mule applies a chevron in front of
your project name (below). This icon indicates that you have made
changes to your Studio project but have not yet committed those changes
to your Git repository.
3. In the Package Explorer, right click the name of your project, go to Team,
and select Commit.
18. 4. In the Commit message field of the Commit Changes panel, enter notes to
describe what you have added or changed in the Studio project.
5. Click the box next to all items listed in the Files pane, then
click Commit to save your changes to your local Git repository.
19. Committing and Pushing to a Remote Repository
When multiple people work on a Studio project, they must all synchronize
changes through the a remote Git repository. Within Studio, you can push your
latest commits to a project to the remote Git repository.
1. If your project is already being tracked on a remote Git repository, you
must first Cloning and Pulling from a Remote Repository of your project
from the remote repository before proceeding to step 2. This ensures that
the commits you are about to push contain all the project changes that
others have previously committed to the remote repository
2. Follow the steps above to commit your changes locally.
3. In the Package Explorer, right-click the name of your project, navigate to
Team, then select Push to Upstream.
20. 4. Mule pushes your commits to the remote Git repository, then presents a
Push Results panel that describes the commits you have pushed. Click
OK
21. Importing a Git Project into Studio
Studio offers two ways to import a project from a Git repository:
a. If you have already cloned your Git repository and stored it on your local
drive, follow the procedure for Importing a Project from a Local Drive.
b. If you have not yet cloned your Git repository and stored it on your local
drive, follow the procedure for Importing From a Remote Repository
22. Importing from a Local Drive
1. In Studio, under the File menu, select Import
2. In the Import wizard, click the expand arrow next to the Git folder, then
select Projects from Git.
3. Click Next to continue.
23. 4. In the Import Projects from Git wizard, select Local, then click Next.
5. Click to select a Git repository from the list of repositories on your local
drive, then click Next.
6. Select Import existing projects from the list of import methods, then click
to select the Working Directory folder
7. Click next
24. 8. Use the drop-down menu in the Working sets field to select the project
you wish to import, then click Finish.
9. Known Issue: Under the Projects menu, select Clean to scrub the project
and ensure that Studio has created a consistent build path.
10. Under the File menu, select Open, then navigate to the cloned repository
on your hard drive to open your project and work with it in Studio.
25. Importing From a Remote Repository
1. In Studio, under the File menu, select Import
2. In the Import wizard, click the expand arrow next to the Git folder, then
select Projects from Git.
3. Click Next to continue.
26. 4. In the Import Projects from Git wizard, select URI, then click Next.
5. In the URI field, identify your user name and the name of your Git
repository. Use the following format to enter the
information:git@github.com:username/repository-name.git. When you
enter this information, Studio automatically completes the remaining
required fields in the panel.
27. 6. In the list of branches in your Git repository, click the boxes next to the
branch (or branches) of your project that you wish to check out and work
on in Studio.
7. Click Next to continue.
8. Select the directory on your local drive to which you want to clone and
save your project, then click Next. Git clones the branch(es) you selected
and stores them on your local drive.
9. Select Import existing projects from the list of import methods, select the
working Directory folder, then click Next
28. 10. Use the drop-down menu in the Working sets field to select the project
you wish to import, then click Finish.
11. Known Issue: Under the Projects menu, select Clean to scrub the project
and ensure that Studio has created a consistent build path
12. Under the File menu, select Open then navigate to the cloned repository
on your hard drive to open your project and work with it in Studio.
29. Cloning and Pulling from a Remote Repository
For multiple people to collaborate on a Studio project, everyone must
synchronize their changes through a remote Git repository. To work on your
project locally within Studio, clone, then pull the latest version of a project
from a remote Git repository.
1. In Studio, close all the Message Flow tabs of the project you are about to
pull from your remote Git repository.
2. In Package Explorer, right-click the name of your project, navigate
to Team, then select Pull
3. Mule pulls the project from the remote repository, then it presents a Pull
Result panel that describes the changes others have made to the project
since your last pull.
30. 5. Click OK.
6. In Package Explorer, double-click the name of the flow(s) in your project
to reopen them on your Studio canvas.