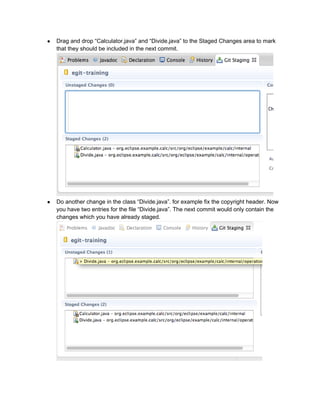
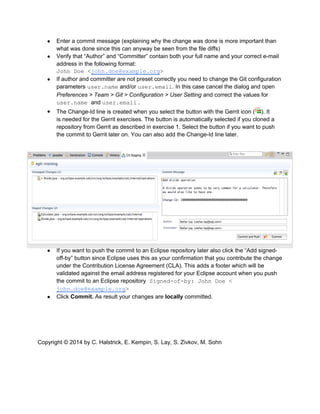
Develop a feature/bug fix
In this exercise you will learn how to develop a new feature using EGit. Using a new local
branch for each new change (feature or bug fix) is what we recommend.
● Create a local Feature Branch
The development of a new feature (or bug-fix) should normally only depend on the
submitted state of the project (and not depend on pending changes that might or might
not pass the code review). This is why every new feature or bug-fix should be developed
in isolation on its own branch which is usually created based on the latest state of the
master branch available on the server (this is the remote tracking branch origin/
master in your local clone).
○ Go to the History View
○ Select the latest commit which has the label ‘origin/master’ and
click Create Branch..
○ in the “New Branch” dialog
■ enter a name for the local feature branch into the “Branch Name” field
(this is just a local name that is not exposed to anybody else)
■ keep the Pull Strategy Merge
■ keep Checkout new branch selected
■ confirm the dialog by clicking on Finish
○ This creates and checks out the new branch
● Develop the feature
Simply start editing the source code and implement the feature. The example project
implements a simple calculator, you may want to add an operation (create a new class
Divide.java in package org.eclipse.example.calc.internal.operations
and add a corresponding line to method setupDefaultOperations in class
Calculator) or polish its SWT or Swing UI..
● Test your feature
Run the unit tests. To keep the tutorial setup simple there are only unit tests for the logic
but no UI tests.
● Commit your changes locally
Now you want to create a new version of the local repository in your current feature
branch containing your changes. This is called “commit”.
There are two ways to perform a commit: with the Commit Dialog or from the Staging
View. In this exercise we will use the Staging View.
● Open the Git Staging view and inspect the status
Open the staging view by selecting Window > Show View > Other… > Git Staging. This
view presents which files you have touched and which files will be in the next commit.
“Unstaged Changes” lists those changes which you have done locally but which you
have not yet added to the index. “Staged Changes” list those changes which you already
have added to the index. You can drag and drop files from one area to the other.
● The Git Staging view should list two files “Calculator.java” and “Divide.java”. Double-click
on “Calculator.java” to inspect which changes you have done.
● Drag and drop “Calculator.java” and “Divide.java” to the Staged Changes area to mark
that they should be included in the next commit.
● Do another change in the class “Divide.java”. for example fix the copyright header. Now
you have two entries for the file “Divide.java”. The next commit would only contain the
changes which you have already staged.
● Enter a commit message (explaining why the change was done is more important than
what was done since this can anyway be seen from the file diffs)
● Verify that “Author” and “Committer” contain both your full name and your correct e-mail
address in the following format:
John Doe <john.doe@example.org>
● If author and committer are not preset correctly you need to change the Git configuration
parameters user.name and/or user.email. In this case cancel the dialog and open
Preferences > Team > Git > Configuration > User Setting and correct the values for
user.name and user.email .
● The Change-Id line is created when you select the button with the Gerrit icon ( ). It
is needed for the Gerrit exercises. The button is automatically selected if you cloned a
repository from Gerrit as described in exercise 1. Select the button if you want to push
the commit to Gerrit later on. You can also add the Change-Id line later.
● If you want to push the commit to an Eclipse repository later also click the “Add signed-
off-by” button since Eclipse uses this as your confirmation that you contribute the change
under the Contribution License Agreement (CLA). This adds a footer which will be
validated against the email address registered for your Eclipse account when you push
the commit to an Eclipse repository Signed-of-by: John Doe <
john.doe@example.org>
● Click Commit. As result your changes are locally committed.
Copyright © 2014 by C. Halstrick, E. Kempin, S. Lay, S. Zivkov, M. Sohn

Git Tutorial EclipseCon France 2014 - Git Exercise 02 - develop a feature

  • 1.
    Develop a feature/bugfix In this exercise you will learn how to develop a new feature using EGit. Using a new local branch for each new change (feature or bug fix) is what we recommend. ● Create a local Feature Branch The development of a new feature (or bug-fix) should normally only depend on the submitted state of the project (and not depend on pending changes that might or might not pass the code review). This is why every new feature or bug-fix should be developed in isolation on its own branch which is usually created based on the latest state of the master branch available on the server (this is the remote tracking branch origin/ master in your local clone). ○ Go to the History View ○ Select the latest commit which has the label ‘origin/master’ and
  • 2.
    click Create Branch.. ○in the “New Branch” dialog ■ enter a name for the local feature branch into the “Branch Name” field (this is just a local name that is not exposed to anybody else) ■ keep the Pull Strategy Merge ■ keep Checkout new branch selected
  • 3.
    ■ confirm thedialog by clicking on Finish ○ This creates and checks out the new branch ● Develop the feature Simply start editing the source code and implement the feature. The example project implements a simple calculator, you may want to add an operation (create a new class Divide.java in package org.eclipse.example.calc.internal.operations
  • 4.
    and add acorresponding line to method setupDefaultOperations in class Calculator) or polish its SWT or Swing UI.. ● Test your feature Run the unit tests. To keep the tutorial setup simple there are only unit tests for the logic but no UI tests. ● Commit your changes locally Now you want to create a new version of the local repository in your current feature branch containing your changes. This is called “commit”. There are two ways to perform a commit: with the Commit Dialog or from the Staging View. In this exercise we will use the Staging View. ● Open the Git Staging view and inspect the status Open the staging view by selecting Window > Show View > Other… > Git Staging. This view presents which files you have touched and which files will be in the next commit. “Unstaged Changes” lists those changes which you have done locally but which you have not yet added to the index. “Staged Changes” list those changes which you already have added to the index. You can drag and drop files from one area to the other. ● The Git Staging view should list two files “Calculator.java” and “Divide.java”. Double-click on “Calculator.java” to inspect which changes you have done.
  • 5.
    ● Drag anddrop “Calculator.java” and “Divide.java” to the Staged Changes area to mark that they should be included in the next commit. ● Do another change in the class “Divide.java”. for example fix the copyright header. Now you have two entries for the file “Divide.java”. The next commit would only contain the changes which you have already staged.
  • 6.
    ● Enter acommit message (explaining why the change was done is more important than what was done since this can anyway be seen from the file diffs) ● Verify that “Author” and “Committer” contain both your full name and your correct e-mail address in the following format: John Doe <john.doe@example.org> ● If author and committer are not preset correctly you need to change the Git configuration parameters user.name and/or user.email. In this case cancel the dialog and open Preferences > Team > Git > Configuration > User Setting and correct the values for user.name and user.email . ● The Change-Id line is created when you select the button with the Gerrit icon ( ). It is needed for the Gerrit exercises. The button is automatically selected if you cloned a repository from Gerrit as described in exercise 1. Select the button if you want to push the commit to Gerrit later on. You can also add the Change-Id line later. ● If you want to push the commit to an Eclipse repository later also click the “Add signed- off-by” button since Eclipse uses this as your confirmation that you contribute the change under the Contribution License Agreement (CLA). This adds a footer which will be validated against the email address registered for your Eclipse account when you push the commit to an Eclipse repository Signed-of-by: John Doe < john.doe@example.org> ● Click Commit. As result your changes are locally committed. Copyright © 2014 by C. Halstrick, E. Kempin, S. Lay, S. Zivkov, M. Sohn