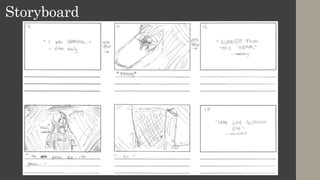
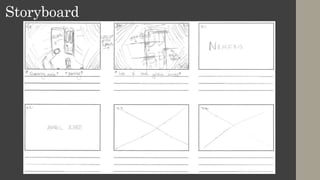
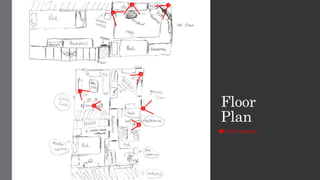
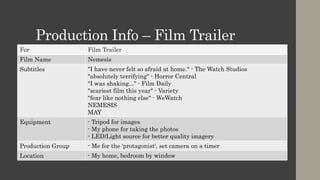
FMP Planning
Millie Smith
Film Poster
Planning
Style Sheet
Colour Scheme 1:
This colour scheme consists of melancholy and
dark blues. I believe this colour scheme is quite
fitting for the vibe and aesthetic I am aiming for.
Cold colours in horror are commonly used as they
connote a sinister atmosphere and give a 'chilling'
effect as explored in my research. I can
incorporate this colour scheme into my trailers
lighting in order to help build the atmosphere I
am going for, lonesome and dark. I can also use
colouring effects in premiere to help amplify this
colour scheme. With my film poster, I can also
incorporate this colour scheme with filters and
creating lighting effects with photoshop. I can also
include it with my typography, making sure that
the colours matches the rest of the image.
Colour Scheme 2:
This colour scheme, in contrast to the first colour scheme, includes much warmer colours.
Usage of warmer colours gives the opposite effect of the 1st colour scheme; it builds a more
comforting atmosphere unlike the melancholy feeling from colder colours. Despite this
subverting horror convention, I believe incorporating these colours can supply a good
contrast. I can portray an almost binary opposition between 'freedom' and being 'trapped'.
Combining both colour schemes into my project could give an interesting contrast. In my
trailer, I could use warmer colours at the beginning and slowly descend into the second
colour scheme as the tone shifts to a more sinister one. I could also use a warmer colouring
when looking outside and keep colder colours on the inside where the protagonist is trapped
in order to show the idea of desired freedom. In my film poster I can directly have these 2
colour schemes clashing in order to emphasise the contrast. This may work as the colours are
complementary to one another. I can use lighting in the film poster in order to portray this.
For my film poster I'd like to include imagery similar to this. As
you can see in this image, there is a girl peering out the
window, the inside having colder colours whilst the outside has
much warmer colours. This shares a lot of similarities with my
idea for my film poster. The contrast between colours, using the
lighting to help portray the feeling of being trapped. I can
follow my colour schemes in order to create an interesting and
appealing contrast. Not only this but I'd like to incorporate
glitches and distortion effects to add to the creepy feeling (like
the CAM film poster in my research). This could work
quite nicely and give my poster a sinister and unique vibe. I
could also do a similar technique with my film trailer, having
warm lighting slowly descend into darker and colder lighting
as the tone shifts.
Title:
Sub-Title:
Here I picked fonts that
fit my style and genre.
For the film title I chose
a glitchy VHS esc font to
help portray the idea of
found footage. It also
looks unsettling to still
tap into the horror
genre. For the sub-title
font, I chose a serif font
in order to conform to
horror genre convention.
Layout Plan
For my film poster layout, I want my image to reflect my style
sheet. I want the photo to be of a person looking outside a window
to portray the idea of being trapped indoors. I also want to include
the 2 colour schemes simultaneously, having the warmer colour
scheme being on the outside and the colder colour scheme being
on the inside with the character. The lighting will give an
interesting contrast and give the poster a unique vibe. I also want
to include glitchy and distortion effects to put on emphasis on the
recording style of my trailer, watching back found footage.
Another aspect I'll include in my film poster is an eerie shadow
behind the protagonist to add to the idea of being hunted.
There will also be the title at the top with the tagline and billing
block below. This is a common compostion for film posters, the
title will be the largest as it is the most siginificant piece of
information and I want to draw the audiences attetion to this
first. I'll also include a tagline to make the film more memorable.
Production Info – Film Poster
For Film Poster
Film Name Nemesis
Tagline "you can't run, and you can't hide."
Equipment - Tripod for images
- My phone for taking the photos
- LED/Light source for better quality imagery
Production Group - Me for the 'protagonist', set camera on a timer
Location - My home, bedroom by window
Film Trailer
Planning
Style Sheet
Title:
Sub-Title:
Here I picked fonts that fit
my style and genre. For the
film title I chose a glitchy
VHS esc font to help portray
the idea of found footage. It
also looks unsettling to still
tap into the horror genre. For
the sub-title font, I chose a
serif font in order to conform
to horror genre convention.
In my film trailer I will also
add glitch effects on top of
the text to add to the
distorted and glitchy vibe.
In my film trailer I want to have frames with
text of positive 'review' quotes in order to help
promote the film. In these cuts I will have the
background be dark and eerie (smoke, lightleaks
etc) to reflect the horror genre in my trailer. I
will have white text on screen in order to stand
out from the background, and I'll also include
glicth/vhs effects. Having random glitches over
the text will add to the horror aspect as it'll act
as a jump-scare if accompanied by a noise. I
believe this will make my film trailer scarier
and therefore comformative to horror genre
convention. The VHS effects will also add to the
illusion of watching back footage. I can use
glitch overlays and use a mix of the blue and
orange colour scheme from my first style sheet!
For my film trailer I will have 'night vision' camera
shots for the security footage in the dark. In these
shots I will use a green colour scheme in order to
easily show that the scene is in the dark and that
the cameras are night vision. Not only this but
greens are cold colours which conform to horror
convention well! The colour green is also often
associated with ghosts which works quite well for
my film idea. For the rest of my clips, I will try keep
the footage desaturated or dark in tone, this is so
horror convention is followed and so that my trailer
follows the creepy vibe I am going for.
There will be a lot of usage of high
angles in my film trailer as I want to
replicate the feeling of security
footage, having cameras in high up
areas and putting effects on these
clips in order to portray that security
footage feeling. This footage may
portray the character going about
their day normally or paranormal
activity in order to build a setting and
immerse the audience into the world.
It will help put on emphasis on the
fact that the audience are watching
'found footage'.
Storyboard
"Being alone all the time sucks. I
can't go outside and..."
"...being stuck
indoors..."
"...all the time gets a little
worrying."
"So, I set up..."
Storyboard
Storyboard
Storyboard
Floor
Plan
still cameras
1
2 3
4
5
6
7
8
Locations
Dining room/living room
Outside
Kitchen
Bedroom
Hallway
Bathroom
1
2
3
6
4
5
8
7
Production Info – Film Trailer
For Film Trailer
Film Name Nemesis
Subtitles "I have never felt so afraid at home." - The Watch Studios
"absolutely terrifying" - Horror Central
"I was shaking..." - Film Daily
"scariest film this year" - Variety
"fear like nothing else" - WeWatch
NEMESIS
MAY
Equipment - Tripod for images
- My phone for taking the photos
- LED/Light source for better quality imagery
Production Group - Me for the 'protagonist', set camera on a timer
Location - My home, bedroom by window
Locations/Recording Style
• As explained in my pre-production work I want to record in a style which I
can do on my own, similar to Paranormal Actitvity giving the illusion of
found footage. I'll also be recording strictly in my own home with no other
locations. I decided this because not only does it immerse the audience more
into my trailer, making it seem as if it were able to happen to them, I believe
it works well with my current restrictions due to the pandemic. I won't be
able to record in many locations and recording other people can be a risk.
Therefore, I have taken this route to not only create an effective
advertisement but also adhere to the restrictions that are currently in place.
I think this will improve my product and also allow for better contingency as
less can go wrong.
Script
• [build-up]
line 1: "Being alone all the time sucks. I can't go outside and being stuck
indoors all the time gets a little worrying. So, I set up cameras,
because... I don't think I'm really alone. *gasp*"
• [after build-up]
line 2: "I NEED TO GET OUT LET ME OUT!" - screaming
line 3: "I'm gonna die, I'm gonna die..." - hysterical + crying
*panting*
Music + Sound
Sound Source/How I'll create it
Main Soundtrack https://www.youtube.com/watch?v=jrw0qHJLRtA
Glitches https://www.youtube.com/watch?v=F7Yso1Oxu4k
https://www.youtube.com/watch?v=cwnzygvHhGM
Banging Foley method, banging against wall, door and window
Speech Voice over the clips after they've been recorded
Slamming Door Recording myself slamming door
Footsteps Record friend walking on various floors for different sound (hard-floor,
running on carpet)
Fumbling Camera Record on phone whilst fumbling with it to create the same effect
Typing + Clicking Typing on a keyboard, then separately clicking a mouse
Eating/Crunching Crunch cereal
Doorbell Ringing https://www.youtube.com/watch?v=hvD8t7uzD7k
Shot List
Shot
Number
Shot
Size
Location Camera Content
1 + 7 + 8 CU Bathroom Moving Recording self with camera, talking to camera, line 1. Like a
diary. Then turns head and gasps after hearing a sound.
2 + 2.5 FS Living Room 5 + 4 Eating cereal, going about daily life.
3 DS Bedroom 3 Typing on computer, laid in bed + looking out window.
5 CU Bedroom 1 Setting up a camera in bedroom whilst it is recording.
6 FS Kitchen 6 Walking past a setup camera with dishes.
9 + 10 MCU Bedroom,
Computer
2 Typing on computer, then being grabbed by a mysterious
figure from behind. (dark)
9.5 [ x ] Doorbell (built
in camera)
7 Nothing is noticeably visible; doorbell being constantly rung by
seemingly nothing. (dark)
12 FS Bedroom 1 Banging on window, line 2. (dark)
14 FS Bedroom 3 Asleep in bed, then waking up distressed, having
shadowy figures moving around in the background.
16 CU,
ECU
Bedroom Moving Sat on floor, shaky camera, crying. Line 3. (dark)
17 [ x ] Bathroom 8 Light banging against doorframe
Shot List
Shot
Number
Shot
Size
Location Camera Content
19 + 20 [ x ] Hallway Moving Rushing through hallway. (dark.)
8 FS Bathroom Moving Curled up in a ball, looking frightened, camera still on the
8.5 [ x ] Kitchen Moving Walking through kitchen, door slams in front.
General
Planning
Planning
Schedule
Week Plan
1 Get images for film poster as well as needed sound effects. Edit film
poster, using techniques from my glitch experiment to make my horror
film poster.
2 Record footage and start editing it, putting it all together alongside the
music.
3 Effects, voice overs, sound effects etc!
4 Finish off anything production wise such as the editing (mainly)
Schedule – Week One
Day Plan
[x] - mon [ X ]
1 - tue - Get images for film poster
- Start editing film poster
- Work on colour correction, implementing my colour scheme by making
edits to the lighting (using a smoke brush and overlays)
2 - wed - Finish off film poster
- Add typography
- Glitch effects
- Any final additions
Schedule – Week Two
Day Plan
4 - mon - Record footage film trailer
- Finish off film poster if needed
- Start editing film trailer
- Colour correction, putting it together against the track
5 - tue - Get sound effects
- Keep editing film trailer, add glitch transitions and security camera
effects
6 - wed - Add sound effects
- Finish adding effects to other clips
- Do title screen, review messages
- Get more footage
Schedule – Week Three
Day Plan
7 - mon - Get more footage and add it to edit
- Colour correct new footage
8 - tue - Work on adjustment layers for camera effects, one for the dark
for the light
9 - wed - Add more sound effects
- Finish up any editing or colour correcting needed
- Add more effects for fear factor
Schedule – Week Four
Day Plan
[x] - mon [x]
10- tue - Get final batch of footage
- Colour correct footage and add necessary effects
- Put new clips in
11- wed - Final touches and finishing up the edit
- Get voice overs to add over the trailer
Risk Assessment
Risk Risk Level Safety Precaution
Tripping over wires Medium Make sure all the wires on the floor are out the
way, keep the floor clear where I am working
Tripping when running High Yet again making sure the floor area is cleared,
jogging rather than sprinting
Falling when setting up high
cameras
Med Use a chair or step ladder to securely set up
cameras in the high areas so I have more height
to adjust the cameras without the risk of falling
Knocking things off high areas
when setting up cameras
Low Make sure nobody is below me when I am setting
up so there's no risk of anything falling on them
Getting fingers trapped in door
when recording foley
Low Keep fingers clear of the door when slamming it.
Getting harmed when being
grabbed for shot #10
Med When getting grabbed from behind, make sure
not to do so too violently in case of being harmed.
Catching COVID when in
college
Med When editing in college make sure to use hand
sanitiser and clean my work-space before using
it.
Contingency Plan
What could go wrong Backup plan
No access to a tripod or it
breaks
Use my phone stand and put my phone in areas like my drawers which will be
fine as a tripod alternative.
Phone breaks (falling from a
height)
Use a camera instead to gather footage or borrow a phone from a family
member when recording. Can take precautions to secure phone to ensure it
doesn't fall or have something soft beneath just in case it does fall (won't be in
camera shot).
Losing project Making sure to have a backup save on onedrive, saving regularly not to lose
any progress.
Spilling water on phone when
recording shot #5
Make sure phone is raised on an object like a coaster so that if a spillage were
to occur, it would not be affected.
Can't get access to LED for
dark clips
Use phone torch as an alternative, however if it doesn't reach far enough have
the lights turned on in order to light up the room, can be edited in post.
Go into lockdown/can't edit at
college
Have all my work backed up to one drive so I can work from home, if need be,
my project itself is all recorded at home.
Bad quality audio Try and make sure to be in a quiet area to record audio, if needed can edit out
noise in post
Can't record sound at college Record at home instead, can have brother or another family member assist me
instead

Fmp Planning

  • 1.
  • 2.
  • 3.
    Style Sheet Colour Scheme1: This colour scheme consists of melancholy and dark blues. I believe this colour scheme is quite fitting for the vibe and aesthetic I am aiming for. Cold colours in horror are commonly used as they connote a sinister atmosphere and give a 'chilling' effect as explored in my research. I can incorporate this colour scheme into my trailers lighting in order to help build the atmosphere I am going for, lonesome and dark. I can also use colouring effects in premiere to help amplify this colour scheme. With my film poster, I can also incorporate this colour scheme with filters and creating lighting effects with photoshop. I can also include it with my typography, making sure that the colours matches the rest of the image. Colour Scheme 2: This colour scheme, in contrast to the first colour scheme, includes much warmer colours. Usage of warmer colours gives the opposite effect of the 1st colour scheme; it builds a more comforting atmosphere unlike the melancholy feeling from colder colours. Despite this subverting horror convention, I believe incorporating these colours can supply a good contrast. I can portray an almost binary opposition between 'freedom' and being 'trapped'. Combining both colour schemes into my project could give an interesting contrast. In my trailer, I could use warmer colours at the beginning and slowly descend into the second colour scheme as the tone shifts to a more sinister one. I could also use a warmer colouring when looking outside and keep colder colours on the inside where the protagonist is trapped in order to show the idea of desired freedom. In my film poster I can directly have these 2 colour schemes clashing in order to emphasise the contrast. This may work as the colours are complementary to one another. I can use lighting in the film poster in order to portray this. For my film poster I'd like to include imagery similar to this. As you can see in this image, there is a girl peering out the window, the inside having colder colours whilst the outside has much warmer colours. This shares a lot of similarities with my idea for my film poster. The contrast between colours, using the lighting to help portray the feeling of being trapped. I can follow my colour schemes in order to create an interesting and appealing contrast. Not only this but I'd like to incorporate glitches and distortion effects to add to the creepy feeling (like the CAM film poster in my research). This could work quite nicely and give my poster a sinister and unique vibe. I could also do a similar technique with my film trailer, having warm lighting slowly descend into darker and colder lighting as the tone shifts. Title: Sub-Title: Here I picked fonts that fit my style and genre. For the film title I chose a glitchy VHS esc font to help portray the idea of found footage. It also looks unsettling to still tap into the horror genre. For the sub-title font, I chose a serif font in order to conform to horror genre convention.
  • 4.
    Layout Plan For myfilm poster layout, I want my image to reflect my style sheet. I want the photo to be of a person looking outside a window to portray the idea of being trapped indoors. I also want to include the 2 colour schemes simultaneously, having the warmer colour scheme being on the outside and the colder colour scheme being on the inside with the character. The lighting will give an interesting contrast and give the poster a unique vibe. I also want to include glitchy and distortion effects to put on emphasis on the recording style of my trailer, watching back found footage. Another aspect I'll include in my film poster is an eerie shadow behind the protagonist to add to the idea of being hunted. There will also be the title at the top with the tagline and billing block below. This is a common compostion for film posters, the title will be the largest as it is the most siginificant piece of information and I want to draw the audiences attetion to this first. I'll also include a tagline to make the film more memorable.
  • 5.
    Production Info –Film Poster For Film Poster Film Name Nemesis Tagline "you can't run, and you can't hide." Equipment - Tripod for images - My phone for taking the photos - LED/Light source for better quality imagery Production Group - Me for the 'protagonist', set camera on a timer Location - My home, bedroom by window
  • 6.
  • 7.
    Style Sheet Title: Sub-Title: Here Ipicked fonts that fit my style and genre. For the film title I chose a glitchy VHS esc font to help portray the idea of found footage. It also looks unsettling to still tap into the horror genre. For the sub-title font, I chose a serif font in order to conform to horror genre convention. In my film trailer I will also add glitch effects on top of the text to add to the distorted and glitchy vibe. In my film trailer I want to have frames with text of positive 'review' quotes in order to help promote the film. In these cuts I will have the background be dark and eerie (smoke, lightleaks etc) to reflect the horror genre in my trailer. I will have white text on screen in order to stand out from the background, and I'll also include glicth/vhs effects. Having random glitches over the text will add to the horror aspect as it'll act as a jump-scare if accompanied by a noise. I believe this will make my film trailer scarier and therefore comformative to horror genre convention. The VHS effects will also add to the illusion of watching back footage. I can use glitch overlays and use a mix of the blue and orange colour scheme from my first style sheet! For my film trailer I will have 'night vision' camera shots for the security footage in the dark. In these shots I will use a green colour scheme in order to easily show that the scene is in the dark and that the cameras are night vision. Not only this but greens are cold colours which conform to horror convention well! The colour green is also often associated with ghosts which works quite well for my film idea. For the rest of my clips, I will try keep the footage desaturated or dark in tone, this is so horror convention is followed and so that my trailer follows the creepy vibe I am going for. There will be a lot of usage of high angles in my film trailer as I want to replicate the feeling of security footage, having cameras in high up areas and putting effects on these clips in order to portray that security footage feeling. This footage may portray the character going about their day normally or paranormal activity in order to build a setting and immerse the audience into the world. It will help put on emphasis on the fact that the audience are watching 'found footage'.
  • 8.
    Storyboard "Being alone allthe time sucks. I can't go outside and..." "...being stuck indoors..." "...all the time gets a little worrying." "So, I set up..."
  • 9.
  • 10.
  • 11.
  • 12.
  • 13.
  • 14.
    Production Info –Film Trailer For Film Trailer Film Name Nemesis Subtitles "I have never felt so afraid at home." - The Watch Studios "absolutely terrifying" - Horror Central "I was shaking..." - Film Daily "scariest film this year" - Variety "fear like nothing else" - WeWatch NEMESIS MAY Equipment - Tripod for images - My phone for taking the photos - LED/Light source for better quality imagery Production Group - Me for the 'protagonist', set camera on a timer Location - My home, bedroom by window
  • 15.
    Locations/Recording Style • Asexplained in my pre-production work I want to record in a style which I can do on my own, similar to Paranormal Actitvity giving the illusion of found footage. I'll also be recording strictly in my own home with no other locations. I decided this because not only does it immerse the audience more into my trailer, making it seem as if it were able to happen to them, I believe it works well with my current restrictions due to the pandemic. I won't be able to record in many locations and recording other people can be a risk. Therefore, I have taken this route to not only create an effective advertisement but also adhere to the restrictions that are currently in place. I think this will improve my product and also allow for better contingency as less can go wrong.
  • 16.
    Script • [build-up] line 1:"Being alone all the time sucks. I can't go outside and being stuck indoors all the time gets a little worrying. So, I set up cameras, because... I don't think I'm really alone. *gasp*" • [after build-up] line 2: "I NEED TO GET OUT LET ME OUT!" - screaming line 3: "I'm gonna die, I'm gonna die..." - hysterical + crying *panting*
  • 17.
    Music + Sound SoundSource/How I'll create it Main Soundtrack https://www.youtube.com/watch?v=jrw0qHJLRtA Glitches https://www.youtube.com/watch?v=F7Yso1Oxu4k https://www.youtube.com/watch?v=cwnzygvHhGM Banging Foley method, banging against wall, door and window Speech Voice over the clips after they've been recorded Slamming Door Recording myself slamming door Footsteps Record friend walking on various floors for different sound (hard-floor, running on carpet) Fumbling Camera Record on phone whilst fumbling with it to create the same effect Typing + Clicking Typing on a keyboard, then separately clicking a mouse Eating/Crunching Crunch cereal Doorbell Ringing https://www.youtube.com/watch?v=hvD8t7uzD7k
  • 18.
    Shot List Shot Number Shot Size Location CameraContent 1 + 7 + 8 CU Bathroom Moving Recording self with camera, talking to camera, line 1. Like a diary. Then turns head and gasps after hearing a sound. 2 + 2.5 FS Living Room 5 + 4 Eating cereal, going about daily life. 3 DS Bedroom 3 Typing on computer, laid in bed + looking out window. 5 CU Bedroom 1 Setting up a camera in bedroom whilst it is recording. 6 FS Kitchen 6 Walking past a setup camera with dishes. 9 + 10 MCU Bedroom, Computer 2 Typing on computer, then being grabbed by a mysterious figure from behind. (dark) 9.5 [ x ] Doorbell (built in camera) 7 Nothing is noticeably visible; doorbell being constantly rung by seemingly nothing. (dark) 12 FS Bedroom 1 Banging on window, line 2. (dark) 14 FS Bedroom 3 Asleep in bed, then waking up distressed, having shadowy figures moving around in the background. 16 CU, ECU Bedroom Moving Sat on floor, shaky camera, crying. Line 3. (dark) 17 [ x ] Bathroom 8 Light banging against doorframe
  • 19.
    Shot List Shot Number Shot Size Location CameraContent 19 + 20 [ x ] Hallway Moving Rushing through hallway. (dark.) 8 FS Bathroom Moving Curled up in a ball, looking frightened, camera still on the 8.5 [ x ] Kitchen Moving Walking through kitchen, door slams in front.
  • 20.
  • 21.
    Schedule Week Plan 1 Getimages for film poster as well as needed sound effects. Edit film poster, using techniques from my glitch experiment to make my horror film poster. 2 Record footage and start editing it, putting it all together alongside the music. 3 Effects, voice overs, sound effects etc! 4 Finish off anything production wise such as the editing (mainly)
  • 22.
    Schedule – WeekOne Day Plan [x] - mon [ X ] 1 - tue - Get images for film poster - Start editing film poster - Work on colour correction, implementing my colour scheme by making edits to the lighting (using a smoke brush and overlays) 2 - wed - Finish off film poster - Add typography - Glitch effects - Any final additions
  • 23.
    Schedule – WeekTwo Day Plan 4 - mon - Record footage film trailer - Finish off film poster if needed - Start editing film trailer - Colour correction, putting it together against the track 5 - tue - Get sound effects - Keep editing film trailer, add glitch transitions and security camera effects 6 - wed - Add sound effects - Finish adding effects to other clips - Do title screen, review messages - Get more footage
  • 24.
    Schedule – WeekThree Day Plan 7 - mon - Get more footage and add it to edit - Colour correct new footage 8 - tue - Work on adjustment layers for camera effects, one for the dark for the light 9 - wed - Add more sound effects - Finish up any editing or colour correcting needed - Add more effects for fear factor
  • 25.
    Schedule – WeekFour Day Plan [x] - mon [x] 10- tue - Get final batch of footage - Colour correct footage and add necessary effects - Put new clips in 11- wed - Final touches and finishing up the edit - Get voice overs to add over the trailer
  • 26.
    Risk Assessment Risk RiskLevel Safety Precaution Tripping over wires Medium Make sure all the wires on the floor are out the way, keep the floor clear where I am working Tripping when running High Yet again making sure the floor area is cleared, jogging rather than sprinting Falling when setting up high cameras Med Use a chair or step ladder to securely set up cameras in the high areas so I have more height to adjust the cameras without the risk of falling Knocking things off high areas when setting up cameras Low Make sure nobody is below me when I am setting up so there's no risk of anything falling on them Getting fingers trapped in door when recording foley Low Keep fingers clear of the door when slamming it. Getting harmed when being grabbed for shot #10 Med When getting grabbed from behind, make sure not to do so too violently in case of being harmed. Catching COVID when in college Med When editing in college make sure to use hand sanitiser and clean my work-space before using it.
  • 27.
    Contingency Plan What couldgo wrong Backup plan No access to a tripod or it breaks Use my phone stand and put my phone in areas like my drawers which will be fine as a tripod alternative. Phone breaks (falling from a height) Use a camera instead to gather footage or borrow a phone from a family member when recording. Can take precautions to secure phone to ensure it doesn't fall or have something soft beneath just in case it does fall (won't be in camera shot). Losing project Making sure to have a backup save on onedrive, saving regularly not to lose any progress. Spilling water on phone when recording shot #5 Make sure phone is raised on an object like a coaster so that if a spillage were to occur, it would not be affected. Can't get access to LED for dark clips Use phone torch as an alternative, however if it doesn't reach far enough have the lights turned on in order to light up the room, can be edited in post. Go into lockdown/can't edit at college Have all my work backed up to one drive so I can work from home, if need be, my project itself is all recorded at home. Bad quality audio Try and make sure to be in a quiet area to record audio, if needed can edit out noise in post Can't record sound at college Record at home instead, can have brother or another family member assist me instead