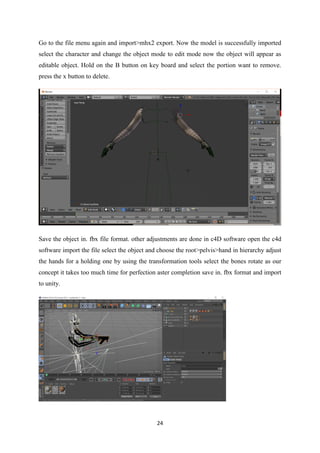
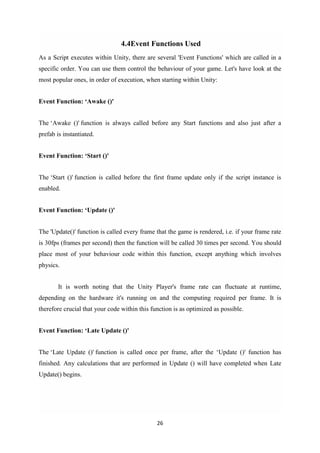
This document is a project report submitted by Rohith G.S. for the partial fulfillment of a Bachelor of Science degree in computer science. The project involved developing a 3D first-person game application using the Unity game engine with C# and JavaScript scripting languages. Key aspects of the project included designing game scenarios, gameplay mechanics, enemy AI, and an energy system. The report provides details on the hardware and software used, including using 3D modeling software to create in-game assets and audio editing tools for sound effects. It also describes the front-end and back-end design of the game application.


![36
FourWheelDrive
}
internal enum SpeedType
{
MPH,
KPH
}
public class CarController : MonoBehaviour
{
[SerializeField] private CarDriveType m_CarDriveType = CarDriveType.FourWheelDrive;
[SerializeField] private WheelCollider[] m_WheelColliders = new WheelCollider[4];
[SerializeField] private GameObject[] m_WheelMeshes = new GameObject[4];
[SerializeField] private WheelEffects[] m_WheelEffects = new WheelEffects[4];
[SerializeField] private Vector3 m_CentreOfMassOffset;
[SerializeField] private float m_MaximumSteerAngle;
[Range(0, 1)] [SerializeField] private float m_SteerHelper; // 0 is raw physics , 1 the car will g
rip in the direction it is facing
[Range(0, 1)] [SerializeField] private float m_TractionControl; // 0 is no traction control, 1 is
full interference
[SerializeField] private float m_FullTorqueOverAllWheels;
[SerializeField] private float m_ReverseTorque;
[SerializeField] private float m_MaxHandbrakeTorque;
[SerializeField] private float m_Downforce = 100f;
[SerializeField] private SpeedType m_SpeedType;
[SerializeField] private float m_Topspeed = 200;
[SerializeField] private static int NoOfGears = 5;
[SerializeField] private float m_RevRangeBoundary = 1f;
[SerializeField] private float m_SlipLimit;
[SerializeField] private float m_BrakeTorque;
private Quaternion[] m_WheelMeshLocalRotations;
private Vector3 m_Prevpos, m_Pos;
private float m_SteerAngle;
private int m_GearNum;
private float m_GearFactor;
private float m_OldRotation;
private float m_CurrentTorque;
private Rigidbody m_Rigidbody;
private const float k_ReversingThreshold = 0.01f;
public bool Skidding { get; private set; }
public float BrakeInput { get; private set; }
public float CurrentSteerAngle{ get { return m_SteerAngle; }}
public float CurrentSpeed{ get { return m_Rigidbody.velocity.magnitude*2.23693629f; }}
public float MaxSpeed{get { return m_Topspeed; }}
public float Revs { get; private set; }
public float AccelInput { get; private set; }
// Use this for initialization
private void Start()
{
m_WheelMeshLocalRotations = new Quaternion[4];](https://image.slidesharecdn.com/mergeresult-180820150937/85/FIRST-PERSON-SHOOTER-GAME-UNITY-3D-43-320.jpg)
![37
for (int i = 0; i < 4; i++)
{
m_WheelMeshLocalRotations[i] = m_WheelMeshes[i].transform.localRotation;
}
m_WheelColliders[0].attachedRigidbody.centerOfMass = m_CentreOfMassOffset;
m_MaxHandbrakeTorque = float.MaxValue;
m_Rigidbody = GetComponent<Rigidbody>();
m_CurrentTorque = m_FullTorqueOverAllWheels -
(m_TractionControl*m_FullTorqueOverAllWheels);
}
private void GearChanging()
{
float f = Mathf.Abs(CurrentSpeed/MaxSpeed);
float upgearlimit = (1/(float) NoOfGears)*(m_GearNum + 1);
float downgearlimit = (1/(float) NoOfGears)*m_GearNum;
if (m_GearNum > 0 && f < downgearlimit)
{
m_GearNum--;
}
if (f > upgearlimit && (m_GearNum < (NoOfGears - 1)))
{
m_GearNum++;
}
}
// simple function to add a curved bias towards 1 for a value in the 0-1 range
private static float CurveFactor(float factor)
{
return 1 - (1 - factor)*(1 - factor);
}
// unclamped version of Lerp, to allow value to exceed the from-to range
private static float ULerp(float from, float to, float value)
{
return (1.0f - value)*from + value*to;
}
private void CalculateGearFactor()
{
float f = (1/(float) NoOfGears);
// gear factor is a normalised representation of the current speed within the current gear's r
ange of speeds.
// We smooth towards the 'target' gear factor, so that revs don't instantly snap up or down
when changing gear.
var targetGearFactor = Mathf.InverseLerp(f*m_GearNum, f*(m_GearNum + 1), Mathf.Abs(](https://image.slidesharecdn.com/mergeresult-180820150937/85/FIRST-PERSON-SHOOTER-GAME-UNITY-3D-44-320.jpg)
![39
CalculateRevs();
GearChanging();
AddDownForce();
CheckForWheelSpin();
TractionControl();
}
private void CapSpeed()
{
float speed = m_Rigidbody.velocity.magnitude;
switch (m_SpeedType)
{
case SpeedType.MPH:
speed *= 2.23693629f;
if (speed > m_Topspeed)
m_Rigidbody.velocity = (m_Topspeed/2.23693629f) * m_Rigidbody.velocity.normal
ized;
break;
case SpeedType.KPH:
speed *= 3.6f;
if (speed > m_Topspeed)
m_Rigidbody.velocity = (m_Topspeed/3.6f) * m_Rigidbody.velocity.normalized;
break;
}
}
private void ApplyDrive(float accel, float footbrake)
{
float thrustTorque;
switch (m_CarDriveType)
{
case CarDriveType.FourWheelDrive:
thrustTorque = accel * (m_CurrentTorque / 4f);
for (int i = 0; i < 4; i++)
{
m_WheelColliders[i].motorTorque = thrustTorque;
}
break;
case CarDriveType.FrontWheelDrive:
thrustTorque = accel * (m_CurrentTorque / 2f);
m_WheelColliders[0].motorTorque = m_WheelColliders[1].motorTorque = thrustTorq
ue;
break;
case CarDriveType.RearWheelDrive:
thrustTorque = accel * (m_CurrentTorque / 2f);
m_WheelColliders[2].motorTorque = m_WheelColliders[3].motorTorque = thrustTorq](https://image.slidesharecdn.com/mergeresult-180820150937/85/FIRST-PERSON-SHOOTER-GAME-UNITY-3D-46-320.jpg)
![40
ue;
break;
}
for (int i = 0; i < 4; i++)
{
if (CurrentSpeed > 5 && Vector3.Angle(transform.forward, m_Rigidbody.velocity) < 50f
)
{
m_WheelColliders[i].brakeTorque = m_BrakeTorque*footbrake;
}
else if (footbrake > 0)
{
m_WheelColliders[i].brakeTorque = 0f;
m_WheelColliders[i].motorTorque = -m_ReverseTorque*footbrake;
}
}
}
private void SteerHelper()
{
for (int i = 0; i < 4; i++)
{
WheelHit wheelhit;
m_WheelColliders[i].GetGroundHit(out wheelhit);
if (wheelhit.normal == Vector3.zero)
return; // wheels arent on the ground so dont realign the rigidbody velocity
}
// this if is needed to avoid gimbal lock problems that will make the car suddenly shift direct
ion
if (Mathf.Abs(m_OldRotation - transform.eulerAngles.y) < 10f)
{
var turnadjust = (transform.eulerAngles.y - m_OldRotation) * m_SteerHelper;
Quaternion velRotation = Quaternion.AngleAxis(turnadjust, Vector3.up);
m_Rigidbody.velocity = velRotation * m_Rigidbody.velocity;
}
m_OldRotation = transform.eulerAngles.y;
}
// this is used to add more grip in relation to speed
private void AddDownForce()
{
m_WheelColliders[0].attachedRigidbody.AddForce(-transform.up*m_Downforce*
m_WheelColliders[0].attachedRigidbody.velocity.magnitude);
}
// checks if the wheels are spinning and is so does three things
// 1) emits particles
// 2) plays tiure skidding sounds](https://image.slidesharecdn.com/mergeresult-180820150937/85/FIRST-PERSON-SHOOTER-GAME-UNITY-3D-47-320.jpg)
![41
// 3) leaves skidmarks on the ground
// these effects are controlled through the WheelEffects class
private void CheckForWheelSpin()
{
// loop through all wheels
for (int i = 0; i < 4; i++)
{
WheelHit wheelHit;
m_WheelColliders[i].GetGroundHit(out wheelHit);
// is the tire slipping above the given threshhold
if (Mathf.Abs(wheelHit.forwardSlip) >= m_SlipLimit || Mathf.Abs(wheelHit.sidewaysSlip
) >= m_SlipLimit)
{
m_WheelEffects[i].EmitTyreSmoke();
// avoiding all four tires screeching at the same time
// if they do it can lead to some strange audio artefacts
if (!AnySkidSoundPlaying())
{
m_WheelEffects[i].PlayAudio();
}
continue;
}
// if it wasnt slipping stop all the audio
if (m_WheelEffects[i].PlayingAudio)
{
m_WheelEffects[i].StopAudio();
}
// end the trail generation
m_WheelEffects[i].EndSkidTrail();
}
}
// crude traction control that reduces the power to wheel if the car is wheel spinning too much
private void TractionControl()
{
WheelHit wheelHit;
switch (m_CarDriveType)
{
case CarDriveType.FourWheelDrive:
// loop through all wheels
for (int i = 0; i < 4; i++)
{
m_WheelColliders[i].GetGroundHit(out wheelHit);
AdjustTorque(wheelHit.forwardSlip);
}
break;
case CarDriveType.RearWheelDrive:
m_WheelColliders[2].GetGroundHit(out wheelHit);
AdjustTorque(wheelHit.forwardSlip);](https://image.slidesharecdn.com/mergeresult-180820150937/85/FIRST-PERSON-SHOOTER-GAME-UNITY-3D-48-320.jpg)
![42
m_WheelColliders[3].GetGroundHit(out wheelHit);
AdjustTorque(wheelHit.forwardSlip);
break;
case CarDriveType.FrontWheelDrive:
m_WheelColliders[0].GetGroundHit(out wheelHit);
AdjustTorque(wheelHit.forwardSlip);
m_WheelColliders[1].GetGroundHit(out wheelHit);
AdjustTorque(wheelHit.forwardSlip);
break;
}
}
private void AdjustTorque(float forwardSlip)
{
if (forwardSlip >= m_SlipLimit && m_CurrentTorque >= 0)
{
m_CurrentTorque -= 10 * m_TractionControl;
}
else
{
m_CurrentTorque += 10 * m_TractionControl;
if (m_CurrentTorque > m_FullTorqueOverAllWheels)
{
m_CurrentTorque = m_FullTorqueOverAllWheels;
}
}
}
private bool AnySkidSoundPlaying()
{
for (int i = 0; i < 4; i++)
{
if (m_WheelEffects[i].PlayingAudio)
{
return true;
}
}
return false;
}
}
}
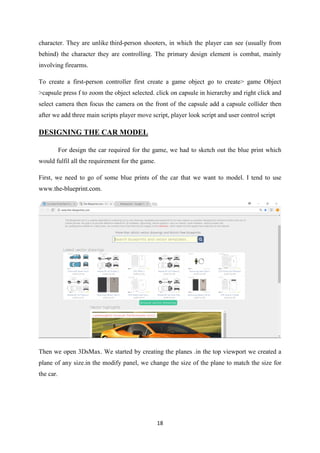
CAR USER CONTROLLER
using System;
using UnityEngine;](https://image.slidesharecdn.com/mergeresult-180820150937/85/FIRST-PERSON-SHOOTER-GAME-UNITY-3D-49-320.jpg)
![43
using UnityStandardAssets.CrossPlatformInput;
namespace UnityStandardAssets.Vehicles.Car
{
[RequireComponent(typeof (CarController))]
public class CarUserControl : MonoBehaviour
{
private CarController m_Car; // the car controller we want to use
private void Awake()
{
// get the car controller
m_Car = GetComponent<CarController>();
}
private void FixedUpdate()
{
// pass the input to the car!
float h = CrossPlatformInputManager.GetAxis("Horizontal");
float v = CrossPlatformInputManager.GetAxis("Vertical");
#if !MOBILE_INPUT
float handbrake = CrossPlatformInputManager.GetAxis("Jump");
m_Car.Move(h, v, v, handbrake);
#else
m_Car.Move(h, v, v, 0f);
#endif
}
}
}
CAR SOUND
namespace UnityStandardAssets.Vehicles.Car
{
[RequireComponent(typeof (CarController))]
public class CarAudio : MonoBehaviour
{
// This script reads some of the car's current properties and plays sounds accordingly.
// The engine sound can be a simple single clip which is looped and pitched, or it
// can be a crossfaded blend of four clips which represent the timbre of the engine
// at different RPM and Throttle state.
// the engine clips should all be a steady pitch, not rising or falling.
// when using four channel engine crossfading, the four clips should be:
// lowAccelClip : The engine at low revs, with throttle open (i.e. begining acceleration at very l
ow speed)
// highAccelClip : Thenengine at high revs, with throttle open (i.e. accelerating, but almost at
max speed)
// lowDecelClip : The engine at low revs, with throttle at minimum (i.e. idling or engine-](https://image.slidesharecdn.com/mergeresult-180820150937/85/FIRST-PERSON-SHOOTER-GAME-UNITY-3D-50-320.jpg)

![59
using UnityEngine;
using UnityEngine.SceneManagement;
public class MoveScene : MonoBehaviour {
[SerializeField] private string loadLevel;
void OnTriggerEnter(Collider other)
{
if(other.CompareTag("Player"))
{
SceneManager.LoadScene (loadLevel);
}
}
}
SPLASH SCREEN
using System.Collections;
using System.Collections.Generic;
using UnityEngine;
using UnityEngine.UI;
using UnityEngine.SceneManagement;
public class SplashFade : MonoBehaviour {
public Image splashImage;
public string loadLevel;
IEnumerator Start()](https://image.slidesharecdn.com/mergeresult-180820150937/85/FIRST-PERSON-SHOOTER-GAME-UNITY-3D-66-320.jpg)