This document is a thesis submitted by Syedzaada Mouhammad Alee Kazmi for a Bachelor's degree in Electrical and Computer Engineering. The thesis describes a Bluetooth controlled intelligent car project.
The project involves coding an Arduino with ultrasonic sensors to detect distance and control a remote controlled car. The Arduino is then programmed to allow remote control of the car via Bluetooth from a phone or laptop. If completed successfully, the student aims to be able to remotely control the RC car without direct line of sight using the ultrasonic sensors to guide it.
The thesis includes chapters explaining the Arduino and Processing code used, running the experiment, and concluding remarks. Code snippets and figures are provided to illustrate the technical


![8 Chapter 2. Explanation of the Code
int lf =10;
Serial myPort;
String myString=null;
float num1;
float num2;
String firstvalue;
String secondvalue;
PImage bg;
This is the setup part where I define certain important parameters. First
of all size(500,500) creates a window of 500 by 500 dimension where the
visualization is supposed to take place. The black line on the graph indi-
cates the 10cm line, which tells the user that the car is 10cm away from an
obstacle. The background of this window is then loaded from a file called
background.jpg. It looks as follows-:
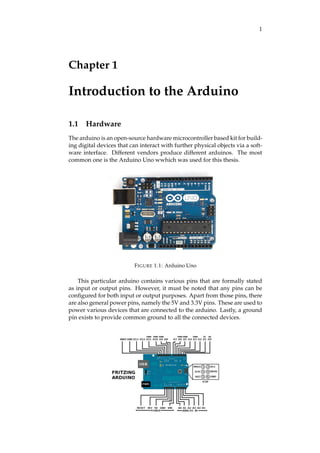
FIGURE 2.1: Arduino Uno
Smooth(2) is an internal processing function that smooths out the figure. I
set the framerate to 60fps and tell the arduino which COM to use which is
automatically retrieved by ’Serial.list()[0]’
void setup()
{
size(500,500);
bg=loadImage("background.jpg");
smooth(2);
frameRate(60);
String portName = Serial.list()[0];
myPort = new Serial(this,portName,9600);
}
The next code is basically a string splitter. The arduino sends the ultrasonic
readers values in the following format-:
x,y
where x and y are integer lengths from the front and back ultrasonic reader
respectively. This is parsed as a string in processing. Now I need to break](https://image.slidesharecdn.com/3ca0439b-d81e-4442-9279-39d83c29b371-160619001910/85/FinalThesisdraft-14-320.jpg)
![2.2. Processing Code 9
this string up into x and y for which I make use of the following function.
This was taken directly from the stackexchange site. Basically, it takes the
string "data" and reads until the char "separator". Then it reads again until
the function ends and using the index, stores the first, second... string into
the return variable.
String getValue(String data, char separator, int index)
{
int found = 0;
int strIndex[] = {0, -1};
int maxIndex = data.length()-1;
for(int i=0; i<=maxIndex && found<=index; i++){
if(data.charAt(i)==separator || i==maxIndex){
found++;
strIndex[0] = strIndex[1]+1;
strIndex[1] = (i == maxIndex) ? i+1 : i;
}
}
return found>index ? data.substring(strIndex[0],
strIndex[1]) : "";
}
This is the main part of the code where every previous function is made
use of. The background is declared. While the serial monitor is transmit-
ting data, the first stream of data is read until the new line. That data is
split using the string splitting function and stored in first value and second
value. These are then converted to floats since they are still a string. Now I
use a specific method to draw rectangles in the figure. It is as follows -:
FIGURE 2.2: rectMode(CORNERS)
As we can see, the coordinates of the vertices are given in the rectMode
function. I use this to draw two rectangles corresponding to the length from
the obstacle. x1,y1 are fixed for both the rectangles since they stay at one
place. However, the other end depends on the length of obstacle in front
of the sonic detector. Lastly, I have disregarded the 0 distance value since
there is an internal error in the sonic sensors and they send out clusters of 0
at times.
void draw()
{
background(bg);](https://image.slidesharecdn.com/3ca0439b-d81e-4442-9279-39d83c29b371-160619001910/85/FinalThesisdraft-15-320.jpg)


![16
Bibliography
[1] Dr Fangning Hu. Embedded System Laboratory Course Lecture Notes. Bre-
men, Germany, 2016
[2] Friends of Fritzing. Fritzing Arduino Official Learning Guide. FH Pots-
dam, 2016
[3] Alvaro Luis Bustamante. String Splitting Code used on page 9, http://
stackoverflow.com/a/14824108, 2012
[4] Daniel Shiffman. Learning Processing, https://processing.org/
tutorials/drawing, 2008](https://image.slidesharecdn.com/3ca0439b-d81e-4442-9279-39d83c29b371-160619001910/85/FinalThesisdraft-22-320.jpg)